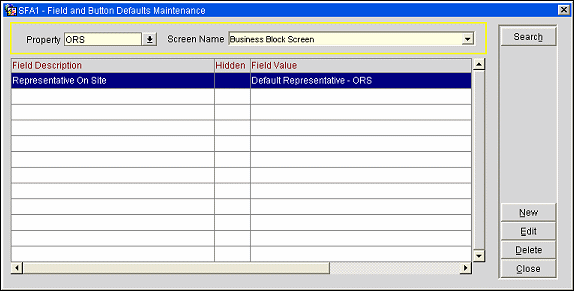
Field and Button Defaults
Select Configuration > Setup > Screen Design > Field and Button Defaults to display the Field and Button Maintenance Defaults screen. Field and button default values are referenced during the initial population of the screen as long as they do not comprise or change the behavior for the field or button. For example, if the Fixed Rate YN was defaulted to Y in the Reservation screen, then the Fixed Rate check box would be selected automatically. But this is assuming that the rate code had been defaulted, which is the behavior when creating reservations through Rate Query. Otherwise, the default will be ignored and the Fixed Rate check box can't be selected as there is no default rate code for the Rate Code field.

This screen can be used to set up the default values and field names for the fields displayed as user defined fields. Use the search criteria to locate the screen to review or edit default field values.
Property. Select the down arrow to choose a property to review default field values (available if the OPP MHT2 license is active).
Screen Name. Select the down arrow to choose the name of the screen to review field defaults.
Field Description. Description of the field.
Hide. Displays a Y if the field or button has been selected to be hidden on the screen when viewed by the user.
Field Value. Default field value.
Note: In central environments, property specific field defaults can be set. When both property and generic field defaults exist for the same field, the property default overrides the generic default.
Custom. Custom default field value, if applicable.
Field Name. Database name of this field.
Action. Action, if any, that can be applied to this field (e.g., increment, decrement).
To create a field default, select the New button. To edit an existing default, highlight the field default you want to edit and select the Edit button. The Field Maintenance Details screen appears. Provide the following information:
Property. Select the down arrow to choose the property to which the screen configuration applies. Once the field details have been saved, this field cannot be edited. (Available if the OPP MHT2 license is active.)
Screen Name. Select the down arrow to choose the screen where this field appears. Once the field details have been saved, this field cannot be edited.
Field Name. Select the down arrow to choose the field to be made available on the selected screen.
Hide. Select the check box to hide specific fields or buttons throughout OPERA. If a field or button is hidden, only the Field Name and Hide check box are displayed on the form.
Parent Data. This check box is available when the Field Name you have selected can pull its data from a field associated with another screen. When you select this check box you are prompted to identify the parent screen and the field where the data is to be found. For example, if you are setting up a field default for the Contact Profile's Address1 field and you want to pull default contact profile address information from the associated account profile, you could select the Parent Data check box. On the Parent Information screen, select the Parent Name down arrow and choose the Account/Company Profile option. In the Column Name field, select the down arrow to choose the account profile field from which the Address1 information should be pulled (in this case, the field is also called Address1).
Compute. Select this check box if the default value is to be computed. The Compute check box is available depending on the type of data that would be displayed in the field you selected in the Field Name field; for example, date information. Based on the field you are populating, specific options become available. For example, if you are configuring a default for a date field, the system date can be selected, along with operators to increment or decrement the system date.
Field Value. This field shows the computed field value, or allows you to select the field default from a list of valid field values, as appropriate.
Note: For Reservation, Individual/Group, Account/Company, and Contact screens, the Country default value can be specified as a question mark (?) or another "invalid" code in the Field Value field. When users create a profile or reservation they will be prompted to select a country.
Execute as Function. If this default field value executes a function, enter the name of the function here.
Custom Field Default. If a custom field default is allowed for the selected field, you can enter the value here.
Note: When field defaults are configured, they are configured for a particular screen name. If the field defaults are called from another screen name, then they will not be populated. For example, the Nationality field is set to "American" for the screen name of PROFILE (Profile screen). This means that when the PROFILE screen is called, the Nationality field will populate as "American." But if a profile is created from the RSEDIT screen (Reservation screen) when making a new reservation, the Nationality field will not be populated.
Account Profile (Company/Source/Travel Agent)
Account Search
Activity
AR Account Search
AR Statements
Batch Registration Cards
Block Room Assign
Business Block
Check In Group
Contact Profile
Contact Profile Search
Detailed Availability
End of Day Reports
Fixed Charges
Folio Type
Gaming Enrollment
Group Reservation List
Group Rooming List
Housekeeping
In House Guest Search
Individual/Group
Out of Order/Service
Print Registration Cards/Cut Keys
Profile Search
Quick Business Block
Quick Business Block Search
Rate Codes
Rate Query
Reservation
Room Assign
Room Type Configuration
Routing Screen - Transaction Code Selection
User Configuration
See Also