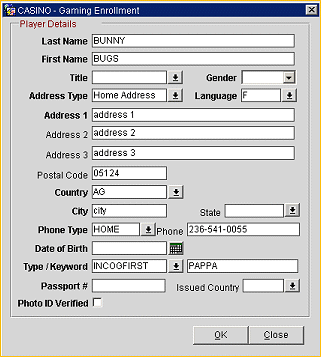
Gaming Enrollment
The Gaming Enrollment screen allows you to provide the information required by the Patron Tracking System (PTS) in order to enroll a guest who does not already have a PTS number, or player ID. The Gaming Enrollment feature is available when the OPERA Gaming Interface is installed. The OPERA Gaming Interface requires an active Comp Accounting license (OPP_GCA) and an interface between OPERA and the property's PTS (Patron Tracking System) provided by license codes OPX_GA2, OPX_BALL, OPX_ACRS, etc. Only individual profile types can enroll in the PTS.
When you provide guest information on the Gaming Enrollment screen and submit it to the PTS (by selecting the OK button), the gaming system compares the data you provide to the player profiles stored in its database. In this way, the PTS determines whether a profile already exists for this guest. If the PTS finds possible matches, you are prompted to select one of the potential matches or to create an entirely new player profile. If you select one of the possible matches, membership in the PTS is recorded in the guest's OPERA profile along with the player ID obtained from the PTS profile. In addition, any of the PTS profile details that differ from the information in the OPERA profile for the guest will overwrite the corresponding OPERA information. If no possible matches for the enrollment request exist in the PTS, a new player profile will be automatically created in the PTS. Membership in the PTS is recorded in the guest's OPERA profile, along with the PTS-assigned player ID.
To access the Gaming Enrollment screen, highlight the guest's name on the Profile Search screen (Reservations > Profiles) and select the Enrollment button. Or, select the Enrollment button from the Profile Options menu (select the Options button from the guest Profile screen) or from the Profile Membership List screen (available when you select the Memberships button from the Profile Options menu). You can also access enrollment when creating a new reservation. From the New Reservation screen — which appears when you select Reservations > New Reservation — enter all or part of the guest's name. Select the Search button to display the Profile Search screen, from which you can select the Enroll button. The Profile Enrollment screen appears.
Note: The Membership > Enrollment Type application setting may specify that multiple programs are in use at the property. In this case, when you select the Enrollment button, you are prompted to choose the type of enrollment.
The following application setting formulas determine if the Profile Enrollment options menu and Gaming button are displayed:
- Membership > Enrollment application function is set to Y, Gaming is active, and Comp Accounting > Auto Enroll Player is set to Prompt or Never, then the Gaming button is displayed.
- Membership > Enrollment application function is set to Y, Comp Accounting > Auto Enroll Player is set to Always, and Membership > Enrollment Type is set to Loyalty or Gaming or OPP_GCA license is inactive, then the Gaming button is not displayed and the user is taken directly to the Enrollment form.
To enroll the guest in the PTS, select the Gaming button. The Gaming Enrollment screen appears. If the Gaming button is grayed out, the guest is already enrolled in the PTS and has a player ID assigned.

Note: The fields on this screen are screen paintable (see Screen Painting for details).
If a guest record is selected on the Profile Search screen, or if you are working from a guest's Profile Membership List screen, information for the current guest will automatically appear on the Gaming Enrollment screen. Provide the following information on the Gaming Enrollment screen. When you are done, select the OK button to submit the enrollment to the PTS system.
Last Name. Enter the last name of the guest.
First Name. Enter the first name of the guest.
Title. Select the down arrow to choose the title (e.g., Mr., Miss, Mrs., Ms.) of the guest.
Gender. Select the down arrow to choose the gender of the guest (Male, Female, Unknown).
Address Type. Select the down arrow and choose a value from the Address Types list of values.
Language. Select the down arrow to choose the guest's language.
Address. Enter the appropriate address information depending on the address type you selected.
Postal Code. Enter the postal code portion of the guest's address.
Country. Select the down arrow to choose the country where the guest resides.
City/State. Enter the city portion of the address. Select the down arrow to choose the state.
Phone Type/Phone. Select the down arrow and choose a value from the Phone Types list of values.
Date of Birth. Enter the guest's date of birth, or select the date of birth using the calendar tool.
Passport No./Issued Country. Enter the guest's passport number; select the down arrow to choose the issuing country.
Note: When the Passport/ID Number View permission is not granted to the user, then the Passport/ID Number will be masked with Xs except for the last two numbers.
Type/Keyword. (This field is available when the PROFILES > KEYWORD application function is set to Y.) Select the down arrow to choose a keyword type, then enter the keyword in the field to the right. For example, if you select Social Security Number from the Type list of values, enter the 9-digit Social Security Number in the Keyword field to the right.
Photo ID Verified. Select this check box to indicate that you have reviewed and verified an accepted photo ID presented by the guest.
When you select OK to submit the enrollment, a message appears: Please wait... enrollment in progress. If for any reason OPERA is unable to communicate with the PTS, the following message appears: "Request not processed." Wait for the connection to be restored and re-submit the enrollment.
The following fields' default values can be changed by using the Field and Button Defaults feature:
See Also