
|
|
|
Item Templates
Item Templates are groupings of catering resources that alleviate the time consuming task of adding multiple individual items to an event. Templates can be used to create groupings of any items that would normally be used together. For instance, if most meeting and conference events often require an LCD Projector, a wireless lapel microphone and a viewing screen, these items can be grouped together using an item template. With item templates, items can be grouped together regardless of item class. This simplifies the task of adding item resources to events by eliminating the need to add items one at a time.
In Sales & Catering, (OPS<version number>) access the Item Inventory Setup screen by selecting Configuration>Catering> Item Inventory Setup>Templates. You may also access a view-only Item Inventory Setup screen by selecting Business Management>Resource Lookup>Items.

There are three separate display grids on this screen: Item Templates, Template Details and Item Selection. The Item Templates grid contains the name of the new item template as well as options to create new templates, edit or delete existing templates. The Template Details grid contains the list of each item added to the template, along with those items' rates, attributes, quantities, etc. The Item Class Selection grid allows you to select individual items from an item class to group into an Item Template. Once selected you can specify the rate, attribute and quantity that should default for each resource when this Item Template is selected on the Event level. You can also define the sequence in which they should appear. When printed on the BEO, the items will continue to print under their designated Item Class.
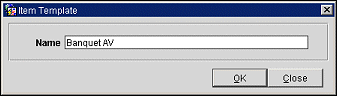
To create a new item template, or modify an existing one, select either New or Edit from the Item Templates grid. The Item Template name screen displays. Enter the name for the template to be created. Generally, this name should reflect the same concept of the items it contains. For instance, if you are creating a template with audio visual supplies for a banquet, you might name your template Banquet AV or something similar.
To add items to a template, select the appropriate item class from the Item Class Selection grid then place an X next to each item you want to add. Once all items are selected choose Select to add them to the template. To remove items from a template, choose Unselect from the Template Details grid. Select a new item class from the Item Class Selection grid to add items from a different item class (e.g., furniture, decoration, entertainment, etc.).
The value of creating Item templates is in adding them to Events. From the Event Search screen (Business Management>Events or select the Events button from the Business Block screen), search for the event you want to modify. Select the Resources button and the Event Resources screen displays. Select Item to display the Select Items screen.
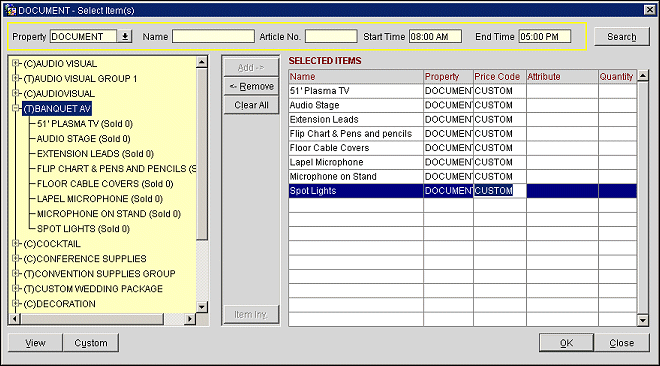
Note: Item Templates display with a (T) next to the template's name. Item Classes display with a (C)next to the classes' name.
Choose the Item Template to add to the event. Notice that when you select the Add button, all of the items in the Item Template move to the Selected Items list. Individual items in an item template cannot be moved to the selected items list. Only Item classes can contain single items, Item Templates contain entire groupings of items and must be added and removed as such.
See Also