
|
|
|
Relationships - Profile
Relationships define the associations between and among individuals, companies, travel agents, groups, sources, and other entities in OPERA. Knowing that Jim Lawson is an employee of Alpha Sources, Inc.; that Tim Marks is the spouse of VIP Sandra Haley; or that Asset Management Corp. is a subsidiary of CountyWide Bank, for example, can aid in decision-making and in providing good customer service. In addition, when a relationship has been set up between profiles, one profile can be allowed to share negotiated rates with another by virtue of their relationship.
Relationship types can be configured to describe the associations between and among profile types (e.g., individual, contact, company, travel agent, source, and group), as well as between and among other entities (e.g., hotels, vendors, business blocks, activities, etc.) that may have relationships you want to recognize when working in OPERA. (Relationship types are set up in Configuration>Profiles>Relationship Types. See Relationship Types for details.)
Note: For information on assigning relationships to other profile types of accounts (companies, travel agents, and sources) see Relationships - Account. For information on assigning relationships to contacts, see Relationships - Contact.
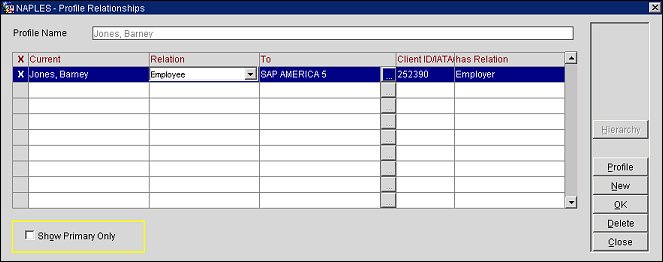
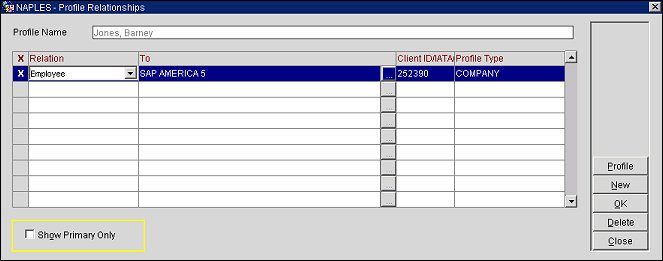
The Profile Relationship screen lists the relationships that have been set up for the current individual or group profile. The Profile Name field displays the read-only name of the profile that has been highlighted to view its relationships or create or new ones. One relationship of each relationship type (shown in the Relation column) can be designated as the primary relationship. The primary relationship has an X in the X column. The primary designation can be used in preparing reports on profile relationships. Select the Show Primary Only check box to show only the primary relationship of each relationship type set up for the current profile.
The following information is displayed in the Profile Relationship screen grid.
X. An X in this column indicates that this relationship is the primary relationship of its relationship type. (The relationship type is shown in the Relation column.)
Current. Available when the Profiles>Advanced Relationships application function is set to Y. Name of the current profile.
Relation. (This LOV is unavailable if the application parameter Profiles>Full Protection is set to Y and the profile is centrally protected.) Displays the type of relationship the current profile has with the related profile. Select the down arrow to change the type of relation. The relationship options that are available for the profile type the user is positioned on is based on the type of profile that is selected for the To field.
To. Displays the name of the profile that the current profile has a relation with (e.g., the profile Barney Jones has a relationship as an employee to SAP AMERICA 5). Select the ellipsis button to display the Profile Search screen and to select another relationship profile. Selecting this button will only display the Profile types that are associated with the Relation field. For example, if the Relation field displays Individual, then the profile search will display only the profiles listed as individuals.
Client ID/IATA/Corp No. Client ID/IATA/Corp No (if available) of the profile that the current profile has been set up to have a relationship with.
Profile Type. Available when the Profiles>Advanced Relationships application function is set to N. Displays the type of profile that is displayed in the To field.
Has Relation. Available when the Profiles>Advanced Relationships application functions are set to Y. Displays the type of relationship the Related profile has with the current profile. This field is automatically populated based on what is populated in the Relation field.
Profile. View the profile identified in the To column (that is, the profile which the current profile shares the relationship).
New. (Unavailable if the application parameter Profiles>Full Protection is set to Y and the profile is centrally protected.) .) Select this button to add an existing profile and relationship to the current profile. See Adding Relationships below.
OK. (Unavailable if the application parameter Profiles>Full Protection is set to Y and the profile is centrally protected.) .) Select this button to save your changes when adding or modifying the relationships.
Delete. (Unavailable if the application parameter Profiles>Full Protection is set to Y and the profile is centrally protected.) .) Select this button to delete the highlighted relationship from the current profile. When global relationship types for a profile are deleted, they will also be deleted in the PMS to which the profile is subscribed. In OXIHUB, a PROFILE message with a DELETE RELATIONSHIP action will be created.
Note: If buttons New, OK, or Delete are disabled, even though the user has the appropriate permissions, the cause may be that the application parameter Profiles>Full Protection is active or that Custom Protection has been configured for profiles (Setup>Configuration>Profile>Custom Protection) and that the relationship-type has not been exempt from protection. Relationship types can be exempt from protection by selecting the Ignore Protection check box in Relationship Types Configuration.
Note: When a relationship type is defined as "Global," it is shared among properties in the enterprise.
Hierarchy. Available when the Profiles>Advanced Relationships and Profiles>Relationship Hierarchy application functions are set to Y and when the highlighted profile has at least one hierarchical relationship configured. If the current profile is a Company, Travel Agent, or Source, select this button to display the current profile's hierarchical position in a tree view style diagram. If another account is selected from the diagram, then the user is returned to the Profile Relationships screen refreshed with the selected account as the current profile (See Relationship Hierarchy for details).
Primary. Make the highlighted relationship the primary relationship of its relationship type. This button is available if the currently highlighted relationship is not already the primary relationship. If multiple relationships of a specific relationship type are created, one must be the primary. By default, the first-created (or only) relationship of a relationship type is the primary.
In broad terms, adding a new relationship consists of selecting the relationship type, then choosing the profile with which the current profile is to share the relationship. (The sharing profile must already exist; you cannot create new profiles as part of setting up a relationship.)
To create a new relationship, select the New button on the Profile Relationship screen. The Relationships types list of values appears. Select the relationship type you want to create for the current profile. For example, you might select the Spouse relationship type if you want to make known that the current profile is the spouse of another guest. Or you might select the Employee relationship type if the current profile is the employee of an account with which you do business.
When you have chosen a relationship type and select OK, the Profile Search screen appears. Use the Profile Search screen to choose the profile with which the current profile is to be related. The related profile must already exist; you cannot create a new profile at this point.
Note: You cannot change the profile type shown in the Profile Search screen View By field when searching for the profile which will share the new relationship. The profile types which can be selected for a given relationship type are defined when the relationship type is configured.
Once the related profile has been selected, the new relationship appears in the Profile Relationship screen; in addition, a reciprocal relationship is automatically created for the profile which shares the relationship. For example, if you set up a Spouse relationship type for Todd Slater and select Susan Brandt as the profile that will share this relationship, Susan Brandt's Profile Relationship screen will automatically show the Spouse relationship with Todd Slater.
Note: When the relationship being added is Company Master to Company Subsidiary relationship or Company Subsidiary to Company Master relationship and the Copy to Sub check box is selected for a Keyword Type (see Keyword Types for details) that is attached to the profile, the following prompt is displayed: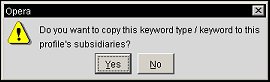
Selecting Yes will copy the Keyword Type and Keyword to the Company Subsidiaries or Company Master profile relationship that is being created. Selecting No will not copy the Keyword Type/Keyword.
Note: This section describes managing a relationship between a Company and a Travel Agent for an example.
See Also