Room Moves
The Room Move screen is available when you select the Room Move button from the Reservation Options menu. This screen allows you to move the checked in guest from one room to another.
The room move feature is used to select a new room (and, possibly, a new phone extension) for guests who want to move from one room to another. The room move feature smoothly integrates the following functionality:
Availability/Housekeeping: When moving guests to a new room, the system checks the availability and housekeeping status of the target room similar to the way room assignment is initially handled from the reservation screen.
Shares: When moving a guest to another room that is occupied, you may set up a share. Similarly, when moving a guest from a room that is being shared, you may opt to move all sharers or selected sharers.
Assigned Rooms: Guests who have not yet checked in but for whom a room has been assigned can be "moved” to another room.
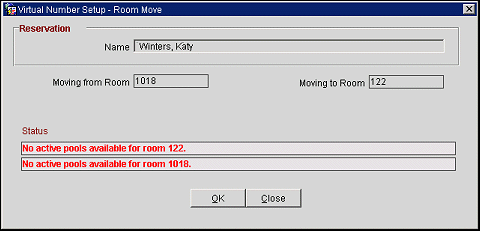
Virtual Numbers: If your property uses virtual extension numbers, a room move will check whether virtual number pools are available for the target room and assist with setting up the virtual numbers in the new room. If the guest being moved has virtual numbers permanently assigned to their profile, the move will ensure that these numbers are available to the guest in the target room.
Financial Transactions: When a room move is conducted for a checked in guests with financial transactions, the room number stored in the FINANCIAL_TRANSACTIONS table will not be updated with the new room number, as the financial transaction has to show the original room for which the transaction was made. Thus, statistics and reports pulling from this table will show the original room number.
OPERA offers a variety of ways to accomplish room moves.
These options are discussed below.
The Room Move screen is also available from the Room Plan screen when you select Room Move from the right- click context menu, and from the Share Confirmation screen when you select the Break Share button.
The following fields are available on this screen:
Move to Room. If you know the room to move the guest to, type the room number in this field. Alternatively, select the down arrow to display the Available Room Search screen. Use this screen to select the room to which the guest is to be moved.
When the Reservations > Connecting Rooms application parameter is set to Y and the room you select has connecting rooms, you will be prompted whether you want to create a reservation for the connecting rooms. The default response is No. This message prompt can be hidden with a default value selected, see Popup Messages for details.
Note: When the OPV_<version number> Opera Vacation Ownership System license code is active and a room number is manually typed in that is not the first unit in rotation, then the Rotation Room Override prompt will prompt for the reason why that room was selected (See Rotation Room Override for details).
Note: When the OPV_<version number> Opera Vacation Ownership System license code is active and the Ownership > Reciprocal Ownership application parameter is set to Y, when the Room number is changed a message is displayed to notify the user that the guest is the Owner and will be given an option to create a Reciprocal Owner.
Change of Room Type to Charge. When the Reservation > Room Type to Charge application parameter is set to Y, OPERA implements the addition of the RTC field on the Reservation screen. By using this field it is possible to have the reservation be inventoried on one room type, but charged as if it was another room type (the room type specified in the RTC field). When you change a guest's reservation to a room which has a different room type, a prompt appears: "Room type has been changed to <new_room_type>. Do you want to change RTC to <new_room_type>?" Respond Yes to continue with the move and change the RTC to the new room type (Yes is the default). Respond No to continue with the move without changing the RTC from what appears on the Reservation screen. This feature is available only if the RTC on the Reservation screen matches the room type shown on the reservation prior to the move.
Reason. (Field is Mandatory when the Reservations > Mandatory Room Move Reasons application parameter is set to Y.) Manually enter a reason, or select the down arrow to select a pre-defined reason, as to why the room is being moved to another room. These pre-defined reasons are configured in the Room Move Reasons.
Extension. This field appears if the General > Extension Number application parameter is set to Y. Select the down arrow to display the Extensions LOV. Choose extensions for the target room. See Extension Number for details.
Note: If you choose not to specify a new extension during the room move, no extension will be associated and the extension from the previous room is disabled. However, if the extension for the chosen room is defined as mandatory in the Extension Room Setup (Configuration > Setup > Property Interfaces > Interface Configuration > Import Rooms Tab), you must select a new extension before the room move can be successfully completed. See Extension Configuration for more details.
When you select OK, appropriate messages and screens appear depending on the circumstances of the move. In particular:
In addition, if the Virtual Numbers add-on license code OPP VNS is active (Configuration > License Codes > PMS > Add-On Licenses), you will be prompted to confirm the Virtual Number setup for the room move. Depending on the Virtual Numbers configuration (Configuration > Setup > Virtual Numbers) and whether Virtual Numbers are permanently assigned to the guest profile, you may have the opportunity to assign virtual numbers for the guest's use in the target room.
See Virtual Numbers for details on the Virtual Numbers feature.

Once you have indicated the target room for the first member of a sharing group, and possibly selected the extension for that guest, you are prompted whether to change the room for other sharing guests as well: "Guest <name> is sharing with <names>. Do you want to block sharer(s) also?"
Note: The Room Move Shares Prompt may be hidden at your property. If this is the case, this prompt will not display and a default response has been configured. (See Popup Blockers for details.)
If you reply No, the first guest will be broken from the share and moved to the new room, while all other sharers will continue to share the original room.
If you reply Yes, the Sharing Guests screen allows you to make your selection of those other sharers to change the room by marking an X next to their names. By default, all sharers are marked with an X to be moved along with the main reservation room move.
This screen also allows you to choose an extension for the sharers who are being moved. Select the down arrow in the Extension field for the sharer to whom you want to assign an extension. The Extension Numbers screen appears.
Already assigned extensions will have the name of the guest and the guest's reservation status in the Name column. Mark an X next to the unassigned extension you want to choose for the current sharer. Select the OK button to return to the Sharing Guests screen where you may begin assigning an extension to another sharer, as necessary.
See Shares for additional details on room moves for sharing guests.
The Room Plan screen is available when you select Reservations > Room Plan. This screen allows you to "drag and drop" a checked in guest from one room to another room in order to make a room move.
To make a room move from the Room Plan screen, search for and display the guest who you want to move and the target room to which you will move the guest.
For example, suppose you want to move the guest in room 207 to room 209. Place your cursor on the guest's name and hold down the left button.

Now drag the cursor to the target room, in this case, 209.

Release the left button. A message will prompt you to confirm the move; for example, "Move Singletary from 207 to 209?" Select Yes to complete the move.
When you select Yes, appropriate messages and screens appear depending on the circumstances of the move. In particular:
A "Move completed successfully" message appears and the guest is shown in the target room.

See Room Plan Screen for additional details.
Guest may be assigned a room before check in. Room Assignment prevents the room from being assigned to another guest during the period of the designated guest's stay. At times, it may be necessary to "move" the guest to another room. You may also want to reverse the room assignment without assigning a new room for the guest.
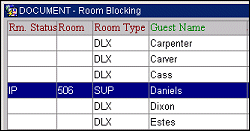
To "move" the guest to a different room, select Front Office > Room Assignment. The Room Assignment screen appears. Search for the guest to change an assigned room and click in the Room field.
Type the new room number directly in the Room field of the grid. For example, if you wanted to assign room 506 instead of 505, type 506 directly in the Room field.

When you tab out of the field, appropriate messages display depending on the circumstances.
To unblock a room without selecting a new room for the guest, click in the Room field and select the [Delete] key. Tab out of the field to complete the unblock.
When the Reservations > Connecting Rooms application parameter is set to Y and when moving a guest to a room which has been set up as a connecting room, the following message appears: "The room selected has a connecting room(s). Would you like to create a Checked In reservation for room <connecting room number>?" Respond Yes to create a duplicate of the moving guest's reservation and check the guest into the selected room and the connecting room. Respond No to move the guest to the selected room without also checking the guest into the connecting room. For example, assume Jane Peters is staying in room 204 and wants to be moved to room 115, which is set up as a connecting suite with room 117. When you move Peters to 115 a message asks you whether you want to create a reservation for Peters in 117.
When the Reservations > Connecting Rooms application parameter is set to Y and when moving a guest out of a room which has been set up as a connecting room, the following message appears: "A connecting reservation exists for room (connecting_room_no>. Do you want to continue? If you select Yes, the guest is moved from the selected room only. The guest remains checked into the connecting room. For example, assume connecting rooms 115 and 117 are assigned to John Hale. If you move Hale from room 115 to room 405, room 117 will remain assigned to Hale.
Show Me
See Also