
|
|
|
IFC Data Through Tab
The User Defined tab allows users to configure their own actions that need to be sent to IFC8 as a DataThrough command in DefRef fields. In most cases, the Data Through Tab is used to configure non-standard interface functionality to the PMS user and is mainly used for PIN-Pad based EFT systems, where certain administrative functions need to be provided in PMS to gain certification. The Data Through tab is displayed when the Use Data Through check box is selected in the Interface Header area.
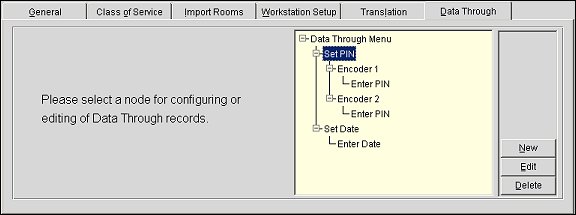
In the Data through Menu box, the configured nodes and records are displayed in a tree structure.
New. Select to create a new Data Through Menu.
Edit. Select to edit the highlighted Data Through Menu.
Delete. Select to delete the highlighted Data Through Menu. If a child node is selected, then only that node will be deleted. But if the parent node is selected, then parent node and child nodes will be deleted.
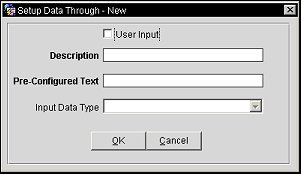
User Input. Select to make the child element node user input. Only the last child element node will be a user input data as all the parent nodes are pre-configured text.
Description. Description of the node.
Pre-Configured Text. Contains the pre-configured text that has the actual data that is being sent in DefRef field.
Input Data Type. The input data type is valid only if the type is a user input data.
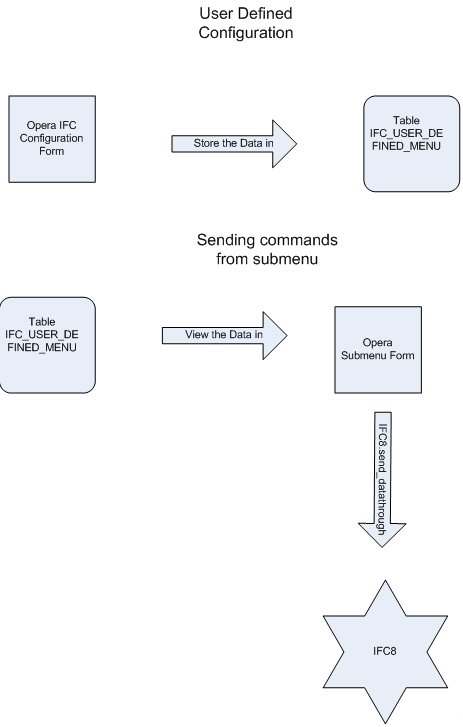
The is a flow on how the Data Through will function.
For Example
The following example is configuring a PIN Data Through command for a DIB EFT interface.
1. Select the Data Through tab and click New.
2. Enter "Set PIN" in the Description field and "SET_PIN" in the Pre-Configured Text fields. The entered description will be displayed in the sub-menu for the user (Shift+F8) and the Pre-Configured Text is sent in the DefRef field to the vendor.
3. Highlight Set PIN and click New.
4. Enter "Encoder 1" in the Description field and "EC1" in the Pre-Configured Text fields. Click the OK button.
5. Highlight Encoder 1 an click New.
6. Check the User Input check box and enter "Enter PIN" in the Description field and selected "Number" for the Input Data Type field. Select the OK button.
7. In PMS, go to Miscellaneous>Interfaces>Interfaces and select the Data Through option, based on if the user has the IFC>Data Through Menu permission granted.
8. Select the DIB EFT in the grid and select OK.
9. The Set PIN and Set Date option will be displayed. Click on the Set PIN to expand the options and Encoder 1 will be available.
10. Expand Encoder 1 and see the Enter PIN option. Click on the option and the OK button becomes available. Click the OK button.
11. Enter the PIN, 1234 for example, in the window that is displayed and click OK.
12. It can now be verified that a Data Through record went to the DIB IFC8 with DefRefs for SET_PIN, EC1 and 1234.
See Also