9. Maintaining Cheque Book Details
In the ‘Cheque book details’ table you can maintain details of Cheque books issued to your customers. In addition, you can view the status of each Cheque − whether used, cancelled, rejected, or if a stop payment has been issued against it.
When Cheque-based transactions are initiated in the Data Entry module, the system updates the amount and date of the transaction in this table. If a Cheque has been cancelled by the customer, or has been returned unpaid by you, this event can also be captured with the ‘Stop payment’ table, where you maintain your customers’ instructions for stop payment.
For each Cheque, the system maintains a history of the Cheque status. For instance, a customer requests a stop payment, revokes it, and subsequently this Cheque is paid by you over clearing. You can view the three events on this Cheque in the Cheque Details table.
The Cheque book details table is maintained by the individual branches.
This chapter contains the following sections:
- Section 9.1, "Cheque Book Maintenance"
- Section 9.2, "Cheque Details Maintenance"
- Section 9.3, "Cheque Book Archive"
9.1 Cheque Book Maintenance
This section contains the following topics:
- Section 9.1.1, "Maintaining Cheque Book Details"
- Section 9.1.2, "Fields Button"
- Section 9.1.3, "View Cheque Status Button"
- Section 9.1.4, "Charge Button"
- Section 9.1.5, "Events Button"
9.1.1 Maintaining Cheque Book Details
In the ‘Cheque Book Maintenance’ screen, you can maintain the following details for a Cheque book issued to a customer:
- Branch Code
- Customer account number
- First Cheque number of the Cheque book
- The total number of Cheque leaves in the book
- The Kind of Cheque (whether Euro or Commercial)
- The date on which the order was placed for the book
- The date on which the Cheque book was issued
- Any other order related detail
Note
You can query the other branch transactions only from the summary screen.
You can invoke the ‘Cheque Book Maintenance’ screen by typing ‘CADCHBOO’ in the field at the top right corner of the Application tool bar and clicking on the adjoining arrow button. Click new button on the Application toolbar.
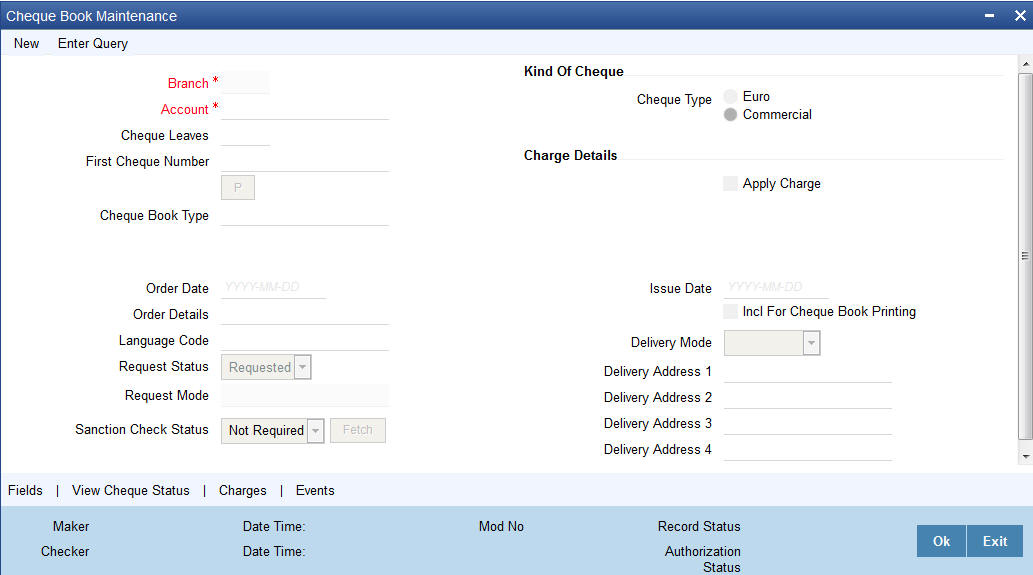
The following details need to be maintained for a Cheque book:
Branch Code
System displays the branch code.
Account Number
Specify the account number of the customer to whom you are issuing a Cheque book in the Account Number field. The adjoining option list displays all customer account numbers maintained in the selected transaction branch which are enabled for cheque book issuance. You can choose the appropriate one.Highlight the customer’s account number, and click ‘Ok’ button to select.
To view the joint holder’s details of an account and the mode of operation maintained at the account level, place the cursor on the ‘Account Number’ field and press Ctrl+J. The system displays the ‘Joint Holder’ screen.
For more information on the ‘Joint Holder’ screen refer to the section ‘Joint Holder Maintenance’ in this User Manual.
Cheque Leaves
Specify the total number of leaves in the Cheque book you are issuing the customer.
First Cheque Number
When issuing a Cheque book, you have to capture the number of the first leaf of the Cheque book.
You need not specify the first cheque number if cheque book number is auto generated.
If you specify the First Cheque Number, the system displays an error message as ‘Input of First check number is not allowed for automatic cheque numbering scheme”.
If the number of check leaves and the first check number is specified for manual cheque numbering scheme, the system will issue the cheque book as per the requested series,
If the number of check leaves is specified and the ‘First Cheque Number’ is left blank, then the system displays an override message as “First Check Number has not been input, do you want system to auto-generate the First cheque Number?” You can select “YES” or “No”. If “YES”, the system will generate the “First Check Number” based on the auto-generation logic without cheque sum and will save the maintenance. If “No” is selected for the override, you can manually input the First Cheque Number and save.
Cheque Book Type
If the cheque book is generated with inventory tracking, then specify the inventory by selecting it from the adjoining option list.
Kind Of Cheque book
A cheque book for customer can be of two types; commercial and Euro. A radio button is provided by which you can make your choice, as displayed on the screen. You can issue the Euro cheque book to a customer, whose account specifies for a ‘Euro Cheques’ option in the customer account maintenance screen.
Order Date
This is the date on which the customer placed a request for a new Cheque book.
If order date is not provided then the system defaults the system current date on save.
Incrementing Alpha-numeric Cheque Numbers
f the cheque mask is defined as alpha-numeric, the numeric characters will be incremented by adding the number of leaves requested to the last issued cheque number in case of auto-numbering scheme and auto re-order of cheque books during EOD.
If the numeric characters reach its maximum, the immediately preceding alpha character will be incremented to the next alphabet and the numeric serial will start from the minimum.
If an alpha character reaches the maximum, i.e. Z, the immediately preceding alpha character will be incremented to the next alphabet.
Issue Date
This is the date on which the Cheque book was issued to the customer.
Order Details
Against ‘order details’, you can enter any detail such as the name of the person who has collected the book on the customer’s behalf, or the details of any special request for additional number of leaves in the Cheque book, and so on.
After having made the required mandatory entries and having saved your work, your user ID will be displayed at the made by field at the bottom of the screen, the date and time at which you saved the product will be populated. However, the authorization status will remain blank, which means that your entries have not been authorized by a user other than you. Status remains open or closed depending upon the status of the record.
Request Status
Select the status of the cheque book request from the adjoining drop-down list. This list displays the following values:
- Requested
- Generated
- Delivered
- Destroyed
Request Mode
The system displays the mode by which the cheque book request was made. This list displays the following values:
- Oracle FLEXCUBE
- Any other external system
Sanction Check Status
The system displays the status of the sanction check.
Language Code
Select the language code from the adjoining option. It displays all the language code in the system.
Delivery Mode
Select the mode of delivery of the cheque book from the adjoining drop-down list. This list displays the following values:
- Courier
- Branch
Note
If the delivery mode is ‘Courier’, then you will need to specify the delivery address.
Delivery Address 1
Specify the address to which the cheque book should be delivered. From the adjoining option list, You can choose the valid account address maintained in the system.
Delivery Address 2- 4
Specify the address to which the cheque book should be delivered.
Apply Charge
Check this box to indicate that Online service charge is applied on new (issue)/modify/auth of the cheque book against customer account.
Include for Cheque Book Printing
When processing automatic reordering of cheque books for your branch, a file will be generated which will include the details of cheque books marked for automatic reorder. This file will then be sent to the Cheque Book printer. If you select the ‘Include for Cheque Book Printing’ option, then the system will include the details of manually reordered Cheque Books as well in the file to be sent to the printer.
Automatic reordering of Cheque Books will be triggered based on your specifications maintained for an account in the Customer Accounts Maintenance screen.
Refer the ‘Core Entities’ User Manual for more details on the maintenances required for the same.
Specifying the value of the UDF ‘Cheque Type’
When maintaining Cheque Book reordering parameters, you also have to specify the type of cheque that you would like to order. This is captured in the field Cheque Type, which is maintained as an UDF.
Refer to the ‘User Defined Fields’ User Manual for details on defining UDFs.
9.1.2 Fields Button
Click ‘Fields’ button in the Cheque Book Details screen toolbar to invoke the ‘User Defined Fields' screen.

The UDF ‘Cheque Type’ will be displayed in this screen. Select the appropriate value from the option list provided. The possible values are:
- J: 20 page x 3.5’ Personal
- K: 40 page x 3.5’ Business
- P: 40 page x 3.5’ Business
- L: 40 page x 3.5’ (2 Part)
- R: 80 page x 3.5’ Business
9.1.3 View Cheque Status Button
For each cheque book issued to a customer the system maintains the status of each leaf in the book.
The status of a cheque leaf can be one of the following:
Symbol |
Status |
Significance |
N |
Not Used |
This cheque has not been used |
U |
Used |
This cheque has been used |
R |
Rejected |
This cheque has been returned without clearance |
S |
Stopped |
A stop payment has been issued for this cheque |
C |
Cancelled |
This cheque has been cancelled |
To view the status of a Cheque book the details of which are on display, click ‘View Cheque Status’ button, on the ‘Cheque Book Maintenance’ table. The ‘View Cheque Status’ table is invoked.

Here you can view the status of all the leaves in this Cheque book. The ‘Cheque Number’ on display is the number of the first leaf on this Cheque book and is defaulted from the ‘Cheque Book Details’ screen.
The Cheque leaf status can be viewed in a matrix form. The column number should be suffixed to the row number to arrive at the Cheque number whose status you want to view. For example, in the matrix above the second row number - 000000000000001 when suffixed with 0 would give the status of the Cheque number 0000000000000010, which is under a stop payment order.
To move up and down the matrix, click on the upward and downward arrow respectively on the side of the matrix.
You have the option of manually changing the status of any of the Cheque leaves; except a Cheque, which has been ‘used’ or a Cheque under a stopped payment order. The stop payment order can be for a Cheque or a series of Cheques and is maintained in the ‘stop payment’ table from where it gets updated in the status table.
9.1.3.1 Viewing Details of a Cheque and changing its Status
To change the status of any leaf in a book, go to that leaf’s status block in the status matrix, and double click on the block. You will be returned to the ‘Cheque Details’ table. The ‘Cheque Details' table is invoked from the Application Browser.
9.1.4 Charge Button
You can view all the charge related details in the ‘Charge Details’ screen. Click on ‘Charges’ button to invoke ‘Charge Details’ screen.
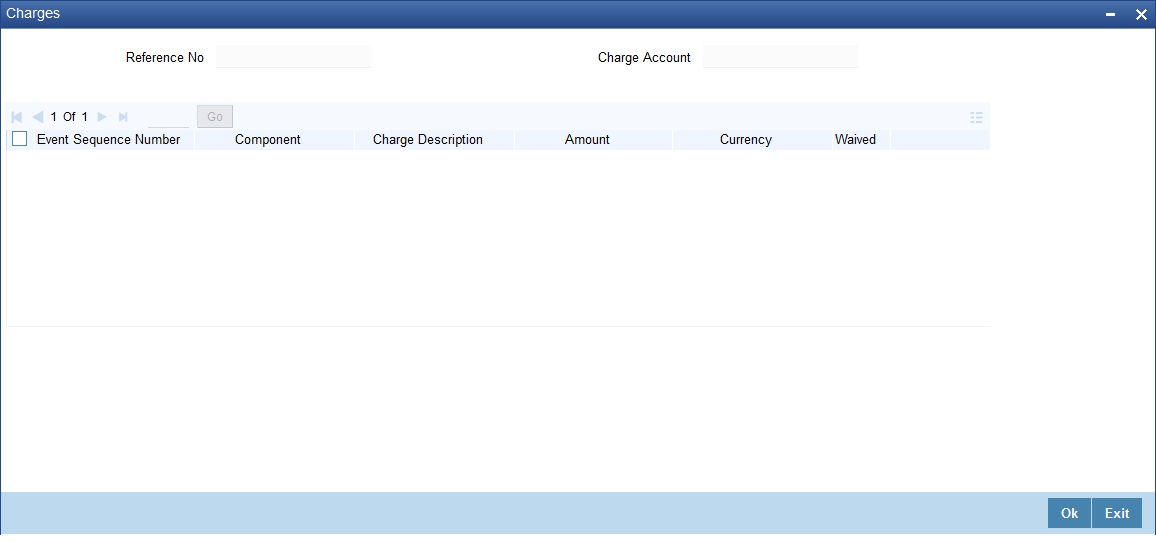
Contract Reference
System displays the contract reference number here.
Charge Liquidation
System displays the following details under this section:
- ESN – Event sequence number
- Component – Charge component name
- Charge Description – Description of the charge account
- Charge Currency – Charge currency
- Charge Amount – Computed charge amount
- Waiver – If this box is checked, then charge will be waived.
Waiver
Check this box to waive the charge.
Charge Amount
System displays the calculated charge amount here. You can amend this, if required.
9.1.5 Events Button
You can view all the events in the ‘Events’ screen. Click on ‘Events’ button to invoke ‘Events’ screen.’
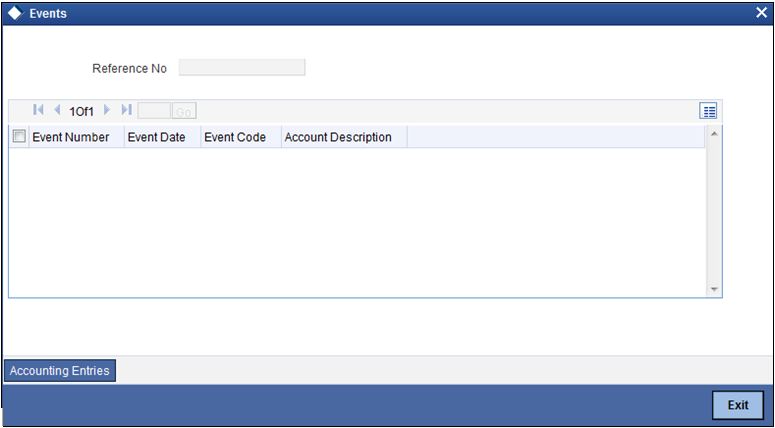
Reference Number
System displays the reference number.
Events
System displays the following details under this section:
- Event Number - Event sequence number
- Event Date- Date of the event
- Event Code - The event code of the transaction
- Account Description - The description of the event code
9.1.5.1 Accounting Entries Button
You can view accounting entries in the ‘Events’ screen. Click on ‘Accounting Entries’ button to invoke ‘Accounting Entries’ screen.

Reference Number
System displays the transaction reference number here.
Event
System displays the event code of the transaction here.
Accounting Entries
System displays the following details under this section:
- Branch - Account branch code
- Account - Account number
- Dr/Cr - ‘C’ Indicates ‘Credit’ and ‘D’ indicates ‘Debit’
- Amount Tag - Amount Tag of the transaction
- Currency - Account currency
- Foreign Currency Amount - Amount in foreign currency
- Local Currency Amount - Amount in local currency
- Date - Date of the transaction
- Value Date - Value date of the transaction
- Code - Transaction code
9.2 Cheque Details Maintenance
This section contains the following topics:
9.2.1 Maintaining Cheque Details
You can invoke the ‘Cheque Details Maintenance’ screen by typing ‘CADCHKDT’ in the field at the top right corner of the Application tool bar and clicking on the adjoining arrow button.

Branch Code
Specify code of the branch where the account for which you need to maintain the cheque details exists, from the adjoining option list.
If you have invoked this screen by double clicking on the Cheque status, all details related to the Cheque would be displayed in the ‘cheque details’ screen.
If the screen has been invoked from the Application Browser, then click on the account number (a display field), press F7 and enter the account number of this customer, whose Cheque status you want to view. Then press F8. The details of a Cheque leaf would be displayed. Move to the concerned ‘Cheque number’ record by using the arrow buttons on the toolbar or the <down arrow> key of your keyboard. You can also invoke the Cheque details by inputting the Cheque number, the details of which you want to view. The ‘Amount’, ‘Beneficiary’, ‘Presented On’, ‘Date on Cheque’ are populated from the concerned module from where the Cheque transaction took place. You can change any of the details.
In this screen the following details are updated from the front-end modules − Data Entry for a Cheque issued to a customer:
- Amount for which the Cheque is drawn
- Status of the Cheque
- Date on which the Cheque was presented for encashment Partial cheque payment feature is available for all accounts created under a branch that have ‘PARTCHKPAY’ feature id. If the original claim amount is more than the transaction amount, then the cheque will be partially paid. In such cases the cheque status should be marked as ‘Part Used’. A cheque can be partially paid multiple times.
If ‘PARTCHKPAY’ feature id is not available for the branch and an user tries to modify the status to ‘Part Used’, the system displays an error message “Partial cheque utilization feature is not allowed for account branch”.
For more information on Feature Id, refer to the section ‘Feature ID Maintenance’ in the Core Services User Manual.
To modify a status detail, click unlock icon in the Application toolbar. Make the desired changes. Remember, the following points while modifying:
- A ‘used’ status cannot be changed
- For cheques that are stopped from payment, the ‘Stopped’ box is checked and 'Status' of the cheque is set to 'Unused'.
- ‘Not used’ status can be changed to rejected/cancelled.
- A ‘Canceled’ status cannot be changed
- ‘Rejected’ status can be changed to ‘used’
- ‘Part Used’ status can only be ‘Cancelled’ or ‘Rejected’
A Cheque may have passed through a series of status changes. The modification number moves up serially, each time you change the status of a Cheque. If a cheque is partially paid more than once, the account details and the presented date will be available for each payment with different modification numbers. To view the status, click the arrow button under Modification Number. This arrow will take you through the modifications.
To view the modification history of a Cheque, click ‘History’ button ,to display the ‘Cheque Details - History’ screen.
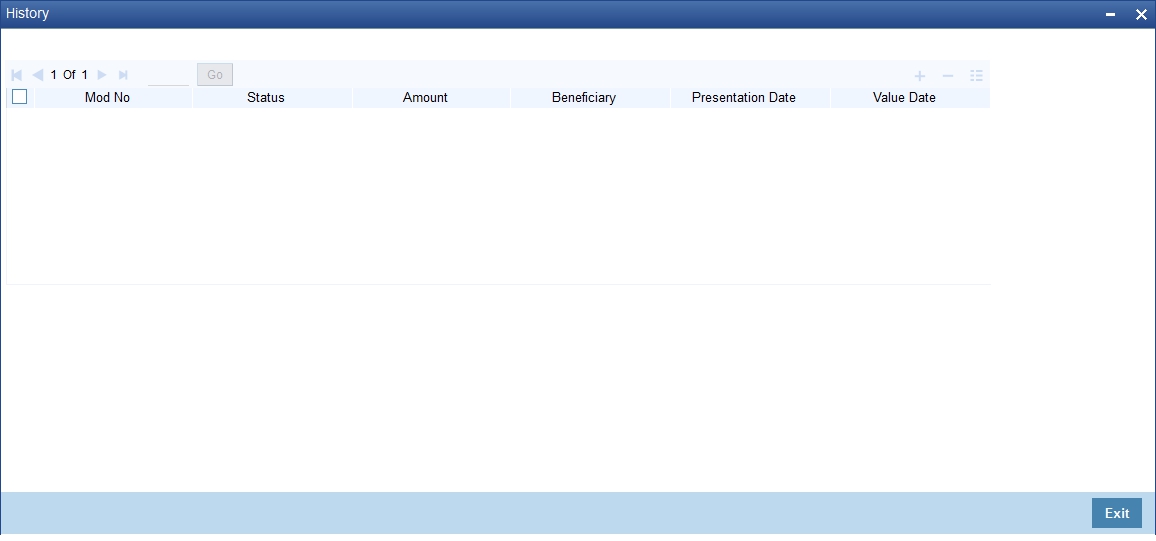
This screen lists all details pertaining to a .The amount for which the Cheque was issued, the presentation date, the value date and the Claim Amount of the Cheque are also displayed. The serial number represents the modification number.
To view the joint holder’s details of an account and the mode of operation maintained at the account level, place the cursor on the Account Number field and press Ctrl+J. The system displays the ‘Joint Holder’ screen.
For more information on the ‘Joint Holder’ screen refer to the section ‘Joint Holder Maintenance’ in this User Manual.
To exit from the ‘Cheque Details - History’ screen, click ‘Exit’ or ‘Cancel’ button. If you have invoked the table from the Application Browser you would be returned to the Browser. If you have invoked this table from the ‘Cheque Status’ screen you would be returned to the ‘Cheque Status’ table.
9.2.2 Retrieving Cheque Details
You can view, modify, or authorize details related to cheques using ‘Cheque Details Summary’ screen. You can invoke the ‘Cheque Details Summary’ screen by typing ‘CASCHKDT’ in the field at the top right corner of the Application tool bar and clicking on the adjoining arrow button.

You can query based on any or all of the following criteria:
- Authorization Status
- Record Status
- Branch Code
- Account Number
- Cheque Number
Click ‘Search’ button. The system identifies all records satisfying the specified criteria and displays the following details for each one of them:
- Authorization Status
- Record Status
- Branch
- Account Number
- Cheque Number
- Amount
- Presented On
- Mod Number
You can acquire access rights to operate in multiple branches by checking the ‘Multi Branch Operational’ check box at ‘User Maintenance’ level. When the record is selected, the system validates your access rights of the branch and function.
If you do not have appropriate rights on the branch, then the system displays an error message. If the branch is a valid branch, then the system updates the same as transaction branch and then queries it in the maintenance screen.
9.3 Cheque Book Archive
This section contains the following topics:
- Section 9.3.1, "Archiving Cheque Book"
- Section 9.3.2, "Viewing Archived Cheque Books"
- Section 9.3.3, "Querying Archived Cheque Details"
9.3.1 Archiving Cheque Book
You can archive the used and cancelled cheques for all accounts of the selected branch by using the Archive Cheque Book screen. To invoke this screen type ‘CADCHARC’ in the field at the top right corner of the Application tool bar and clicking on the adjoining arrow button.

You can capture the following in this screen:
Archival Reference Number
The system displays the archival reference number.
All Accounts
Select ‘All Accounts’ to archive the cheque books of all accounts of selected branch.
Specific Accounts
Select ‘Specific Accounts’ to archive cheque books of specific account/accounts. You can specify the specific account numbers under Account Number.
You will have to select the accounts either as ‘All’ or ‘Specific’. If ‘All’ is selected then cheque issued against all the accounts for the selected branch will be considered. If ‘Specific’ is selected, you have to specify the account for the selected branch.
On authorization all the cheques satisfying the query are considered for archival and the actual archival process will get triggered.
To view the joint holder’s details of an account and the mode of operation maintained at the account level, place the cursor on the Account Number field and press Ctrl+J. The system displays the ‘Joint Holder’ screen.
For more information on the ‘Joint Holder’ screen refer to the section ‘Joint Holder Maintenance’ in this User Manual.
Branch
The system defaults the branch code here. However you can modify it by selecting the branch code from the adjoining option list.
Issued Before Date
Specify the date until which all the issued cheques should be considered for archival.
All the cheques issued to the account before the ‘Issued Before Date’ will be considered for archival process.
Presented Before Date
Specify the date until which the used cheques, presented for payment, should be considered for archiving.
All the used cheques presented for payment for the account before the ‘Presented Before Date’ will be considered for archival process.
Start Cheque Number
Specify the starting cheque number of the cheque series.
End Cheque Number
Specify the ending cheque number of the cheque series,
The system archives those cheques which are in Used (U) status and Cancelled (C) status.
If inventory is enabled, then reissue of the same cheque number will not be possible for cheque archival.
The cheques that do not conform to the archival branch's cheque mask will not be considered for archival.
If the cheques are not archived, the system displays the information message as ‘No Cheques are archived for selected criteria’ a authorization level.
A new cheque book is created in the cheque book maintenance for the cheque numbers which are not archived.The number of leaves in the cheque book will be one if these cheques (for an account) are not in sequence, otherwise the number of leaves will be equal to the number of such cheques which are in a sequence. The cheque details for individual cheques will also be updated with the new cheque book numbers.
9.3.2 Viewing Archived Cheque Books
You can view the archived cheque book details maintained in the 'Archive Cheque Book' screen using the 'Archive Cheque Book Summary' screen. You can invoke this screen by typing 'CASCHARC' in the field at the top right corner of the Application tool bar and clicking on the adjoining arrow button.

In the above screen, you can base your queries on any or all of the following parameters and fetch records:
- Authorization Status
- Branch Code
- Record Status
- Archival Reference Status
Select any or all of the above parameters for a query and click 'Search' button. The records meeting the selected criteria are displayed.
- Authorization Status
- Record Status
- Branch
- Archival Reference Number
- Issued Before Date
- Presented Before Date
- Start Cheque Number
- End Cheque number
9.3.3 Querying Archived Cheque Details
You can query all the archived cheque details for a customer account in the ‘Archive Cheque Details Query’ screen. To invoke this screen type ‘CADCHARQ’ n the field at the top right corner of the Application tool bar and clicking on the adjoining arrow button.

You can base your queries on any of the following parameters:
- Branch Code
- Archival From Date
- Account Number
- Archival To Date
To view the joint holder’s details of an account and the mode of operation maintained at the account level, place the cursor on the Account Number field and press Ctrl+J. The system displays the ‘Joint Holder’ screen.
For more information on the ‘Joint Holder’ screen refer to the section ‘Joint Holder Maintenance’ in this User Manual.
Select any or all of the above parameters for a query and click 'Execute Query' button. The records meeting the selected criteria are displayed.
- Archival Date
- Branch
- Account Number
- Cheque Book Serial Number
- Archived Quantity
Select a record and click on ‘Details’ button to view the following details of the archived cheque:
- Cheque Number
- Status
- Presented On
- Amount
- Remarks