16. Instrument Details
Instrument transactions entered through an Oracle FLEXCUBE branch are stored in the host Oracle FLEXCUBE database through the Instrument details screen.
The Instruments module of Oracle FLEXCUBE provides for the maintenance of appropriate reference information, which would enable entry of instrument transactions from an Oracle FLEXCUBE, and also enable you to view and enrich transactions that have been entered through a Branch.
The accounting and charges details for combinations of product, customer, branch and currency, that will be applicable for instruments transactions, must be maintained in the host Oracle FLEXCUBE installation, through the ARC Maintenance.
This chapter contains the following sections:
- Section 16.1, "Maintaining Instrument Product"
- Section 16.2, "Maintaining Instrument Types for Other Banks"
- Section 16.3, "Instruments Transactions Query"
- Section 16.4, "Instrument Type Maintenance"
- Section 16.5, "Message Generation for Instruments"
- Section 16.6, "Uncollected Funds on Payment Instruments"
- Section 16.7, "Instrument Clearing Details Maintenance"
16.1 Maintaining Instrument Product
Oracle FLEXCUBE allows you to maintain instruments issued by the bank. As part of the instrument type maintenance, you have to maintain a list of currencies, branches and DAO GL for an instrument type.
You can invoke the ‘Instrument Product Maintenance’ screen by typing ‘DDDPRMNT’ in the field at the top right corner of the Application tool bar and clicking on the adjoining arrow button.

In this screen you can enter certain basic details of the instrument. They are:
- The instrument type
- A description of the instrument
- The other preferences which include:
- Whether auto authorization is allowed for the instrument type
- Whether you need a print of the instrument details as and when the details are entered and authorized.
- Whether online authorization is allowed for the instrument
- Whether the instrument type allows to create demand drafts payable at other banks
- Whether revalidation is allowed for the instrument type
- Whether duplication of issuance allowed for the instrument type
- The expiry frequency of the instrument - in days, months or years
- Revalidation frequency of the instrument – in days, months or years
- The advice format applicable under this instrument type
- The status of the instrument and the product codes associated with the same
- The currency in which the DD is being issued
- The dao branch where the DD is being issued from
- The dao account which will get credited for the DD issued as per the currency and dao branch.
- The payable limit indicates the limit for the issuing an instrument for the bank. You can set a limit for each instrument type. All the instruments (under the instrument type) issued by your bank should be within the specified limit. In case the instrument issued for the issuer bank exceeds this limit, the system displays an error message ‘Transaction amount is more than the payable limit’..
- Event to maintain the events REVA, DISU
- For instrument module the instrument types that are supported are BCW, BCA, BCG, BCC/DDW, DDA, DDG,
- DDC, TTW, TTA, TTG/TCA, TCG, TCW.
The various products selected against the various statuses should have maintenance in ARC except for statuses like ‘Expired’ or ‘Reissue’.
16.2 Maintaining Instrument Types for Other Banks
Oracle FLEXCUBE facilitates maintenance of issuance performed by other banks. For maintaining instruments types on behalf of other banks, invoke the Banker Cheques/Demand Drafts – Issuer Banks Details screen from the Application Browser. You can invoke the ‘Banker Cheques/Demand Drafts – Issuer Banks Details’ screen by typing ‘DEDDRISB’ in the field at the top right corner of the Application tool bar and clicking on the adjoining arrow button

In this screen you can enter certain basic details of the instrument. They are:
- The Bank Code and the description of the bank
- The Currency in which the instrument is being issued
- The instrument type
- The DAO (Draft Advice Outstanding) branch where the instrument is being issued from.
- The DAO account which will get credited for the instrument issued as per the currency and DAO branch.
- The parameters for the instruments issued by another bank:
- The code for the branch issuing the instrument
- The description for the branch
- The DAO branch where the instrument is being issued from
- The DAO account which will get credited for the instrument issued as per the currency and DAO branch.
- The payable limit for the instrument issued on behalf of another bank. You can set a limit for each instrument type. In case the instrument issued for the issuer bank exceeds this limit, the system displays an error message ‘Transaction amount is more than the payable limit’.
Note
- For the Instrument Type, Telegraph Transfer, you can liquidate it in Payable branch only, whereas refund and cancel operation can be performed in any branch.
- For the Instrument Type, Demand Draft and Banker’s Cheque, you can refund, cancel and liquidation in any branch.
16.3 Instruments Transactions Query
This section contains the following topics:
- Section 16.3.1, "Querying Instruments Transactions"
- Section 16.3.2, "Transaction Details Tab"
- Section 16.3.3, "Charges tab"
- Section 16.3.4, "MIS Button"
- Section 16.3.5, "Clearing Button"
- Section 16.3.6, "Accounting Entries Button"
- Section 16.3.7, "Viewing Instrument Transaction Query Summary"
16.3.1 Querying Instruments Transactions
You can query instruments transactions in the ‘Instruments Transaction Query’ screen. You can invoke the screen by typing ‘DDDQUERY’ in the field at the top right corner of the Application tool bar and clicking on the adjoining arrow button.

Click ‘Enter Query’ button to query the transaction.
16.3.2 Transaction Details Tab
Reference Number
Specify the reference number of the transaction. Alternatively, you can select the reference number from the option list. The list displays all the reference number maintained in the system.
Click ‘Execute Query’ button. The system displays the following details:
- Instrument type
- Issue Branch
- Instrument Number
- Instrument Date
- Instrument Currency
- Old Instrument Number
- Process Status
- Payable Bank
- Payable Branch
- Demand Draft MICR No
- Instrument Amount
- Multi Reference Number
- Original Draft Number
- Discount Days
- Reissued draft number
- Batch Number
- Transaction Tanked
- Print Status
- Remitter
- Account Branch
- Reissue Remarks
- Expiry Date
- SSN
- Reissued
- Exchange rate
- User Reference
- Name
- Address
- Country
- Narrative
16.3.3 Charges tab
The charges that you have specified for the instrument, branch and currency combination that you have chosen for the transaction, in the ARC Maintenance, are applied by default.
Click on the ‘Charges’ tab in the main ‘Instruments Transaction Query’ screen to view the charges.
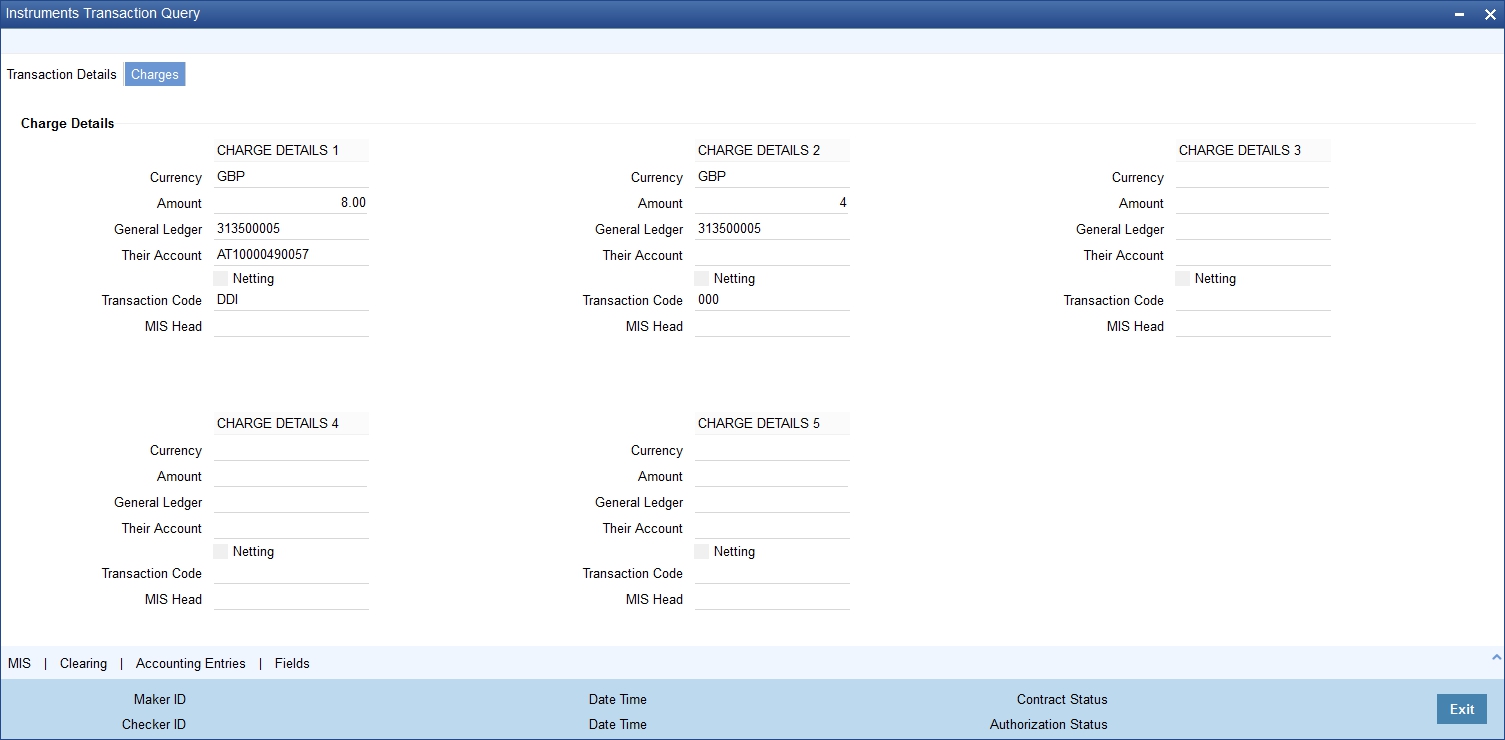
The following details are displayed in this screen, based on the ARC record for the instrument, branch and currency chosen for the transaction:
- The charge account (typically the income account) specified in the charges section of the ARC Maintenance.
- The details of the charge such as currency and the transaction code used to post charge entries, whether netting is required, the amount of the charge is computed by the system are displayed.
16.3.4 MIS Button
Click ‘MIS’ button to invoke the ‘MIS’ screen, where you can capture the MIS details for the instrument.
For more information on MIS, refer to the section ‘MIS Details for a Contract and Account’ in the chapter 'Defining MIS Details for a Customer, Account Class, Account, Product, and Contract' in MIS User Manual.
16.3.5 Clearing Button
Click ‘Clearing’ button to invoke the ‘Clearing Transaction Input Detail’ screen, where you can capture the details for the outward clearing instrument.

The information you capture in this screen is required to route outward clearing transactions to the appropriate clearing house.
In this screen, you have to capture the following information for clearing:
- The End Point
- The Bank Code
- The Branch Code (as identified in the network)
- The Sector to which it belongs
- Whether Reg CC is applicable
- Whether special cheque is governed by the Reg CC schedules
- Whether late clearing is required
- The reason for rejection
Depending on your Bank Code, Branch Code and Sector Code combination, the system displays the Routing Number, Bank Value Date and the Customer Value Date.
After you maintain the above details for clearing, click ‘Exit’ or ‘Cancel’ button to return back to the Instrument Type Details screen.
16.3.6 Accounting Entries Button
To view the accounting entries and overrides for the transaction, click ‘Accounting Entries’ button in the Instrument Type Detail screen. The Accounting Entries and Overrides screen is opened.
The system displays overrides that occurs while passing each transaction.
16.3.7 Viewing Instrument Transaction Query Summary
You can view a summary of Instrument Transaction Queries using ‘Instrument Transaction Query screen. You can invoke this screen by typing ‘DDSQUERY’ in the field at the top right corner of the Application tool bar and clicking the adjoining arrow button.

You can query records based on any or all of the following criteria:
- Reference Number
- User Reference
- Remitter
- Instrument Number
- Instrument Currency
- Instrument Amount
- Instrument Date
- Issue Branch
- Instrument Type
- Expiry Date
- Payable Bank
- Payable Branch
- Batch Number
- Old Instrument Number
- Print Status
Click ‘Search’ button. The system identifies all records satisfying the specified criteria and displays the following details for each one of them:
- Reference Number
- User Reference
- Remitter
- Instrument Number
- Instrument Currency
- Instrument Amount
- Instrument Date
- Issue Branch
- Instrument Type
- Expiry Date
- Payable Bank
- Payable Branch
- Batch Number
- Old Instrument Number
- Print Status
16.4 Instrument Type Maintenance
This section contains the following topics:
- Section 16.4.1, "Maintaining Instrument Types"
- Section 16.4.2, "Status Button"
- Section 16.4.3, "Defining Cheque Details"
16.4.1 Maintaining Instrument Types
Your bank may issue Cheques to customers from the nostro accounts maintained with other banks. To facilitate this, you need to maintain the details of all the Cheque books issued by those banks/institutions to your bank in Oracle FLEXCUBE. Apart from these your bank would be issuing other instruments such as Drafts, DDs, MCKs and so forth, which also need to be maintained in Oracle FLEXCUBE. Each instrument type is identified by a unique instrument type code, which can be captured in Oracle FLEXCUBE.
Further, depending on the number of leaves and the book number, the system automatically generates the serial number for all the Cheque leaves associated with the book for a particular instrument type. You can view these numbers and the status of the Cheques in the ‘Status of Cheque’ screen. You are also allowed to change the status of a Cheque if a Cheque is cancelled.
You can settle a contract by associating an instrument type (example: Cheque s drawn on nostro accounts, DDs, MCKs etc.) with the settlement instruction. Multiple deals can be settled with a single Cheque if the same counter party, module and instrument type is associated with the settlement instructions for the deals.
You can define the various instrument types with the relevant details in the ‘Instrument Type Maintenance’ screen. You can invoke the ‘Instrument Type Maintenance’ screen by typing ‘ISDINSMS’ in the field at the top right corner of the Application tool bar and clicking on the adjoining arrow button.
You can view the details of all the existing instrument types from the summary screen.

You need to maintain the following details for an instrument type:
Instrument Type
Specify a name for the instrument type that you are defining. There will be a list of values for the instrument type that will show all the instrument types from the DD status maintenance screen. Instrument number is picked from the Instrument type level.
Branch Code
Indicate the name of the branch to which the Cheque book is issued. All the branches maintained in Oracle FLEXCUBE are displayed in an option list. Select the branch code from the option list.
Account No
This is the nostro account maintained with other banks. If this Account is involved in a deal settlement, the type of instrument associated with the account will be defaulted in the ‘Instrument Type’ field of the ‘Settlement Message Details’ screen (invoked from the Contract Online screen of a front-end module).
Note
- You can associate a settlement account with one instrument type only.
- The instrument type will get defaulted only if you associate the liquidating event with the advice tag PAYMENT _MESSAGE.
Account Branch
The branch in which the nostro account resides is defaulted on selection of the account number. If you select a GL, the current branch is defaulted.
Issuer Code
Specify the issuer code of the cheque book. Alternatively, you can select the issuer code from the option list. The list displays all valid options maintained in the system.
No of Leaves
Specify the total number of Cheque leaves in the Cheque Book you are defining.
Cheque Book No
This is the number of the Cheque Book maintained for the Instrument Type. These numbers will be unique for a specific branch and instrument type.
LPAD Required
The user has an option to specify whether the instrument numbers have to be left padded with zeroes. If you enable this option, the instrument numbers will be prefixed by zeroes. By clicking ‘Status’ button you can view the status of each instrument.
16.4.2 Status Button
Click ‘Status’ button in the ‘Instrument Type Maintenance’ screen to invoke the ‘Status of Cheque’ screen. In this screen, you will see the individual Cheque numbers and Cheque status. By default the status of a Cheque is ‘Not Used’.
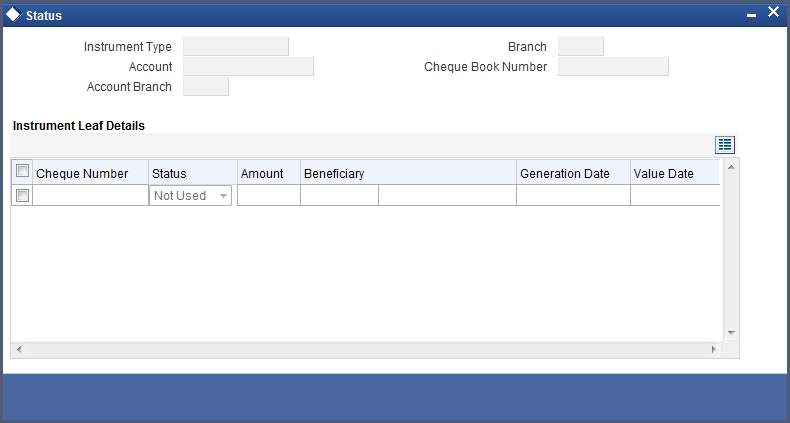
The operation you perform on a Cheque book effects the corresponding Cheque leaves also. For instance, if you choose to close a Cheque book, the status of the Cheque leaves is also automatically updated to ‘Cancelled’. On reopening the Cheque book, the status becomes ‘Not Used’ again.
Note
User can maintain same cheque number for instruments of same Branch, Instrument Type, Instrument Currency, Instrument Number issued by different Issuers.
16.4.3 Defining Cheque Details
After the Cheque book is saved and authorized, you can view the details of the individual Cheque leaves in the ‘Instrument Type Leaf Maintenance’ screen. You can invoke this screen by typing ‘ISDINSDT’ in the field at the top right corner of the Application tool bar and clicking on the adjoining arrow button.

Navigate to the desired Cheque book number, by using the previous and next arrow buttons in the toolbar. The following operations are not allowed:
- Creating a new record
- Copying a record
- Deleting a record
- Reopening a record
- Closing a record
The Messaging Subsystem of Oracle FLEXCUBE populates the following details whenever a Cheque is printed:
- Amount for which the Cheque is drawn
- Currency of the amount
- Beneficiary of the Cheque Date for which the Cheque was issued
- Date on which the Cheque was printed
You cannot change any of the above details. However, you are allowed to change the status of a Cheque. Select ‘Modify’ from the Actions Menu in the Application toolbar or click unlock icon to make the changes.
The status of Cheque is modified through the ‘Change Instrument Status’ screen. Click ‘Change Status To’ button to display this screen.
You will be allowed only the following status changes:
- A ‘Used’ status to a ‘Cancelled’ status
- A ‘Not Used’ status to a ‘Cancelled’ status
Note
You cannot change the status of a ‘Cancelled’ Cheque.
16.5 Message Generation for Instruments
This section contains the following topics:
- Section 16.5.1, "MT110 and MT111 Generation"
- Section 16.5.2, "Processing MT110 and MT111"
- Section 16.5.3, "Mapping between Common Payment Gateway Fields and Instruments"
16.5.1 MT110 and MT111 Generation
MT110 and MT111 will be generated from Instruments module.
- MT110 is generated whenever a foreign currency draft is issued from Instruments module and the message is sent to the bank on which the draft is drawn.
- MT111 is generated whenever a foreign currency draft is marked for stop payment and is sent to the bank where the draft is payable
16.5.2 Processing MT110 and MT111
Message type DD_ISSUE will be used to generate MT110 and DD_STOP_PMNT for MT111. You can link these message types to products in the DD status maintenance. In the DD status maintenance these message types will be input across the INIT and the STOP statuses. If DD_ISSUE is linked to an INIT product the existing message DEMDRAFT also will get printed along with MT110. Since this messages are going to be generated only for DD’s issued in currencies other that USD and CAD separate instrument type has to be maintained for issuing DD’s in other currency. This is because the message and product linkage is in the DD status maintenance. The receiver of the message will be the BIC code for the customer of the NOSTRO account / Credit Account.
The receiver will be obtained in the following way.
- The credit account specified as the DAO account would be picked as the receiver. The offset account is credited along with the debit of remitter account
- A DAO account needs to be maintained in the Teller-> Demand draft details for each bank +branch +currency combination
- The related customer of the credit account thus obtained will be determined
- The Swift address / BIC code for the customer will be obtained from the customer address/BIC directory
MT 110 and MT 111 generated will not have any funding advice. The fields 53A and 54A will not be populated for these messages.
The population of the tags of MT110 and MT111 will be as follows.
MT110 –
The receiver of MT110 will be the BIC for the customer corresponding to the Nostro a/c of the Liquidation product’s ARC setup.
Message Text |
Message Contents |
Transaction Reference Number |
20: Contract Reference Number of the DD transaction |
Number of the cheque |
21: Instrument Number from the DD transaction |
Date the cheque was issued |
30: Instrument Date from DD transaction |
Currency and Amount of Cheque |
32B: Instrument Currency, Instrument Amount |
Payee of the cheque |
59. Beneficiary Name |
MT111
The receiver of the MT111 will be the BIC for the customer corresponding to the Nostro a/c of the liquidation product’s ARC setup.
Message Text |
Message Contents |
Transaction Reference Number |
20: Contract Reference Number of the DD transaction |
Number of the cheque |
21: Instrument Number from the DD transaction |
Date the cheque was issued |
30: Instrument date from DD transaction |
Currency and amount of cheque |
32B: Instrument Currency, Instrument Amount |
Payee of the cheque |
59: Beneficiary Name |
16.5.3 Mapping between Common Payment Gateway Fields and Instruments
The following table gives the mapping between the common payment gateway fields and the fields supported by Instruments. This mapping is maintained in the system using the message type – product category / product mapping screen.
Common Payment Gateway Field |
Instruments Field |
Source Reference |
External Reference |
Source Code |
Source Code |
Queue |
Not mapped |
Amount |
Instrument Amount |
Value Date |
Instrument Date |
Currency |
Instrument Currency |
Status |
Not mapped |
Error Reason |
Not mapped |
Contract Reference Number |
Not mapped (Generated upon upload) |
Customer Account Number |
Account Number |
Customer Account Currency |
Account Currency |
Customer Amount |
Amount in Account Currency |
Customer Value Date |
Not mapped |
Counterparty Account Number |
Beneficiary Account |
Counterparty Currency |
Beneficiary Account Currency |
Counterparty Amount |
Offset Amount |
Counterparty Value Date |
Not mapped |
Exchange Rate |
Exchange Rate |
By Order Of (5 Columns) |
Not mapped |
Our Correspondent (5 Columns) |
Not mapped |
Receiver’s Correspondent (5 Columns) |
Not mapped |
Intermediary (5 Columns) |
Not mapped |
Account With Institution (5 Columns) |
Not mapped |
Beneficiary Institution1 |
Beneficiary Name |
Beneficiary Institution 2 |
Beneficiary Address Line 1 |
Beneficiary Institution 3 |
Beneficiary Address Line 2 |
Beneficiary Institution 4 |
Beneficiary Address Line 3 |
Beneficiary Institution 5 |
Beneficiary Address Line 4 |
Payment Details (5 Columns) |
Not mapped |
Sender to Receiver Information (5 Columns) |
Not mapped |
Bank Operation Code |
Not mapped |
Instruction Code |
Not mapped |
Related Reference Number |
Not mapped |
Reject Code |
Not mapped |
Reject Details |
Not mapped |
UDF_1 |
Instrument Number |
UDF_2 |
DD MICR Number |
UDF_3 |
Instrument Status |
UDF_4 |
Identifier Name 1 |
UDF_5 |
Identifier Value 1 |
UDF_6 |
Identifier Name 2 |
UDF_7 |
Identifier Value 2 |
UDF_8 |
Identifier Name 3 |
UDF_9 |
Identifier Value 3 |
UDF_10 |
Identifier Name 4 |
UDF_11 |
Identifier Value 4 |
UDF_12 |
Identifier Name 5 |
UDF_13 |
Identifier Value 5 |
UDF_14 |
Identifier Name 6 |
UDF_15 |
Identifier Value 6 |
UDF_16 |
Charge Account |
UDF_17 |
Expiry Date |
Modification Number |
Modification Number |
UDF_18 |
SSN |
UDF_19 |
Reissued Flag |
UDF_20 |
Original Draft Number |
UDF_21 |
Reissue Remarks |
UDF_22 |
Reissued Draft Number |
UDF_23 |
Transaction Date |
UDF_24 |
Beneficiary Customer Number |
UDF_25 |
Print Status |
UDF_26 |
Payable Bank |
UDF_27 |
Copy of instrument printed |
UDF_28 |
Offset Account |
UDF_29 |
Offset Currency |
UDF_30 |
Narrative |
Maker Id |
Maker Id |
Maker Date Stamp |
Maker Date Stamp |
Authorizer Id |
Authorizer Id |
Chequeer Date Stamp |
Chequeer Date Stamp |
Record Status |
Record Status |
Authorization Status |
Authorization Status |
Authorized Once flag |
Authorized Once flag |
Message Type |
Not mapped |
Branch Code |
Payable Branch |
Version Number |
Version Number |
Latest Version Number |
Not mapped |
Customer Account Branch |
Account Branch |
Counterparty Account Branch |
Offset Branch |
16.6 Uncollected Funds on Payment Instruments
This section contains the following topics:
- Section 16.6.1, "Manual Processing for Uncollected Funds"
- Section 16.6.2, "Operations that you can Perform"
- Section 16.6.3, "Intra-day Release of Uncollected Funds"
- Section 16.6.4, "Querying for Details on Overdrawn Accounts"
16.6.1 Manual Processing for Uncollected Funds
Typically, uncollected funds on a payment instrument will be actually cleared after a specified time interval, depending upon the type of instrument. This is referred to as the ‘availability information’ for uncollected funds. The availability information is maintained for each kind of transaction in your bank, represented by transaction codes in Oracle FLEXCUBE. You can manually make available (or release) uncollected funds, before the available date, for credit transactions.
You can invoke the ‘Uncollected Funds Release’ screen by typing ‘ACDUNFDR’ in the field at the top right corner of the Application tool bar and clicking on the adjoining arrow button.

In the Uncollected Funds Release screen, you can choose to:
- Release the uncollected funds for a credit transaction for which manual release has been specified, or for which a float period has been specified. You can release the funds before the available date is reached. The release can be automatic or manual. If automatic, you can specify a To Date, and any transactions whose available date falls between the application date and specified To Date can be released.
- Specify a new available date for a credit transaction
- Authorize any previous release of uncollected funds for a transaction
- View any credit transactions for which manual release has been specified, or a float period has been specified, or in respect of which funds have been previously released and the release is pending authorization.
To view the joint holder’s details of an account and the mode of operation maintained at the account level, place the cursor on the Account field and press Ctrl+J. The system displays the ‘Joint Holder’ screen.
For more information on the ‘Joint Holder’ screen refer to the section ‘Joint Holder Maintenance’ in this User Manual.
16.6.2 Operations that you can Perform
The operation you select here is used both to retrieve the transaction in this screen, and for application of the operation when you select a transaction from the retrieved transaction list. Once a record is released, the system internally stores the user ID of the person who released the funds along with the release time.
16.6.2.1 Retrieving a Transaction
To perform any of these operations on a credit transaction, you must first retrieve the transaction in this screen. To do so, you can employ any of the following means:
- Select the operation you want to perform, by selecting the appropriate radio button in the Fund Selection section
- Select the release option, either Automatic or Manual, in the Option section. If you specify an automatic release option, specify a To Date
16.6.2.2 Selecting a Transaction for an Operation
After you have retrieved the transaction, the following details of the transaction are displayed:
- The Available Date
- The Account pertaining to the specified Uncollected Fund
- Reference Number
- Amount of the transaction
- Release details, such as the user that released the transaction, and time of the release
In the list, Cheque the ‘Select’ box in the row of the transaction for which you want to perform the selected operation, and then click ‘Exit’ button.
16.6.2.3 Making uncollected Funds available before the Available Date
You can use the Uncollected Funds Manual Release screen to indicate that uncollected funds must be made available before the available date. In this screen, you must first display the record of the transaction with uncollected funds, unlock it, and make funds available on the application date, in the manner described above. The system sets the available date for such a transaction as the application date, thereby ensuring the release of funds.
16.6.2.4 Changing the Available Date for a Transaction with uncollected Funds
In the Uncollected Funds Manual Release screen, you can also choose to change the available date for a transaction with uncollected funds. To do this, you must first display the record of the transaction with uncollected funds, unlock it, and specify a new available date in the Available Date field. The system sets the available date for such a transaction as the new date you have specified.
You can only specify a future date when you are changing the available date for a transaction with uncollected funds.
16.6.3 Intra-day Release of Uncollected Funds
During the course of a business day, you can manually release uncollected funds for transactions that have been posted using a transaction code for which the Intraday Release option has been enabled, and are due for release on or before the current date. You can do this by executing the Intraday Funds Release batch process, in the Intraday Funds Release screen.
You can invoke the ‘Intra Day Batch Start’ screen by typing ‘BABIDBAT’ in the field at the top right corner of the Application tool bar and clicking on the adjoining arrow button.

The Beginning of Day process skips the release of uncollected funds in respect of transactions posted using a transaction code for which the Intraday Release option has been enabled.
During the End of Day batch process, uncollected funds for transactions that have been posted using a transaction code for which the Intraday Release option has been enabled, and are due for release on or before the current date, are released. This takes place after all the End of Transaction Input (EOTI) validations are performed.
The EOD batch processing ensures that, if the Intraday Release batch is not run, or the transactions are posted after the Intraday Release batch is run, and the funds are due to be released, the same is done. This is done just after performing all pre EOTI validations.
16.6.4 Querying for Details on Overdrawn Accounts
You can query for details of accounts that are overdrawn over limits through the ‘Overdrawn Accounts Query’ screen.

You can view the following information in this screen:
- Customer Number
- Account Branch
- Account Number
- Account Currency
- Facility Identifier
- Line ID
- Liability Number
- Payable Balance: This is the available balance after taking limits into account. This is the sum of the temporary overdraft and the minimum of the available amount for the line and the sub limit.
- Uncollected Funds- the funds which are pending collection on the customer account.
- Uncollected Funds Limit
- Withdrawable Uncollected Funds - this is the uncollected funds that will be released either today or with a value date lesser than today. This is determined by your specification for the Withdrawable Uncollected Funds Basis at the branch level, subject to uncollected funds limit at the account level.
Note
- If, for a branch, you have specified the Uncollected Funds Basis as ‘Uncollected’, then the total of uncollected funds is treated as uncollected funds. If your specification is ‘Uncollected funds Avl same day’, then only that amount of uncollected funds which is available for the current day or any previous day is treated as uncollected funds.
- Overdrawn balance: The sum of payable balance including limits and the withdrawable uncollected funds subject to uncollected funds limits. The overdrawn balance should be negative.
- Intraday uncollected fund release batch status
16.7 Instrument Clearing Details Maintenance
This section contains the following topics:
- Section 16.7.1, "Maintaining Interface Clearing Details for Instruments"
- Section 16.7.2, "Charges tab"
- Section , "For maintaining charge details in the ‘Charges’ screen, click the ‘Charge’ tab on the ‘Interface Clearing Details screen.’"Events tab
- Section 16.7.3, "Viewing Interface Clearing Summary"
16.7.1 Maintaining Interface Clearing Details for Instruments
You can invoke the ‘Interface Clearing Details’ screen by typing ‘IFDCLGDT’ in the field at the top right corner of the Application tool bar and clicking on the adjoining arrow button. You can view the details of clearing transactions triggered from any clearing and PDC using this screen.
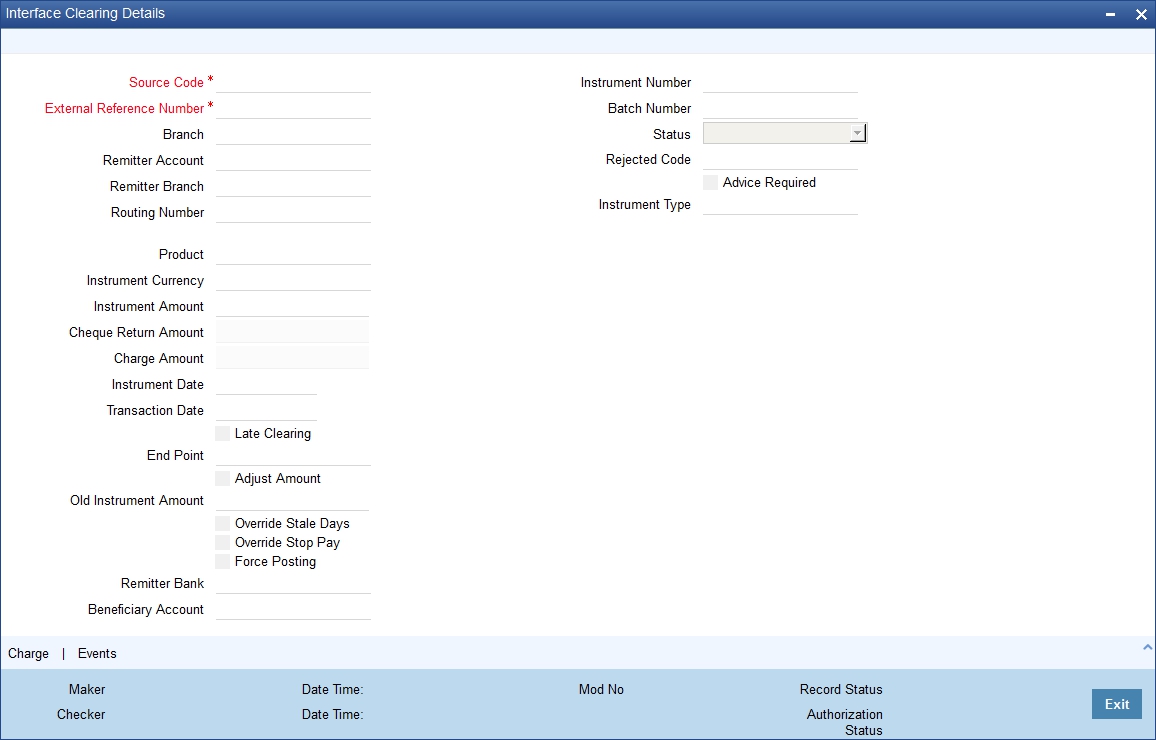
You can query for the interface details based on the following criteria:
Source Code
Specify the source code for clearing transaction.
External Reference
Specify the external reference number.
Click ‘Execute Query’.The system displays the following details:
- Branch
- Remitter Account
- Remitter Branch
- Routing Number
- Product
- Instrument Currency
- Instrument Amount
- Instrument Date
- Transaction Date
- Cheque Return Amount
- Presenting Bank Cheque Amount
- Late Clearing
- End Point
- Adjust Amount
- Old Instrument Amount
- Override Stale Days
- Override Stop Pay
- Force PostingModule Reference Number
- Error Codes
- Error Message
- Instrument Number
- Batch Number
- Status
- Rejected Code
- Advice Required
- Instrument Type
- Remitter Bank
- Beneficiary Account
- Beneficiary Bank
- Beneficiary Branch
- Bank Value Date
- Customer Value Date
- Serial Number
- Contract Reference
- Entry Number
- Din
- Din Date
- Remarks - The system defaults the remarks based on the narrative maintained in the respective data entry screen.
The system also displays the Charge and Events details in the respective windows.
16.7.2 Charges tab
For maintaining charge details in the ‘Charges’ screen, click the ‘Charge’ tab on the ‘Interface Clearing Details screen.’Events tab

For maintaining event details in the ‘Events’ screen, click the ‘Events’ button on the ‘Interface Clearing Details’ screen..

16.7.3 Viewing Interface Clearing Summary
You can view the summary details of the clearing transactions using ‘Interface Clearing Summary’ screen by typing ‘IFSCLGDT’ in the field at the top right corner of the Application tool bar and clicking on the adjoining arrow button.

You can query on records based on any or all of the following criteria:
- Authorization Status
- Source code
- Product
- Beneficiary Account
- Transaction Date
- Entry Number
- Module Reference
- Batch Number
- Record Status
- External Reference
- Remitter Account
- Instrument Number
- Status
- Rejected Code
- Instrument Type
Click ‘Search’ button. The system identifies all records satisfying the specified criteria and displays the following details for each one of them:
- Authorization Status
- Record Status
- Source Code
- External Reference
- Product
- Branch
- Remitter Account
- Remitter Branch
- Beneficiary Account
- Instrument Number
- Transaction Date
- Routing Number
- Status
- Entry Number
- Rejected Code
- Advice Required
- Module Reference
- Instrument Type
16.8 Inward Interface Clearing Details
This section contains the following topics:
- Section 16.8.1, "Invoking Inward Interface Clearing Details Screen"
- Section 16.8.2, "Charges Button"
- Section 16.8.3, "Events Button"
16.8.1 Invoking Inward Interface Clearing Details Screen
You can invoke the ‘Inward Interface Clearing Details’ screen by typing ‘IFDIWCGD’ in the field at the top right corner of the Application tool bar and clicking on the adjoining arrow button. You can view the details of inward clearing transactions triggered from any inward clearing and PDC using this screen.
You can query for the inward interface details based on the following criteria:
Source Code
Specify the source code for inward clearing transaction.
External Reference
Specify the external reference number.
Click ‘Execute Query’.The system displays the following details:
- Branch
- Remitter Account
- Remitter Branch
- Routing Number
- Product
- Instrument Currency
- Instrument Amount
- Instrument Date
- Transaction Date
- Cheque Return Amount
- Presenting Bank Charge Amount
- Late Clearing
- End Point
- Force Posting
- Module Reference Number
- Error Codes
- Error Message
- Instrument Number
- Batch Number
- Status
- Rejected Code
- Advice Required
- Instrument Type
- Remitter Bank
- Beneficiary Account
- Beneficiary Bank
- Beneficiary Branch
- Bank Value Date
- Customer Value Date
- Serial Number
- Contract Reference
- Entry Number
- Din
- Din Date
- Remarks - The system defaults the remarks based on the narrative maintained in the respective data entry screen.
The system also displays the Charge and Events details in the respective windows.
16.8.2 Charges Button
For maintaining charge details in the ‘Charges’ screen., click ‘Charges’ button on ‘Interface Clearing Details’

16.8.3 Events Button
For maintaining event details in the ‘Events’ screen., click ‘Events’ button on ‘Interface Clearing Details’.