7. Continuous Linked Settlements (CLS)
7.1 Introduction
Continuous Linked Settlement (CLS) is an industry initiative to eliminate the settlement risk in foreign exchange transactions. This is achieved by using a 'payment versus payment' method, which provides a simultaneous exchange of currency values through CLS Bank International. The CLS concept is being adopted globally with a view to reduce the risks involved in settlement of Foreign Exchange transactions. Before CLS, each side of a trade was paid separately. Taking time-zone differences into account, this heightened the risk of one party defaulting. CLS is a real-time system that enables simultaneous settlement globally, irrespective of time zones. CLS is an ongoing process of:
- submitting instructions - receiving payments of specified currencies from customers
- funding - settling pairs of instructions that satisfy all criteria
- execution - making pay-outs in specified currencies.
Settlement is final and irrevocable or funds are returned same day.
Participating banks get real-time settlement information that helps them to manage liquidity more efficiently, reduce credit risks and introduce operational efficiencies.
The members of the CLS Bank, referred to as the ‘Settlement Members’, submit the deals through the CLS Bank which in turn will match the deals and settle the same by debiting/crediting their accounts in accordance with their instructions.
This chapter explains the maintenances required in Oracle FLEXCUBE to support the CLS scheme as a third party participant and the processing involved in the settlement of such FX transactions.
In order to support CLS as a third party participant, you must:
- Maintain the CLS preferences for your branch
- Allow your customers to settle their deals via the CLS bank
- Maintain currency restrictions for customers to participate in CLS trades
- Maintain currency preferences for your branch exclusively for CLS
- Set up the calendar of holidays for the CLS bank
- Identify the financial institutions participating in CLS and the type of link with the CLS bank, whether direct or indirect.
- Specify the settlement instructions for CLS deals
- Maintain an alert group for a specific CLS status
The above maintenances and the processing involved in the CLS settlement of Foreign Exchange deals are explained in detail in the following sections of this chapter.
7.2 CLS Preferences
This section contains the following topics:
- Section 7.2.1, "Maintaining CLS Preferences for the Branch"
- Section 7.2.2, "Allowing a Currency to be Settled Inside CLS"
- Section 7.2.3, "Identifying the customer as a CLS Participant and maintaining currency restrictions"
- Section 7.2.4, "Maintaining CLS currency preferences for the branch "
- Section 7.2.5, "Specifying UDF Values"
- Section 7.2.6, "Maintaining Holidays for CLS Bank "
- Section 7.2.7, "Specifying UDF Values"
- Section 7.2.8, "Maintaining the participant type for CLS customers"
- Section 7.2.9, "Specifying UDF Values"
- Section 7.2.10, "Maintaining Settlement Instructions for CLS Deals"
- Section 7.2.11, "Maintaining Alert Preferences for CLS deals"
- Section 7.2.12, "Specifying UDF Values"
7.2.1 Maintaining CLS Preferences for the Branch
You can specify the CLS preferences as part of maintaining the generic processing guidelines for FX deals entered into at your branch. You can invoke the ‘Foreign Exchange Branch Parameters Maintenance’ screen by typing ‘FXDBRMNT’ in the field at the top right corner of the Application tool bar and clicking on the adjoining arrow button.
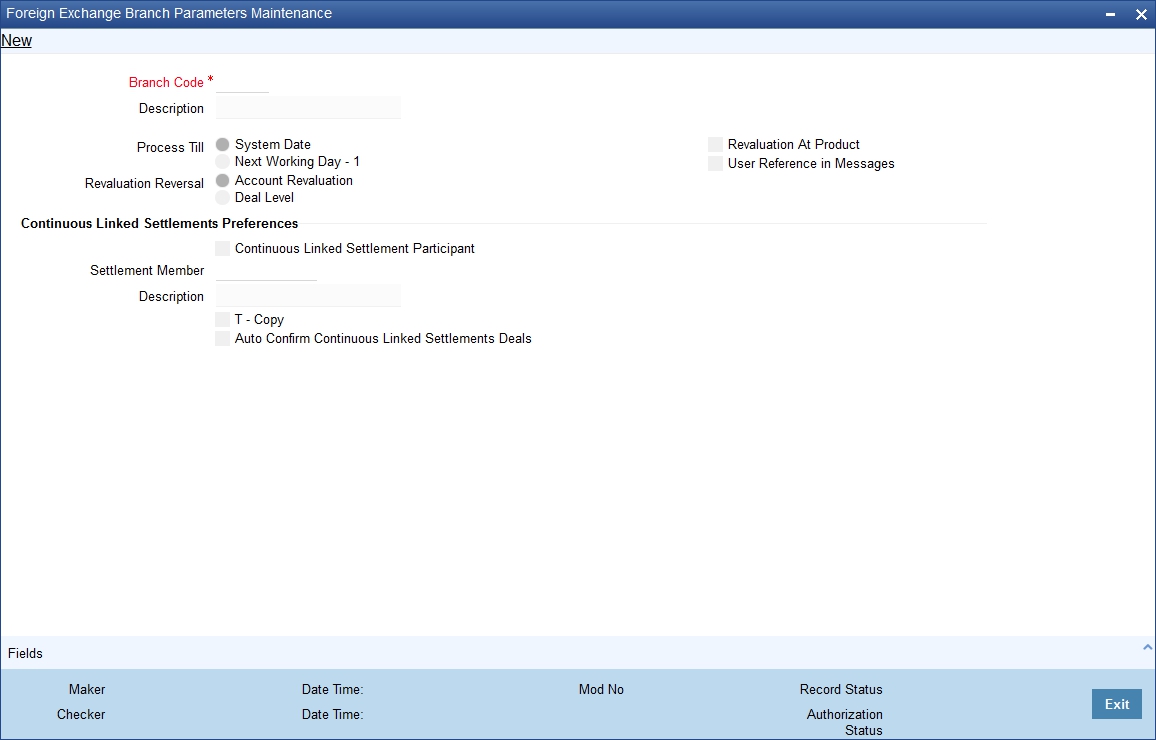
The branch code, along with the name of the branch for which the preferences are being maintained, will be defaulted to the screen.
Branch Code
Specify the branch code. Alternatively, you can select the branch code from the option list. The list displays all valid options.
Branch Description
The system displays the branch description.
Process Till
Select the date up to which FX deals should be processed in the branch.
The options are:
- System Date
- Next Working Day -1
Revaluation Reversal
Revaluation entries can be reversed in either of two ways, according to your specification:
- Account Revaluation - If you select this option, revaluation entries passed during the EOD process are reversed as part of the account revaluation process on the next working day. You must ensure that the account revaluation process is run before running the contract revaluation process.
- Deal Level - If you opt for deal level revaluation reversal, a BOD process reverses the contract revaluation entries posted the previous day. Revaluation entries are posted and reversed at the level of individual contracts.
Revaluation At Product
By checking this box, you enable the passing of a consolidated revaluation entry at the product level for all forward FX contracts under that product.
User Reference Number in Messages
Based on the specification you make here, the system assigns the Tag 20 (Sender’s reference number) of an SWIFT message to either user reference number or contract reference number.
Check this box if you want the system to apply the user reference number for sender’s reference Tag 20 of the SWIFT messages sent.
If you leave the box unchecked, the system applies the custom reference number according to the format (or logic) defined for the product that the contract uses.
Note
This feature is applicable only for SWIFT messages sent out by Foreign Exchange module.
CLS participant
You have to select this option to identify the branch as a CLS participant. This will enable you to process the FX deals entered into at your branch via the CLS bank.
Only after you mark the branch as a CLS participant, you will be allowed to maintain the following CLS preferences:
Settlement Member
Here, you have to select the BIC Code of the customer who will be the intermediary /settlement member through whom the FX deals of your branch will be routed to the CLS bank. The Messaging System of Oracle FLEXCUBE will identify this customer as the receiver of the MT 304 (Confirmation Message/ Advice of a Third Party deal).
T- Copy
This is applicable if the counterparty is a SWIFT member. If you specify that ‘T-Copy’ is required, the SWIFT media will send the CLS Confirmation Message (MT300) to the counterparty of the deal with a copy to your settlement member. If multiple addresses are maintained, MT300 will be sent to the location, which is marked as the counterparty’s primary address.
If the third party does not subscribe to T-copy or if the counterparty is not a SWIFT member, Oracle FLEXCUBE will automatically generate the MT304 message and identify the BIC of the Settlement Member (where your branch is the Third Party participant) as the receiver of the message. In such a case, MT300 will be a normal confirmation, which will be sent to your counterparty if it is a SWIFT subscriber.
If you check T - Copy, the system will include the TPS identifier in MT300 message for CLS NDF deals. However, the system will not generate MT304 message for the message type FS_FMCONF.
Auto-Confirm CLS Deals
You may select this option to enable the system to automatically confirm the CLS deals processed at your branch. In this case, the system will ignore the MT300 received from the counterparty and mark the confirmation status as ‘Confirmed’.
For details on the other generic preferences, refer the ‘Maintaining Data Specific to the FX Module’ chapter of this User Manual.
7.2.2 Allowing a Currency to be Settled Inside CLS
When setting up currency details in the ‘Currency Definition’ screen, you can allow a currency to be CLS compliant by selecting the ‘CLS Currency’ option. FX deals in the CLS currency only will be eligible to be routed through the CLS bank.
Further, from the available list of CLS currencies, you can maintain a list of ‘allowed’ or ‘disallowed’ currencies for a specific customer. This is explained in the following section.
Refer the Core Services User Manual for more information on maintaining currency details in Oracle FLEXCUBE.
7.2.3 Identifying the customer as a CLS Participant and maintaining currency restrictions
At the time of maintaining the details of a customer in the ‘Customer Information Maintenance’ screen, you can mark the customer as a ‘CLS Participant’. To invoke this screen, click on Customer Maintenance in the Application Browser, select Customers and click on Detailed under it. You can also invoke this screen by typing ‘STDCIF’ in the field at the top right corner of the Application tool bar and clicking on the adjoining arrow button.
You will be allowed to capture currency restrictions only for customers who are CLS participants. You can maintain a list of allowed or disallowed currencies for CLS trading, in the ‘CLS Currency Restriction’ screen. Click on the ‘CLS Restrictions’ button in the ‘Customer Information Maintenance’ screen to invoke it.
However, you have to ensure that the branch at which the customer operates is also qualified to process CLS deals i.e. the branch should also be marked as a CLS Participant (refer the section titled ‘Maintaining CLS Preferences for the branch’ in this chapter) before allowing the same for the customer.

All the currencies that are allowed for CLS trading will be listed as available currencies. You may define a list of allowed or disallowed CLS currencies for a specific customer. By default, every customer who is a ‘CLS Participant’ will be allowed to trade in all the available CLS currencies unless specifically mentioned. Only if the customer is allowed to transact in a CLS currency, the particular deal will be eligible for CLS trading.
7.2.4 Maintaining CLS currency preferences for the branch
You can maintain CLS preferences exclusively for currencies that are allowed to participate in CLS trading. You may use the ‘CLS Currency Details’ screen available in the Application Browser for defining the CLS preferences.
You can invoke the ‘CLS Currency Maintenance’ screen by typing ‘FSDCLSCD’ in the field at the top right corner of the Application tool bar and clicking on the adjoining arrow button.
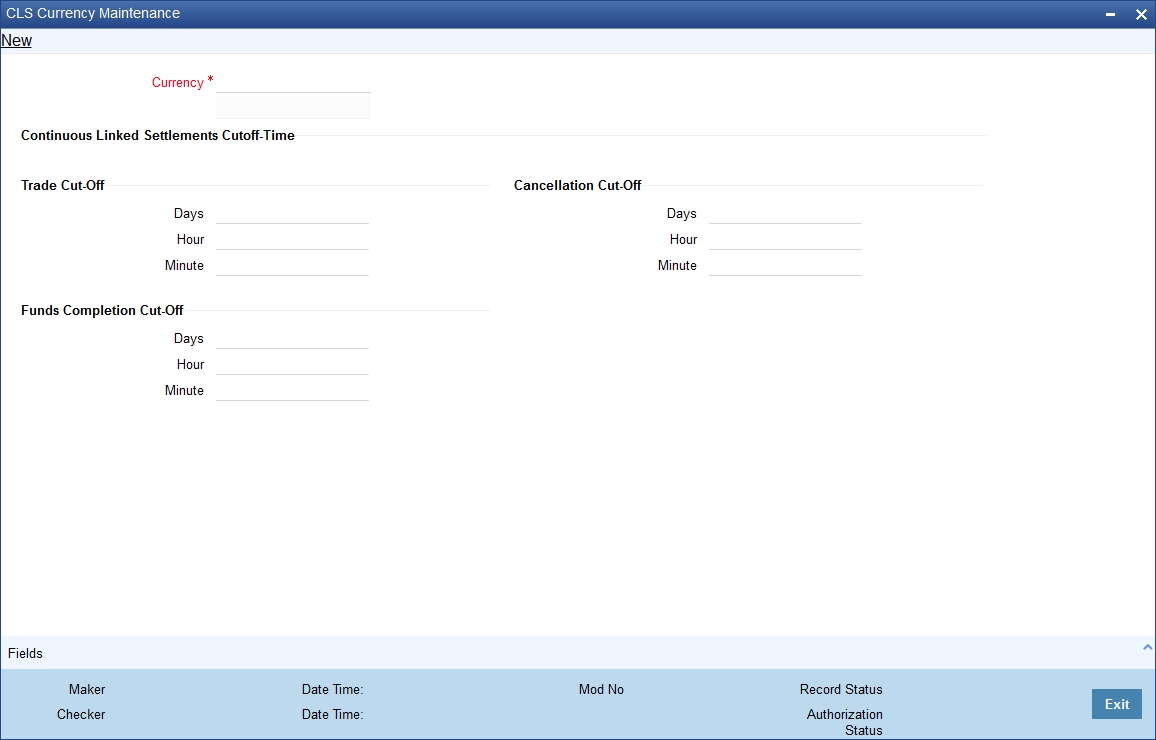
The following details are captured here:
Currency
Select the currency for which CLS details needs to be maintained. The preferences are maintained for a branch and currency combination. The option-list will display only those currencies that are marked as a ‘CLS Currency’ in the ‘Currency Definition’ screen.
7.2.4.1 Specifying CLS Cutoff-Time
Specify the following details.
Trade Cut-off Days
As a CLS preference, you have to maintain the cut-off days within which a CLS deal should be completed. For instance, if you are on 1st April ’08 (current date) and you have maintained 2 days as the cut-off period, the value date of an FX deal should not be less than 03-Apr-2008, assuming that 02-Apr-2008 is a working day for both the CLS Bank and the deal currency. If trade is done after the cut-off days, the system will display an override message stating the cut-off date has passed. If you select ‘OK’ for the override, the deal will be saved as a CLS deal. Otherwise it will be considered as a non-CLS deal.
Trade Cut- off Hour
Specify the trade cut-off time in hours.
If you enter into an FX deal on the trade cut-off date (current system date), the system will check the cut-off time for the currency. On the cut-off date, the deal should be done within the cut-off time. The time is with respect to the branch time zone.
Trade Cut-off Minute
Specify the trade cut-off time in minutes.
Cancellation Cut-off Days
Specify the cut off days for canceling a CLS deal.
Cancellation of CLS deal should be done before the cancellation cut-off date and time.
If the cancellation is done on the cancellation cut-off date (equal to the current date), the system will validate that the cancellation time on the cut-off date is within the cut-off time maintained for the currency. The time is with respect to the branch time zone.
If the cancellation is done after the cancellation cut-off date/time, the system will display an override message stating that the cancellation cut-off date/time has passed. If you select ‘OK’, the deal will get cancelled. If you select ‘Cancel’ for the override, the deal will not get cancelled.
Cancellation Cut-off Hour
Specify the cancellation cut-off time in hours.
Cancellation Cut-off Minute
Specify the cancellation cut-off time in minutes.
Funds Completion Cut-off Days
Here, you have to capture the funding cut-off period for a deal. This will ensure that the funds are made available before the settlement date of the deal. This value will be used only for information purposes. Again, the time is with respect to the branch time zone.
Funds Completion Cut-off Hour
Specify the cut off time in hours for the making the funds available.
Funds Completion Cut-off Minute
Specify the cut off time in minute for the making the funds available.
7.2.5 Specifying UDF Values
You can associate values to all the User Defined fields created and attached to the ‘CLS Currency Details’ screen.
You can view the list of User Defined fields associated to this screen by clicking ‘Fields’ button on the ‘CLS Currency Details’ screen.
You can enter the value for the UDFs listed here in the ‘Value’ column.
For more details on how to create user Defined fields, refer chapter ‘Creating custom fields in Oracle FLEXCUBE’ in the User Defined Fields User Manual under Modularity.
7.2.6 Maintaining Holidays for CLS Bank
You can maintain a holiday calendar for the CLS Bank through the ‘CLS Holiday Calendar Maintenance’ screen.
You can invoke the ‘CLS Holiday Calendar Maintenance’ screen by typing ‘FSDLCHOL’ in the field at the top right corner of the Application tool bar and clicking on the adjoining arrow button.
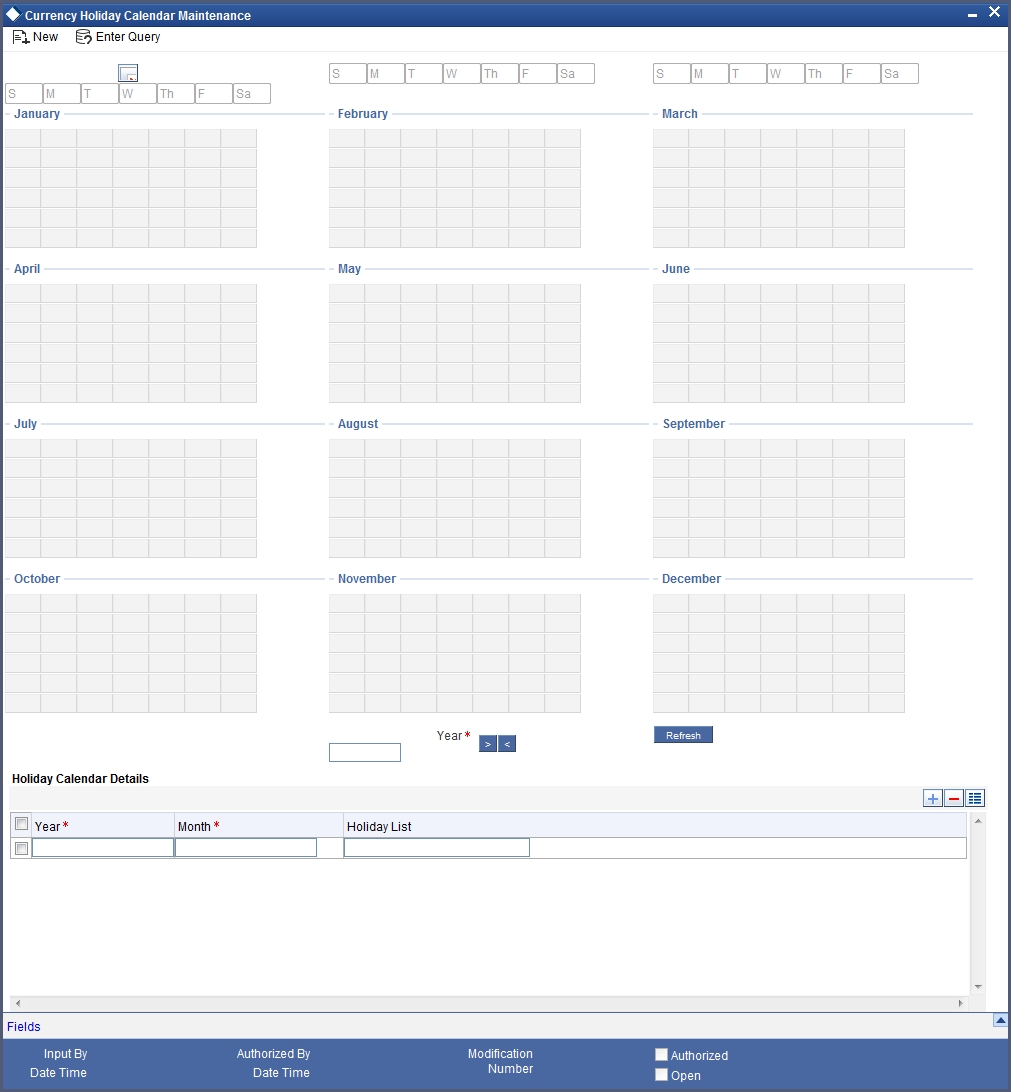
At the time of booking a CLS deal, the system will use the CLS Bank holiday calendar to check if the value date of the contract falls on a holiday. If the value date falls on a holiday, the deal will not be saved as a CLS deal. The system will process it as a normal FX transaction.
7.2.7 Specifying UDF Values
You can associate values to all the User Defined fields created and attached to the ‘CLS Bank Holiday Calendar Maintenance’ screen.
You can view the list of User Defined fields associated to this screen by clicking ‘Fields’ button on the ‘CLS Holiday Calendar Maintenance’ screen.
You can enter the value for the UDFs listed here in the ‘Value’ column.
For more details on how to create user Defined fields, refer chapter ‘Creating custom fields in Oracle FLEXCUBE’ in the User Defined Fields User Manual under Modularity.
7.2.8 Maintaining the participant type for CLS customers
After you identify a customer to be a CLS participant, you have to specify the type of relationship the customers/financial institutions have with the CLS bank. This can be done through the ‘CLS Directory’ available in the Application Browser.
You can invoke the ‘Continuous Linked Settlement Bank Directory Maintenance’ screen by typing ‘FSDBICDI’ in the field at the top right corner of the Application tool bar and clicking on the adjoining arrow button.
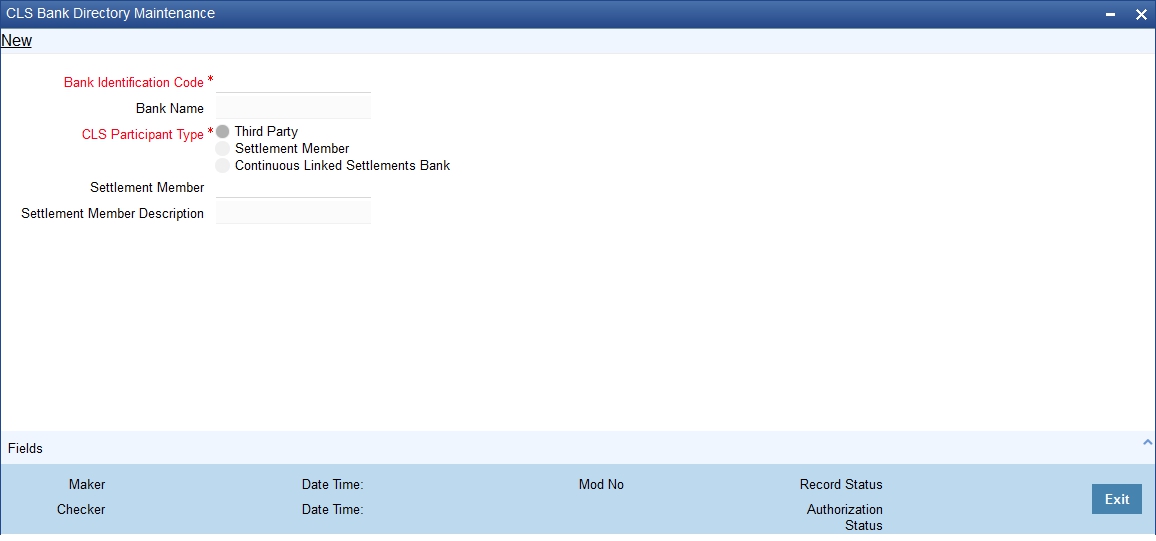
Specify the following details.
Bank Identification Code
You have to select the BIC of the CLS party to determine the participant type. On selection of the BIC, the name of the customer is displayed alongside.
CLS Participant Type
You can identify a CLS party as a ‘Direct’ or an ‘Indirect’ participant. The system will use the participant type as a criterion to determine the CLS eligibility of an FX deal. The participant type can be one of the following:
- Third Party – If the participant type is ‘Third Party’, the customer will be required to subscribe to the CLS bank via a Settlement Member. In this type, the party will be indirectly associated with the CLS bank.
- Settlement Member – In this type, the customer will be a direct CLS participant.
- CLS Bank – This will identify the customer as the ‘CLS Bank’. The BIC for the CLS bank will be maintained as ‘CLSBUS33’.
Settlement Member
As stated above, if the participant type is defined as ‘Third Party’, the CLS deals will be processed via a settlement member. You have to select the BIC of the Settlement Member in this field. The name of the member will be displayed alongside.
7.2.9 Specifying UDF Values
You can associate values to all the User Defined fields created and attached to the CLS Directory screen. You can view the list of User Defined fields associated to this screen by clicking ‘Fields’ button on the ‘CLS Directory’ screen.
You can enter the value for the UDFs listed here in the ‘Value’ column.
For more details on how to create user Defined fields, refer chapter ‘Creating custom fields in Oracle FLEXCUBE’ in the User Defined Fields User Manual under Modularity.
7.2.9.1 Uploading CLS Directory Information to Oracle FLEXCUBE
You can automatically upload the CLS Directory information from an external source on to Oracle FLEXCUBE. The uploaded data will be populated in the ‘CLS Directory’. You can specify the upload details in the ‘CLS Bank Directory Upload’ screen invoked from the Application Browser.
You can invoke the ‘Bank Directory Upload’ screen by typing ‘FSDBICUP’ in the field at the top right corner of the Application tool bar and clicking on the adjoining arrow button.
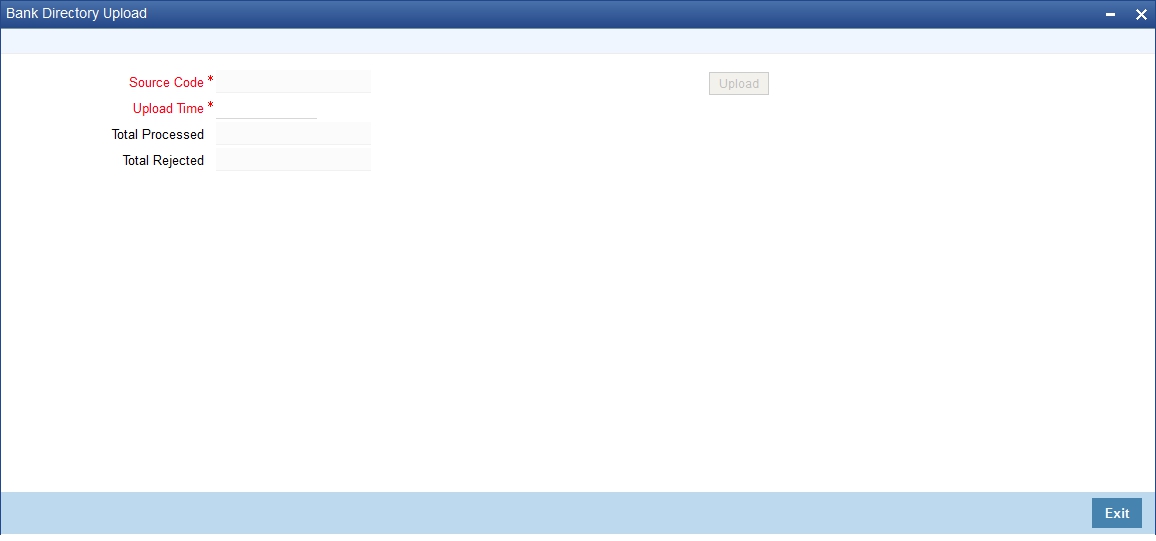
Specifying the Upload Source and Date
You can select the source from which you want to upload the details into Oracle FLEXCUBE from the option-list provided.
It is assumed that the upload source contains details of all relevant BIC codes. The BIC records that are uploaded to Oracle FLEXCUBE should contain the following tags:
- U - indicating that the record should be updated
- D - indicating that the record should be deleted
- N - indicating a new record
BIC addresses that have changed will be appropriately updated. Addresses bearing the tag ‘D’ will be automatically deleted. New BIC records will be created for records that bear the tag ‘N’.
You can also specify the date as of which data was written into the upload tables of Oracle FLEXCUBE.
Click ‘Upload’ button to start the upload of BIC Codes from the selected source. After the upload is complete, the following details are displayed:
- The total number of records that were processed and
- The number of records that were rejected.
7.2.10 Maintaining Settlement Instructions for CLS Deals
You can maintain the settlement preferences for a customer in the ‘Settlement Instructions Maintenance’ screen. You can invoke the ‘Settlement Instructions Maintenance’ screen by typing ISDINSTN’ in the field at the top right corner of the Application tool bar and clicking on the adjoining arrow button.
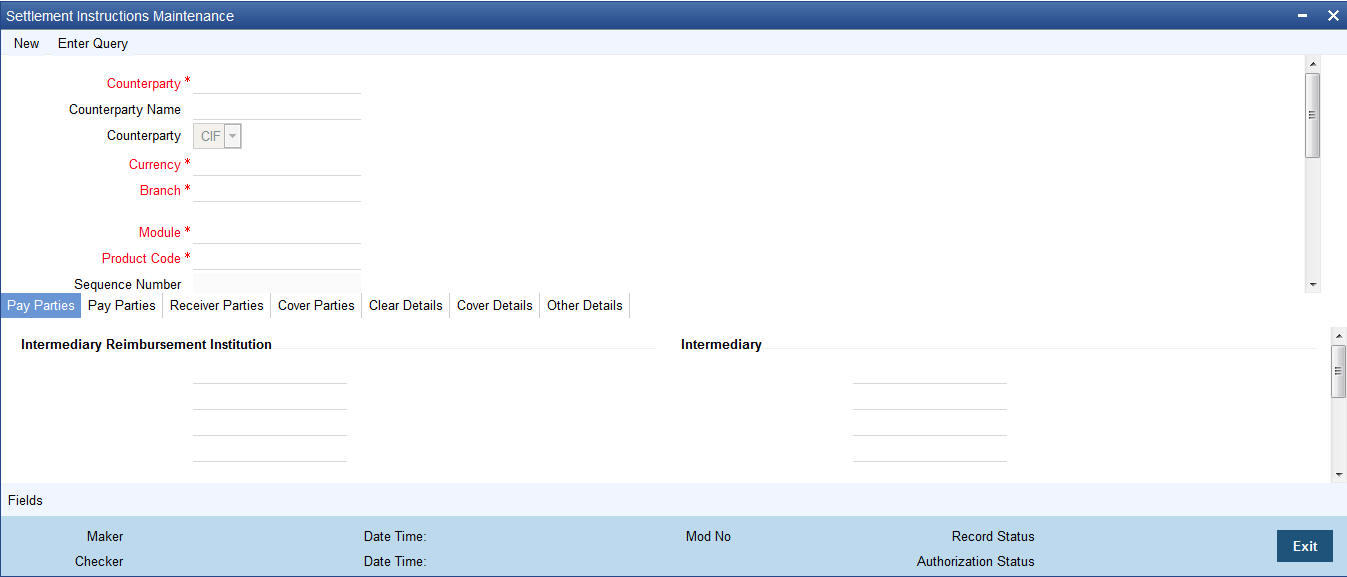
You have to maintain the settlement instructions exclusively for CLS deals. For this, you have to select the module ‘FS’ (FX Settlements) which will indicate that the instructions are applicable to CLS deals alone.
For the ‘FS’ module, the system will perform the following validations:
Counterparty Type
The counterparty is of the ‘CIF’ type.
Counterparty
The counterparty is a specific customer who is identified as a ‘CLS Participant’ (in the ‘Customer Information Maintenance’ screen). You cannot select the counterparty ‘ALL’ in this case.
Currency
The currency is a specific currency, which is eligible to participate in CLS deals (this is defined in the ‘Currency Definition’ screen). In addition, the currency should be allowed for the counterparty and the CLS participant branch. The CLS Currency Restrictions maintained for the customer will be used to verify the same.
Product Code
If you have selected a specific product, it should necessarily be an ‘FX’ product. Otherwise, the product should be ‘ALL’.
Branch
The branch that you select is identified as a ‘CLS Participant’ (in the ‘FX Branch Parameters – CLS Preferences’ screen). This validation will not be applicable if you select the branch code as ‘ALL’.
Parties
The different parties involved are maintained in the ‘CLS Directory’.
Settlement Instruction Description
Enter a description for the Settlement Instruction.
Settlement Sequence Number
The system displays the Settlement Sequence Number by default on the click of the Save icon.
Note
When multiple settlement instructions are maintained for the same combination of keys, it is useful to have a settlement instruction description. The settlement instruction description that you specify here is displayed in the list of values for settlement details during contract booking.
7.2.10.1 Specifying the Pay/Receive accounts for CLS deals
The debit and credit accounts maintained for the module ‘FS’ and ‘CLS Currency’ combination will be referred to as the ‘Control Accounts’ and will be debited/credited on liquidation of a CLS FX deal. Entries will be posted to the Control Accounts at the individual deal level. On receipt of pay-out/pay-in advice from the settlement member, you can pass a net entry to the Control Account and post the other leg to the Real CLS Nostro account.
Refer the Settlements User Manual for more information on maintaining settlement instructions for customers.
7.2.11 Maintaining Alert Preferences for CLS deals
You can maintain an alert group for a specific CLS Status. The alert will be generated for the selected group of users alone. The ‘CLS Alert Group’ screen is used for this purpose.
You can invoke the ‘CLS Alert Group Maintenance’ screen by typing ‘FSDALRTG’ in the field at the top right corner of the Application tool bar and clicking on the adjoining arrow button.
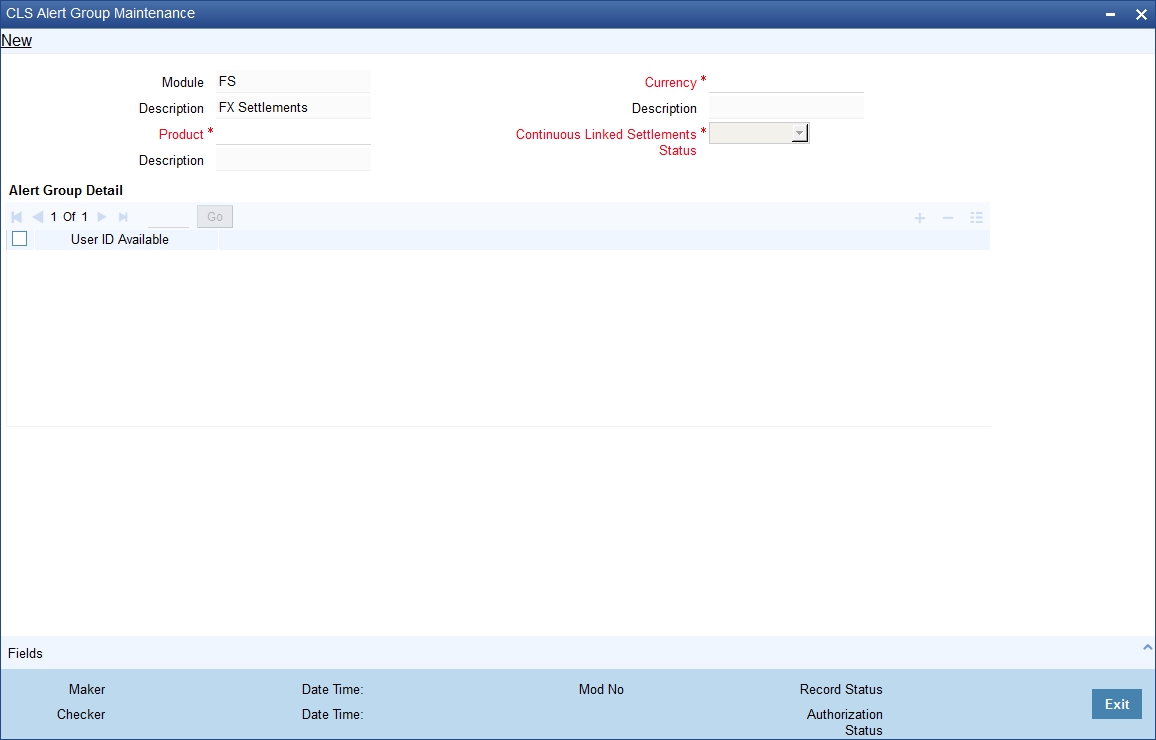
The alert group is defined for a combination of Branch, Module, Product, Currency, and CLS Status. The values of the fields should be as follows:
Module
This defaults to ‘FS’ (Foreign Exchange Settlements).
Product
Select a specific product or else ‘ALL’.
Currency
Select a specific currency or ‘ALL’
CLS Status
The CLS Status for which you require the alert. If the status of a CLS deal or an alleged trade is updated to the CLS status maintained in CLS Alert ZGroup Maintenance, the system generates an alert to the specific users.
User Id Available
From the available list of user ids (the list will contain only those user ids, for which the CLS participant branch is the home branch), you have to select the users who have to receive the alert for any deal that is with the above status. You can select the users whose home branch is the CLS participating branch itself. The selected users will receive alerts for deals with the CLS status maintained.
The product and currency combination should be as follows:
Product |
Currency |
Specific |
Specific Bought/Sold |
Specific |
ALL |
ALL |
ALL |
ALL |
Specific Bought/Sold |
You can retrieve the alerts from ‘Unprocessed Alert Browser’ on Oracle FLEXCUBE.

From this browser, you can manually select an alert and process it. Use the checkbox adjoining an alert and click ‘Process’ button. Processed records will not be displayed on the browser anymore.
7.2.12 Specifying UDF Values
You can associate values to all the User Defined fields created and attached to the ‘CLS Alert Group’ screen. You can view the list of User Defined fields associated to this screen by clicking ‘Fields’ button on the ‘CLS Alert Group’ screen.
You can enter the value for the UDFs listed here in the ‘Value’ column.
For more details on how to create user Defined fields, refer chapter ‘Creating custom fields in Oracle FLEXCUBE’ in the User Defined Fields User Manual under Modularity.
7.2.12.1 The Alert Generation Process
The system will check the CLS Status Browser for any deals with ‘CLS Status’ as maintained in the ‘CLS Alert Group’ screen. If the specified Deal Status is ‘Rescinded’ or ‘Failed’, only ‘Active’ deals with the specified status will be considered.
If any deal is found, the deal reference and status details will be inserted into a table to be picked up for displaying to the selected group of users. The users will receive the alert on their screens if they are logged into Oracle FLEXCUBE.
7.3 CLS deal
This section contains the following topics:
- Section 7.3.1, "Processing a CLS deal"
- Section 7.3.2, "Checking the CLS Eligibility of an FX deal"
- Section 7.3.3, "Processing a CLS deal as a non-CLS deal"
- Section 7.3.4, "Processing a CLS deal"
- Section 7.3.5, "Message Generation for CLS deals"
7.3.1 Processing a CLS deal
You can process a CLS deal in the ‘FX Contract’ screen. You can invoke the ‘Foreign Exchange Contract Input’ screen by typing ‘FXDTRONL’ in the field at the top right corner of the Application tool bar and clicking on the adjoining arrow button.
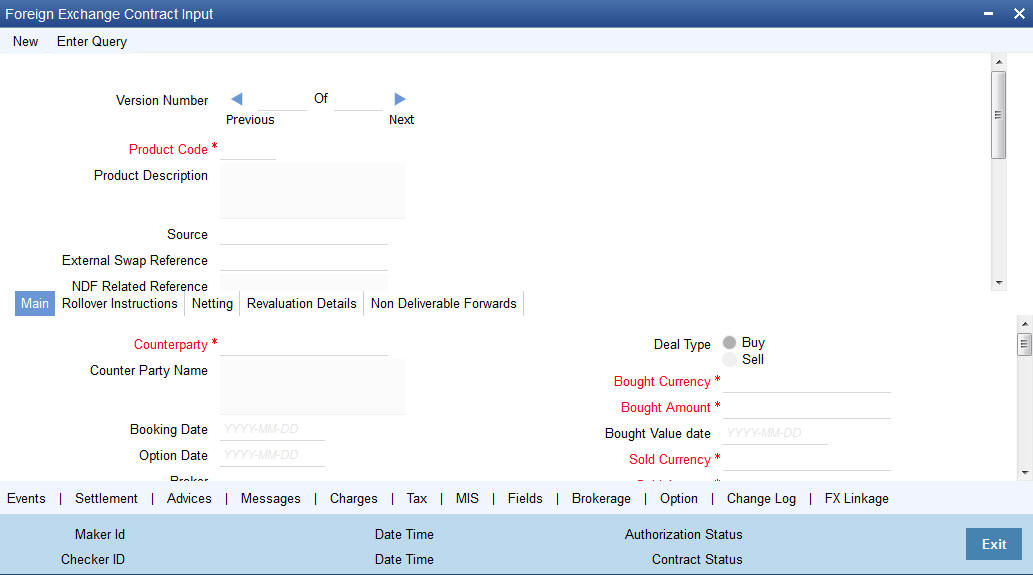
The CLS eligibility of an FX deal will be automatically determined by the system. Further, you also have the option of excluding a CLS eligible deal from the CLS scheme and processing it as a non-CLS deal. You have to select the ‘Exclude From CLS’ option to do this.
7.3.2 Checking the CLS Eligibility of an FX deal
The system will automatically mark an FX deal as ‘CLS Eligible’ if the contract satisfies the required eligibility criteria. Three levels of check will be performed before qualifying a contract as a CLS deal.
The criteria for each level are discussed below:
7.3.2.1 First Level Validations
The first level check will ensure the following:
- The branch is identified as a ‘CLS Participant’.
- The sold and bought currencies are identified as ‘CLS currencies’.
- The CLS currency details are maintained for the Branch + Bought Currency and Branch + Sold Currency combinations.
- The customer of the contract is a CLS participant who is allowed to deal in both the bought and sold CLS currencies.
- The value date of the contract should be a working day for both the currencies as per the Currency Holiday Calendar and the CLS Bank Holiday Calendar.
- The ‘Exclude From CLS’ option is not selected for the contract.
The following validations will be performed for CLS Settlement Instructions:
- The module is ‘FS’.
- The product is a specific FX product.
- The currency is a ‘CLS Currency’.
- The counterparty is a ‘CLS Participant’.
If the first level check fails, the contract will not qualify to be processed as a CLS deal and will be saved as non-CLS (the ‘CLS Eligible’ option will remain unchecked). The system will process the deal with module as ‘FX’.
7.3.2.2 Second Level Check
The second level check will be performed only if the first level check is successful.
Settlement Parties validations for the ‘Sold’ side of the deal
During the check, the system will verify the following:
- The Delivery Agent (Field 53) is the BIC of the Settlement Member as maintained in the ‘FX Branch Parameters – CLS Preferences’ screen.
- If the participant type of the counterparty is ‘Third Party’ or if the party is a CLS Participant but not maintained in the ‘CLS Directory’, then the Intermediary (Field 56) is the BIC of the CLS Bank as maintained in the CLS Directory (for CLS Participant Type ‘CLS Bank’).
- If the counterparty is a Settlement Member, then the Receiving Agent (Field 57) is the BIC of the CLS bank as maintained in the ‘CLS Directory’ (for CLS Participant Type ’CLS Bank’).
- If the counterparty is a ‘Third Party’ participant, then the Receiving Agent is the BIC of the Settlement Member for the ‘Third Party’ as maintained in the ‘CLS Directory’. The Intermediary will be the BIC of the CLS Bank.
- If the counterparty is a ‘CLS Participant’ but not maintained in the ‘CLS Directory’, then the Receiving Agent/Account with Institution is maintained in the ‘CLS Directory’. The Intermediary is the BIC of the CLS Bank.
Settlement Parties validations for the ‘Bought’ side of the deal
The following verifications will be done by the system:
- The Delivery Agent (Field 53) is same as Field 57 of the ‘Sold’ side.
- The Intermediary (Field 56) is the BIC of the CLS Bank as maintained in the ‘CLS Directory’ (for CLS Participant Type ’CLS Bank’).
- The Receiving Agent (Field 57) is the BIC of the Settlement Member as maintained in the ‘FX Branch Parameters – CLS Preferences’ screen.
If the second level check fails, the system will display the over-ride message as “‘This will not be saved as a CLS Deal. OK to proceed?”
- If you choose ‘OK’, the system will proceed with the deal with module as FX. There will be no settlement re-pickup in this case.
- If you ‘CANCEL’ the over-ride, you have the option to make the required corrections so as to satisfy the second level check.
On successful completion of the second level check, the deal will be marked as ‘CLS Eligible’.
The following tables list the settlement fields, for deals between the Third Party (Oracle FLEXCUBE Branch) and different counterparty types:
Deal between the Third Party and Counterparty type
‘Settlement Member’
Settlement Field |
Field Value |
Sender |
Ourselves (Third Party) |
Receiver |
Counterparty (Settlement Member) |
Bought Side |
|
53 (Delivery Agent) |
CLSBUS33 (obtained from the CLS Directory for CLS Participant Type ’CLS Bank’. |
56 (Intermediary) |
CLSBUS33 |
57 (Receiving Agent) |
BIC of the Settlement Member as maintained in the ‘FX Branch Parameters – CLS Preferences’ screen. |
Sold Side |
|
53 |
BIC of the Settlement Member as maintained in the ‘FX Branch Parameters – CLS Preferences’ screen. |
57 |
CLSBUS33 |
Deal between the Third Party and Counterparty type ‘Third Party’
Settlement Field |
Field Value |
Sender |
Ourselves (Third Party) |
Receiver |
Counterparty (Third Party) |
Bought Side |
|
53 |
BIC of their Settlement Member. |
56 |
CLSBUS33 |
57 |
BIC of the Settlement Member as maintained in the ‘FX Branch Parameters – CLS Preferences’ screen. |
Sold Side |
|
53 |
BIC of the Settlement Member as maintained in the ‘FX Branch Parameters – CLS Preferences’ screen. |
56 |
CLSBUS33 |
57 |
BIC of their Settlement Member. |
Deal between the Third Party and Counterparty type
‘CLS Participant’ where the counterparty neither a
Settlement Member or a Third Party
Settlement Field |
Field Value |
|
Sender |
Ourselves (Third Party) |
|
Receiver |
Counterparty (CLS Participant) |
|
Bought Side |
||
53 |
BIC of their Settlement Member/Third Party BIC. |
|
56 |
CLSBUS33 |
|
57 |
BIC of the Settlement Member as maintained in the ‘FX Branch Parameters – CLS Preferences’ screen. |
|
Sold Side |
||
53 |
BIC of the Settlement Member as maintained in the ‘FX Branch Parameters – CLS Preferences’ screen. |
|
56 |
CLSBUS33 |
|
57 |
BIC of their Settlement Member /Third Party BIC. |
|
7.3.2.3 Third level validations
The third level check will be performed only if the first and second levels checks are successful. As part of this check, for trades done on the trade cut-off date, the system will verify the trade cut-off times defined for both the bought and sold currencies of the deal and consider the earlier of the two as the actual cut-off time for the deal.
If the third level check is not satisfied, the system will display the override message as “Cut-off time has passed for CLS currency”.
If you select ‘OK’ and ignore the message, the deal will be saved as a CLS deal. Otherwise, it will be considered as a non-CLS deal.
7.3.3 Processing a CLS deal as a non-CLS deal
You can process a CLS eligible deal as a non-CLS deal by selecting the ‘Exclude From CLS’ option at the time of capturing the contract details in the ‘FX Contract’ screen. In this case, the contract will be processed as a normal FX contract.
7.3.4 Processing a CLS deal
For CLS eligible deals, where the ‘Exclude From CLS’ option is not selected, the system will perform the following as part of deal processing:
- The SGEN event (Settlement Message Generation) will be suppressed for CLS eligible deals. The Payment and Receive messages, the Debit and Credit advices will also be suppressed.
- The CLS deals will not form part of the ‘Netting Agreement’ and hence will be excluded from the FX netting process, both auto and manual.
- The accounting entries will be posted to the Control Accounts at the individual deal level.
- When you save the contract, the system will check whether the Settlement Accounts are ‘CLS Control Accounts’ (the Pay/Receive accounts maintained for the module ‘FS’).
- Settlement instructions with module ‘FS’ will be picked up selectively for the amount tags ‘SETBOTAMT’ (Bought Settlement Amount) and ‘SETSOLDAMT’ (Sold Settlement Amount).
- During amendment, if a CLS deal becomes a non-CLS deal, the system will display an error message. Amendment of CLS deals will be allowed only if the CLS Status is ‘Matched’ or ‘Un-matched’.
- In the case of New, Amend and Reverse operations, the CLS Status will be updated as ‘Un-matched’.
Note
The system liquidates both matched and unmatched CLS deals on the value date.
7.3.4.1 Processing uploaded deals
In the case of uploaded contracts, if the first level check fails, the deal will get uploaded as a Non-CLS deal. If the second and third level checks fail, the upload also fails and an error message will be displayed to notify the same. Upload of CLS deals will happen successfully if all the three levels of checks are satisfied.
7.3.5 Message Generation for CLS deals
If you have maintained multiple FX Confirmation Message types for the ‘SWIFT’ Media across different locations for a customer (in the ‘Customer Address: Detailed’ screen), the T-Copy will be sent to the ‘Primary Address’ of the counterparty.
However, this option is available only for the message type ‘FX_CONFIRMN’.
Refer the chapter titled ‘Maintaining Addresses for a Customer’ in the Messaging Systems User Manual for more details.
7.3.5.1 Generation of the FS Confirmation Message for CLS deals (MT304)
The MT 304 will be generated automatically upon authorization of an FX deal if the following conditions are satisfied:
- The deal is CLS Eligible and the ‘Exclude From CLS’ option is not checked for the deal.
- You have not maintained the SWIFT primary address for the counterparty with message type as ‘FX CONFIRMN’, OR
- The ‘T-Copy Required’ option is not selected at the branch level.
If the above conditions are satisfied, MT 304 will be generated in addition to MT 300 (FX Confirmation Message). Depending upon the operation performed, whether you have captured a new deal, amended an existing deal or cancelled a deal, one of the following MT304 Message Types will be generated.
- FS_FMCONF_NEW – For a new deal
- FS_FMCONF_AMND – When a deal is amended
- FS_FMCONF_CANC – On cancellation of a deal
Note
If you have not maintained a primary address for the counterparty, the message will be put into repair.
The following table lists the fields that are different between MT300 and MT304. It also identifies the fields that are mandatory for MT304.
Fields |
MT300 |
MT304 |
MT304 Value |
94A |
Optional AGNT/BILA/BROK |
Mandatory ASET/AFWD |
ASET |
83 |
Optional |
Mandatory |
83A:<Sender BIC> |
87/82 |
Mandatory if 94A exists |
Mandatory |
Same as MT300 |
24D |
<Confirmation Info> |
Field not allowed |
- |
88A |
Optional (Broker Id) |
Field not allowed |
- |
72 |
- |
<Same as 24D + 88A of MT300> |
BROKER/PHON/TELEX/ELEC |
22C |
Mandatory |
Field not allowed |
- |
53 |
Optional |
Mandatory as 'Delivery Agent' |
Same as field 57 of Sold Side |
The ‘Receiver’ of MT304 will be the BIC of the ‘Settlement Member’ defined for your branch which is a CLS participant of the ‘Third Party’ type. MT304 will be always sent to this Settlement Member. MT300 will always be sent to your counterparty.
The processing workflow is explained in the annexure provided at the end of this chapter.