7. Defining Interest and Charge Products
This chapter contains the following sections:
- Section 7.1, "Interest and Charges Product Maintenance"
- Section 7.2, "Transaction Codes for Processing External Charges"
- Section 7.3, "Booking of External Charges"
7.1 Interest and Charges Product Maintenance
This section contains the following topics:
- Section 7.1.1, "Invoking Interest and Charges Product Maintenance"
- Section 7.1.2, "Preference Button"
- Section 7.1.3, "Specifying Preferences for Charges Product"
- Section 7.1.4, "Charge Basis in Oracle FLEXCUBE"
- Section 7.1.5, "Status Maintenance Button"
- Section 7.1.6, "Fields button"
- Section 7.1.7, "Accounting Roles Button"
- Section 7.1.8, "Events Button"
- Section 7.1.9, "UDE Limits Button"
- Section 7.1.10, "Restrictions Button"
- Section 7.1.11, "Preferences for Consolidated Charges Products"
- Section 7.1.12, "Charge Product Application on an Account"
- Section 7.1.13, "General Condition"
- Section 7.1.14, "Special Condition"
7.1.1 Invoking Interest and Charges Product Maintenance
In this chapter, we shall discuss the manner in which you can define attributes specific to an Interest or Charges product. You can create an interest or charges product in the ‘Interest & Charges - Product Maintenance’ screen. You can invoke the ‘Interest & Charges Product Maintenance’ screen by typing ‘ICDPRMNT’ in the field at the top right corner of the Application tool bar and clicking the adjoining arrow button.
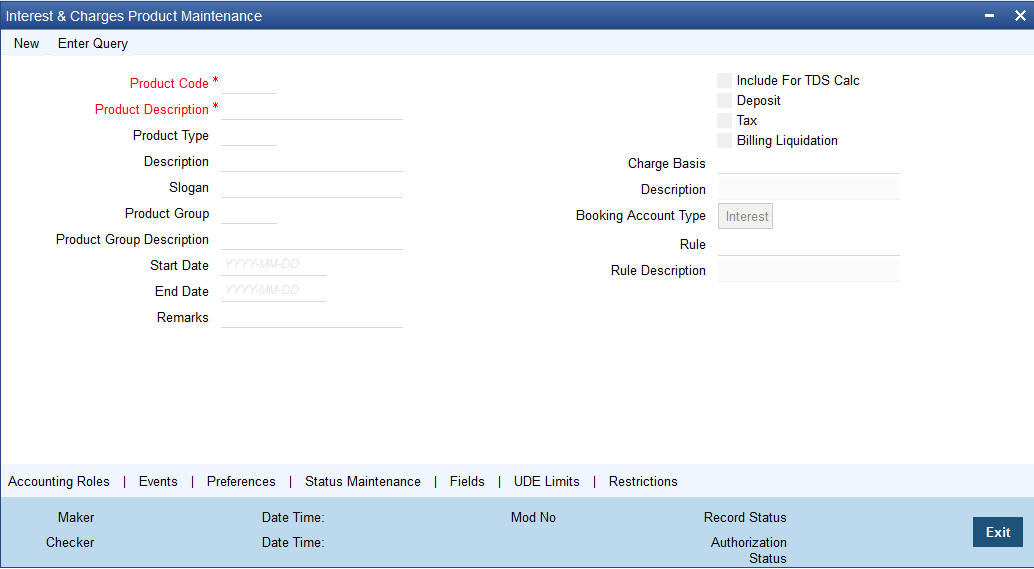
For any product you create in Oracle FLEXCUBE, you can define generic attributes, such as branch, currency, and customer restrictions, accounting roles and heads, etc., by clicking on the appropriate icon in the horizontal array of icons in this screen. For an interest or charges product, in addition to these generic attributes, you can specifically define other attributes. These attributes are discussed in detail in this chapter.
You can define the attributes specific to an interest and charges product in the Interest and Charges Product maintenance Main screen and the ‘Interest and Charges – Interest Product Preferences’ screen. In these screens, you can specify the product type and set the product preferences respectively.
For further information on the generic attributes that you can define for a product, please refer the following Oracle FLEXCUBE User Manuals:
- Products
- Settlements
Product Code
The code of the product, for which you are defining preferences, is displayed in this field.
Description
Give an appropriate description for the Product Code defined.
Product Type
First of all, you should specify the type of product that you are creating. You can either create:
- Interest
- Charges/Allowances
- Consolidated Charges
Interest Products
If you are creating an interest product, you must link the product to an Interest Rule that you have already maintained (To recall, an Interest Rule identifies the method in which interest is calculated). When you apply this interest product on an account (or account class), interest will be calculated for the account according to the method specified for the Interest Rule.
When you link an Interest Rule to the product, the description of the rule will be displayed.
Additionally, you have the option to specify whether the interest product has to be considered for TDS (Tax Deducted at Source) calculation or not. To indicate that the product is to be used for computation of TDS, click ‘Include for TDS Calc’ in the Product Definition screen for the Interest product you are maintaining. In case you do not want to use a particular interest product to compute TDS, leave the box unchecked.
Charges/ Allowances Products
If you are creating a Charge product, you must specify the basis on which you want to apply the charge.
Refer the section ‘Charge Basis in Oracle FLEXCUBE’ in this manual for more details on various types of charge basis available in Oracle FLEXCUBE.
After you have specified the basis on which you would like to levy the charge, you have to specify the liquidation related details for the charge product, the account classes on which the product should be applied, the frequency of liquidation, the amount or rate of charge to be applied, amongst other details. You specify these details in the Product Preferences screen.
Note
The ‘preferences’ screen that will be displayed during product definition will be either interest preferences or charge preferences, based on the product type. All the other screens are the same for both Interest and Charge products.
Consolidated Charges Products
To set up a charge product that would be used for consolidating charges applicable for accounts under an account class, you can select Consolidated Charge as the Product Type, in the ‘Interest and Charges Product maintenance’ screen.
Slogan
Enter a slogan for the product that you are creating. In the Slogan field enter a slogan that suitably announces the product to your customers.
Product Start Date
When you create a product, you must also specify a date from which it can be used. This date is called the product ‘Start Date’. The start and end dates of a product come in handy when you are defining a product for a scheme, which is open for a specific period.
Product End Date
Indicate an expiry date for a product that you create. The expiry date is referred to as the product end date. You cannot use a product beyond the specified expiry date.
If you have attached the expired product at the account level, on save, the system displays the override message as, “The product has expired.”
Note
If you do not specify an ‘End Date’, the product can be used until it is closed.
If you have enabled the check box ‘Include for TDS Calc’ for the IC product, you can maintain the IC product as a Tax or Non Tax product. Choose the ‘Tax’ option in the Product Type to define the IC product as a Tax product. This allows you to calculate, deduct and view the TDS for the accounts belonging to this product. No accounting entries are available for IACR (Interest accrual) since no accrual is done for the Tax products.
The rule for calculating the interest for TDS and booking is computed using the following two formulas:
Formula 1: Non-Booked No accruals required
TOT_INT_AMOUNT > TDS_LIMIT INTEREST_AMOUNT*TAX_RATE
Formula 2: Booked no accruals
GREATEST [(FORMULA1-TDS_AMOUNT) 0]
You have to maintain the TDS_LIMIT and TAX_RATE UDE's at the rule level for each product, account class, currency and effective date combination.
Note
In case you have defined the IC product as a Tax product, then the ‘Deposit’ check box will be disabled.
In case the Tax check box is left unchecked, the IC product for which you have enabled ‘Include for TDS Calc’ option will be treated as a non-tax product. The credit interest for the account will be calculated and booked using such non-tax products.
For details on setting SDE’s for computing TDS, refer to the section ‘Maintaining SDE for TDS’ under the chapter Maintaining System Data Elements in this (Interest and Charges) user manual
Charge Basis
If you are creating a Charge product, you must specify the basis on which you want to apply the charge. You can choose to apply charges on the basis of any of the following:
- NUM-ACCT-STMTS (Number of Account Statements): You can fix the number of free account statements for a liquidation cycle. For every extra account statement that you issue, you can levy a charge.
- NUM-CHQ-RET (Number of cheques returned): Every cheque that bounces is recorded in the Cheques Returned file. You can charge a penalty on every bounced cheque.
- NUM-CHQ-ISS (Number of cheques issued): For every extra cheque leaf issued, you can levy a charge.
- NUM-STOP-PAY (Number of Stop Payments): You can levy a charge for every stop payment instruction.
- TURNOVER (Total turnover): You can charge on the basis of the turnover in an account. You can opt to levy charges on turnovers exceeding a ‘free amount’ that you specify in the Charge Product Preferences screen.
- ITEM-COUNT (Number of transactions): If the number of transactions during a liquidation cycle exceeds a certain number, you can levy a charge.
- ADHOC-STMT (Number of ad-hoc Account Statements): Account statements are normally generated at a specific frequency. If you generate an out of turn statement, you can levy a charge.
- NET-TURNOVER-DR (Dr Turnover): You can charge a customer on the basis of the debit turnover in an account. This will return a value if the account is in debit else zero will be returned.
- NET-TURNOVER-CR (Cr Turnover): You can also charge a customer based on the net credit turnover in the account. (Sum of all credits – the sum of all debits) = net credit turnover. This will return a value if the account is in debit else a value of zero will be returned. Turnovers will be applied on an account only if the transaction code associated with the credit entry is defined with ‘IC Balance Inclusion’ option.
- EXTCHG (External Charge): You can charge the customer on the basis of the turnover of external transactions with a charge rate as 1.The turnover is always in the account frequency.
- ACCOUNT-OPENING: You can charge the customer at the time of opening an account.
- NUM-COMB-STMTS: You can charge a customer based on the number of combined statements generated during EOD Batch statements. However, this is not applicable for adhoc statements.
- LINE-CREATION: You can define the charge product with charge basis as LINE-CREATION and periodicity as daily to achieve service fee for facility sanctioning.
- LINE-INCREASE: You can define the charge product with charge basis as LINE-INCREASE and periodicity as daily to achieve service fee for facility increase.
- LINE-EXPIRY: You can define the charge product with charge basis as LINE-EXPIRY and periodicity as daily to achieve service fee for facility expiry.
- LINE-RENEWAL: You can define the charge product with charge basis as LINE-RENEWAL and periodicity as daily to achieve service fee for facility renewal.
- MINIMUM-CHARGE: You can define the charge product with charge basis as MINIMUM-CHARGE to collect minimum maintenance charge based on the periodicity of the product. The slab amount maintained for the product should be same as minimum charge amount.
Note
To count the turnover and number of transactions, you can use the transaction code with the check boxes 'IC Transaction Count' and 'IC Turnover Inclusion' checked. Also, you need to maintain the transaction code at the 'Interest Product Preferences' screen.
Deposits
The interest that applies on time deposits may vary with every deposit product you offer. In Oracle FLEXCUBE, interest on a time deposit (and balance type accounts) is calculated on the basis of the Interest Rules and Interest Products that are associated with the deposit account.
To calculate and apply interest on a time deposit you have to set up an Interest product in the IC module. Interest products are set up in the IC Product Definition screen. Indicate that the IC product you are creating applies on deposit accounts by choosing the ‘Deposit’ option in the Product Type.
Note
For a deposit type Interest product, you have to specify the Unclaimed Deposits GLs that should be used to move the principal and interest amounts of unclaimed deposits. The Accounting Roles for the GLs are ‘PRN_UNCLAIMED’ and ‘INT_UNCLAIMED’ respectively. In the Accounting Role Definition screen, you have to ‘map’ these roles to the appropriate Miscellaneous Credit GLs maintained. In addition, in the IC Product Events screen, you have to specify the accounting entries for the event ‘MAT’. For this event, you have to specify all possible accounting entries that will be passed, including the movement of unclaimed deposits to the respective GLs.
Tax
Interest products can also be used for computing the TDS (Tax Deducted at Source) on the interest earned for a customer. In Oracle FLEXCUBE you can compute TDS only for savings, current and TD accounts. However this facility is not applicable for deposits booked under the Loans.
Booking Account Type
Identify the Booking Account Type depending on the IC product type you are creating.
If the Booking Account Type is ‘Interest’, the Interest and Charge will be liquidated into the Interest Booking Account maintained in the IC Special Conditions Maintenance screen. However, if the Booking Account Type is ‘Charge’, the Interest/Charge will be liquidated to the Charge Booking Account that you identify in the IC Special Conditions Maintenance screen.
Billing Liquidation
Charge products can also be used for billing liquidation on the charges levied for a customer. In Oracle FLEXCUBE, all the charge products specified for billing liquidation will not be liquidated during the IC EOD process but will be processed during the invoice generation maintained for the consolidated billing product. As a result, the system handles the EOD processing separately for billing products and non billing products.
An unchecked box will indicate that the product is a non billing product.
Note
The Billing Liquidation check box is applicable only for charge products and consolidated charge products.
Remarks
Enter information about the product intended for your bank’s internal reference, in this screen. This information will not be printed on any correspondence with the customer.
The remarks are displayed when the details of the Interest or Charge product is displayed or printed.
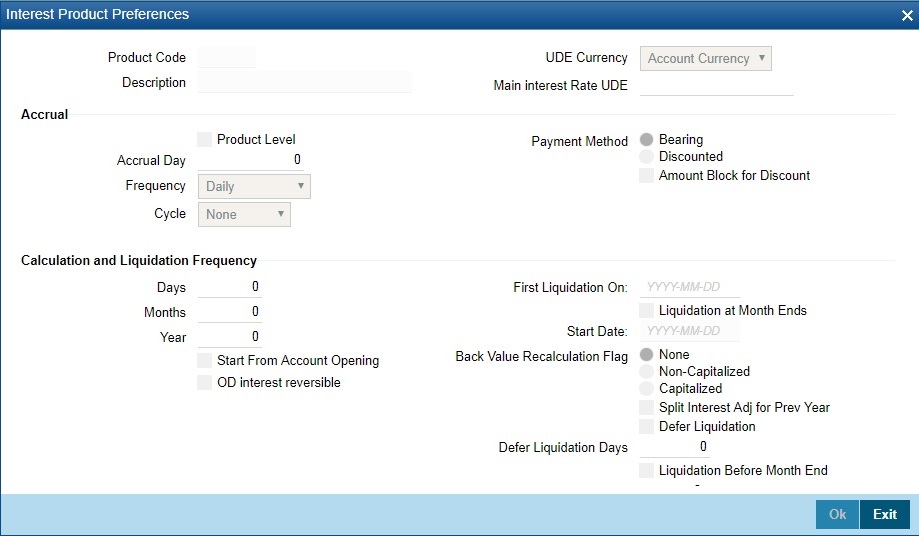
7.1.2 Preference Button
While creating an interest product, you identify one rule or interest calculation method that you would like to use to calculate interest for the product. In linking a product to a rule, you identify how the principal, period and rate components are to be picked up from accounts on which the product should be applied. You are yet to identify the accounts, or account classes, on which you would apply the product.
In the Interest Product Preferences screen specify the interest accrual and liquidation details for the product. These specifications are referred to as ‘Preferences’. In addition, you also make the product applicable on an account by linking an account class or an account itself, to the product.
For an interest product you can define the following preferences:
- The account class and currency combination on which you would like to apply the product
- Accrual related details
- Whether accrual entries for all accounts linked to the product should be passed at the product level. If not, they will be passed for each account separately.
- The frequency at which interest should be automatically accrued
- Whether automatic accruals should always take place on a month-end
- Liquidation related details
- The frequency of liquidation
- Whether interest should be applied right from the day the account is opened.
- The date on which the first liquidation should be done for accounts linked to the product.
- Whether automatic liquidation’s should always take place on a month-end.
To invoke the ‘Interest and Charges – Interest Product Preferences’ screen click ‘Preferences’ button from the ‘Interest and Charges Product Maintenance’ screen.
Note
You can apply a product to any number of accounts or account classes. When you apply a product to many account classes, interest for all the accounts will be calculated according to the rule (or the calculation method) to which the product is linked. That is, the principal, period and type of rate (not the numeric value) will be picked up from the accounts in the same manner. Also, the accrual and liquidation details for all the account classes will be the same for all the account classes. You can thus have all the attributes except those of User Data Elements (UDEs) like the rate, tier structure, etc.,. same for accounts belonging to different account classes.
Product Code
The product code, for which you are defining preferences, is displayed in this field.
Main Interest Rate UDE
Specify the interest rate for the product. The adjoining option list displays all the UDE’s available in IC rule linked to that product. You can choose the appropriate one.
Accrual
While building a formula (for the rule to which you have linked the product), if you indicated that the result of the formula is interest that should be accrued, the interest amount for all the accounts linked to the product will be accrued. When defining the preferences for this product, you can choose to pass the accrual entries in the following manner:
- Pass an accrual entry for each account
- Consolidate the interest to be accrued (for individual accounts) and track it against the product.
If you choose the latter option, the cumulative value of all the accruals (for accounts linked to the product) will be passed as a single accounting entry.
Frequency
Let us recall the operations relating to accruals that you have performed so far. When you build an interest rule you define if the result of a formula is to be accrued.
When defining the product (to which you link the rule), you would:
- Identify the GL/SL to which you post the interest accrued (Product Accounting Role Definition screen), and
- Specify that when the event ‘accrual’ occurs you would post the entry to the GL/SL that you identified (Events Definition screen).
Now, the frequency with which you accrue interest for the account classes has to be defined. In the Product Preferences screen, select the accrual frequency from the adjoining drop-down list. This list displays the following values:
- daily
- monthly
- quarterly
- semi-annual
- annual
- on liquidation (accrues only when you liquidate interest)
Periodic accruals for all formulae for which interest has to be accrued will be done during the end-of-day processing, for each account linked to the product. Entries will be passed to the accrual accounts that you have specified while creating the product.
If you have specified that accrual entries have to be passed for a product rather than for individual accounts, a consolidated entry will be passed for the formula, for all the accounts linked to the product. If not, an entry will be passed for each account individually.
Accruals will also be performed whenever there is interest liquidation. For an account on which a liquidation is done out of turn (an ad-hoc liquidation when a periodic liquidation is not due), accrual entries will be passed till the date of liquidation. The next accruals for the account will be done from the next day onwards.
Product Level
If you choose to accrue interest for each account linked to the product, an accrual entry will be posted for each account individually. The account for which the accrual entry is passed will be shown when you retrieve information about an entry. If you opt, however, to accrue interest at the ‘Product Level’, the accrued interest due to a formula for all the accounts linked to the product will be consolidated and a single entry posted for the product. The details of accruals for each account will be available in the Accrual Control Journal, a report generated whenever accruals are performed as part of end-of-cycle processing.
Cycle
If the frequency with which you choose to accrue interest is
- quarterly
- semi-annual
- annual
Specify the accrual cycle vis-à-vis the months. For example, a quarterly cycle may be March, June, September and December, indicating that the accrual should take place in these months. For a half-yearly cycle you would specify June and December.
Accrual Day
For a non-daily accrual frequency, the ‘Accrual Day’ indicates the day of the month on which the accruals have to be carried out. For example, an Accrual Day of 25 indicates an automatic accrual should be done on 25 of the month, as per the frequency.
Accruing only on month-ends
If you have specified that you would like to accrue interest for accounts linked to a product, in cycles of a month or more (that is, every month, quarter, six months or year), you can indicate if the interest is to be accrued on the last working day of the month. If you opt to accrue interest on a month-end, accruals will be carried out every month on the last working day of the month.
Normally, you would want to accrue interest on month ends. To accrue interest on month ends, enter ‘31’ in the Accrual Day field. For months with 31 days, interest will be accrued on the 31st. For months with 30 days, interest will be accrued on the 30th, and for February interest will be accrued on the 28th, or the 29th, as the case may be.
If you enter ‘30’, in the Accrual Day field for example, interest will be accrued on the 30 of the month, till the 30. For February, it will be either 28 or 29, as the case may be. If a month has 31 days, the accruals for the extra day will be done during the next accrual cycle. That is, the 31st of the month will be taken into account when interest is accrued for the next month.
Note that accruals will always be done till the Next Working Day -1 (that is, upto but not including the next working day).
Payment Method
In case of Term deposits, you have to specify whether the payment method for the main interest is to be Bearing or Discounted. This cannot be changed at the time of processing a deposit.
Bearing
In case you choose bearing product as the payment method, the system books the TD without liquidating the interest for the account. The end of day process accrues the interest and at BOD, liquidation will occur based on the maturity date.
Discounted
For discounted products,
- the payment of interest is upfront
- no interest liquidation on maturity date
In case of true discounted, the payment method is calculated based on the formula maintained in the IC rule definition and the interest is calculated based on the formula defined at the rule level.
Note
The rule you define for true discounted products is applied exclusively for the discounted products.
The rule is maintained in the following two ways:
- Formula 1 Non-booked:
DEPOSIT_AMOUNT * TENOR * RATE / 100 * YEAR
The first formula is used for calculating the interest.
- Formula 2 Booked:
FORMULA1 / POWER ((1 + RATE/100), (TENOR/YEAR))
The second formula is used for discounting the result of formula 1.
To define the formula for the rule and to calculate the TD interest, System Data Element (SDE) titled ‘Deposit_Amount’ is used.
Amount Block for Discount
Check this box, if you wish to create amount block on the term deposit account.
Note
- This option is applicable only to ‘Discounted’ Payment Method products.
- This option is applicable only if the ‘Discounted Interest’ option is chosen and interest liquidation account is a savings / current account.
Liquidation Related Details
Just as you defined the accrual related details for account classes linked to a product, you should define liquidation related details as part of preferences for the product.
You can liquidate interest for an account:
- periodically
- on an ad hoc basis
Monthly liquidation of interest on an account is an example of periodic liquidation. When you do not liquidate interest on an account at fixed intervals, the liquidation is referred to as ‘ad hoc liquidation’.
If you opt to liquidate interest periodically, you can automate the liquidation process. The automatic processes that are generated at the end of day will liquidate interest for those accounts that are marked for liquidation.
You can perform an ad hoc liquidation on accounts anytime - even if the accounts are marked for auto liquidation.
Note
You should necessarily liquidate interest before you:
- close an account
- change its account class
- change the calculation account
Calculation and Liquidation
Frequency
The term ‘liquidation frequency’ refers to the interval between successive periodic liquidation’s.
Specify the liquidation frequency for the Interest product that you are creating. You can specify the liquidation frequency in
- days
- months
- years
Frequency
Description
Days
If you want to liquidate interest every 15 days, enter ‘15’. If you want to liquidate interest every 9 days enter ‘09’.
Months
If you want to liquidate interest every month enter ‘01’. If you want to liquidate interest every quarter enter ‘03’.
Years
If you want to liquidate interest every year enter ‘01’.
Interest for the accounts linked to the product will be liquidated automatically according to your specifications, during the end-of-day processing on the day the liquidation becomes due.
To specify ad hoc liquidation for a product, enter a zero for day, month, and year in the liquidation frequency.
Ad-hoc liquidation can be carried out any time on an account, even if it has been defined for automatic liquidation. An ad-hoc liquidation of interest for an account (defined for auto liquidation) will liquidate interest till the date you specify when you carry out ad-hoc liquidation. The subsequent automatic liquidation will be for the remaining days in the liquidation period.
The following example illustrates this point:
Note
For a product, you specify whether the account closing month has to be included for interest application. Whether interest will be applied for the current month during ad hoc liquidation (on 15 April in our example) depends on this parameter for the product. Interest for the current month will be applied during ad hoc liquidation only if the definition is that account closing month should be included for interest application. If not, the next automatic liquidation will process interest for the entire month.
Start Date
The system displays the Start Date based on the First Liquidation Date and the Liquidation Frequency that you specify. The Start Date that is displayed is the First Liquidation Date - the Liquidation Frequency.
For example, if you specified the First Liquidation Date as 31 January 2000, and the Liquidation Frequency as 1 Month, the system will display the Start Date as 1 January 2000.
First Liquidation On
Once the liquidation frequency has been defined, you should specify the First Liquidation Date. The frequency and the date will be used to arrive at the first and subsequent dates of liquidation for the accounts linked to the product.
For example, your quarterly liquidation cycle may be March, June, September and December, and the liquidation is as of the month-end. For such a cycle, you should indicate 31 March as the date of first liquidation during the year. The subsequent dates will be automatically fixed by the system based on the frequency and the first liquidation date.
Similarly
If you want to liquidate on a half-yearly basis - that is, June and December (and on month-ends) - you should specify the date of first liquidation as 30 June 1999. If you want to liquidate interest every two months, that is February, April, June, August, October and December (at the end-of-month), you should specify the date of first liquidation as 29 February 1999. If you want to liquidate interest annually, that is every December (on 31 December), you should specify the first day of liquidation as 31 December, and so on.
The First Liquidation Date thus determines the date on which the first liquidation should be carried out for all accounts linked to a product. Subsequent liquidation dates will be fixed based on this date and the frequency of liquidation.
Start From Account Opening
We have seen how periodic liquidation’s can be fixed to begin on a particular date (First Liquidation Date) and happen at a definite frequency. Instead of giving a First Liquidation Date and bringing all the accounts linked to the product to the same liquidation cycle, you could opt to liquidate interest for accounts, periodically, according to a frequency determined by the Account Opening Date.
For example, the liquidation frequency is defined as quarterly for a product, starting from the Account Opening Date. For each account, the periodic liquidation will fall due a quarter from its Account Opening Date. Thus, there will not be a fixed periodic liquidation date for all accounts linked to the product; it will depend on the Account Opening Date of each account.
Liquidation at month – ends and Days
For a liquidation frequency in months or multiples of a month (for example quarterly, half-yearly, every two months, etc.,) you can specify that liquidation has to be carried out as of the last working day of the month. In this case, you should specify the Liquidation Start Date as the last date of the month from which you would begin liquidation. For example, for a month-end quarterly liquidation beginning March ‘98, you should have the Liquidation Start Date as 31 March ‘98. You should also check the box against ‘Liquidation at month-ends’.
Thus, all the accounts that are linked to a product will have the same liquidation date (fixed using the first liquidation date) and frequency, irrespective of their account opening date. The first ever interest liquidation would, therefore, be for a period that may not reflect the frequency of liquidation for the product.
The following example illustrates this point:
Thus, accounts that were opened anytime during this quarter will have varying number of interest days, depending on the date they were opened.
Also, the month in which the account was opened will be considered for interest application depending on your definition in the Rule Maintenance screen. During subsequent automatic liquidation’s, interest will be applied for a quarter provided there are no ad hoc liquidation’s on an account during the quarter.
Note
If you have selected both ‘Start from Account Opening’ and ‘Liquidation at Month End’ days, then precedence is given to Start from Account opening i.e. Liquidation happens based on the account opening date and not on month ends.
Back Value Recalculation
Select the appropriate ‘Back Value Recalculation’ option from the below list:
- Not Required - If this option is selected, there will be no re-computation of back valued interest.
- Non-Capitalized - If this option is selected, there will be no split in accounting entries or interest and it will not be capitalized during back valued re-computation.
- Capitalized - If this option is selected, there will be a split in accounting entries or interest in this feature and it will be capitalized during back valued re-computation.
Split Interest Adj for Prev Year’
Check this box to split the interest adjustments. You can check this box only if:
- Back Value Recalculation Flag’ is enabled
- Interest Liquidation Frequency is Monthly
- Liquidation at Month End’ is enabled
If ‘Split Interest Adj for Prev Year’ is checked for an interest product, then during back value dated recalculation the interest adjustment will be split into current financial year and previous financial years (if the start period for recalculation is in previous financial year). The adjustment amount for previous financial year will be the cumulative adjustment amount for all the previous financial years together. If the start period for recalculation is in current financial year, there will be no split of interest adjustment.
Defer Liquidation
Check this box if you wish to defer the calculation and liquidation of periodic interest on an account for a few days beyond the end date of each interest period.
Liquidation Before Month End
While specifying the IC product preferences if you have set the interest liquidation frequency to a monthly, yearly, quarterly cycle you can choose to liquidate interest a specified number of days before the month end for all accounts linked to the product.
You have to specify the number of days before which interest should be liquidated. The system arrives at the interest liquidation date based on the number of days that you specify.
Let us assume that you would like to liquidate interest one day before the month end. You have to capture the following values in the respective fields:
Field |
Value |
Frequency Month |
1 |
Liquidate before Month End |
b |
Days |
1 |
Consequently, interest liquidation for the account associated with the product will be done a day before the month end. Therefore, in March interest will be liquidated on the 30th, in April interest will be liquidated on the 29th. However the value-date of the interest will be the month end.
For instance, if the interest is liquidated on the 30th of March, the Value Date will be 31st of March. Similarly, if interest is liquidated on the 29th of April the value-date will be 30th of April.
Refund Tax on Pre-closure
Oracle FLEXCUBE provides you the flexibility to refund tax whenever a preclosure of a term deposit takes place in the system. However, you have the option to charge a penalty on the amount being withdrawn from a term deposit or when a term deposit is closed before its maturity date.
To facilitate this feature, you have to select the ‘Refund Tax On Preclosure’ option. As a result, tax collected on the interest due to the customer will be refunded on preclosure of a deposit. Tax will be refunded for the interest that is calculated from the deposit value date till the preclosure date.
When you process a foreclosure for a term deposit, the system will first check whether the ‘Refund Tax On Preclosure’ option is selected for the interest product that is attached to the term deposit account. If selected, system will refund all the taxes that are levied till date for the deposit.
Note
This option will be enabled only when you maintain deposit type of interest products.
Recalc Flag
Check this box to indicate that for all accounts associated with this product the recalculation of interest needs to be done.
If a back dated accounting entry is passed within the current liquidation cycle, the next accrual will consider the revised principal effective the back date. If a back dated entry is passed, for a date in the previous liquidation cycle, then the difference in interest adjusted during the next liquidation as an interest adjustment entry.
If this box is not checked, then for any back dated transaction neither interest adjustment nor accrual adjustment will be triggered. Thus, the revised principal will be considered effective the booking date of the transaction.
Defer Liquidation and Defer Liquidation By Days
You may wish to defer the calculation and liquidation of periodic interest on an account for a few days beyond the end date of each interest period. This deferment will allow the inclusion of interest adjustments due to back-valued entries posted into the account after the period end date.
In order to avail of this facility, you need to enable the Defer Liquidation option and also mention the number of calendar days by which you wish the interest liquidation for a period to be deferred.
The functionality is explained with the help of the following example.
For example:
You have enabled the Defer Liquidation option and opted to defer liquidation by 10 days.
For the period – 01-Mar-2014 to 31-Mar-2014 – the period code in M03. On 05-Apr-2014, an entry is posted (with period code M04) into the CASA for value date 15-Mar-2014. Since interest for M03 is not yet liquidated, interest calculation for M03 is adjusted for this entry. The same process is followed for all back-valued entries, with value dates lying in M03, posted into the account up to and including 10-Apr-2014. The final adjusted interest is liquidated as part of end-of-day batch process on 10-Apr-2014.
OD Interest Reversible
Check this box to track interest reversible separately. If this box is checked, then all the OD interest details against the account will be tracked against the following table 'ICTB_OD_INTEREST_BREAKUP'.
Maintaining ILM Parameters
Integrated LM
Choose this option if you want to use the product for Integrated Liquidity Management processing.
Integrated LM Type
Specify the type of System Account to which the product ought to be linked. It can be:
- Pool Leader: Indicates that the Rule will apply to Header accounts in a structure.
- Pool Reallocation: Indicates that the rule will apply to Parent and Child Accounts below the Header Account.
Debit Interest Notification
Receivable General Ledger
Before applying debit interest on personal current accounts you can choose to notify your customers through Debit Interest Notification messages. In the interim period interest is debited from a Receivable before actually debiting the customer account. While specifying preferences for Interest products you can identify the Receivable GL which is to be used for storing debit interests on a temporary basis. Debit interest notification preferences are specifies for an account class through the Account Class Maintenance screen.
You can specify the Receivable GL only for products linked to rules having debit formulae.
This feature is applicable only for the debit interest on the account calculated through the IC module. Refer the Daily Processing of Interest and Charges for information on End of Day processing for Debiting Receivable GL. Passing accounting entries for the refund amount.
Redemption Advice Required
Check this box, if redemption advice is required.
When a preclosure of a term deposit takes place, the original tax entries are not reversed. Instead, the system will pass a new set of entries for the refunded tax amount. The amount tag ‘TAX_REFUND’ will be used to pass the refund entry. This amount tag will give the total tax calculated on the interest.
Accounting Role |
Amount Tag |
Dr/Cr Indicator |
LIABGL |
TAX_REFUND |
Cr |
FRTAXS_PAY |
TAX_REFUND |
Dr |
Note
Refer Annexure A of this User Manual for a list of accounting entries and amount tags that you can set up for an Interest product.
Generating Customer Notice for Debit Interest
Credit interest is liquidated and credited to the account by the System on the liquidation date, which may be the end date of the interest period or a deferred date, depending on your choice.
Debit interest is also calculated on the liquidation date. If you have specified for an Account Class that debit interest notices have to be generated, then the debit interest is not liquidated immediately, but tracked in a Receivable GL for manually debiting to the customer account at a future date. You need to specify the Receivable GL to be used for this purpose. If you do not, then interest for a particular period is liquidated with the value date as the first day of the next period, irrespective of your preference for deferring liquidation.
The functionality of tracking Debit interest in the Receivable GL is explained earlier in this chapter under the heading – Receivable General Ledger to store debit interest on Customer Accounts.
Rate Change on Interest Liquidation
If you have created ‘Special Conditions’ for an account, but would like the general conditions (defined for the account class to which it belongs) to apply at the end of the current liquidation cycle, you must indicate it in this screen. If you specify so, the UDE values defined for the General Condition will be picked up for the account at the end of the current liquidation cycle.
In case of current and savings accounts, if you have selected this option, it ensures that interest is applied based on special condition tariff during the first liquidation period and subsequently the latest effective general condition tariff will be applied. Post first liquidation period, when the general condition tariff is subject to change the revision of general tariff is not applied on the accounts.
Rate Change on Rollover
For the account class and currency, you can specify whether you want to repopulate the rates during a rollover of the Term Deposits. If you opt for this option, the system will use the latest available rate maintained (UDE) for the account class and currency combination at the time of rollover. Conversely, the system will use the rates maintained initially for the deposit.
Continue Variance on Rollover
Check this box to enable continued variance on rollover. If you check this, then the system will default account variance as current value to the rollover deposit.
If you do not check this, then the account variance will not be carried forward to next rollover cycle.
After the first authorization, you cannot change the status of this field.
External Pricing
If this check box is checked for an account class signified as ‘Special Condition Only’, then you can fetch pricing from external pricing and billing engine during contract creation under this account class.
7.1.3 Specifying Preferences for Charges Product
The following types of charges can be processed on an account:
Charge Type |
Description |
Remarks |
NUM-ACCT-STMTS |
Number of Account Statements |
You can fix the number of regular periodic (free) account statements for a liquidation cycle. For every extra account statement that you issue, you can levy a charge. |
NUM-CHQ-RET |
Number of cheques returned |
Every cheque that bounces is recorded in the Cheques Returned file. You can charge a penalty on every bounced cheque. |
NUM-CHQ-ISS |
Number of cheques issued |
You can fix the number of free cheques that can be issued for a liquidation cycle. For every extra cheque leaf issued, you can levy a charge. |
NUM-STOP-PAY |
Number of Stop Payments |
You can levy a charge for every stop payment instruction. |
TURNOVER |
Turnover |
You can charge on the basis of the turnover in an account. You can opt to levy charges on turnovers exceeding a certain amount. An SDE based on turnovers will be applied on an account only if the transaction code of the transaction is defined with ’Include for Account Turnover’. |
ITEM-COUNT |
Number of transactions |
If the number of transactions during a liquidation cycle exceeds a certain number, you can levy a charge. An SDE based on turnovers will be applied on an account only if the transaction code of the transaction is defined with ‘Include for Account Turnover.’ |
ADHOC-STMT |
Number of ad hoc Account Statements |
Account statements are normally generated at a specific frequency. If you generate a statement out of this frequency, you can levy a charge. |
NET-TURNOVER-DR |
Dr Turnover |
You can charge a customer on the basis of the debit turnover in an account. This will return a value if the account is in debit else zero will be returned. |
NET-TURNOVER-CR |
Cr Turnover |
You can also charge a customer based on the net credit turnover in the account. (Sum of all credits – the sum of all debits) = net credit turnover This will return a value if the account is in debit else a value of zero will be returned. Turnovers will be applied on an account only if the transaction code associated with the credit entry is defined with ‘IC Balance Inclusion’ option. |
To recall, when creating a product in the IC module, you must first specify whether it is an Interest or a Charge product. This is called the product type.
If the product type is Charges, you have to specify the basis on which you would like to levy the charge. In the ‘Product Preferences’ screen, you have to specify the liquidation related details for the charge product, the account classes on which the product should be applied, the frequency of liquidation, the amount or rate of charge to be applied, amongst other details.
For applying charges on an account, you can define a General Condition or a Special Condition. Charges thus applied will figure in the Account Statement for the account.
Note
The ‘preferences’ screen, displayed during product definition, will be either interest preferences or charge preferences, based on the product type.
All the other screens are the same for both Interest and Charge products.
While creating a Charge product, you will recall, you identify the basis on which you would levy the charge. You are yet to identify the account classes on which you would apply the product, and the following details:
- the currency in which you would like to levy the charge
- The periodicity with which you would levy the charge (and for a non-monthly cycle, the month from which you would like to begin liquidation).
- whether you would levy the charge on tier or slab structures
- the account class-currency combination on which you would apply the Charge product.
- the minimum and the maximum charge for the product
- the numeric values of the slab/tier, the charge amount, and the charge rate
- the number of free transactions
Note
You can apply a product to any number of account classes. When you apply a product to many account classes, charges for all the accounts belonging to the classes will be calculated in a similar fashion. You can also apply several products on an account.
Product Code
The product code, for which you are defining preferences, is displayed in this field.
Charge Currency
Normally, you would calculate charges in the local currency. However, when indicating your preferences for a Charge product, you can opt to levy a charge either in:
- the local currency
- the account currency
All charges due to a product will be applied in this currency. In addition, any amount involved in the application of charges, like the turnover amount, the slab and tier amounts, a flat charge, etc. will always be in the currency specified here.
Note
If the charge currency is defined as the local currency, and the product is applied on an account class in a foreign currency, all the charge values (such as the slab/tier amounts, charge amounts, etc.) will be converted to the account currency, from the local currency, before the charge is applied. This currency conversion will be done at the mid rate for the two currencies.
Slab / Tier
When defining your preferences for a Charge product, you can opt to levy the charge on the basis of either
- Slabs
- Tiers
7.1.3.1 Specifying Liquidation Related Details
You should define liquidation related details as part of preferences for the Charge product that you are creating.
You can liquidate charges for an account:
- periodically
- on an ad hoc basis
7.1.3.2 Liquidating Charges Periodically
Monthly liquidation of charges levied on an account is an example of periodic liquidation.
If you opt to liquidate charges periodically, you will automate the liquidation process. The automatic processes that are generated at the end of day will liquidate charges for those accounts that are marked for liquidation.
Liquidation Periodicity
If you opt to liquidate charges periodically, you must specify the ‘liquidation frequency’. The term ‘liquidation frequency’ refers to the standard interval between successive periodic liquidations.
For the Charge product that you are creating, select the liquidation frequency (in other words, the cycle) from the adjoining drop-down list. This list displays the following values:
- Monthly
- Quarterly
- Half Yearly
- Yearly
Charges for all the accounts linked to the product will be liquidated, automatically, according to your specifications, during the end of day processing on the day the liquidation is due.
If you opt to liquidate charges on a quarterly, half-yearly, or yearly basis, you must also specify the first month on which you would like to liquidate charges (that is, the month from which the cycle would commence).
7.1.3.3 Liquidating Charges on Ad Hoc Basis
When you do not liquidate charges at fixed intervals, the liquidation is referred to as ‘ad hoc liquidation’.
If you propose to liquidate charges on an ad hoc basis (for accounts on which you apply the product), choose the ‘Ad Hoc’ option when specifying the Liquidation Frequency.
An ad hoc liquidation can be carried out any time on an account, even if it has been defined for periodic liquidation. When you carry out an ad hoc liquidation for accounts (defined for periodic liquidation) charges will liquidated till the date you specify. The subsequent periodic liquidation will be for the remaining days in the liquidation period. The following example illustrates this point:
Note
You should necessarily liquidate all charges before you close an account or change its account class. Typically, you would use the Ad Hoc liquidation function to do this.
Account Details
Account Class
Choose the account class on which you would like to apply the Charge product (for which you are defining preferences).
Currency Code
Specify the currency of the Account Class on which you would like to apply the Charge product.
Free Items
You can specify the number of items on which you would not like to levy charges, as ‘Free Items’. If the items exceed the value that you specify here, a charge would apply.
You would specify an amount as a ‘Free Item’ in case you identified the ‘Charge Basis’ for the product, as ‘Turnover’.
For example, if you do not want to levy a charge on debit turnovers that do not exceed USD 3000, enter ‘3000’ in this field.
When charge is calculated on a charge basis other than ‘TURNOVER’, you would specify the number or items, in this field. For example, if you want to allow two free account statements for the account class on which you apply the charge product, enter ‘2’ here.
Open
More than one product may be applicable on an account class at the same time. You can temporarily stop applying a product on an account class by ‘closing’ it.
You can achieve this by removing the tick for the field ‘Open’. The product will cease to be applied on the account class. You can make the product applicable again by ticking the ‘Open’ box.
Minimum and Maximum
You must indicate the charge amount range, representing the maximum and minimum charge that can be applied for the account.
Charge Notification
Receivable General Ledger
Before applying charges on personal current accounts you can choose to notify your customers through Charge Notification messages. In the interim period charges are debited from a Receivable before actually debiting the customer account. While specifying preferences for Charge products you can identify the Receivable GL which is to be used for storing charges on a temporary basis. Charge notification preferences are specified for an account class through the ‘Account Class Maintenance’ screen.
You can specify the Receivable GL only for products linked to rules having debit formulae. This is applicable only for the debit interest and charges on the account calculated through the IC module.
Refer the Daily Processing of Interest and Charges for information on End of Day processing for Debiting Receivable GL.
Charge Tracking Preference
Select charge tracking preference from the adjoining drop-down list. The options available are:
- Part Debit/Part Waive - If your account does not have an amount sufficient to collect the full charge, then the system collects the available amount and waives off the remaining amount.
- Part Debit/Part Track - If your account does not have an amount sufficient to collect the full charge, then the system collects the available amount and tracks the remaining amount.
- Full Waive - If your account does not have sufficient balance then the system waives off the full charge amount.
- Full Track - If your account does not have sufficient balance to cover the charge, then the system tracks the entire amount as receivable.
- Force Debit - The system debits the charge amount forcefully from your account. If the amount available in the account is not sufficient then force debit results in negative balance.
- Not Required - Select ‘Not Required’ if charge for tracking is not preferred.
Note
- Charge tracking will be considered only if sufficient balance is not available for collection of charge.
- If “Charge tracking preference” is selected as anything other than “Not Required”, the given preference will take precedence over the account overdraft check validation (AC-OVD) parameter. For example, if account overdraft check validation (AC-OVD) parameter is set up as an Override, but tracking preference is selected as full track or part debit/ part track, the charge amount will be tracked if balance is not sufficient to cover the charges.
- If tracking preference is selected as “Not Required”, then system will go ahead with debiting the account for charge if balance is not sufficient to cover the charges
Liquidation Preference for Tracked Charges
Select liquidation preference for tracked charges from the adjoining drop-down list. The options available are:
- Partial - If ‘Partial’ is selected, the system liquidates the tracked charge amounts partially during EO only if part amount is available in the account. For example: If Rs.30 is tracked for an account and during next day EOD, system finds Rs10 is available in the account, system will try to collect the available Rs10.
- Full - If this is selected, then the system tries to liquidate the individual tracked charge amount fully during EOD. If only part amount is available in the account, system will not try to collect the part amount. For example: If Rs30 is tracked for a charge in an account and during next day EOD, system finds Rs10 is available in the account; system will not try to collect the available Rs10. But, system will wait till the time balance available in the account becomes Rs30.
The system displays override messages when:
- Available balance is sufficient to cover the transaction amount but not sufficient for the charge.
- Product level tracking is checked and when transaction amount is greater than the available balance.
Process flow for Non sufficient Funds Treatment
If ‘Charge Tracking Preference’ is selected as ‘Part track’ or ‘Full track’ then, once the amount for tracking has been calculated then the system does the following:
- Creates an internal amount block for the amount to be tracked against the charge account in table CSTB_AUTO_SETTLE_BLOCK.
- The tracked amount will be updated in receivable amount in the CASA account
- Once the receivable amount is updated, the available balance is affected. The receivable amount is deducted from current balance while arriving at the available balance.during tracking.
- The receivable amount will be displayed in customer account
- If you modify or waive any of the charges after the override is displayed, the override should be cancelled and modify the charges. After the modification of charges, system will re-evaluate the NSF preferences based on the available balance and the modified charges. On save, system displays if any charge amount is being tracked or waived or force debited to the account.
Whenever an account is credited for which there are tracked receivables, the system will do the following:
- For all the existing internal amount blocks, system checks for earmarking the credit of book date, blocking order and liquidation order.
- If there are multiple charges tracked as a part of a single RT transaction, like all five ARC charges, the order of evaluation will be in increasing order from Charge 1 to charge 5.
- During online apportionment of credit and subsequent liquidation, the system will not consider account level receivable tracking for NSF tracked charges. If there are any NSF tracked charge amount for the account, system will go ahead with the online apportionment of credit and subsequent liquidation of the charges during EOD.
For further details refer ‘Maintaining Accounting Details’ chapter of Retail Teller user manual.
Force Charges during A/c Closure
Check this box to indicate that force charges should be collected / waived during account closure. By default this option is unchecked.
Force Charges during A/c Closure field is applicable only for the charges on the account calculated through the IC module.
7.1.4 Charge Basis in Oracle FLEXCUBE
If the product type is Charges, you have to specify the basis on which you would like to levy the charge. The following charge basis is available in Oracle FLEXCUBE:
- Charge Basis for Oracle FLEXCUBE transactions
- Charge basis for maintenance types of charges
- Charge basis for external charges
All three charge basis are explained in detail below:
7.1.4.1 Charge Basis for Oracle FLEXCUBE Transactions
Non YTD Basis
For processing charges for all Oracle FLEXCUBE transactions, you can use one of the following non YTD based charge basis:
Charge Basis |
Describes… |
NUM-ACCT-STMTS |
You can fix the number of regular periodic (free) account statements for a liquidation cycle. For every extra account statement that you issue, you can levy a charge. |
NUM-CHQ-RET |
Every cheque that bounces is recorded in the Cheques Returned file. You can charge a penalty on every bounced cheque. |
NUM-CHQ-ISS |
You can fix the number of free cheques that can be issued for a liquidation cycle. For every extra cheque leaf issued, you can levy a charge. |
NUM-STOP-PAY |
You can levy a charge for every stop payment instruction |
TURNOVER |
You can charge on the basis of the turnover in an account. You can opt to levy charges on turnovers exceeding a certain amount. An SDE based on turnovers will be applied on an account only if the transaction code of the transaction is defined with ‘Include for Account Turnover.’ |
ITEM-COUNT |
If the number of transactions during a liquidation cycle exceeds a certain number, you can levy a charge. An SDE based on turnovers will be applied on an account only if the transaction code of the transaction is defined with ‘Include for Account Turnover.’ |
ADHOC-STMT |
Account statements are normally generated at a specific frequency. If you generate a statement out of this frequency, you can levy a charge. |
NET-TURNOVER-DR |
You can charge a customer on the basis of the debit turnover in an account. This will return a value if the account is in debit else zero will be returned. |
NET-TURNOVER-CR |
You can also charge a customer based on the net credit turnover in the account. (Sum of all credits – the sum of all debits) = net credit turnover. This will return a value if the account is in debit else a value of zero will be returned. Turnovers will be applied on an account only if the transaction code associated with the credit entry is defined with ‘IC Balance Inclusion’ option. |
YTD Basis
For processing charges for all Oracle FLEXCUBE transactions, you can use one of the following YTD based charge basis:
Charge Basis |
Describes… |
YTD – ITEM – COUNT |
Charges are calculated on YTD basis applying the item count of the transaction. |
YTD-DR-TURNOVER |
Charges are calculated on YTD basis depending on Debit turnover of the transaction. |
YTD - CR-TURNOVER |
Charges are calculated on YTD basis depending n the credit turnover of an account. |
YTD - NET-TURNOVER |
Charges are calculated on YTD basis depending on the net turnover of an account. |
Slab/Tier
For YTD calculation, the system applies the slab basis to compute the current YTD volume and current cycle volume for every liquidation cycle.
The applicable rate is derived from the current YTD volume and the current cycle volume will be charged on the current rate. In case there is a change in the rate, the system will pass an adjustment entry.
This is calculated as:
Current rate * (Current YTD value – Current cycle value) less actual amount passed YTD upto previous billing
Let us understand the above equation with the following example:
Specifying the amount tags
For YTD type of products, you need to maintain the following amount tags for CLIQ event:
- CLIQ_ADJ: the adjustment entries are calculated applying the YTD volume. The amount tag will be the same for negative adjustment entries
- CLIQ_NADJ: the adjustment entries are passed only if the adjustment amount is negative and the absolute value is used
- CLIQ_PADJ: the adjustment entries are passed only if the adjustment amount is positive
Note
Along with CHARGE tag entries, you can maintain entries for either for CLIQ_ADJ or for CLIQ_NADJ and CLIQ_PADJ for CLIQ event. You cannot maintain entries for both.
For YTD calculation, the system applies only the current rate since there can be a change in the rate. All the parameters (free items, minimum balance etc) are applied to YTD volume.
7.1.4.2 Charge Basis for Maintenance Type of Charges
You can apply different charge basis for positive pay instructions using the following tags:
Charge Basis |
Describes… |
NUM-STALE-PPAY |
This is the number of stale cheques for a given account |
NUM-STOP-PPAY |
This is the number of stop payment applied on the cheques (positive pay). |
NUM-CANCL-PPAY |
This is the number of cheques cancelled or closed. It includes the cancellations done for Refunded/Refused cheques also. |
NUM-REPLACE-PPAY |
This is the number of cheques which are in replaced status. |
NUM-AUT-ISS-PPAY |
This is the number of positive pay instructions which are issued automatically or through uploads. It can be used to collect/calculate using source code of the positive pay instruction. In case the source code is not ‘FLXC’ then it is considered as auto issued. |
NUM-MAN-ISS-PPAY |
This is the number of positive pay instruction issued manually. All positive pay instructions for which the source code is ‘FLXC’ are considered for this charge basis. |
NUM-TOT-ISS-PPAY |
This is the total issued positive pay instruction for a given account (sum of point 5 and point 6). |
NUM-TEL-TXN-CONS |
This number of teller transaction calculated and can apply excess charge for teller transaction on individual customer accounts. |
TRD-LIC-EXP-CONS |
You can calculate the trade license expiry charge based on the slab maintained. |
TOD-RNW-CHG |
The user will maintain charge amount in charge product preference screen that would be applied for renewal of TOD during batch processing. |
7.1.4.3 Charge Basis for External Charges
External charges are the charges levied for all NON Oracle FLEXCUBE transactions like faxes sent or concentrator charges etc. To maintain the charge product for the external charges, you can use the charge basis defined below:
Charge Basis |
Describes… |
EXT-BD-ITEM-CNT |
Indicates the count of external transactions based on value date. External transaction has the flexibility to be charged on booking date or on a value date basis. System stores the count at both level (booking date and value date). |
EXT-VD-ITEM-CNT |
Indicates the transaction count of external transaction on Value date basis. |
EXT-BD-ACY-TUR |
Indicates the turnover of external transactions on basis of booking date. This turnover is always in the account currency. |
EXT-VD-ACY-TUR |
Indicates the turnover of external transactions on basis of value date. This turnover is always in the account currency. |
EXT-BD-LCY-TUR |
Indicates the turnover of external transactions on basis of booking date. This turnover is always in the local currency. |
EXT-VD-LCY-TUR |
Indicates the turnover of external transactions on basis of value date. This turnover is always in the local currency. |
While applying charge basis on Account currency (EXT-VD-ACY-TUR, EXT-BD-ACY-TUR), the system allows only those external transaction codes for which you have maintained the type as ‘Account currency’.
Similarly, Charge basis on Local currency (EXT-VD-LCY-TUR, EXT-BD-LCY-TUR) is enabled only those external transaction codes for which the type is defined as ‘Local currency’.
Also, the system allows External transaction codes on count basis only for those products for which the charge basis is either EXT-BD-ITEM-CNT or EXT-VD-ITEM-CNT.
Refer to ‘Transaction codes for processing external transactions’ and ‘Booking of external charges’ sections in this manual for more details on maintaining transaction codes for external transactions and capturing details for external charges.
7.1.5 Status Maintenance Button
At the time of defining an Interest/Charge product, you can maintain different status codes and specify parameters based on which accrual and application of interest/charges will happen for the status of the account.
Status codes are maintained through the ‘Status Control’ screen. Click the ‘Status Maintenance’ button in the ‘Interest and Charges – Product maintenance’ screen to invoke it.
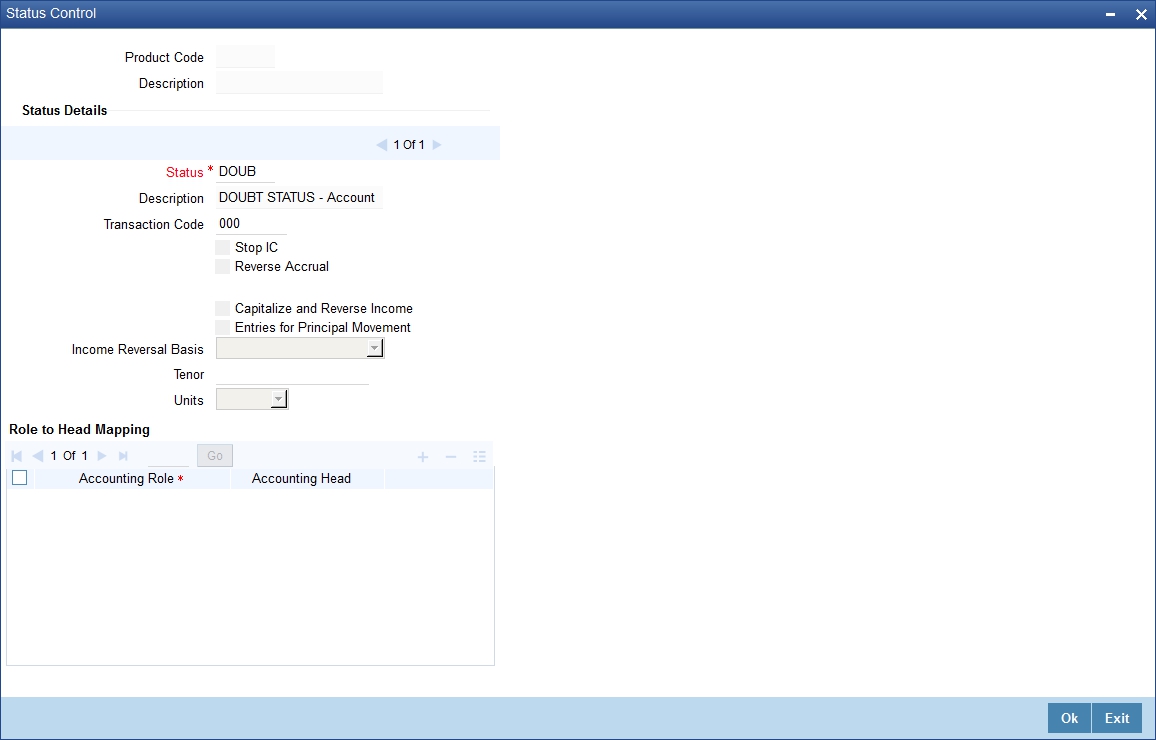
The following parameters may be maintained in this screen:
Status Details
Product Code
The code of the Interest/Charge product, for which you are defining preferences, is displayed in this field.
Status
Select the different status codes applicable to the product, in this field. Use the add button to define each status and the attributes for the same. You can use the navigation buttons to move from one status to the other. The status codes with status type ‘Account’ and ‘Both’ will be available in the option list provided.
On selection of the status, the associated description will be displayed alongside.
Transaction Code
A Transaction Code is used to identify the nature of the accounting entries posted. The code selected here will be used to track the accounting entries resulting from the movement of the account to the status being maintained.
Stop IC
Select this option if you want the system to stop processing Interest and Charges when the account moves to the status that is being defined. If not checked, interest and charges will continue to be applicable on the account.
Reverse Accrual
If you select this option, all the accruals that have happened till date will be reversed when the account moves into this status.
Note
If Reverse Accrual is selected, then capitalize and reverse income and its preferences are not applicable. This has to be manually done.
Capitalize and Reverse Income
Check this box to capitalize and reverse an income, if you have checked ‘OD Interest Reversible’ check box at preferences level of the ‘Interest & Charges Product Maintenance’ screen.
Note
- If you have checked Capitalize and Reverse Income, then during status change, system processes the interest amount movement from Income GL to suspense GL
- If you uncheck this box, then IC product will not be allowed to save with the values for Entries for principal movement, Income reversal basis, Tenor and units.
Entries for Principal Movement
Check this box to post the entries for principal movement.
Income Reversal Basis
Specify basis to reverse income for the IC product, if you have checked ‘Capitalize and Reverse Income’ check box. The options available are:
- Complete - Select ‘Complete’ to do a complete movement of unrecognized interest income from start date of the account to the suspense GL maintained at interest branch parameter level.
- Till Current Financial Year - Select this option to do the movement of Unrecognized interest to suspense GL within the current financial year.
- For a Tenor - Select the option for the movement of Unrecognized
interest to suspense GL based on the Criteria below:
- Tenor - Specify the number, so that unrecognized interest movement to suspense GL happens based on the units and tenors specified.
- Units: Displays the drop down list with the values Days, Years, Months. Based on the Values maintained with the Units and Tenor combination system moves the unrecognized interest to suspense GL
Note
If Income reversal basis is selected for a tenor, then Tenor and Units should be specified.
Accounting Role to Account Head mapping
Accounting Roles are tags that identify the type of accounting entry that is posted to an accounting head which in turn refer to the different GLs and SLs maintained in your Chart of Accounts. You can select the different heads and roles to which the accruals till date would be posted when the account moves to this status. Further accruals will be posted to the account heads specified here if the account heads maintained for the next status is not different from the ones specified for the current status.
To track the interest in suspense GL after the status change, specify the GL maintained in interest suspense GL in the Interest and Charges Branch Parameter for the accrual role. This is applicable only if ‘Capitalize and Reverse Income flag’ is set.
Note
- ‘Entries for Principal Movement’ can be selected for the highest adversity status of the product/class.
- If the ‘Capitalize and Reverse Income’ is maintained for a status, then all the subsequent adversity statuses are selected.
- Recognition of Income, Capitalize and reverse income feature are functional only for accounts which have OD account as interest booking account.
7.1.6 Fields button
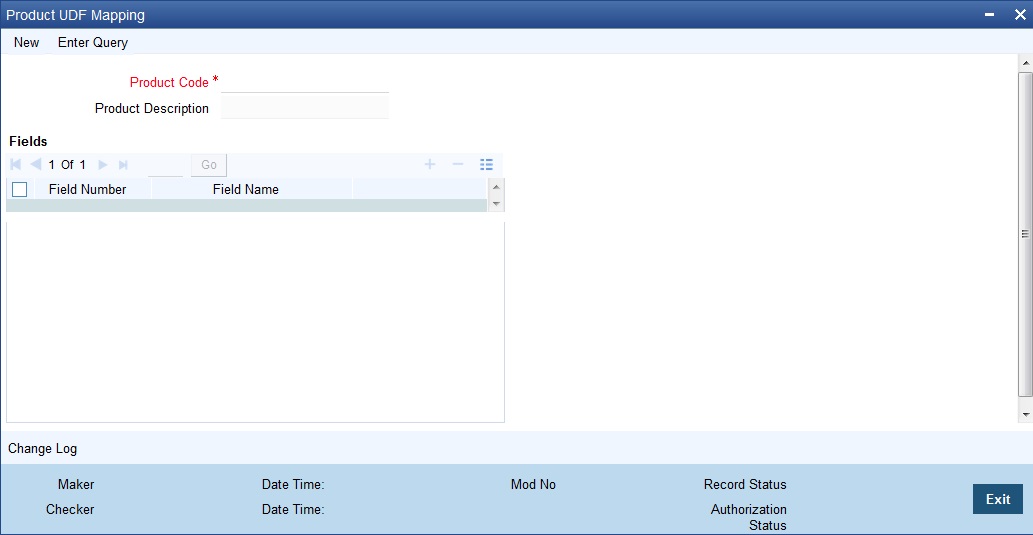
For details on User Defined Fields screen refer Other Maintenances chapter in Core Service User Manual.
7.1.7 Accounting Roles Button
To invoke ‘Accounting Roles’ screen click ‘Accounting Roles’ button from the ‘Interest and Charges – Product maintenance’ screen.

Product Code
The code of the Charge product, for which you are defining preferences, is displayed in this field.
Description
The description of the product, for which you are defining the Accounting Roles and Heads, will be displayed in this field.
Class Details
Class Code
In this field, you can view the code of the product for which you are defining the Branch and Currency restrictions.
7.1.8 Events Button
To invoke ‘Events’ screen, click ‘Events’ button from the ‘Interest and Charges – Product maintenance’ screen.
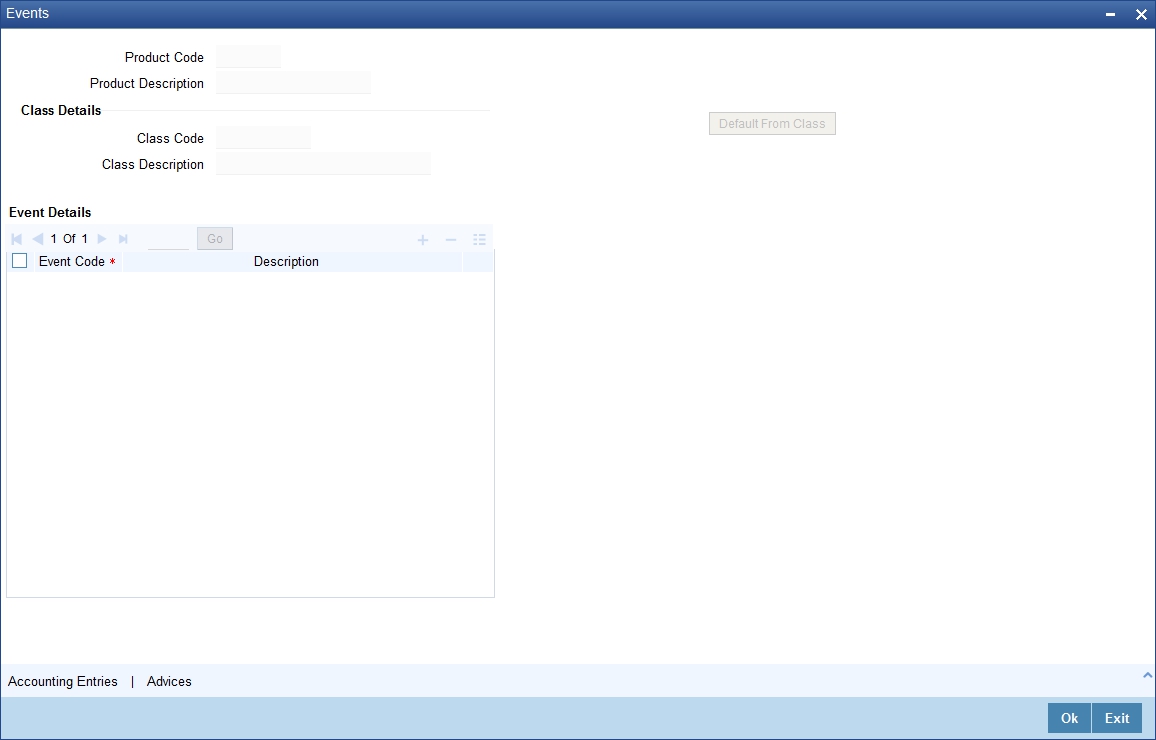
You can maintain the following details here:
Product Code
The code of the Charge product, for which you are defining preferences, is displayed in this field.
Description
The description of the product, for which you are defining the Accounting Roles and Heads, will be displayed in this field.
Class Details
Specify the following details.
Class Code
The code of the product, for which you are defining the Accounting Roles and Heads, will be displayed in this field.
Events Details
Specify the following details.
Event
In this field, you can select the event for which you are specifying the accounting role and account head (in other words, the GLs to which the accounting entries would be passed). When you liquidate or accrue interest or charge, the accounting entries will be posted to the specified GL/SLs for the event.
The following are the events available for an interest product:
- ILIQ Interest liquidation
- IACR Interest accruals
- UDCH Change of UDE values
For a charge product, the following are the events available:
- CLIQ Interest liquidation
- UDCH Change of UDE values
For further information on Accounting Entries and Events that you can define for a product, please refer Product Definition User Manual.
7.1.9 UDE Limits Button
You can define minimum-maximum effective values and minimum-maximum variance for interest rates in UDE Limits screen. To invoke this screen, click ‘UDE Limits’ button from the ‘Interest and Charges – Product maintenance’ screen.

Product Code
The system defaults the Product Code from the Interest and Charges Product Maintenance screen.
Rule
The system defaults the Interest Rule ID from the Interest and Charges Product Maintenance screen.
User Element Limits
User Element
Specify the user element for which you want to maintain upper and lower limits. Alternatively, you can select the user element from the option list. The list displays all valid user elements linked to the rule.
Currency Code
Specify the currency code. Alternatively, you can select the currency code from the option list.The list displays all valid currency codes maintained in the system. If you select ‘ALL’ as currency code, then the limits are applicable for all currencies.
Min Effective Value
Specify the minimum value for the user element and currency combination.
Max Effective Value
Specify the maximum value for the user element and currency combination.
Minimum Variance
Specify the minimum value of interest variance that can be maintained at account level for the given UDE and currency combination.
Maximum Variance
Specify the maximum value of interest variance that can be maintained at account level for the given UDE and currency combination. The value of 'Maximum Variance' cannot be less than 'Minimum Variance'.
While creating an account if variance is specified at special condition level in the ‘Variance’ field against a UDE, then that variance value will be compared with the Minimum and Maximum variance maintained at the product level for the account currency.
If the variance is below minimum variance and above maximum variance, the system displays an error message. The validation of minimum and maximum variance will be performed during creation, modification and reopening of the account.
The system performs the following validations during user data element maintenance:
- If there is no rate code or TD rate code attached, then the user element value in the ‘Interest and Charges User Data Elements Maintenance’ screen should be between Min Effective Value and Max Effective Value maintained at product level for IC Product - User Element - Currency Combination.
- If a rate code or TD rate code is attached for a user element, then the effective UDE value should be between Min Effective Value and Max Effective Value maintained at product level for IC Product - User Element - Currency Combination.
These validations will be performed at account level if ‘Special Condition’ is maintained at account level. The effective UDE value for special condition will be User Element Value + Value from Rate Code/TD Rate Code + Variance.
The minimum and maximum UDE validations will be performed during:
- CASA and TD creation and modification
- Child TD account creation
- TD creation from Auto Deposits
- TD Rollover
- Structured Deposit
- TD Creation from web-branch screens
- CASA Reopen and UDE Maintenance Reopen Operation
- Term deposits created from TD simulation screens
- TD creation and modification from origination module
- CASA creation and modification from origination module
- EOD at the time of interest accrual and liquidation
7.1.10 Restrictions Button
To invoke ‘Restrictions’ screen, click ‘Restrictions’ button from the ‘Islamic Profit Distribution Product Maintenance Detailed’ screen.
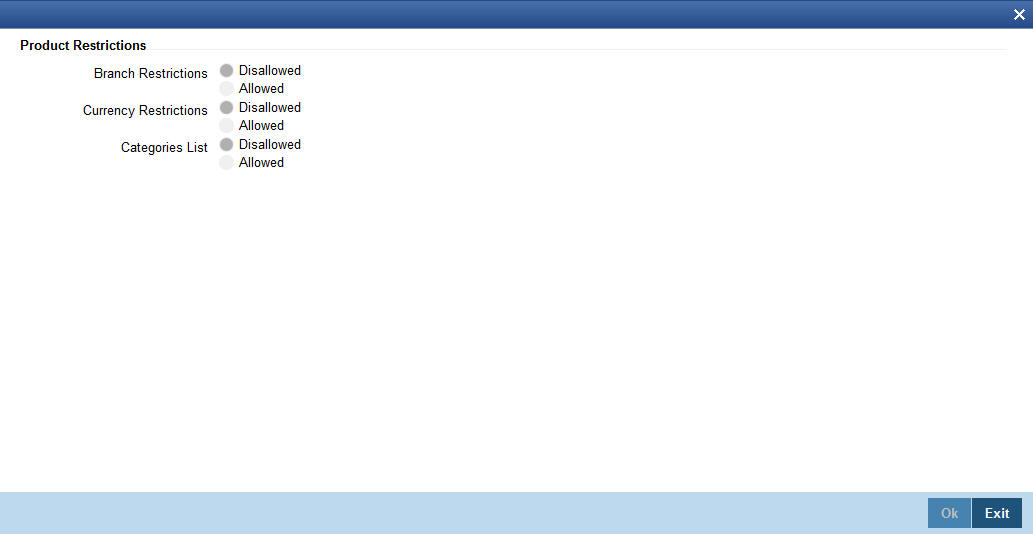
Branch Restrictions
Indicate whether you want to create a list of allowed branches or disallowed branches by selecting one of the following options:
- Allowed
- Disallowed
Currency Restrictions
Indicate whether you want to create a list of allowed currencies or disallowed currencies by selecting one of the following options:
- Allowed
- Disallowed
Categories List
Indicate whether you want to create a list of allowed customers or disallowed customers by choosing one of the following options:
- Allowed
- Disallowed
You can define product restrictions for branch, currency, customer category and customer in Product Restrictions (CSDPRDRS) screen.
For details on product restrictions refer Product Restriction Maintenance chapter in Core Service User Manual.
7.1.11 Preferences for Consolidated Charges Products
When you create a consolidated charge product, you can define the properties for the product such as accounting roles and accounting heads, events, branch and customer restrictions in the same manner as you would do for a normal Interest and Charges product. For details, refer the Products user manual.
You can also set the following specific preferences for a consolidated charges product in the Interest and Charges Consolidated Charge Product Preferences screen. Click ‘Preferences’ button from the IC Product Definition screen to invoke the Preferences screen.
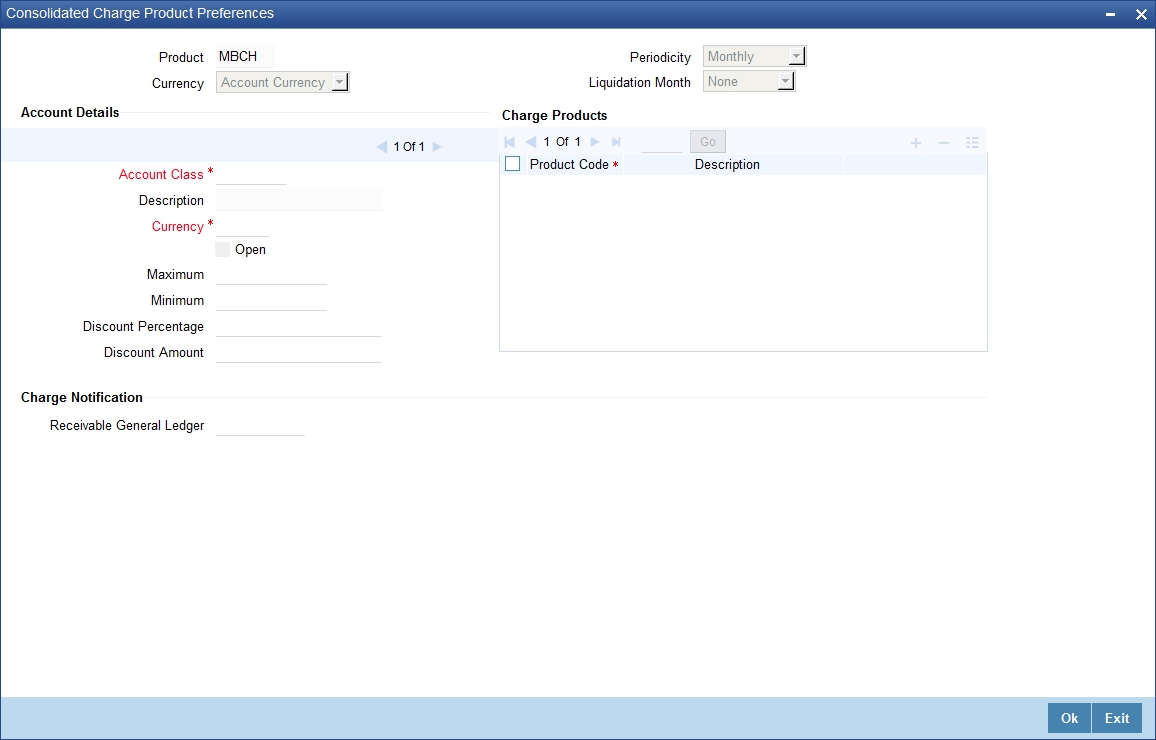
Product
You must identify the individual charge products for which the applicable charges would be consolidated, using the consolidated charge product.
While linking charge products with a consolidated charge product, remember:
- Only charge products can be linked to consolidated charge products
- A charge product can be linked to just one consolidated charge product
- The charge liquidation periodicity defined for individual charge products linked to a consolidated charge product must be the same as the charge liquidation periodicity set for the consolidated product
Charge Currency
You can indicate the currency in which the charges would be consolidated - either account currency or local currency.
Periodicity and Liquidation Month
You must indicate the periodicity at which the consolidated charges would be liquidated, for the indicated account class, using the consolidated charge product. If the liquidation is to take place on a yearly basis, you can specify the month during which it would take place. As stated earlier, the charge liquidation periodicity defined for individual charge products linked to a consolidated charge product must be the same as the charge liquidation periodicity that is set for the consolidated product.
Account Details
Account Class and Currency Code
You must indicate the combination of account class and currency for which the consolidation of charges, using the consolidation product would be applicable. This indicates the application of the charge consolidation as a general condition. For an account class, you can maintain different consolidation products for each currency.
Maximum and Minimum
You must indicate the charge amount range, representing the maximum and minimum charge that can be applied for the product.
Discount Amount
In this field, you can indicate the flat discount amount, if any, which would be applicable for the consolidated charge calculated for the product. After the discounting has been applied, the Maximum and Minimum validations are performed.
Alternatively, the discount, if any, which is applicable, can be specified as a percentage of the calculated consolidated charge amount
Discount Percentage
You can indicate the discount percentage, if any, which would need to be applied to the calculated charge. After the discounting has been applied, the Maximum and Minimum validations are performed.
The discount, if any, which is applicable, can also be specified as a flat discount amount.
Open
By default, each charge consolidation charge setup that you set up is enabled and active. You can also disable the setup by checking the ‘Open’ box.
Charge Notification
Receivable General Ledger
You can also indicate the receivable GL onto which the customer account liquidates the charges on the liquidation.
7.1.12 Charge Product Application on an Account
You can apply a charge product on an account in two ways:
- By linking an account class to a charge product, thereby making the product applicable to all the accounts of the class. This method of linking accounts is called the definition of a General Condition; or
- By linking an account itself to the product. This method of linking accounts is called the definition of a Special Condition.
Often, you may calculate charges for several account classes using the same Charge Basis. In such a case, you can apply the same charge product on all the account classes. In the Charge Product Preferences screen you can link a product to an account class (es).
However, since the actual charge values that you wish to apply on each account class may be different, you can specify different values for each of the account class.
7.1.13 General Condition
7.1.13.1 Defining General Conditions
When you apply a product on an account class-currency combination (in the Charge Product Preferences screen), you define a General Condition. The attributes that you have defined for the product will apply on all accounts belonging to this account class-currency combination.
In the Charge Product Preferences screen, you can also specify different charge values for each account class and currency combination (on which you apply the product). Thus, though you apply the same product on several account classes, you can charge at different scales for different accounts.
Specifying Number of Free Items or Amount
You can specify the number of items on which you would not like to levy charges as ‘Free Items’. If the items exceed the value that you specify here, a charge would apply.
You would specify an amount as a ‘Free amount’ if you identified the ‘Charge Basis’ for the product, as ‘Turnover’.
Specifying Charge Applicable
You should define the following details about the charges that will be applicable for an account class and currency combination:
- the amount or rate of charge free transactions
- The slab or tier structure, as the case may be, and the applicable amounts and rates.
- The minimum and maximum charge to be collected in the case of the charge being a rate.
Charging on Basis of Slab and Tier Structures
To recall, you can apply a charge based on the turnover in an account. You can apply this charge based on a tier or slab structure. The following example illustrates the concept of tiers and slabs.
Defining Minimum and Maximum Charge
If the charge is a percentage of the transaction amount (in the case of charge on turnovers, for example), you can indicate the minimum and the maximum charge that you would like to levy. When charges are calculated for an account on which you apply the product, the values that you enter here will determine the actual charge that is applied on the account.
7.1.13.2 Identifying Suspense GL to Store Charges on Customer Accounts
Before applying charges on personal current accounts you can choose to notify your customers through Charge Notification messages. In the interim period charges are debited from a Receivable before actually debiting the customer account. While specifying preferences for Charge products you can identify the Receivable GL that is to be used for storing charges on a temporary basis. Charge notification preferences are specifies for an account class through the Account Class Maintenance screen.
This feature is applicable only for the charges on the account calculated through the IC module.
Refer the Daily Processing of Interest and Charges for information on End of Day processing for Debiting Receivable GL.
7.1.13.3 Specifying Charge Values
Finally, you must specify the values of the charge that you want to apply on an account class.
If you have opted to levy charges on the basis of a tier or slab, you must first build the tier/slab structure. Corresponding to each slab/tier, enter the charge amount or rate.
Specifying an Amount
You would specify the value of a charge as an amount when you levy charges on the basis of:
Charge Type |
Description |
NUM-ACCT-STMTS |
Number of account statements |
NUM-CHQ-RET |
Number of cheques returned |
NUM-CHQ-ISS |
Number of cheques issued |
NUM-STOP-PAY |
Number of stop payments |
ITEM-COUNT |
Number of transactions |
ADHOC-STMT |
Number of ad-hoc Account Statements |
In the charge amount field of the first row, enter the charge amount applicable for per item. For example, enter the charge applicable for each extra statement, for each extra cheque book, and so on. This amount will be applied on items beyond the number of free items.
Specifying a Rate
You could specify the charge value as a rate when the basis is:
Charge Type |
Description |
TURNOVER |
Total turnover |
Enter the rate (according to the tier or slab structure, if any is applicable). This rate will be applied, for an amount beyond the Free Amount, if you have specified one.
If there is no slab or tier structure, specify a big amount in the Slab/Tier field in the Amount window and specify the rate. For such a situation, it is immaterial whether you select slab or tier as the amount basis.
7.1.13.4 Closing Condition
More than one product may be applicable on an account class at the same time. You can temporarily stop applying a product on an account class by ‘closing’ it. You can achieve this by unchecking the field ‘open’. The product will cease to be applied on the account class. You can make the product applicable again by checking the ’open’ box.
7.1.13.5 Waiving General Condition for Specific Account
Many General Conditions can be defined for an account class. For example, you could define a condition by linking two different charge products (one for extra account statements generated, and another on the basis of turnovers) to an account class. Both products will be applied on all the accounts belonging to the account class.
You can, however, waive a product from being applied on an account. This would mean that of all the General Conditions defined for an account class, you do not want to apply one or more products to a specific account.
Continuing with the example, for a specific account, you could waive the application of charges on turnovers.
The Procedure
In the ‘Customer Accounts’ screen, you need to click on the ‘Charges’ button. You can view the Account Level Charges screen. You can choose the product that you do not want to apply on the account and choose the ‘Waive Charges’ option. The General Condition will cease to apply on the account.
7.1.13.6 Closing General Condition
More than one product may apply on an account class at the same time. You can temporarily stop applying a product on an account class by ‘closing’ it. You can achieve this by removing the tick for the field ‘open’. The product that you have chosen will cease to be applied on the account class. You can make the product applicable again by ticking the ‘open’ box.
This feature is useful when you have to temporarily (or permanently) stop the application of charges due to a condition.
7.1.14 Special Condition
7.1.14.1 Defining Special Condition
When you define charge attributes for an account itself, rather than for the account class to which it belongs, it is referred to as a Special Condition. Typically, you would want to maintain a special charge condition for a special customer.
Note
An account can get linked only if its account class and currency has been linked earlier.
When creating an account in the ‘Customer Account Maintenance’ screen, you can click the ‘Default’ button to fetch all the products, along with their attributes, that are applicable for the account. You can then modify the values specific to the account.
However, the ‘Default’ button cannot be used once the account is authorized. You can select the product from the option list provided alongside.
When maintaining an account in the Customer Account Maintenance screen, you can opt to define ‘special conditions’ for it. If you opt to define special conditions for an account, the ‘general conditions’ defined for the Account Class, to which the account belongs, will NOT apply to this account.
To define special conditions invoke the IC Account Level Charges Conditions screen from the Customer Account Maintenance screen by clicking on the Charges icon.
In this screen, you can view the account number (and the branch to which the account belongs) for which you are defining special conditions.
7.1.14.2 Applying Product on Account
To calculate charges for an account, you must apply a charge product on the account. To recall, every charge product that you create is built on a ‘Charge Basis’. When you apply a product on an account, charges for the account will be calculated according to the basis that you specify.
For the account for which you are defining special conditions choose the product(s) that you wish to apply.
You may want to apply more than one charge product on an account. For example, you may want to levy a charge for additional account statements and for debit turnovers in the account. In order to achieve this, you would have to apply two products (one built on the basis of ‘Number of Account Statements’ and another built on the basis of ‘Turnover’). In this screen, you can choose the products that you want to apply on the account.
Note
The charge currency, defined for the product (in the Charge Product Preferences screen) that you apply on the account, is displayed. Note that the charge values that you specify for the account subsequently will be taken to be in this currency.
7.1.14.3 Defining Minimum and Maximum Charge
In this screen, you can indicate the minimum and the maximum charge that you would like to levy on the account. When charges are calculated for the account, the values that you enter here will determine the actual charge that is applied on the account.
The following example illustrates this:
7.1.14.4 Specifying Charge Value
Finally, in this screen, you must specify the values of the charge that you want to apply on the account for which you are defining ‘special conditions’.
If you have opted to levy charges on the basis of a tier or slab, you must first build the tier/slab structure. Corresponding to each slab/tier, you must enter the charge amount or rate.
Specifying an Amount
You would specify the value of a charge as an amount when you levy charges on the basis of:
Charge Type |
Description |
NUM-ACCT-STMTS |
Number of Account Statements |
NUM-CHQ-RET |
Number of cheques returned |
NUM-CHQ-ISS |
Number of cheques issued |
NUM-STOP-PAY |
Number of Stop Payments |
ITEM-COUNT |
Number of transactions |
ADHOC-STMT |
Number of adhoc Account Statements |
Specifying a Rate
You could specify the charge value as a rate when the basis is:
Charge Type |
Value |
TURNOVER |
Total turnover |
Enter the rate (according to the tier or slab structure, if any is applicable). This rate will be applied, for an amount beyond the Free Amount, if you have specified one.
If there is no slab or tier structure, specify a big amount in the Slab/Tier field in the Amount window and specify the rate. For such a situation, it is immaterial whether you select slab or tier as the amount basis.
7.1.14.5 Closing Special Condition
More than one product may be applicable on an account at the same time. You can temporarily stop applying a product on an account by ‘closing’ it. You can achieve this by removing the tick for the field ‘open’. The product will cease to be applied on the account. You can make the product applicable again by ticking the ‘open’ box.
This feature is useful when you have to temporarily stop the application of a charge due to a condition.
7.1.14.6 Consolidated Charges Button
You can apply consolidated charges for an account as a special condition. In the ‘Customer Accounts Maintenance’ screen, you need to click ‘Consolidated Charge’. The Account Level Consolidated Charges Conditions screen is displayed.
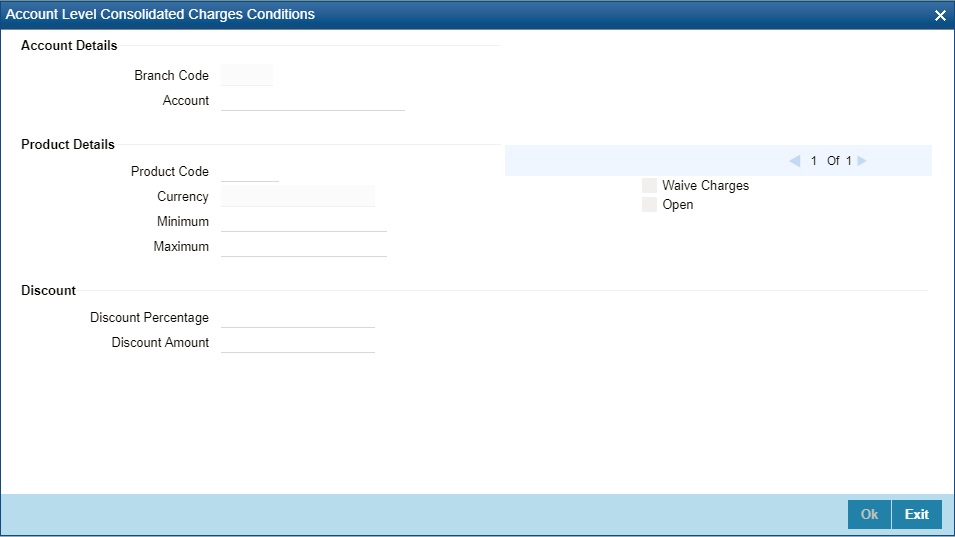
In this screen, you define the following consolidated charge options for an account:
Account Details
Branch
The Branch Code to which the account belongs (for which you are defining special conditions) is displayed in this field.
Account
The Account number of customer (for which you are defining special conditions) is displayed in this field.
Product Details
Product
You must identify the consolidated charge product using which the applicable charges would be consolidated.
Currency
The charges would be consolidated in the currency defined for the selected consolidated charge product, and this currency is displayed on the screen.
When you opt for a consolidated charge product, all the consolidated charge parameters defined for the selected product are defaulted to the account for which the product has been linked. You can change the default in respect of the following parameters:
- Minimum and maximum charge
- Discount percentage and discount amount
Maximum and Minimum
You must indicate the charge amount range, representing the maximum and minimum charge that can be applied for the account.
Open
By default, each charge consolidation charge setup that you set up is enabled and active. You can also disable the setup by checking the ‘Open’ box.
Waive Charges
You can choose to waive consolidated charges for an account.
Discount
Discount Amount
In this field, you can indicate the flat discount amount, if any, which would be applicable for the consolidated charge calculated for the product. After the discounting has been applied, the Maximum and Minimum validations are performed.
Alternatively, the discount, if any, which is applicable, can be specified as a percentage of the calculated consolidated charge amount.
Discount Percentage
You can indicate the discount percentage, if any, which would need to be applied to the calculated charge. After the discounting has been applied, the Maximum and Minimum validations are performed.
The discount, if any, which is applicable, can also be specified as a flat discount amount.
7.1.14.7 SSIA – Special Type of Savings Account
SSIA refers to a special type of savings account used for promoting savings by customers. This scheme was introduced between May 1st 2001 and April 30th 2002 and will last for 5 yrs. Though there is no provision to open a new SSIA after April 30th 2002, you may transfer an SSIA from one institution to another.
Depending on the policies of your government, you can maintain a minimum and a maximum deposit amount for an SSIA. Further, you can also assign a fixed allowance rate on the deposited amount if the deposit is within the specified limits. The deposit may be made by means of a cash deposit, a journal entry or a teller transaction.
On maturity (after 5 yrs), you can collect an exit tax on the interest component alone. A customer can make a partial or total withdrawal from his SSIA before the 5-year term in which case tax will be applicable on the full amount (including the principal). When a customer requests for withdrawal of a certain amount from the SSIA, the account is debited for an amount that is inclusive of the tax component as well, so as to ensure that the customer receives the amount requested for, at any point of time before maturity. This is illustrated in the following example.
A customer can make more than one lodgment (deposit) in a month into an SSIA. You can generate a report at the end of a month to ascertain the number of lodgments made during the month. If the deposit exceeds the maximum permissible limit, you can refund the excess to the customer. On maturity, you can send the details of the SSIA to the Revenue department to claim the allowance made to the customer.
Setting Up Charge Product for SSIA Processing
Specifying the account class
All SSIA accounts will be made to report to an account class defined for the purpose. You can select the account class in the ‘IC - Charge Product Preferences’ screen.
Identifying the charge basis
When setting up a charge product for SSIA, you have to identify the basis on which you want to calculate the allowance on the deposit made into an SSIA.
To recall, for SSIA processing, you may use one of the following charge bases:
- NET-TURNOVER-DR – will return a value if the account is in debit else the value will be zero.
- NET-TURNOVER-CR – will return a value if the account is in debit else the value will be zero.
Since the allowance is made for the net credit turnover (Sum of all credits – the sum of all debits) in the account, the charge basis would typically be ‘NET-TURNOVER-CR’.
Specifying the transaction code
A Transaction Code is associated with every accounting entry in Oracle FLEXCUBE. To track the credit entries posted to an SSIA account, you have to associate the transaction codes for which the ‘IC Balance Inclusion’ option is checked. This is a mandatory requirement for processing SSIA. The transaction code is selected at the time of defining accounting entries in the ‘Product Event Accounting Entries Maintenance’ screen. Thus, all accounting entries that are generated as a result of lodgments into an SSIA account will be tracked under the transaction code for which ‘IC Balance Inclusion’ option is enabled.
Specifying the accounting roles
The customer is always debited for the charge amount, for an SSIA however, the customer will be credited with the charge amount, which is referred to as an allowance on the deposit.
The following accounting roles will be maintained for SSIA:
Accounting Role |
Description |
Dr/Cr Indicator |
CR_ALLOWANCE (SSIA Receivable A/C) |
Allowance made on the SSIA deposit |
Dr |
CHG_BOOK (Customer A/C) |
Allowance received by the customer. |
Cr |
Defining a slab/tier structure
To recall, you can calculate allowance on an SSIA based on the net credit turnover in the account. The amount limits (minimum and maximum) that will be eligible for an allowance (a fixed rate decided by your bank) can be maintained as a tier or slab structure.
You can define the slab structure in the ‘IC - Charge Product Preferences’ screen.
Processing Allowance on SSIA
At the end of the month, the following processing will be done on the account:
All lodgments to the SSIA will be totaled at the end of the month. The allowance amount will be calculated on the deposited amount. The following entries are passed:
Dr/Cr |
Account |
Dr |
SSIA Receivable A/C |
Cr |
Customer A/C |
The allowance will be recovered from the revenue department by means of a direct debit. The following entries will be passed for this:
Dr/Cr |
Account |
Cr |
SSIA Receivable A/C |
Dr |
Nostro |
The SSIA will be set up in the Customer Accounts Maintenance screen. Refer to the ‘Core Entities’ User Manual for more details.
Note
You can define custom fields (UDFs – User Defined Fields) to maintain SSIA related information. This information will be used for storing information and will not involve any processing. The UDFs will be used to communicate the SSIA related information to the revenue department, based on which your bank is reimbursed for the allowance made to the customers.
Refer to the ‘User Defined Fields’ User Manual for more details on defining a custom field.
7.2 Transaction Codes for Processing External Charges
This section contains the following topics:
7.2.1 Processing Transaction Code for External Charges
A Transaction Code is associated with each accounting entry in Oracle FLEXCUBE. All external charges for billing have to be booked using external transaction codes. For this you need to maintain a list of transaction codes that can be used for booking and calculation of external charges.
You can invoke the ‘External Transaction Code Maintenance’ screen by typing ‘ ICDTRMNT’ in the field at the top right corner of the Application tool bar and clicking the adjoining arrow button.

Specifying the transaction code
Specify a unique transaction code for external transactions.
Specify a unique identification for the transaction code you are creating. This code will be used for external transactions. You must also specify a unique description for the transaction code.
Specifying the Transaction Type
While maintaining the transaction code, you can define the following types of transaction codes:
- Lcy Amount – the amounts specified for the external transactions will be in the local currency.
- ACY Amount – the amounts specified for the external transactions will be in the account currency.
- Count – the system will base the external transaction on the basis of the count.
7.3 Booking of External Charges
This section contains the following topics:
7.3.1 Booking of External Charges
Through the External Transactions screen you can capture the data for NON Oracle FLEXCUBE related charges.
You can invoke the ‘Interest & Charges External Transaction Online’ screen by typing ICDEXTRI’ in the field at the top right corner of the Application tool bar and clicking the adjoining arrow button.
Specifying the Reference Number
In Oracle FLEXCUBE, the reference number will be generated in a running sequence and is unique for each transaction.
Indicating the Account
Select the customer account number from the option list for which you want to apply the charge. The branch and the currency of the account are automatically displayed by the system. You cannot change these values.
Indicating the Transaction Code
The transaction code you have maintained for external transactions in the External Transaction screen will be displayed in the option list. System will use the code you specify here during IC batch data collection and calculation. The description you have maintained for the transaction code will also be displayed in the next field and you are not allowed to change this description.
Displaying the Booking date
The system defaults the current system date and you will not be allowed to change this date.
Specifying the Value Date
In Oracle FLEXCUBE, charges are calculated based on Value date or Booking date. Hence it is very vital to maintain a value date for the transaction. In case you do not define a value date here, the system will default the current system date as the value date. Make sure that the value date is not less than the last liquidation date for all charge products linked to the account which you have specified in the previous field. The value date defined for a transaction will be used during the data collection of Charges and Charge calculation.
Maintaining the Amount /Count
The value you have maintained in this field will be used in two different ways depending on the type defined for the transaction code. While defining the transaction code, if you have maintained the transaction code type as:
- Amount - the system uses the value you have define in this field to calculate the charge for turnover.
- Count - the system will apply the value maintained in this field to derive the total count while calculation the charge.
System allows you to maintain negative and positive value in this field. Negative value can be maintained for reversing a transaction. The system stores the ACY value data only if you have defined transaction type as ACY amount for the transaction code and similarly the LCY value data is stored only when the transaction type is LCY amount.
Specifying the Remarks
You can specify any remarks you think necessary for the external transaction you have defined. This will be in free format text.