2. Maintenance
2.1 Introduction
Whenever you need to collect an ICCF component, availment amount, or the collateral amount, you debit it from the customer’s account. On some occasions, you may have to debit it from an internal receivable/payable GL, to be debited from the customer account at a later date.
The debiting of the receivable or payable account happens at the event for which the commission or charge has to be collected (issue of a contract, amendment of a contract, availment against an contract, etc.). When the customer account has to be debited at a later date, you have to perform, what is termed as receivable liquidation. There are two related functions associated with liquidation:
- A batch process that reverses the liquidated receivable components, for a contract that is reversed during the day (the LQ EOTI function)
- A batch process that generates the charge and commission claim advice to the party on behalf of whom a charge or commission was debited, from a receivable account during the day (the LQ EOD function)
This chapter contains the following sections:
- Section 2.2, "Online Receivable/Payable Details"
- Section 2.3, "Consolidated Liquidation"
- Section 2.4, "Liquidation Tracers"
2.2 Online Receivable/Payable Details
This section contains the following topics:
- Section 2.2.1, "Invoking Receivable/Payable Online Screen"
- Section 2.2.2, "Main Tab"
- Section 2.2.3, "Advices Tab"
- Section 2.2.4, "Tracers Tab"
- Section 2.2.5, "Events Button"
- Section 2.2.6, "MIS Button"
- Section 2.2.7, "Authorizing Receivable/ Payable Online"
- Section 2.2.8, "Viewing Online Receivable/Payable Details"
2.2.1 Invoking Receivable/Payable Online Screen
You can pass manual entries into LQ Module to maintain additional entries into AR/AP LQ Module in the ‘Receivable/Payable Online’ screen. You can invoke ‘Receivable/Payable Online’ screen by typing ‘LQDTRONL’ in the field at the top right corner of the Application tool bar and clicking on the adjoining arrow button.
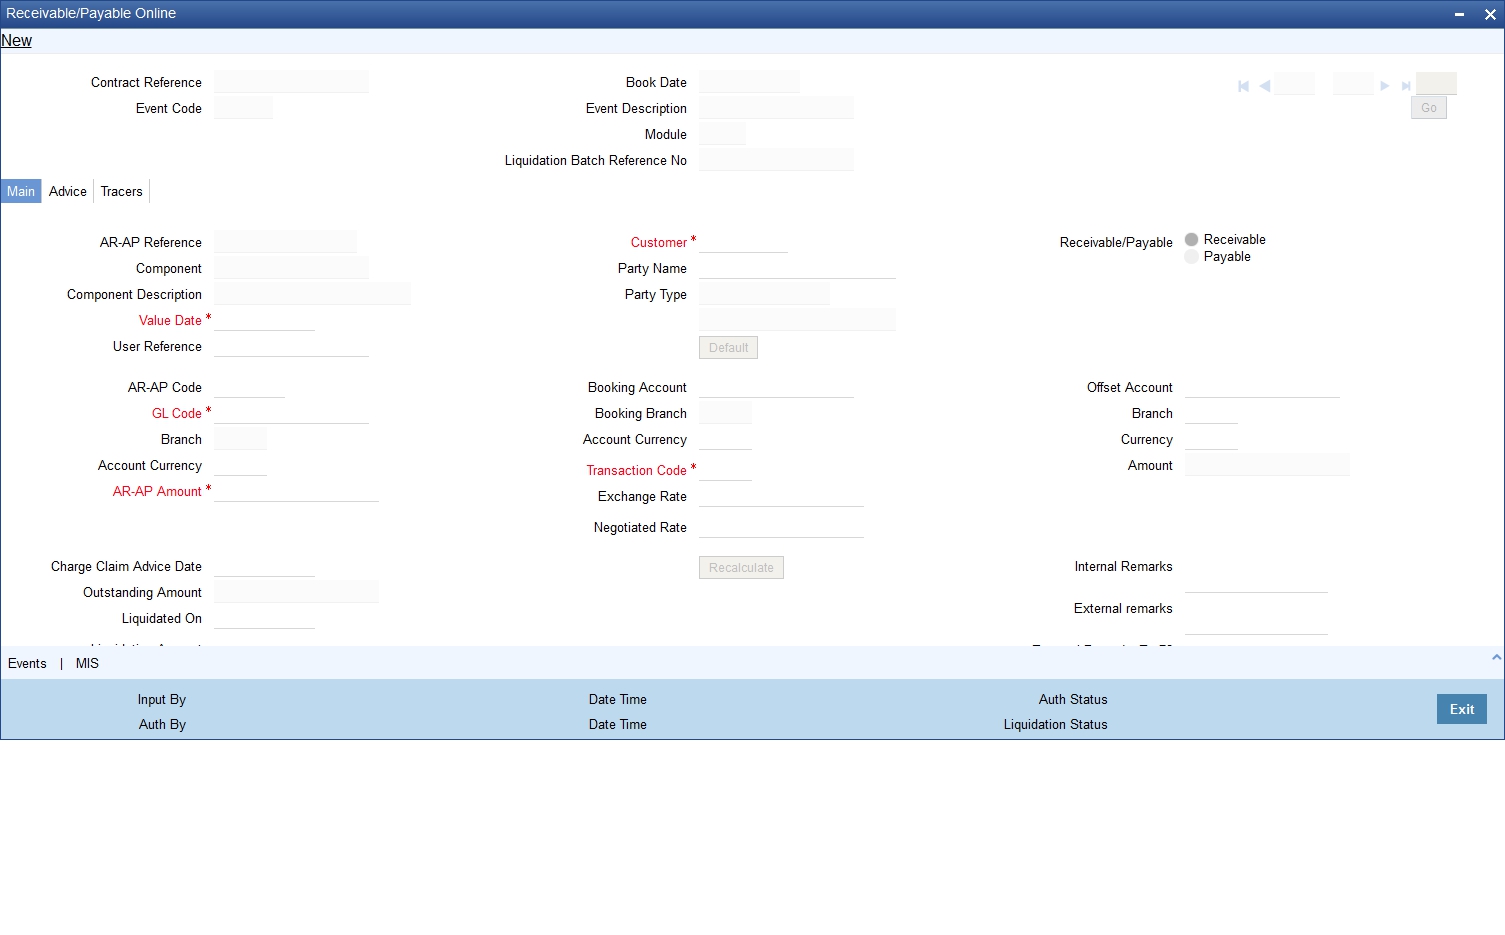
You can liquidate the components of a contract that have been put into a receivable account.
Contract Reference
Specify a valid contract reference number you need to mark, to the Track Receivable or Payable process. The adjoining option list displays valid reference numbers of the contracts created in different modules. You can choose the appropriate one.
However, the system displays reference number for AR-AP records created as part transaction initiated in different modules.
Book Date
The system defaults book date to the current date of the system.
Event Code
The system defaults event code to INIT.
Event Description
The system defaults event description to ‘Initiation’.
Module
The system defaults module to LQ.
2.2.2 Main Tab
You can maintain the following parameters here:
AR-AP Reference
The system defaults a unique liquidation reference number as AR-AP reference number.
Customer
Specify a valid name of the customer you need to link the AR-AP liquidation. The adjoining option list displays all valid open and authorized customer numbers. You can choose the appropriate one.
Receivable/Payable
Select component type from the options. The following options are available for selection:
- Receivable – Select if you need to maintain the component as receivable.
- Payable – Select if you need to maintain the component as payable.
Component
Component assigned to the specified contract reference is defaulted here, based on the details maintained at contract level.
Component Description
Description of the displayed component is defaulted here.
Party Name
Specify name of the party for which you need to maintain the receivable or payable details.
Party Type
Party type of the specified party name is defaulted here based on the details maintained in the system.
Value Date
Specify a valid value date for the specified contract reference from the adjoining calendar. The system defaults application date as the value date; however you can modify the same.
Click ‘Default’ button, to default the values maintained at contract level.
AR-AP Code
Specify a valid AR-AP code you need for the specified contract reference. The adjoining option list displays all valid open and authorized AR-AP codes. You can choose the appropriate one.
GL Code
Specify a valid GL code you need to assign to specified AR-AP code. The adjoining option list displays all valid open and authorized Asset or Liability Leaf GLs. You can choose the appropriate one.
If the GL Code is not specified, then the system displays the GL code based on the AR/AP Code maintained at AR-AP Code Maintenance level.
Branch
Code of the current branch is defaulted here.
Account Currency
Specify currency code you need to assign for the account. The adjoining option list displays all valid open and authorized currency codes. You can choose the appropriate one.
AR-AP Amount
Specify a valid amount for the AR-AP account.
Booking Account
Specify a valid booking account to book the receivable or payable amount. The adjoining option list displays all valid Income and Expense Leaf GLs. You can choose the appropriate one.
Booking Branch
Specify branch code of the booking account. The adjoining option list displays all valid branch codes. You can choose the appropriate one.
Account Currency
Specify currency code of the booking account. The adjoining option list displays all valid currency codes. You can select the appropriate one.
Offset Account
Specify offset account for the specified contract, if you want to maintain offset account details at the booking stage. The adjoining option list displays all valid account numbers. You can choose the appropriate one.
Branch
Specify branch code of the offset account, if you want to maintain offset account details at the booking stage. The adjoining option list displays all valid branch codes. You can choose the appropriate one.
Currency
Specify currency code of the offset account, if you want to maintain offset account details at the booking stage. The adjoining option list displays all valid currency codes. You can select the appropriate one.
Transaction Code
Specify transaction code for the specified contract. The adjoining option list displays all valid transaction codes. You can choose the appropriate one.
Exchange Rate
Specify an exchange rate for the specified account currency.
Negotiated Rate
Specify negotiated rate for the account currency, if there is a difference in the exchange rate.
Amount
The system displays amount equivalent to the offset currency, if the offset account currency is different from the AR-AP account and you click ‘Recalculate’ button.
Charge Claim Advice Date
Specify a valid date when you need to generate Charge Claim Advice from the adjoining calendar.
Outstanding Amount
The system computes the outstanding amount which needs to be liquidated in the AR-AP account currency.
Liquidation On
Specify a valid date when you need to liquidate the specified outstanding amount from the adjoining calendar.
Liquidation Amount
Specify the amount you need to liquidate from the displayed outstanding amount. The system enables partial or complete liquidation of the outstanding amount.
Description
Specify remarks, if any, for the liquidation amount.
Waive Outstanding Amount
Check this box if you need to waive the outstanding amount.
Internal Remarks
Specify internal remarks for the contract, if any.
External Remarks
Specify external remarks for the contract, if any.
External Remarks Tag72
Specify external remarks you want to specify for Tag72 of the message, if any.
External Remarks Tag79
Specify external remarks you want to specify for Tag79 of the message, if any.
2.2.3 Advices Tab
Click ‘Advices’ tab to maintain advice details.
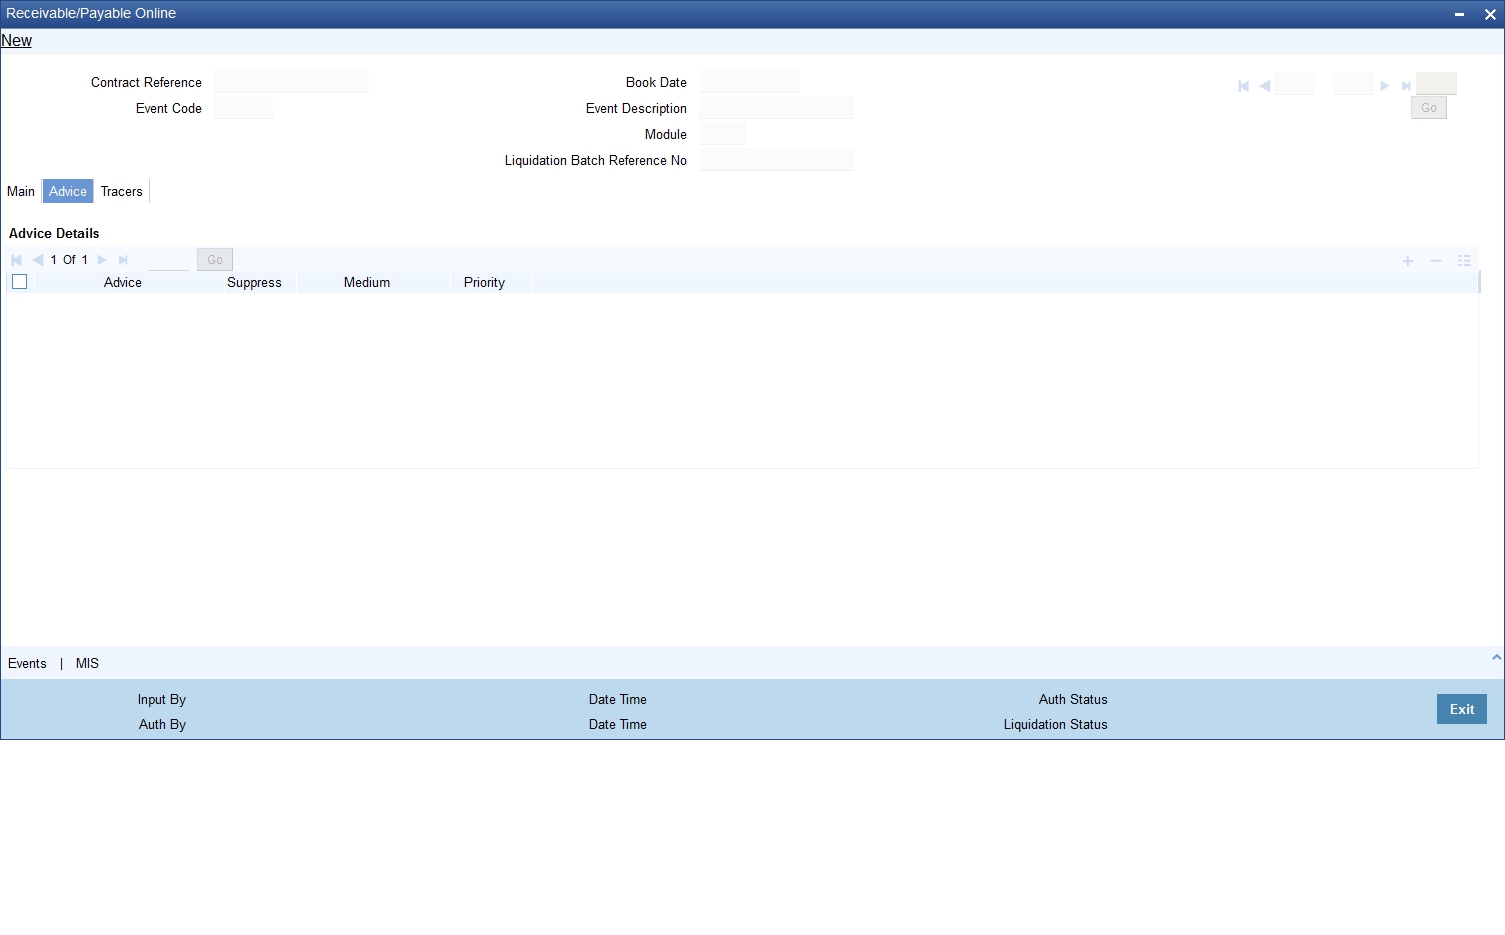
You can maintain the following parameters here:
Advice Details
The following advice details can be maintained:
Advice
The system defaults the name of the advice that needs to be generated.
Suppress
Check this box if you need to suppress the advice.
Medium
Select the medium through which you need to generate the displayed advice. The adjoining option list displays all valid media. You can choose the appropriate one.
Priority
Select priority in which the advice needs to be generated from the adjoining drop-down list. This list displays the following values:
- High – Select if you need to generate the advice on high priority.
- Medium – Select if you need to generate the advice on medium priority.
- Low – Select if you need to generate the advice on low priority.
Note
- If you are booking a new receivable contract, then the system defaults ‘LQCHG_CLAIM_ADV’ advice
- If you are booking a new payable contract, then the system defaults ‘LQCHG_PAYADV’ advice
- If you are liquidating a receivable contract, then the system defaults ‘CHG_LIQ_DR_ADV’ advice
- If you are liquidating a payable contract, then the system defaults ‘CHG_LIQ_CR_ADV’ advice
2.2.4 Tracers Tab
Click ‘Tracers’ tab to maintain tracer details.
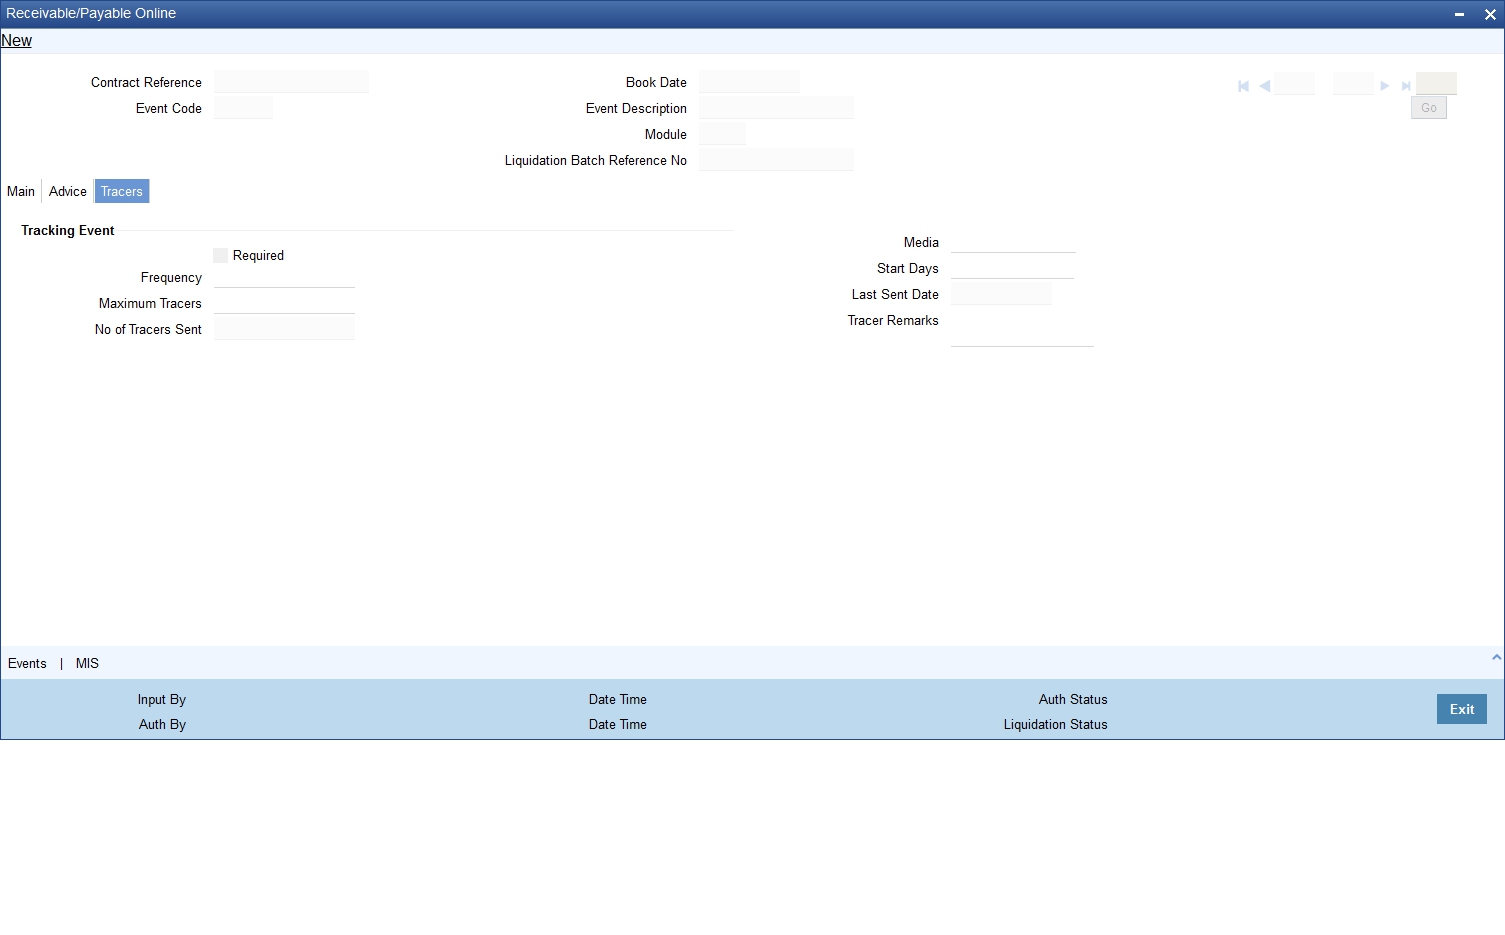
You can maintain the following parameters here:
Tracking Event
The following advice details can be maintained:
Required
Check this box if you require to maintain tracking event.
Frequency
Specify the frequency of tracking the events.
Maximum Tracers
Specify the maximum number of tracers allowed for tracking an event.
No of Tracers Sent
The system defaults the number of tracers which were sent.
Medium
Select the medium through which you need to generate the displayed advice. The adjoining option list displays all valid media. You can choose the appropriate one.
Start Days
Specify the date from which the tracers has to be sent.
Last Sent Date
The system defaults the last date when the tracking event was sent.
Remarks
Specify remarks if any.
Note
You can unlock a LQ Contract and change the counterparty details to track and collect the charges. During, LQ Contract amendment, you can edit only two fields, Customer (Main Tab) and Remarks(Tracers Tab).When the counterparty is changed, the system will generate tracers to the new counterparty based on the remarks captured.
2.2.5 Events Button
At an event, typically, you would want to post the accounting entries to the appropriate account heads and generate the required advices. When setting up a liquidation contract, you can view the accounting entries that have been posted at the various events. To do this, click ‘Events’ button in the screen.
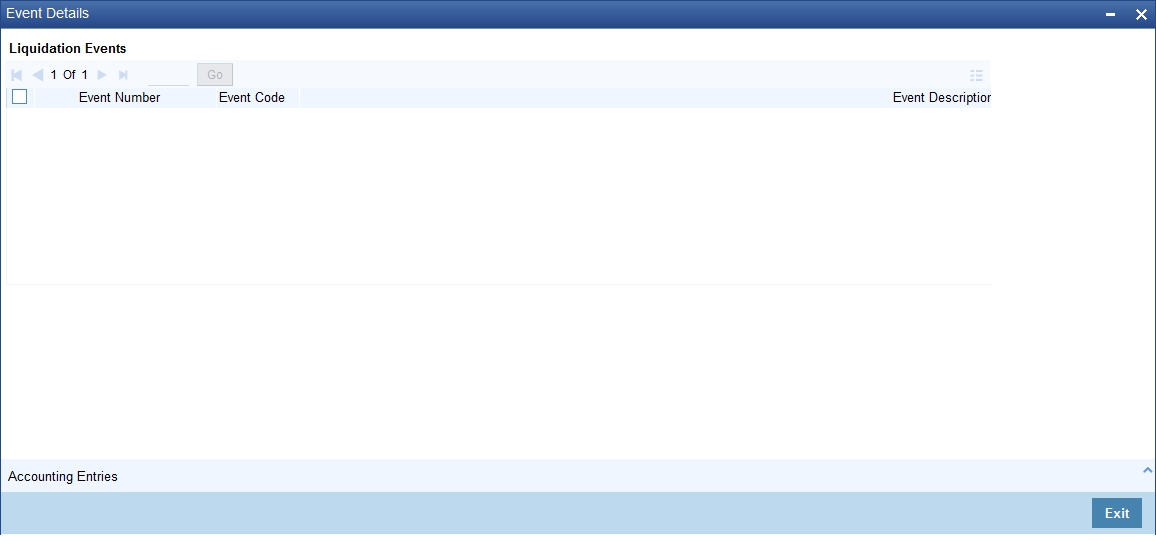
The system displays the following details of the Events associated with the specified contract, which can not be modified:
- Event Number
- Event Code
- Event Description
- Value Date
2.2.5.1 Defining Accounting Entries
To view accounting entries for an event, click ‘Accounting Entries’ in the ‘Events’ button of the ‘Receivable/Payable Online’ screen.
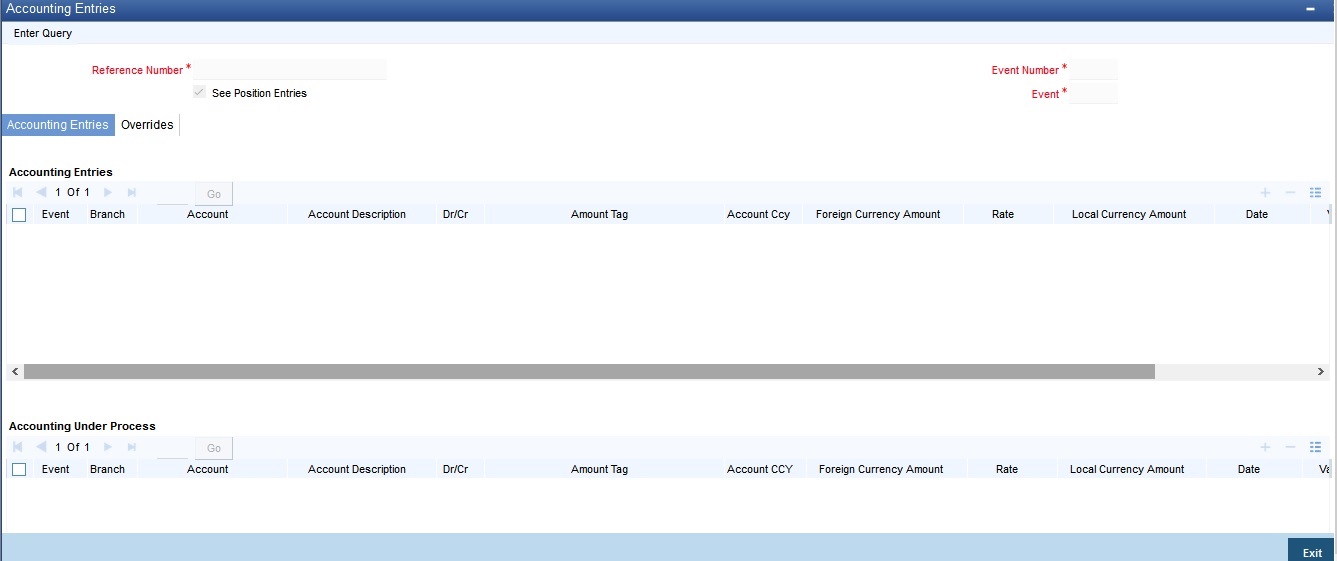
You can view the following parameters:
- Branch
- Account
- Dr/Cr
- Amount Tag
- Currency
- Foreign Currency Amount
- Rate
- Local Currency Amount
- Date
- Value Date
- Code
- Overrides
- Override Status
- Authorized By
- Auth Date Stamp
2.2.5.2 Reversing Liquidation Accounting Entries
You can reverse the authorized accounting entries that were passed, when you liquidated a receivable/payable outstanding component of a contract.
You can reverse the accounting entries, passed for the liquidation of an outstanding component of a contract, through the ‘Receivable/Payable Liquidation’ screen. Specify the Contract Reference Number of the contract. All the outstanding components of the contract that were paid from a receivable/payable and income/expense GL account will be displayed. Query the component whose liquidation entries you want to reverse. Click ‘Roll-over’ icon on the tool bar.
The system will prompt you to indicate whether you want to reverse the liquidation entries passed for the outstanding component or make the component outstanding again.
If you indicate that the entries should be reversed, the accounting entries that were passed earlier will be reversed. However, you will not be able to liquidate the component at a future date.
If you indicate that the component should be made outstanding, the accounting entries that were passed earlier will be reversed and the component will become outstanding again. The component can be liquidated later on.
You can also mark an Outstanding Liquidation Contract as Reversed. This option would be used to waive a particular Receivable/Payable Contract. When an outstanding liquidation contract is reversed, the accounting entries are reversed for the Outstanding Liquidated Amount from the Receivable/Payable GL and the Income/Expense GL. The Income/Expense GL will be derived from the Product Event Accounting Entry Definition for the corresponding Amount Tag and Event Code.
These entries would be passed with the Accounting Reference Number as the AR/AP Reference Number.
2.2.6 MIS Button
You can associate MIS details with a product in the ‘MIS’ screen. Click ‘MIS’ button in the ‘Receivable/Payable Online’ screen to invoke it.

The system defaults MIS details maintained for the contract.
2.2.7 Authorizing Receivable/ Payable Online
Oracle FLEXCUBE facilitates online authorization of AR-AP account using ‘Receivable/Payable Online Authorization’ screen. You can invoke ‘Receivable/Payable Online Authorization’ screen by typing ‘LQDTRAUT’ in the field at the top right corner of the Application tool bar and clicking on the adjoining arrow button. This screen can also be viewed when you click on authorize button after maintaining details in the ‘Receivable/Payable Online’ screen.
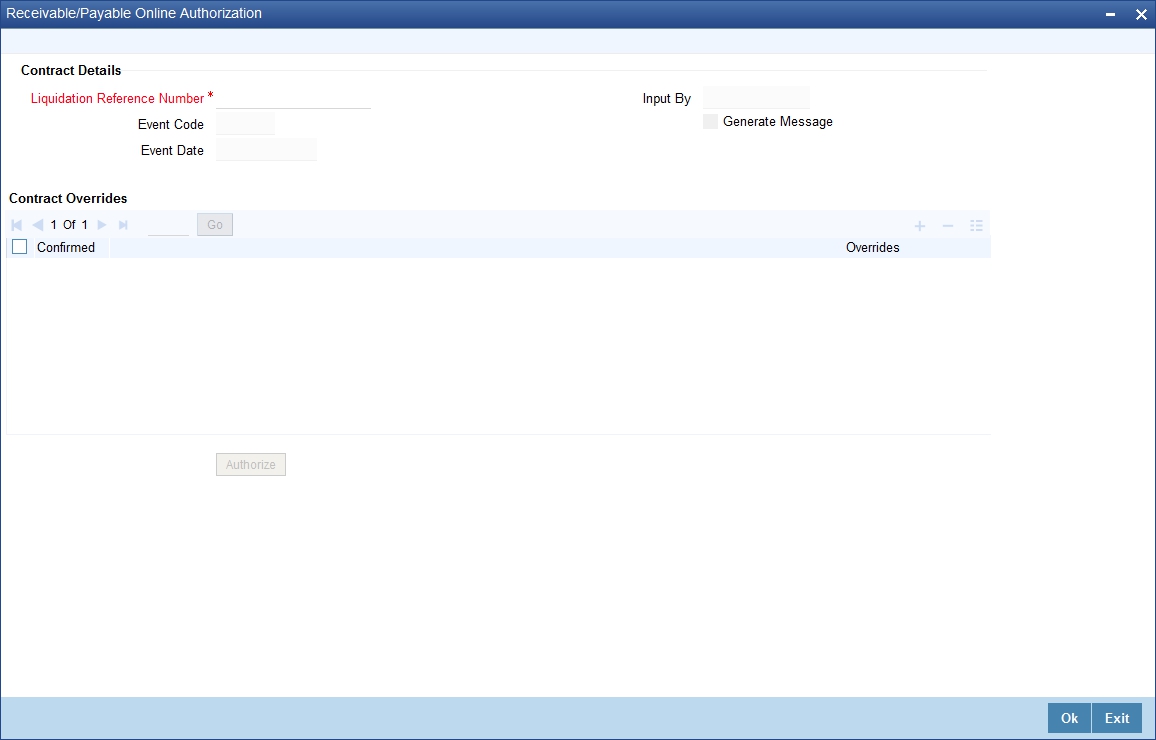
You can query unauthorized LQ contracts and authorize the contract after accepting override messages, if any raised at that time of saving.
You can query based on the following criteria:
Liquidation Reference Number
Specify a valid liquidation reference number of AR-AP account. The adjoining option list displays all valid reference numbers. You can choose the appropriate one.
Input By
The system defaults ID of the maker here.
Generate Message
Check this box to generate message.
Contract Overrides
You can specify the following parameters here:
Confirmed
Check this box to confirm override message displayed, if any.
Overrides
System defaults override messages displayed while generating message, if any.
2.2.8 Viewing Online Receivable/Payable Details
You can view details related to the AR-AP accounts using the ‘Receivable/Payable Online Summary’ screen. You can invoke ‘Receivable/Payable Online Summary’ screen by typing ‘LQSTRONL’ in the field at the top right corner of the Application tool bar and clicking on the adjoining arrow button.
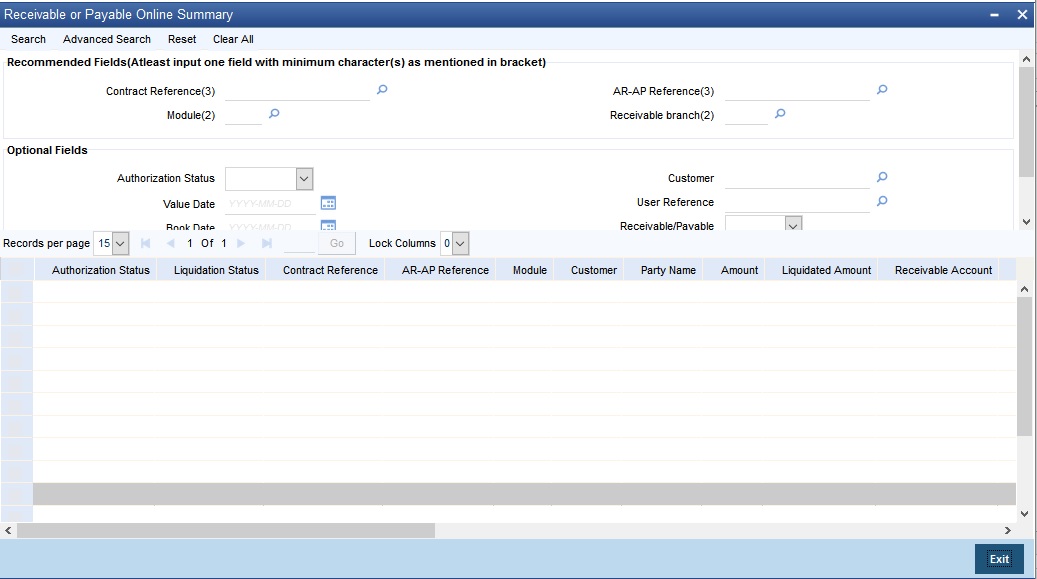
You can search for the AR-AP details based by specifying any or all of the following criteria:
Contract Reference
Specify a valid contract reference number to query based on the contract reference. The adjoining option list displays all valid contract reference numbers. You can choose the appropriate one.
AR-AP Reference
Specify a valid AR-AP reference linked to the contract, to query based on the AR-AP reference. The adjoining option list displays all valid AR-AP reference numbers. You can choose the appropriate one.
Module
Specify a valid module in which the contract was created to query based on the module. The adjoining option list displays all valid available modules. You can choose the appropriate one.
Customer
Specify a valid customer name to query based on the customer. The adjoining option list displays all valid customer names. You can choose the appropriate one.
Value Date
Specify a valid date to query based on the value date of the contract from the adjoining calendar.
User Reference
Specify a user reference number of the contract to query based on the user reference. The adjoining option list displays all valid user reference numbers. You can choose the appropriate one.
Booking Date
Specify a valid date to query based on the booking date of the contract from the adjoining calendar.
Receivable Branch
Specify a branch code of the receivable Bank to query based on the receivable branch. The adjoining option list displays all valid branch codes. You can choose the appropriate one.
Receivable/Payable
Select if the account is a receivable or a payable account to query based on the account type, from the adjoining drop-down list.
Click ‘Search’ button. The system displays the following details based on the criteria specified:
- Authorization Status
- Liquidation Status
- Contract Reference
- AR-AP Reference
- Module
- Customer
- Party Name
- Amount
- Liquidated Amount
- Receivable Account
- Ac CCY
- Value Date
- Event Code
- Charge Claim Advice Date
- User Reference
- Booking Date
- Receivable Branch
- Booking Branch
- Receivable/Payable
2.3 Consolidated Liquidation
This section contains the following topics:
2.3.1 Processing Consolidated Liquidation
Oracle FLEXCUBE facilitates selecting multiple LQ contracts associated with a single customer and contract and initiating bulk liquidation by viewing all the outstanding receivable or payable contracts for the customer of a branch, for a specified period of time. You can perform the above operation using ‘Consolidated Liquidation’ screen. You can invoke ‘Consolidated Liquidation’ screen by typing ‘LQDCLIQ’ in the field at the top right corner of the Application tool bar and clicking on the adjoining arrow button.
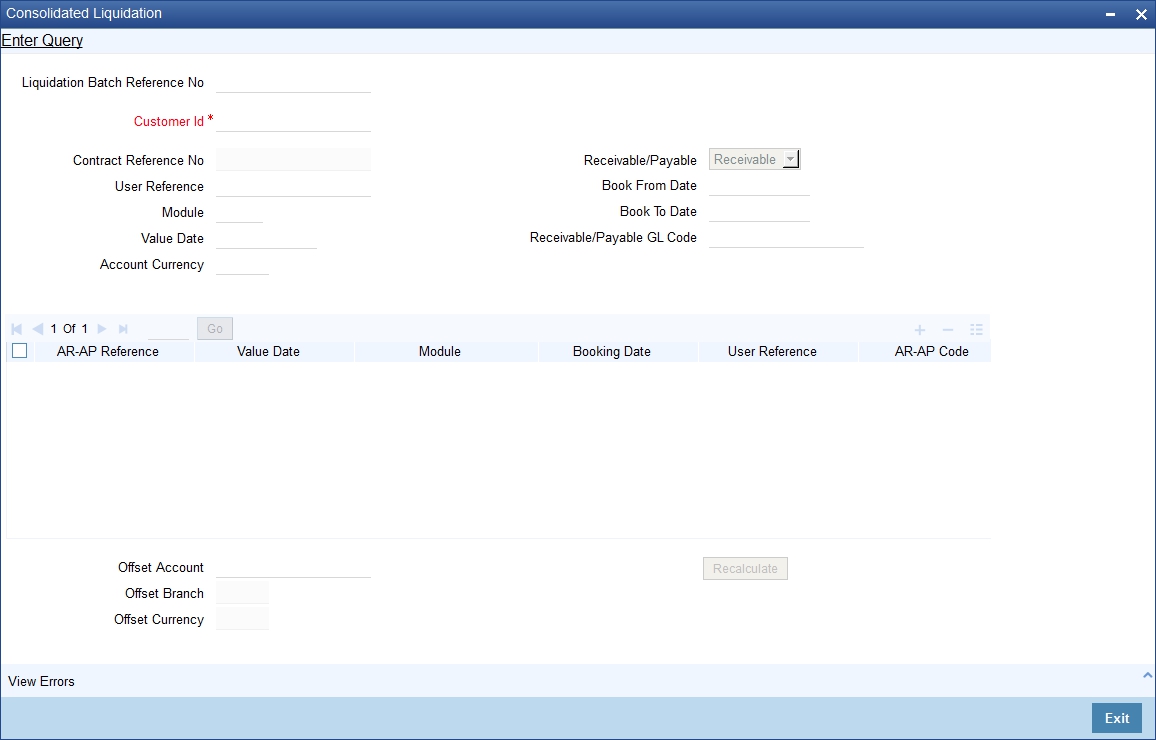
After querying the contract, you can liquidate the contract and add remarks, if any, for each LQ contracts before saving.
You can search for the AR-AP details based by specifying any or all of the following criteria:
Liquidation Batch Reference No
Specify a valid liquidation batch reference number to query based on the liquidation batch reference. The adjoining option list displays all valid liquidation batch reference numbers. You can choose the appropriate one.
Customer ID
Specify a valid customer ID to query based on the customer ID. The adjoining option list displays all valid customer IDs. You can choose the appropriate one
Contract Reference
Specify a valid contract reference number to query based on the contract reference. The adjoining option list displays all valid contract reference numbers. You can choose the appropriate one.
User Reference
Specify a user reference number of the contract to query based on the user reference. The adjoining option list displays all valid user reference numbers. You can choose the appropriate one.
Module
Specify a valid module in which the contract was created to query based on the module. The adjoining option list displays all valid available modules. You can choose the appropriate one.
Value Date
Specify a valid date to query based on the value date of the liquidation batch from the adjoining calendar.
Account Currency
Specify a valid currency of the account to query based on the account currency. The adjoining option list displays all valid currency codes. You can choose the appropriate one.
Receivable/Payable
Select if the account is a receivable or a payable account to query based on the account type, from the adjoining drop-down list.
Booking from Date
Specify a valid date from when the liquidation batch was booked to query based on the booking from date of the batch from the adjoining calendar.
Booking to Date
Specify a valid date till when the liquidation batch was booked to query based on the booking to date of the batch from the adjoining calendar
Receivable/Payable GL Code
Specify GL code of the receivable/payable GL to query based on the GL code. The adjoining option list displays all valid GL codes. You can choose the appropriate one.
Click ‘Search’ button. The system displays the following details based on the criteria specified:
- AR_AP Reference
- Value Date
- Module
- Booking Date
- User Reference
- AR-AP Code
- Component
- GL Code
- Account Currency
- Amount
- Liquidation Amount
- Outstanding Amount
- Transaction Code
- Exchange Rate
- Offset Amount
Select contracts you need to add to bulk liquidation and maintain the following parameters:
Negotiated Rate
Specify a valid negotiated rate for queried LQ contract, if any.
Remarks
Specify remarks for queried LQ contract, if any.
Offset Account
Specify a valid account you need to set as offset account for liquidation. The adjoining option list displays all valid account number. You can choose the appropriate one.
Offset Branch
Specify code of the branch in which the specified offset account is maintained. The adjoining option list displays all valid branch codes. You can choose the appropriate one.
Offset Currency
Specify currency you need to assign to the specified offset account. The adjoining option list displays all valid currencies. You can choose the appropriate one.
Recalculate
Click on recalcualte button after giving the offset details for the liquidation to happen.
After processing the Bulk Liquidation, if there are any errors during the Liquidation of an Account Payable or a Receivable Contract, you can click ‘View Error’ Button to invoke ‘View Error’ screen which displays the Error code and Error Message for the corresponding Account Payable or a Receivable Contract.

Authorizing Consolidated Liquidation
Oracle FLEXCUBE facilitates querying for unauthorized Receivable or Payable contracts based on Liquidation Batch Reference Number, using ‘Consolidated Liquidation Authorization’ screen. Only the user with authorization rights to ‘Receivable/Payable Online’ records can authorize these records; however maker is of the record is not eligible to authorize.
You can invoke ‘Consolidated Liquidation Authorization’ screen by typing ‘LQDALIQ’ in the field at the top right corner of the Application tool bar and clicking on the adjoining arrow button.
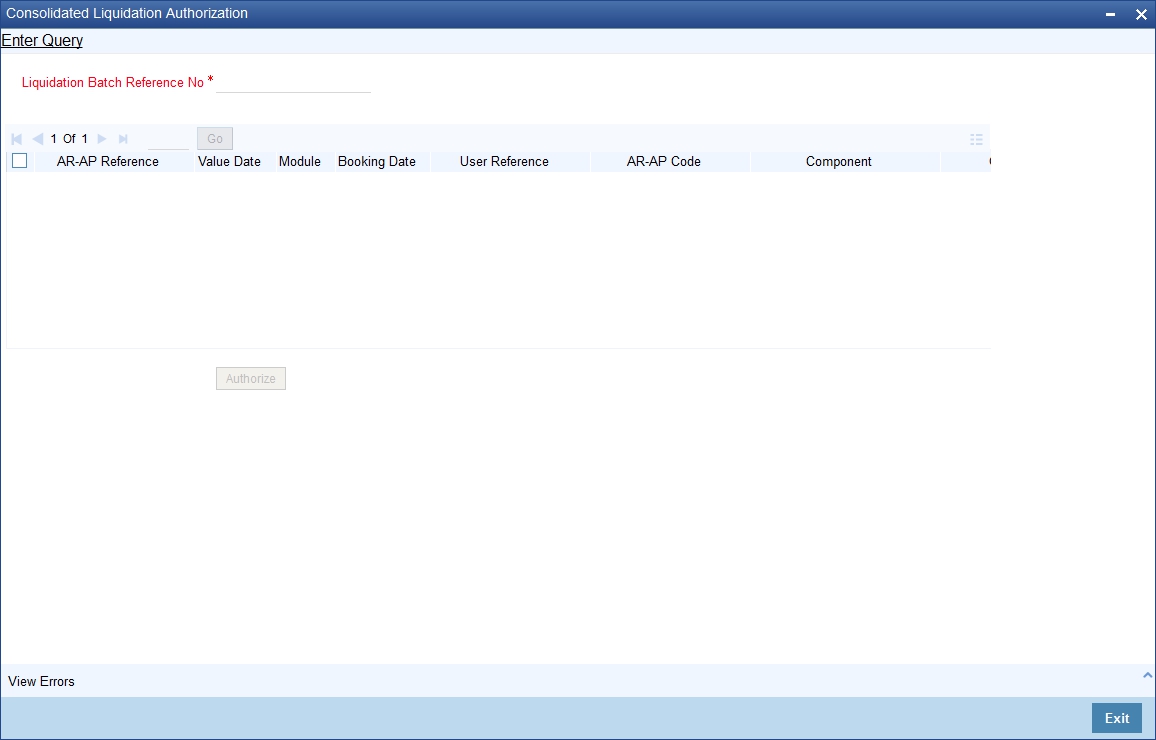
You can query for the record based on the following criteria:
Liquidation Batch Reference No
Specify a valid liquidation batch reference number to query based on the liquidation batch reference. The adjoining option list displays all valid liquidation batch reference numbers. You can choose the appropriate one.
Click ‘Search’ button. The system displays the following details based on the criteria specified:
- AR_AP Reference
- Value Date
- Module
- Booking Date
- User Reference
- AR-AP Code
- Component
- GL Code
- Account Currency
- Amount
- Liquidation Amount
- Outstanding Amount
- Transaction Code
- Offset Account
- Offset Branch
- Offset Currency
- Exchange Rate
- Negotiated Rate
- Offset Amount
- Remarks
2.4 Liquidation Tracers
This section contains the following topics:
2.4.1 Generating Liquidation Tracers
The system enables you to generate Charge Claim Tracer manually using ‘Tracer Generation’ screen. You can invoke ‘Tracer Generation’ screen by typing ‘LQDTRGEN’ in the field at the top right corner of the Application tool bar and clicking on the adjoining arrow button.
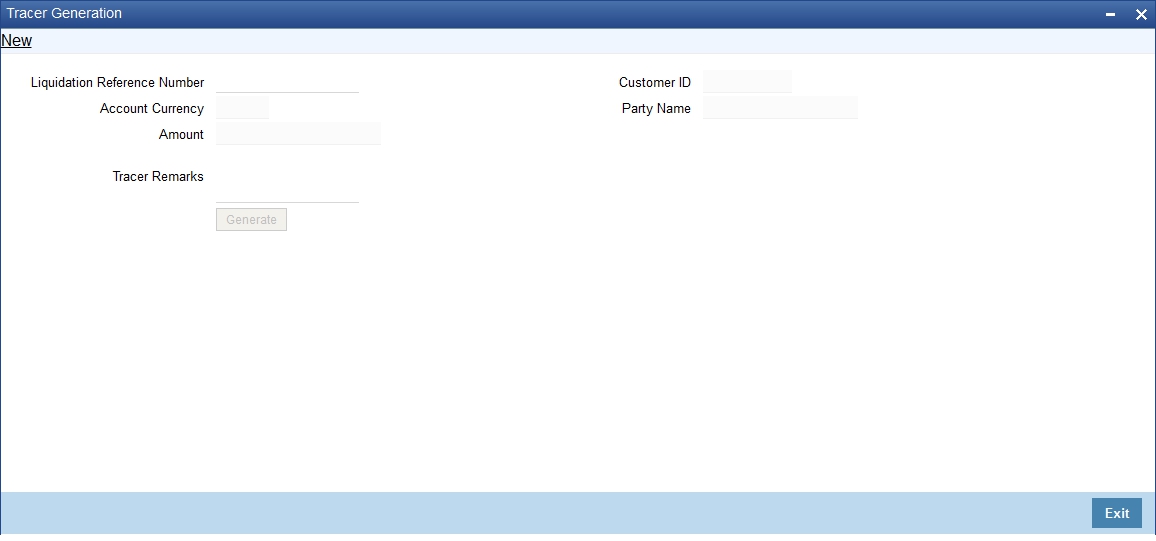
You can maintain the following parameters here:
Liquidation Reference Number
The system defaults the liquidation reference number maintained at ‘AR-AP Liquidation’ level.
Customer ID
The system defaults the customer ID maintained at ‘AR-AP Liquidation’ level.
Party Name
The system defaults the party name maintained at ‘AR-AP Liquidation’ level.
Account Currency
The system defaults the account currency maintained at ‘AR-AP Liquidation’ level.
Amount
The system defaults the amount number maintained at ‘AR-AP Liquidation’ level.
Tracer Remarks
Specify remarks you need to generate for SWIFT or MAIL tracer messages, if any.