4. Product
4.1 Introduction
You can define different types of microfinances and distinguish the various services based on their characteristics. You need to key in relevant information in the product screen to create and categorize microfinance products. This chapter explains the methods to set up and organize microfinance products in Oracle FLEXCUBE.
This chapter contains the following section:
4.2 Setting up a Product
This section contains the following topics:
- "Example 4.2.1" on page 2
- "Example 4.2.2" on page 3
- "Example 4.2.3" on page 4
- "Example 4.2.4" on page 5
- "Example 4.2.5" on page 19
- "Example 4.2.6" on page 20
- "Example 4.2.7" on page 35
- "Example 4.2.8" on page 39
- "Example 4.2.9" on page 41
- "Example 4.2.10" on page 46
- "Example 4.2.11" on page 53
- "Example 4.2.12" on page 53
You can capture product details in the ‘Product Maintenance’ screen. You can invoke this screen by typing ‘MFDPRMNT’ in the field at the top right corner of the Application tool bar and clicking on the adjoining arrow button.
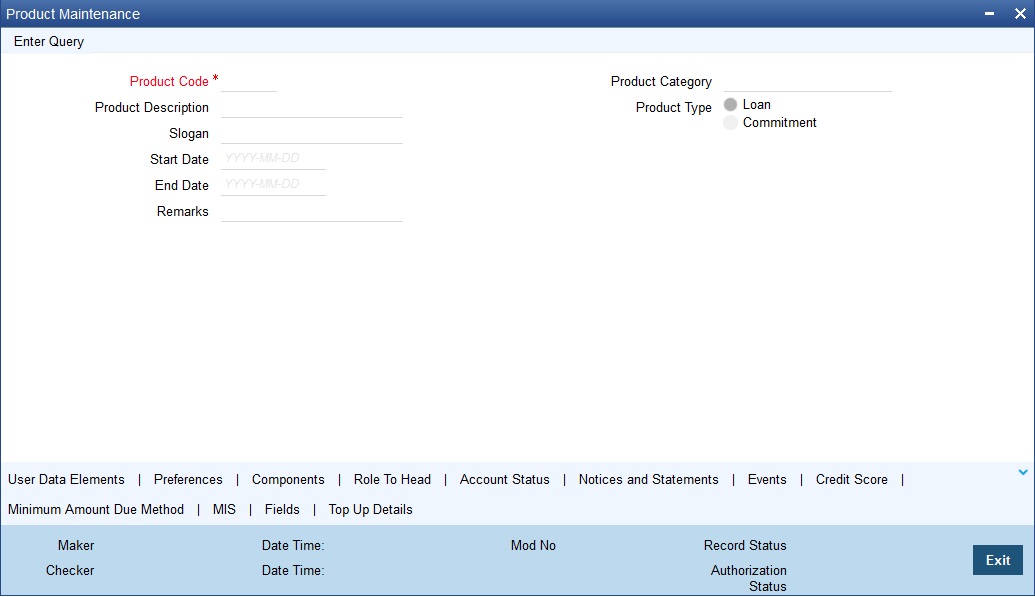
In this screen, you can enter basic information about a product such as the Product Code, the Description, etc. Information related to specific attributes of a product such as accrual details, tenor, account roles and heads, the events etc. have to be defined in the respective sub-screens.
4.2.1 Specifying Basic Product Details
Basic details include the following:
Product Code and Description
The code you enter for a product identifies it throughout the module. You can follow your own conventions for devising the code. However, it must have a minimum of four characters.
When defining a new product, you should enter a code. This code is unique across the MF modules of Oracle FLEXCUBE. For instance, if you have used VA01 for a product in this module, you cannot use it as a product code in any other module.
You should also enter a brief description of the product. This description will be associated with the product for information retrieval.
Select the type of Micro Finance product that you are creating. The options available are:
- Loan – Select this option if you want to create a loan product
- Commitment – Select this option if you want to create a commitment product
Slogan
You can enter a marketing punch line for every product you create. This slogan will be printed on all advices that are sent to customers who avail of the product.
For example, if you set up a borrowings product called Money Multiplier, you could enter the slogan ‘Watch your money grow with Money Multiplier.’
Product Category
Products can be categorized into groups, based on the common elements that they share. For example Vehicle Loans, Personal Loans, Home Loans, and so on. You must associate a product with a category to facilitate retrieval of information for a specific category.
The categories defined through the ‘Product Category Maintenance’ are available in the option-list provided.
Start Date and End Date
A product can be defined to be active for a specific period. When you create a product, you specify a Start and End Date for it. The product can only be used within the specified period i.e. within the Start Date (the date on which the product is created) and End Date.
If you do not specify an end date for a product, it can be used for an indefinite period and the product becomes open-ended in nature.
Refer ‘Annexure 1’ provided at the end of this chapter for details on default product creation.
You can, however, change the default values for a new product.
Remarks
Specify remarks about the product, if any.
4.2.2 Defining Other Attributes for a Product
After specifying the basic details of a product, you can define the other finer attributes for a product in the appropriate sub-screens provided. From the ‘Microfinance Product’ screen, you can move to the sub-screen of your choice to define these details. Click on the buttons provided at the bottom of the screen for this purpose.
Each button is explained briefly in the table below:
Sub Screen Name |
Description |
User Data Elements |
To define the UDEs and Components relating to the product |
Preferences |
To indicate your preferences specific to the product |
Components |
To specify the component details, schedule definition and formulae for the product |
Notices & Statements |
To specify details of account statements and notices to be issued to customers. These have to be generated for different events in the life cycle of a loan |
Role to Head |
To specify accounting roles and account heads for the product. (The concept of accounting roles and heads is explained later) |
Account Status |
To indicate the status preferences for the product |
Events |
To specify events |
Fields |
To associate User Define Fields(UDFs) i.e. Character Fields, Number Fields and Date Fields, with the product |
Credit Score |
To maintain the rules for calculating the credit score of a customer. |
Minimum Amount Due Method |
To define the MAD formula for OLL products |
MIS |
To define the MIS details |
Note
There are some fields in the product definition screens, to which input is mandatory. If you try to save a product without entering details in these fields, the product will not be saved.
When you save a product that you have created, your user-id will be displayed in the ‘Input By’ field and the date and time at which you saved the product in the ‘Date/Time’ field. The Status of the product will be updated as ‘Unauthorized’. A product is available for use only after it has been authorized by another user.
4.2.3 User Data Elements
The main details are defined in the ‘User Data Element’ sub screen. The header section of the screen is used to define the basis details of a product.
The main details include the definition of ‘Used Data Elements and Components.
To define a User Data Element (UDE), you have to specify the following details:
User Data Element ID and Description
Data elements like the rate at which interest has to be applied, the tier structure based on which interest needs to be computed etc. are called User Data Elements (UDEs). These are, in effect, elements for which you can capture the values. You have to specify a unique ID to identify the UDE in the system. For instance, you can have a UDE ‘SUBSIDY_RATE’ to indicate the rate to be used for calculating the subsidy interest amount. The UDE maintained here will be available for defining product rules.
You can also provide a brief description of the UDE being defined.
UDE Type
UDE Type will describe the nature of the UDE. An UDE can fall into one the following types:
- Amount
- Number
- Rate
- Rate Code
UDE Currency
If the UDE type is ‘Amount’, you should specify the currency of the UDE. The currencies maintained in the ‘Currency Definition’ screen are available in the option-list provided. You can select a currency from this list.
Minimum UDE Value
You need to specify the floor limit for the UDE value. This means that the actual UDE value cannot be less than the rate specified here. Note that this amount has to be less than the maximum UDE value. The system will throw an error message if the minimum UDE value is greater than the maximum UDE value.
Maximum UDE Value
You need to specify the ceiling limit for the UDE value. This means that the actual UDE value cannot be greater than the rate specified here. Note that this amount has to be greater than the minimum UDE value. The system will throw an error message if this value is less than the minimum UDE value.
The UDE names alone are captured here. To capture the values for the UDEs defined for a product, you have to use the ‘UDE Values’ screen.
Refer the section titled ‘Providing UDE Values’ in the ‘Maintenances and Operations’ chapter of this User Manual for more details.
4.2.4 Preferences
Preferences are the options that are available to you for defining the attributes of a loan account product. These could be:
- The manner in which the system should handle schedules falling due on holidays
- Whether rollover should be automatic or with user intervention (manual)
- The tenor details for the loan
- Whether receivables should be tracked for the loan account etc.
The options you choose, ultimately, shape the product. These details are used for loan account processing. Click ‘Preferences’ button on the ‘Product Definition’ screen to move to this section of the screen.
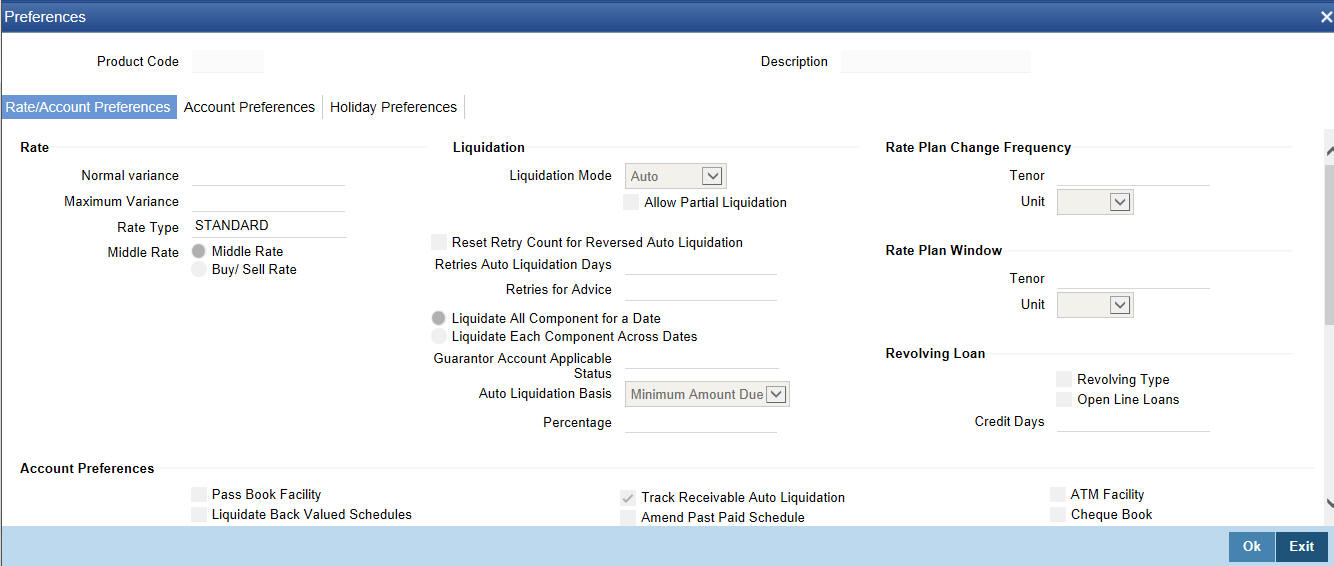
You should maintain the following preferences for the loan product:
4.2.4.1 Rate/Account Preferences
Rate
The exchange rate preferences include the following:
Middle Rate
You have to indicate the exchange rate applicable for the product you are maintaining. The available options are:
- Mid Rate
- Buy/Sell Rate
By default, the Buy/Sell Rate is used.
Rate Type
You have to select the code that should be used for the product from the option list provided. The ‘Rate’ and ‘Rate Type’ are used in combination to determine the actual rate applicable for currency conversion.
The default value for Rate Code is ‘STANDARD’. This means that, if you choose ‘Mid Rate’, the mid rate maintained for the STANDARD code is used for the loans created under the product.
Maximum Variance
When creating a product, you can capture the maximum limit for rate variance. This is expressed in percentage. The variance between the exchange rate (specified for the product) and the rate captured for a loan (at the account level) should not be greater than the value specified here. If the exchange rate exceeds the maximum variance that you have defined for the product, the system will not allow you to save the loan. The transaction is rejected.
This value should be greater the value for ‘Normal Variance’.
Normal Variance
You also need to specify the minimum/normal variance allowed for the rate. If the exchange rate variance between the exchange rate (specified for the product) and the rate captured for a loan exceeds the value specified here, the system will display an override message before proceeding to apply the exchange rate. The normal variance should be less than the maximum variance.
For back valued transactions, the system applies the rate on the basis of the exchange rate history. The variance will be based on the rate prevailing at that time.
Liquidation Preferences
Liquidation preferences include the following:
Liquidation Mode
You can specify the mode of liquidation to be either Auto Liquidation or Manual Liquidation.
Allow Partial Liquidation
In case of insufficient funds in the account, you can instruct the system to perform partial auto liquidation to the extent of funds available in the account. However, if this option is not selected, the schedule amount due will not be liquidated if sufficient funds are not available in the account.
Reset Retry Count for Reversed Auto Liquidation
If you have maintained a limit on the number of retries for auto liquidation, this option will reset the retries count to zero during reversal of auto liquidation. This will be applicable from the date of reversal of payment. Hence, the system will once again attempt auto liquidation till the number of retries allowed. The system will update the status of the reversed payment to ‘Unprocessed’ after which it again attempts auto liquidation.
Retries Auto Liquidation Days
Capture the number of working days for which the system should attempt auto liquidation. The number of retries per day will depend on the configuration maintained for the ‘Liquidation Batch Process’ - during BOD, EOD or both. For instance, if the batch is configured for both EOD and BOD, and the number of retry days is ‘1’, then, auto liquidation is attempted twice on the same day i.e. once during BOD and another retry at EOD.
Retries for Advice
Specify number of times you want to retry generation of advice. The number of retries should be less than ‘Retries Auto Liquidation Days’. When auto liquidation fails and advice retry count is reached, the system generates a failure advice and sends it to the customer to initiate an appropriate action for the successful execution of the advice.
Liquidate All Components for a Date
Check this box if you want to liquidate all the components in a single day,
Liquidate Each Component across Dates
Check this box if you want to liquidate all the components across different days.
Guarantor Account Applicable Status
Select customer account status at which guarantor account should be considered, from the adjoining option list. This list displays all valid status maintained at the customer account level.
Account Preferences
Pass Book Facility
Check this box to indicate that a passbook can be issued to the loan account holder
Liquidate Back Valued Schedules
If you select this option, on initiation of a back value dated loan, all the schedules with a due date less than the system date will be liquidated.
Back Value Dated Entry Allowed
This option facilitates back valued transactions. If you select this option, you will be allowed to process transactions with a value date less than the current system date.
Special Interest Accrual
If you check this box, accrual of interest is done on the basis of the formula specified for a component. Otherwise, interest accrual will be done based on the number of days in the schedule.
Project Account
Check this box to track multiple limit lines in case of joint venture. The settlement account for these loans will be the project account.
Track Receivable Auto Liquidation
Check this box to indicate that the receivables should be tracked during auto liquidation.
Amend Past Paid Schedule
This option, if checked, allows you to perform value dated amendments to interest rate, instalment amount etc with effective date beyond the last paid schedule. In such a case, the increase/decrease in the interest amount, as a result of the amendment, will be adjusted against the next available schedule after the current system date (date on which the amendment was performed) even if unpaid (overdue) schedules are present for the loan. Note that this option is applicable only to term loans.
Packing Credit Product
Check this box to indicate the possibility of linking MF Accounts to BC under this product.
For more details on the Packing Credit Sub System and Pre-Shipment Finance refer section ‘Specifying Purchase Details’ in chapter ‘Processing Bills’ of the ‘Bills and Collections’ manual.
Notary Confirmation Required
You can check this box to indicate that the product is a mortgage product that requires confirmation from the notary for disbursing the loan.
CL Against bill
Check this box if you want this MF product to be used for loans against an export bill. By default this is not checked.
For Loan Against Salary
Check this option to indicate that loan against salary should be allowed for a MF Product. The system defaults this value to loan account details screen.
ATM Facility
Check this box to indicate Loan account accessible for ATM operations.
Cheque Book
Check this box to if you wish to write cheques against the Loan account.
Interest Statement
You have to select this option to facilitate interest statement generation for the account.
Limit Product
Check this box to indicate that the product is for limits. If you check this option, the product will be available for limits linkage during line creation.
Amount
You can specify the minimum and maximum loan amount for each currency:
Currency
Specify a valid currency for which you wish to specify the minimum and maximum loan amount. The adjoining option list displays all valid currencies maintained in the system. You can select the appropriate one.
Maximum Loan Amount
Specify the maximum loan amount allowed for this currency.
Minimum Loan Amount
Specify the minimum loan amount for this currency.
Note
While saving the record, the system validates whether the Minimum Loan Amount is:
- Less than or equal to the Loan Amount Financed
- Less than or equal to the Maximum Loan Amount with respect to the loan currency
While creating a loan account based on an existing product, the Minimum Loan Amount must be:
- Less than or equal to the Loan Amount Financed
- Less than or equal to the Maximum Loan Amount with respect to the loan currency
You can save the record only upon satisfying the above criteria.
Rate Plan Change Frequency
You can change the rate plan frequency of a loan account in the ‘Preferences’ sub screen.
Tenor
Specify the amount of time to be given to the customer for rate change plan option.
Unit
Select the unit for the specified tenor from the drop-down list. The following options are available for selection:
- Monthly
- Yearly
Rate Plan Window
Tenor
Specify the amount of time that the customer can take to decide on the ‘rate plan’ and intimate the bank about the decision.
Unit
Select the unit for the rate plan tenor from the drop-down list. The following options are available for selection:
- Monthly
- Yearly
MFi Preferences
Default from Meeting Schedule
Check this box to indicate that the contract inherits all the schedules maintained at the ‘Meeting Schedule Definition’ screen.
During End of Day (EOD), VAMI is triggered automatically only if Cascade Change to loans and deposits is enabled at ‘Meeting Schedule Definition’ screen and if Default from meeting schedule is enabled at product level.
Revolving Loan
The following options are available to specify a revolving loan:
Revolving Type
Check this box to facilitate the reset of credit for loans availed under this category as and when payment is received.
Open Line Loans
Check this box to indicate that the product type is Open Line Loans.
Note
Open Line Loans should always be revolving type. Open Line Loans product will support only Manual disbursement.
Credit Days
The system will display the repayment date (pay by date). The repayment date (pay by date) should be ‘X’ number of days after the billing date.
OLL account will arrive the pay by date based on the credit days entered here plus schedule due date.
You can calculate the minimum amount due based on the formula chosen maintained in the Product Maintenance.
Product Restriction
Branch Restriction List
Indicate whether you want to create a list of allowed branches or disallowed branches by choosing one of the following options:
- Allowed
- Disallowed
Currency Restriction List
Indicate whether you want to create a list of allowed currencies or disallowed currencies by selecting one of the following options:
- Allowed
- Disallowed
Category Restriction List
Indicate whether you want to create a list of allowed customers or disallowed customers by choosing one of the following options:
- Allowed
- Disallowed
4.2.4.2 Account Preferences
On the ‘Product Preferences’ sub screen, click ‘Account Preferences’ tab to enter details of account preferences.

As part of specifying the account preferences, you can indicate the following:
Readjustment Entry Preferences
You have to specify the manner in which adjustment entries passed due to back dated adjustments should be handled. The options are:
- Settlement: This means that the adjustment is settled directly
- Adjust: In this case, the entries are tracked as a receivable (Cr) or a payable (Dr), to be settled later
The following options are available to make a disbursement:
- Auto - Choose this option to instruct the system for automatic disbursal of loan. In this case, disbursement happens based on the disbursement schedule maintained for the product. This is defined in the ‘Components’ sub screen. By default, the system does an auto disbursal.
- Manual – Choose this option to manually disburse the loan. Here, disbursement happens on demand. In this case, disbursement schedules need not be maintained for the PRINCIPAL component.
The ‘Manual Disbursement’ screen is used for this purpose.
For details, refer the ‘Making Manual Disbursements’ chapter of this User Manual.
Accrual Preference
Frequency
Specify the frequency at which IRR accrual should be performed. This can be either Daily or Monthly. Choose the appropriate option from the adjoining drop-down list.
Handling of Foreclosure
Specify how foreclosures in respect of the loan contracts under the product, must be handled. You can opt for complete accruals or refund. Choose the appropriate option from the adjoining drop-down list.
Note
In case of pre-closure of the loan (prepayment of the total outstanding amount), the fund interest will also get liquidated and thus the accrual entries will get reversed.
Acquisition Type
Specify the acquisition type for the product. You can specify any of the following options:
- Par
- Par/Discount
- Par/Premium
- Par/Discount/Premium
Tenor Preferences
You can set the minimum and maximum tenor limits for a product. You can also specify a standard or a default tenor.
Minimum Tenor
You can fix the minimum tenor of a product. The tenor of the loan account that involves the product should be greater than or equal to the Minimum tenor that you specify.
Maximum Tenor
Likewise, you can also specify the maximum tenor for a product. The tenor of the loan accounts that involve the product should be less than or equal to the Maximum tenor that you specify.
Default Tenor
The ‘default tenor’ is the tenor that is associated with a loan account involving this product. The value captured here should be greater than the minimum tenor and less than the maximum tenor. You can change the default tenor applied on a loan account during loan processing. However, the new tenor should be within the minimum and maximum tenors maintained for the product.
Units
The tenor details that you specify for a product can be expressed in one of the following units:
- Days
- Months
- Year
Account Opening Instalment Calculation Type
Account Opening Instalment Calculation Type
The Account Opening Instalment Calculation Type based on future rates can be:
- Single Instalment: A single instalment is computed using the future rates.
- Multiple Instalments: Multiple EMIs are defined as per the future rates.
Payment in Advance
This check box indicates that the payment of interest and principal happens at the beginning of the schedule. If you check this box, it indicates that payment in advance concept is applicable. Otherwise, it will indicate an arrear.
Rollover Preferences
The rollover specifications for a loan account will apply to all loan accounts opened under the product.
Auto/Manual Rollover
You have the option to rollover the loan manually or instruct the system to do an automatic rollover. If you choose the do an auto rollover, then upon maturity of the loan, the system will automatically rollover the account.
The rollover will happen as part of the Rollover Batch executed at BOD or EOD, depending on your requirement.
Rollover Type
The following options are available:
- Custom: This determines if the Rolled over amount will include the unpaid components of the product. The option list provided will display the components relevant to the product from which you can choose the components that are to be rolled over.
- Special: Choose this option to indicate that a special amount is to be rolled over. The amount is captured at the account level when the actual rollover is initiated.
Rollover Comp
This allows the user to select the components that are to be rolled over(only for auto rollover)
Rollover By
This is applicable if you have opted for automatic rollover. You have to specify the unit based on which Rollover will be triggered. The options are:
- Days
- Months
- Quarters
- Semi Annuals
- Years
UDE Type
Here, you need to specify whether UDE Values for the new (rolled over) loan should be defaulted from the product or from the original loan account/contract that is being rolled over.
Schedule Basis
You should also specify the schedule basis for the rolled over loan. The new loan can inherit the schedules from the loan product or you can apply the schedules maintained for the original loan itself.
Prepayment of Loan
The following are the preferences based on which prepayment of amortized loan should be processed:
Recomputation Basis
Recomputation of amortized loans as a result of a prepayment can be based on one of the following:
- Recalculate Instalment Amount: In this case the tenor remains constant.
- Recalculate Tenor: Here, the tenor is recomputed while the instalment remains constant.
Prepayment Equated Monthly Instalment Type
For Prepayment of amortized loans, if you have chosen to recompute the Instalment Amount keeping the tenor constant, then the Instalment calculation can be one of the following types based on future rates:
- Single Instalment: A single instalment is computed using the future rates.
- Multiple Instalments: Multiple EMIs are defined if a future rate change is known upfront.
- While giving the UDE values, effective dates can be given based on which the UDE values will become applicable.
Let us say a loan is sanctioned on 1.1.2008. The rate of interest is as follows:
- UDE value Effective date is 01.11.2007 - 10%
- UDE Value effective date is 01.04.2008 - 11%
If the option chosen is ‘Multiple instalment’ then based on the UDE values, EMI will be calculated depicting a higher EMI from 1.4.2008 at the new rate of interest. So, when ever a prepayment happens it will take into effect the two rates and calculate two different EMIs for these periods.
Minimum EMI Amount
You can enter the minimum amount that has to be paid as EMI after recomputing the EMI. The recalculated EMI after prepayment should be greater than this amount.
Minimum EMI Ccy
You can enter the currency of the EMI amount to be paid.
Recomputation of Amortization Loan at Amendments
You have to indicate whether the tenor of the loan should be reduced or the instalment should be recalculated whenever a maturity date, principal change or a rate change is made against an amortized loan.
Value Dated Amendment Action
The possible amendments and the recomputation basis are given below:
- For amendment of maturity date of an amortized loan: You can opt to change the tenor, keeping the instalment constant.
- For amendment of principal amount: You can affect it either as a Balloon additional amount in the last schedule or apportion it across the instalments
- For interest rate change: You can change the tenor keeping the instalment constant or vary the EMI and keep the tenor same.
VAMI Instalment Calculation Type
For amendments, if the recomputation basis is ‘Change Instalment’, then the Instalment calculation can be:
- Single Instalment
- Multiple Instalment based on multiple future rates
Interest Preferences
Interest only Period
Specify (in numbers) the duration for which the customer needs to repay only the interest component. This period thereby indicates a holiday period for principal repayment.
Unit
Select the unit of period to be considered for the interest holiday, from the adjoining drop-down list. This list displays the following values:
- Days
- Weeks
- Months
- Years
Note
In Oracle FLEXCUBE, one month is equal to 30 days.
Rate Change Action
Select the rate change action from the adjoining drop-down list. The available values are:
- Change Instalments
- Change Tenor
The system defaults Change Instalments as rate change action value. However, you can modify it. The value ‘Change Tenor’ is applicable only for amortized accounts. During rate revision, the system re-schedules the loan account based on the selected value of the rate change action. Rate Change Action is applicable for ARVN and REVN operations.
4.2.4.3 Holiday Treatment Preferences
The value date, schedule date, revision date or the maturity date of a contract might fall on a local holiday defined for your branch or on a holiday specified for the currency involved in the contract. To set you preferences specific to holiday treatment, click ‘Holiday Treatment’ tab.
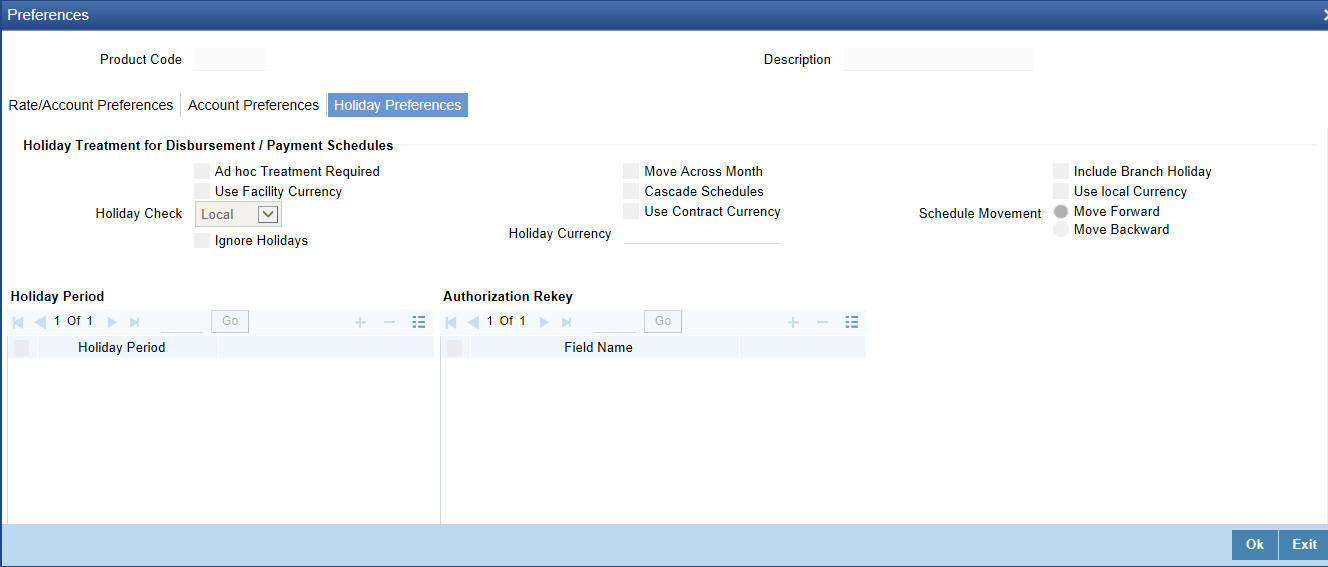
You need to specify the following holiday parameters, which has to be considered for holiday handling:
Adhoc Treatment Required
Check this option to allow the movement of due dates of the schedules that fall on the newly declared holidays. This option is enabled only if the options, Ignore Holidays parameter and the Cascade Schedules parameter are not checked at the product level.
Holiday Check
Select the type of holiday from the drop down list. The options available are as follows:
- Local
- Currency
- Both
Ignore Holidays
If you check this option, the schedule dates will be fixed without taking the holidays into account. In such a case, if a schedule date falls on a holiday, the automatic processing of such a schedule is determined by your holiday handling specifications for automatic processes, as defined in the ‘Branch Parameters’ screen.
Cascade Schedules
If you check this option, when a particular schedule falls due on a holiday and hence is moved to the next or previous working day (based on the ‘Branch Parameters’), the movement cascades to other schedules too. If not selected, only the affected schedule will be moved to the previous or next working day, as the case may be, and other schedules will remain unaffected.
Example
Assume that you have opted to move holiday schedules to the next working day and a schedule falling due on 29th April is moved to 30th April, 29th being a holiday.
The schedule date for May depends on whether you have chosen to cascade schedules. If you have, chosen to cascade schedules, the schedule date for May will be set as 30th May, since the frequency has been specified as monthly. All subsequent schedules will be moved forward by a day.
If you have not specified that schedules have to be cascaded, the date originally specified will be the date for drawing up the remaining schedules. Even if you move the April schedule from 29th to 30th, the next schedule will remain on 29th May.
However, when you cascade schedules, the last schedule (at maturity) will be liquidated on the original date itself and will not be changed like the interim schedules. Hence, for this particular schedule, the interest days may vary from that of the previous schedules.
Move across Month
If you have chosen to move the schedule date of a loan falling due on a holiday, either to the next or previous working day and the movement crosses over into a different month, then this option will determine whether the movement should be allowed or not.
Schedule Movement – Forward /Backward
If you opt to move the schedule date falling due on a holiday across months, you need to specify whether the schedule date should move forward to the next working day in the following month or move backward to the previous working day of the current schedule month itself.
However, if you opt to ignore the holidays and do not select the ‘Move Across Months’ option, the system Ignores the holidays and the due will be scheduled on the holiday itself.
Use Contract Currency
Check this box to include the contract currency.
Include Branch Holiday
Check this box to include the branch holiday.
Use Local Currency
Check this box to consider the local currency.
Authorization Rekey
As a cross-checking mechanism to ensure that you are invoking the right loan for authorization, you can specify that the values of certain fields should be entered, before the other details are displayed. The complete details of the loan will be displayed only after the values to these fields are entered. This is called the re-key option. The fields for which the values have to be given are called the re-key fields.
You can specify the values of a loan that the authorizer is supposed to key-in before authorizing the same. You can select the fields from the option list provided. If no re-key fields have been defined, the details of the loan will be displayed immediately once the authorizer calls the loan for authorization.
The re-key option also serves as a means of ensuring the accuracy of the data captured.
Holiday Period
Select the holiday period from the adjoining option list.
4.2.4.4 Prepayment Penalty Component
An SDE, ‘CUR_PREPAID_AMOUNT’ defines the formula of the prepayment penalty component. This indicates the prepaid amount for the current year. This SDE picks its value from the system. ‘CUR_PNLTY_COLLECTED’ is an SDE that indicates the prepayment penalty already collected for the financial year. ‘CUR_PRINCIPAL_OUTSTND’ is an SDE that defines the formula of the prepayment penalty component. This indicates the principal outstanding amount at the beginning of the current year.
You can use the following formula to base the ceiling percentage on original disbursement amount:
CUR_PREPAID_AMOUNT>(MAX_PREPAID_PCT*AMOUNT_DISBURSED/100)
You can use the following formula to base the ceiling percentage on the opening principal outstanding amount for the current year:
CUR_PREPAID_AMOUNT>(MAX_PREPAID_PCT*CUR_PRIN_OUTSTND/100)
The result of the above formulae is as follows:
(CUR_PREPAID_AMOUNT-(MAX_PREPAID_PCT*AMOUNT_DISBURSED/100))*(PREPAY_RATE/100)-(CUR_PNLTY_COLLECTED)
After the collection of pre-payment penalty, if there is any additional disbursement to the customer which leads to the increase in limit of the prepaid amount, system will not pass on the benefits back to the customer. However, for subsequent calculations the disbursed amount and the pre-payment penalty paid till date for the financial year is considered based on the formula defined. If SDE ‘CUR_PRINCIPAL_OUTSTND’ is the basis for calculation, the additional disbursement will not be considered in calculation for current year. It is used for calculation only from next year onwards.
4.2.4.5 Calculating NPV Difference
In case of early repayment of loans (partial or full), the following method is followed for penalty calculation:
Let us assume that, X% of the total loan amount can be paid in one year. Penalty is applicable on anything above X%. This penalty is the difference between the NPV of existing cash flows of the loan being paid and the NPV of the cash flows post-prepayment application. Both the NPVs are based on current yield curve i.e. yield rate supplied. This penalty can also be based on percentage of amount being overpaid.
A UDE, ‘YIELD_RATE’ is used for the calculation of penalty based on NPV of current cash flows of loan and NPV of new cash flows post-prepayment.
An SDE, XNPV computes the NPV value based on the current cash flows and future cash flows (i.e. post-prepayment application) respectively.
The formula for calculating NPV is as follows:
PREPAID_AMOUNT > 0
The result of the formula is as follows:
@XNPVDIFF (XNPV, YIELD_RATE)
Result of the formula can be some percentage of the difference of the NPV as shown below:
@XNPVDIFF (XNPV, YIELD_RATE) * 0.05
The computation of pre-payment penalty is done by the system at the time of allocate. Internally system applies the pre-payment and gets the future schedules. Subsequently, based on the formula defined for XNPVDIFF, system finds the difference between the NPV based on the yield rate and populates the same against the pre-payment penalty component.
Note
Penalty based on NPV is supported by the system only when product is amortized.
4.2.5 Specifying Credit Score Details
You need to maintain the rules for calculating the credit score of a customer. You can do this in the ‘Credit Score’ screen which can be invoked by clicking ‘Credit Score’ in the ‘‘Product Maintenance’ screen.

You can maintain the following details in this screen:
Rule Name
Specify a suitable name for the credit scoring rule.
Default Rule
Check this box if you want to select this rule as the default rule, which gets defaulted to the account.
Note
You can maintain only one rule as the default rule.
Line
Specify a sequence number, to keep track of the number of expressions maintained for that rule name.
Condition
You need to specify the condition to be satisfied for the rule by clicking the ‘Condition’ button. You can specify the condition in the ‘Condition Builder’ screen, which gets invoked. To specify the condition, you need to select the field name, operator and the value and click ‘Accept’.
Result
Specify the expected result of the condition to be satisfied.
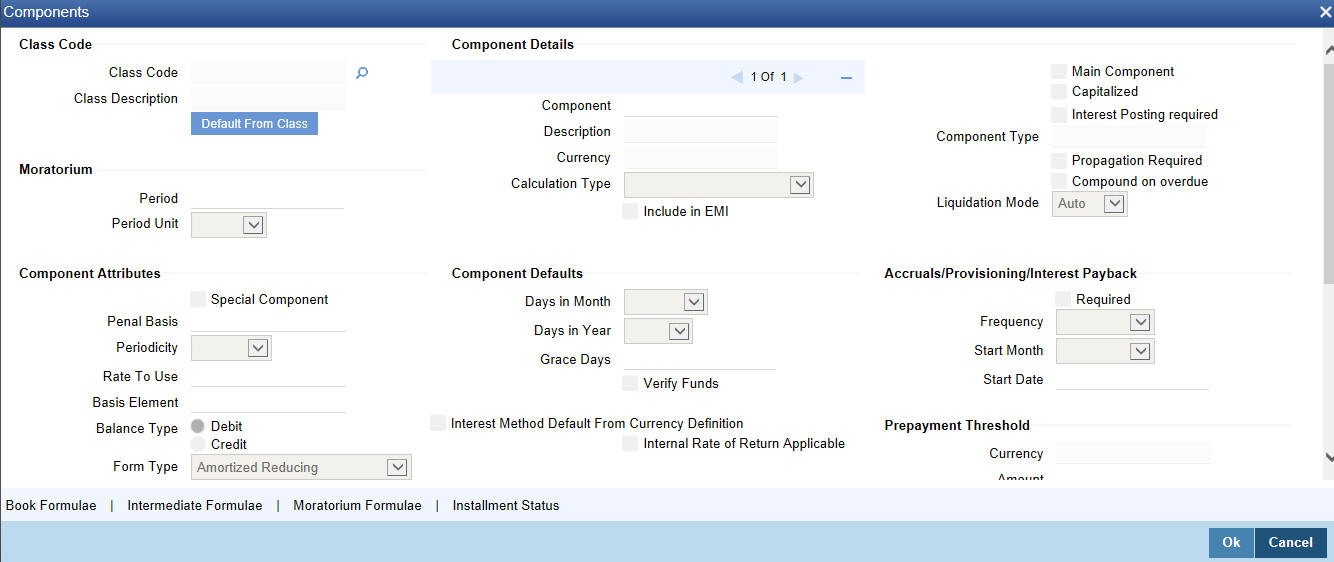
4.2.6 Specifying Components
You have already maintained the components of the product in the ‘Microfinance Product’ screen. The features of the components are defined in the ‘Components’ sub screen.
From the component list, highlight a component and then go on to define the features for the selected component e.g, highlighting the ‘Fund Interest’ component will treat the component as ‘Funding Interest component’.
Note
The relevant accounting entries will be maintained for ACCR and MLIQ/ALIQ events. With this maintenance, the system will pass accounting entries for accrual.
Class Code
You can get the details of the component defaulted from a component class.
Specify the class code from which you wish to get the details defaulted for the component. The option list displays all valid class codes maintained in the system. Choose the appropriate one. Based on the class code specified, the system displays the description.
Once you have specified the class code, click ‘Default from Class’ button. The system defaults the details common to all components in a class.
Component Details
The basic information for a component is specified here. This includes the following:
Component
The Components which are defined in screen are available in Component list.
The Component which is selected in the list appears in Component field. For e.g. ‘PRINCIPAL’, ‘INTEREST’, ‘PENALTY’ ‘PROV’ etc. Subsequently, you have to define the parameters for these components in the ’Component’ sub screen of the screen.
For Commitment products, the MAIN_INT component is used for defining periodic fees on the unutilized commitment amount.
Currency
Associate the component with a currency. The component is expressed in the currency selected here. You can select the currency of your choice from the option list provided.
Calculation Type
Specify the manner in which the component should be calculated and liquidated. You can choose one of the following options (the applicable ‘Component Type’ is also provided):
- Formula with schedule (Component Type - Interest)
- Formula without schedule (Charge)
- Penal Interest
- Prepayment Penalty
- Discount
- Schedule without formula (Principal)
- No schedule No formula (Ad Hoc Charges)
- Penalty Charges
- Savings
Note
- ‘Penalty Charges’ are calculated only once for a ‘Penal Basis’ schedule. ‘Penal Basis’ is explained later in this user manual.
- The component ‘Savings’ is used for interest calculation
on the value dated balance of the savings account. This component needs
to be defined as simple interest component with its basis element
as ‘CUSTAC_BAL’, and rate to use as ‘INTEREST_RATE’.
Formula for this component is as shown:
@SIMPLE (CUSTAC_BAL, (INTEREST_RATE), DAYS, YEAR, COMPOUND_VALUE)
Include in EMI
Check this box to indicate that the selected component should be included in EMI calculation.
Main Component
This option is used to designate a component as the ‘Main’ Interest component. If you enable the ‘Main Component’ option for a particular component, the system treats this component as the main component. Also, you are allowed to define the amortization schedules only for this component.
‘Principal’ is an implicit component that is automatically created for the product
Capitalization
You can indicate whether capitalization is required for all the schedules for various component of the loan. At anytime, the outstanding interest will be capitalized on the schedule date at the rate prevalent on that day. You can opt for capitalization at the component level or opt for capitalization/non capitalization for a particular schedule at the ‘Schedule’ level.
You could have more than one type of schedules applicable on a product. In such a case, you can designate one as the capitalized and the other as un-capitalized schedule.
Interest Posting Required
Check this option if you require interest posting.
Component Type
Indicate the nature of the component. This is also known as the ‘Reporting Type’. It defines the manner in which the component should be classified for reporting/accounting purposes. A component can be of one of the following types:
- Reimbursement: these are components which have both Dr and Cr mapped to settlement accounts
- Off-Balance Sheet (OBS): An OBS Component will have balances but these need not be zero when an account is closed
- Fund Interest: This indicates the funding component
- Ad hoc Charges
- Charge
- Tax
- Insurance
- Interest
- Provisioning
- Deposit
Note
The fund interest component gets liquidated on schedule even if the customer does not pay the other components.
During EOD, provisioning event is triggered for all loan accounts linked to a customer whenever you modify the credit rating of a customer at the customer level. Provisioning amount is calculated based on the formula maintained for the Provisioning Component at the Product level. During EOD batch, PROV event is picked and processed for all the loan accounts for which PROV event is to be triggered. As a part of end of day batch accounting entries are passed for the calculated provision amount.
Even though the credit rating changes at customer level, the Provision event will not be triggered for accounts belonging to that MF product level, if the following maintenances are not done:
- Provisioning component maintenance at product level
- Provisioning event (PROV) maintenance at product level
- If Accrual frequency is daily at product level
Propagation is required
Check this option to indicate that the interest amount collected from the borrower should be passed on to participants.
Compound on overdue
Check this box to compound the interest/penalty interest when it is overdue.
Note
- This check box can be checked only for a single interest and penalty components.
- If you check this box, then the system compounds the overdue interest or penalty computed till the last compounding date, to the principal.
- If this check box is checked and a component schedule is overdue, then the system triggers re-computation on the compounding dates and compound the overdue/penal interest on that date.
Liquidation Mode
Select the liquidation mode from the drop down list. The options available are:
- Auto
- Manual
Component Attributes
The component attributes include the following:
Special Component
You can define a component as a ‘Special Interest Component’. You can override such components at the account level. You may need to apply a special interest component as a result of customer negotiations. A special interest component is specified as an amount.
Penal Basis
You may want to allot the penalty to the recovery of certain components. Once a component is overdue, an appropriate penalty is applied. Therefore, you need to identify the component, which on becoming overdue will trigger the penalty computation. However, the system will calculate the penalty on the component you select in the ‘Basis Element’ field.
Note
For commitment products ‘PRINCIPAL’ is not used for penal basis and for basis amount. In case of EMI products, instalment amount is used for calculating the penalty.
Periodicity
The periodicity of the component can be either:
- Daily
- Periodic
If you choose the periodicity as ‘Daily’, any changes to UDE and SDE values will result in recalculation of the component. The recalculation happens as and when a change in value occurs. If maintained as ‘Periodic’, the values and calculations of the elements will be refreshed on the last day of the period.
In case of a product having main and subsidy interest components, the schedule periodicity needs to be identical for both components.
Rate to Use
Here, you need to select the UDE which will define the rate to be used for computing the component. The value of the selected UDE is picked up as per the maintenance in the ‘UDE Values’ screen. For instance, you need to choose the option ‘SUBSIDY_RATE’ for a subsidy interest component.
This is applicable only for components defined with ‘Standard’ Formula Type
Note
The ‘Basis Element’ for computing fund interest will always be ‘Principal Outstanding’ and the ‘Formula Type’ will be ‘Simple’, independent of the main interest component. The liquidation mode for funding component will always be ‘Auto’, independent of the Product / Account Liquidation mode.
Balance Type
Identify the nature of the balance that the component would hold. This can be represented through this field. For instance, for a loan product, the ‘Principal’ component is expected to have a ‘Debit’ balance.
Basis Element
If you select the ‘Standard’ formula type, you have to specify the component upon which calculation should be performed. The component is denoted by an SDE (e.g. PRICIPAL_EXPECTED) and you can select it from the option list provided. For an overdue/penalty component, this is the element on which penalty is applied.
This is not applicable if ‘Formula Type’ is ‘User Defined’.
Form Type
You can specify the type of formula to be used for calculating the component. This formula is applied for the component across all its’ schedules. It can be one of the following:
- User Defined: This can also include a combination of standard formulae for different schedules of the component or can have a completely user defined formula.
- Standard
- Simple
- Amortized Rule of 78
- Discounted
- Amortized Reducing
- True Discounted
- Rate Only
You can choose the option ‘Amortized Reducing’ for subsidy component.
Note
- This is not applicable for the ‘PRINCIPAL’ component
- For a commitment product, the formula type cannot be ‘Amortized’, ‘Discounted’ or ‘Simple’
Moratorium Preferences
The following parameters have to be specified:
Moratorium Period and Period Units
If you wish to provide a moratorium on a loan, you need to mention the moratorium period and moratorium unit for each component. This refers to a repayment holiday at the beginning of the loan.
When you input a loan in Oracle FLEXCUBE, the repayment start date of each component will be defaulted based on your specifications here. The moratorium unit should be in terms of:
- Days
- Months
- Years
Component Defaults
For computing interest, you have to specify the following:
Days in Year
You can specify the number of days to be considered for a year during computation of a particular component. This could be:
- 360: This means that only 360 days will be considered irrespective of the actual number of calendar days
- 365: In this case, leap and non leap year will be 365
- Actual: In this case, leap year will be 366 and non leap year will be 365
This value corresponds to the denominator part of the interest method
Days in Month
Here, you have to specify the number of days to be considered in a month for component computation. The options available are:
- Actual: This implies that the actual number of days is considered for calculation. For instance, 31 days in January, 28 days in February (for a non-leap year), 29 days in February (for a leap year) and so on
- 30 (EURO): In this case, 30 days is considered for all months including February, irrespective of leap or non-leap year
- 30 (US): This means that only 30 days is to be considered for interest calculation for all months except February where the actual number of days is considered i.e. 28 or 29 depending on leap or non-leap year
The value selected here corresponds to the Numerator part of the Interest method
Interest Method Default from Currency Definition
You also have the option to use the interest method defined for the currency of the component. In this case, the interest method defined in the ‘Currency Definition’ screen (for the component currency) will become applicable to the loan. By default, this option is checked.
Grace Days
The grace days refer to the period after the repayment date, within which the penalty interest (if one has been defined for the product) will not be applied, even if the repayment is made after the due date. This period is defined as a specific number of days and will begin from the date the repayment becomes due. However, if the customer fails to repay even within the grace period, penalty will be applied and calculated from the repayment due date.
However, in case a penalty charge is defined for a penal basis component under a microfinance product, the ‘Grace Days’ is defined as part of itself. The schedule due date for the penalty charge is then computed by adding the ‘Grace Days’ to the corresponding schedule due date of the penal basis component.
IRR Applicable
Check this option to indicate that the chosen component needs to be considered for Internal Rate of Return (IRR) calculation. This option is applicable to interest, charge, adhoc charge, prepayment penalty, penalty and upfront fee components.
This option should not be checked for Commitment products.
If a charge component is to be considered for IRR, the charge will be accrued using the FACR (Upfront Fee Accrual) batch.
The following components cannot be considered for IRR calculation:
- Off-balance sheet component
- Provision component
If you check this option, then you have to check the ‘Accrual Required’ option.
For bearing type of component formula, you can check this option only if the ‘Accrual Required’ option is checked.
For discounted or true discounted types of component formula, this option will be enabled irrespective of the whether the ‘Accrual Required’ option is checked or not. If this option is checked and ‘Accrual Required’ is not, the discounted component will be considered as a part of the total discount to be accrued for Net Present Value (NPV) computation. If both ‘Accrual Required’ and ‘IRR Applicable’ are checked, then discounted interest will be considered for IRR computation.
Verify Funds
You can indicate whether the system should verify the availability of sufficient funds in the customer account before doing auto liquidation of the component.
Accruals/Provisioning/Interest Payback
To perform accrual of the components, you have to capture the following details:
Required
You can use this option to indicate that the component has to be accrued and provisioning is applicable. For the components that have been marked for accrual, you need to specify the accrual frequency, start month and start date in the respective fields.
If the ‘Calculation Type’ is ‘Penalty Charges’ for a component, the ‘Accrual Required’ option is disabled.
Frequency
If you have opted for accrual and provisioning for the components, you have to specify the frequency for the same. The frequency can be one of the following:
- Daily
- Monthly
- Quarterly
- Half yearly
- Yearly
Start Month
If you set the accrual/provisioning frequency as quarterly, half yearly or yearly, you have to specify the month in which the first accrual has to begin, besides the date.
Start Date
In the case of monthly, quarterly, half yearly or yearly frequencies, you should specify the date on which the accrual/provisioning has to be done. For example, if you specify the date as ‘30’, accruals will be carried out on the 30th of the month, according to the frequency that you have defined.
Prepayment Threshold
This includes the threshold amount and currency, explained below:
Amount
Here, you can maintain the minimum limit for allowing prepayment of schedules. If the residual amount after prepayment against a schedule is less than the threshold amount you specify here, the system will disallow the prepayment.
Currency
If you specify the threshold amount, you also have to indicate the currency in which the amount should be expressed. You can select the currency from the option-list provided.
Schedule
Sequence Number
You can define more than one schedule for a component. The sequence number determines the order in which the individual schedule should be applied on a component. For instance, you can define a schedule structure consisting of a moratorium schedule and a normal schedule. The moratorium schedule, if defined for a component, should necessarily be the first schedule. You cannot have moratorium schedules in between normal schedules.
Type
This is the kind of schedule you want to define. The options are:
- Payment: This is used to define a repayment schedule. You can capitalize a payment schedule. If the ‘Capitalized’ option (under Component Definition) is checked, the ‘Capitalized’ option at the schedule level will also be checked for payment schedules. You can, however, uncheck/check this option for a schedule.
- Disbursement: You can maintain a disbursement schedule for loan disbursal if the ‘Disbursement Mode’ is automatic (this is maintained on the ‘Preferences’ sub screen). For auto disbursement, you have to maintain at least one disbursement schedule.
- Rate Revision schedules: This will capture the schedule at which the rates applicable to the component should be revised.
Start Reference
This is used to capture the reference to arrive at the due date of the schedule. The options are:
- Calendar: If you select this option, you should also specify the ‘Start Date’ for the schedule. For example, if an account is created on 15th Sept with a ‘Monthly’ schedule frequency and the Start Date is 1st, then the schedule due dates would be 1st Oct, 1st Nov and so on.
- Value Date: If you select value date, the schedule due dates will be based on the Value Date of the account. For instance, if an account is created on 15th Sept and the schedule frequency is ‘Monthly’, then the schedule due date would be 15th October, 15th Nov and so on.
For a component, you can define schedules based on both value date and calendar date.
Frequency Unit
Here, you have to capture the unit to define the schedule. The unit can have the following values:
- Daily
- Weekly
- Monthly
- Quarterly
- Half Yearly
- Yearly
- Bullet
If the schedule unit is ‘Weekly’, you should also capture the ‘Start Day’. Similarly, for units ‘Quarterly’, ‘Half Yearly’ and ‘Yearly’, you should also specify the ‘Start Month’.
Frequency
This is used in combination with ‘Unit’ explained above, to define non-standard frequencies. For instance, a ‘Monthly’ unit and frequency 2 implies that the schedule is bi-monthly (occurring every two months).
Start Day
If the schedule unit is ‘Weekly’, you should specify the start day to initiate the schedule. The drop-down box lists the days of the week
Start Month
This is applicable if the schedule unit is one of the following:
- Quarterly
- Half Yearly
- Yearly
The drop-down box lists the months in a year
Start Date
Here, you can specify a value between 1 and 31. This is applicable if the schedule unit is ‘Monthly’
Due On
You can use this to define a schedule on a particular date of the month. A value between 1 and 31 can be used for this purpose. If you specify a value here, the system will build the schedules based on this date even if you have indicated the ‘Start Date’ for the schedule.
Formula
You have to select the formula applicable for component value calculation. The Booked and Intermediate formulae defined for the component are available in the option list. With a user-defined formula maintained through the rule builder, you can define a schedule with multiple formulae.
Flag
You can define a non-repayment schedule or a repayment schedule. This field is used to identify the schedule type:
- Normal: This refers to a repayment schedule. Repayment happens as and when the schedule falls due
- Moratorium: This refers to a non-repayment schedule or a repayment holiday during the repayment cycle of a loan
Number of schedules
The value captured here determines the number of times a schedule frequency should recur. For example, a 12 monthly schedule would have a ‘Monthly’ unit and number of schedules as 12.
Capitalized
Check this option to specify capitalization of the component for a particular schedule. If the ‘Capitalized’ option (under Component Definition) is checked, the ‘Capitalized’ option at the schedule level will also be checked for payment schedules. You can, however, uncheck this option for a schedule.
Intermediate Formula
Intermediate Formulae are used as building blocks for more complex formulae. An intermediate formula is used to create a Booked/Moratorium formula as an intermediate step. It will not be associated directly to any schedule.
To define an intermediate formula, click ‘Intermediate’ in the ’Components’ sub screen of the screen.
Formula Name
Specify a suitable name to identify the formula that you are defining. After you specify the name you can define the characteristics of the formula in the subsequent fields. You have to use the name captured here to associate a formula with a schedule. The name can comprise of a maximum of 27 alphanumeric characters.
Round Up To
If you want to round off the results of an intermediate formula, you can indicate the number of digits upto which the results should be rounded-off to. Compound Days/Months/Years
If you want to compound the result obtained for the intermediate formula, you have to specify the frequency for compounding the calculated interest.
The frequency can be in terms of:
- Days
- Months
- Years
If you do not specify the compound days, months or years, it means that compounding is not applicable
Rounding Factor
Specify the precision value if the number is to be rounded
It is mandatory for you to specify the precision value if you have maintained the rounding parameter.
Compound Days
If you want to compound the result obtained for the intermediate formula, you have to specify the frequency for compounding the calculated interest. The frequency can be in terms of days.
Compound Months
If you want to compound the result obtained for an intermediate formula, you have to specify the frequency for compounding the calculated interest. The frequency can be in terms of months.
Compound Years
If you want to compound the result obtained for an intermediate formula, you have to specify the frequency for compounding the calculated interest. The frequency can be in terms of years.
Condition and Result
A formula or calculation logic is built in the form of expressions where each expression consists of a ‘Condition’ (optional) and a ‘Result’. There is no limit to the number of expressions in a formula. For each condition, assign a unique sequence number/formula number. The conditions are evaluated based on this number. To define a condition, click on ‘Condition’. In ‘Conditions’ screen, you can use the elements, operators, and logical operators to build a condition.
Although you can define multiple expressions for a component, if a given condition is satisfied, subsequent conditions are not evaluated. Thus, depending on the condition of the expression that is satisfied, the corresponding formula result is picked up for component value computation. Therefore, you have the flexibility to define a computation logic for each component of the product.
The result of the formula may be used as an intermediate step in other formulae.
Using Intermediate Formulae for Amortized Loans
You can use intermediate formula in the interest components of amortized mortgage loans. To enable this, you need to select the UDE ‘Z_INTRMDT_RATE’ against the field ‘Rate to Use’.
Further, you can set an intermediate formula with a combination of multiple UDEs in the ‘Result’ field. For example, you may specify the following formula:
INTEREST_RATE + MARGIN_RATE
This implies that the result is the sum of two user defined elements viz. ‘INTEREST_RATE’ and ‘MARGIN_RATE’. You may also define different formulae based on the conditions set. Intermediate formulae support the following mathematical functions:
- Plus (+)
- Minus (-)
- Multiplication (*)
- Division (/)
Based on requirements, you may define and set various formulae using the above mathematical functions.
The system calculates the value of the UDE ‘Z_INTRMDT_RATE’ based on the intermediate formula defined. This calculation is handled in the system generated package. Apart from ‘Z_INTRMDT_RATE’, the system will not allow you to define a UDE that starts with ‘Z_’.
Oracle FLEXCUBE uses the following formats to display the derived interest rate:
Formats |
CL_AMD_ADV |
CL_LOAN_DETAIL |
CL_CONTR_STMT |
CL_UDE_ADVC |
CL_RTCH_ADV |
4.2.6.1 Booked Formula
Booked Formula refers to the formula used to compute a component value for a particular schedule. You can use intermediate formulae to create a ‘Booked’ formula. To create the formula, click ‘Book’ in the ‘Component’ sub screen of the screen.
The SDEs available will be shown in the Condition Builder. You can use the relevant ones to build the formula. For instance, you need to use the SDE ‘TOTAL_SCHODUE’ in the formula to compute schedule amount for subsidy loan products. The Booked formula so created will be linked to a schedule.
These are some of the examples of the formulae generated by the system on its own by choosing the formula type and the basis elements.
- Simple - @SIMPLE(PRINCIPAL_EXPECTED,(INTEREST_RATE),DAYS,YEAR,COMPOUND_VALUE)
- Amortized Reducing - @AMORT_RED(PRINCIPAL_EXPECTED,(INTEREST_RATE),DAYS,YEAR)
- Discounting - @DISCOUNTED(PRINCIPAL_EXPECTED,(INTEREST_RATE),DAYS,YEAR)
- Amortised Rule 78 - @AMORT_78(PRINCIPAL_EXPECTED,(INTEREST_RATE),DAYS,YEAR)
- True Discounted - @TRUE_DISC(PRINCIPAL_EXPECTED,(INTEREST_RATE),DAYS,YEAR)
The parameters required to create a ‘Booked’ formula are similar to the ones explained for an Intermediate formula.
The formula for calculation of ‘Provision Amount’ is defined based on the following conditions:
Line |
Condition |
Result |
1 |
CUSTOMER_CREDIT_RATING=”AAA” |
PRINCIPAL_OUTSTAND*0.0015 |
2 |
CUSTOMER_CREDIT_RATING=”AA+” |
PRINCIPAL_OUTSTAND*0.0025 |
3 |
CUSTOMER_CREDIT_RATING=”AA” |
PRINCIPAL_OUTSTAND*0.0035 |
4 |
CUSTOMER_CREDIT_RATING=”A+” |
PRINCIPAL_OUTSTAND*0.0045 |
5 |
CUSTOMER_CREDIT_RATING=”A” |
PRINCIPAL_OUTSTAND*0.0055 |
6 |
CUSTOMER_CREDIT_RATING=”BBB” |
PRINCIPAL_OUTSTAND*0.0065 |
7 |
CUSTOMER_CREDIT_RATING=”BB+” |
PRINCIPAL_OUTSTAND*0.0075 |
8 |
CUSTOMER_CREDIT_RATING=”BB” |
PRINCIPAL_OUTSTAND*0.0085 |
Amortized
Select this option to specify that the schedules of the component should be amortized
Note
For Commitment products do not select this option.
Amortization Basis
If you opt to Amortize the schedules of the component, you have to identify the element based on which the component is amortized. For example, if it is deposit interest, the amortization basis would be ‘Principal’. The components are available in the option list provided.
In case of a subsidy loan, amortization is done with both the main interest and the subsidy component. For instance, if the interest rate is x% and the subsidy rate is y%, amortization will be done using net interest rate as x+y%, in the aforesaid scenario. The interest component will be calculated for the main interest and the subsidy component based on the principal expected and the individual rates for the components.
4.2.6.2 Moratorium Formula
Moratorium refers to the repayment holiday given during the period between the value date of the loan and the first repayment date. While no repayment will happen during this period, computation will continue. However, you can also have a principal moratorium wherein no principal repayment happens in a certain period; only interest component is repaid. This moratorium may be applied at any stage of the repayment cycle of the loan. In case of a principal moratorium, you need to ensure that the tenor given in the formula does not exceed the principal moratorium period. The Moratorium formula is used for the computation of interest for the moratorium period.
To define the formula, click ‘Moratorium’ in the ‘Component’ sub screen of the screen.
The procedure for defining the Moratorium formula is as explained for Intermediate and Booked formulae. The following additional fields are also applicable for a moratorium formula:
Formula Name
Here, you specify a suitable name to identify the formula that you are defining. After you specify the name, you can define the characteristics of the formula in the subsequent fields. You have to use the name captured here to associate a formula with a schedule. The name can comprise of a maximum of 27 alphanumeric characters.
Moratorium Liquidation Formula
The formula used for computation of interest for the moratorium period is called ‘Moratorium Formula’. The Interest calculated using the moratorium formula should be liquidated for the lifetime of the loan by apportioning it across all the instalments. Therefore, you need to maintain a formula for liquidating the moratorium interest.
Check this option to indicate that the formula you have maintained is for Moratorium liquidation.
Liquidate Moratorium to Instalment
This option is applicable only if you are defining a ‘Moratorium Liquidation Formula’.
Note
- If you check this option, the moratorium interest amount is added to the first instalment amount and collected along with the schedule on the day the schedule falls due.
- If you do not check this option, the moratorium amount is allocated from the Instalment due. The principal component of the EMI is liquidated towards the moratorium. Therefore, Principal repayment does not begin until complete settlement of the moratorium amount.
Default Moratorium Formula
If you want to create a default moratorium formula, check this option. By default, the system will attach this formula to a moratorium schedule. You can, however, change it to a different moratorium formula.
4.2.6.3 Instalment Level Status
For a component, you can maintain Schedule/Instalment level status change parameters. You can also specify the account Heads and Roles to be used whenever an instalment changes from one status to the other.
To define the instalment level status change details, click ‘Instalment Status’ in the ‘Components’ sub screen.
The following details have to be captured in Instalment Status screen.
Sequence Number
The number you capture here is used to identify the adversity level of an instalment. It should not overlap with that of an account status, expect for the first factory shipped status ‘NORM’ (Normal).
Status Code
The status that an instalment will go through is specified here. The sequence number determines the order when the instalment would attain this status. The status codes defined in the ‘Status Codes Maintenance’ screen are available in the option-list provided.
Status Rule
The rule defined here will determine the movement of the instalment to the selected status (in the ‘Status’ field). You can build multiple conditions for a rule.
To do this, click ‘Condition’. The ‘Condition Builder’ is displayed.
You can build the conditions using the elements (SDEs), operators and logical operators available in the screen above.
Examples of Status Movement Rules are given below:
- NORM TO PDO1 PRINCIPAL_OVR_DAYS > 30 OR MAIN_INT_OVR_DAYS > 30
- NORM TO DOUB PRINCIPAL_OVR_DAYS > 60 OR MAIN_INT_OVR_DAYS > 60
- PDO1 TO NORM PRINCIPAL_OVR_DAYS < 31 AND MAIN_INT_OVR_DAYS < 31
- PDO1 TO DOUB PRINCIPAL_OVR_DAYS > 60 OR MAIN_INT_OVR_DAYS > 60
- DOUB TO PDO1 (PRINCIPAL_OVR_DAYS > 30 AND PRINCIPAL_OVR_DAYS < 61) AND (MAIN_INT_OVR_DAYS > 30 AND MAIN_INT_OVR_DAYS < 61)
- DOUB TO NORM PRINCIPAL_OVR_DAYS < 31 AND MAIN_INT_OVR_DAYS < 31
For details on building a condition using the options available in the screen, refer the section titled ‘Defining UDE Rules’ in the ‘Maintenances and Operations’ chapter of this User Manual.
The instalment will move to the status selected if the associated status rule is satisfied.
Complete Pending Accruals
Check this box to indicate if the pending interest accruals need to be completed before the Instalment status changes. This is applicable only if Accrual Frequency is any one of the following:
- Monthly
- Quarterly
- Half yearly
- Yearly
This check box will not be enabled if Accrual Frequency in the ‘Product’ screen is ‘Daily’.
Accounting Entries
For each status of the instalment, you can specify the accounting entry preferences. Whenever an instalment attains a status, the entries are passed as per the setup maintained for that status. Therefore, the entries will be moved from the active GLs to the status specific GLs. However, when the actual payment occurs, the system will automatically resolve the appropriate GLs.
For more details on setting up accounting entry preferences, refer the section titled ‘Maintaining Event details’ in this chapter.
4.2.6.4 Specifying Policy Preferences
You can associate policies at an instalment level. Policies are user defined validations that are fired when an event is triggered. To link a policy, click ‘Policies’ in the ‘Component Instalment Status’ screen – the following screen is displayed:

Specify the following in this screen:
Policy Code
The Standard Policies (defined through the ‘Policy Maintenance’ screen) and the Policies associated with the product category are available in the option list provided. Policies are used to handle special validations and operations on a loan.
Execution Type
You can associate a policy at one of the following points in time in a loan -event lifecycle:
- Before Event
- After Event
- Both
The policy is executed appropriately.
For details on maintaining policy details, refer the section titled ‘Maintaining User Defined Policies’ in the ‘Maintenances and Operations’ chapter of this User Manual.
4.2.6.5 Processing at Instalment Level
At the instalment level, if there is a change in the instalment status, Oracle FLEXCUBE will first check if accrual is required for the instalment components. When the accrual frequency for a component is not ‘Daily’, Oracle FLEXCUBE will validate if the instalment status changes before accrual execution date. If it changes, Oracle FLEXCUBE will trigger catchup accrual for the component till the instalment status change date. Subsequent to this, Oracle FLEXCUBE will process the instalment status change.
The following example will explain the Complete Pending Accrual functionality. This is applicable for both Instalment Level as well as Account Level Status change.
Example
Let us assume an accrual frequency for a component MAIN_INT. The schedules for this component are as follows:
- Value Date – 05-Jan-06
- Schedule Dates:
- 05-Jan-06,
- 05-Feb-06
- 05-Mar-06
- Accrual Execution Dates:
- 31-Jan-06
- 28-Feb-06
If the instalment status or account status changes on 15-Jan-06, Oracle FLEXCUBE will trigger catch up accrual if ‘Complete Pending accrual’ is checked.
Note
- An instalment status change will not change the next execution date of unprocessed ACCR events.
- A status change is applicable for both manual and automatic instalment status.
- If you delete an Instalment level status change, it will delete the catch up accrual accounting entries also.
- You can reverse an instalment level status change by inputting another instalment level status change. For example, if instalment status changes from NORM to OVD1, reversal of the same can be done by doing instalment status change from OVD1 to NORM. In this case no processing will be done.
4.2.7 Notices and Statements
Just as you define components that should become a part of the product, so also you can associate Notices and Statements with a product.
The actual communication/correspondence, however, is handled by the Messaging Module of Oracle FLEXCUBE. Click ‘Notices & Statements’ button in the ‘Product Maintenance’ screen.
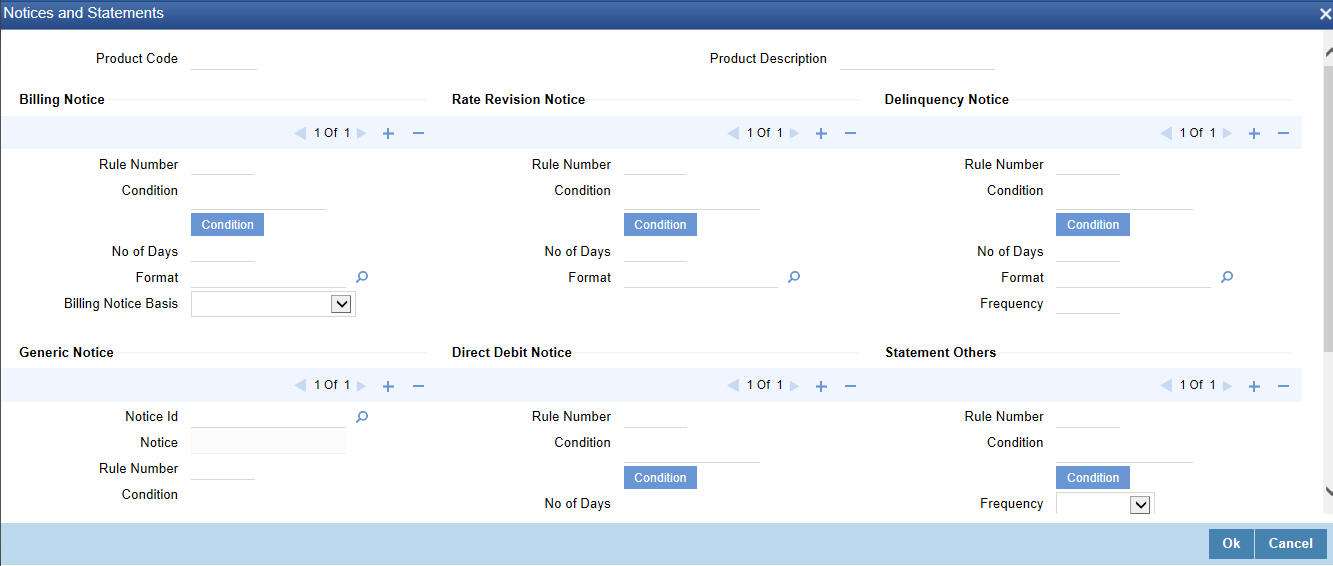
In this screen, you need to maintain the preferences for Billing Notices, Delinquency Notices, Rate Revision Notice, Direct Debit Notice and Statements. Also, you can associate multiple formats for the generation of notices and statements. The selection of a particular format is based on the condition.
Rule No/Condition No
You can assign a unique number for each rule/condition that is being maintained for notice and statement generation.
Condition
Define the conditions/rules for notice and statement generation. The system will evaluate the conditions and based on the one that is satisfied, the corresponding advice format is selected for notice/statement generation.
To maintain a condition, click ‘Condition’ button in the screen above. The ‘Condition Builder’ is displayed.
For details on building a condition using the options available in the screen, refer the section titled ‘Defining UDE Rules’ in the ‘Maintenances and Operations’ chapter of this User Manual.
Number Days
The Number of days indicates the period before the due date, when the system starts sending the Billing/Delinquency notices to customers.
This period is defined as a specific number of days and will begin before the date the repayment becomes due.
Format
For the condition defined, select the format in which the advice should be generated. The system will select the specific format of the message type when the condition maintained evaluates favorably. Frequency Days
Specify the frequency (in days) for generation of Delinquency Notices. The first notice is sent on the basis of the ‘Num Days’ maintained. For instance, if the ‘Num Days’ is four and the payment due date is 4th April 2004, the first notice will be sent on 31st March ’04 (4 days before due date). Subsequent generation of the same notice is based on the frequency days maintained. If the ‘Frequency Days’ is ‘2’, the second notice will be sent on 2nd April ’04 i.e. the notice is sent once in two days only.
The following information is applicable to Statement generation:
Frequency
Indicate the frequency in which the Statements have to be generated. The available options:
- Daily
- Monthly
- Quarterly
- Half Yearly
- Yearly
Frequency Days
The frequency captured here is used to get the next date for statement generation subsequent to the first statement. This will be used in combination with the ‘Frequency’ explained above.
Start Date
The date entered here is used as a reference to start generation of the statement
The following example illustrates the manner in which the ‘Frequency’, ‘Frequency Days’ and ‘Start Date’ are used together:
Assume that you have maintained the following preferences for Statement generation:
Frequency: Monthly
Frequency Days: 2
Start Date: 1st Jan 2005
You open a loan account on 15th Jan 2005. The first statement for this loan will be generated on 1st February 2005 (Based on the Start Date and at a Monthly frequency). The second statement will be generated on 1st April 2005 (once in two months – based on the frequency days).
Message Type
Specify the type of Statement that should be generated. Statements are of the following types:
- Interest Statements
- Loan Statements
Generic Notice
Notice
Select the notice type of the rate plan from the list of options.
Rule Number
Specify the unique number for the rule maintained for notice. It is a running number starting from 1.
Condition
Specify the condition for notice generation. The system will evaluate the conditions and based on the one that is satisfied, the corresponding advice format is selected for notice.
Click ‘Condition’ button to maintain a condition in ‘Product’ screen. The ‘Condition Builder’ is displayed.
Format
Select the format of the advice to be generated from the list of options.
Number of Days
Specify the number of days required to intimate the customer in advance about the UDE rate change period.
Frequency
Select the frequency at which the notice has to be generated from the adjoining drop-down list. This list displays the following values:
- Daily
- Monthly
- Quarterly
- Half Yearly
- Yearly
Tenor
Specify the tenor at which the notice has to be generated.
Start Date
Specify the date on which the notice has to be generated.
Transaction Code
Specify the identifier code of the transaction.
Interest Rate Revision within the Rate Revision Period
The Rate Revision Notice section allows you to maintain the number of days for the generation of the advice, prior to the scheduled date of rate revision. During End of Day if the notification date is less than or equal to schedule date, a Rate Revision Advice is generated.
The four different conditions for the rate revision will be handled in Oracle FLEXCUBE as follows:
- Condition 1
Once the interest revision date is reached, the system continues to use the same interest rate code, till the next revision date.
- Condition 2
If the request for change in interest rate is received a few days before the scheduled revision date, the interest rate code of the loan account is changed by value dated amendment, with the effective date as the scheduled interest revision date. On the effective date, the system changes the rate code and picks up the new interest rate
- Condition 3
If the request is for a future dated prepayment of the loan account there is no change in the interest rate, the principal is changed depending on the prepaid amount and once the payment is available in the settlement account, you can liquidate the loan manually with the requested effective date.
An outstanding component breakup of prepayment penalty charges if applicable is sent to the customer.
- Condition4
If the request for interest rate revision is made much before the scheduled revision date, you can change the interest rate code of the loan account by value dated amendment with effective date as requested.
The rate revision will be applicable on the total principal outstanding amount.
4.2.8 Role to Head
You can define the accounting roles for a product in the ‘Role to Head’ sub screen of the ‘Product Maintenance screen.
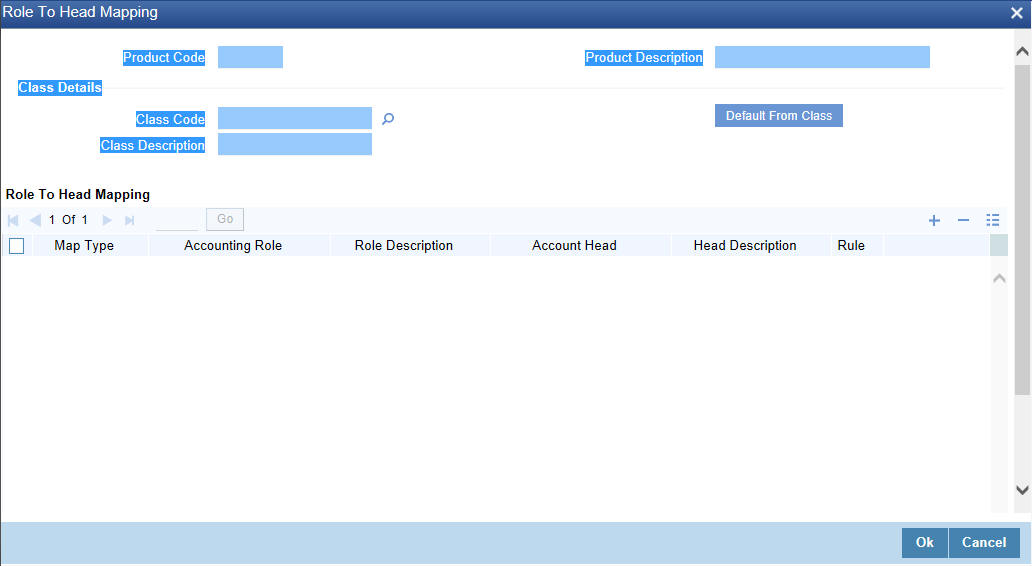
The following details are captured in this screen:
Class Code
Select a class code from the adjoining option list. The option list displays all the valid classes maintained in the system.
Click ‘Default from Class’ button to default the role to head mapping details for the selected class. You can select and modify the required role to head mapping details to suit the product you are defining. You can also define new role to head mapping by clicking the ‘+’ button.
Map Type
The mapping between an accounting role and account head can be of the following types:
- Static: If the map type is static, you can link an accounting role to only one accounting/GL head (one to one mapping).
- User Defined: For a user defined map type, you can maintain multiple linkages under different conditions using a case-result rule structure (one to many accounting).
Accounting Role and Description
Accounting role is used to denote the accounting function of a GL or Account. This is defaulted as per the mapping done using the ‘Role To Head Mapping Class Maintenance’ screen.
The description maintained for the role is also displayed in the adjacent field.
If you do not want to select a role from the option list, you can also create an accounting role for a product and specify a brief description for the same.
Note
The GLs (Account Heads) for the Dr/Cr Settlement Bridge Role will default as per your selection in the ‘Branch Parameters’ screen.
Account Head and Description
The account head identifies the GL or Account to which the accounting entries would be posted. Based on the type of accounting role you select (Asset, Liability etc.), the list of Account Heads (General Ledger heads) that are of the same type as that of the accounting role, becomes available in the option list provided. You can select an accounting head from this list and thus, create a role to head mapping. On selection of the Account Head, the description is also displayed in the adjacent field.
Click Add icon to create subsequent mappings for the product. If you would like to delete a role to head mapping, click Delete icon.
Rule
If the ‘Map Type’ is ‘User Defined’, you can create a case-result rule structure based on which the entries are posted to the appropriate account head. To create a rule, click ‘Rule’ in the ‘Role to Head’ sub screen of the product screen.
You can define multiple conditions and for each condition you can specify the resultant ‘Account Head’. This way you can maintain one to many mappings between an accounting role and an account head. Depending on the condition that is evaluated favorably, the corresponding account head is used for posting the entries.
To build a condition, click ‘Condition’. The ‘Condition Builder’ is displayed.
You can build the conditions using the elements (SDEs), operators and logical operators available in the screen above.
For details on building a condition using the options available in the screen, refer the section titled ‘Defining UDE Rules’ in the ‘Maintenances and Operations’ chapter of this User Manual.
Note
The system ensures that all accounting roles that are applicable for the Product and which have been used in the definition of the accounting entries are necessarily linked to an account head. If the mapping is not complete, an error message is displayed when you attempt to save the product.
Dynamic Creation of Accounting Roles for a Component
For each component you define for a product in the product screen, six accounting roles are dynamically created by the system. For example, if you have defined a component ‘MAIN_INT’, the following accounting roles are created:
- MAIN_INTINC - Component Income
- MAIN_INTEXP - Component Expense
- MAIN_INTRIA - Component Received in Advance
- MAIN_INTPAY - Component Payable
- MAIN_INTREC - Component Receivable
- MAIN_INTPIA - Component Paid in Advance
For a detailed list of Events, Advices, Accounting Roles and Amount Tags, refer ‘Annexure 1’ of this User Manual.
4.2.9 Specifying Account Status
Ideally, when setting up a product, you should identify all possible status that loans involving the product would move into.
A status can apply either to a loan instalment or the entire loan account. Instalment level status change preferences are maintained in the ‘Component’ sub screen of the screen.
For more details, refer the section titled ‘Specifying Component Details’ in this chapter
You can maintain account level status movement preferences the ‘Account Status’ sub screen of the screen.
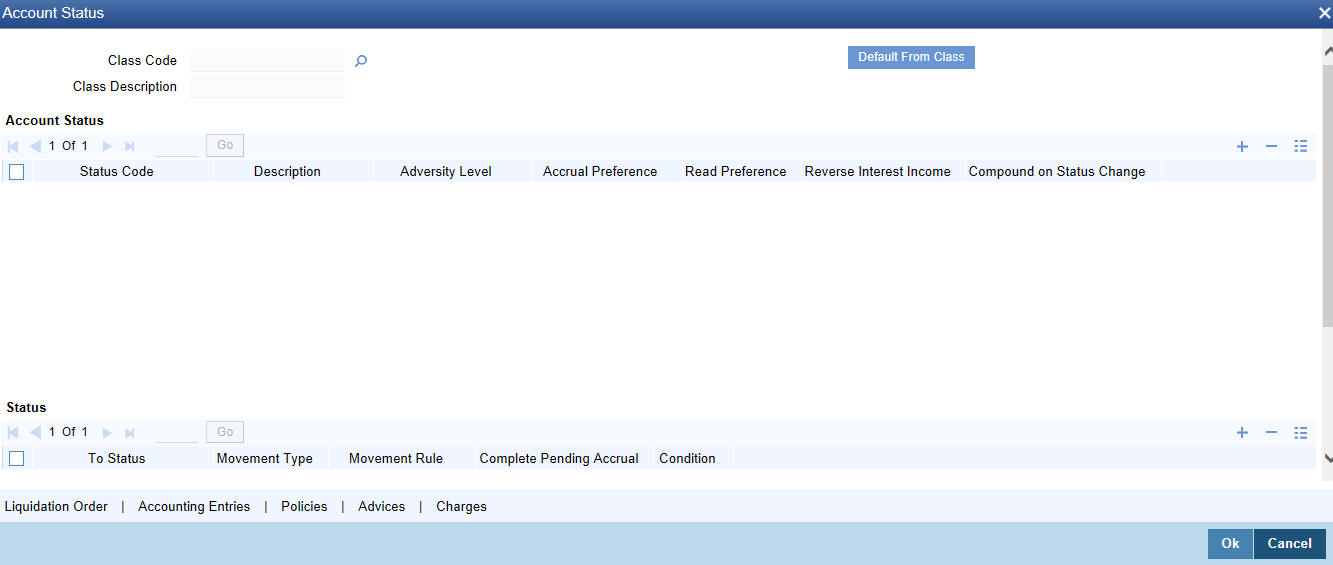
In this screen, you can specify the following:
- Define a status derivation rule to resolve a status
- Define accounting entries, advices etc. which need to be fired for a status
- Specify the liquidation order for a status
- Associate charges, if applicable, for a status
- Policies to be triggered for a status change
Account Status
Class Code
Select a class code from the adjoining option list. The option list displays all the valid classes maintained in the system.
Click ‘Default from Class’ button to default the account status details for the selected class. You can select and modify the required details to suit the product you are defining. You can also define new account status by clicking the ‘+’ button.
- Define a status derivation rule to resolve a status
- Define accounting entries, advices etc. which need to be fired for a status
- Specify the liquidation order for a status
- Associate charges, if applicable, for a status
- Policies to be triggered for a status change
Status Code
When setting up a product, you should identify all possible statuses that loans involving the product would move into. By default, the ‘NORM’ (Normal) status is defined for the product. You can select the relevant status codes from the option list provided. The status codes defined through the ‘Status Codes Maintenance’ screen with ‘Status Type’ as ‘Account’ is available in this list.
When you select a status, the associated description is also displayed in the adjacent field.
Adversity Level
This signifies the adversity level of the status. The Status ‘NORM’ has an adversity level of ‘1’ and is the most favorable. This is the default status for a loan.
Accrual Preference
For a status, you have to indicate the manner in which accounting entries should be posted when the loan moves to the status. The options are:
- Stop Accrual – accruals are frozen
- Reverse Accrual – accruals till date are reversed by transferring them to an expense GL
- Continue Accrual – accruals continue as in the previous status as per the Role to Head maintained for the status and as per the accounting entries defined
After you specify the status codes applicable for the product, you need to specify the manner in which the status movement should occur.
Compound on Status Change
Check this box if you need to compound on status change.
Specifying Reverse Income Interest Details
You can maintain reverse interest income details for MF product. You can specify following details in this screen:
Tenor
Specify period for which you need to reverse interest income.
Unit
Select unit for which interest income has to be reversed from the adjoining drop-down list. This list displays the following values:
- Days – Select if you need to reverse days’ income.
- Months – Select if you need to reverse months’ income.
- Years – Select if you need to reverse years’ income.
- Current Financial Year – Select if you need to reverse current financial years’ income
Note
If you chose Current Financial Year, then ‘Least of Interest Income for Current Financial Year and Chosen Period’ and Tenor will not be available.
Least of Interest Income for Current Financial Year and Chosen Period
Check this box if you need least of interest income for current financial year and chosen period.
Note
If the check box is checked and ‘Current Financial Year’ is selected, then the system computes the amount based on the least of the two – Current Financial Year and Chosen Period. However; this reversing of income and accounting entries are processed only for ‘Write-off’ status.
From Status and To Status
When you highlight a status from the list of status codes maintained for the product, the selected status becomes the ‘From Status’
In the option list provided for the ‘To Status’, the status codes applicable for the product is displayed. Select the relevant status into which a loan should move from the ‘From Status’.
Movement Type
You have to indicate the type of movement of a loan from the current status (From Status) to the next status (To Status). The movement can be:
- Automatic
- Manual
- Both
Movement Rule
You have to define the status derivation rule which will determine the movement of a loan from one status to the other. This is the condition based on which the status movement occurs. If a loan satisfies all the rules defined due to which it can move to several statuses at a time, it will identify the most adverse status and move to that status.
To define a derivation rule, click ‘Condition’. The ‘Condition Builder’ is displayed.
You can build the conditions using the elements (SDEs), operators and logical operators provided in the screen above.
For details on building a condition using the options available in the screen, refer the section titled ‘Defining UDE Rules’ in the ‘Maintenances and Operations’ chapter of this User Manual.
Example
Assume that the current status of a loan is ‘ACTIVE’ and you want the loan to move to the ‘OVERDUE’ status if the overdue months exceeds zero. To meet this requirement, you can define the following parameters:
- From Status: Active
- To Status: Overdue
- Movement Type: Automatic
- Rule: If LOAN_STATUS = 'ACTIVE' AND OVERDUE_MONTHS > 0
If the loan satisfies the rule, it automatically moves to the ‘Overdue’ Status.
Complete Pending Accruals
Check this box to indicate if the pending interest accruals need to be completed before the Account status changes. This is applicable only if Accrual Frequency is any one of the following:
- Monthly
- Quarterly
- Half yearly
- Yearly
This check box will not be enabled if Accrual Frequency in the ‘Product’ screen is ‘Daily’.
Condition
You can build the conditions using the elements (SDEs), operators and logical operators.
For details on building a condition using the options available in the screen, refer the section titled ‘Defining UDE Rules’ in the ‘Maintenances and Operations’ chapter of this User Manual.
Example,
Assume that the current status of a loan is ‘ACTIVE’ and you want the loan to move to the ‘OVERDUE’ status if the overdue months exceeds zero. To meet this requirement, you can define the following parameters:
From Status: Active
To Status: Overdue
Movement Type: Automatic
Rule: If LOAN_STATUS = 'ACTIVE' AND OVERDUE_MONTHS > 0
If the loan satisfies the rule, it automatically moves to the ‘Overdue’ Status.
Note
For securitization supporting product, you need to define a status called ‘SECR’ in the product and maintain corresponding accounting entries for the status change to / from SECR status.
Before Securitization, the user defined status will be ‘NORM’. During securitization, system triggers the status change event and changes the status to ‘SECR’ and accordingly updates the Securitization Pool Reference Number. During Buyback of securitization contract, system triggers the status change event and changes the status from ‘SECR’ to ‘NORM’ status.
4.2.9.1 Specifying Liquidation Order
You can prioritize the liquidation of the various loan components at a status level. To maintain liquidation order of components, click ‘Liquidation Order’ in the ‘Account Status’ sub screen.
When a loan attains an adverse status, you may want to allot priority to the recovery of certain components. For example, you may want to recover the Principal first and then the Interest type of components.
The components maintained for the product are available in the option list provided. Select a component and then specify the order of liquidation for the component.
Click on Add icon to maintain the liquidation order for the next component
4.2.9.2 Specifying Accounting Preferences
You can specify accounting preferences at a status level. You may have a GL structure under which loans in ‘Normal’ status should report. You can maintain a different structure for loans in other status. To do this, click ‘Accounting Entries’ in the ’Account Status’ sub screen.
Also, for a status, you may not want to change accounting roles but change only the accounts/GLs. The accounting roles will be the same. To achieve this, you can create a rule based ‘Role to Head’ mapping. The SDEs like ’Account Status’ can be used to create the rule and if a loan satisfies the rule i.e. moves to the status maintained in the rule, the Account Head selected for the rule is used for posting the entries.
For a commitment product, the following amount tags are used for passing accounting entries:
Sl No |
Amount Tag |
Description |
1 |
COMMUTIL_INCR |
Commitment Amount Utilized |
2 |
COMMUTIL_DECR |
Commitment Amount Reinstated |
3 |
COMM_UNUTIL |
Commitment Amount unutilized |
Refer the section titled ‘Maintaining Role to Head mapping preferences’ for details on creating a ‘Role to Head’ mapping.
4.2.9.3 Specifying Advices
You can also specify the advices that should be generated when a status change occurs. For instance, when a loan moves from an ‘ACTIVE’ status to an ‘OVERDUE’ status, you can choose to send an advice to inform the customer of the status change and request for payment.
The advices can be maintained in the ‘Product Event Advices Maintenance’ screen - click ‘Advices’ in the ‘Account Status’ sub screen to invoke it.
You can associate advices at an event level also.
For more details on maintaining advice preferences, refer the ‘Maintaining Event details’ section of this User Manual.
4.2.9.4 Specifying Policy Preferences
Just as you associate policies at an instalment level, you can also associate policies for a loan account status. To do this, click ‘Policies’ in the ‘Account Status’ sub screen of the product screen.
Specify the following in this screen:
Policy Code
The policies defined in the ‘User Policy’ screen are available in the option list provided. Policies are used to handle special validations and operations on a loan.
Execution Type
You can associate a policy at one of the following points in time in a loan-event lifecycle:
- Before Event
- After Event
- Both
The policy gets executed appropriately
4.2.9.5 Associating Charges
Whenever a loan undergoes a status change, you can apply charge on the loan. You need to associate charge components at a status level. To do this, click ‘Charges’ in the ‘Account Status’ sub screen of the screen.
The charge type of components defined for the product (in the ‘Components’ sub screen) are displayed in the option list. Select the component you wish to associate with the loan. The charge is applied when the loan moves to the status and is debited to the customer account.
4.2.9.6 Processing at Account Level
At the account level, when there is a change in the status, Oracle FLEXCUBE will first check if accrual is required for the components. When the accrual frequency for a component is not ‘Daily’, Oracle FLEXCUBE will validate if the instalment status or the account status changes before accrual execution date. If it changes, Oracle FLEXCUBE will trigger catchup accrual for the component till the instalment status and the account status change date. Subsequent to this, Oracle FLEXCUBE will process the instalment status change and account status change.
Note:
- An instalment status change will not change the next execution date of unprocessed ACCR events
- A status change is applicable for both manual and automatic account status
- If you delete an account level status change, it will delete the catch up accrual accounting entries also
- If you reverse an account level status change, it will reverse the catch up accrual accounting entries as well.
4.2.10 Specifying Events
A contract goes through different stages in its life cycle. In Oracle FLEXCUBE, the different stages a contract passes through in its life cycle are referred to as ’Events‘.
At an event, typically, you would want to post the accounting entries to the appropriate account heads and generate the required advices. When setting up a product, you can define the accounting entries that have to be posted and the advices that have to be generated at the various events in the life cycle of loans involving the product.
Therefore, for the required events you have to specify the Accounting entries, Charges, Policies and Advices. To do this, click ‘Events’ button in the ‘Product Maintenance’ screen.
You can maintain the following in this screen:
Class Code
Select the class code from the adjoining option list. The list displays all the class codes maintained in the system.
Click ‘Default’ button to default the events maintained for the selected class. You can select the required events for the product you are defining. You can also define new events apart from the defaulted events.
Event Code and Event Description
These are the events for which the accounting entries, advices, policies and charges will be maintained, individually. The event codes applicable for the module are available in the option list provided. Select the relevant events for the product from this list.
The description for the event chosen is also displayed .
For a commitment product the following events are used:
- LINK
- DLNK
- CLOC
The following events should not be maintained for a commitment product:
- BADJ
- CLOS
- REOP
- RNOG
- ROLL
- SROL
- YACR
- NOVA
- REVV
- REVL
- PWOF
An event PWOF (Partial Write Off) is used when a loan is partially written off by the Bank.
For more information on this topic refer section ‘Partial Write- Off of Loans’ in this manual.
4.2.10.1 Defining Accounting Entries
To define accounting entries for an event, click ‘Accounting Entries’ in the ‘Events’ button – the ‘Product Event Rule Based Entries’ screen is displayed.
With the Rule definition builder, you can maintain different set of accounting entries for different conditions.
Rule Number
Every rule/condition you define for a product should be assigned a unique number. The rule number can consist of a maximum of 5 digits
Condition
You can use the ‘Condition Builder’ to define a rule.
You can define a rule using the SDEs like Tenor, Customer Risk Category and other UDFs.
If you do not specify a rule/condition, the accounting entries become applicable to all conditions.
For details on building a condition using the options available in the screen, refer the section titled ‘Defining UDE Rules’ in the ‘Maintenances and Operations’ chapter of this User Manual.
Accounting Role
Select the accounting role that should be used at the event. The option list displays all the accounting roles specified for the product in the ‘Role To Head’ sub screen of the ‘Product’ screen. Select the role appropriate for the event.
Amount Tag
Specify the amount tag applicable for the Accounting Role. An amount tag identifies the amount/value that is actually due for a component. Depending on the components defined for the product, the system dynamically creates a set of amount tags. For instance, if the component is ‘MAIN_INT’, the following amount tags are automatically created:
- MAIN_INT _RESD - Component Amount Residual
- MAIN_INT_ADJ - Component Amount Adjustment
- MAIN_INT_LIQD - Component Amount Liquidated
- MAIN_INT_ROLL - Component Amount Rolled over
- MAIN_INT_CAP - Component Amount Capitalized
- MAIN_INT_ACCR - Component Amount Accrued
- MAIN_INT_DLIQ - Component Amount Paid against Due Schedules/future not-due schedules
- MAIN_INT_OLIQ - Component Amount Paid against Overdue Schedules
The ‘_DLIQ’ and ‘_OLIQ’ tags will be generated only for the events LIQD and ROLL.
Select the appropriate amount tag from this list
Debit or Credit
Here, you have to specify the type of accounting entry to be posted – the entry can be a debit entry or a credit entry.
Transaction Code
Every accounting entry in Oracle FLEXCUBE is associated with a Transaction Code that describes the nature of the entry. Specify the transaction code that should be used to post the accounting entry to the account head. You can group all similar transactions under a common transaction code. The transaction codes maintained in the ‘Transaction Code Maintenance’ screen are available in the option list provided.
Netting
Specify whether accounting entries should be netted at an event. You can net the accounting entries that are generated at an event by selecting ‘Yes’ from the drop down list. The system will then net the entries and show the resultant value in account statements. If you do not net, the entries will be shown separately in the statements.
MIS Head
An MIS Head indicates the manner in which the type of entry should be considered for profitability reporting purposes. This classification indicates the method in which the accounting entry will be reported in the profitability report. It could be one of the following:
- Balance
- Contingent Balance
- Income
- Expense
You can also link a product to an MIS Group if you do not want to define individual entities for the product.
Refer the section titled ‘Associating an MIS Group with the product’ in this chapter for more details.
Revaluation Required
Online Revaluation refers to revaluation done on transaction amounts during transaction posting, and not as part of an end-of-day process. The Revaluation profit /loss are booked to the Online ‘Profit GL’ or Online ‘Loss GL’ that you maintain for the GL being revalued.
You can opt for online revaluation by selecting the ‘Reval Reqd’ option.
Profit GL and Loss GL
If you have opted for online revaluation and the result of revaluation is a profit, the profit amount is credited to the Profit GL you select here. Similarly, if the result of revaluation is a loss, the loss amount is credited to the Loss GL you specify here.
Reval Txn Code
If you opt for online revaluation, you need to associate the transaction code to be used for booking revaluation entries. The system will use this transaction code to track the revaluation entries.
Holiday Treatment
Specify whether holiday treatment is applicable for processing accounting entries falling due on holidays. Select one of the following:
- Yes
- No
GAAP
Indicate the GAAP indicators for which the accounting entry is required for reporting under multi GAAP accounting. The adjoining option list shows all the GAAP indicators maintained in the system. Choose the appropriate one.
The system will then post entries into the specified books (GAAP indicators) during the different events that occur in the lifecycle of the loan. You can retrieve the balance for a certain component in an account in a specific status, for a given GAAP indicator, in a certain branch, reporting to a certain GL. The system will show the real and contingent balances accordingly.
Split Balance
Specify whether you need the balances to be split or not. If you check this option, the system will store the balance break-up for the specified GAAP indicators. You can then retrieve the balances separately for the different GAAP indicators to which accounting entries are posted for the loan.
If you need to move the balances from multiple/Single GLs, where the balances are currently lying, check this box. In such case the credit leg will be governed by the GLs from where component balances need to move, and not the GL maintained at the product level for the event.
For partial write off (PWOF event) you need to check this box to split balance for all the credit legs of PWOF event.
For example:
For ALIQ event, the maintenance is as follows:
Dr/Cr |
Role |
Settlement Reqd |
Amount Tag |
Spilt Balance |
Dr |
DR_SETTL_BRIDGE |
Y |
MAIN_INT_LIQD |
N |
Cr |
INTEREST RECEIVABLE (say GL-000 |
N |
MAIN_INT_LIQD |
Y |
However, the balance for interest is lying like this: 500 (GL-001) and 200 (GL-002) Lets say we are liquidating 700 against MAIN_INT component.
In this scenario, finally system will pass the following entries:
- Dr Customer A/c 700
- Cr GL-001 500
- Cr GL-002 200
In case Split balance is set to NO for Cr leg the entry would have been:
- Dr Customer A/c 700
- Cr GL-000 700
When you are building new balances into GLs, you need to uncheck this option for the credit leg also. In such cases accounting will go by the maintenance of the GLs/account done for the event.
For Example:
If you want to move ACCRUED_AMOUNT from one GL into another GL, and also build one parallel entry for the same in OFF BALANCE sheet, then in such case for the movement pair, you will maintain split balance as Y for the credit leg. For the new balance into OFF BALANCE sheet, you will maintain the split balance as N for both the legs.
When you need to reverse the contingents, for both the credit and debit leg, the GLs will be governed by the GLs where the balances are currently lying then you need to set it to CONTRA.
This means that if the accounting entry setup is like this:
Dr/Cr |
Role |
Settlement Reqd |
Amount Tag |
Spilt Balance |
Dr |
CONT-001 |
N |
MAIN_INT_OVD1_REAL |
N |
Cr |
CONT-002 |
N |
MAIN_INT_OVD1_REAL |
Y |
And if balances (say 50 for the component) for MAIN_INT_OVD1_REAL are lying in CONT-003 AND CONT-004 GLs. (This kind of setup means while doing status movement, you are building one parallel set of entry into contingents)
With this setup, system will pass the entry like this
- Dr CONT-003 50
- Cr CONT-004 50
If for both the legs, split is set to NO, then system will pass the following entries instead:
- Dr CONT-001 50
- Cr CONT-002 50
Balance Check in Batch
Indicate whether the balance check is required for the batch operations/online processing.
The options available are:
- Reject – The transaction is rejected if there is insufficient fund to process the transaction.
- Delinquency Tracking – The transaction is processed. If you have specified delinquency tracking for the accounting entries, the tracking is done according to the parameters you have defined for the Delinquency Product.
- Force Debit – The transaction is processed. However, no delinquency tracking is done even if the account goes into overdraft.
- Partial Liquidation – The transaction is processed. If you have specified partial delinquency, the system liquidates upto the available amount and the delinquency tracking is done on the remaining amount only.
Delinquency Product
In case you have specified delinquency tracking for balance check type, you need to specify the delinquency product under which the entry is tracked. The option list displays all the delinquency product codes maintained in the Oracle FLEXCUBE. Select the appropriate from the option list.
Settlement
This field used to settle the amount. If it set as yes, while doing settlement system uses the Account used during amount settlement. If it is no it will use default account, which is mapped in role to head.
If you have selected the ‘Accounting Role’ as DR_SETTL_BRIDGE or CR_SETTL_BRIDGE in and if ‘Settlement’ box is checked then system looks at the default settlement accounts maintained in the Debit settlement Mode and Credit settlement mode. If ‘Settlement’ box is not checked then the system tries to arrive at the GL through Role to Head Mapping.
4.2.10.2 Specifying Advices for an Event
You can select the advices that should be triggered for various events. These advices can be simple Debit /Credit advices when any payment or disbursement is made, Rate Revision advices, Loan advices etc.
To specify the advices for an event, click ‘Advices’ in the ‘Events’ sub screen of the ‘Product Maintenance’ screen.
The following advice details have to be maintained in the screen:
Message Type
Select an advice from the option list provided. The advices applicable for the module are available in this list. When you select an advice, the description is displayed in the adjacent field.
Generation Time
The ‘Trigger’ indicates the appropriate time at which the advice is to be generated. You can indicate whether the advices specified for the product should be generated when the event takes place (Input) or at authorization.
Suppress
This option may be used if you want to suppress the generation of some advices
Priority
You can indicate the importance of the advice generation. The priority may be:
- High
- Medium
- Low
Charges
You may check this option to collect charges for advice generation.
You can specify a definite format for advice generation. The formats maintained through the ‘Format File Maintenance’ are available in the option list. Select the appropriate format from this list.
For a detailed list of Events, Advices, Accounting Roles and Amount Tags, refer ‘Annexure 1’ of this User Manual.
4.2.10.3 Defining User Defined Policies
Policies are user defined validations that will be fired when any event is triggered. These can even be policies which govern the firing of an event under certain conditions.
For example, if an operation called payment is being done and the customer is paying an amount greater than his current overdue and one additional instalment, you can associate a policy to disallow the payment. Therefore, you have to associate policies to an event.
Click on ‘Policies’ in the ‘Events’ sub screen of the screen to define the policies that should be executed for an event.
You can select the appropriate policy from the option list provided. The policies defined in the ‘User Policy’ screen are available in this list. You should also specify the instance when the policy should be triggered for the event. The options are:
- Before Event
- After Event
- Both
4.2.10.4 Associating Charges
You can associate charges to an event. Linking a charge to an event implies calculating the value of the charge.
To associate charges, click ‘Charges’ in the ‘Event’ sub screen of the screen
The charge type of components defined for the product (in the ‘Components’ sub screen of the screen) are displayed in the option list. Select the component you wish to associate with the event.
4.2.11 ng User Defined Fields
UDFs are additional fields that are available for use depending on the bank’s requirement. You can define UDFs in the ‘Product UDF Mapping (CLDPRUDF’)’ screen by clicking on the ‘Fields’ button.
Refer the section ‘CL Product UDF Maintenance’ in the Retail Lending User Manual.
4.2.12 Associating an MIS Group with the Product
You can associate MIS details with a product in the ‘MIS’ screen. Click ‘MIS’ button in the ‘Product’ screen to invoke it.

In this screen, you can associate an ‘MIS Group’ to which the product should be linked (if it is applicable; if not, you can define the individual entities under which the product should be reviewed).
To associate a group, check the ‘Link Group’ option. If a group is linked, the entities defined for the group will be displayed. Only the Transaction MIS Code will be applicable to a product. The specific MIS entity (in the form of an MIS Code) will be picked up by default only if you have defined them for the group. If not, you have to indicate the appropriate MIS code for each applicable MIS class.