6. TD Operations
6.1 Introduction
You can perform the following operations on a Term Deposit (TD):
- Top-up
- Redemption
- Advice/Certificate generation
- Closure
- Simulation
This chapter contains the following sections:
- Section 6.2, "Topping-up a TD"
- Section 6.3, "Redeem TD"
- Section 6.4, "Premature Redemption of Top-up Deposit"
- Section 6.5, "Premature Redemption of ‘Rate Chart Allowed’ TD"
- Section 6.6, "Generate or Print TD Certificate"
- Section 6.7, "Closing a TD"
- Section 6.8, "Transferring to Unclaimed Deposit on Maturity"
- Section 6.9, "Closing TD by Payout to Loan Account"
- Section 6.10, "Simulate TD"
- Section 6.11, "Simulate TD Opening"
- Section 6.12, "Simulating TD Rollover"
- Section 6.13, "Simulating TD Top Up"
- Section 6.14, "Simulating TD Redemption"
- Section 6.15, "Deposit Audit Trail Inquiry"
6.2 Topping-up a TD
You can top-up a TD by adding funds to an existing active term deposit.The top-up can be done anytime after the opening date of the TD or anytime before the maturity date of the TD. Top-up input and approval is restricted to only those users who have sufficient rights assigned to their user roles. Limit for input and limit for approval defined at the role level for the user is applicable for the top-up transactions.
You are allowed to do multiple top-ups to the same account in a single day provided the minimum and maximum booking amount and the maximum amount for the deposit account is not breached.The top-up amount must not exceed the limit of minimum and maximum amount allowed for the deposit. If the deposit amount after top-up exceeds the maximum amount system displays the error message: “Deposit amount after top-up should not cross the maximum amount limit allowed for the deposit”. On top up, the deposit amount including top up amount is validated against the min-max limits at deposit cluster level and account class level. If the top-up amount crosses the maximum booking amount for the deposit currency, then the top-up is not allowed. The top-up amount is validated against the top-up units specified for each Ccy at account class.
The top-up amount is validated against the top-up units specified for each Ccy at account class. If top-up is not in multiples of top-up units system displays the following error message:
"Top-Up amount should be given in the Multiples of for Top-Up units"
The rate pick-up happens on top-up, based on the interest rate option defined for top-up at account class. The rate will be applicable from the value date of top-up.
The funding of top-up amount can be through multiple modes such as Account, GL, and cash and its combination.
You can top-up a TD using the ‘Top-up of Term Deposit’ screen. You can invoke this screen by typing ‘STDTDTOP’ in the field at the top right corner of the Application tool bar and clicking the adjoining arrow button.

The following details are captured here:
Account Number
Select the account number from the adjoining option list.
On the click of ‘P’ button the following details related to the selected account is populated in the screen.
To view the joint holder’s details of an account and the mode of operation maintained at the account level, place the cursor on the Account Number field and press Ctrl+J. The system displays the ‘Joint Holder’ screen.
For more information on the ‘Joint Holder’ screen refer to the section ‘Joint Holder Maintenance’ in the Core User Manual.
Account Description
The description of the selected TD account is displayed here. You cannot modify this.
Account Branch
The branch code where the selected TD account is available is displayed here. You cannot modify this.
Currency
The currency of the selected TD account is displayed here. You cannot modify this.
Customer Name
The name of the customer holding the TD account is displayed here.
Customer No
The code of the customer holding the TD account is displayed here.
Top-up Reference Number
A system generated reference number for the top-up transaction is displayed here.
Current Deposit Details
Interest Start Date
The date from which the interest on the TD account should be calculated is displayed here. You cannot modify this.
Principal Balance
The principal balance amount of the term deposit is displayed here. You cannot modify this.
In case a partial redemption is made to the TD account, the principal balance is arrived at by subtracting the partially redeemed amount from TD amount. Any interest liquidated to TD account during partial redemption will not be considered in principal balance.
Maturity Amount
The amount available on the maturity of the TD account is displayed here.
In case of partial redemption of the TD account, the maturity amount displayed will not include the liquidated interest on partial redemption.
Maturity Date
The maturity date of the TD account is displayed here.You cannot modify this.
Deposit Tenor
The deposit tenor details of the TD are displayed here.
Years
The tenor of the TD account in years is displayed here.You cannot modify this.The tenor of the TD account in years is displayed here.You cannot modify this.
Months
The tenor of the TD account in months is displayed here.You cannot modify this.
Days
The tenor of the TD account in days is displayed here.You cannot modify this.
Top-up Details
The top-up details of the TD are captured here.
Top-Up Amount
Specify the top-up amount for the TD.
Value Date
Select the date on which the top-up on the TD has to be effective.The top-up value date can be a back-dated or current date. Future dated top-up is not allowed.
Note
- Top-up can be back-dated to the date of last financial transaction like pay-in, interest liquidation, redemption, maturity, rollover, and top-up of funds.
- If TD booked is backdated and TD ILIQ is due then top up cannot be made till ILIQ happens for the back dated TD.
- If top-up is made back-dated before last financial transaction system displays the following error message: "Top up can be back value dated only up to the value date of the last financial transaction”.
- Top- up value date cannot fall on a holiday. If back-dated top-up date is a holiday system displays the following error message: "Top- up value date is holiday"
Narrative
Enter remarks about the top-up transaction, if any.
Remitter Name
Specify the name of the remitter in this field.
Top-Up Pay-in Details
The pay-in details for the TD top-up is captured here.
Pay-in Option
Select the funding option from the adjoining drop-down list. The following options are available for selection in the drop-down list:
- Account
- GL
- Cash- This option for TD Pay-in is not allowed for ‘Top-up of Term Deposit’ STDTDTOP screen. If top-up is made through branch screen ‘TDTP’ by Cash, then on query the same will be displayed.
Percentage
Specify the percentage of top-up amount that has to be funded through the selected funding option.
Amount
Specify the top-up amount that has to be funded through the selected funding option.
Note
In case of multiple pay in modes, the sum of amounts in multiple payins should match the top up amount entered.
Offset Account
Select the offset account for passing the accounting entries.
Offset Branch
The branch where the selected offset account is available is displayed here.
Offset Currency
The currency of the offset account.
Original FX Rate
The FX rate picked up by the system.
Applied FX Rate
The user defined FX rate.
By default, the Original FX Rate is picked up, but the user can change
it within the variance range.
In the following scenarios the Applied FX rate should be equal to the Original FX rate:
- If the Deposit Account Currency and the Pay-In/Out Account Currency are same.
- If the Rate Type/Rate code combination is not maintained at the account class for a Pay-In/Out Mode. In this case the system considers the STANDARD Rate as the default and the MID Rate code as the existing rate type.
Offset Amount
The amount paid for the term deposit account, in the account currency.
After entering the above details, click the Compute button.The system will compute the deposit details after top-up and display it.
Note
The top-up payin account number and the customer numbers should use different CASA account numbers. The following override message is displayed to ensure that the account numbers are different:
“Do Top-up with different pay-in A/C number”
Deposit Details After Top-up
The following details are captured here:
Principal Balance
The principal balance amount of the term deposit after top-up is displayed here. You cannot modify this.
Interest Rate
The new interest rate to be applied on the top-up deposit, which is maintained at the account class level, is displayed here.
Maturity Amount
The amount that you will get on maturity of the top-up deposit is displayed here.
6.2.1 Viewing Top-up of Term Deposits Summary
You can view the details of top-up TDs using the ‘Top-up of Term Deposit Summary’ screen.
To invoke this screen, type ‘STSTDTOP’ in the field at the top right corner of the Application tool bar and click the adjoining arrow button.

You can search records based on the following parameters:
- Authorization Status
- Record Status
- Account
- Top-Up Value Date
- Top-up Amount
- Top-up Reference Number
- Customer No
- Currency
- Branch
Click ‘Execute Query’ button. System fetches and displays all records matching with the entered query parameters. The following details pertaining to each record are displayed:
- Authorization Status
- Record Status
- Account
- Account Description
- Interest Start Date
- Top-up Date
- Top-up Value Date
- Top-up Amount
- Top-up Reference Number
- Principal Balance
- Interest Rate After Top-up
- Maturity Date
- Maturity Amount
- Customer No
- Customer Name
- Currency
- Branch
- Maker ID
- Release Time
6.3 Redeem TD
This section contains the following topics:
- Section 6.3.1, "Redeeming a TD"
- Section 6.3.2, "Capturing Denominated Deposit Certificate Details"
- Section 6.3.3, "Capturing Pay Out Details"
- Section 6.3.4, "Cheque/DD Details Tab"
- Section 6.3.5, "Counter Party Details Tab"
- Section 6.3.6, "Capturing Interest Details"
- Section 6.3.7, "Interest Tab"
- Section 6.3.8, "Deposit Tab"
- Section 6.3.9, "Authorizing Transaction"
- Section 6.3.10, "Viewing TD Redemption Details "
6.3.1 Redeeming a TD
The ‘Term Deposits Redemption Input’ screen enables you to redeem a term deposit. Using this screen, you can do a premature redemption, either in full or in part, ahead of maturity of the deposit and also after maturity date when the TD is in grace days..
This screen also allows you to renew the TD manually. However, renewal of the TD is allowed only on the following scenarios:
- If you have selected ‘Grace period for Renewal’ at the account class maintenance level
- If the TD is in the grace period currently
- The maturity instruction of the TD is ‘Move Principal to Unclaimed’ & ‘Move Interest to Unclaimed’.
In case of ‘Close on Maturity’ or ‘Auto rollover’, the maturity instruction will be executed on the BOD of maturity date, and thus, Grace Days are not applicable. You can invoke the ‘Term Deposit Redemption Input’ screen by typing ‘ICDREDMN’ in the field at the top right corner of the Application tool bar and clicking the adjoining arrow button.
Click the new button on the Application toolbar.

You have to specify the following fields for redeeming the TD.
Branch
Specify the branch where the TD resides. The adjoining option list displays all valid branch codes maintained in the system. You can select the appropriate one.
Term Deposit Account Number
Specify the TD Account Number. You can also choose the appropriate one from the option list. The option list displays the deposit type of accounts maintained in the system.
Note
Redemption can be done from a different customer account number. The following override message is displayed:
“Payout account belongs to different CIF”
The option list also lists auto deposit type of accounts., but on save, error will be displayed as below:
“Redemption is not allowed for auto deposit.”
To view the joint holder’s details of an account and the mode of operation maintained at the account level, place the cursor on the TD Account Number field and press Ctrl+J. The system displays the ‘Joint Holder’ screen.
For more information on the ‘Joint Holder’ screen refer to the section ‘Joint Holder Maintenance’ in the Core User Manual.
Customer ID
The customer identification (CIF) of the customer for whom TD needs to be renewed or redeemed is displayed based on the TD account number.
Account Currency
The TD currency is displayed here based on the TD account number.
Account Description
A description of the TD is displayed here based on the TD account number.
Account Balance
The account balance is displayed here based on the TD account number.
Redemption Reference Number
The system displays the reference number here.
This field will be enabled only for the query mode and not for the new transaction.
Product Code
You can select an RT product from the adjoining option list.
Note
- In case of product selection in this field, the RT product set as part of close mode (existing setup) would be ignored. System will post the accounting entries as defined in the selected RT product and charges, if any, linked to the selected RT product would be applied.
- You have to select an RT product so that the accounting is in conjunction to the selected mode.
- The manual product selection is applicable only for transfer to GL or Savings or Loan. For other modes, the respective BC / DD / PC product would hold good.
- In case you select an RT product in ICDREDMN screen then on save, the following override message is displayed: 'The selected RT product would supersede the RT product set based on the close mode'.
Waive Interest
Check this box to waive off the accrued interest amount that is to be paid to the customer during redemption. This flag is disabled if ‘Tenor Modification’ is selected.
Note
The interest accrued for the current period alone will be waived and already liquidated interest will not be waived.
Rollover/Redemption/Tenor Modification
Choose ‘Rollover’ option to rollover the accounts that are within the grace period days. Grace period can be opted only for unclaimed TD’s and manual rollover is possible only during grace days. Choose ‘Redemption’ to redeem the term deposit. If, rollover is opted, the payout instructions are not applicable at redemption screen. On saving, the renewal days / months / years need to be specified and the next maturity date is defaulted based on the rollover tenor, on save. Select Tenor Modification if you wish to modify the tenor of the TD account.
- The tenor can be extended or reduced and a new rate will be picked up for either case.
- The reduction can be done to date till previous ILIQ cycle.
- The modified tenor will be populated to TD account.
- Online ILIQ will happen if tenor reduction is made for previous cycles. For current non liquidated period, the accrual adjustment will happen in EOD.
Add Funds
Check this box to add additional funds for rollover.
Add Amount
Specify the additional amount to be considered for rollover in TD account currency.
Note
- If the user specifies higher amount, the ‘Add Funds’ gets updated as ‘Yes’ and ‘Add Amount’ will be updated as the difference between special rollover amount and TD maturity amount (P+I) on Save of TD booking. The additonal amount field will not be updated on subsequent events in the TD. Any difference amount after rollover will be transferred to the principal payout account.
- If Rollover amount specified is lower than TD amount, the difference will be paid out.
Redemption
Indicate the following details if you have chosen ‘Redemption’. The fields under the heading Redemption will not be applicable when the ‘Tenor Modification’ is selected.
Redemption Mode
Select the mode of redemption from the following options.
- Full Redemption - In this case, you can redeem the complete deposit balance of the account. On save, the redemption amount will be equal to the account balance. Full redemption will update the status of the deposit account as closed. On complete redemption interest along with principal is redeemed. The redemption amount is equal to the total of principal and interest amounts subtracted by penalty and tax amounts.
- Partial Redemption - In this case you have to specify the redemption amount. Ensure that the redemption amount is less than the account balance. On partial redemption only the principal amount is withdrawn where as the interest amount for the partially redeemed amount is liquidated to the interest booking account. This is allowed only if ‘Allow Partial Liquidation’ check box is checked at Account Class Maintenance level.
During partial redemption, if amount blocks of type ‘discounted’ exist, the system throws an override stating “Amount Blocks exist for the Discounted Deposit Account”.
Note
- If a back dated TD account is booked and it is due for ILIQ, then partial redemption will not be allowed.
- Full redemption will be allowed for a back dated TD account pending ILIQ/Unclaimed TD account after maturity /Maturity processing has failed. An override will be displayed in such cases as “ Pending ILIQ exists in account.”.The liquidated interest of previous periods will be paid out on redemption but capitalization benefit will not be provided. This has to be operationally controlled.
- In case of partial redemption, the amount block on the TD account will be updated to the extent of the credited discounted interest.
- On accepting the override, the system will close the amount blocks and process the redemption. The amount blocks can also be closed manually. However in the case of a full redemption, the system will close any existing amount Blocks of type ‘discounted’ and process the redemption.
Redemption Amount
Specify the redemption amount for the partial redemption. Ensure that that the redemption amount is less than the account balance. On partial redemption only the principal amount is withdrawn. The interest amount applicable for the partially redeemed principal is liquidated to the interest booking account specified at TD level.
The system will validate for the following:
- During partial redemption the withdrawal amount should be a multiple of withdrawal unit maintained at the ‘Deposits Cluster Maintenance’ level, else the system will display the error message “Withdrawal amount must be multiples of withdrawal unit”.
- Withdrawal amount should be greater than minimum booking amount maintained at the ‘Deposits Cluster Maintenance’ level, else the system will display the error message “Withdrawal exceeds minimum balance level”.
During “Full Redemption” of the term deposit with “Goal Reference Number”, the system validates whether there is any open settlement instruction available for that particular TD. If an open settlement instruction is available then full redemption is not allowed and an error message “Full Redemption of TD is not Possible When Open SI’s are Available” will be displayed to the user.
Waive Penalty
Check this field to waive any penalty related to the deposit redemption.
Note
You can check the ‘Waive Interest’ and ‘Waive Penalty’ boxes only for full redemption and not for partial redemption.
Suppress Redemption Advice
By default the system will generate the redemption advice. However if you check this box, the redemption advice creation will be suppressed.
Principal and Interest Details
The system displays the following principal and interest details:. The fields under the heading Principal and. Interest Details heading will not be applicable when the ‘Tenor Modification’ is selected.
Principal Amount
The system displays the amount paid at the time of term deposit booking, when you click on the ‘Compute’ button.
Interest Rate
The system displays the current interest rate applicable after partial/full redemption when you click on the ‘Compute’ button. On redemption, for rate chart allowed TD’s, the system picks the rate again, based on the amount slab and tenor
Maturity Amount
Revised maturity amount is displayed here based on the current redemption maintained, when you click ‘Compute’. Also, for partial redemption, the revised maturity amount is updated on the TD account automatically.
The maturity amount displayed is net of Principal, Interest less tax and penalty, if any.
Refer the chapter ‘Annexure B - IC Rule Set-up’ in this user manual for details on calculating principal and interest amount during term deposit redemption.
Tenor
You can rollover a TD only during the grace period. You can select the TD account and define the tenor for which TD should be renewed.
During rollover, the interest is liquidated. The system changes the TD interest start date as the maturity date of the old TD. In the ‘Main’ tab of the ‘Deposit Accounts Booking’ screen, you can see the new maturity date based on the tenor defined here.
If ‘Rollover’ box is checked, then indicate the rollover tenor for the TD account. You can select one of the following options:
- Account Class Tenor - If ‘Re-pick up Account Class Tenor’
on rollover is set to ‘Yes’ at the account class level, then
on selecting rollover, the rollover tenor will be defaulted as account
class tenor.
The default account class tenor is displayed as tenor in days, months and years which you cannot change. However, you can change the default option during rollover. When you save it, the system displays an override message ‘Re-pick account class tenor on rollover restrictions exists at account class’.
If ‘Re-pick up Account Class Tenor on Rollover’ is checked at the account class level, then by default, this option is selected. If you select this option, then the following are applicable:- The value of ‘Default Tenor’ at account class is considered as the ‘Rollover Tenor’ during deposit rollover
- During opening or modification within the term of the deposit, if you change the defaulted value for ‘Rollover Tenor’ from ‘Account Class Tenor’ to ‘Account Tenor’ or ‘Independent Tenor’, then on save system displays the override message, “Re-pick up Account Class Tenor on Rollover restrictions at account class will be ignored”.
- On save, the system displays the ‘Next Maturity Date’.
- Account Tenor - If re-pick up account class tenor on rollover is
set to ‘No’ at the account class level, then on selecting
rollover, the rollover tenor will be defaulted as account tenor.
On rollover, the system displays the original tenor of the TD in terms of days, months and years. However, you can change the default option during rollover. When you save it, the system displays an override message ‘Re-pick account class tenor on rollover restrictions exists at account class’.
If ‘Re-pick up Account Class Tenor on Rollover’ is unchecked at the account class level, then by default, this option is selected. If you select this option, then the following are applicable:- The value of ‘Original Tenor’ of the deposit account is considered as the ‘Rollover Tenor’ during deposit rollover.
- During opening or modification within the term of the deposit, if you change the defaulted value for ‘Rollover Tenor’ from ‘Account Tenor’ to ‘Account Class Tenor’, then on save system displays the override message, “Re-pick up Account Class Tenor on Rollover restrictions at account class will be ignored”.
- On save, system updates the ‘Next Maturity Date’ with the sum of maturity date and original tenor of the deposit.
- Independent Tenor - Select this option to provide a different tenor,
rather than default from account class or account tenor. On selecting
this option, you can specify the Rollover Tenor in years, months and
days combination.
The tenor should be specified within the minimum and maximum tenor limits maintained at the account class level. If it is not within the minimum and maximum limit, then the system will display an error message "Rollover tenor does not fall in the range of minimum and maximum tenor allowed". The rollover tenor for independent tenor should not be null.
On save, system updates the ‘Next Maturity Date’ accordingly.
Note
System validates that the rollover tenor is within the minimum and maximum tenor allowed for the account class. If this validation fails, then system displays the error message, “Rollover tenor does not fall in the range of minimum and maximum tenor allowed”.
The next maturity date will be adjusted based on the holiday treatment at account class level. The tenor in ICDREDMN screen will remain the same after holiday adjustment. On query from STDCUSTD after rollover, Deposit tenor will be populated with the holiday adjusted tenor and original tenor with the actual tenor before holiday adjustment.
Days(Offset)/ Value date (Slab)
Specify number of days for the rollover of term deposit.
Months
Specify number of months for the rollover of term deposit.
Years
Specify number of years for the rollover of the term deposit.
Note
On saving the rollover, the system displays the ‘Maturity Date’.
Next Maturity Date
The system displays the new maturity date based on the given renewal period.
Interest Rate Based on Cumulative Amount
Check this box to indicate that the system should arrive at the interest rate of a new deposit using the cumulative amount of other active deposits, under the same account class, customer, and currency.
The cumulation of the amount for arriving at the interest rate is done at the account level during the save of the below events:
- Deposit account opening
- Any interest rate change to the deposit - floating rate deposits, rate change on interest liquidation, and rate change on rollover
Note
- When cumulating the amount of the deposits system considers the current deposit balance of all the deposits along with the new deposit amount.
- TD accounts opened after the interest start date will not be considered for arriving at the cumulation amount.
- For backdated deposit opening, all the active deposits as of the current system date are considered to arrive at the cumulative amount, if the ‘Interest Rate Based on Cumulative Amount’ box is checked.
- The interest rate derived is applied only to the new deposit to be opened and there will be no changes done to the deposits which are used for arriving at the interest rate.
Refer the section ‘Calculating Interest Rate Based on Base Amount’ in this User Manual for details about arriving at interest rate based on cumulative amount.
Continue Variance on Rollover
The system defaults it based on the flag availability in the TD account level. However, you can modify this flag.
Check this box to enable continued variance on rollover. If you check this, then the system will default account variance as current value to the rollover deposit for the next cycle.
If you do not check this, then the account variance will not be carried forward to next rollover cycle.
Tenor Modification
If ‘Tenor Modification’ box is checked, then it indicates that the Tenor of the TD account can be modified. This flag is applicable only when ‘Tenor Modification’ is selected in ‘Deposits’ screen of the Account Class Maintenance (STDACCLS) screen. If this box is checked, then the following fields are disabled:
- Waive Interest Flag
- Fields under the ‘Redemption’ and ‘Principal and Interest Details’ section
If this box is checked, then the Days, Months, Years and New Maturity fields are enabled. You can specify the modified tenor in years, months and days combination. Independent Tenor field is selected automatically. The tenor should be specified within the minimum and maximum tenor limits maintained at the account class level. If it is not within the minimum and maximum limit, then the system will display an error message. The independent tenor for ‘Tenor Modification’ should not be a null value.
Specify the following details if Tenor Modification is checked:
Days
Specify the new number of days in this field.
Months
Specify the new number of months .
Years
Specify number of years for the tenor modification of term deposit.
Next Maturity Date
The system displays the new maturity date based on the given tenor on ‘Save’ operation.
On ‘Save’ operation, the transaction system will also validate whether ‘Tenor Modification’ flag is selected in the ‘Account Class’ STDACCLS screen. In case, this flag is not selected in the STDACCLS screen, then an error message ‘Tenor Modification Facility Not available for this TD Account’ is displayed.
Term Deposit Redemption Pay Out Details
Specify the following details for TD payout.
Pay Out Type
Select the pay-out type from the drop-down list. The options available are:
- Account
- General Ledger
- Banks Check
- Payments
- Term Deposit
- Demand Draft
- Loan Payment
Note
For Dual Currency Deposits you are allowed to select only ‘GL’ and ‘Savings Account’ options as the pay-out mode. You can either select GL or Savings Account but not both. Also, you can select only one GL or one Savings account and not multiple GLs or accounts in either case.
Percentage
Specify the amount of redemption in percentage. For redemption through multiple payment modes, the redemption amount that needs to be paid to each mode is computed based on the percentage of payout specified.
Redemption Amount
Specify the actual amount of redemption.
The percentage and redemption amount are conditionally mandatory. You should specify either the percentage or the redemption amount.
Instrument Number
Specify the instrument number to be issued, if payout mode is BC. If not, the system will default the least instrument no available in the branch on save.
Waive Issuance Charges
Check this box to indicate waive option for pay-out BC issuance charge
Offset Branch
Specify the branch code of the account for redemption.
Offset Account
Specify the account number/ GL for redemption through account, GL and loan. For redemption through PC, BC / DD, TD the offset account should not be given.
Narrative
Give a brief description for the redemption.
Original FX Rate
The FX rate picked up by the system.
Applied FX Rate
The user defined FX rate.
By default, the Original FX Rate is picked up, but the user can change
it within the variance range.
In the followiing scenarios the Applied FX rate should be equal to the Original FX rate:
- If the Deposit Account Currency and the Pay-In/Out Account Currency are same.
- If the Rate Type/Rate code combination is not maintained at the account class for a Pay-In/Out Mode. In this case the system considers the STANDARD Rate as the default and the MID Rate code as the existing rate type.
Offset Amount
The amount paid for the term deposit account, in the account currency.
Note
You can query, modify and amend other branch transactions only through the summary screen.
Payin Details
Select the Payin Details for debiting the additonal amount for rollover from the drop down list. The list displays the following values:
- GL - In case of pay-in through GL, if the offset GL account specified should be the GL maintained at 'TD Payin Parameters' (STDTDPAY) screen. If not, on save, the GL at STDTDPAY will be auto defaulted.
- Account - In case of pay-in from savings account, it is mandatory
to specify the offset account. If it is not specified, the system displays
an error on saving the TD account. If the pay-in account specified is
disallowed for the TD product, then on saving the account, the system
displays an error message
- If the offset account is not specified then, an error message is displayed as : “Offset account is mandatory.”
- Before rollover, the customer has to manually verify the availability of funds in the offset account. If not the rollover will fail. If the offset account does not have sufficient funds then the system will display an error as ‘Insufficient balance in the account.
- If the offset account provided has limits attached, then on save the system will display a message as “The limits/Collateral attached is used for Payin.”
- Pay in by Cheque - In case of pay-in by cheque, the TD should be
entirely funded by a single cheque. Multimode, combining multiple cheques
or part payment by cheque and the rest by other modes, is not allowed.
- In case of payin by cheque, the additonal amount will be reflected online after authorization of redemption. TD account will be TD amount plus additional amount.
- Till the completion of float days, the funds will be uncollected in the TD account. Until the cheque is cleared, no operations/modifications will be allowed on this account.The system displays an error message as “Account is in tanked status.Operations will not be allowed.”
- Cheque can be rejected till the float days. Rejection can be done through 6560,CGDCLGDT, IFDCLGDT or file upload.If the float days is zero, then the cheque can be rejected only on current day
- On cheque rejection, if the consolidation has not be done, then REVR will be fired debiting the uncollected amount online. If the consolidation has been done, then RETN will be fired debiting the TD amount online. The uncollected amount will b released online.
- On rejection, the maturity amount and interest rate update will happen only in EOD.
- If the cheque float days in zero and the transaction code availability is X days, then till that X days, the funds will be in uncollected status and account will be in tanked status. No operations will be allowed till the cheque clearance..
Note
On manual renewal, new event MROL will be fired and the additional funds pay in account will be debited for additional amount. If the ‘pay in’ is selected as Cheque, then MROL will be fired debiting the clearing GL and crediting the TD account. The funds will be in uncollected till the cheque clearance date.
Percentage
Specify the percentage of payout for each payout option specified.
Amount
Specify the amount to be transferred to TD.
Offset Branch
The system displays the branch code of the account to which fund is transferred from TD account.
Offset Account
Specify the account number/ GL to which the fund is transferred to TD account on liquidation, maturity or rollover. This field will return the branch code if the account is selected and NULL will be returned if GL is selected. If pay-out mode is GL then the system displays only GLs in the option list.
Cheque Instrument No
Specify the cheque instrument number.
Clearing Type
Specify the clearing type for the transaction. Alternatively, you can select the clearing type from the option list. The list displays the list of outward clearing products maintained in the system. The cheque clearing happens based on the clearing product specified.
Cheque Date
Specify the date of issue of the cheque.
Drawee Account Number
Specify the drawee account number.
Routing No.
Specify the Routing number.Alternatively, you can select the routing number from the option list. The list displays all the routing number maintained in the system.
Note
If a TD is opened through cheque and is rejected or if a manual rollover transaction through a cheque is rejected, then the TD is updated during the IC batch. The maturity amount, initial principal amount and interest rate of this transaction will be updated only during the EOD batch. Hence, these details will not be available in the report or advice generated during the day.
6.3.2 Capturing Denominated Deposit Certificate Details
Click ‘Denominated Deposit’ button on the ‘Term Deposit Redemption Input’ screen and invoke the following screen.

Specify the following details for denominated deposit certificate:
Select All
Check this box to select all certificates for the account.
Certificate Number
Select the certificate number from the option list. The list displays all active certificates issued for the account.
Certificate Status
This indicates the current status of the certificate selected.
Certificate Amount
This indicates the amount of the certificate.
Redeem
Check this box to redeem a certificate.
After you enter the above details click ‘Populate’ button. The following details will be displayed:
Total Amount of Redemption
The total amount of redemption is displayed here.
Number of Certificate Redeemed
The number of certificates currently redeemed is displayed here.
During manual part redemptions, all the active certificates of the account are displayed in the ‘Denominated Deposit Certificate Details’ screen and available for redemption.
At the time of full redemption or automatic redemption (i.e. close on maturity), all the active certificates will be marked as ‘Redeemed’ provided there are no certificates with amount block. In case of part redemption of the TD, only the available certificates can be redeemed. A single certificate cannot be part redeemed. The interest amount for the certificates being redeemed prematurely will be paid along with the principal amount. Once a particular certificate has been redeemed, it will not be available for further redemption.
6.3.3 Capturing Pay Out Details
Click ‘TD Pay Out’ button on the ‘Term Deposit Redemption Input’ screen and invoke the following screen. Here you can specify details of the child TD that should be created on maturity of the parent TD.
Note
For denominated deposits, payout to a child TD using the same denominated deposit account class or any other denominated deposit account class will be restricted. This restriction will be applicable during opening, redemption, maturity processing or amendments. System will do a validation for this and if the validation fails an error similar to ‘Payout to term deposit using denominated deposit account class is not allowed for this denominated deposits’ is displayed...

The ‘Term Deposit’ tab is displayed by default. Here you can capture the following details:
Branch Code
The system displays the branch code.
Account No
The system displays the TD account number. When you click ‘Populate’, the new child TD number is computed automatically for payout through TD,.
Customer Number
The system displays the customer number. However, you can change it.
Currency
The system displays the TD currency.
Account Class
Specify the account class from which the interest and deposit should be picked up. If you have selected the ‘Account Class’ option, then you have to specify the Account Class. Else you can leave it blank.
Account/Account Class
Indicate whether the interest and deposit should be picked up from the parent account TD account or from the account class. The options available are:
Note
If you select the option ‘Account’, then on clicking ‘P’ button, the system will default the interest and deposit details from the parent TD account. If you select the ‘Account Class’ option, then on clicking ‘P’ button, the system will default the interest and deposit details from the account class selected.
6.3.4 Cheque/DD Details Tab
Click ‘Instrument Details’ tab on the ‘Term Deposit’ screen and invoke the following screen. Here you can capture details of the banker’s cheque by which the TD needs to be redeemed. You need to maintain these details, if you have selected ‘Payout Option’ as ‘Banker’s Cheque’ or ‘Demand Draft’.

You can capture the following details:
Instrument Details
Specify the following instrument details.
Bank Code
Specify the bank code of the Bankers cheque.
Instrument Type
Specify the type of the instrument.
Cheque Date
Specify the cheque date for the pay-out.
Payment Branch
Specify the payable branch for the cheque. The adjoining option list displays all branch codes linked to the specified bank code. You can select the appropriate one.
Beneficiary Details
Indicate the following details.
Beneficiary Name
Specify the name of the beneficiary for the payout.
Other Details
Specify other details (if any) for the beneficiary.
Narrative
Give a brief description for the payout.
Country Code
Specify the country code for the payout address.
Address Line 1 to 3
Specify the address of the beneficiary for the payout.
6.3.5 Counter Party Details Tab
Click ‘Counter Party Details’ tab on the ‘Term Deposit’ screen and invoke the following screen. Here you can capture pay-out details for Local Payment transfer to another bank account. You need to maintain these details, if you have selected ‘Payout Option’ as ‘Payments’.

You can capture the following details:
Counter Party Details
Specify the following cheque details.
Counter Party Bank Code
Specify the bank code of the counter party.
Counter Party Offset Account
Specify the branch code of the account for redemption.
Beneficiary Details
Indicate the following details.
Beneficiary Name
Specify the name of the beneficiary.
Address Line 1 to 2
Specify the address of the beneficiary.
Other Details
Specify other details (if any) for the beneficiary.
Narrative
Give a brief description for the payout.
6.3.6 Capturing Interest Details
The Child TD parameters are similar to the Parent TD, except the child will not have the option to create a new TD as part of Pay-out. You can capture the details of child TD that is created by payout, by clicking on the ‘Interest’ button on the ‘Term Deposit’ screen.
Here you can capture the following details:
Branch
The system displays the branch code where the child TD resides.
Account Class
The system displays the account class to which the TD belongs.
Account
The system displays the child TD account number.
Customer No
The customer identification (CIF) of the TD customer is displayed here.
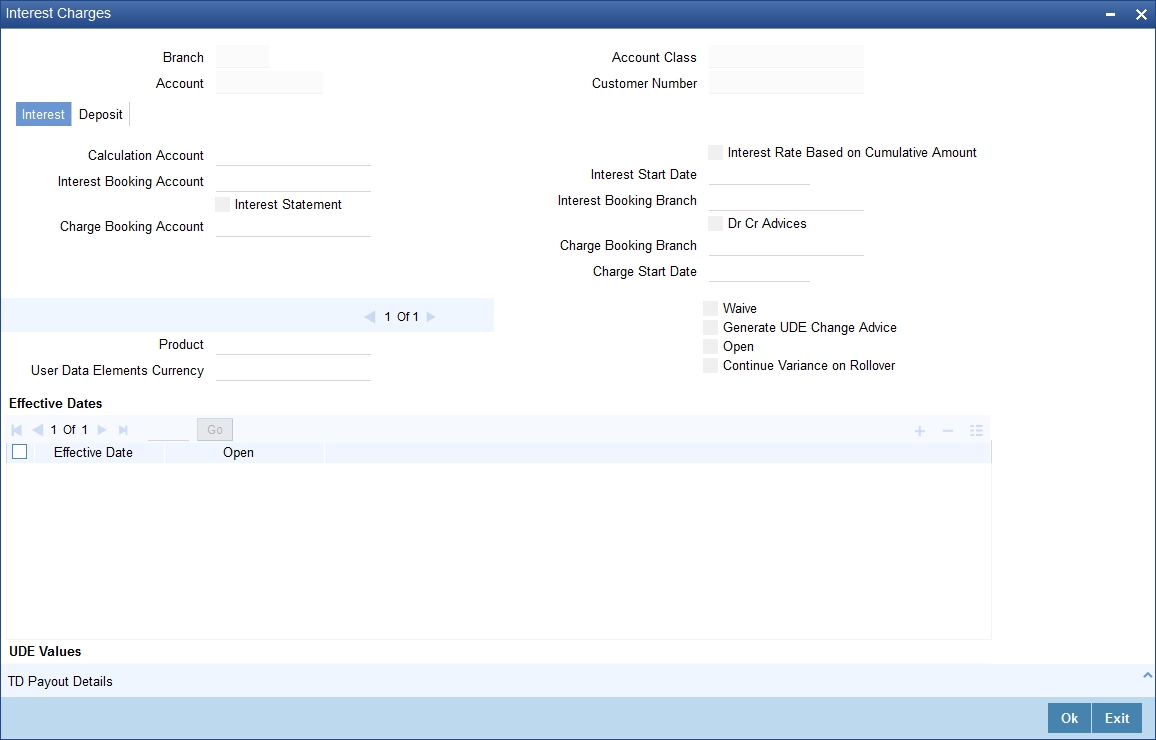
6.3.7 Interest Tab
This tab is displayed by default. You can specify the following details:
Calculation Account
Specify the calculation amount of the child TD. The adjoining option list displays all accounts maintained in the respective branch. You can select the appropriate one.
Interest Start Date
Indicate the date from which interest calculation should start, using the adjoining calendar.
Interest Booking Account
Specify the account to which interest should be booked. You have an option of booking interest to a different account belonging to another branch. The accounts maintained in the selected booking branch are available in the option list provided. The system liquidates the interest into the selected account.
The interest booking account lists only CASA accounts and the TD account nos. which is to be created.
Interest Booking Branch
Specify the interest booking branch. The adjoining option list displays all valid branch codes available in the system. You can select the appropriate one.
Interest Statement
Check this box to generate an interest statement for the account. The interest statement will furnish the values of the SDEs and UDEs and the interest rule that applies on the account.
Dr Cr Advices
Check this box to generate payment advices when interest liquidation happens on an account. The advices are generated in the existing SWIFT or/and MAIL format. No advices will be generated if you leave this box unchecked.
Charge Booking Branch
Specify the charge booking branch. The adjoining option list displays all valid branch codes available in the system. You can select the appropriate one.
Charge Book Account
Specify the account to which charge should be booked. You have an option of booking charge to a different account belonging to another branch. The accounts maintained in the selected booking branch are available in the option list provided. The system liquidates the charge into the selected account.
Charge Start Date
Indicate the date from which charge calculation should start, using the adjoining calendar.
Continue Variance on Rollover
The system defaults it based on the Interest and Charges product. However, you can modify this. If this is modified, during the save, the system displays a prompt ‘Continue variance on Rollover Flag is modified’.
Check this box to enable continued variance on rollover. If you check this, then the system will default account variance as current value to the rollover deposit for the next cycle.
If you do not check this, then the account variance will not be carried forward to next rollover cycle.
Product Code
Specify the interest/charge (IC) product code that should be linked to the account. The adjoining option list displays all valid IC products available in the system. You can select the appropriate one.
UDE Currency
Specify the UDE Currency defined for the product.
Waive
Check this box to waive off an interest or a charge that has been specified.
Generate UDE Change Advice
Check this box to generate the UDE change advice.
Open
Check this box to make the product applicable again. More than one product may be applicable on an account class at the same time. You can temporarily stop applying a product on an account class by ‘closing’ it. You can achieve this by un-checking the box ‘Open’. The product will cease to be applied on the account class.
Effective Dates
Specify the following details:
Effective Date
Indicate the date from which a record takes effect, using the adjoining calendar.
Open
Check this box for records with different effective dates if the values of the UDEs vary within the same liquidation period.
Account UDE Value
Specify the following details:
User Defined Element ID
Specify the UDE ID for the account.
UDE Value
Specify the values for a UDE, for different effective dates, for an account. When interest is calculated on a particular day for an account with special conditions applicable, the value of the UDE corresponding to the date will be picked up.
Rate Code
Specify the rate code for the account.
Variance
Specify the variance in the interest rate. This is the variance alone. The effective rate will be the sum of the TD rate code and the variance that you specify here. This value can be modified at any point of time.
Interest Rate Based on Cumulative Amount
Check this box to indicate that the system should arrive at the interest rate of a new deposit using the cumulative amount of other active deposits, under the same account class, customer, and currency.
The cumulation of the amount for arriving at the interest rate is done at the account level during the save of the below events:
- Deposit account opening
- Any interest rate change to the deposit - floating rate deposits, rate change on interest liquidation, and rate change on rollover.
Note
- When cumulating the amount of the deposits system considers the current deposit balance of all the deposits along with the new deposit amount.
- TD accounts opened after the interest start date will not be considered for arriving at the cumulation amount.
- For backdated deposit opening, all the active deposits as of the current system date are considered to arrive at the cumulative amount, if the ‘Interest Rate Based on Cumulative Amount’ box is checked.
- The interest rate derived is applied only to the new deposit to be opened and there will be no changes done to the deposits which are used for arriving at the interest rate.
Refer the section ‘Calculating Interest Rate Based on Base Amount’ in this User Manual for details about arriving at interest rate based on cumulative amount.
6.3.8 Deposit Tab
Click ‘Deposit tab’ in the ‘Interest Charges’ screen to capture deposit details.
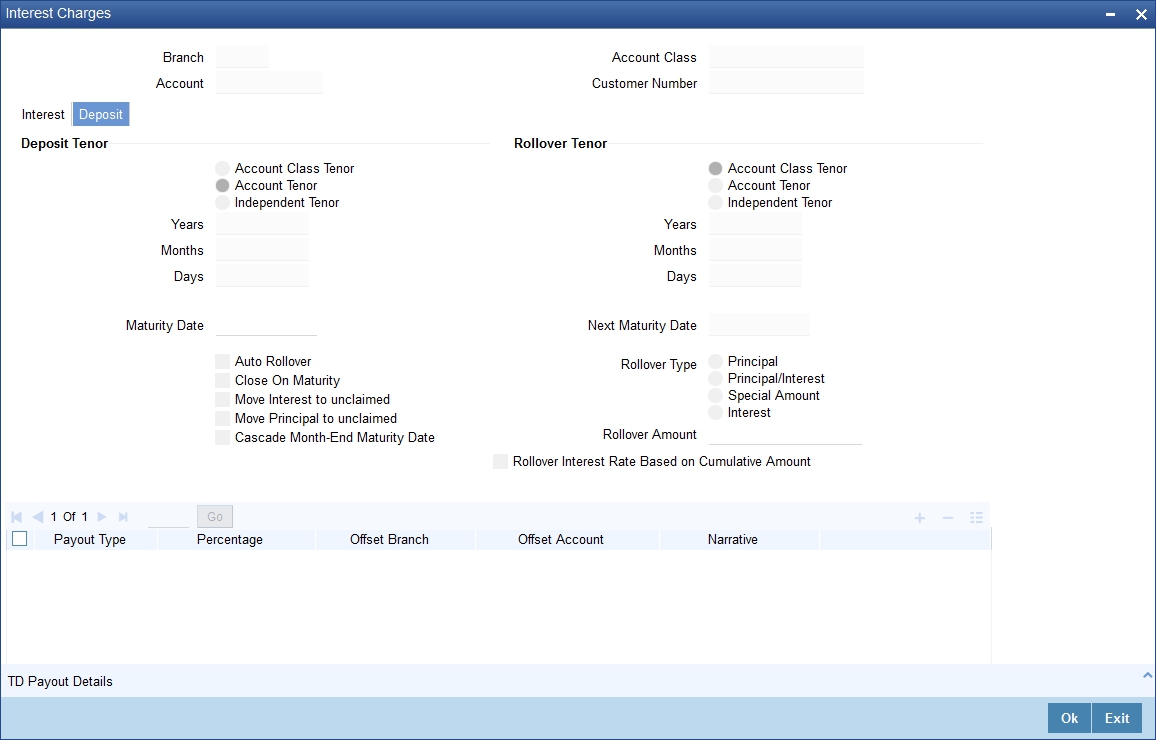
You can capture the following details:
Next Maturity Date
On selecting the ‘Auto Rollover’ box, the system displays the next maturity date based on the previous tenor of the deposit.
Deposit Tenor
Select the deposit tenor type. The following options are available.
- Account class tenor - If you select this, the system will default the default tenor from the account class. This is represented in terms of days, months and years. You cannot edit it. The maturity date is displayed based on the tenor specified.
- Account tenor - If you select this, the system displays the original tenor of the parent TD. The tenor is represented in days, months and years. You cannot change this.
- Independent tenor - If you select this, you can specify the tenor in terms of days, months and years. The default value of the independent tenor will be null.
- The tenor should be specified within the minimum and maximum tenor limits maintained at the account class level. The tenor months cannot be greater than 11 months and if tenor months is specified, the tenor days cannot be greater than 30 days.
Years
This indicates the number of years in the original tenor.
Months
This indicates the number of months in the original tenor.
Days
This indicates the number of days in the original tenor.
If the maturity date falls on the holiday, the system adjusts it,
Rollover Tenor
The deposit tenor has following options as below,
- Account class tenor - If you select this, the system displays the account class tenor in days, months and years. You cannot change this. The system will not display the next maturity date, The default account class tenor at the time of rollover is considered.
- Account tenor - This is the default option. If this is selected, the system populates the original tenor of the parent TD. The tenor is represented in days, months and years. You cannot change this.
- Independent tenor - If you select this, you can enter the rollover tenor in terms of days, months and years. The default value of the independent tenor will be null.
Years
This indicates the number of years in the rollover tenor.
Months
This indicates the number of months in the rollover tenor.
Days
This indicates the number of days in the rollover tenor.
The tenor should be specified within the minimum and maximum tenor limits maintained at the account class level. The tenor months cannot be greater than 11 months and if tenor months is specified, the tenor days cannot be greater than 30 days.
The tenor is represented in terms of years, months and days. For example, if the deposit tenor is 185 days, it should be represented as 0 years, 6 months and 5 days. You need to specify the values in the appropriate fields.
Maturity Date
The system picks up the maturity date from the default tenor from the linked account class and displays it here. However, you can modify this date.
Auto Rollover
Check this box to automatically rollover the deposit you are maintaining. You have to indicate ‘Rollover Type’ on selecting this option.
Close on Maturity
Check this box to close the term deposit account on maturity date and transfer the amount as per the pay-out details maintained for the TD.
Move Interest to Unclaimed
Check this field to move the interest amount to the unclaimed GL mapped at the IC product in the accounting role ‘INT_UNCLAIMED’ on grace period end date. If you select this option, you will need to check the box ‘Move Principal to Unclaimed’.
Move Principal to Unclaimed
Check this box to move the principal amount to the unclaimed GL mapped at the IC product in the accounting role ‘PRN_UNCLAIMED’ and liquidate the interest amount to the interest booking account on grace period end date.
Rollover Type
Indicate the components that should be rolled over by choosing one of the following options:
- Principal - If you select this option, then the system will roll over the principal amount alone on EOD of TD maturity date or BOD after end of the grace period. If interest booking account is given as TD account, then on maturity date the interest amount will be first liquidated to the TD account and then settled as per the pay-out details maintained for the TD account.
- Principal + Interest - For you to choose this option, the interest booking account has to be the TD account. If you select this option, then the system will roll over the principal and interest amount on EOD of TD maturity date or BOD after end of the grace period.
- Special Amount – If you choose this option, the system will roll over the amount specified in ‘Rollover Amount’ field, irrespective of what the interest booking account is. Upon maturity of the rolled over TD, the system will roll over with the same amount special amount and settle the interest amount as per TD pay-out details maintained.
- Interest - For you to choose this option, the interest booking account has to be the TD account. If you select this option, then the system will roll over the interest amount on EOD of TD maturity date or BOD after end of the grace period. The principal will be settled as per the pay-out details maintained.
Rollover Amount
If a special amount is to be rolled over, you have to specify the amount (less than the original deposit amount).
Term Deposit Payout Details
Specify the following details in order to allow automatic pay-out:
Pay Out Type
Select the pay-out mode from the drop down list. The options available are:
- Bankers Cheque - BC
- Transfer to Other bank - Local Payment
- Transfer to GL – GL
- Transfer to Savings Account – AC
Note
- This option will be available only when account number generation is ‘Auto’.
- For Dual Currency Deposits you are allowed to select only ‘GL’ and ‘Savings Account’ options as the pay-out mode. You can either select GL or Savings Account but not both. You can select only one GL or one Savings account and not multiple GLs or accounts in either case.
Percentage
Specify the amount of redemption in percentage.
Offset Branch
Specify the branch code of the account for redemption. The adjoining option list displays all valid branch codes available in the system. You can select the appropriate one.
Offset Account
Specify the account number/ GL for redemption. The adjoining option list displays all valid accounts and GLs available in the offset branch. You can select the appropriate one.
Narrative
Give a brief description for the redemption.
6.3.8.1 Indicating Payout Details
Click ‘Term Deposit Payout Out’ button in the ‘Interest Charges’ screen and invoke the following screen.

The ‘Bank Cheque’ tab is displayed by default. You can capture the following details for pay-out using a banker’s cheque:
Bankers Cheque
Specify the following cheque details.
Bank Code
Specify the bank code of the Bankers cheque.
Payment Branch
Specify the payable branch for the cheque. The adjoining option list displays all branch codes linked to the specified bank code. You can select the appropriate one.
Currency
The currency code is displayed here.
Beneficiary Details
Indicate the following details.
Beneficiary Name
Specify the name of the beneficiary.
Other Details
Specify other details (if any) for the beneficiary.
Narrative
Give a brief description for the payout.
Country Code
Specify the country code for the payout address.
Address Line 1 to 3
Specify the address of the beneficiary for the payout.
6.3.8.2 Counter Party Details Tab
Click ‘Counter Party Details’ tab on the ‘Term Deposit Payout Details’ screen and invoke the following screen. Here you can capture details for pay-out through Local Payment transfer to another bank account.

You can capture the following details:
Counter Party Details
Specify the following cheque details.
Counter Party Bank Code
Specify the bank code of the counter party.
Counter Party Offset Account
Specify the branch code of the account for redemption.
Beneficiary Details
Indicate the following details.
Beneficiary Name
Specify the name of the beneficiary.
Address Line 1 to 2
Specify the address of the beneficiary.
Other Details
Specify other details (if any) for the beneficiary.
Narrative
Give a brief description for the payout.
While saving the transaction, if you had modified the interest rate at TD account level for TD booking or for creating Payout TD, the system displays configurable override messages.
These overrides are displayed during subsequent modifications of the interest rate. You can also configure overrides for Dual Authorization to be displayed at Contract and Maintenance level in the ‘Override Maintenance’ screen.
For more information about configuring overrides, refer to the section ‘Override Maintenance’ in the chapter ‘Configuring Overrides’ in the Core Services User Manual.
6.3.9 Authorizing Transaction
For the transaction to be authorized, click ‘Authorize’ button. The following screen will be displayed:

Note
The accounting entries for redemption/renewal are passed only on authorization.
6.3.10 Viewing TD Redemption Details
You can view the details of TDs redemption using the ‘Term Deposit Redemption Input - Summary’ screen.
To invoke this screen, type ‘ICSREDMN’ in the field at the top right corner of the Application tool bar and click the adjoining arrow button.

You can query on records based on any one or all of the following criteria:
- Authorization Status
- Record Status
- Redemption Reference Number
- Branch Code
- Account Number
- Transaction Date
Click ‘Search’ button. The system identifies all records satisfying the specified criteria and displays the following details for each one of them:
- Authorization Status
- Record Status
- Redemption Reference Number
- Branch Code
- Account Number
- Transaction Date
- Customer Id
- Account description
- Redemption Amount
- Action
- Redemption By
- Currency
- Redemption Mode
- Bank Narrative
- Savings Narrative
- GL Narrative
Note
- You can query or modify the account details of the customers whose accounts are permitted to you for the query/modification in the ‘Group Code Restriction’ screen.
- If you are allowed to query customer information, then system displays the details pertaining to the fetched records:
- You can query, modify and amend other branch transactions through the summary screen.
6.4 Premature Redemption of Top-up Deposit
While doing a premature partial redemption of a top-up deposit, system follows the LIFO method, i.e. the redemption amount will be taken from the latest top-up first.
The system keeps track of the funds inflow and outflow. During premature redemption the funds moving out using LIFO method are tracked and the interest for the remaining amount is calculated accordingly.The penalty is calculated on LIFO method, based on the number of days the redemption amount is available in the deposit. This is applicable during premature full redemption penalty calculation also. The SDEs DAYS_FROM_START, DEPOSIT_AMOUNT and PENALTY_BASIS are used for calculation of penalty.
If for a deposit the interest amount is liquidated to the deposit account itself, then any redemption after the top-up will consider only the principal amount i.e. the interest amount liquidated to the account will not be considered for the redemption. If the interest rate for the redeemed amount and the amount after redemption is ‘Corresponding slab as on Opening date’ at the account class, then the opening date of the deposit is considered instead of the top-up date.
If a top-up is made to a deposit and the redemption amount is taken only from top-up amount, then the interest re-calculation will happen only from that top-up date, and the initial deposit amount and the interest rate picked up for that will remain unaffected.
6.5 Premature Redemption of ‘Rate Chart Allowed’ TD
This section contains the following topics:
- Section 6.5.1, "Rate Pick-up and Interest Recalculation for the Redemption Amount"
- Section 6.5.2, "Rate Pick-up and Interest Recalculation for the Remaining Principal"
- Section 6.5.3, "Recovering Paid Interest from the Redemption Amount"
6.5.1 Rate Pick-up and Interest Recalculation for the Redemption Amount
For Pre-mature redemption of rate chart allowed term deposit, system re-calculates the interest for the principal amount being redeemed with any one of the following interest rate as defined in the field 'Interest Rate for Redemption Amount':
- Continue Existing - The contracted interest rate for the deposit to continue. This is the rate applicable to the account just before the current redemption.
- As on Opening Date – Corresponding interest rate for the completed tenor and redeemed amount applicable as on the opening date for the deposit interest rate code. The completed tenor will be used to pick the rate.
- As on the Redemption Date – Corresponding interest rate for the completed tenor and redeemed amount applicable as on the current redemption date for the deposit interest rate code. The completed tenor will be used to pick the rate.
- As on the Rate Revision Events – Corresponding interest rate for the redemption amount and completed tenor will be re-picked for each event where the rate revision is done. For e.g. If the interest rate for the deposit is changed for each interest liquidation cycle and on the top-up date, then the interest rate is re-picked for the redemption amount and completed tenor for each liquidation cycle date and top-up date.
- Special Rate Code – A fixed rate effective as on current redemption date. The rate code defined using ICDRATMA screen is to be captured in case of fixed rate. The rate code is captured at the STDACCLS screen ‘Special Rate Code’ field. The pick list for this field will display only the rate codes defined using the ICDRATMA. This field is mandatory for this option. There will be a validation available for the same and if the validation fails system displays an error message: ‘The special rate code field is mandatory for the interest rate for redemption amount’.
6.5.2 Rate Pick-up and Interest Recalculation for the Remaining Principal
The interest rate for the remaining principal amount after premature partial redemption (i.e. interest rate after redemption) can be any of the following:
- Continue Existing - The contracted interest rate (existing rate) of the deposit to continue. This is the rate applicable to the account just before the redemption.
- As on Opening Date – Corresponding interest rate for the deposit tenor and remaining amount applicable as on the opening date applicable for deposit opening date. The deposit tenor is used to pick the rate.
- As on Redemption Date – Corresponding interest rate for the deposit tenor and remaining amount applicable as on the current redemption date. The deposit tenor is used to pick the slab rate.
- As on the Rate Revision Events – Corresponding interest rate for the remaining amount and deposit tenor will be re-picked for each event where the rate revision is done. For e.g. If the interest rate for the deposit is changed for each interest liquidation cycle and on the top-up date, then the interest rate is re-picked for the remaining amount and deposit tenor for each liquidation cycle date and top-up date.
- If the interest is compounded (i.e. liquidated to the same deposit account) then, it is not considered while arriving at the principal amount for interest pick-up.
6.5.3 Recovering Paid Interest from the Redemption Amount
For premature redemption, the interest amount is recalculated for both redemption amount and the balance principal amount.In case the interest already paid is greater than the interest liable to be paid as of redemption date, then the difference amount needs to be recovered from the interest booking account. This is applicable to partial and full premature redemption of term deposits.
The following override message is displayed to the authorizer only during authorization:.
“Interest adjustment amount is debited from the interest booking account of the customer. Do you want to Proceed?”
6.6 Generate or Print TD Certificate
This section contains the following topics:
- Section 6.6.1, "Generating or Printing a TD Certificate"
- Section 6.6.2, "Capturing Regular Deposit Details"
- Section 6.6.3, "Capturing Denominated Certificates Details"
- Section 6.6.4, "Certificate Re-denomination"
6.6.1 Generating or Printing a TD Certificate
Once a denominated deposit is opened the certificates and duplicate deposit advice can be printed using the ‘Term Deposit Certificate’ screen You can also do a partial printing of denominated deposit certificates i.e. print few certificates at one point of time and the balance certificate later.
To invoke ‘Term Deposit Certificate’ screen, type ‘ICDBADHC’ in the field at the top right corner of the Application tool bar and click the adjoining arrow button.
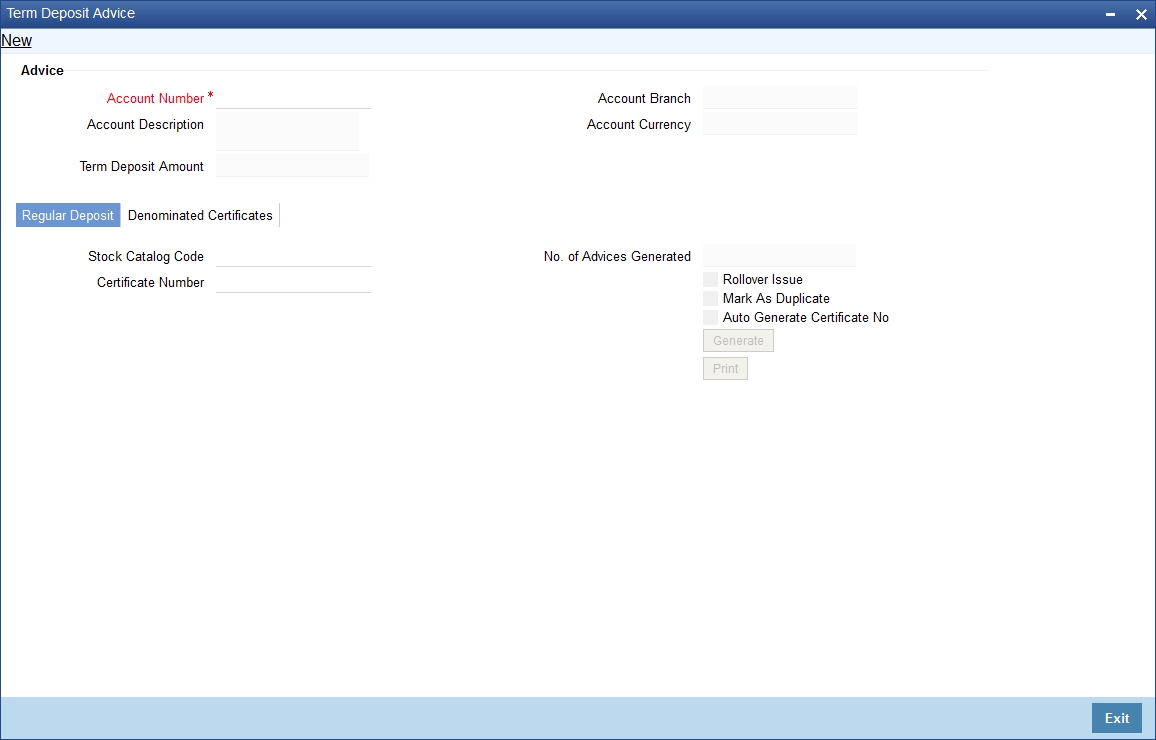
You need to specify the following details.
Advice
Account Number
Specify the account for which you want to generate an advice. The adjoining option list displays all valid accounts maintained in the system. You can select the appropriate one.
To view the joint holder’s details of an account and the mode of operation maintained at the account level, place the cursor on the Account Number field and press Ctrl+J. The system displays the ‘Joint Holder’ screen.
For more information on the ‘Joint Holder’ screen refer to the section ‘Joint Holder Maintenance’ in the Core User Manual.
Account Description
The description of the selected account number is defaulted here.
Term Deposit Amount
The deposit amount of the selected TD account is defaulted here.Branch Code
The system displays the branch code.
Account Currency
The currency of the selected TD account is displayed here.
6.6.2 Capturing Regular Deposit Details
If the TD account selected is a regular deposit and not a denominated deposit then this tab is enabled. The following details are captured here:
Stock Catalog Code
Select the stock catalog code from the adjoining option list. The list displays active stock catalog codes for the TD Certificate instrument type.
Certificate Number
Specify the Certificate Number if the Auto Generate Certificate Number is not checked. System defaults the Certificate Number if Auto Generate Certificate Number is checked.
Note
If the Auto Generate Certificate Number is checked, then the existing Generate button will be used to fetch the next Certificate Number from the inventory maintenance based on the selected Stock Catalog Code for the TD Certificate instrument type.
If Auto Generate Certificate Number is not checked then you have to enter the certificate number. System validates whether the certificate number is valid or not based on the selected stock code. If the entered certificate number is already in use then the system displays an error message.
No. of Advice Generated
The system displays the advice number being generated automatically, when each certificate is generated. On rollover of Term deposit this field will be updated as zero.
Rollover Issue
Check this box if the certificate is generated for a rolled over term deposit.
Note
- If you want to issue certificate for Rollover, then the Rollover should be checked.
- If the account is not rolled over and if you select rollover issue, system throws an error message “Since Account is not rolled over, Rollover issue should not be checked”.
- If The Rollover certificate is issued already but the rollover issue is selected again, then the system prompts to select Duplicate Issue.
- If The certificate is not issued for rollover activity and if the duplicate issue is done,then the system displays the message “Certificate not issued for Rollover activity”.
Mark as Duplicate
Select Mark as Duplicate to issue duplicate certificate, for TD account for which certificate is already issued. If it is not selected, then the system displays an error message while generating the certificate
Auto Generate Certificate Number
Check this box to indicate whether system should automatically pickup the certificate number from inventory or the certificate number should be entered manually.
Click ‘Generate’ button. The system will generate the deposit advice. The advice can be viewed on clicking the ‘Print button.

You can view the advice using the ‘Outgoing Message Browser Summary’ screen (MSSOUBRS).
6.6.3 Capturing Denominated Certificates Details
If the TD account selected is a denominated deposit then this tab is enabled.
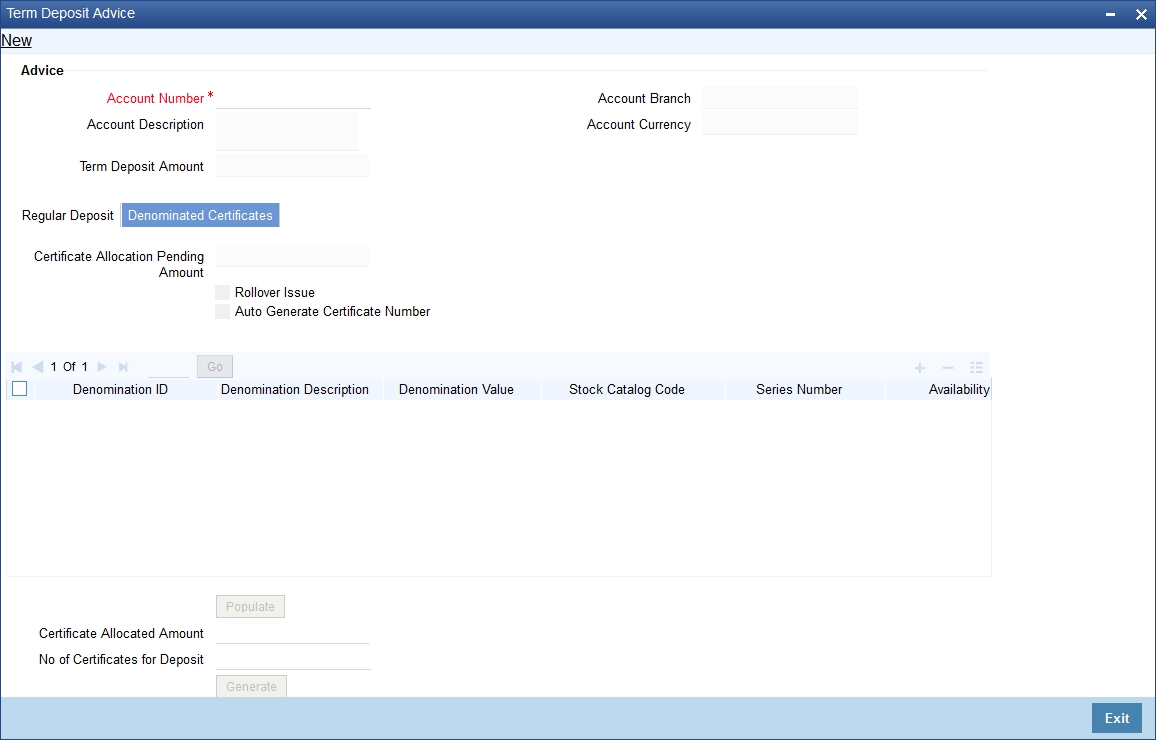
Certificate Allocation Details
The following details are captured here:
Certificate Allocation Pending Amount
This indicates the amount for which the certificate is yet to be allocated. Certificate Allocation Pending Amount = Term Deposit Amount - Certificate Allocated Amount.
Rollover Issue
Check this box if the certificate is generated for a rolled over term deposit.
Note
This is applicable only if the deposit is rolled over.
Auto Generate Certificate Number
Check this box to indicate that system should auto populate the certificate start number and end number.
Denomination ID
Select the denomination id from the adjoining option list. The list displays all denominations that are already allocated to the account in the ‘Deposit Account Booking’ screen and are not yet issued.
Denomination Description
The description of the selected denomination id is defaulted here.
Denomination Value
The denomination value of the selected denomination id is defaulted here.
Stock Catalog Code
Specify the stock catalog code here. Alternatively you can also select the code from the adjoining option list. The list displays all stock catalog codes defined at the inventory level.
Note
This is applicable only if Inventory module is used for certificate tracking
Series No.
This is the series number as defined at the inventory level.
Note
This is applicable only if Inventory module is used for certificate tracking
Availability
This indicates the number of certificates available in the inventory for the selected denomination id.
Note
This is applicable only if Inventory module is used for certificate tracking
Units
This is defaulted from the ‘Deposit Account Booking’ or ‘TD Account Opening by Multi Mode’ screen. However, you can modify this value.
You can modify the 'Units' field to a number less than the defaulted value, but it cannot be greater than the defaulted value. System validates the same on click of ‘Populate’ button by verifying whether the number of units for each denomination are less than or equal to the selected units during opening using STDCUSTD or TDMM screens.
Note
The number of units entered is validated with the ‘Availability’ field.
Total Amount
The system computes the denomination value by multiplying the denomination value with the number of units.
Certificate Start No
This indicates the certificate start number. This is auto-generated if the box ‘Auto Generate Certificate Number’ is checked.
If the 'Auto Generate Certificate Number ' is not checked then you have to key in the 'Certificate Start Number'
Certificate End No
This is auto generated if the box ‘Auto Generate Certificate Number’ is checked, else it gets defaulted based on the value provided at Certificate Start Number and Units field. Certificate End Number = Certificate Start Number + Units
Once the above specified details are entered, you have to click the ‘Populate’ button. On click of the ‘Populate’ button the 'Certificate Allocation Pending Amount', 'Certificate Allocated Amount' and 'Number of Certificates for the Deposit' fields are displayed.
Certificate Allocated Amount
This indicates the sum of ‘Total Amount’ field.
Number of Certificates for the Deposit
The total number of certificates for the term deposit is displayed here.Number of Certificates for the Deposit = Total of ‘Units’ field.
If you do not use the ‘Populate’ button these fields will get displayed on click of ‘Generate’ or ‘Print’ button, whichever is clicked first.
Click 'Generate' button to generate the certificates and click 'Print' button to print the certificates.
6.6.4 Certificate Re-denomination
During the life cycle of a deposit, a customer can surrender some or all of the certificates to issue new certificates with new denominations.
You can unlock the existing account using the STDCUSTD screen. At the ‘Denominated Deposit’ sub-screen the ‘Certificate Status Query/Modification’ grid you can change the status of the existing certificate to ‘Modified’.
The status can be changed for a single certificate or for bulk certificates, by selecting the certificates required to change status and there by selecting the bulk status change field as 'Modified'.
On click of ‘Populate’ button the following actions will take place:
- The ‘Denomination Allocation Pending Amount’ is displayed as the total amount of the modified certificates.
- The denomination allocation details grid displays only the denomination and the corresponding units currently available for the account. I.e. the 'Modified ' denominations are removed from the list
You can input the required denomination by adding new rows only if the existing certificate status is ‘Modified’. System validates whether the ‘Denomination allocation pending amount’ and the new denomination total amount are the same.Fresh certificates with the new denomination are issued using the ICDBADHC screen. The status of the new certificates will be ‘Re-denominated’.
6.7 Closing a TD
Deposit accounts can be closed automatically on the Maturity Date of the deposit. You can specify this by choosing the ‘Close on Maturity’ option while creating the TD. A deposit acquires the specifications for the account class under which it is opened; you can change this.
If you choose the ‘Close on Maturity’ option, during the Beginning of Day operations on the Maturity Date, the account will be closed. The principal will be moved, if specified, to the account your customer has directed. If the deposit remains unclaimed, you can opt to move the principal and interest to the respective ‘Unclaimed GLs’ maintained at your bank.
Note
If value has been provided to the field “No. of Days for Closing Authorized Accounts With No Activity” at the account class level and if there is no activity in the deposit account for that particular period of time the account will get closed automatically.
6.8 Transferring to Unclaimed Deposit on Maturity
As explained in the ‘Main Tab’ section in the chapter ‘TD Account’, you can move the deposit to an unclaimed GL as per options specified in ‘Main’ Tab in ‘Deposits Account Booking’ screen upon deposit maturity (end of grace period).
Configure the Unclaimed Principal GL and Unclaimed Interest GL at accounting role maintenance at IC product level, to move the Principal & Interest components respectively.
6.8.1 Moving Principal and Interest to Unclaimed GLs
The following example explains this case.
Assume the following:
- 26155010000889’ is the TD account opened under Account class ACCT2 for which ‘Grace period for renewal’ is 1.
- Interest Booking Account and Principal Liquidation account are TD accounts.
The TD is maturing on July 13, 2010. Grace period counter is 0 till the start of July 13 EOD. The grace period counter is 1 till the start of July 14 EOD.
The TD can be renewed post maturity for ‘Principal + Interest’ as defined above till the grace period (1 day) is over. Hence, the renewal of deposit is possible till EOD starts on (maturity date+1) i.e. till July 14, 2010. But the maturity date will be taken as the value date for renewal i.e July 13, 2010.
On maturity date (grace period count 0), renewal is possible and value date of TD will be July 13, 2010.
On July 14, 2010 (grace period count 1), renewal is possible and value date will still be July 13, 2010.
In case renewal is not done within the grace period, on lapse of the grace period, both the principal and interest will be moved to Unclaimed Principal and Unclaimed Interest Misc GLs respectively, with an instrument code (reference number for reconciliation).
July 15, 2010 onwards (grace period is over), the principal and interest can be debited from the Miscellaneous GLs using the reference number (instrument code). No renewal is possible beyond this date.
6.9 Closing TD by Payout to Loan Account
If you select ‘Payout Type’ as ‘Loan Account’ at ‘term Deposits Redemption Input’ level, then the system credits the payout amount and automatically initiates liquidation event. The components of the loan, which are due on the payout date, are liquidated based on the liquidation order maintained for Loan Account.
If the payment amount is greater than the due amount, then the system generates an interest book log and the account will be closed manually.
Note
- The maturity date of the payout loan account should be greater than the maturity date of the TD account.
- If the Payout Loan Account and the Term Deposit Account customers are different, then the system displays an override message.
6.9.1 Viewing TD Execution Log
You can view the execution log of all TDs using the ‘Term Deposits Execution Log Summary’ screen. To invoke this screen, type ‘ICSEXELG’ in the field at the top right corner of the Application tool bar and click the adjoining arrow button.

You can query on records based on any one or all of the following criteria:
- Branch Code
- Account
- Currency Code
- Run Date
Click ‘Search’ button. The system identifies all records satisfying the specified criteria and displays the following details for each one of them:
- Branch Code
- Account
- Currency Code
- Event
- Tenor
- Amount
- Run Date
- Execution Status
- Error Reason
- Deposit Number
- Maturity Date
6.10 Simulate TD
This section contains the following topics:
- Section 6.10.1, "Simulating TD"
- Section 6.10.2, "Generating and Viewing Account Certificate"
- Section 6.10.3, "Specifying Interest Details for Simulated Account"
6.10.1 Simulating TD
Oracle FLEXCUBE allows you to simulate a TD account in order to enhance sales and services to new and existing customers. You can also provide the customer a certificate with all the details of account. This certificate is generated with a pre-printed number.
You can simulate an account for a customer using the ‘Customer Accounts Simulation’ screen. The details of a account can be entered in this screen and a printed certificate of the account can be obtained by using this screen. To invoke this screen type ‘STDSCSAC’ in the field at the top right corner of the Application tool bar and click the adjoining arrow button.

In this screen you can input all the details of the deposit account. A term deposit account is simulated based on all the information you provide in the screen above. You can also view and generate the details of the term deposit account certificate of the account. Additionally you can view the details of interest, charges and amounts for the simulated TD account.
Branch
The branch where the deposit account is being simulated is displayed here on clicking new icon in the Application Toolbar.
Customer
Specify the customer for whom the account is being simulated. You can also select the customer from the option list provided.
Customer Name
The name of the customer for whom the account is simulated, is displayed here, based on the customer selected.
Account Currency
Specify the currency for the deposit account. You can also select the currency from the option list provided.
Account Class
Specify the ‘deposit’ type of account class under which the deposit should be simulated. You can also select the appropriate account class from the option list provided.
Description
Based on the account class specified, the system displays the corresponding description.
Click ‘Default’ button after specifying the customer, account class and currency.
Account Number
The account number of the customer for whom you need to simulate a deposit account is displayed here.
Status
The status of the simulated account is displayed here based on the customer selected
First Nominees
Specify the first person to hold the right to the simulated account balance after the customer’s expiration.
DCN
The Delivery Control Number used for uniquely identifying a message in Oracle FLEXCUBE is displayed here.
Second Nominees
Specify the secondary person to hold the rights to the simulated account balance after the customer’s expiration.
Account Open Date
The date on which the account has to be opened is defaulted based on the account class selected here. You can however change the value of the opening date of account.
Media
Select the media to communicate account related details to the customer, such as account maintenance related charges, fees, interest etc. from the option list. You can choose either of the following:
- Telex
- SWIFT
- Fax
Type
The type of account is defaulted based on the account class selected. However, you can select the type of deposit account that you are maintaining a simulation for; you can select any one of the following options:
- Single
- Joint
Clearing Bank Code
The code for the bank serving as clearing house for the simulated account is displayed here
Clearing Account Number
The account number for the clearing activity for the simulated account is displayed here
Alternate Account Number
Specify an alternate account for the simulated account
6.10.2 Generating and Viewing Account Certificate
To generate the details of TD account in certificate format, click the ‘Generate Certificate’ button on the ‘Customer Accounts Simulation’ screen.
To view the details of the certificate generated for the simulated account, click the ‘View Certificate’ button on the ‘Customer Accounts Simulation’ screen. The following details are displayed:
- The Document Certificate Number
- The account branch
- The reference number
- The report Module
- The contents of the message
To procure a hard copy of the certificate click ‘Print’. The generated certificates are also available through the Messaging browser. Messaging archival or purge action determines the storage or removal of these certificates from the Application Browser.
6.10.3 Specifying Interest Details for Simulated Account
To specify the interest and charge related details of the term deposit account click the ‘Interest’ button. The screen is as shown below:

You can define the interest and charge related details associated with the customer’s deposit account.
For more information on specifying Interest details for TD refer to the section, ‘Specifying Interest Details’ in the chapter ‘TD Additional Details’ in this User Manual.
6.10.3.1 Specifying Deposit Details
Click ‘Deposit’ button in the ‘IC Special Conditions Maintenance’ screen to specify preferences for the simulated account.

Specify the following details:
Principal Liquidation Branch
Specify the branch in which the liquidation account is maintained. The adjoining option list displays all valid branches maintained in the system. You can select the appropriate one.
Principal Liquidation Account
On maturity, the principal of a time deposit can be liquidated into an account you specify. This would typically be the customer’s account. When maintaining a deposit, indicate the account into which the principal should be liquidated. You should also
Interest Start Date
Specify the date from which the interest accruals of TD account begins.
Maturity Date
The system defaults the maturity date from the default tenor from the account class. However, you can modify this date. On this date the term deposit account gets liquidated.
Auto Rollover
Check this field to automatically rollover the deposit you are maintaining. You have to indicate ‘Rollover Type’ on selecting this option
Close on Maturity
Check this field to close the term deposit account on maturity date and transfer the amount to the principal liquidation account. If you select this option, the principal liquidation account should be an account other than the term deposit account.
Move Interest to Unclaimed
Check this field to move the interest amount to the unclaimed GL mapped at the IC product in the accounting roles on grace period end date of the term deposit account.
Move Principal to Unclaimed
Check this field to move the principal amount to the unclaimed GL mapped at the IC product in the accounting roles and liquidate the interest amount to the interest booking account on grace period end date of the term deposit account.
Term Deposit Amount
Specify the amount for which TD should be simulated.
Next Maturity Date
On selecting the rollover for the TD account, the system defaults the next maturity date from the previous tenor of the deposit.
Deposit Tenor
The system calculates the tenor of the deposit account to the difference between Interest start date and Maturity date and displays it. In case of change in maturity date, the system changes the value of this field.
Rollover Type
Indicate the components that should be rolled over by choosing one of the following options:
- Principal
- Principal + Interest
- Special Amount
Rollover Amount
If a special amount is to be rolled over, you have to specify the amount (less than the original deposit amount) in this field.
Term Deposit Pay-in Option
Indicate the method for initial funding during account creation. Choose one of the following options:
- PAYIN BY GL
- PAYIN BY CASH
- PAYIN BY SAVINGS
Offset Account
Specify the account number/ GL from which the fund should transferred to TD account as part of simulation. This field returns the branch code if the account is selected and NULL is returned if GL is selected. If the pay-in mode is GL then the system will display only GLs and if the pay-in mode is account then only accounts will be displayed in the option list.
Recurring Deposit
Specify the following details:
Auto Payment Take Down
Check this field to allow the recurring deposit account to debit the payment account for the payment amount as per the installment frequency.
Move Maturities to Unclaimed
Check this field to move all the funds, on the maturity date, to the unclaimed GL mapped to the accounting role in the IC product.
Payment Branch
Specify the details for the branch to which the payment account belongs.
Payment Account
Specify the Payment Account; this can be either savings account or the current account from which the installment for the Recurring Deposit is collected as per the installment frequency
Installment Amount
Specify the installment amount that has to be collected from the payment account as per the installment frequency. This installment amount should be greater than the minimum amount mentioned at the account class.
Recurring Deposit Account
Check this field to indicate recurring deposit account.
Payment Date
Specify the date on which the payment needs to be done for recurring deposit account.
Payment Currency
Specify currency of the payment amount.
Note
- The system enables the offset account and branch detail fields only if the option to pay is selected as the savings account.
- The Unclaimed Interest and Principal GLs are specified while maintaining an Interest and Charges (IC) Deposit Type product. The Accounting Roles for the GLs are ‘INT_UNCLAIMED’ and ‘PRN_UNCLAIMED’ respectively. When maintaining an IC-Deposit type product, you have to map these Accounting Roles to the appropriate GLs maintained at your bank.
- The system allows you to select ‘Close on Maturity’ box, only when you specify the recurring deposit details. You have to maintain deposit transaction code as ‘DPN’ RD payment transaction code as ‘RED’ and prepayment transaction code as ‘TRF’ for the recurring payments in the Branch Parameters for the Interest and Charges.
- All recurring deposit payments are part of IC batch beginning of day activity.
Installment Frequency
Specify the following details:
Move funds on Overdraft
Check this option to indicate whether the Recurring Deposit account funds should move to an unclaimed account if it is overdue
Days
Specify the installment frequency in terms of days.
Months
Specify the installment frequency in terms of months.
Years
Specify the installment frequency in terms of years.
6.11 Simulate TD Opening
This section contains the following topics:
- Section 6.11.1, "Simulating TD Opening"
- Section 6.11.2, "Deposit Input"
- Section 6.11.3, "Simulation Details"
- Section 6.11.4, "Creating Term Deposit"
- Section 6.11.5, "Specifying Interest Details for Simulated Account"
6.11.1 Simulating TD Opening
You can use this screen to initiate the deposit opening simulation for the existing customers as well as for the prospects using Conventional Term Deposit Simulation Input screen. To invoke this screen type ‘STDTDSIM’ in the field at the top right corner of the Application tool bar and click the adjoining arrow button.

You need to specify the following details:
Account Class
Specify the account class in which the customer wishes to open the TD. The adjoining option list displays the available TD account classes. You can select the appropriate one.
If an RD account class is selected, then on clicking the ‘Populate’ button the system displays an error message as “RD account class not allowed for simulation”.
Click the ‘P’ button adjoining to the account class. The system validates the account number and defaults the following fields:
Branch
Specify the branch code in which customer wants to open the account. By default, the system displays the current branch code; however, if you are multi branch operational user, then you can modify this by selecting it from the adjoining option list.
Account Open Date
System defaults the current date as account opening date; however, you can modify this date to a back date or future date.
If you have selected the future date for simulation; and you click on ‘Create Deposit’ button, then the system displays an error message as “Future Dated Deposit Opening not Allowed”.
Term Deposit Currency
Select the term deposit currency from the adjoining option list.
Customer No
Specify the customer’s/ prospect’s identification number.For prospects, walk in customer id of the branch has to be specified.
Note
Customer account number, pay in account number, and payout account number should have different CASA account numbers. The following override message is displayed:
“Book TD with Single or Joint, Provide the IB, Pay-in and Payout Account as different customer”.
Customer Name
Specify the customer’s/ prospect’s name. The system defaults this if you have specified the customer number.
6.11.2 Deposit Input
Initial Deposit Amount
Specify the initial deposit amount you want to keep with the bank for a particular tenor. The system displays an error message if initial deposit amount is not specified.
Maturity Date
If tenor is provided system calculates and displays the maturity date automatically. If maturity date is provided then tenor is calculated automatically.
Click ‘Compute’ button to default the maturity details as an output of the deposit opening simulation.
Deposit Tenor
Years
Specify the tenor of deposit in years.
Months
Specify the tenor of deposit in months.
Days
Specify the tenor of deposit in days.
6.11.3 Simulation Details
Interest Earnings
System displays the gross amount of interest that will be earned during the tenor of deposit.
Interest Rate
System displays the interest rate applicable for the deposit based on the product/amount/tenor.
Tax Deductions
The system displays the amount of tax that will be deducted from the gross interest amount.
Maturity Amount
System displays the total maturity amount of the deposit, i.e. Principal + Interest earned after deducting tax.
Annual Percentage Yield
System displays the annual percentage yield for the applicable interest rate.
Note
For discounted TDs, Annual Percentage Yield will display the applicable interest rate.
Interest Liquidation Details
You can view the following details here:
Date
System displays the date of interest liquidation.
Interest Amount
System displays the net interest amount that will be earned and liquidated for the compounding period.
Principal Balance
System displays the updated principal balance amount after adding net interest amount earned during the compounding period.
Note
The data can be modified after or before simulation.
Click ‘Clear’ button to clear the available data in simulation screen at any point of time.
Click on the ‘View/Print Advice’ button to view or print the simulation details.
6.11.4 Creating Term Deposit
Click ‘Create Deposit’ button to create the term deposit.

System enables the fields related to deposit opening. System defaults the fields maintained in the ‘TD Simulation’ screen.
- Account Class
- Term Deposit Currency
- Customer Number
You can modify the following details:
- Account Open Date
- Term Deposit Amount
- Deposit Tenor
- Maturity Date
On clicking ‘Create deposit tenor’ the min and max tenor applicable for the account class are validated. Validations for deposit opening in this screen are same as in STDCUSTD screen.
Once the create deposit button is clicked and the deposit opening screen is visible, then you will not be able to navigate back to the simulation screen.
Note
If you try to create deposit for a walk-in customer from a TD simulation screen, system will throw an error “Term Deposit cannot be opened with walk-in customer Id".
Account number is created in the simulation screen itself, but displayed only post clicking of “Create Deposit” button. For existing customers new deposit can be created using the existing customer id.
The system displays the pay in options as ‘Others’. If the Pay in By option is changed to ‘Cheque’ then it is mandatory to specify all the details and click on ‘Default’ button. Once this button is clicked the pay in details provided will be defaulted in the ‘Pay in Details’ multi- grid.
For more information on specifying TD creation details, refer to the section ‘Creating a Deposit Account’ in the chapter ‘TD Account’.
6.11.5 Specifying Interest Details for Simulated Account
To specify the interest and charge related details of the term deposit account click the ‘Interest’ button. The screen is as shown below:

You can define the interest and charge related details associated with the customer’s deposit account.
For more information on specifying Interest details for TD refer to the section, ‘Specifying Interest Details’ in the chapter ‘TD Additional Details’ in this User Manual.
6.12 Simulating TD Rollover
You can initiate to simulate the term deposit renewal for existing TD accounts using ‘Rollover Simulation’ screen. To invoke this screen type ‘ICDREDRN’ in the field at the top right corner of the Application tool bar and click the adjoining arrow button.

The rollover simulation can be done on any date before the maturity date of the deposit, but only the matured and unclaimed deposits which are in a grace period can be renewed using the Rollover Simulation screen. If the user instructs to renew the deposit before the maturity date from simulation screen, then the system displays an error message as “Only matured accounts can be renewed”.
Specify the following details:
Existing Deposit Details
Account Number
Specify the existing term deposit account number. The adjoining option list displays all the account numbers for which the top up is allowed at the account class level. Select the appropriate one.
To view the joint holder’s details of an account and the mode of operation maintained at the account level, place the cursor on the Account Number field and press Ctrl+J. The system displays the ‘Joint Holder’ screen.
For more information on the ‘Joint Holder’ screen refer to the section ‘Joint Holder Maintenance’ in the Core User Manual.
Click the ‘P’ button. The system validates the account number and defaults the following fields:
Account Description
System displays the description of the account.
Account Branch
The system displays the branch code in which the account is maintained on click of ‘New’ button. By default the current branch code is displayed.
Custom Number
The system displays the customer number.
Customer Name
System displays the customer name based on the customer Id.
Account Currency
System displays the currency of term deposit account.
Add Funds
Check this box to add additional funds for rollover.
Add Amount
Specify the additional amount to be considered for rollover in TD account currency.
Current Deposit Details
Account Open Date
The system displays the date on which the existing deposit is opened.
Principal Balance
The system displays the principal balance of deposit.The principal amount displayed here is the current principal amount of the deposit.
Account Balance
System displays the balance available in deposit account as on date.
Interest Rate
System displays the rate of interest of the current deposit.
Maturity Date
This indicates the maturity date of the existing deposit. This is only a display field and cannot be modified.
Maturity Amount
System displays the amount of maturity for the existing deposit.
Interest Paid Out
System displays the amount of interest liquidated till date from the date of account opening.
Tax Collected
The system displays the amount of tax collected till date from the date of account opening.
Deposit Tenor
Years
The system displays the tenor of deposit in years.
Months
The system displays the tenor of deposit in months.
Days
The system displays the tenor of deposit in days.
Rollover Details
Rollover Type
Select the rollover type from the following:
- Principal - For rollover simulation, only principal amount of the existing deposit is considered. For denominated deposits, only the option of simulating the principal amount is allowed.
- Special Amount - The rollover amount field is enabled when this option is chosen. You can enter the special amount and the rollover calculation is done based on that amount.
- Interest - Rollover calculation happens only for the interest portion of the existing deposit as on maturity date (Gross interest for the whole term - Applicable tax for the whole term - Applicable charges if any).
- Principal + Interest - When this option is chosen the principal and interest amount as on TD maturity date of the existing deposit is taken as principal amount for simulation. This option can be chosen only when the interest booking account is the same deposit account, otherwise system displays an error message
Rollover Amount
You need to specify the rollover amount only if you have selected ‘Special Amount’ as rollover type. Specify the amount taken for the rollover. System considers this amount in rollover calculation.
Years
System defaults the tenor of the existing deposit in years; however, you can modify this if required. Maturity date is updated when the tenor is modified.
Months
System defaults the tenor of the existing deposit in months; however, you can modify this if required. Maturity date is updated when the tenor is modified.
Days
System defaults the tenor of the existing deposit in days; however, you can modify this if required. Maturity date is updated when the tenor is modified.
Maturity Date
System calculates and displays the maturity date based on the tenor of existing deposit. You can modify the maturity date. The system updates the tenor based on the modification made on the maturity date. If the maturity date is modified, accordingly the tenor gets adjusted.
Interest rate Based on Cumulative Amount
Check box to confirm whether interest rate will be based on cumulative amount or not. System defaults this box based on the Account Class; however, you can modify this.
Continue Variance on Rollover
Check box to confirm whether variance on rollover will be continued or not. System defaults this box based on the Account Class; however, you can modify this.
Click ‘Compute’ button to calculate the ‘Deposit Details After Rollover’ and ‘Liquidation Details’.
Payin Details
Select the Payin Details for debiting the additonal amount for rollover from the drop down list. The list displays the following values:
- GL - In case of pay-in through GL, if the offset GL account specified should be the GL maintained at 'TD Payin Parameters' (STDTDPAY) screen. If not, on save, the GL at STDTDPAY will be auto defaulted.
- Account - In case of pay-in from savings account, it is mandatory
to specify the offset account. If it is not specified, the system displays
an error on saving the TD account. If the pay-in account specified is
disallowed for the TD product, then on saving the account, the system
displays an error message
- If the offset account is not specified then, an error message is displayed as : “Offset account is mandatory.”
- Before rollover, the customer has to manually verify the availability of funds in the offset account. If not the rollover will fail. If the offset account does not have sufficient funds then the system will display an error as ‘Insufficient balance in the account.
- If the offset account provided has limits attached, then on save the system will display a message as “The limits/Collateral attached is used for Payin.”
- Pay in by Cheque - In case of pay-in by cheque, the TD should be
entirely funded by a single cheque. Multimode, combining multiple cheques
or part payment by cheque and the rest by other modes, is not allowed.
- In case of payin by cheque, the additonal amount will be reflected online after authorization of redemption. TD account will be TD amount plus additional amount.
- Till the completion of float days, the funds will be uncollected in the TD account. Until the cheque is cleared, no operations/modifications will be allowed on this account.The system displays an error message as “Account is in tanked status.Operations will not be allowed.”
- Cheque can be rejected till the float days. Rejection can be done through 6560,CGDCLGDT, IFDCLGDT or file upload.If the float days is zero, then the cheque can be rejected only on current day
- On cheque rejection, if the consolidation has not be done, then REVR will be fired debiting the uncollected amount online. If the consolidation has been done, then RETN will be fired debiting the TD amount online. The uncollected amount will b released online.
- On rejection, the maturity amount and interest rate update will happen only in EOD.
- If the cheque float days in zero and the transaction code availability is X days, then till that X days, the funds will be in uncollected status and account will be in tanked status. No operations will be allowed till the cheque clearance..
Note
On manual renewal, new event MROL will be fired and the additional funds pay in account will be debited for additional amount. If the ‘pay in’ is selected as Cheque, then MROL will be fired debiting the clearing GL and crediting the TD account. The funds will be in uncollected till the cheque clearance date.
Percentage
Specify the percentage of payout for each payout option specified.
Amount
Specify the amount to be transferred to TD.
Offset Branch
The system displays the branch code of the account to which fund is transferred from TD account.
Offset Account
Specify the account number/ GL to which the fund is transferred to TD account on liquidation, maturity or rollover. This field will return the branch code if the account is selected and NULL will be returned if GL is selected. If pay-out mode is GL then the system displays only GLs in the option list.
Offset Currency
The currency of the offset account.
Cheque Instrument No
Specify the cheque instrument number.
Clearing Type
Specify the clearing type for the transaction. Alternatively, you can select the clearing type from the option list. The list displays the list of outward clearing products maintained in the system. The cheque clearing happens based on the clearing product specified.
Cheque Date
Specify the date of issue of the cheque.
Drawee Account Number
Specify the drawee account number.
Routing No.
Specify the Routing number.Alternatively, you can select the routing number from the option list. The list displays all the routing number maintained in the system.
Original FX Rate
The FX rate picked up by the system.
Applied FX Rate
The user defined FX rate.
By default, the Original FX Rate is picked up, but the user can change
it within the variance range.
In the following scenarios the Applied FX rate should be equal to the Original FX rate:
- If the Deposit Account Currency and the Pay-In/Out Account Currency are same.
- If the Rate Type/Rate code combination is not maintained at the account class for a Pay-In/Out Mode. In this case the system considers the STANDARD Rate as the default and the MID Rate code as the existing rate type.
Offset Amount
The amount paid for the term deposit account, in the account currency.
Note
If a TD is opened through cheque and is rejected or if a manual rollover transaction through a cheque is rejected, then the TD is updated during the IC batch. The maturity amount, initial principal amount and interest rate of this transaction will be updated only during the EOD batch. Hence, these details will not be available in the report or advice generated during the day.
Deposit Details After Rollover
View the following details:
Term Deposit Amount
System displays the term deposit amount based on the "Rollover Type" selected. This amount will be taken as the principal amount for rollover calculations.
Interest Rate
System displays the interest rate applicable for the deposit based on product/amount/tenor as on maturity date of the existing deposit.
Interest Earnings
System displays the total interest that will be earned by the deposit during the rollover tenor.
Tax Deductions
System displays the applicable percentage of tax that will be deducted from the total interest during the term of deposit mentioned for rollover.
Maturity Amount
System displays the maturity amount of the deposit after the rollover term, i.e. Rollover Principal + Interest earned after deducting tax.
Annual Percentage Yield
System displays the annual percentage yield for the applicable interest rate for rollover.
Interest Liquidation Details
You can view the following:
Date
System displays the date of interest liquidation.
Interest Amount
System displays the net interest amount that will be liquidated based on the compounding frequency.
Principal Balance
System displays the Principal balance of deposit after adding net interest amount earned during the compounding period, i.e. Principal Balance at the beginning of cycle + Net Interest liquidated for that compounding cycle.
Click ‘Clear’ button to clear the available data in simulation screen at any point of time.
Click ‘View/Print Advice’ button to view or print the simulation details.
6.12.1 Rollover TD
Click ‘Rollover Deposit’ button to rollover term deposit.

System enables the fields related to deposit rollover. System defaults the fields maintained in the ‘Rollover Simulation’ screen. You can modify the following details:
- Account Number
- Maturity Date
- Rollover Tenor
- Interest Rate Based on Cumulative Amount
- Continue Variance on Rollover
You cannot navigate to the Rollover Simulation screen once you click on the ‘Renew Deposit’ button.
Note
- Deposit rollover simulation can be initiated only for existing customers, who have term deposit accounts with the Bank.
- The renewal simulation can be done on any date before the maturity date of the deposit, but only matured unclaimed deposits which are in grace period can be renewed from the simulation screen.
- If you try to renew the deposit before the maturity date from simulation screen then the error message 'Unable to renew as the deposit is not matured' is displayed.
While saving the transaction, if you had modified the interest rate at TD account level for TD booking or for creating Payout TD, the system displays configurable override messages.
These overrides are displayed during subsequent modifications of the interest rate. You can also configure overrides for Dual Authorization to be displayed at Contract and Maintenance level in the ‘Override Maintenance’ screen.
For more information about configuring overrides, refer to the section ‘Override Maintenance’ in the chapter ‘Configuring Overrides’ in the Core Services User Manual.
6.13 Simulating TD Top Up
You can simulate the term deposit top up (additional investments) only for the existing customers having TD account with the bank using the ‘Top Up Simulation’ screen. To invoke this screen type ‘STDTPSIM’ in the field at the top right corner of the Application tool bar and click the adjoining arrow button.

Specify the following details:
Account Number
Specify the existing term deposit account number. The adjoining option list displays all the account numbers for which the top up is allowed at the account class level. Select the appropriate one.
To view the joint holder’s details of an account and the mode of operation maintained at the account level, place the cursor on the Account Number field and press Ctrl+J. The system displays the ‘Joint Holder’ screen.
For more information on the ‘Joint Holder’ screen refer to the section ‘Joint Holder Maintenance’ in the Core User Manual.
Click the ‘P’ button. The system validates the account number and defaults the following fields:
Account Branch
The system displays the branch code in which the account is maintained on click of ‘New’ button. By default the current branch code is displayed.
Account Description
The system displays the description of the account.
Account Currency
The system displays the currency of the term deposit account.
Customer Name
The system displays the customer name based on the account number selected.
Customer Number
The system displays the customer name based on the customer Id.
Current Deposit Details
Principal Balance
The system displays the current principal amount of the deposit.
Interest Start Date
The system displays the date from which the interest is applicable for this deposit.
Maturity Date
The system displays the maturity date of the existing term deposit.
Maturity Amount
The system displays the maturity amount of the term deposit.
Account Balance
The system displays the current balance available in the deposit account.
Interest Rate
The system displays the rate of interest of the current deposit.
Interest Paid Out
The system displays the interest paid out till date in the term deposit account.
Tax Collected
The system displays the amount of tax collected till date in the term deposit account.
Deposit Tenor
Years
The system displays the tenor of the existing deposit in years.
Months
The system displays the tenor of the existing deposit in months.
Days
The system displays the tenor of the existing deposit in days.
Top Up Term Deposit
Value Date
Specify the date on which top up will be made.
Simulation is allowed for the back date or for future date; however, when ‘Top up’ button is clicked system will display an error that “Future Dated Top Up is not Allowed”.
Top-Up Amount
Specify the amount that will be added to the existing deposit on the top up date.
Click ‘Compute’ button. The system defaults the ‘Deposit Details after Topup’ and Interest Liquidation Details’.
Deposit Details After Top-up
Term Deposit Amount
The system displays the revised term deposit amount after adding the top up amount to the existing deposit.
Interest Rate
The system displays the revised interest rate applicable for the account class/amount/tenor combination from date of top up.
Interest Earnings
The system displays the total interest that will be earned from the start date of current compounding cycle to the maturity date of deposit by taking top up amount and the revised interest rate into consideration.
Tax Deductions
The system displays the applicable tax amount that will be deducted from the interest earnings during the tenor of deposit.
New Maturity Amount
The system displays the revised maturity amount considering the top up amount.
Annual Percentage Yield
The system displays the annual percentage yield for the applicable interest rate.
Interest Liquidation Details
Date
The system displays the date of interest liquidation.
Interest Amount
The system displays the interest amount that will be liquidated based on the compounding frequency.
Principal Amount
The system displays the updated principal balance amount as on interest liquidation, i.e. Principal Balance at the beginning of cycle + Net Interest liquidated for that compounding cycle.
Click ‘Clear’ button to clear the available data in simulation screen at any point of time.
Click ‘View/Print Advice’ button to view or print the simulation details.
6.13.1 Topping up TD
Click ‘Top Up Deposit’ button to top up the term deposit.

System enables the fields related to deposit top up. System defaults the fields maintained in the ‘Deposit Top Up Simulation’ screen. You can modify the following details:
- Term Deposit Account Number
- Value Date
- Top Up Amount
You cannot navigate to the Top Up Simulation screen once you click on the ‘Top Up Deposit’ button.
Note
- Deposit top up simulation can be initiated only for existing customers who have term deposit accounts with the Bank.
- You can edit the input data for simulation both before and after the simulation.After the simulation is completed, you can top-up a deposit using the same parameters as entered during simulation.
- The top up simulation can be back dated but in the "Top Up" deposit screen back value dated is allowed only up to the value date of the last financial transaction on the deposit account.
- The applicable financial transactions are pay-in, interest liquidation, redemption, maturity, rollover, and top-up of funds.
6.14 Simulating TD Redemption
You can simulate the partial redemption as well as full redemption for the existing TD accounts using ‘Redemption Simulation’ screen. To invoke this screen type ‘ICDRDSIM’ in the field at the top right corner of the Application tool bar and click the adjoining arrow button.

Specify the following details:
Existing Deposit Details
Account Number
Specify the term deposit account number. The adjoining option list displays the existing TD account numbers. Select the appropriate one.
Click the ‘P’ button. The system validates the account number and defaults the following fields:
To view the joint holder’s details of an account and the mode of operation maintained at the account level, place the cursor on the Account Number field and press Ctrl+J. The system displays the ‘Joint Holder’ screen.
For more information on the ‘Joint Holder’ screen refer to the section ‘Joint Holder Maintenance’ in the Core User Manual.
Account Branch
The system displays the branch code in which the account is maintained on click of ‘New’ button.
Account Description
System displays the description of the account.
Account Currency
System displays the currency of term deposit account.
Customer Number
System displays the customer number based on the account number.
Customer Name
System displays the customer name based on the customer Id.
Current Deposit Details
Account Open Date
The system displays the date on which the existing deposit is opened.
Principal Balance
The system displays the principal balance of deposit.
Account Balance
System displays the balance available in deposit account as on date.
Interest Rate
System displays the rate of interest of the current deposit.
Maturity Date
System calculates and defaults the maturity date if the tenor details are maintained.
Maturity Amount
System displays the amount of maturity for the existing deposit.
Interest Paid Out
System displays the amount of interest liquidated till date from the liquidated interest.
Tax Collected
The system displays the amount of tax collected till date.
Deposit Tenor
Years
The system displays the tenor of deposit in years.
Months
The system displays the tenor of deposit in months.
Days
The system displays the tenor of deposit in days.
Redemption Details
Redemption Mode
Select the mode of redemption from the adjoining drop-down list. Select one of the following:
- Full Redemption
- Partial Redemption
Redemption Execution Date
Specify the date on which redemption will be executed. This date cannot be the past date. If the past date is specified, then the system displays an error message as “Back Dated Redemption is not Allowed”.
Redemption Amount
Specify the amount to be redeemed. Depending on the redemption mode selected,
- Full Redemption: If selected, the system defaults the full redemption amount.
- Partial Redemption: If selected, you need to specify the amount for the partial redemption.
Note
For a TD account that is booked back dated and is due for ILIQ,
- Partial redemption will not be allowed. The system displays an error message as “Redemption not allowed. Pending liquidation exists.”
- Full redemption will be allowed with an override message as “Pending ILIQ exists.”. In such cases, capitalization benefit will not be provided. This has to be controlled operationally.
Click ‘Compute’ button. The system displays the following details:
Payment Details of Redemption
Interest Rate
The system displays the interest rate of the term deposit.
Total Interest
The system displays the total interest amount payable for the current redemption.
Penalty Amount
The system displays the penalty amount for the current redemption.
Tax Amount
The system displays the amount of tax applicable for the current redemption.
Net Interest
The system displays the net interest payable after deducting tax and penalty for the current redemption.
Net Payable Amount
The system displays the net redemption amount that will be paid to the customer.
Deposit Details After Redemption
In case of partial redemption, the system displays the following details:
Term Deposit Amount
The system displays the term deposit amount.
Interest Rate
The system displays the revised interest rate after redemption for the term deposit.
Interest Earnings
The system displays the total interest that will be earned from the redemption date to the maturity date of the deposit.
Tax Deductions
The system displays the applicable tax amount that will be deducted from the interest earnings during the tenor of deposit.
New Maturity Amount
The system displays the recalculated maturity amount after redemption.
Annual Percentage Yield
The system displays the annual percentage yield for the applicable interest rate.
Click ‘Clear’ button to clear the available data in simulation screen at any point of time.
Click ‘View/Print Advice’ button to view or print the
simulation details.
6.14.1 Redeeming a TD
Click ‘Redeem Deposit’ button to redeem the term deposit.
System enables the fields related to deposit redemption. System defaults the fields maintained in the ‘Redemption Simulation’ screen. You can modify the following details:
- Term Deposit Account Number
- Redemption Execution Date
- Redemption Mode
- Redemption Amount
You cannot navigate to the Redemption Simulation screen once you click on the ‘Redeem Deposit’ button.
Note
- Deposit redemption simulation can be initiated only for existing customers.Option is available to simulate full redemption or partial redemption. You can edit the input data for simulation both before or after the simulation.
- You can simulate the redemption calculations for a denominated deposit. After the simulation is completed, you can redeem a deposit using the same parameters as entered during simulation.
- If the redemption simulation is done with a future date then while you try to redeem the deposit by clicking the "Redeem Deposit" button, system will display an error message: "Future Dated Redemption is not Allowed"
- If there is any amount blocks available for the deposit, it will be possible to perform the simulation. However if you try to redeem the deposit by clicking "Redeem Deposit" button then system will display an error message: "Deposit Cannot be Redeemed due to Amount Block".
You have to enter the following values to redeem a deposit:
Payout Component
Select the payout component from the options given below. The options available are:
- Principal
- Interest
Payout Type
Select the pay-out mode from the drop down list. The options available are:
- Account
- General Ledger
- Bank’s Cheque
- Payment
- Term Deposit
- Demand Draft
- Loan Payment
Percentage
Specify the amount of redemption in percentage.
Redemption Amount
Specify the Redemption Amount if you have selected the Redemption Mode as ‘Partial Redemption’.
System displays the principal amount as ‘Redemption Amount’ if you have selected the Redemption Mode as ‘Full Redemption’.
Instrument Number
Specify the instrument number to be issued.
Waive Issuance Charges
Check this box to indicate waive option for pay-out BC issuance charge
Offset Branch
Enterthe offset branch code of the account for redemption.
Offset Account
Enter the offset account number/GL for redemption.
Offset Currency
The currency of the offset account.
Narrative
Enter the description for the redemption.
Original FX Rate
The FX rate picked up by the system.
Applied FX Rate
The user defined FX rate.
By default, the Original FX Rate is picked up, but the user can change
it within the variance range.
In the followiing scenarios the Applied FX rate should be equal to the Original FX rate:
- If the Deposit Account Currency and the Pay-In/Out Account Currency are same.
- If the Rate Type/Rate code combination is not maintained at the account class for a Pay-In/Out Mode. In this case the system considers the STANDARD Rate as the default and the MID Rate code as the existing rate type.
Offset Amount
Enter the amount paid for the term deposit account, in the account currency.
6.15 Deposit Audit Trail Inquiry
The following audit trail Inquiry will be provided to query the Audit Trail details of TD and RD Accounts. When TD account is manually rolled over using add funds, an event MROL is generated. This event will be listed in search results when such TDs are queried.
You can query the audit trail details of a TD and RD accounts using ‘Customer Account TD Audit Trail’ screen. To invoke this screen type ‘ACDAUDTR’ in the field at the top right corner of the Application tool bar and click the adjoining arrow button.

Specify the following details:
Branch Code
Specify the branch code of the account.
Account No
Specify the TD/RD Account numbers of the branch. The adjoining option list displays the list of all the valid TD/RD account numbers maintained in the system. You can choose the appropriate one.
Trn From Date
Specify the transaction from date.
Trn To Date
Specify the transaction to date.
Cheque Number
Specify the cheque number issued for the transaction.
Currency
The system displays the account currency of the account being queried.
Action
Select the event of the account for the action. This drop down will have
- Booking
- Liquidation
- Accrual
- Rollover
- Redemption
- RD Payments
- RD Payments
- Reversal
Account Description
The system displays the description of the account being queried.
Account Class
The system displays the account class of the account being queried.
Description
The system displays the description of the account class of the account being queried.
Accounting Entries
You can view the accounting entries details:
Event
The system displays the event of transaction of the account being queried.
Description
The system displays the description of the transaction i.e. the description of the transaction code.
Branch
The system displays the account branch of transaction of the account being queried.
Account Number
The system displays the account number being queried.
Dr/Cr
Either Dr/Cr leg is displayed based on the accounting entry posted to the TD account..
Foreign Currency Amount
The system displays the foreign currency amount.
ount of transaction of the account being queried.
Lcy Amount
The system displays the local currency amount of transaction of the account being queried.
Transaction Date
The system displays the transaction date of transaction of the account being queried.
Value Date
The system displays the value date of the transaction.
Trn Int Dt
The system displays the transaction Initiation date of transaction of the account being queried.
Related Account
The system displays the related account of transaction of the account being queried.
Auth Stat
The system displays the authorization status of transaction of the account being queried.
User ID
The system displays the user Id of transaction of the account being queried.
Accrual
You can view the accrual details:
Event
The system displays the event of transaction of the account being queried.
Description
The system displays the description of the transaction i.e. the description of the transaction code.
Branch
The system displays the account branch of transaction of the account being queried.
Account Number
The system displays the account number being queried.
Dr/Cr
The system displays the Dr/Cr Indicator of transaction of the account being queried.
Fcy Amount
The system displays the foreign currency amount of transaction of the account being queried.
Lcy Amount
The system displays the local currency amount of transaction of the account being queried.
Transaction Date
The system displays the transaction date of transaction of the account being queried.
Value Date
The system displays the value date of the transaction.
Trn Int Dt
The system displays the transaction Initiation date of transaction of the account being queried.
Related Account
The system displays the related account of transaction of the account being queried.
Auth Stat
The system displays the authorization status of transaction of the account being queried.
User ID
The system displays the user Id of transaction of the account being queried.
6.15.1 IC Batch Processing
There will be no interest paid during the course of the deposit in ‘Discounted’ type products.
The Amount Block created on term deposit account for discounted interest will be removed by the system during the maturity of the term deposit.
The discounted interest of the rolled over deposit will be paid upfront during rollover. If ‘Amount Block for Discount’ option is required, the amount block will also be done on the new deposit. ICEOD batch will do this operation.