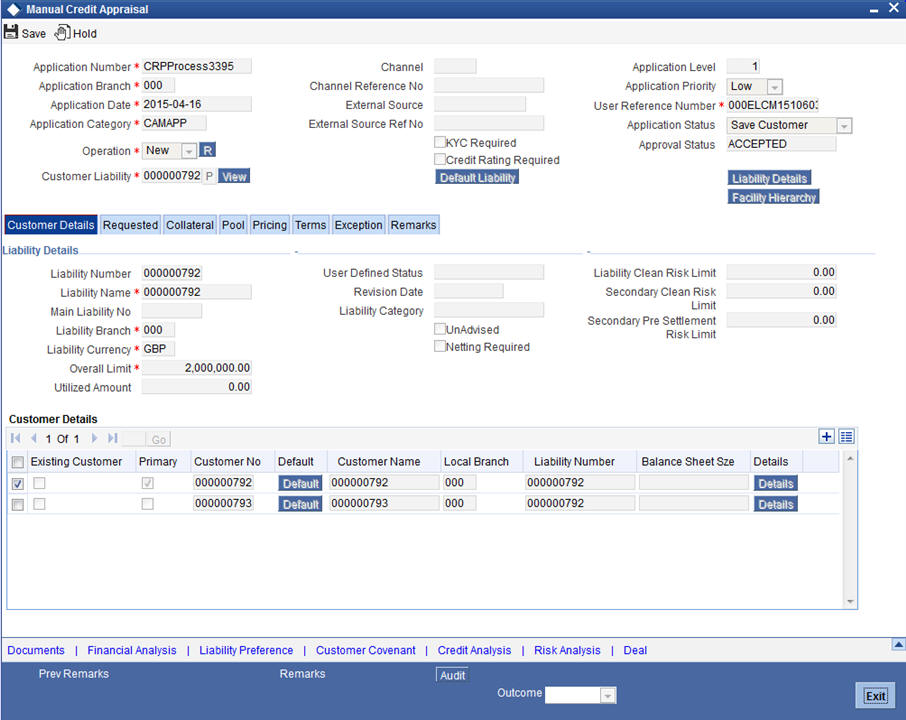
3. Credit Appraisal Management Origination
This chapter contains the following sections:
- Section 3.1, "Introduction"
- Section 3.2, "Credit Appraisal Management Creation Process"
- Section 3.3, "Stages in Credit Appraisal Management Origination"
3.1 Introduction
The process of credit appraisal management origination gets initiated when a prospective customer approaches the bank, for setting up a new facility or extend the facility limit to get new / additional loans. The proposal application consists of customer details, financial information, and the requested credit limit details.
The credit proposal process is initiated with capturing the customer basic details like customer name, address, corporate details, financial information and facility details like no of facilities requested and corresponding credit limit. The entire process is carried out in multiple stages and on successful completion of each stage, it moves automatically to the next stage.
3.2 Credit Appraisal Management Creation Process
The Oracle FLEXCUBE provides the following features for Corporate customers:
- Apply for a new facility
- Amendment on existing facility
- Closure of facility
- Transfer of facility
- Financial ratio - Benchmark comparison reports for a specific period / quarter
- Facility to change the financial elements and re-compute the financial ratios
- Facility to upload the financial documents
Corporate credit appraisal process flow uses Oracle BPEL (Business Process Execution Language) and BPMN (Business Process Model and Notation) framework with multiple human tasks for workflow stages.
S. No |
Process Name |
Process Type |
Description |
Functionality |
1 |
CRPProcess |
BPMN |
BPMN process for handling the Credit proposal |
New Customers: Creation of new facility Existing Customers: Creation of new facility Amendment of existing facility Amendment of existing facility with new collaterals/collateral pool |
2 |
BPELCRPProcess |
BPEL |
BPEL process for handling the Credit proposal approval |
New Customers: Creation of new facility Existing Customers: Creation of new facility Amendment of existing facility Amendment of existing facility with new collaterals/collateral pool |
3 |
CRPClosureProcess |
BPMN |
BPMN process for handling the facility closure / Transfer |
Facility Closure Facility Transfer |
4 |
BPELCRPClosureProcess |
BPEL |
BPEL process for handling the facility closure / Transfer |
Facility Closure Facility Transfer |
5 |
Bpelcvnprocess |
BPEL |
BPEL process for tracking the Covenants |
Process for tracking the underlying facility covenants, collateral covenants and customer covenant |
6 |
CovenantPoller |
BPEL |
BPEL process for initiate the Covenants |
process to initiate the covenant tasks, for the covenants which are on due/revision date |
7 |
KYCCheck |
BPMN |
BPMN process for KYC Corporate Review |
Process for initiating the KYC corporate review for the customers |
Creating a New Facility for a New Customer
You can capture the details like customer details, Liability details, Collateral details, and collateral pool details for availing the new facility and the following operations can be done:
- Multiple customers to avail the facility
- Multiple collaterals linked to the liability
- Multiple facility linked to a liability
The following core validation is done to evaluate the captured information, before saving the details in process flow:
- Customer details
- Liability details
- Facility details
- Collateral details
- Collateral pool details
After the approval the following details are handed over to Oracle FLEXCUBE / ELCM in this order:
- Customer details
- Liability details
- Collateral details
- Collateral pool details
- Liability customer linkage details
For the existing customer, customer details are modified. For new customer, the system invokes the customer creation service and creates the new customer.
Creating a New Facility for an Existing Customer
The customer details from Oracle FLEXCUBE for availing the new facility and update an indicator (existing customer) as existing customer. The customers who are having the same liability is taken for availing the facility.
The core validation is invoked to evaluate the captured information, before saving the details in process flow:
- Customer details
- Liability details
- Collateral details
- Collateral pool details
After the approval the following details are handed over to Oracle FLEXCUBE ELCM:
- Liability details
- Collateral details
- Collateral pool details
- Liability customer linkage details
Modifying the Existing Facility for an Existing Customer
The selected existing facility are modified with captured facility information. While saving the modification, the system invokes the ELCM services to validate the captured information (to increase the facility limit).
After the approval, the system invokes the ELCM services to hand off the liability, facility, collaterals and collateral pool details and raise the error messages in case ELCM validation fails. The features, maintenances, and the different stages in the process flow are explained in detail in the following sections.
3.3 Stages in Credit Appraisal Management Origination
Corporate credit appraisal process flow uses Oracle BPEL (Business Process Execution Language) and BPMN (Business Process Model and Notation) framework with multiple human tasks for workflow stages. The capture and enrichment of information in multiple steps can be dynamically assigned to different user roles, so that multiple users can take part in the transaction. Oracle Business rules are used for dynamic creation of multiple approval stage.
Oracle Business rules that are embedded help the dynamic creation of multiple approval stages. The different stages and sub-stages in the process flow can be summarized as follows:
3.3.1 Process Flow Diagram
The process flow diagram given below illustrates the activities carried out during the different stages of the workflow.
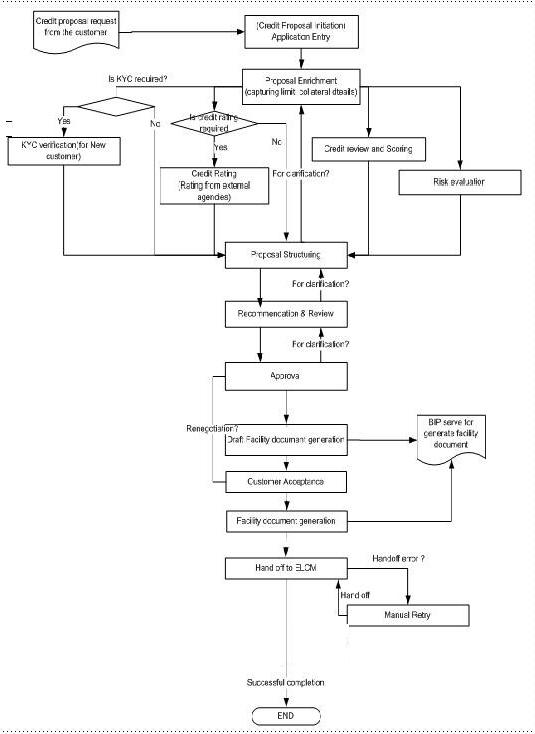
The various tasks carried out in these stages are explained in detail in the subsequent sections.
3.3.2 Process Matrix
The process matrix given below lists out the different stages, the user role handling each stage, the function Ids involved and the exit points for each stage.
Stage |
Stage Title |
Description |
Function ID |
Exit point |
1 |
Application entry |
The following details are captured as part of this stage: Basic details of the customer information Proposal details |
ORDLPAPP/ORDLPAP1 |
PROCEED, DOCMISSING |
2 |
Credit appraisal enrichment |
The following applicant additional details are captured: Collateral details Proposed credit limit The enriched proposal is sent for review and final approval. |
ORDLPENR |
PROCEED, REJECT |
3 |
Initiate KYC Approval sub-process |
Initiating the KYC approval process. The system initiates the existing KYC sub process for performing the KYC for that customer. It is an auto stage the system invokes the service without any Human intervention. |
|
PROCEED |
4 |
Initiate Credit Rating sub-process |
Starting Point for initiating the Credit rating process. The system automatically initiates the existing Credit rating sub process to perform the Credit rating process. It is an auto stage, the system invokes the service without any Human intervention. |
|
PROCEED |
5 |
Credit Review and Scoring |
Applicant financial status and compute the credit score based on the credit score questionnaires are captured. |
ORDLPRSR |
PROCEED
|
6 |
Risk Evaluation |
Capturing applicant risk analysis report and risk evaluation is measured by gathering the risk related questionnaires. |
ORDLPRSV |
PROCEED |
7 |
Proposal Structuring |
Structuring the facility based on the information received from the customer. |
ORDLPSTR |
PROCEED, ADDITONAL_INFO |
8 |
Recommendation and Review |
Stage for capturing the reviewers comments. |
ORDLPREV |
PROCEED, ADDITONAL_INFO, RETURN |
9 |
Approval |
Stage for approver to approve the proposal. |
ORDLPAPR |
PROCEED, ADDITONAL_INFO, REVIEW |
10 |
Draft Facility document generation |
Stage for generating the draft version facility documents. |
|
|
11 |
Customer Acceptance |
Stage for capturing the customer acceptance details. |
ORDLPACP |
NOT ACCEPTED, ACCEPTED, NEGOTIATE |
12 |
Facility document Generation |
Stage for generating the facility documents after the customer acceptance. |
|
|
13 |
DB Hand off |
Stage for Hand off the Limit details to ELCM system. Manual Retry option is provided to resubmit the Hand off, in case the hand off got failed due to unavailability of services. |
|
|
|
Hand off Retry |
|
ORDLPRTY |
PROCEED |
To acquire the next stage, you need to go to the ‘Task’ menu and select ‘Assigned’ under ‘Standard’ option.
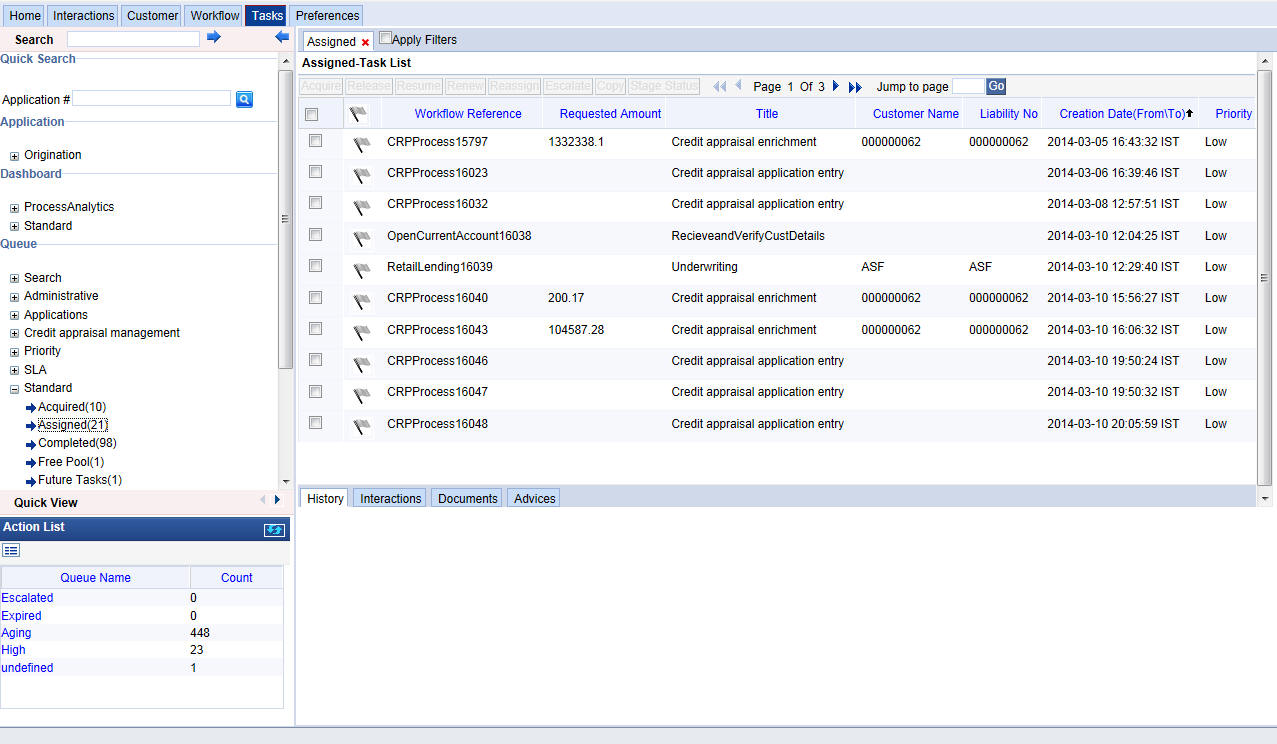
All tasks that have been successfully completed are listed in the right side of the screen. Select the check box against your ‘Workflow Ref No’ and click ‘Acquire’ button at the top of the screen to acquire the next stage of the task.
The system displays the message as “Acquire Successful” on successful acquisition of the task.
Click ‘Ok’ to proceed to the next stage. To select the acquired task for the next stage, select ‘Acquired’ under ‘Standard’ option in the ‘Task’ menu. All the tasks that have been successfully acquired are displayed in the right side of the screen. Search for your workflow reference number and click the ‘Workflow Ref No’ to open ‘Credit Appraisal enrichment’ screen.
Step 1. Application Entry
The credit proposal process initiates with capturing the customer basic details like customer name, address, corporate details, financial information, and facility details like number of facilities requested and corresponding credit limit.
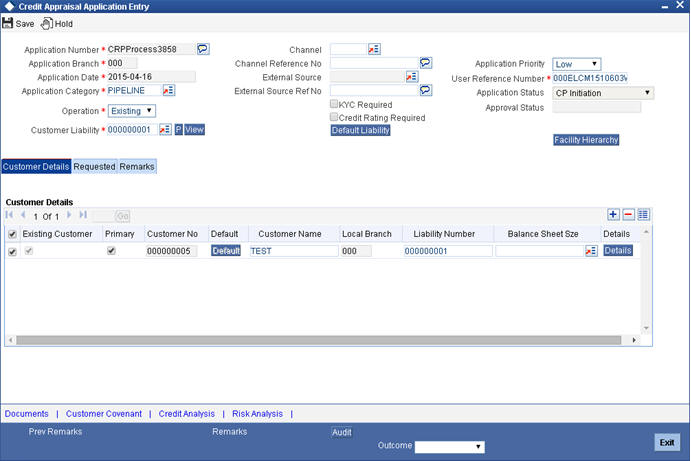
You can maintain the details related to the corporate customer in ‘Credit Appraisal Application Entry’ screen. You can invoke this screen by typing ‘ORDLPAPP/ORDLPAP1’ in the field at the top right corner of the Application tool bar and clicking the adjoining arrow button.
Note
In CRP process, use the function ID ‘ORDLPAPP’. In BPEL CRP process, use the function ID ‘ORDLPAP1’.
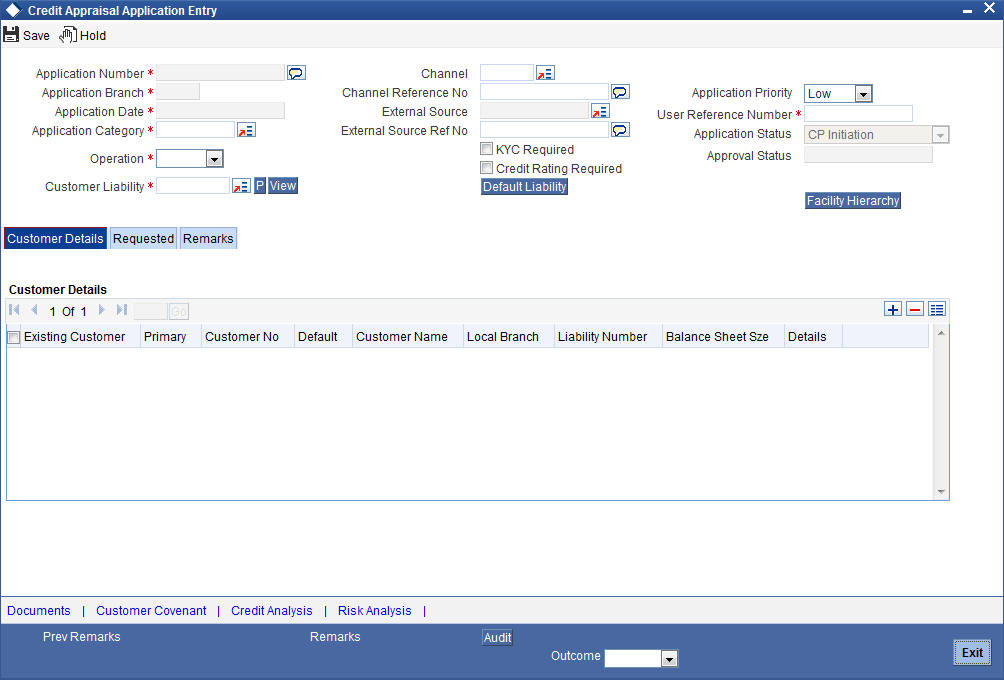
You can specify the following details in this screen:
Application Number
The system displays the application number of the customer.
Application Branch
The system displays the application branch code.
Application Date
The system displays the application date.
Application Category
Specify the application category. The adjoining option list displays all the application categories maintained in the system. Select the appropriate one.
Operation
Select the operation you want to carry out from the drop-down list and the available options are:
- New
- Existing
Channel
Specify the channel. The adjoining option list displays all the channels maintained in the system. Select the appropriate one.
Channel Reference No
Specify the channel reference number.
External Source
Specify the external source. The adjoining option list displays all the external sources maintained in the system. Select the appropriate one.
External Source Ref No
Specify the external source reference number.
Application Priority
Select the priority of the application from the drop-down list and the available options are:
- Medium
- Low
- High
User Reference Number
Specify the user reference number.
Application Status
The system displays the application status and possible options are:
- CP Initiation
- CP Enrichment
- CP Scoring
- CP Risk
- CP Structuring
- CP Review
- CP Approval
- Customer Acceptance
- CP Retry
Customer Liability
Specify the customer liability. The adjoining option list displays all the customer liabilities maintained in the system. Select the appropriate one.
KYC Check
Select this check box to indicate whether KYC check is required.
Risk Rating
Select this check box to indicate whether risk rating is required.
3.3.3 Viewing Liability Details Summary
Click ‘View’ button in the ‘Credit Appraisal Application Entry’ screen to invoke ‘Liability Details Summary’ screen.
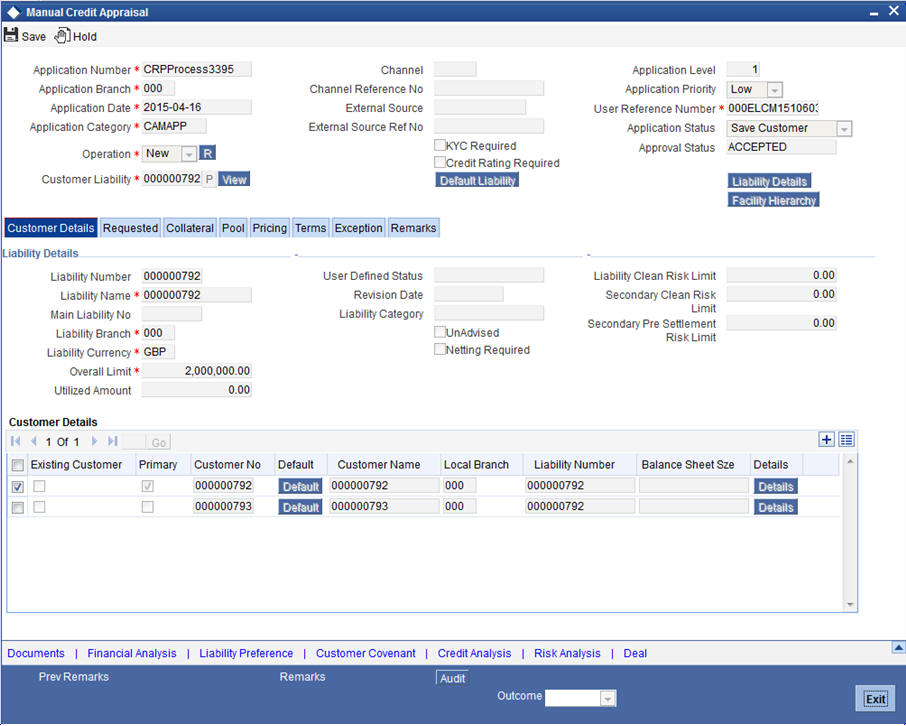
For more details on capturing liability summary details, refer the chapter ‘Limits & Collaterals’ in Enterprise Limits and Collateral Management User Manual.
3.3.4 Customer Details Tab
You can capture the following customer details related to a prospective customer:
Existing Customer
Select this check box if you are an existing customer.
Customer No
Select the customer number.The adjoining option list displays all the customer numbers maintained in the system. Select the appropriate one.
Default
To include an existing customer, you are allowed to select the customer no and click ‘Default’ button. The system defaults the customer details for the selected customer number.
Customer Name
Specify the name of the customer.
Local Branch
Select the local branch of an existing customer. The adjoining option list displays all the local branches maintained in the system. Select the appropriate one.
Liability Number
Specify the liability for all parties other than primary applicant.The adjoining option list displays all the liability numbers maintained in the system. Select the appropriate one.
3.3.5 Capturing Customer Details
Click ‘Details’ button to enter the details on existing customer in the ‘Credit Appraisal Application Entry’ screen to invoke ‘Customer Details’ screen. However for an existing customer the system defaults all the customer details.
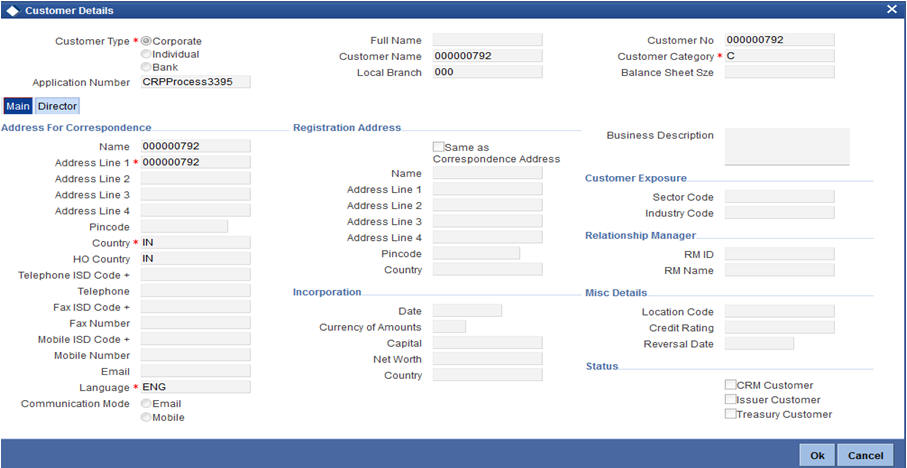
You can enter the following details:
Customer Type
Select the customer type of the customer from the following options provided in the drop-down list:
- Corporate
- Individual
- Bank
Application Number
The system displays the application number.
Full Name
Specify the customer full name.
Customer Name
The system displays the customer name.
Local Branch
The system displays the local branch.
Customer No
Specify the customer number of the customer.
Customer Category
Specify the customer category. The adjoining option list displays all the customer categories maintained in the system. Select the appropriate one.
Main Tab
Address For Correspondence
Name
Specify the name of the customer.
Address
Specify the address of the customer in four lines starting from Address Line 1 to Address Line 4.
Country
Specify the country associated with the address specified.The adjoining option list displays all the countries maintained in the system. Select the appropriate one.
Ho Country
Specify the head office country associated with the address specified.The adjoining option list displays all the HO countries maintained in the system. Select the appropriate one.
Telephone
Specify the telephone number of the customer.
Fax Number
Specify the fax number of the customer.
Specify the Email of the customer.
Mobile Number
Specify the mobile number of the customer.
Language
Specify the primary language of the customer. The adjoining option list displays all the languages maintained in the system. Select the appropriate one.
Communication Mode
Select the communication mode of the customer from the following options provided in the drop-down list:
- Mobile
Same as Correspondence Address
Select this check box, if you want the correspondence address to be the same.
Name
Specify the name of the customer.
Address
Specify the address of the customer.
Country
Specify the country associated with the address specified.The adjoining option list displays all the countries maintained in the system. Select the appropriate one.
Incorporation
Date
Enter the incorporation date.
Currency of Amounts
Specify the currency of amount.The adjoining option list displays all the currencies maintained in the system. Select the appropriate one.
Capital
Specify the capital amount.
Net Worth
Specify the net worth amount.
Country
Specify the country associated with the address specified.
Business Description
Specify the business description.
Customer Exposure
Sector Code
Specify the sector code.
Industry Code
Specify the industry code.
Relationship manager
RM ID
Specify the relationship manager ID. The adjoining option list displays all the RM IDs maintained in the system. Select the appropriate one.
RM Name
The system displays the relationship manager name, whenever you select RM ID.
Director Tab
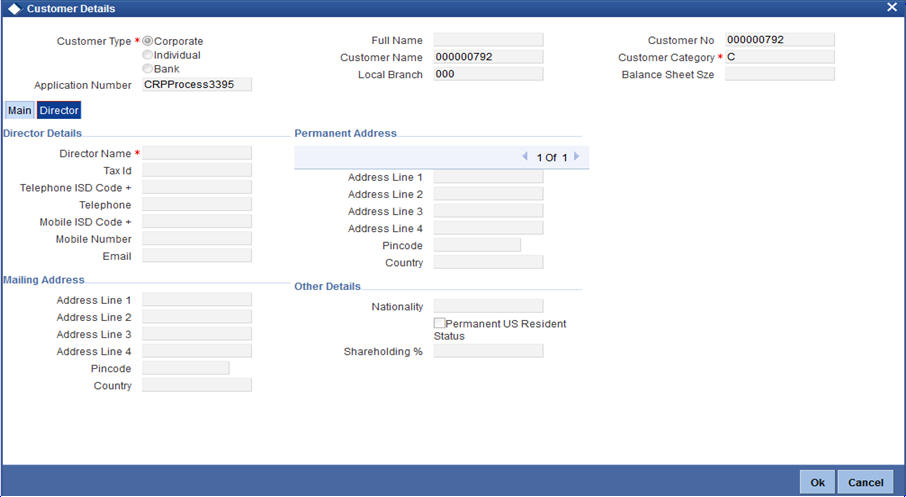
Director Details
Director Name
Specify the name of the director of the corporate customer.
Tax Id
Specify the tax identification of the director.
Telephone ISD Code +
Specify the international dialling code for the telephone number of the director. The adjoining option list displays valid ISD codes maintained in the system. Select the appropriate one.
Telephone
Specify the telephone number of the director.
Mobile ISD Code +
Specify the international dialling code for the mobile number of the director. The adjoining option list displays valid ISD codes maintained in the system. Select the appropriate one.
Mobile Number
Specify the mobile number of the director.
Specify the e-mail ID of the director.
Mailing Address
Address 1 to 4
Specify the mailing address of the customer in Line 1 to Line 4 provided.
Country
Specify the country associated with the address specified.
Permanent Address
Address
Specify the permanent address of the director.
Country
Specify the country associated with the address specified.
Other Details
HO Country
Specify the head office country associated with the address specified.The adjoining option list displays all the HO countries maintained in the system. Select the appropriate one.
Permanent US Resident status
Select this check box to indicate that the corresponding director is a permanent US resident.
Shareholding %
Specify the percentage of share for the key person.
3.3.6 Facility Hierarchy or Liability Detail Report
Click ‘Facility Hierarchy’ button in the ‘Credit Appraisal Application Entry’ screen to invoke ‘Facility Hierarchy or Liability Details Report’ screen.
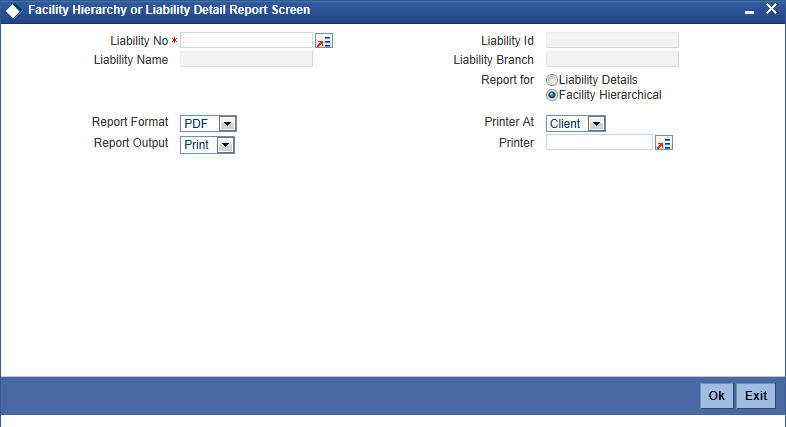
You can enter the following details:
Liability No
Specify the liability number. The adjoining option list displays all the liability numbers maintained in the system. Select the appropriate one.
Liability Name
The system displays the liability name. Whenever you select liability No.
Liability Id
The system displays the liability Id. Whenever you select liability No.
Liability Branch
The system displays the liability branch. Whenever you select liability No.
Report for
Select one of the following options for which report is to be generated:
- Liability Branch
- Facility Hierarchical
Report Format
Select the format of the report from the drop-down list and the available options are:
- HTML
- Excel
- RTF
Report Output
Select the output of the report from the drop-down list and the available options are:
- View
- Spool
Printer At
Select the printer at from the drop-down list and the available options are:
- Client
- Server
Printer
Specify the printer name. The adjoining option list displays all the printers maintained in the system. Select the appropriate one.
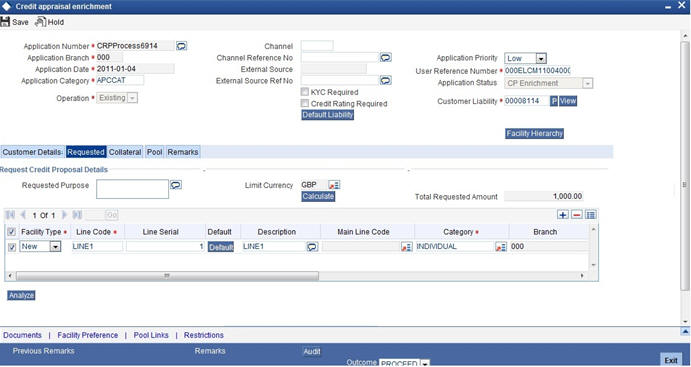
3.3.7 Requested Tab
You can capture the following customer requested credit proposal details:
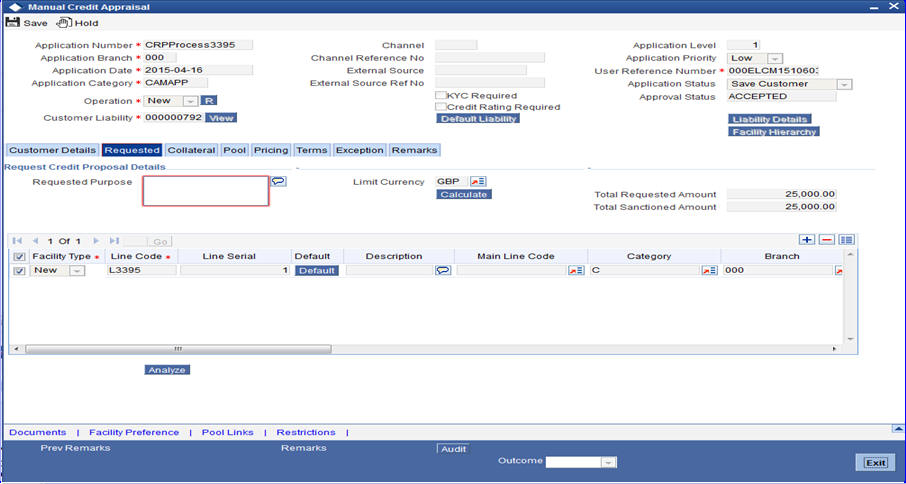
Request Credit proposal Details
Requested Purpose
Specify the purpose of the loan.
Limit Currency
Specify the limit currency.The adjoining option list displays all the limit currencies maintained in the system. Select the appropriate one.
Calculate
Click ‘Calculate’ button, the system computes the ‘Total’ proposed limits and Sanctioned limits for the proposed facilities and calculated amount is displayed in Total Proposed amount and Total Sanctioned Amount.
The Total Proposed Amount is the sum of all the facilities proposed amount and total sanctioned amount is the sum of all the facilities sanctioned amount.
Total Requested Amount
The system displays the total loan amount requested by the prospective customer.The total proposed amount is the sum of all the facilities proposed.
Facility Type
Select the facility type from the drop-down list and the available options are:
- New
- Existing
Line Code
Specify the line code. The adjoining option list displays all the line codes maintained in the system. Select the appropriate one.
Line Serial
Specify the serial line number.
Default
To include an existing customer, you are allowed to select the customer no and click ‘Default’ button. The system defaults the customer details for the selected customer no.
Description
Specify a suitable description about the credit proposal.
Main Line Code
The system displays the main line code.
Category
Specify the category of the request proposal. The adjoining option list displays all the categories maintained in the system. Select the appropriate one.
Branch
Specify the branch code in which the application is processed. The adjoining option list displays all the branch codes maintained in the system. Select the appropriate one.
Currency
Specify the currency of preference of the customer. The adjoining option list displays all the currencies maintained in the system. Select the appropriate one.
Previous Sanctioned
Specify the previous sanctioned amount to the prospective customer.
Available
The system displays the available start date of the loan.
Requested
Specify the loan amount requested by the prospective customer and click ‘Calculate’ button.
Expiry Date
Specify the expiry date of the loan from the adjoining calendar.
3.3.8 Maintaining Facility Details
Click on ‘Details’ button in the ‘Credit Appraisal Application Entry’ screen in ‘Requested’ Tab to invoke ‘Facility Details’ screen.
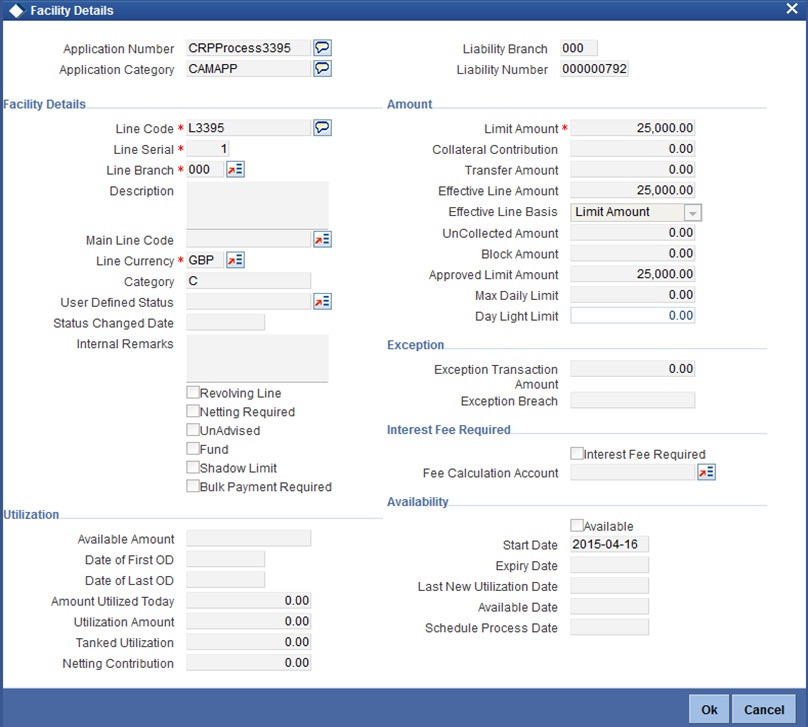
You can enter the following details:
Application Number
The system displays the application number.
Application Category
The system displays the application category.
Liability Branch
The system displays the liability branch.
Liability Number
The system displays the liability number.
Facility Details
Line Code
Specify the Line Code to which the liability ID to be associated. Allocating credit limits for the Line-Liability combination can be done. The customer(s) who fall under this Liability Code in turn avail credit facilities under this Credit line.
Line Serial
Each time a customer - line code combination is specified, Oracle FLEXCUBE ELCM system assigns a unique serial number to the combination. This serial number is unique to the line-liability code combination. Thus, for every new record entered for a Line-Liability combination, a new serial number is generated. The Line - Liability - Serial number forms a unique combination.
Line Branch
By default, the system displays the branch code in which the facility has been created. You can change the branch code from the adjoining option list before saving the facility. Once the facility is saved, you cannot modify the branch code.
Description
Give a brief description of the facility here.
Main Line Code
Specify the main line code if the created facility is a sub line.
Line Currency
Specify the currency in which the facility is defined. The currency that has been selected have the following implications:
- The limit amount that has been specified for this Line-Liability combination is taken to be in this currency.
- The line that has been defined will be available for Utilization only in the line currency, unless specified otherwise under Currency Restrictions in this screen.
Once the entry is authorized you cannot change the currency.
If the limit allotted to this Line-Liability combination can be utilized by accounts and transactions in currencies other than the limit currency, the limit utilization is arrived at by using the mid rate for the currency pair as of that day.
Limit Amount
Specify the limit for the facility. If you have maintained schedules for limits, the system automatically updates the limit amount here on the dates specified for each limit in the schedule.
Collateral Contribution
The collateral amount which has been maintained is displayed when a collateral code has been picked.
Transfer Amount
System displays the transfer amount resulting from 'Facilities Amount Transfer' transactions. The value displayed has either the sign "-" or "+", indicating whether the amount is transferred from or to the line. If the sign is "-", then the amount is transferred from the line and if it is "+", then the amount is transferred to the line.
Effective Line Amount
Specify the effective line amount for the facility. If you have maintained schedules for limits, the system automatically updates the limit amount here on the dates specified for each limit in the schedule.
Effective Line Basis
For defining drawing power of line the elements mentioned below are treated as the basis for the effective line amount calculation.
- Line Amount + Collateral
- Line Amount
- Minimum of Line Amount and Collateral
Uncollected Amount
Specify the uncollected amount.
Block Amount
Specify the block amount.
Approved Limit Amount
This is the maximum limit amount allowed for the facility and must be specified whenever you maintain schedule limits. System ensures that neither the ‘Limit Amount’ maintained here nor the schedule ‘Limit Amount’, maintained as part of the limits schedule is greater than the limit specified here.
Max Daily Limit
Specify the maximum daily limit amount.
Day Light Limit
Specify the day light limit.
Category
Specify the category for which the transactions authorize maintenance is being done. Having specified the category for the liability and the facility, the transaction authorize maintenance can be done for the same category. When the Exception Txn Amount or Exception Breach Percentage gets breached for a line belonging to the same category as defined in the transaction authorize maintenance, the transaction is available in the queue defined in the transaction authorize maintenance for the specific category.
User Defined Status
Specify status of the facility (for example, NORM for normal, BLOCKED, and so on) from the list available here The list displayed here is based on maintenance done in 'User Define Status Summary' screen.
Status Changed Date
Specify the date on which you want to change the status. You can specify a date before the line start date to block the line till the specified date. In addition, you can set a date prior to the application date.
Internal Remarks
Specify the internal remarks as limits terms and conditions.
Revolving Line
Select this check box to indicate that the credit line is Revolving. A revolving credit line indicates that a repayment of the utilized credit should reinstate the credit limit of the customer. You can modify the preference, as required.
Netting Required
This check box is deselected by default, indicating that netting is not required for the facility. You can select this check box to enable netting for the facility.
UnAdvised
Select this check box to indicate that the facility is unadvised.
Fund
Indicate whether the line is fund based or non fund based.
Shadow Limit
Select this check box to indicate that utilization amounts should be updated only for the facility and mainlines for the facility. Thus, when a utilization request is processed, the system updates the utilization amount only at the facility level and leaves the utilization amount at the liability level untouched.
Bulk Payment Required
Select this check box to indicate if bulk payment is required. If you specify here that bulk payment is required for the liner, then the same is maintained at the ‘Bulk Payments’ screen.
For more information about the ‘Bulk Payments’ screen please refer to the section, ‘Making Bulk Payments against loan or commitment’ under the Chapter ‘Operations’ of the ‘Retail Lending’ user manual.
Exception
Exception Transaction Amount
Specify the Exception Txn Amount. During utilization transaction when utilization amount crosses the specified Exception Txn Amount, BEPL process is triggered for Credit Exception Management to authorize the credit utilization amount. The limit transaction amount specified should be below the total effective line amount specified for that facility.
Exception Breach
Specify the Exception Breach Percentage. During utilization transaction when utilization amount crosses the specified Exception Breach Percentage, BEPL process is triggered for Credit Exception Management to authorize the credit utilization amount. The limit transaction amount specified should be below the total effective line amount specified for that facility.
Interest Fee Required
Commitment Fee/ Utilization fee Account
Select this check box to indicate whether the commitment fee or utilization fee account.
Fee Calculation Account
Specify the account which is linked with the facility. The same account is applicable for interest calculation based on ELCM facility. Fee calculation account is used for the fee calculation.
Utilization
Available Amount
Specify the available amount.
Date of First OD
Specify the date of first OD.
Date of Last OD
Specify the date of last OD.
Amount Utilized Today
Specify the amount utilized for today.
Utilization Amount
Specify the utilization amount.
Tanked Utilization
Specify the tanked utilization.
Netting Contribution
Specify the netting contribution.
Availability
Available
If the Line facility is available then this check box is selected.
The Oracle FLEXCUBE ELCM system tracks the status of both the Contract and the Facility. When the status of the Contract changes to PDO, then the facility becomes unavailable.
The product processor gives an ASCII file including all the facilities which need to be frozen. Oracle FLEXCUBE ELCM initiates an amendment event and then deselects the 'Available' check box.
Start Date
Specify the start date for the facility.
Expiry Date
Specify the expiry date for the facility. If the limit amount assigned to the facility is not utilized within the specified expiry date then the Available check box remains deselected. This freezes the line for the respective liability.
Last New Utilization Date
The system updates the Last New Utilization Date for the respective facility record as and when the transaction is processed. You are not allowed to amend it.
Available Date
Enter the available date. The date can be selected from the adjoining calender.
Schedule Process Date
Specify the schedule process date.
3.3.8.1 Generating Facility/Liability Utilization Report
Click on ‘Utilization’ button in the ‘Credit Appraisal Application Entry’ screen in ‘Requested’ Tab to invoke ‘Facility or Liability Utilization Report’ screen.
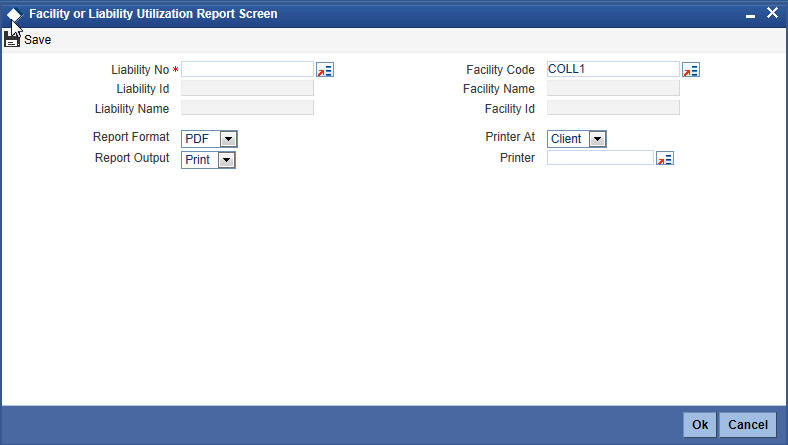
You can enter the following details:
Liability No
Specify the liability number. The adjoining option list displays all the liability numbers maintained in the system. Select the appropriate one.
Liability Id
The system displays the liability Id. Whenever you select liability No.
Liability Name
The system displays the liability name. Whenever you select liability No.
Facility Code
Specify the facility code.The adjoining option list displays all the facility codes maintained in the system. Select the appropriate one.
Facility Name
The system displays the facility name. Whenever you select facility code.
Facility Id
The system displays the facility Id. Whenever you select facility code.
Report Format
Select the format of the report from the drop-down list and the available options are:
- HTML
- Excel
- RTF
Report Output
Select the output of the report from the drop-down list and the available options are:
- View
- Spool
Printer At
Select the printer at from the drop-down list and the available options are
- Client
- Server
Printer
Specify the printer name. The adjoining option list displays all the printers maintained in the system. Select the appropriate one.
3.3.8.2 Facility Preferences
At enrichment and proposal structuring stages, you can capture the preferences for the facility in ‘Facility Preferences’ screen. Click ‘Facility Preferences’ button to invoke this.
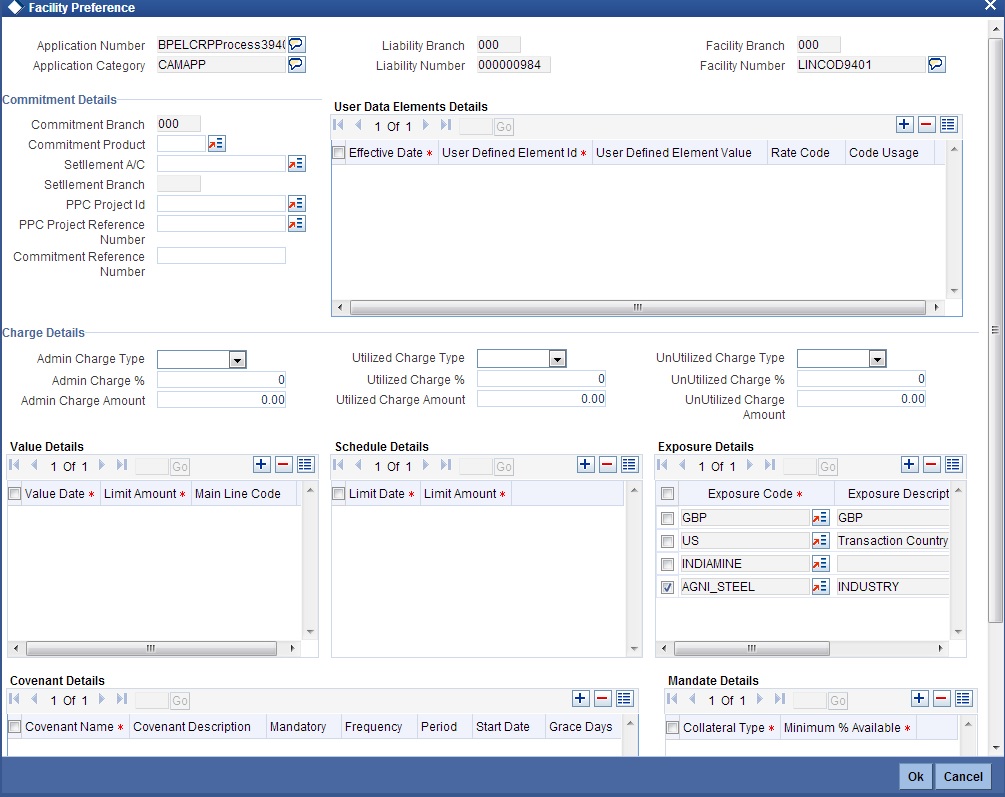
While processing new applications, you can capture the following details.
Commitment Details
Commitment Product
Specify the commitment product name. Select the appropriate one from the option list.
Settlement A/C
Specify the settlement account. Select the appropriate one from the option list.
Settlement Branch
Specify the settlement branch. Select the appropriate one from the option list.
PPC Project Id
Specify the PPC project ID. Select the appropriate one from the option list.
Project Reference Number
Specify the project reference number. Select the appropriate one from the option list.
Commitment Reference Number
Specify the reference number that identifies the commitment.
User Data Elements Details
Effective Date
Specify the effective date of UDE.
User Defined Element Id
Specify the UDE ID.
User Defined Element Value
Specify the user defined element value.
Rate Code
Specify the rate code.
Code Usage
Specify the code usage, that is, Periodic or Automatic.
Charge Details
Admin Charge Type
Specify the admin charge type. Admin charge can be one of the following types:
- Percentage
- Fixed
Admin Charge %
Specify the percentage of admin charge.
Admin Charge Amount
Specify the admin charge amount.
Utilized Charge Type
Specify the utilized charge type. Utilized charge can be one of the following types:
- Percentage
- Fixed
Utilized Charge %
Specify the percentage of utilization.
Utilized Charge Amount
Specify the amount that has been utilized.
UnUtilized Charge Type
Specify the unutilized charge type. This charge can be one of the following types:
- Percentage
- Fixed
UnUtilized Charge %
Specify percentage of unutilized charge.
Unutilized Charge Amount
Specify the unutilized amount.
Value Details
Value Date
Specify the value date.
Limit Amount
Specify the limit amount.
Main Line Code
The system displays the main line code.
Schedule Details
Limit Date
Specify the limit date.
Limit Amount
Specify the limit amount.
Exposure Details
Exposure Code
For new applications, when you open Facility Preference screen for the first time, by default, the system adds two exposure codes, that is, the facility currency code and customer country code.
Additionally, if you have defined a sector code or industry codes in ‘Customer Details’ screen while creating the application, the system adds those also as exposure codes.
You can change the exposure codes displayed by the system. You can also define additional exposure codes by clicking add button.
Exposure Description
The system displays the exposure description.
Exposure Type
The system displays the exposure type of the selected exposure code.
Covenant Details
Covenant Name
Specify the covenant name.
Covenant Description
The system displays the description of the covenant.
Mandatory
Check this box to indicate that it was a mandatory covenant.
Frequency
Select the frequency from drop-down list:
- Quarterly
- Yearly
- Monthly
- Weekly
- Daily
Period
Specify the frequency period.
Start Date
Specify the start date.
Grace Days
Specify the number of grace days.
Reversal Date
Specify the reversal date.
Notice Days
Specify the notice days.
Covenant Reference Number
Specify the reference number.
Mandate Details
Collateral Type
Specify the collateral type.
Minimum % Available
Specify the minimum percentage available.
3.3.9 Facility Restriction
All of the field appearing in this screen are defaulted from system for existing facilities. You need to input details for a new facility.
Customer restriction is mandatory for creating a facility, customer number needs to be given in customer restriction section with allowed as restriction type. That customer is linked to the facility.
To restrict a facility to a particular branch, you can select a branch in the ‘Branch Restriction’ section and proceed to select ‘Disallowed’ or ‘Allowed’ in the ‘Restriction Type’ under Branch Restrictions. Similarly, you can restrict a facility to a specific product, source, branch, exposure and so on by selecting the respective product code, source code and so on and then selecting the Disallowed or Allowed options under the respective restriction types.
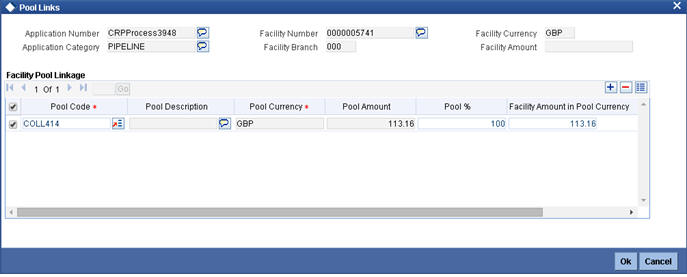
3.3.10 Facility Pool Linkage
Any pool created for the liability of the creating facility can be linked to through this screen.
3.3.11 Remarks Tab
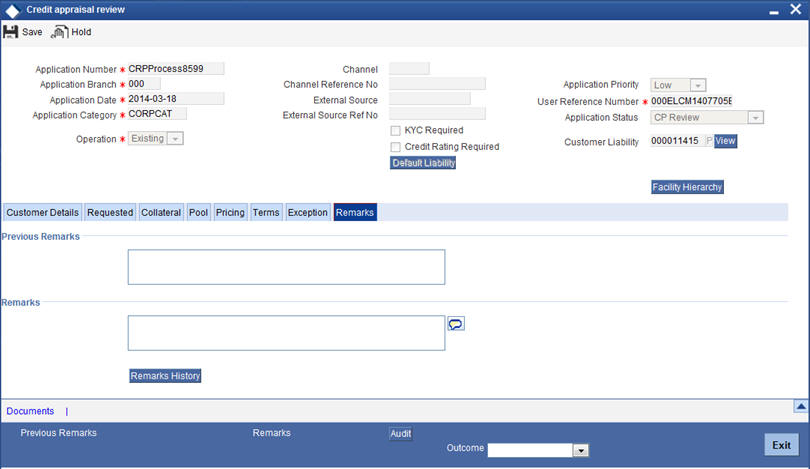
You can capture any remarks details of the prospective customer in ‘Remarks’ tab.
Remarks
Specify remarks, if any, associated with the applicant.
3.3.12 Maintaining Document Details
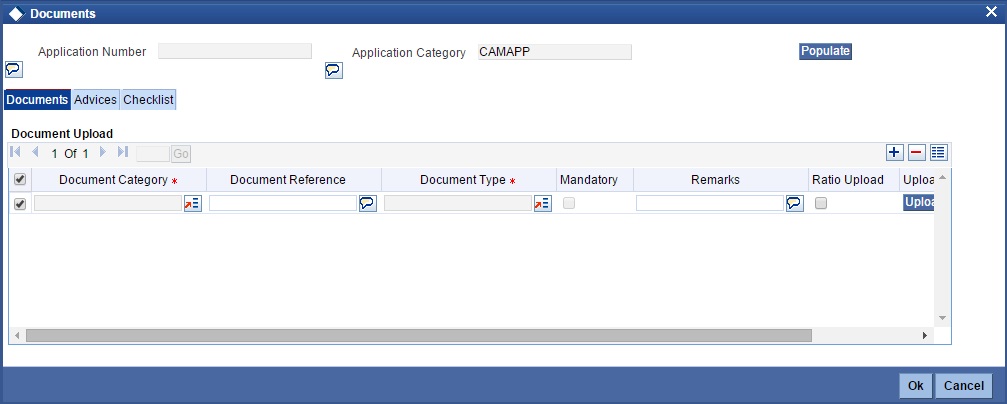
You can maintain the customer related documents in credit appraisal management repository through the ‘Documents’ screen. Click ‘Documents’ button from Credit Appraisal Application Entry’ screen to invoke this screen.
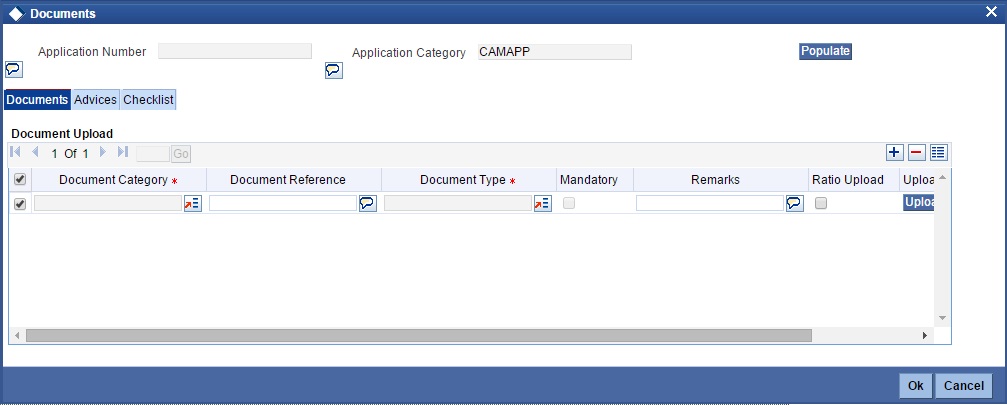
You can enter the following details:
Application Name
The system displays the application number.
Application Category
The system displays the application category.
Document Category
Specify the category of the document to be uploaded.The adjoining option list displays all the document categories maintained in the system. Select the appropriate one.
Document Reference
Specify the document reference number.
Document Type
Select the type of document.The adjoining option list displays all the document types maintained in the system. Select the appropriate one.
Mandatory
Select this check box to indicate whether the document is mandatory.
Compute
Select this check box to indicate whether the document to be computed.
Upload
Click ‘Upload’ button to open the ‘Document Upload’ sub-screen. The ‘Document Upload’ sub-screen is displayed below:
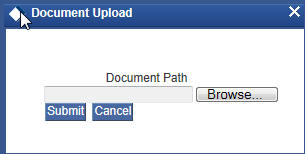
In the ‘Document Upload’ sub-screen, specify the corresponding document path and click the ‘Submit’ button. Once the document is uploaded through the upload button, the system displays the document reference number.
View
Click ‘View’ to view the document uploaded.
Edit
Using the ‘Edit’ button, you can edit the document details. When you click ‘Edit’ button, the system invokes a screen that displays the document and the properties.
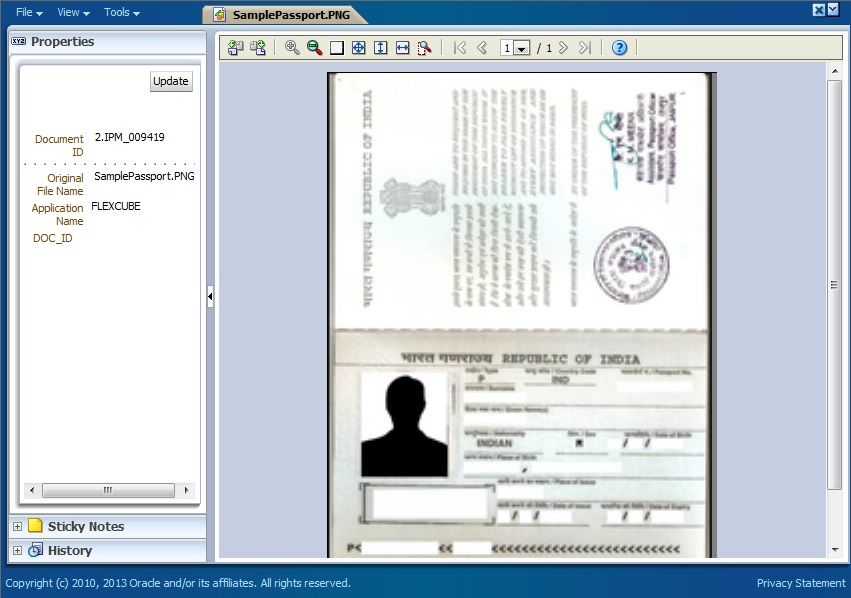
You can modify the document related information and click ‘Update’ button to update the changes. The system saves the changes made to the document.
Note
The changes made to the document using this Edit option is not reverted even if you do not save the transaction. If you want to revert the changes, you need to invoke the Document screen and manually modify it again.
Verified
Select this check box to indicate whether the document is to be verified.
Remarks
Specify remarks, if any.
3.3.12.1 AdvicesTab
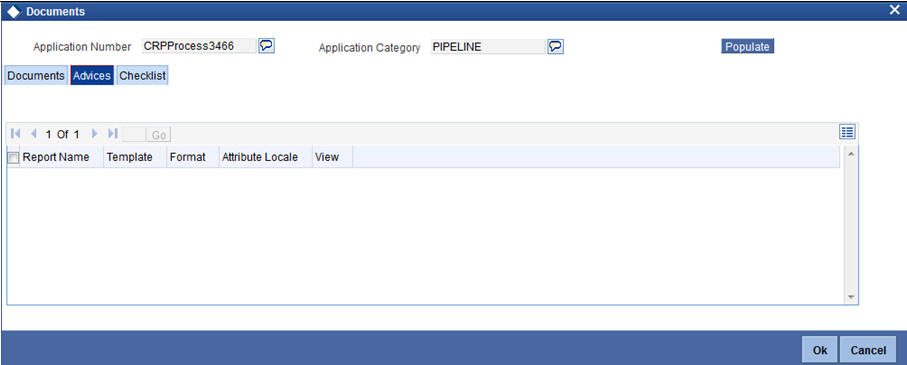
You can view the following details:
- Report Name
- Attribute Template
- Attribute Format
- Locale
- View
3.3.12.2 Checklist Tab
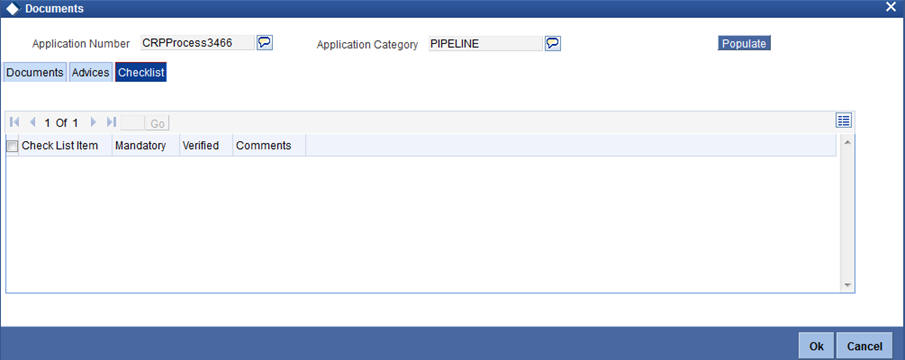
You can enter the following details:
Check List
The system displays the check list details.
Mandatory
The system defaults from Documents main screen.
Verified
Select this check box to indicate whether the documents are verified.
Comments
Specify comments, in any.
3.3.13 Linking Covenant for Customer
You can link customer covenant details through the ‘Customer Covenant’ screen. Click ‘Customer Covenant’ button from Credit Appraisal Application Entry’ screen to invoke this screen.
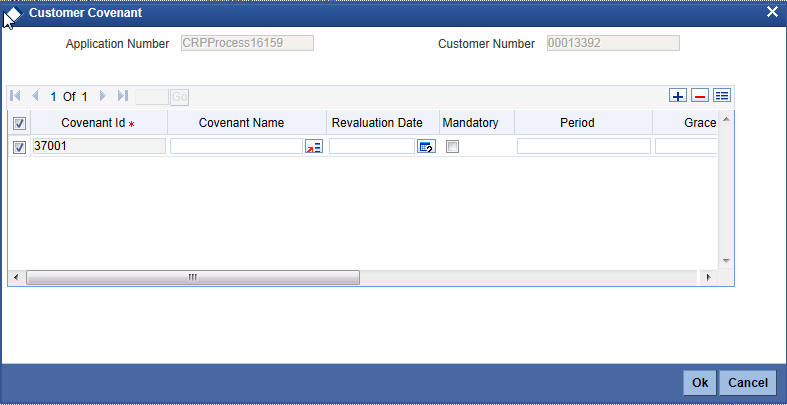
You can enter the following details:
Application Number
The system will display the application number.
Customer Number
The system displays the customer number.
Covenant Id
The system displays the covenant Id.
Covenant Name
Specify the covenant name. The adjoining option list displays all the covenant names maintained in the system. Select the appropriate one.
Revaluation Date
Specify the date on which the covenant needs to be reviewed.
Mandatory
Select this check box to indicate whether covenant defined is mandatory as part of the process or not. You may change this preference when this convent is linked to a Collateral/Facility.
Period
Specify the period for which customer covenant is to be done.
Grace Days
Specify the grace days past the next due/revision date allowed for renewal of the covenant.
Notice Days
Specify the number of days in the notice period. The notice period starts these many days prior to the revision date of the covenant.
Frequency
Select a frequency according to which the Convent has to collected/revised from the drop-down list and the available options are:
- Monthly
- Quarterly
- Half Yearly
- Yearly
Start Month
If the Frequency select is Yearly, Half Yearly, Quarterly, or Monthly, then specify the start month here.
Remarks
Specify the remarks about the covenant maintenance.
Start Date
If the frequency select is Monthly, then specify the start date here.
Step 2. Credit Appraisal Enrichment
The information captured in the previous stage is enriched in the credit appraisal enrichment stage.
The proposal is enriched by capturing additional information like collateral details which are attached along with the proposal, type of the collateral, availability of the collateral, Original Value / market value for the collateral, haircut percentage, limits which are already sanctioned to the Customer, utilized amount, proposed new facility limit, and the current status of the loans.
The enriched proposal is sent for internal review / external review for arriving the borrower limit for that customer.
3.3.14 Collateral Tab
You can capture collateral related details of the corporate customer in ‘Collateral’ tab.
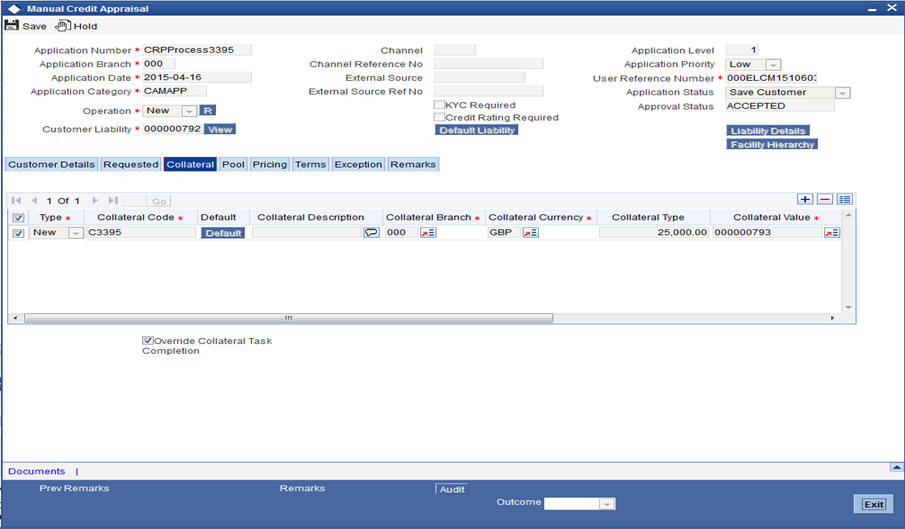
You can enter the following details:
Type
Select the facility type from the drop-down list and the available options are:
- New
- Existing
Collateral Code
Specify the code of the collateral for which you are maintaining details.The adjoining option list displays all the collateral codes maintained in the system. Select the appropriate one.
Default
Click ‘Default’ button to default the details related to collateral.
Collateral Description
Specify detailed description of the collateral.
Collateral Branch
Specify the collateral branch. The adjoining option list displays all the collateral branches maintained in the system. Select the appropriate one.
Collateral Currency
Specify the collateral currency.The adjoining option list displays all the collateral currencies maintained in the system. Select the appropriate one.
Collateral Value
Specify the value of the collateral.
Collateral Type
Select the type of collateral from the adjoining drop-down list.
Customer No
Select the customer number of the collateral from the adjoining option list.
Task Ref No
The system displays the collateral creation task reference number.
Task
Click ‘Task’ to trigger collateral creation task.
Override Collateral Task Completion
Select this check box to override pending collateral creation tasks and proceed with CAM process flow.
During Collateral Creation, in the Credit Review stage, system would check for collateral creation process flow completion and displays necessary message to the reviewer. If ‘Override Collateral Task Completion’ flag is checked, this validation is skipped by the system and limit origination process flow can proceed to next task.
Details
Click ‘Details’ button to invoke ‘Collateral Maintenance’ screen. This screen displays the details of the collateral. However, you cannot modify these details.
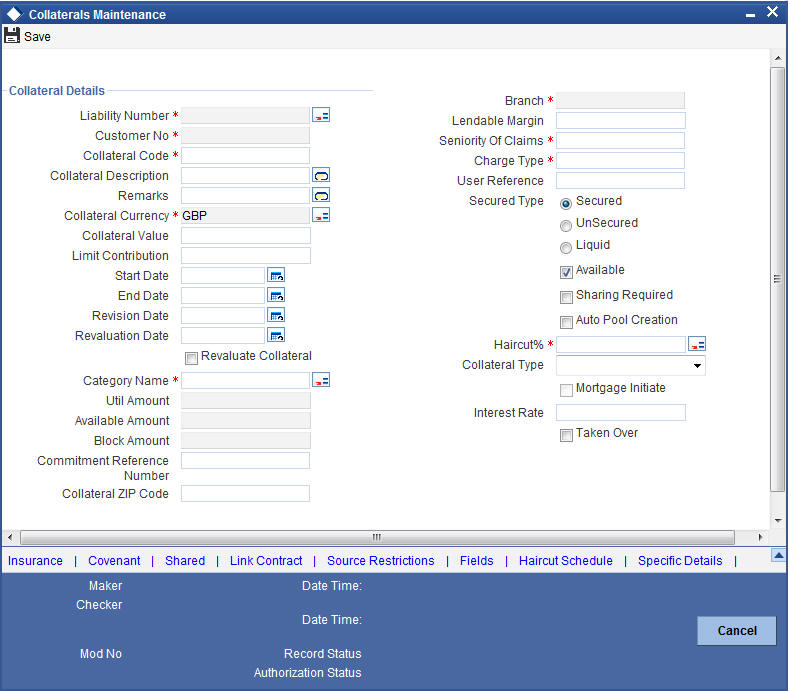
You can enter the following details:
Application Number
The system displays the application number.
Liability Number
The system displays liability number.
Collateral Code
The system displays the collateral code.
Collateral Description
Specify the description about collateral.
Collateral Branch
The system displays the collateral branch.
Collateral Currency
The system display the collateral currency.
Remarks
Specify the remarks, if any about collateral.
Start Date
Specify the start date of the collateral effective period.
End Date
Specify the end date of collateral effective period.
Revision Date
Specify the date on or before which you want to revise the details specified for the collateral code.
Revaluation Date
Specify the date on or before which you want to revalue the details specified for the collateral.
Revaluate Collateral
Select this check box to indicate that you wish to revalue the collateral as per revaluation criteria specified.
Grace Days
Specify the grace days associated with the collateral.
Collateral Category
Specify the collateral category.The adjoining option list displays all the collateral categories maintained in the system. Select the appropriate one.
Haircut %
Specify the percentage of hair cut for the collateral. The adjoining option list displays all the hair cut percentages maintained in the system. Select the appropriate one.
Rate
Specify the rate of collateral.
Contract Reference Number
Specify the contract reference number of collateral.
Block Amount
The system displays the blocked amount.
Collateral Value
Specify the collateral value.
Utilized Amount
The system displays the utilized amount.
Available Amount
The system displays the available amount.
Lendable Margin
Specify the margin that should be allowed for lending.
Charge Type
Select the charge type from the drop-down list and the available options:
- Pledge
- Hypothecation
- Lien
- Mortgage
- Assignment
Collateral Expose Type
Select the one of the collateral expose type from the following options:
- Unsecured
- Secured
- Liquid
Collateral Type
Select the one of the collateral type from the following options:
- Guarantee Based
- Market Value Based
- Normal
Mortgage Initiated
Select this check box, if you want to initiate the mortgage.
Taken Over
Select this check box, if you want the collateral linked to CI/CL account is to be taken over.
Market Value Based
Security Id
Specify the security Id for collateral.The adjoining option list displays all the security Ids maintained in the system. Select the appropriate one.
Nominal Value
Specify the nominal value.
Price Code
Specify the price code. The adjoining option list displays all the price codes maintained in the system. Select the appropriate one.
Last Revaluation Price
The system displays the last revaluation price.
Next Revaluation Date
Specify the next revaluation date.
Guarantee based
Guarantor Id
Specify the guarantor Id of the collateral. The adjoining option list displays all the guarantor Ids maintained in the system. Select the appropriate one.
Revokable
Select this check box to indicate whether revokable is required.
Revoke Date
Specify the revoke date.
Issuer Details
Issuer Name
Specify the issuer name of the collateral.
Issuer Reference Number
Specify the issuer reference number.
3.3.15 Pool Tab
You can capture collateral pool related details of the corporate customer in ‘Pool’ tab.
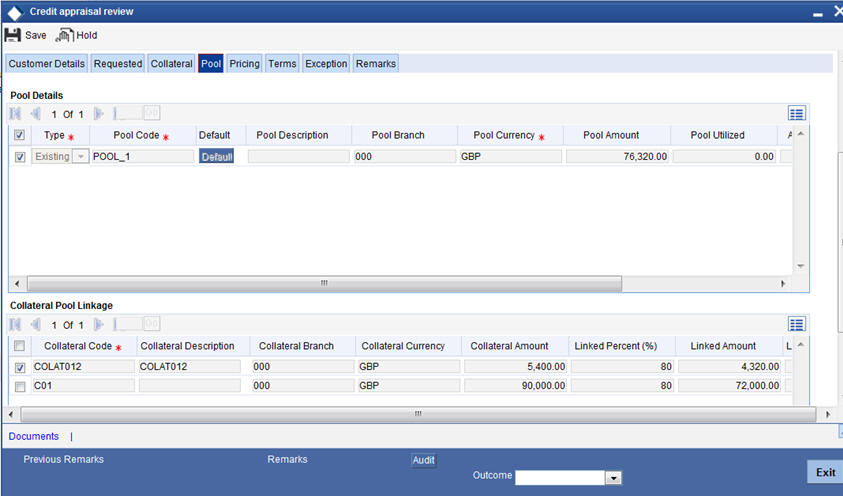
You can enter the following details:
Pool Details
Type
Select the facility type from the drop-down list and the available options are:
- New
- Existing
Pool Code
Specify the Pool Code here. The pool code assigned to each collateral pool can be linked to a liability while creating credit limits.
Default
Click ‘Default’ button to default the details related to collateral pool.
Pool Description
Specify a brief description of the collateral pool here.
Pool Branch
The system displays the pool branch.
Pool Currency
Specify the currency in which the Collateral Pool has to be maintained.
Pool Amount
The system computes and displays the utilization amount to the Collateral Pool, if a collateral Pool is attached to a contract or account and not through a facility.
Pool Utilized
This field displays the pool amount that has been linked to various credit lines, hence displaying the total pool amount utilized at any point in time.
Available Amount
The system displays the available amount.
Mortgage initiated
Select this check box if you want to initiate the mortgage.
Collateral Pool Linkage
Collateral Code
Specify the collateral code.The adjoining option list displays all the collateral codes maintained in the system. Select the appropriate one.
Collateral Description
The system displays the collateral description whenever you select collateral code.
Collateral Branch
The system displays the collateral branch whenever you select collateral code.
Collateral Currency
The system displays the collateral currency whenever you select collateral code.
Collateral Amount
The system displays the collateral amount whenever you select collateral code.
Linked Percent (%)
The part of the collateral amount which has to be linked to the pool can be specified as a percentage here. On save of the record, if Linked Percent Number is specified, then the system defaults the 'Linked Amount' calculated as Linked Percent Number Percentage of 'Collateral Contribution'.
Linked Amount
When a collateral pool comprising the collateral is linked to the facility, the system computes and displays the amount to be linked. The linked amount of Collateral pool is computed based on the pool percentage or pool amount specified when a collateral pool is linked to a Facility.
Linked Amount in Pool Currency
The system displays the linked amount in pool currency.
Order Number
Specify the order number.
Spread
The system displays the spread.
Rate of Interest
The system displays the rate of interest.
Expiry Date
The system displays the expiry date.
The details related to the corporate customer application entry are displayed in this screen.
3.3.16 Deal Information
You can capture the purpose of the application in Deal sub screen. Based on the details provided here, you can structure the deal amount into respective lines and sub lines.
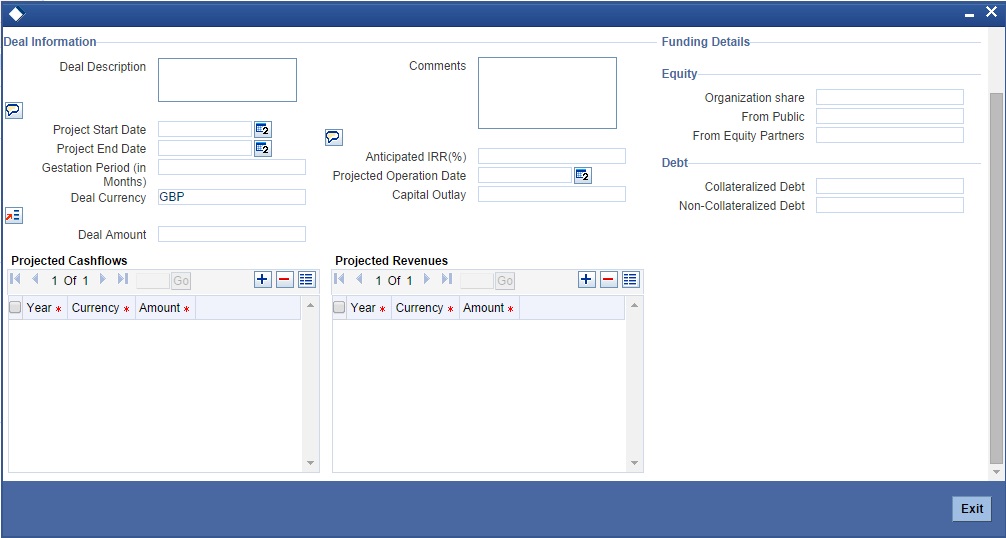
Specify the following details:
Deal Description
Specify a brief description of the deal.
Comments
Specify additional comments, if any.
Project Start Date
Specify the project start date.
Project End Date
Specify the project end date.
Gestation Period (in months)
Specify the gestation period in months.
Deal Currency
Specify the deal currency. You can select the appropriate one from the option list.
Deal Amount
Specify the total deal amount.
Anticipated IRR
Specify the anticipated internal rate of return.
Projected Operation Date
Specify the projected operation date.
Capital Outlay
Specify the capital outlay.
Organization Share
Specify the overall equity held by the organization.
From Public
Specify the equity held by the public.
From Equity Partners
Specify the equity held by partners.
Collateralized Debt
Specify the total collateralized debt.
Non-collateralized Debt
Specify the total non-collateralized debt.
Projected Cash flow - Year
Specify the projected cash flow year.
Projected Cash flow - Currency
Specify the cash flow currency.
Projected Cash flow - Amount
Specify the projected cash flow amount.
Projected Revenue - Year
Specify the projected revenue.
Projected Revenue - Currency
Specify the revenue currency.
Projected Revenue - Amount
Specify the revenue amount.
Deal Advice
The system generates a deal advice. The deal advice gives information on the deal like projected revenues and projected cash flows with respect to the application.
3.3.17 Headroom Analysis
In the ‘Requested Tab’ of the screen you can click the Analyze button to perform an exposure analysis for a facility. This button is available in the following stages:
- Review and Scoring
- Risk Evaluation
- Proposal
- Structuring
- Recommendation and Review
- Approval
Select a facility and click the ‘Analyze’ button which generates the Exposure Analysis report.
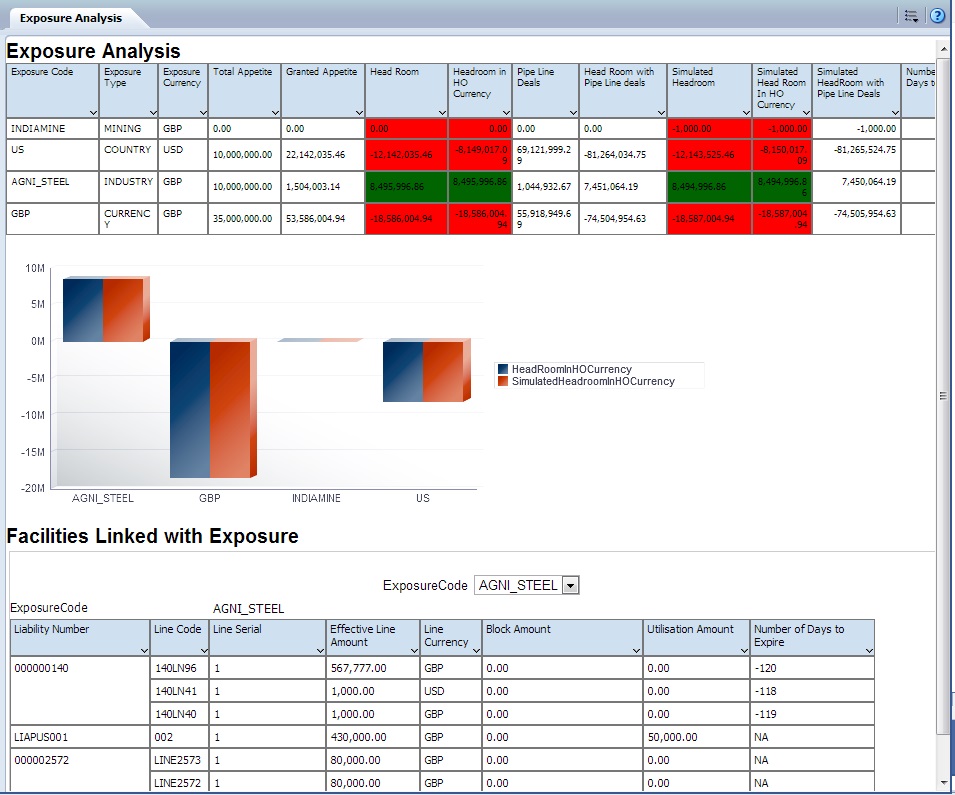
In this report, you can view a table and a bar chart that contains the details of the exposures. You can also view the facilities linked to each report.
If the application details are verified successfully, then you can proceed with the processing of the application by selecting ‘PROCEED’ as the Outcome. You can select ‘REJECT’ to return the process to previous stage for data correction or ‘CANCEL’ to terminate the process.
On successful verification, a message stating that the task is successfully completed, gets displayed.
To acquire the next stage, you need to go to the ‘Task’ menu and select ‘Assigned’ under ‘Standard’ option. All tasks that have been successfully completed are listed on the right side of the screen. Select the check box against your ‘Workflow Ref No’ and click ‘Acquire’ button at the top of the screen to acquire the next stage of the task.
The system displays the system message as “xxx Acquire Successful” on successful acquisition of the task.
Click ‘Ok’ to proceed to the next stage. To select the acquired task for the next stage, select ‘Acquired’ under ‘Standard’ option in the ‘Task’ menu. All the tasks that have been successfully acquired are displayed on the right side of the screen. Search for your Workflow reference number and click the ‘Workflow Ref No’ to open ‘Verify Prospect or Customer Details’ screen.
Step 3. Initiate KYC Approval sub-process
For new facility creation / modification on facility, bank initiates a process for KYC verification for the customer. It includes the internal / external verification, blacklisting of customer and arrangement for credit scoring through internal / external agencies. KYC is not applicable for existing customers. Option will be provided to skip the KYC verification for existing customer.
In case the details captured are incorrect, the bank makes the necessary modifications. If the verification is successful, the bank proceeds to conduct KYC checks. Once KYC checks are carried out, the result is passed on to the parent process.
If any of the checks fail, the relevant regulatory /internal authorities are informed. Once KYC checks are carried out, the result is passed on to the parent process.
Here you perform the Know Your Customer (KYC) check on the customer. The KYC check depends upon the regulatory environment within which your bank operates and its internal KYC policies.
Banks initiate the process of KYC review for a customer as a part of parent process with all the relevant information in the system. This process comprises the following stages:
- Verify prospect /customer details
- Ascertain if KYC checks are required
- SDN checks
- Verify SDN Match
- Internal Black List check
- External KYC Checks
- Verify customer contact details
- Other KYC Checks
- KYC Decision
3.1 Verify Prospect /Customer Details
Users belonging to the user role ‘KYCEROLE’ (KYC Executive) can perform these activities.
Go to the pending list in the system. The system displays all the pending activities. Click ‘Acquire’ button adjoining the ‘Sub-process KYC Review’ task to acquire it. The system displays the information message as "xxx Acquire Successful"
If you have requisite rights, double click on the task in your ‘Assigned’ task list and invoke the following screen.
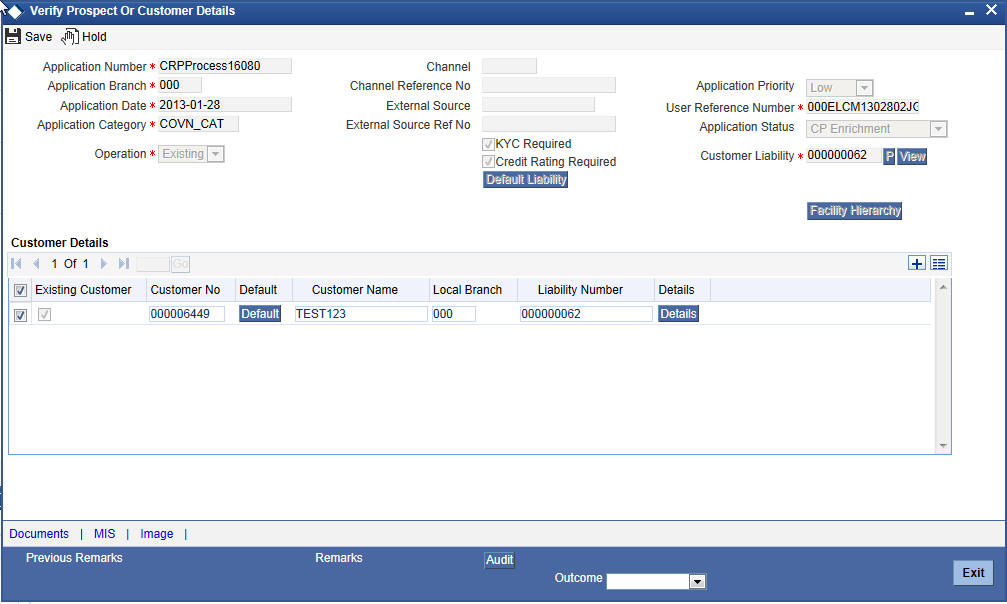
Click ‘Document’ button to invoke ‘Document Upload’ screen. The verifier is able to update only remarks and upload documents that he might obtain in this stage
Click ‘Details’ in the ‘Verify Prospect or Customer Details’ screen to invoke ‘Customer Details’ screen.
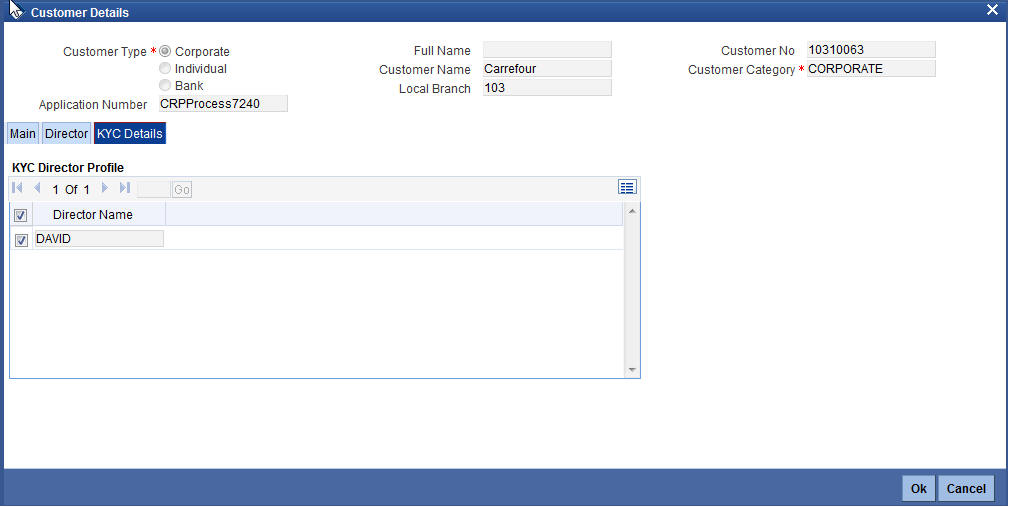
You can view the customer details in this screen. If the customer information is complete, then select the outcome as ‘PROCEED’ and save the record by clicking the save icon in the tool bar.
The system displays the message ‘The task is completed successfully’.
Click ‘Ok’ button. You are taken back to the ‘Verify Prospect or Customer Details’ screen. Click ‘Exit’ button to exit the screen. The task is then moved to the next activity.
3.2 Ascertain if KYC Checks are Required
Users belonging to the user role ‘KYCMROLE’ (KYC Manager) can perform these activities.
In case of an existing customer, the bank checks if there are any changes to the existing KYC information already available with the bank. The KYC check for an existing customer is performed only if there are changes in the customer information (including details of nominee and mandate holder). In all other cases of new and existing customers, KYC checks are mandatory.
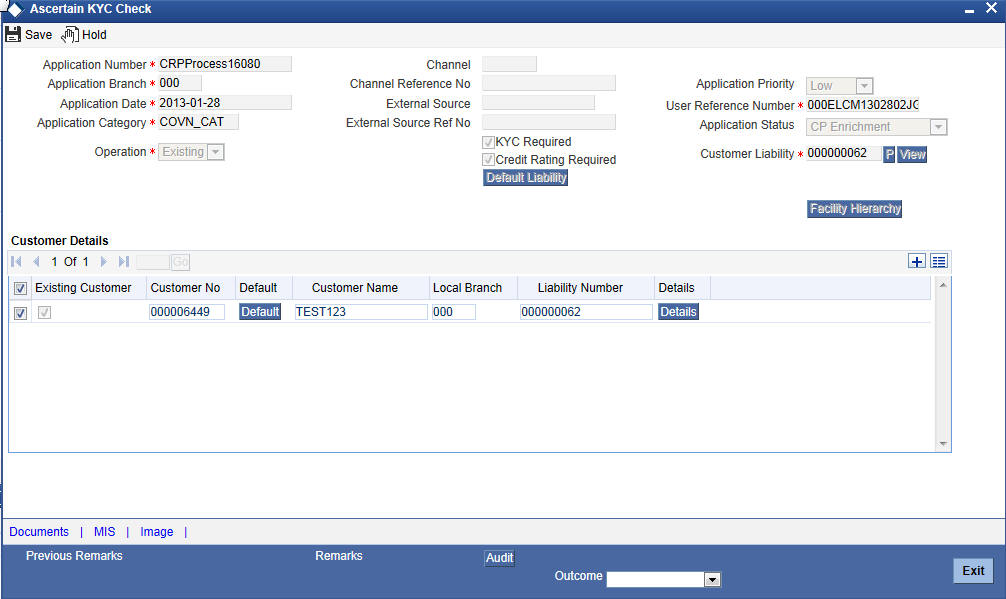
Click ‘Details’ in the ‘Ascertain KYC Check’ screen to invoke ‘Customer Details’ screen.
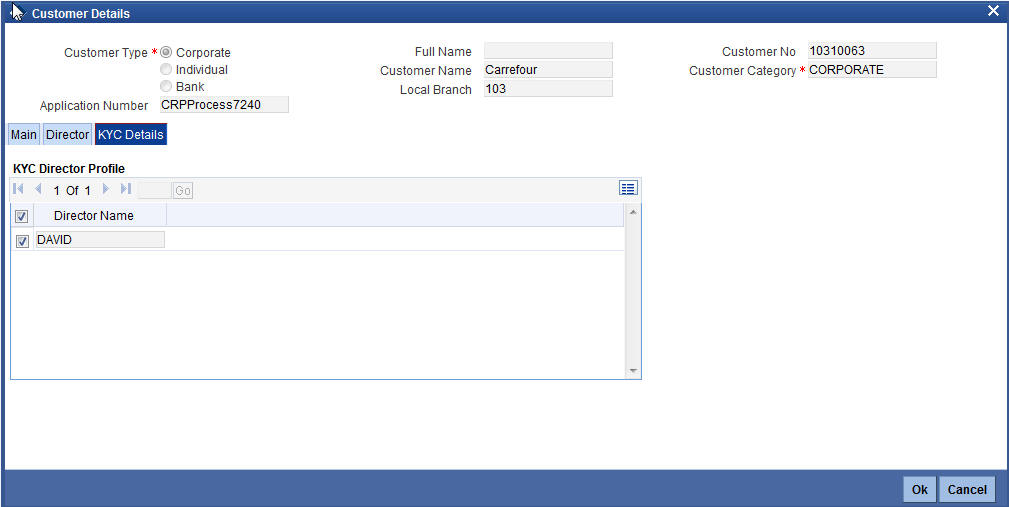
You can view the customer details in this screen. If the customer information is complete, then select the outcome as ‘REQUIRED’ and save the record by clicking the save icon in the tool bar.
The system displays the message ‘The task is completed successfully’.
Click ‘Ok’ button. You are taken back to the ‘Ascertain KYC Check’ screen. Click ‘Exit’ button to exit the screen. The task is then moved to the next activity.
3.3 SDN check
In this stage, the bank checks the applicant’s name for terrorism-related black-listing against the SDN database maintained by the Office of Foreign Assets Control (OFAC). In case of a no match, the process proceeds. In case of a match (positive/partial), you can verify the match again using the OFAC guidelines.
A system task is created which invokes the external service to do the SDN check for all new applicants and any existing customers whose information is modified. All nominee details are also sent for SDN check.
3.4 Verify SDN Match
The bank checks the applicant’s name for terrorism-related black-listing against the SDN database maintained by the Office of Foreign Assets Control (OFAC). In case of a no match, the process proceeds. In case of a match (positive/partial), you can verify the match again using the OFAC guidelines.
Users belonging to the user role ‘KYCMROLE’ (KYC Manager) can perform these activities.
Go to the pending list in the system. The system displays all the pending activities. Click ‘Acquire’ button adjoining the ‘Verify SDN Match’ task to acquire it. The system displays the information message as "xxx Acquire Successful"
If you have requisite rights, double click on the task in your ‘Assigned’ task list and invoke the following screen:
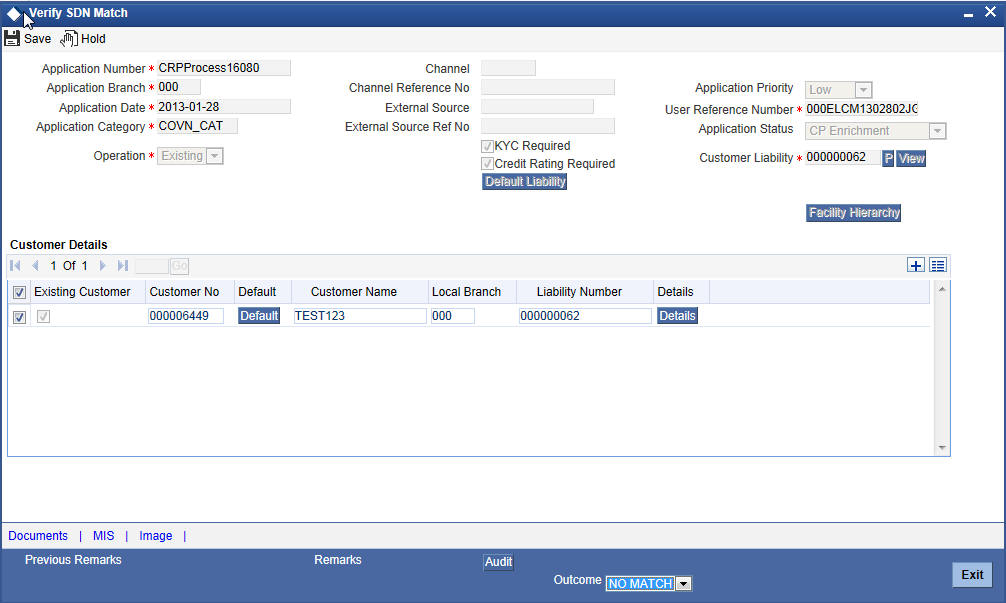
Click ‘Details’ in the ‘Verify SDN Match’ screen to invoke ‘Customer Details’ screen.
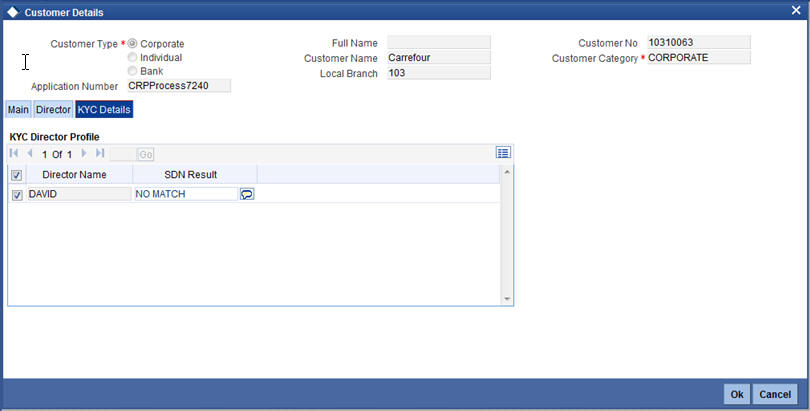
In this screen, you can view the applicant’s details. In case of a positive SDN match, the bank informs the regulatory agency (OFAC or any other similar agency) about the SDN match of the prospect/customer. However, if the match is cleared, you can continue with the subsequent KYC checks. Select the outcome as ‘NO MATCH’ and save the record by clicking the save icon in the tool bar.
The system displays the message ‘The task is completed successfully’.
Click ‘Ok’ button. You are taken back to the ‘Verify SDN Match’ screen. Click ‘Exit’ button to exit the screen. The task is then moved to the next activity.
3.5 Internal Blacklist Check
Users belonging to the user role ‘KYCEROLE’ (KYC Executive) can perform these activities.
Go to the pending list in the system. The system displays all the pending activities. Click ‘Acquire’ button adjoining the ‘Internal Blacklist Check’ task to acquire it. The system displays the information message as "..xxx Acquire Successful"
If you have requisite rights, double-click on the task in your ‘Assigned’ task list and invoke the following screen:
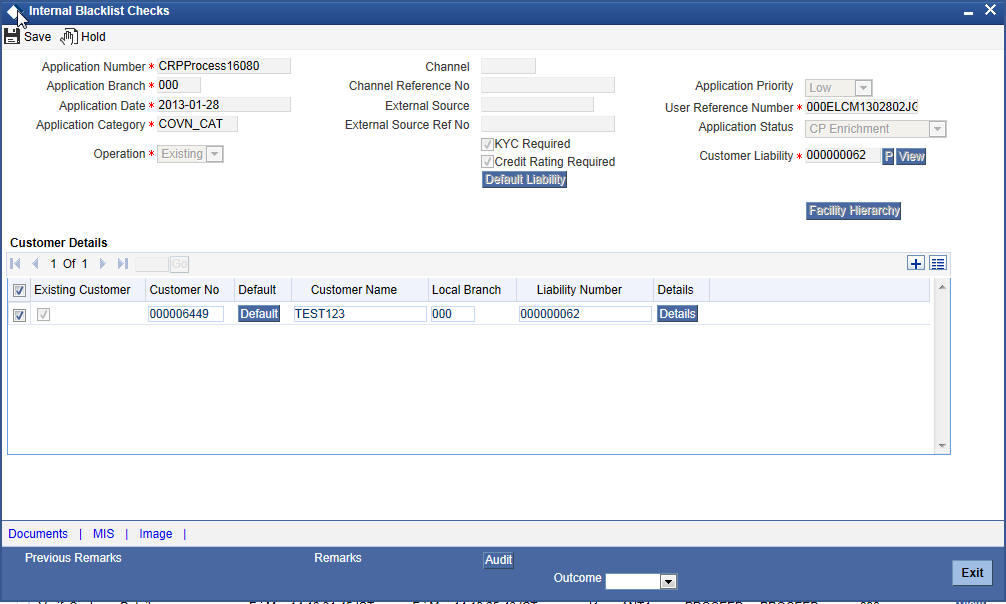
Click ‘Details’ in the ‘Internal Blacklist Checks’ screen to invoke ‘Customer Details’ screen.
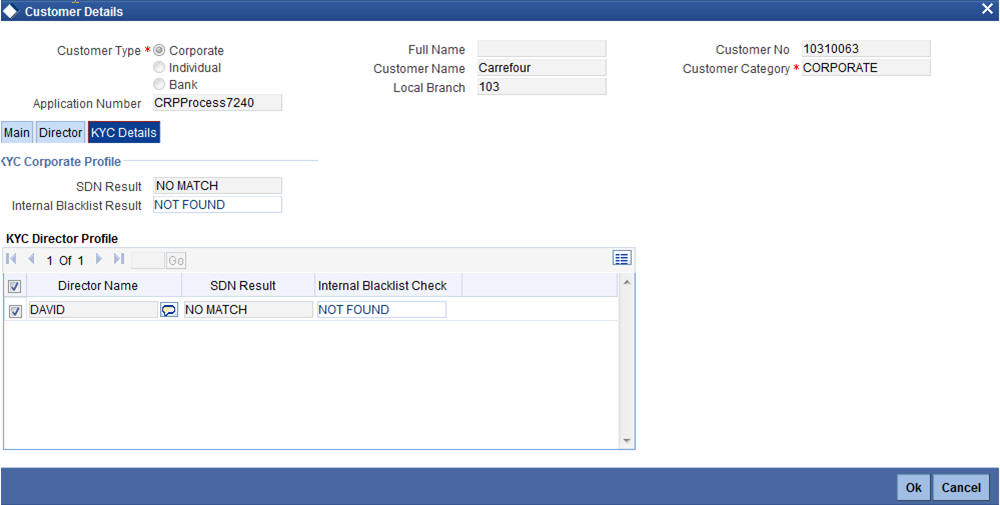
In this screen, you can view the applicant’s details. If the applicant’s name is listed in the bank's internal list of global blacklisted customers, you can report it to the internal authorities of the bank. You can continue with the process of creating account only when the customer passes these checks. Select the outcome as ‘PASSED’ and save the record by clicking the save icon in the tool bar.
The system displays the message ‘The task is completed successfully’.
Click ‘Ok’ button. You are taken back to the ‘Internal Blacklist Checks’ screen. Click ‘Exit’ button to exit the screen. The task is then moved to the next activity.
3.6 Verify Customer Contact Details
Users belonging to the user role ‘KYCEROLE’ (KYC Executive) can perform these activities.
Go to the pending list in the system. The system displays all the pending activities. Click ‘Acquire’ button adjoining the ‘Internal Blacklist Check’ task to acquire it. The system displays the information message as "..xxx Acquire Successful"
If you have requisite rights, double click on the task in your ‘Assigned’ task list and invoke the following screen:
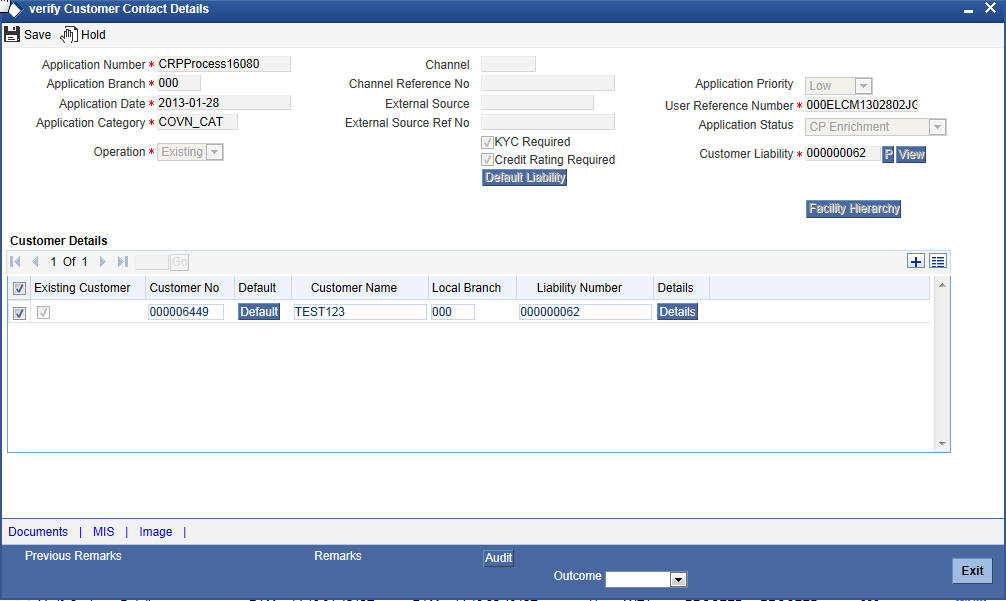
Click ‘Details’ in the ‘Verify Customer Contract Details’ screen to invoke ‘Customer Details’ screen.

In this screen, you can view the applicant’s details. As per the bank’s mandated policy, you will have to perform the customer identification check. This involves verification of customer address, phone number, and so on. You can enter the outcome of various stages in the Audit block for the verifier to make a decision. After verification, select the outcome as ‘PROCEED’ and save the record by clicking the save icon in the tool bar.
The system displays the message ‘The task is completed successfully’.
Click ‘Ok’ button. You are taken back to the ‘Verify Customer Contact Details’ screen. Click ‘Exit’ button to exit the screen. The task is then moved to the next activity.
As per the bank’s mandated policy, you have to check other details like verification of the employer information, verification of the income information, sources and uses of funds so on.
Users belonging to the user role ‘KYCEROLE’ (KYC Executive) can perform these activities.
Go to the pending list in the system. The system displays all the pending activities. Click ‘Acquire’ button adjoining the ‘OtherKYCChecks’ task to acquire it. The system displays the information message as "..xxx Acquire Successful"
If you have requisite rights, double-click on the task in your ‘Assigned’ task list and invoke the following screen:

Click ‘Details’ in the ‘Other KYC Checks’ screen to invoke ‘Customer Details’ screen.
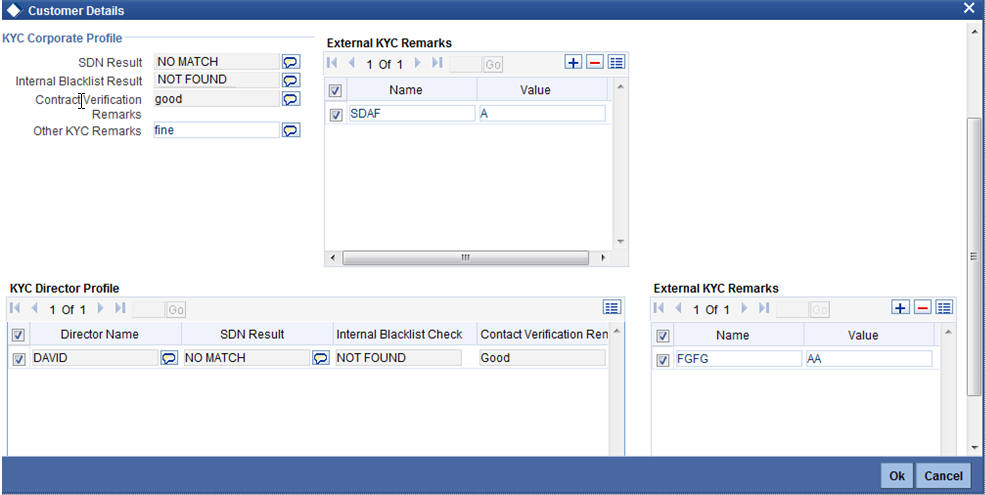
In this screen, you can view and verify the applicant’s details. After verifying the details, select the outcome as ‘PROCEED’ and save the record by clicking the save icon in the tool bar.
The system displays the message ‘The task is completed successfully’.
Click ‘Ok’ button. You are taken back to the ‘Other KYC Checks’ screen. Click ‘Exit’ button to exit the screen. The task is then moved to the next activity.
After verifying and evaluating the KYC information, bank decides whether it should enter into a relationship with the prospect/continue relationship (in case of an existing relationship) or not.
Users belonging to the user role ‘KYCMROLE’ (KYC Manager) can perform these activities.
Go to the pending list in the system. The system displays all the pending activities. Click ‘Acquire’ button adjoining the ‘KYCDecision’ task to acquire it. The system displays the information message as "..xxx Acquire Successful".
If you have requisite rights, double click on the task in your ‘Assigned’ task list and invoke the following screen:
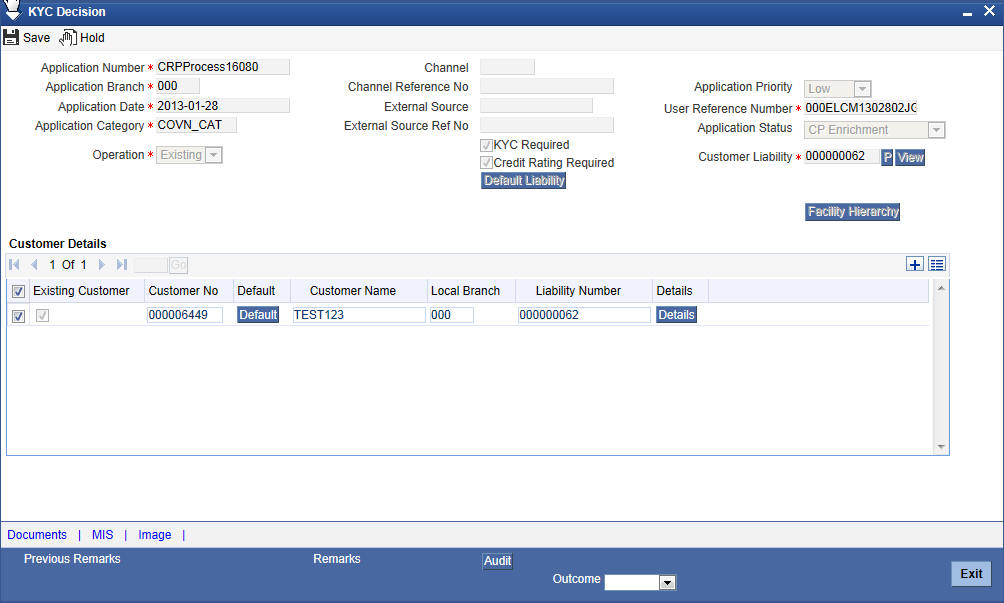
Click ‘Details’ in the ‘KYC Decision’ screen to invoke ‘Customer Details’ screen.
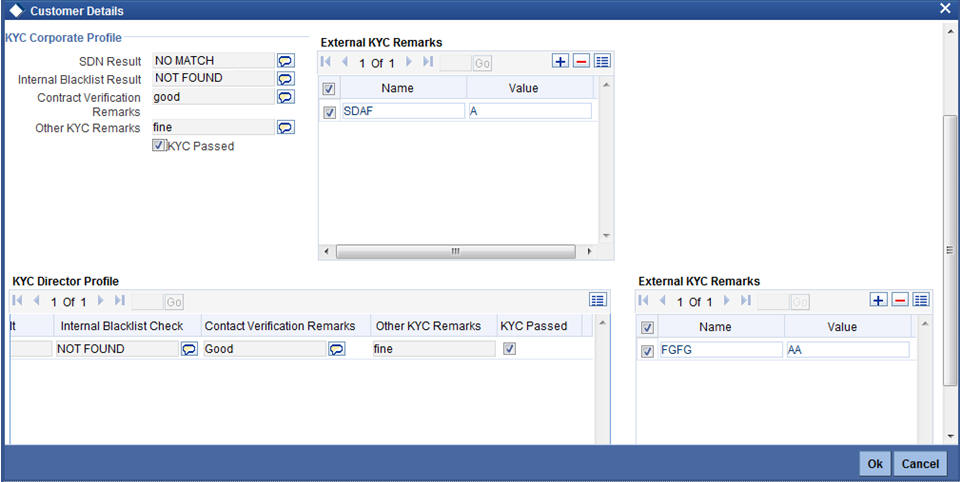
In this screen, you can view the complete information of the applicant. The outcome of various stages of KYC sub process is displayed in the Audit block. Based on these information, you can inform the customer if you enter into a relationship with the prospect/continue relationship (in case of an existing relationship) or not as part of the parent process.
Based on the decision, select the outcome as ‘FAILED’ or ‘PASSED’ and save the record by clicking the save icon in the tool bar.
The system displays the message ‘The task is completed successfully’.
Click ‘Ok’ button. You are taken back to the ‘KYC Decision’ screen. Click ‘Exit’ button to exit the screen. The task is then moved to the Main process.
Step 4. Initiate Credit Rating sub-process
In this stage the system automatically initiates the existing Credit rating sub process to perform the Credit rating process.
It is an auto stage, the system invokes the service without any Human intervention.
Step 5. Credit Review and Scoring
After performing credit rating process, the system will take you to the credit review and scoring stage.
The actual tasks are available in the proposal structuring stage only when the following stages are completed successfully. In case any one of the stage is not completed, the task is not available in the proposal structuring stage:
- Initiate KYC Approval sub-process
- Initiate Credit Rating sub-process
- Credit Review & Scoring
- Risk Evaluation
Task remains in the credit review and scoring stage unless you select the outcome as ‘PROCEED’.
Go to the pending list in the system. The system displays all the pending activities. Click ‘Acquire’ button adjoining the ‘Credit Review and Scoring’ task to acquire it. The system displays the information message as "..xxx Acquire Successful"
If you have requisite rights, double-click on the task in your ‘Assigned’ task list and invoke the following screen:
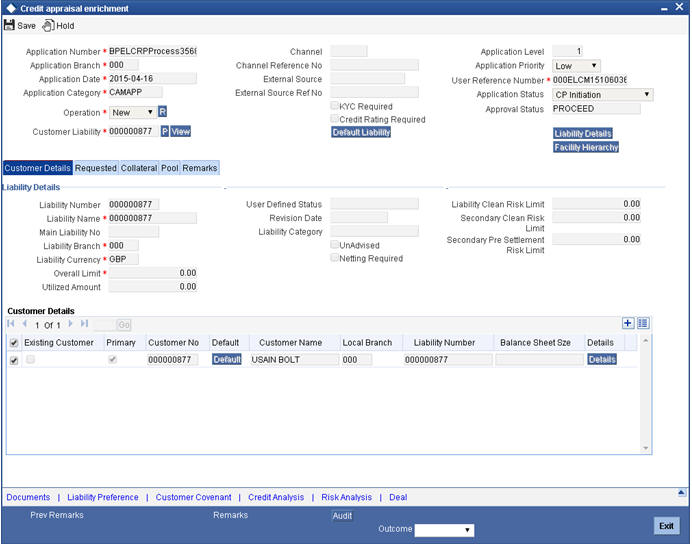
In this screen, you can view the complete information of credit and scoring of the applicant.
5.1 Credit Evaluation
Click ‘Financial Analysis’ button in the ‘Credit appraisal review and scoring’ screen to invoke ‘Credit Evaluation’ screen to view the credit risk, model server, and credit agency details.
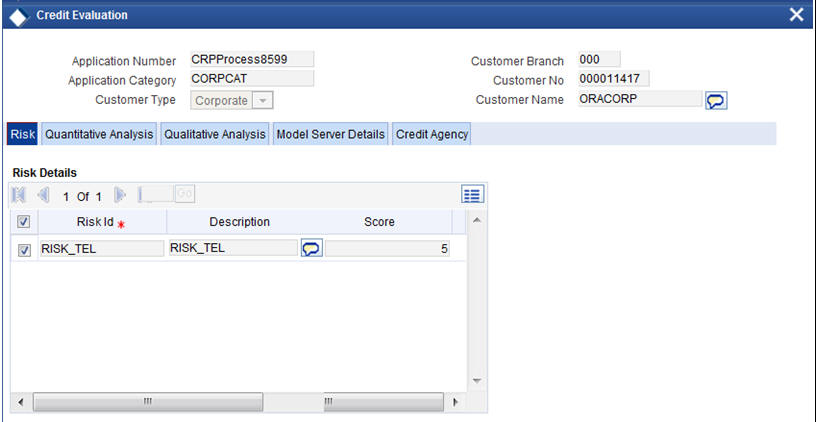
To acquire the next stage, you need to go to the ‘Task’ menu and select ‘Assigned’ under ‘Standard’ option. All tasks that have been successfully completed are listed on the right side of the screen. Select the check box against your ‘Workflow Ref No’ and click ‘Acquire’ button at the top of the screen to acquire the next stage of the task.
The system displays the system message as “xxx Acquire Successful” on successful acquisition of the task.
Click ‘Ok’ to proceed to the next stage. To select the acquired task for the next stage, select ‘Acquired’ under ‘Standard’ option in the ‘Task’ menu. All the tasks that have been successfully acquired are displayed on the right side of the screen. Search for your workflow reference number and click the ‘Workflow Ref No’ to open ‘Credit appraisal risk evaluation’ screen.
Step 6. Risk Evaluation
After performing credit rating process, the system takes you to the credit review and scoring stage.
The actual tasks are available in the proposal structuring stage only when the following stages are completed successfully. In case any one of the stages are not completed, the task is not available in the proposal structuring stage:
- Initiate KYC Approval sub-process
- Initiate Credit Rating sub-process
- Credit Review & Scoring
- Risk Evaluation
Task remains in the credit appraisal risk evaluation stage unless you select the outcome as ‘PROCEED’.
Go to the pending list in the system. The system displays all the pending activities. Click ‘Acquire’ button adjoining the ‘Credit appraisal risk evaluation’ task to acquire it. The system displays the information message as "..xxx Acquire Successful"
If you have requisite rights, double click on the task in your ‘Assigned’ task list and invoke the following screen:
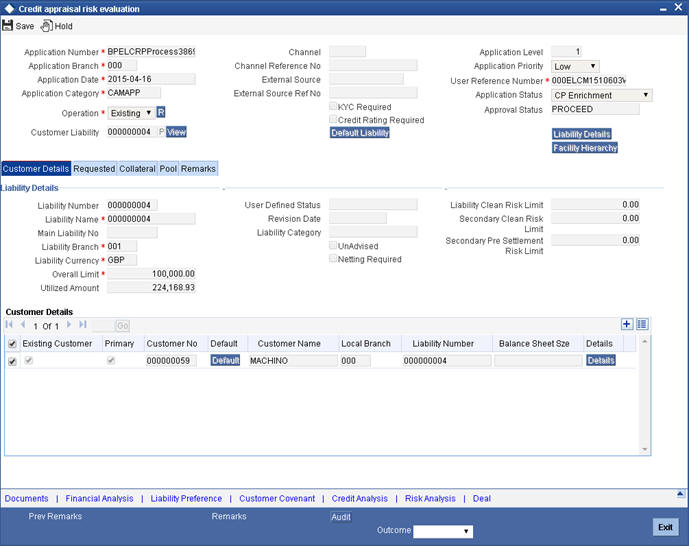
In this screen, you can view the complete information of credit appraisal risk evaluated of the applicant.
6.1 Credit Evaluation
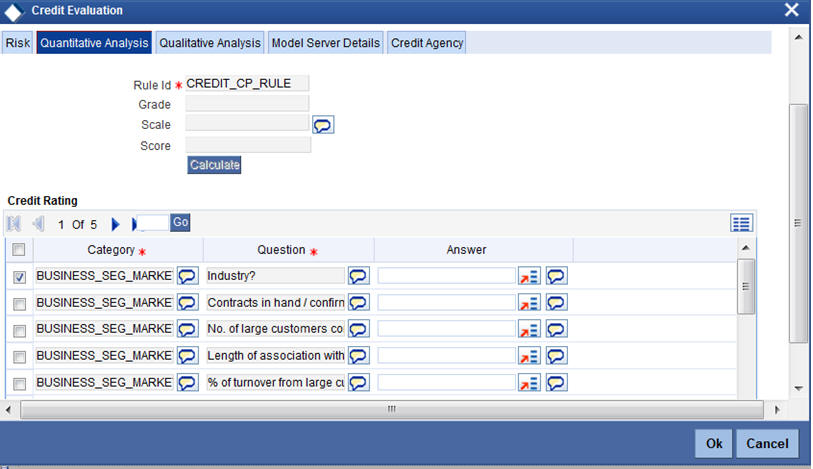
Click ‘Financial Analysis’ button in the ‘Credit appraisal review and scoring’ screen to invoke ‘Credit Evaluation’ screen to view the quantitative analysis, qualitative analysis and model server details.
6.2 Credit Analysis
You can capture the details required for credit analysis in the Credit Analysis sub system. Click 'Credit Analysis' button. This button is enabled only during Credit Evaluation and Credit Scoring stages.
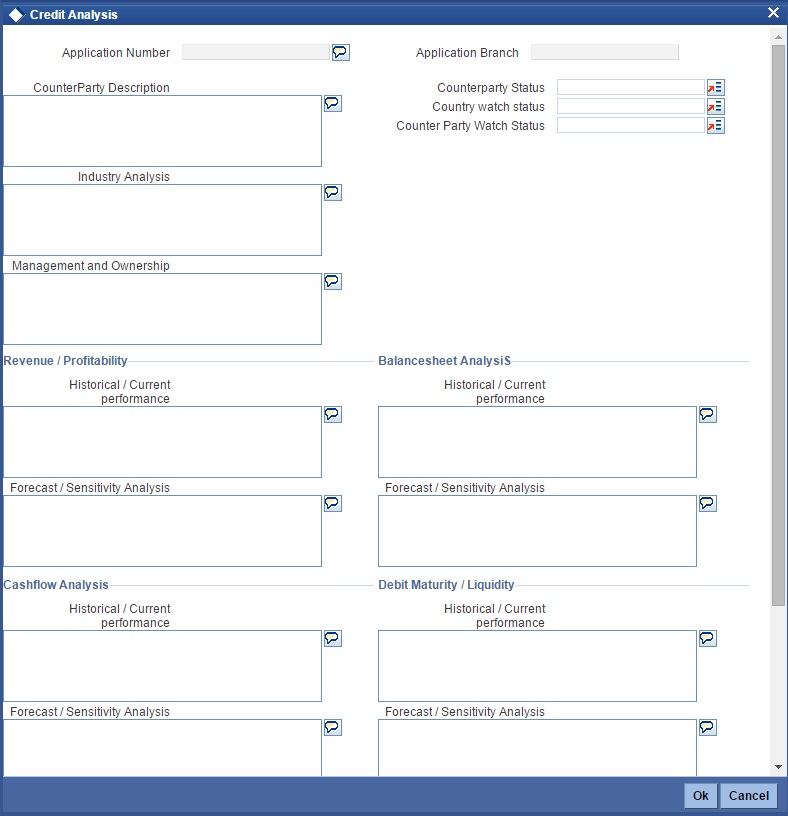
Specify the following details:
Application Number
The system displays the application number.
Application Category
The system displays the application category.
Counterparty Description
Specify a short description about the counter party as per the credit analysers’ view.
Counterparty Status
Specify the status of the counterparty. You can select one of the following statuses:
- .gold
- .platinum
- .silver
Country Watch Status
Specify the watch status of the country. You can select one of the following watch statuses from the option list.
- .watch black
- .watch amber
- .watch red
- .yellow
Counterparty Watch Status
Specify the watch status of the counterparty. You can select one of the following watch statuses from the option list.
- Performing
- Underperforming
- Watch Amber
- Watch Red
Industry Analysis
Specify a short description about the industry level analysis report as per credit analyser's view.
Management and Ownership
Specify a short description about the management and the ownership of the counterparty from credit analyser’s point of view.
Revenue Profitability
Historical-Current Performance
Specify the historical and current performance of applicant towards revenue and profitability.
Forecast/Sensitivity Analysis
Specify the details of forecast and sensitivity analysis of applicant towards revenue and profitability.
Balance Sheet Analysis
Historical-Current Performance
Specify the historical and current performance of applicant towards balance sheet analysis.
Forecast/Sensitivity Analysis
Specify the details of forecast and sensitivity analysis of applicant towards balance sheet analysis.
Cashflow Analysis
Historical-Current Performance
Specify the historical and current performance of applicant towards cash flow analysis.
Forecast/Sensitivity Analysis
Specify the details of forecast and sensitivity analysis of applicant towards cash flow analysis.
Debit Maturity/Liquidity
Historical-Current Performance
Specify the historical and current performance of applicant towards debit maturity and liquidity.
Forecast/Sensitivity Analysis
Specify the details of forecast and sensitivity analysis of applicant towards debit maturity and liquidity.
Primary Source of Payment
Specify the primary source of payment.
Secondary Source of Payment
Specify the secondary source of payment.
6.3 Credit Risk
You can capture the details related to credit risk in the ‘Credit Risk’ sub system. Click 'Credit Risk' button. This button is enabled only during Credit Evaluation and Credit Scoring stages.
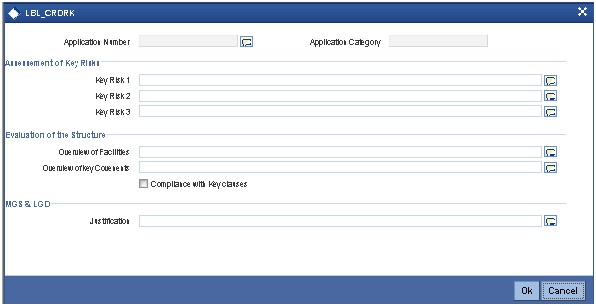
Specify the following details:
Application Number
The system displays the application number.
Application Category
The system displays the application number.
Key Risk Assessment
Key Risk 1
Specify the first key risk factor.
Key Risk 2
Specify the second key risk factor.
Key Risk 3
Specify the third key risk factor.
Evaluation of Structure
Overview of Facilities
Specify a short overview of the facilities.
Overview of Key Covenants
Specify a short overview of the key covenants.
Compliance with Key Clauses
Specify compliance of the application with key clauses. You can specify one of the following values.
- Y (Yes)
- N (No)
MGS & LGD
Justification
Specify a brief justification for MSG and LGD.
6.4 Pipeline Analysis
To process pipeline analysis data, click the ‘Pipeline Analysis’ button. You can subsequently generate the pipeline analysis reports by clicking the ‘Analysis Summary’ button.

The following details are displayed in this report:
Application Number
The system displays the application reference number of the prospective customers.
Branch Code
The system displays the branch code from the adjoining option list.
On the click of the ‘Populate’ button the system populates the list of pipeline facilities and the corresponding prospective customer details. This button is applicable only for generating the Questionnaire Report for specific customers. For the remaining reports, you need not click this button. The following details are populated on clicking this button:
Select
Select a customer or customers based on which the questionnaires report is generated.
Customer Number
The system displays the identification number of the prospective customer.
Customer Name
The system displays the customer name of the prospective customer.
Liability Number
The system displays the liability number of the prospective customer.
Category
The system displays the category of the customer such as corporate and so on.
Type
The system displays the type of customer.
Balance Sheet Size
The system displays the balance sheet size which is classified based on the amount range.
To view the reports click any one of the following buttons:
- Financial Ratio Analysis Report
- Questionnaires Report
- External Agency Analysis Report
- Exposure Analysis Report
Details on the each of these reports are provided in the subsequent sections.
3.3.18 Deal Information
You can capture the purpose of the application in Deal sub screen. Based on the details provided here, you can structure the deal amount into respective lines and sub lines.

Specify the following details:
Deal Description
Specify a brief description of the deal.
Comments
Specify additional comments, if any.
Project Start Date
Specify the project start date.
Project End Date
Specify the project end date.
Gestation Period (in months)
Specify the gestation period in months.
Deal Currency
Specify the deal currency. You can select the appropriate one from the option list.
Deal Amount
Specify the total deal amount.
Anticipated IRR
Specify the anticipated internal rate of return.
Projected Operation Date
Specify the projected operation date.
Capital Outlay
Specify the capital outlay.
Organization Share
Specify the overall equity held by the organization.
From Public
Specify the equity held by the public.
From Equity Partners
Specify the equity held by partners.
Collateralized Debt
Specify the total collateralized debt.
Non-collateralized Debt
Specify the total non-collateralized debt.
Projected Cash flow - Year
Specify the projected cash flow year.
Projected Cash flow - Currency
Specify the cash flow currency.
Projected Cash flow - Amount
Specify the projected cash flow amount.
Projected Revenue - Year
Specify the projected revenue.
Projected Revenue - Currency
Specify the revenue currency.
Projected Revenue - Amount
Specify the revenue amount.
The system generates Customer Acceptance Advice. This advice contains details of facility structure, proposal audit, collaterals details, pool details, and application approvals along with terms and conditions. This advice is sent to the customer for acknowledgement. If the customer accepts the proposal, a signed acknowledged is uploaded into the system for reference.
To acquire the next stage, you need to go to the ‘Task’ menu and select ‘Assigned’ under ‘Standard’ option. All tasks that have been successfully completed are listed on the right side of the screen. Select the check box against your ‘Workflow Ref No’ and click ‘Acquire’ button at the top of the screen to acquire the next stage of the task.
The system displays the system message as “xxx Acquire Successful” on successful acquisition of the task.
Click ‘Ok’ to proceed to the next stage. To select the acquired task for the next stage, select ‘Acquired’ under ‘Standard’ option in the ‘Task’ menu. All the tasks that have been successfully acquired are displayed in the right side of the screen. Search for your workflow reference number and click the ‘Workflow Ref No’ to open ‘Credit appraisal proposal structure’ screen.
Step 7. Proposal Structuring
Task remains in the credit appraisal risk evaluation stage unless you select the outcome as ‘PROCEED’.
Go to the pending list in the system. The system displays all the pending activities. Click ‘Acquire’ button adjoining the ‘Credit appraisal proposal structure’ task to acquire it. The system displays the information message as "..xxx Acquire Successful"
7.1 Pricing Tab
If you have requisite rights, double click on the task in your ‘Assigned’ task list and invoke the following screen:
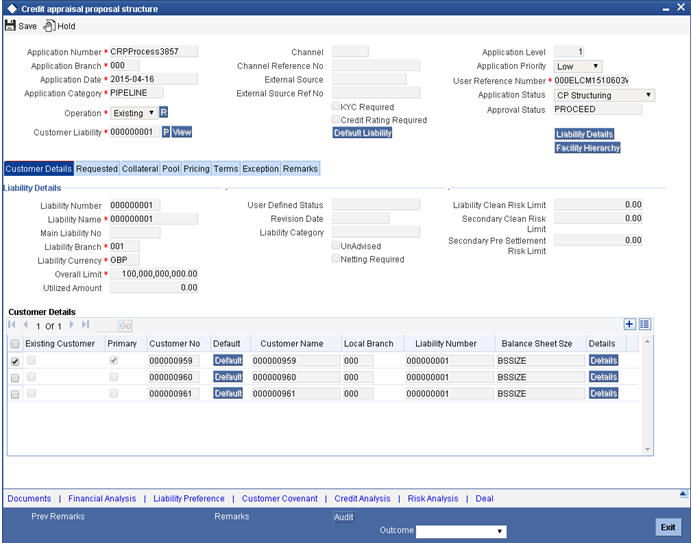
7.2 Calculating RAROC
The system calculates the risk adjusted return on capital (RAROC) using ‘RAROC Calculation’ screen. You can invoke this screen by clicking ‘Raroc’ button in the ‘Credit appraisal proposal structure’ screen.
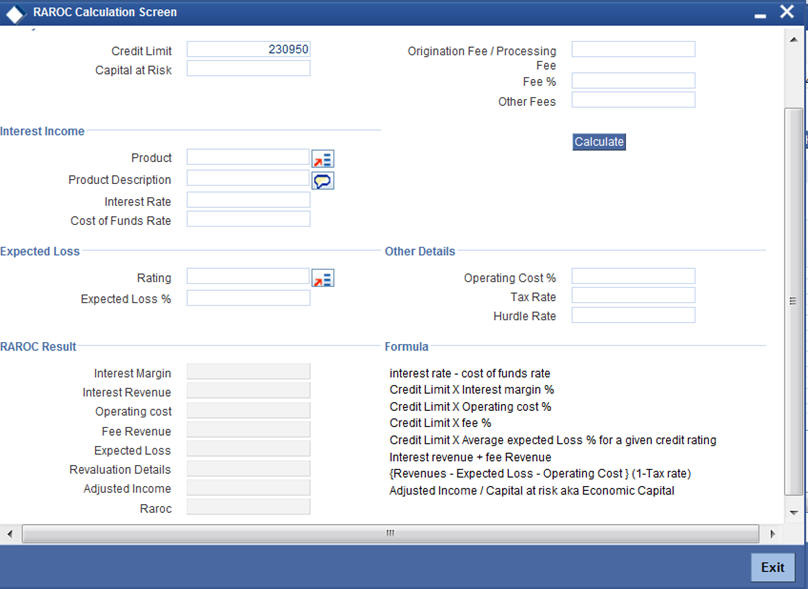
7.3 Terms Tab
In this screen you can view the terms and condition details:
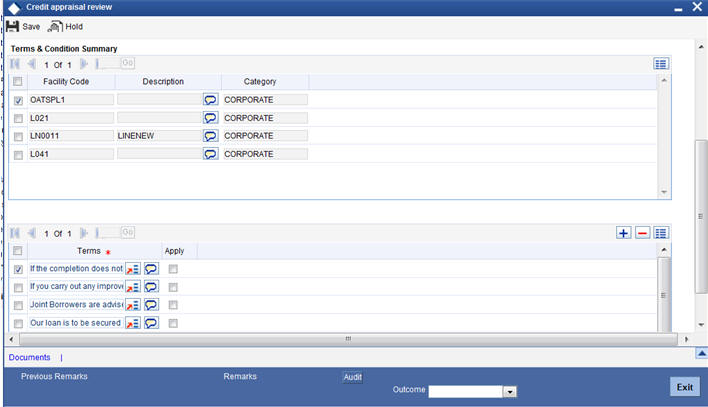
7.4 Exception Tab
In this screen, you can view the facility exception details.
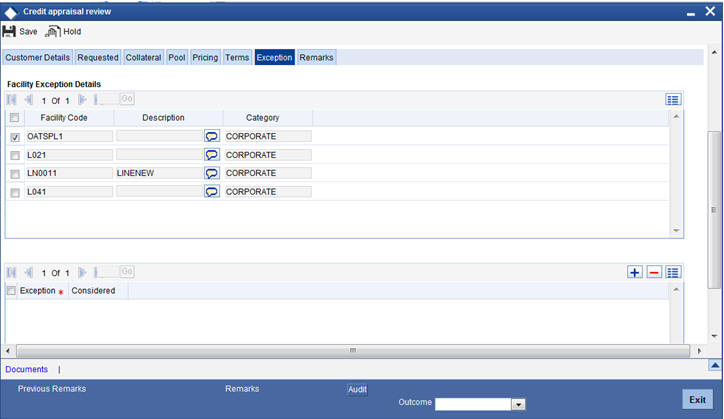
To acquire the next stage, you need to go to the ‘Task’ menu and select ‘Assigned’ under ‘Standard’ option. All tasks that have been successfully completed are listed on the right side of the screen. Select the check box against your ‘Workflow Ref No’ and click ‘Acquire’ button at the top of the screen to acquire the next stage of the task.
The system displays the system message as “xxx Acquire Successful” on successful acquisition of the task.
Task moves to Credit appraisal enrichment stage, if you select ‘ADDITIONAL_INFO’ as the outcome and save the task.
Click ‘Ok’ to proceed to the next stage. To select the acquired task for the next stage, select ‘Acquired’ under ‘Standard’ option in the ‘Task’ menu. All the tasks that have been successfully acquired are displayed in the right side of the screen. Search for your workflow reference number and click the ‘Workflow Ref No’ to open ‘Credit appraisal review’ screen.
Step 8. Recommendation & Review
Task are moved to Recommendation & Review stage, when the user has selected ‘PROCEED’ as the outcome and save the task.
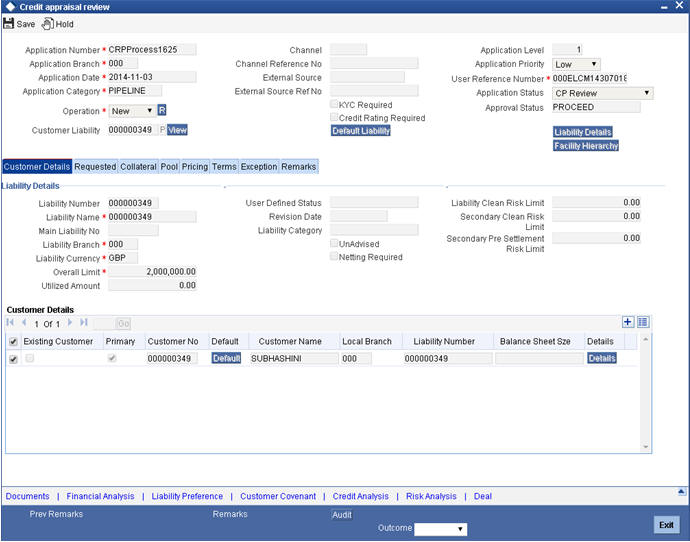
To acquire the next stage, you need to go to the ‘Task’ menu and select ‘Assigned’ under ‘Standard’ option. All tasks that have been successfully completed are listed in the right side of the screen. Select the check box against your ‘Workflow Ref No’ and click ‘Acquire’ button at the top of the screen to acquire the next stage of the task.
The system displays the system message as “xxx Acquire Successful” on successful acquisition of the task.
Task moves to Credit appraisal enrichment stage, if you select ‘ADDITIONAL_INFO’ as the outcome and save the task.
Click ‘Ok’ to proceed to the next stage. To select the acquired task for the next stage, select ‘Acquired’ under ‘Standard’ option in the ‘Task’ menu. All the tasks that have been successfully acquired are displayed in the right side of the screen. Search for your workflow reference number and click the ‘Workflow Ref No’ to open ‘Credit appraisal approval’ screen.
Step 9. Approval
Task is moved to approval stage, when the user has selected ‘PROCEED’ as the outcome and save the task.
The finalized reviewed application will be sent along with review writing to senior management/ Credit proposal approver for final approval.
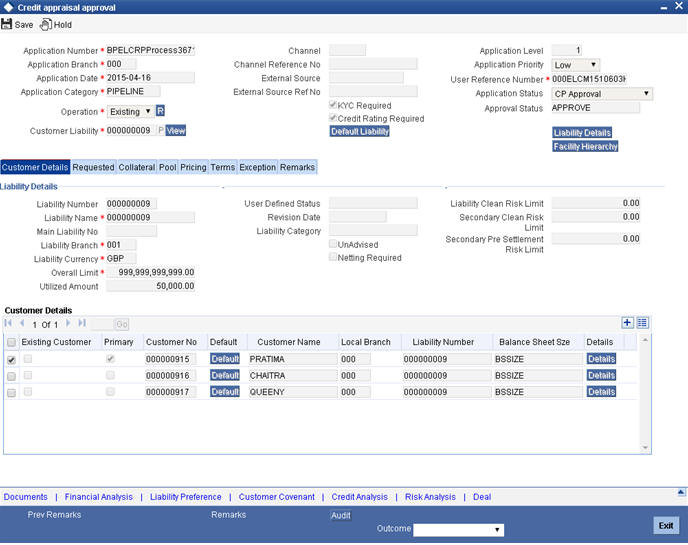
To acquire the next stage, you need to go to the ‘Task’ menu and select ‘Assigned’ under ‘Standard’ option. All tasks that have been successfully completed are listed in the right side of the screen. Select the check box against your ‘Workflow Ref No’ and click ‘Acquire’ button at the top of the screen to acquire the next stage of the task.
The system displays the system message as “xxx Acquire Successful” on successful acquisition of the task.
Task moves to Proposal Structuring stage, if you select ‘ADDITIONAL_INFO’ as the outcome and save the task. The reviewer can send back the proposal application for capturing the additional essential information to the initiator who has prepared the proposal.
Task is moved to Recommendation and Review stage, if you select ‘REVIEW’ as the outcome and save the task.
Click ‘Ok’ to proceed to the next stage. To select the acquired task for the next stage, select ‘Acquired’ under ‘Standard’ option in the ‘Task’ menu. All the tasks that have been successfully acquired are displayed in the right side of the screen. Search for your workflow reference number and click the ‘Workflow Ref No’ to open ‘Customer Acceptance’ screen.
Step 10. Draft Facility Document Generation
In this stage the system automatically initiates the generation of draft facility documents.
It is an auto stage, the system invokes the service without any Human intervention and continue the process to next stage.
Step 11. Customer Acceptance
Task is moved to acceptance stage, when the user has selected ‘ACCEPTED’ as the outcome and save the task.
After the approval, the sanctioned credit proposal package is sent to customer for acceptance. The approver can send back to the reviewer for getting additional details which are essential for sanctioning the credit limit.
The customer can accept the sanctioned proposal or can renegotiate the sanctioned limit by providing additional details like new collaterals or evaluating the collaterals and propose to increase the limit. A detailed renegotiation request from the customer is documented and attached along with the task while sent for renegotiation.
The negotiated application is re-evaluated by the approver or reviewer and change the limits accordingly. The finalized approved limit is sent to customer for acceptance.
After customer acceptance, the sanctioned liability, facility and collaterals are systematically handed over to ELCM by invoking the Liability, facility and collateral creation/ modification services, for new customer / modification of the existing customer details, the core (STDCIF) call will be invoked to create a customer/ modification of the existing customer in Core system. For existing customer, the liability is linked through the ELCM services.
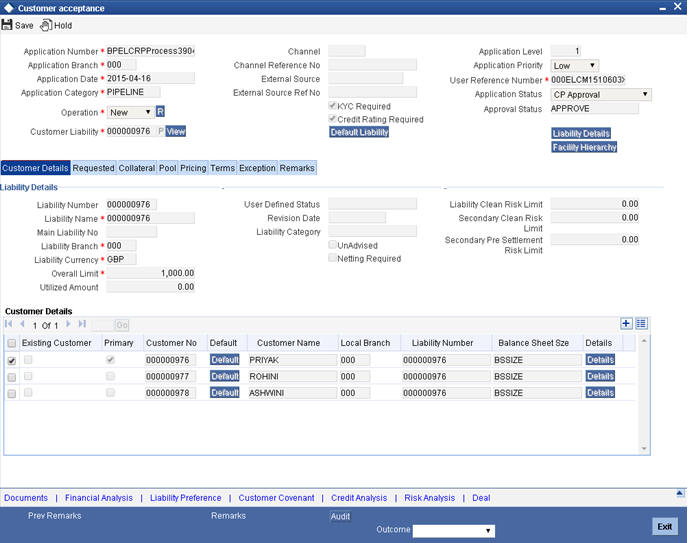
To acquire the next stage, you need to go to the ‘Task’ menu and select ‘Assigned’ under ‘Standard’ option. All tasks that have been successfully completed are listed in the right side of the screen. Select the check box against your ‘Workflow Ref No’ and click ‘Acquire’ button at the top of the screen to acquire the next stage of the task.
The system displays the system message as “xxx Acquire Successful” on successful acquisition of the task.
Task is moved to Approval stage, if you select ‘NEGOTIATE’ as the outcome and save the task.
Task is moved to termination stage, if you select ‘NOT ACCEPTED’ as outcome and save the task. Once the task is moved to termination activity, it will not be available for further activities.
Click ‘Ok’ to proceed to the next stage. To select the acquired task for the next stage, select ‘Acquired’ under ‘Standard’ option in the ‘Task’ menu. All the tasks that have been successfully acquired are displayed in the right side of the screen. Search for your workflow reference number and click the ‘Workflow Ref No’ to go to next stage.
Customer Acceptance Advice
The system generates a Customer Acceptance Advice. This advice contains details of facility structure, proposal audit, collaterals details, pool details, and application approvals along with terms and conditions. This advice is sent to the customer for acknowledgement. If the customer accepts the proposal, a signed acknowledged is uploaded into the system for reference.
Step 12. Facility Document Generation
In this stage the system automatically initiates the generation of facility documents. It is an auto stage, the system invokes the service without any Human intervention and continue the process to next stage.
Step 13. DB Hand off
In this stage the system automatically invokes the DB adaptor call to hand off the Facility details to ELCM. The successful completion of the Facility creation process.
For any exceptions like, unavailability of ELCM services or error while handoff the details, task is moved to Hand off retry stage.
Step 14. Hand off Retry
The system invokes the DB adaptor call to hand off the Facility details
to ELCM.
For any exceptions like, unavailability of ELCM services or error while
handoff the details, task is moved to Hand off retry stage. The retry
counter is incremented accordingly.
For any technical issue like service unavailability / data issues, manual re-try option is provided for re-uploading of Liability details to ELCM.
You can invoke ‘Manual Credit appraisal’ screen by typing ‘ORDLPRTY’ in the field at the top right corner of the Application tool bar and clicking the adjoining arrow button.
