3. Maintenances
3.1 Introduction
As part of general maintenance required for the successful functioning of Dashboard, you should maintain the following in the system:
- Origination Dashboard Maintenance
- Origination Dashboard Role Maintenance
3.2 Maintaining Origination Dashboard Details
You can maintain dashboard related information using the ‘Origination Dashboard Maintenance’ screen. You can invoke this screen by tying ‘ORDDSHMT’ in the field at the top right corner of the Application tool bar and clicking the adjoining arrow button.
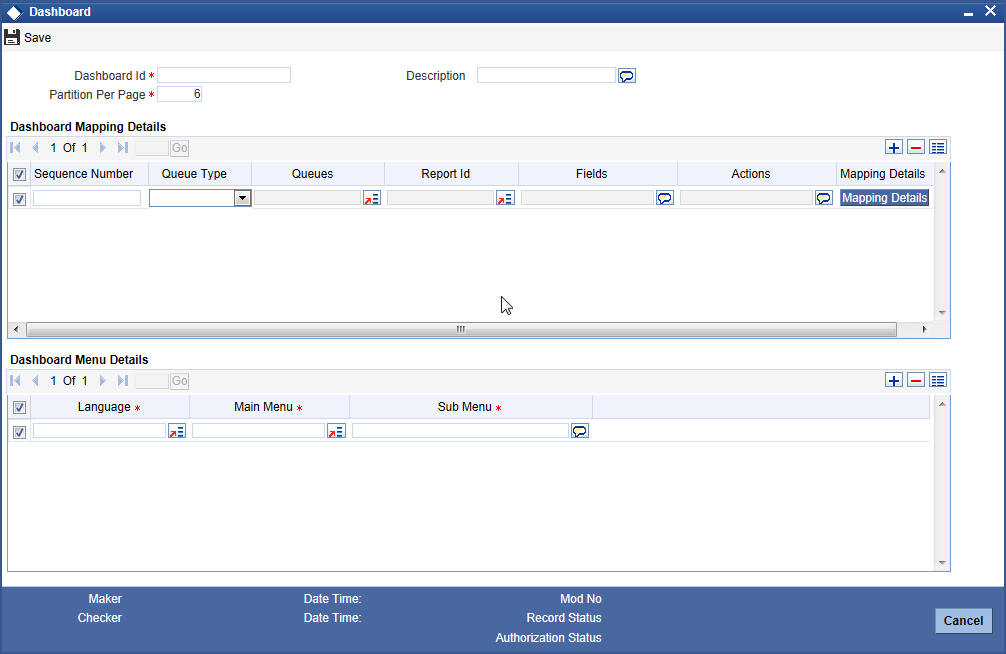
Specify the following details:
Dashboard Id
Specify the dashboard id here.
Description
Specify a brief description of the dashboard.
Partition Per Page
Specify the maximum number of partitions to be displayed in each dashboard page. This should be a number between 1 and 6. The minimum partition required is one and the maximum partitions allowed are 6.
Dashboard Mapping Details
Sequence Number
Specify the sequence number for the dashboard. It is used to sequence the order in which the frames are displayed in dashboard.
Queue Type
Select the queue type from the adjoining drop-down list. This list displays the following values:
- Queue - If you select this option, then system displays all valid queue ids in the ‘Queue Id’ option list.
- Count - If you select this option, then system displays the title for the frame selected.This is used when you want to configure a summary dashboard having multiple queue and their corresponding count.
Queues
If the ‘Queue Type’ is ‘Queue’, then the adjoining option list displays all valid queue ids maintained in the system. If the ‘Queue Type’ is ‘Count’, then the adjoining option list displays the title for the view.
Report ID
Select the report id for the dashboard from the adjoining option list. This list displays all valid report ids maintained in the system.
Fields
System displays the fields of the dashboard here, based on the fields selected from the ‘Mapping Details’ screen.
Actions
System displays the fields of the dashboard here, based on the fields selected from the ‘Mapping Details’ screen.
Dashboard Menu Details
Main Menu
Specify the main menu name here,
Language
Specify the language code of the dashboard.
Sub Menu
Specify the name of the sub menu.
3.2.1 Specifying the Mapping Details
You can select the fields and actions by clicking the ‘Mapping Details’ button in the ‘Origination Dashboard Maintenance’ screen. This screen is used to select the action and columns that you want to perform on a particular frame of the dashboard ..
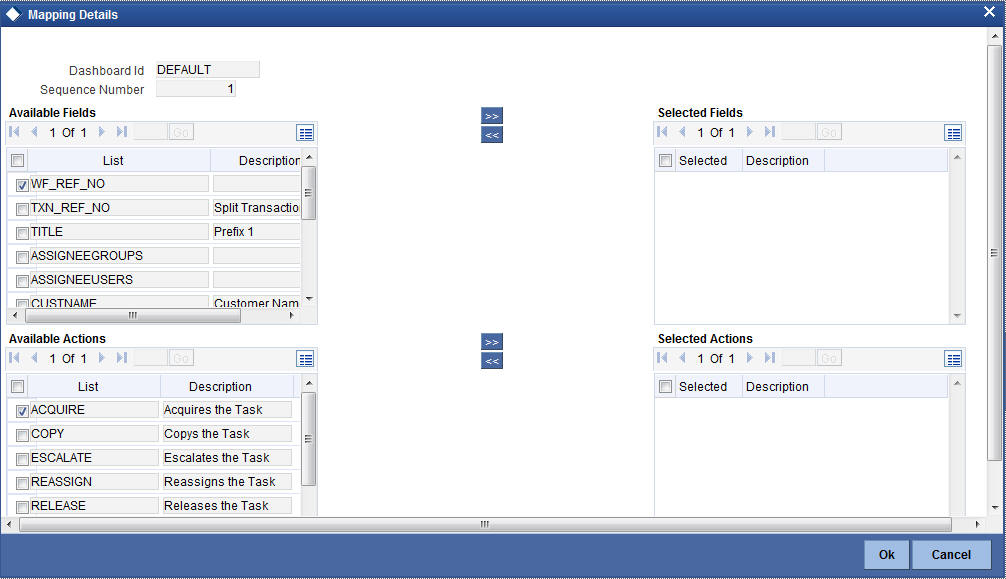
In this screen, you can select the required fields and actions for the dashboard from the Available Fields and Available Actions. Available fields displays all the queues maintained from SMDQUEMT screen, if the option selected is Count in queue type. Available action displays all the actions listed in the header of the task bar. On clicking the right-arrow button, system moves the selected fields and actions to the Selected Fields and Selected Actions sections respectively. Similarly, to de-select an action or a field, click the left-arrow button. Available fields displays blank if the queue type is selected queue and if the option is selected as ‘Queue’.The mapping details are not allowed if the queue type is selected as BAM. The system displays an error message as “No field mappings available for selected queue criteria”.
3.3 Mapping Dashboard and Alerts to User Roles
You can define the role and user for each dashboard using the ‘Origination Dashboard Role Maintenance’ screen. You can invoke this screen by typing ‘ORDDSHRL’ in the field at the top-right corner of the Application tool bar and clicking the adjoining arrow button.
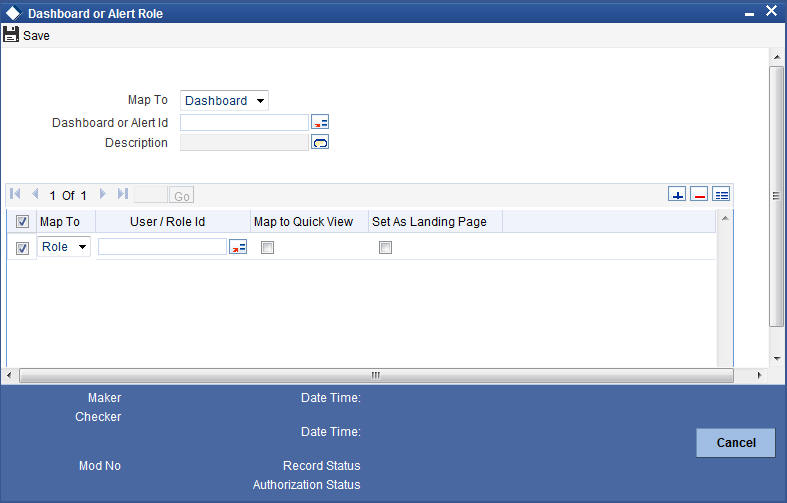
Specify the following details:
Map to
You can map user role to alert or dashboard. Select the appropriate option, that is,.Alert or Dashboard from the option list.
Dashboard or Alert ID
Specify the alert ID or dashboard ID that you need to map to user roles.
If you are mapping the user role to a dashboard, then specify the dashboard ID.
If you are mapping the user role to an alert, specify the alert code here.
You can select the appropriate one from the option list. The option list will display all valid dashboard IDs or alerts IDs maintained in the system, based on what is selected under ‘Map to’.
Description
System displays the description for the selected dashboard id.
Map To
Select the dashboard mapping from the adjoining drop-down list. This list displays the following values:
- Role - f you select this option, then you can map the dashboard user with specific roles.
- User - If you select this option, then you can map the dashboard to a user.
User/Role Id
Select the user id or role id (based on the mapping type) from the adjoining option list. This list displays all valid user ids and roe ids maintained in the system. You can select the appropriate one.
Map to Quick View
Check this box to indicate that the dashboard should be included in the Quick View frame in the left corner of the ‘Tasks’ tab of Oracle FLEXCUBE, for a specific user or role.
Set as Landing Page
Check this box to set this dashboard as the landing page dashboard. If you check this option, the user will see this as the default dashboard when navigated to the ‘Tasks’ tab of Oracle FLEXCUBE.
If a dashboard is mapped as default for a role or user id, then you cannot map another dashboard as default. The system displays an error as “User /Role already has default dashboard” in such case.
If there are different dashboards mapped to role and user id having the same role, then dashboard mapped to the user id will take precedence over the dashboard mapped as default for the role.