5. Alerts
5.1 Introduction
This chapter discusses the user alerts feature of Oracle FLEXCUBE. The alerts from the system and other sources such as BIP, BAM, and external sources are processed and dispatched to the users based on the subscriptions and filter criteria maintained.
5.2 Maintaining Alerts
You can maintain the details pertaining to alerts using ‘Alert Maintenance’ screen. To invoke the screen, type ‘ORDALRTM’ in the field at the top right corner of the application toolbar and click the adjoining arrow button.
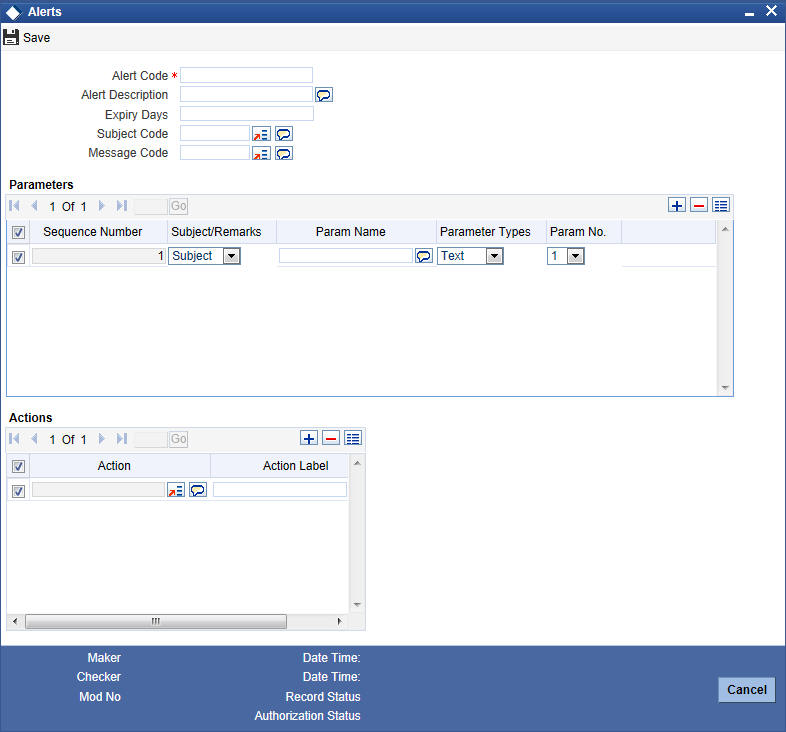
Specify the following details:
Alert Code
Specify a unique alert code to identify the alert that you are maintaining.
Alert Description
Specify a brief description of the alert.
Expiry Days
Specify the number of days to pass for the alert to expire. The alert is active for the number of expiry days that you specify here.
Subject Code
Select the subject code from the option list. The option list displays valid error codes maintained in the system.
Message Code
Select the message code from the option list. The option list displays valid error codes maintained in the system.
Parameters
Sequence Number
The system displays the sequence number of the parameter.
Subject/Remarks
Specify whether the parameter being defined is for the subject of the alert or for the message of the alert. You can select one of the following options from the drop down list:
- Subject
- Message
Parameter Name
Specify a name for the parameter.
Parameter Type
Specify the type of parameter that you are defining. You can select one of the following parameter types from the option list.
- Text
- Number
- Date
Parameter Number
Specify the parameter number. You can select a number between 1 and 10 as the parameter number. This will be the column name in which the value of the parameter name is processed and inserted.
Actions
Action
You can assign multiple actions for the alert being defined. Specify the action supported for the alert. Select the appropriate one from the option list.
Action Label
Specify the label applicable to the selected action.
Once you have captured the above details, save the maintenance.
5.3 Mapping Alerts to User Roles and User Profiles
You can map alerts and dashboards to specific user roles and user profiles using ‘Dashboard or Alert Role’ screen. To invoke this screen, type ‘ORDDSHRL’ in the field at the top right corner of the application toolbar and click the adjoining arrow button.
For further details on this screen, refer to the section ‘Mapping Dashboard and Alerts to User Roles’ in chapter ‘Maintenances’ in this user manual.
5.4 Maintaining User Preferences for Alerts
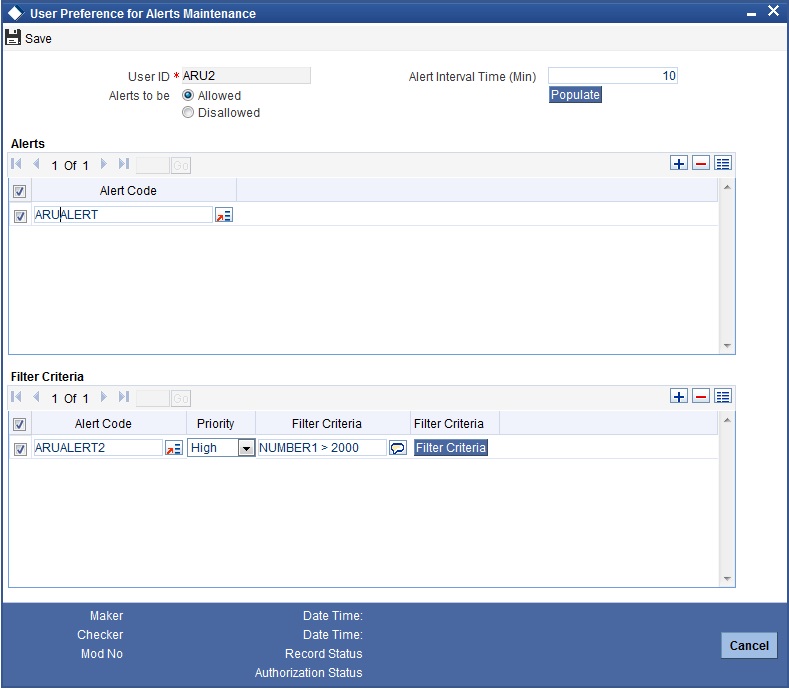
You can maintain the user preferences for alerts using ‘User Preferences for Alerts Maintenance’ screen. To invoke the screen, type ‘ORDUSRPF’ in the field at the top right corner of the application toolbar and click the adjoining arrow button.
Specify the following details:
User ID
The system displays the user ID of the user logged in to the current session.
Alerts to be
Specify whether you need to allow or disallow the alert for the selected user. Select the appropriate radio button from the following.
- Allowed
- Disallowed
Alert Interval Time (Min)
Specify the interval time for displaying consolidated alert messages to the user. This interval time should be maintained in minutes. By default, this is set to two minutes. However, you can change this.
Once you have specified the above details, click ‘Populate’ button to populate the alert codes. The system populates the alerts that the selected user has access to.
Alerts
Alert Code
You can maintain a list of alerts that are allowed or disallowed for the user, based on the option selected under ‘Alerts to be’.
If you have selected ‘Allowed’ under ‘Alerts to be’, then you can maintain the alerts that should be made available to the user.
If you have selected ‘Disallowed’ under ‘Alerts to be’, then you can maintain the alerts that will not be made available to the user.
You can click add button to add more rows to the list. You can delete an existing alert code from the list by clicking delete button.
Filter Criteria
The system display specific alerts to the user if certain conditions are satisfied. You can maintain the conditions and the alerts to be displayed on fulfilling such conditions under ‘Filter Criteria’.
Alert Code
Specify the alert code to which the filter criteria is applied. The system displays this alert to the user of fulfilling the condition defined.
Priority
Specify the priority of the alert. You can select one of the following priority options.
- High
- Medium
- Low
Filter Criteria
Specify the condition to be fulfilled for displaying the alert to the user.
You can also define the condition using ‘Condition Builder’ screen. Click the ‘Filter Criteria’ button to invoke the ‘Condition Builder’ screen.
Once you have captured all the details, save the preferences by clicking ‘Save’ button.
5.5 Switching On / Switching Off Alerts
You can enable or disable the display of alerts subscribed by you from the landing page of Oracle FLEXCUBE. In the landing page, mouse over on your user name and select User Settings. The system displays the user settings window.
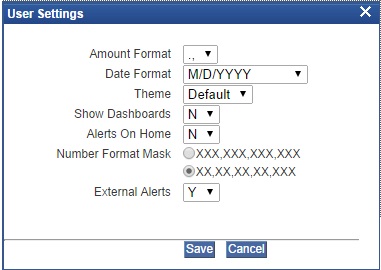
External Alerts
Specify whether you want to be notified of the alerts that come from external sources. You can select one of the following options.
- Yes - select ‘Yes’ to get notified of new alerts
- No - select ‘No’ if you do not wish to get notified
After changing the settings, click ‘Save’ button to apply the changes.
5.6 Alerts Notification
At specific intervals maintained in the ‘User Preferences for Alerts Maintenance’ screen, the system pops up a notification window the consolidated alert messages from various sources.
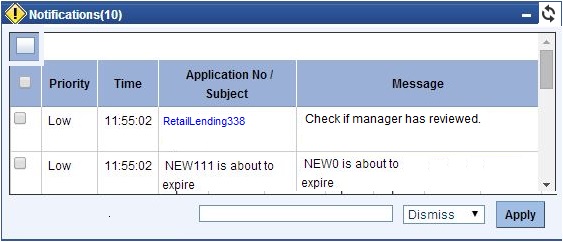
You can view the following details of each alert message:
Priority
The system displays the priority of the alert message, that is, high, medium or low.
Time
The system displays the time at which the alert message was generated.
Application Number/Subject
The system displays the subject line of the alert.
In case of reminder alerts, this may be the application number. If you have sufficient rights, you can click the application number to invoke the Application screen.
Message
The system displays the message of the alert.
Actions on Alerts
You can indicate an action to be performed on the alert and click ‘Apply’ button to execute the action.
You can perform the following actions on alerts from the ‘Notifications’ screen.
Action |
Description |
Dismiss |
Dismisses the alert |
Notify |
Invokes a separate ‘Notification’ screen, using which you can route the notification to the customer with subject, remarks, and mode of notification. |
Reset |
Invokes a screen using which you can reset the alert by setting a different reminder date and time. |
Forward |
Invokes a screen where you can select the user ID of your peer to whom the alert should be forwarded. You can only view and select the users who report to your manager. |
If an action is successfully executed on an alert, then that alert will disappear from the list of alerts in the ‘Notification’ screen. You can view the status of the actions performed in the blown up notifications screen.
5.6.1 Blown Up Notifications
You can blow up the notification window to a full screen with enhanced view using the blow up button. The blow up button is the large square box provided at the top left corner of the ‘Notifications’ window.
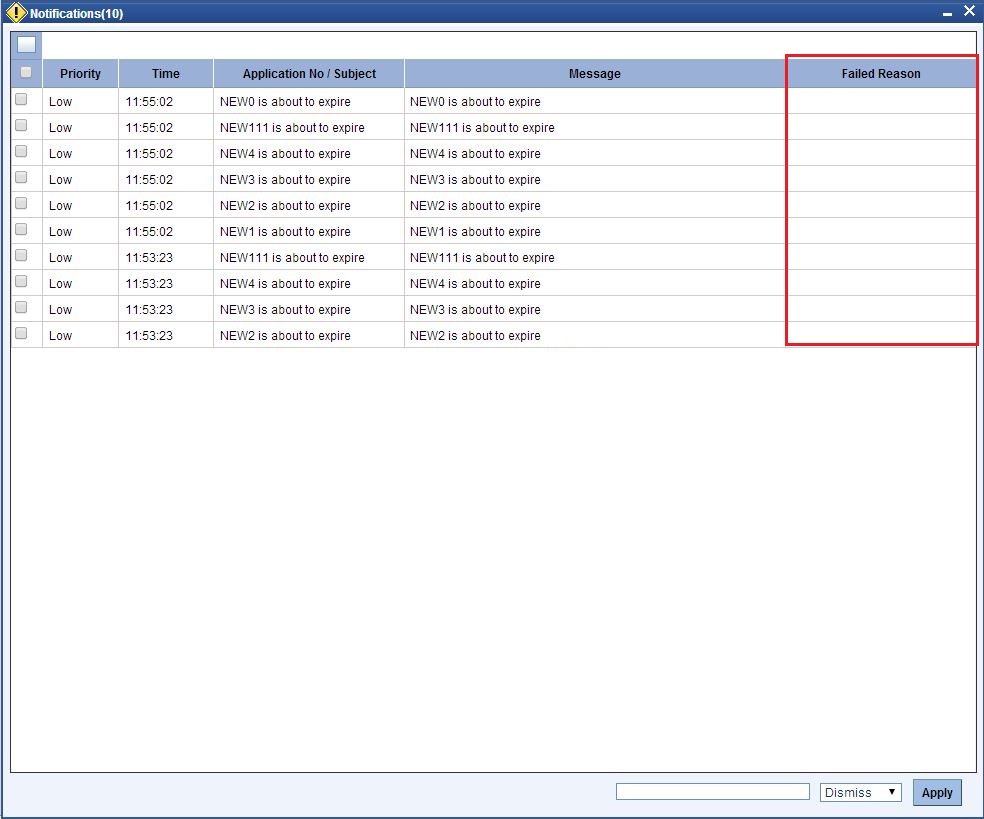
This screen displays the details of the alerts in ‘Notification’ screen. In addition to that, you can also view the reason for failure of actions performed on the notifications.
If the system fails to execute an action on an alert, then the reason for failure is displayed under column ‘Failed Reason’ against the respective alert.
If an action is successfully executed on an alert, then that alert will disappear from the list of alerts.
5.7 Viewing Notifications in Calendar
In the landing page of Oracle FLEXCUBE, you can view the calendar, which displays the number of alerts, task reminders, day notes, and aging tasks for a day.
From the landing page of Oracle FLEXCUBE, go to ‘Tasks’ and click ‘Calendar’ in the left pane. The system displays the calendar.
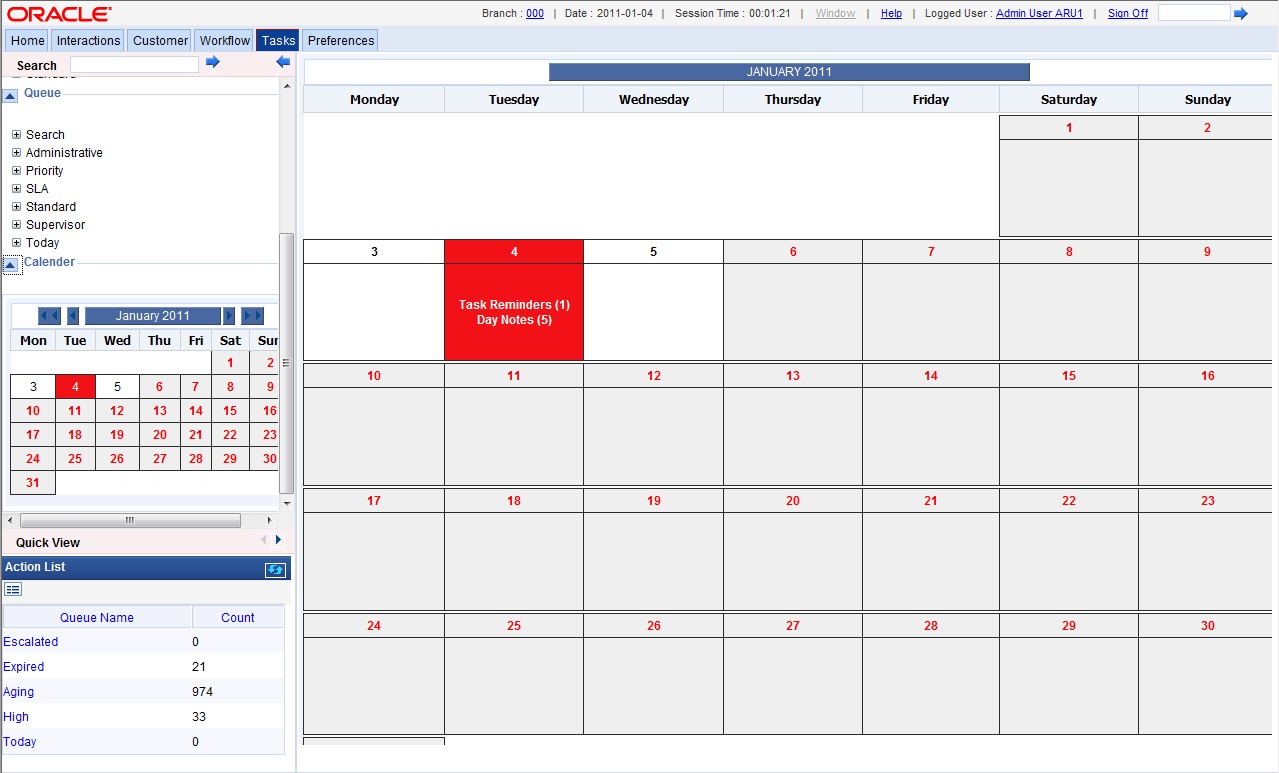
For a date, the system displays the number of task reminders, day notes, alerts, and aging tasks. Click a date to view the details. The system displays a screen that contains the details of the alerts.
For a selected date, you can view the following details on this screen.
- Notes
- Reminders
- Aging tasks
- External alerts
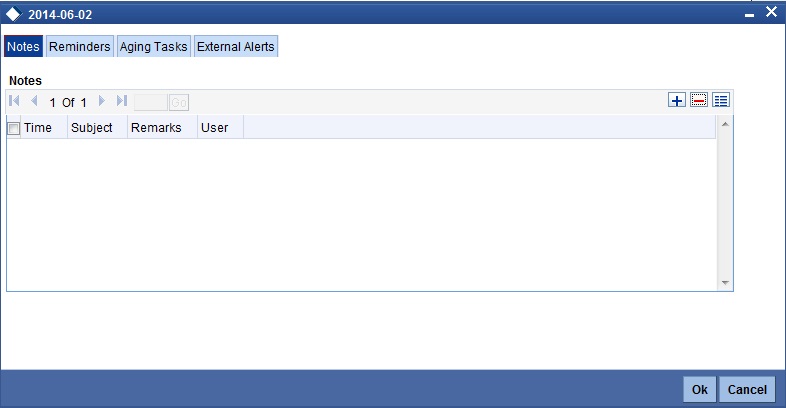
5.7.1 Notes Tab
In the ‘Notes’ tab, you can view the notes captured for that date and also create new notes. Click ‘Notes’ tab.
You can view the details of the existing notes in the ‘Notes’ frame.
For creating new notes, click add button. The system displays an additional row. You can specify the following details in the new row.
Time
Specify the time. You can use this information to act upon the note being created.
Subject
Specify the subject of the note.
Remarks
Specify the complete remarks for the note.
User
Specify the user ID. By default the system displays the user ID of the user currently logged in. However, you can change this and select any of the peers and assign the note.
Only those users who report to the same manager are available for selection.
5.7.2 Reminders Tab
You can view the reminders in the ‘Reminders’ tab.
You can click ‘View’ button on this screen to view the details in the main screen.
5.7.3 Aging Tasks Tab
You can view the aging tasks in the ‘Aging Tasks’ tab.
You can click ‘View’ button on this screen to view the details in the main screen.
5.7.4 External Alerts Tab
You can view the external alerts in the ‘External Alerts’ tab.
5.8 Alerts Dashboard
Under ‘Interactions’ tab, you can view the alerts that require your attention. Click ‘Interactions’ tab on the Application Browser.
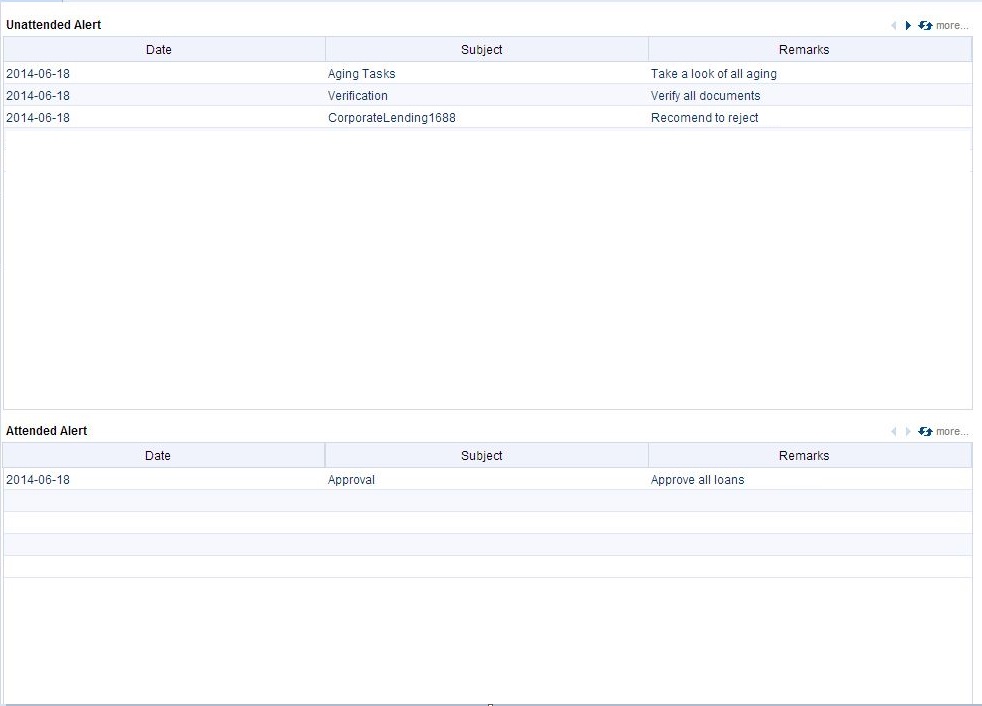
You can view the following alerts in the dashboard.
Alert |
Description |
Attended alerts |
Details of alerts on which some action is executed |
Unattended alerts |
Details of alerts on which actions are not executed |
My alerts |
Details of the alerts to which you (current user) have access rights |
Expired alerts |
Details of the alerts that are expired |