7 Inventory Adjustments
Inventory adjustments can be made online or they can be received from an external system, such as a warehouse management system. There are two types of adjustments that can be made to inventory:
-
Stock on Hand: The quantity of stock on hand, or salable stock, is increased or decreased. Both the quantity and value of the stock on hand are adjusted in the stock ledger.
-
Unavailable Inventory: The quantity of stock on hand does not change, but the quantity of unavailable stock, or non-salable stock, is increased or decreased. In the stock ledger, the adjustment is recorded as a transfer between stock on hand and unavailable inventory. No adjustment is made to the stock value.
Prior to using the inventory adjustment functionality, status types and reasons for adjustments must be set up in the system. The Total Stock on Hand status type is reserved for adjustments made to salable goods. Any additional status types are user-defined and are reserved for adjustments made to non-salable goods. The user-defined status types indicate why the goods are non-salable. When adjusting total stock on hand, you must select a reason for the adjustment. The reason indicates why the total stock on hand must be adjusted.
Inventory Adjustments covers the following sections:
Inventory Status and Adjustment Reasons
For effective management of inventory, Merchandising provides the option to classify unavailable inventory by user defined inventory buckets called inventory status types. This facilitates segregation of inventory that is not available to sell into specific purpose buckets such as customer returns or damaged. Inventory status types are mapped to inventory status codes, which are used in the stores and warehouses, in order to manage inventory updates sent from those solutions in Merchandising. The values that you enter for this in Merchandising should be coordinated with your store and warehouse inventory management solutions. While creating inventory adjustments, users will also need to specify a reason for carrying out such adjustments. These inventory adjustment reason codes are also configurable and each reason code can further be specified to affect cost of goods sold or not. This may be useful if you use budgeted shrink, but wish to post some known shrinkage to the stock ledger separately. These statuses, codes, and reasons are created and maintained in Merchandising through spreadsheet upload and download processes. These processes are accessed through the main Merchandising task list under Foundation Data > Download Foundation Data and Foundation Data > Upload Foundation Data.
To add or update inventory statuses, inventory codes, and reason codes, you will select the template type of Inventory from the Download Data screen and then the template Inventory Status and Adjustment Reasons. Click the Download button and when prompted, choose to either open the .ods file that is generated or save the file and open it separately in the spreadsheet application of your choice. Once opened, there will be six sheets that can be modified - Inventory Status Types, Inventory Status Type Trans, Inventory Status Codes, Inventory Status Code Trans, Inventory Adjustment Reasons, and Inventory Adjustment Reason Tran.
Note:
Inventory statuses, codes, and reasons cannot be deleted. If you wish to not have certain values displayed, then the Used flag should be set to No for the status, code, or reason.To add a new inventory status type, start in the Inventory Status Types tab, and, in a blank line in the template, select the action type of Create. Next enter a unique numeric status type code (up to 2 characters) and the description for the status type in the primary language (as defined in the Merchandising system options) of up to 120 characters. Next, the Used column indicates whether or not you are using this status actively in the system; valid values are Yes and No. If left blank, Yes is taken as default.
Next, if you wish to add translations for the status type in languages other than the primary language, this can be done in the Inventory Status Type Trans tab. Navigate to a blank row and select the action type of Create and the language in which the translated description will be entered. Then, enter the status code for which the translation applies. Finally, enter the translated description. The translated description can also be up to 120 characters long. This is an optional step.
To add a new inventory status code, start in the Inventory Status Codes tab, and, in a blank line in the template, select the action type of Create. Next enter a unique inventory status code (up to 10 characters). Next, optionally enter the inventory status type associated with this inventory status code in the Inventory Status column. If entered, then when an inventory update is made using this code and received from the store or warehouse, Merchandising will place the inventory in the indicated status. If no status type is assigned, then inventory will not be assigned to a non-sellable status. Then enter the description for the status code in the primary language (as defined in the Merchandising system options) of up to 120 characters. Next, the Used column indicates whether or not you are using this status code actively in the system; valid values are Yes and No. If left blank, Yes is taken as default.
If you wish to add translations for the status code in languages other than the primary language, this can be done in the Inventory Status Code Trans tab. Navigate to a blank row and select the action type of Create and the language in which the translated description will be entered. Then, enter the inventory status and status code combination for which the translation applies. Finally, enter the translated description. The translated description can also be up to 120 characters long. This is an optional step.
Add an Inventory Adjustment Reason
To add a new inventory adjustment reason, start in the Inventory Adjustment Reasons tab, and, in a blank line in the template, select the action type of Create. Next enter a unique numeric inventory adjustment reason code (up to 4 characters) and the description for the adjustment reason code in the primary language (as defined in the Merchandising system options) of up to 120 characters. Next, specify if the inventory adjustments carried out with this reason code will affect cost of goods sold or not. Possible values are Yes and No. Lastly, the Used column indicates whether or not you are using this reason actively in the system; valid values are Yes and No. If left blank, Yes is taken as default.
If you wish to add translations for the adjustment reason code in languages other than the primary language, this can be done in the Inventory Adjustment Reason Trans tab. Navigate to a blank row and select the action type of Create and the language in which the translated description will be entered. Then, enter the reason code combination for which the translation applies. Finally, enter the translated description. The translated description can also be up to 120 characters long. This is an optional step.
Update Inventory Status Type or Code or Inventory Adjustment Reason
If you would like to update any details for existing inventory status type or code or inventory adjustment reason, a similar process will be followed as that described above for creating new status type, code or adjustment reason respectively. First, download the spreadsheet, and then navigate to the tab where you would like to make your updates.
The following columns can be updated in each tab:
-
Inventory Status Types - Description, Used
-
Inventory Status Type Trans - Description
-
Inventory Status Codes - Inventory Status, Description, Used
-
Inventory Status Code Trans - Description
-
Inventory Adjustment Reasons - Description, Used
-
Inventory Adjustment Reason Tran - Description
In the tab where you are going to make your updates, select the action type of Update, and then correct the value in the spreadsheet.
For all actions defined above, once all the updates have been made to the data in the spreadsheet, save the file and close it. Then, return to the Merchandising screens and select Foundation Data > Upload Foundation Data from the main task list. In this screen, select the template type Inventory and the template Inventory Status and Adjustment Reasons. This will generate a process description automatically, but this can be updated if desired. Lastly, select the Browse button and navigate to the directory where you saved the updated spreadsheet.
To review the status of the upload and check whether any errors occurred, select the Foundation Data > Review Status task from the main task list.
See also Download/Upload Data from Spreadsheets and View Data Loading Status.
Create an Inventory Adjustment by Item
In the The Inventory Adjustment by Item page you can manually adjust the inventory of an item at one or more locations.
Adjusting Inventory by Item
To adjust inventory by item:
-
From the Tasks menu, select Inventory > Inventory Adjustments > By Item. The Inventory Adjustment by Item page appears.
-
In the Item field, enter the item number or search for the item.
-
Select one of the following options:
-
Total Stock on Hand
-
Unavailable Stock
If you select Unavailable Stock, the Inventory Status field enables.
-
-
In the Inventory Status field, select an inventory status from the list.
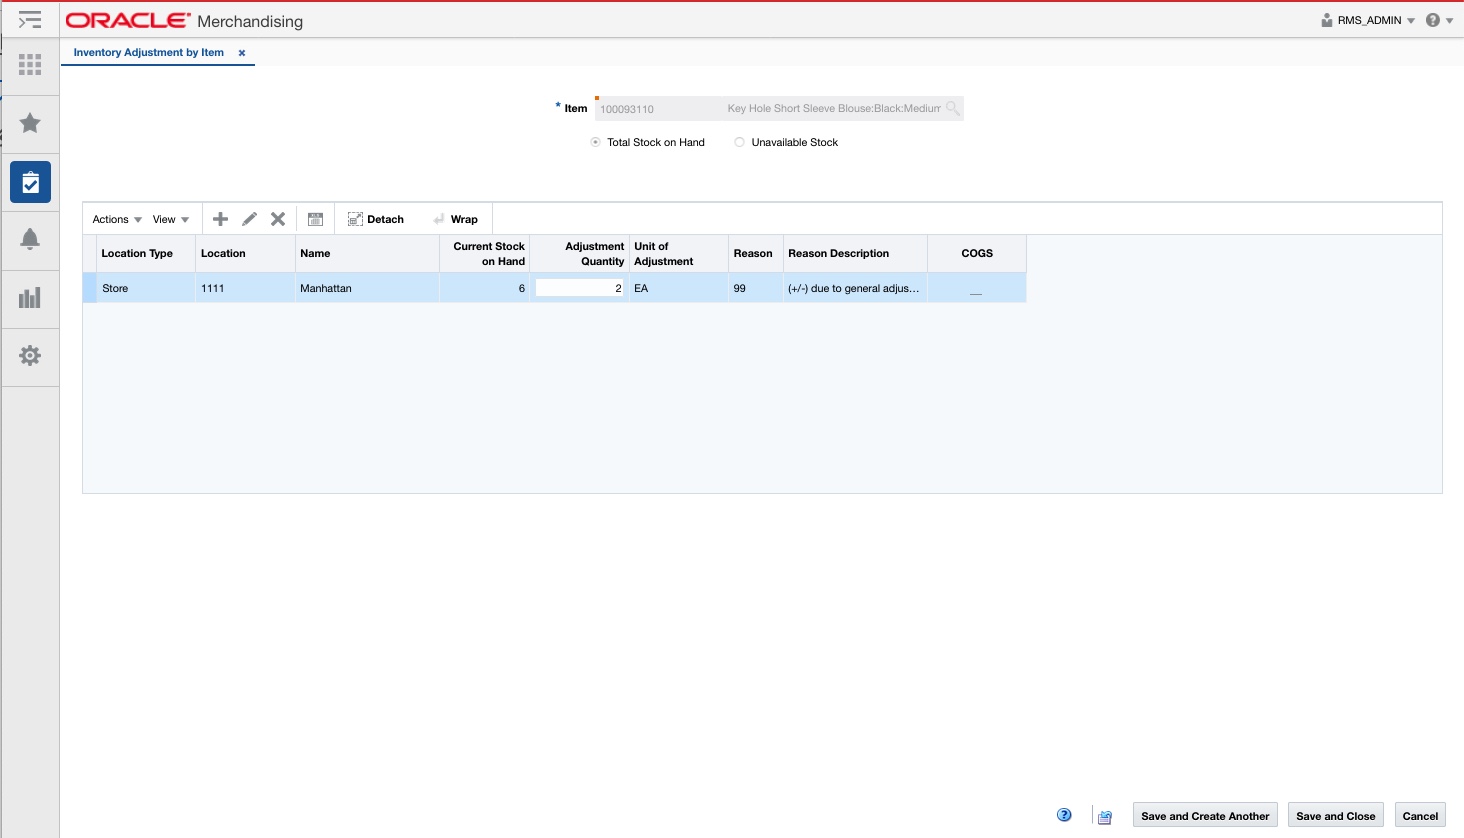
The table lists the locations impacted and the quantity adjusted at each location. You can add, edit or delete inventory adjustments in this table.
You can edit the Adjustment Quantity and the Reason column directly in the table.
-
In the Location field, select the location type from the list. Then enter, select or search for the location. This field is a required field.
-
The Stock on Hand and Unavailable quantity are displayed. The Unavailable quantity only displays, if you select Unavailable stock in the header.
-
In the Adjustment Quantity field, enter the quantity you want to adjust. This field is a required field.
The unit of adjustment defaults to the standard unit of measure for the item. Change the value, if necessary.
Note:
Adjustments for pack items can only be made at warehouses. -
If you are adjusting the total stock on hand, the reason code is required for the adjustment. The reason indicates why the total stock on hand is being adjusted.
-
Then choose one of the following options.
-
Click OK to add the inventory adjustment to the table and close the pop-up.
-
Click OK and Add Another to add additional inventory adjustments.
-
Click Cancel to reject all entries and close the pop-up.
-
Editing Location and Adjustment Quantity
To edit an inventory adjustment, follow the steps below.
-
Select a record in the table.
-
Then select Actions > Edit, or use the Edit icon. The Edit Inventory Adjustment pop-up appears.
-
Edit the adjustment quantity, the unit of adjustment and/or the reason code for the adjustment as necessary.
-
Then choose one of the following options.
-
Click OK to add your changes to the table and close the pop-up.
-
Click Cancel to reject all entries and close the pop-up.
-
Create an Inventory Adjustment by Location
In the Inventory Adjustment by Location page you can manually adjust the inventory of one or multiple items at a location.
To adjust inventory by location:
-
From the Tasks menu, select Inventory > Inventory Adjustments > By Location. The Inventory Adjustment by Location page appears.
-
In the Location field, select the location type from the list. Then enter, select or search for the location.
-
Select one of the following options:
-
Total Stock on Hand
-
Unavailable Stock
If you select Unavailable Stock, the Inventory Status field enables.
-
-
In the Inventory Status field, select an inventory status from the list.

The table lists the inventory adjustments. You can add, edit or delete inventory adjustments in this table.
You can edit the Adjustment Quantity and the Reason column directly in the table.
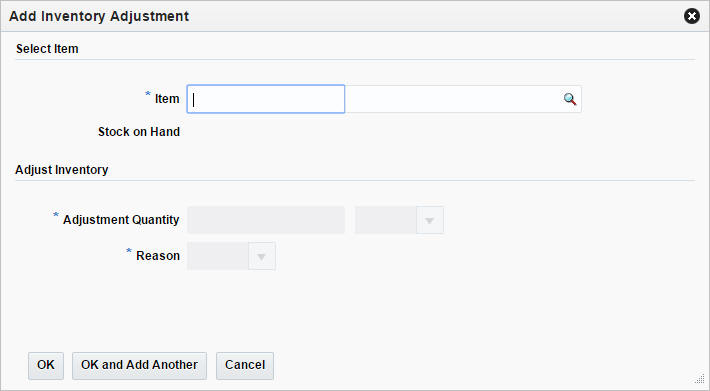
Adding Items and Adjustment Quantities
To add an inventory adjustment, follow the steps below.
-
In the table select Actions > Add, or use the Add icon. The Add Inventory Adjustment page appears.
-
In the Item field, enter or search for the item. This field is a required field.
-
The Stock on Hand and Unavailable quantity are displayed. The Unavailable quantity only displays, if you select Unavailable stock in the header.
-
In the Adjustment Quantity field, enter the quantity you want to adjust. This field is a required field.
The unit of adjustment defaults to the standard unit of measure for the item. Change the value, if necessary.
Note:
Adjustments for pack items can only be made at warehouses. -
If you are adjusting the total stock on hand, the reason code is required for the adjustment. The reason indicates why the total stock on hand is being adjusted.
-
Then choose one of the following options.
-
Click OK to add the inventory adjustment to the table and close the pop-up.
-
Click OK and Add Another to add additional inventory adjustments.
-
Click Cancel to reject all entries and close the pop-up.
-
Editing Items or Quantities
To edit an inventory adjustment by location, follow the steps below.
-
Select a record in the table.
-
Then select Actions > Edit, or use the Edit icon. The Edit Inventory Adjustment pop-up appears.
-
Edit the adjustment quantity, the unit of adjustment and/or the reason code for the adjustment as necessary.
-
Then choose one of the following options.
-
Click OK to add your changes to the table and close the pop-up.
-
Click Cancel to reject all entries and close the pop-up.
-
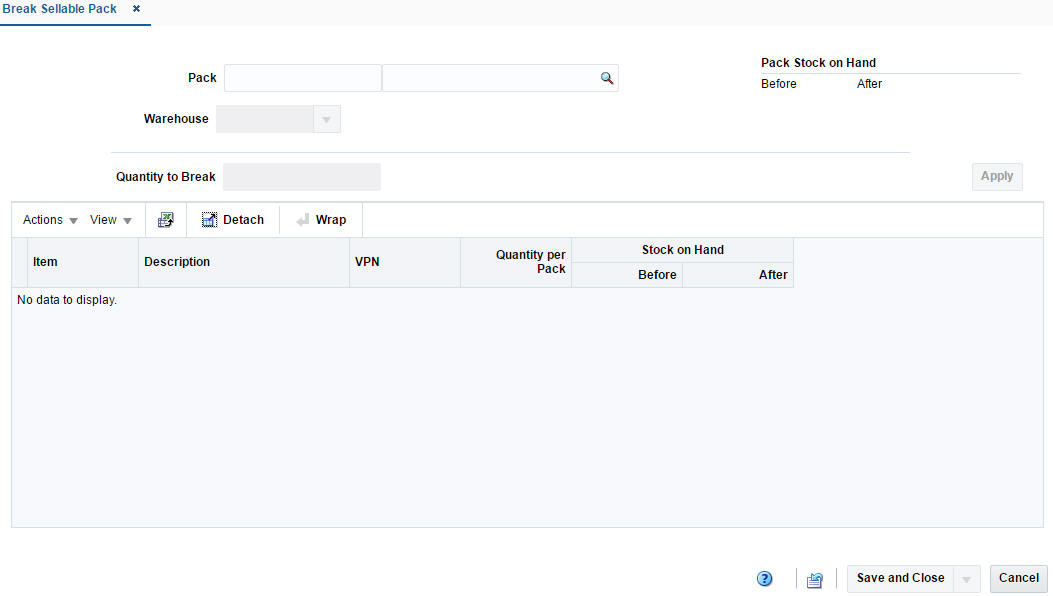
Break Sellable Pack
The Break Sellable Pack page allows you to break orderable packs down to their component items or inner pack levels. The inventory of packs and component items is adjusted accordingly. The number of packs is decremented and the number of inner packs or items is incremented. Pack items are inventoried at the warehouse level.
-
From the Tasks menu, select Inventory > Inventory Adjustments > Break Sellable Pack. The Break Sellable Pack page appears.
-
In the Pack field, enter the number of the pack item or select or search the pack.
-
In the Warehouse field, enter select or search for the warehouse.
The items that make up the pack appear in the table below. In addition the Pack Stock on Hand Before quantity, and Item Stock on Hand Before quantity is populated so you can view the quantities before making any adjustments. The After field in the Pack Stock section displays the value of stock on hand after the pack is broken down
-
If the selected pack contains an inner pack, the Break To radio buttons display, allowing you to select between breaking the pack into individual items or inner packs.
-
In the Quantity to Break field, enter the number of packs that you want to break down to the component level. This number must be less than the number displayed in the Stock on Hand: Before field.
-
Click Apply. The number of packs is decremented. The number of component items is incremented. The system displays the updated Stock on Hand values for the Pack and Item(s) in the After fields.
Product Transformation
The Product Transformation page allows you to manually adjust the inventory of a transformed item and the items derived from the transformed item.
For example, a grocer might buy and place into inventory a side of beef. The butcher may prepare steaks and ground beef from the side of beef. In this example, the grocer reduces inventory by one side of beef and increases inventory by the number of steaks and packages of ground beef. In addition to adjusting the quantities, you can adjust the cost of the items derived from the transformed item. The overall cost of the transaction, however, must remain the same.
Both the quantities and values of the stock on hand are adjusted in the stock ledger.
Inventory adjustments may also be initiated by an external system, such as a warehouse management system.
To access the Product Transformation page:
-
From the Tasks menu, select Inventory > Inventory Adjustments > Product Transformation. The Product Transformation page appears.
-
In the Location field, select the location type from the list. Then enter, select or search for the location. This field is a required field.
-
In the Item field, enter the item number to be transformed or search for the item. This field is a required field.
-
In the Reason field of the Transform section, enter, select or search for the ID of the reason code for the adjustment.
-
In the Quantity to Remove field of the Transform section, enter the number of units subtracted from stock on hand. This field is a required field.
-
When the item is selected, the Current Stock on Hand field is populated to view the stock on hand quantity for the selected item before making any adjustments.
-
The Total Cost to Remove field is auto populated with the value based on the quantity to remove.
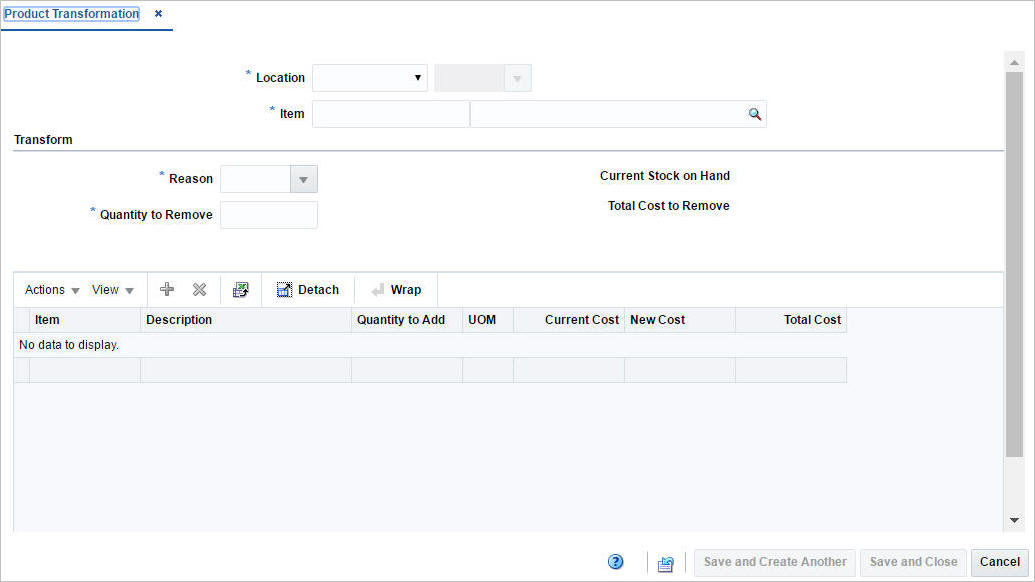
Add Items for the Product Transformation
In the table you must add the items that you will create from the transformed item.
Once added, the items and their attributes appear in the table. The Total Cost in the Summary Row will be updated. The Total Cost to Remove must equal the Total Cost to Add before an adjustment can be made. Therefore, you can adjust the Quantity to Add and the New Cost columns directly in the table.
To add items you want to create from the transformed item, follow the steps.
-
From the Actions menu after entering the required details, click Add or click the Add icon. The Add Item page appears.
-
In the Item field, enter, select or search for the item you want to create. This field is a required field.
-
In the Quantity to Add field, enter the quantity for the item. This field is a required field.
-
In the New Cost field displays the current costs of the item. Edit the costs, if necessary. This field is a required field.
-
Then choose one of the following options.
-
Click OK to create the item and add it to the table and close the pop-up.
-
Click OK and Add Another to create additional items.
-
Click Cancel to reject all entries and close the pop-up.
-