6. Maintaining Parameters for Liquidity Management
6.1 Introduction
You need to maintain certain parameters before you define account structures for global liquidity management process. They are:
- Application Parameters Setup
- Country Setup
- Bank Setup
- Branch Setup
- Currency Setup
- Customer Setup
- Account Setup
- Sweep Frequency Setup
- External System Setup
- Sweep Product Setup
- Sweep Instruction Setup
- MBCC Currency Cutoff Setup
- Interest Rule Setup
- Interest Product Setup
- Interest UDE Setup
- Interest Product Mapping Setup
- File Upload
This chapter contains the following sections:
- Section 6.2, "Maintaining Application Parameters"
- Section 6.3, "Maintaining Bank Setup"
- Section 6.4, "Maintaining Branch Details"
- Section 6.5, "Maintaining Interface Instructions"
- Section 6.6, "Maintaining Currency Definitions"
- Section 6.7, "Maintaining Country Parameters"
- Section 6.8, "Maintaining Customer Setup"
- Section 6.9, "Maintaining Account Setup"
- Section 6.10, "Maintaining Sweep Frequency Setup"
- Section 6.11, "Maintaining External System Setup"
- Section 6.12, "Maintaining Sweep Instruction Setup"
- Section 6.13, "Maintaining Currency Cut off Setup"
- Section 6.14, "Maintaining Interest Rule Setup"
- Section 6.15, "Maintaining Interest Product Setup"
- Section 6.16, "Maintaining Interest UDE Setup"
- Section 6.17, "Maintaining Interest Product Mapping Setup"
- Section 6.18, "Maintaining File Upload"
6.2 Maintaining Application Parameters
You can use the Application Parameters for maintaining the system level parameters.
To view Application Parameters go to Oracle Banking Liquidity Management >Application Parameters
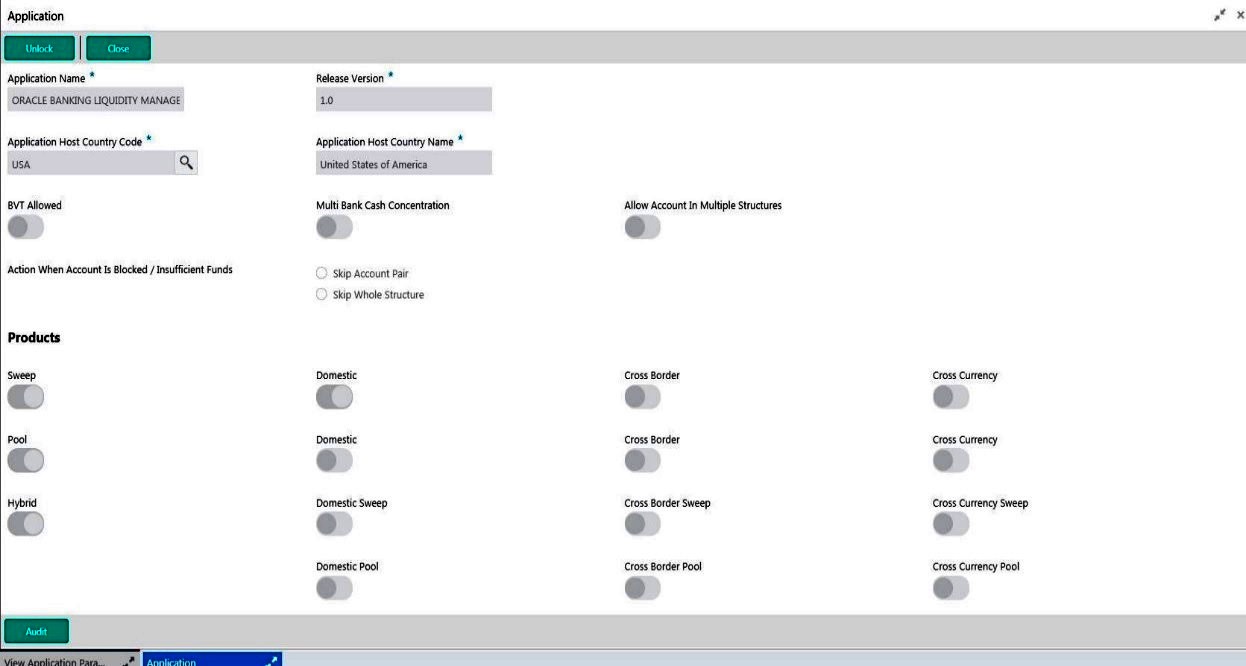
You are required to input the following details in this screen:
Application Name
Specify the unique Application name. This is usually a back-end upload.
Release Version
Specify the LM release number. This is usually a back-end uploadInstance Name
Application Host Country Code
Select the ISO code of the country in which the instance has been installed from the drop down list.
BVT allowed.
Check this box to allow BVT.
Multiple Bank Cash Concentration.
Check this box to allow set up of Multi Bank Cash Concentration Liquidity Structures.
Allow Account In Multiple Structure
Check this box to allow account in Multiple Structure
Products
Select the type of products allowed in the structure. The options are: Physical Sweeping -Check this box to allow only sweep structures in the system Notional Pooling - Check this box to allow only pooling structures in the system
Sweep
Check this box to select domestic/cross border/cross currency in liquidity structures.
Domestic Sweep
Check this box to allow Domestic pairs in sweep liquidity structures.
Cross Border Sweep
Check this box if selected banks allow cross border sweeps.
Cross Currency Sweep
Check this box if selected banks allow cross currency sweeps.
Pool
Check this box to select domestic/cross border/cross currency in selected banks.
Domestic Pool
Check this box if selected banks allow domestic pool.
Cross Border Pool
Check this box if selected banks allow cross border pool.
Cross Currency Pool
Check this box if selected banks allow cross currency pool.
Hybrid
Check this box to select domestic/cross border/cross currency for selected banks.
Domestic Sweep Hybrid
Check this box if selected banks allow domestic sweeps hybrid.
Cross Border Sweep Hybrid
Check this box if selected banks allow cross border sweeps hybrid.
Cross Currency Sweep Hybrid
Check this box if selected banks allow cross currency sweeps hybrid.
Domestic Pooling Hybrid
Check this box if selected banks allow domestic pool hybrid.
Cross Border Pool Hybrid
Check this box if selected banks allow cross border pool hybrid.
Cross Currency Pool Hybrid
Check this box if selected banks allow cross currency pool hybrid.
Action When Account Is Blocked
Indicate the action to be taken by the system when an account in the structure is blocked. You can select one the following options;
Skip Account Pair - Skip the account pair and continue with the rest of the structure
Skip Whole Structure - Skip the whole structure
6.3 Maintaining Bank Setup
Bank setup maintenance captures details of the banks participating in Liquidity Management. This set up is done both for the Host bank and the External banks.
Click on Bank Setup link in the System Oracle Banking Liquidity Management tab to open the Bank Maintenance page.
To View Bank parameters go to Oracle Banking Liquidity Management > Bank Parameters.
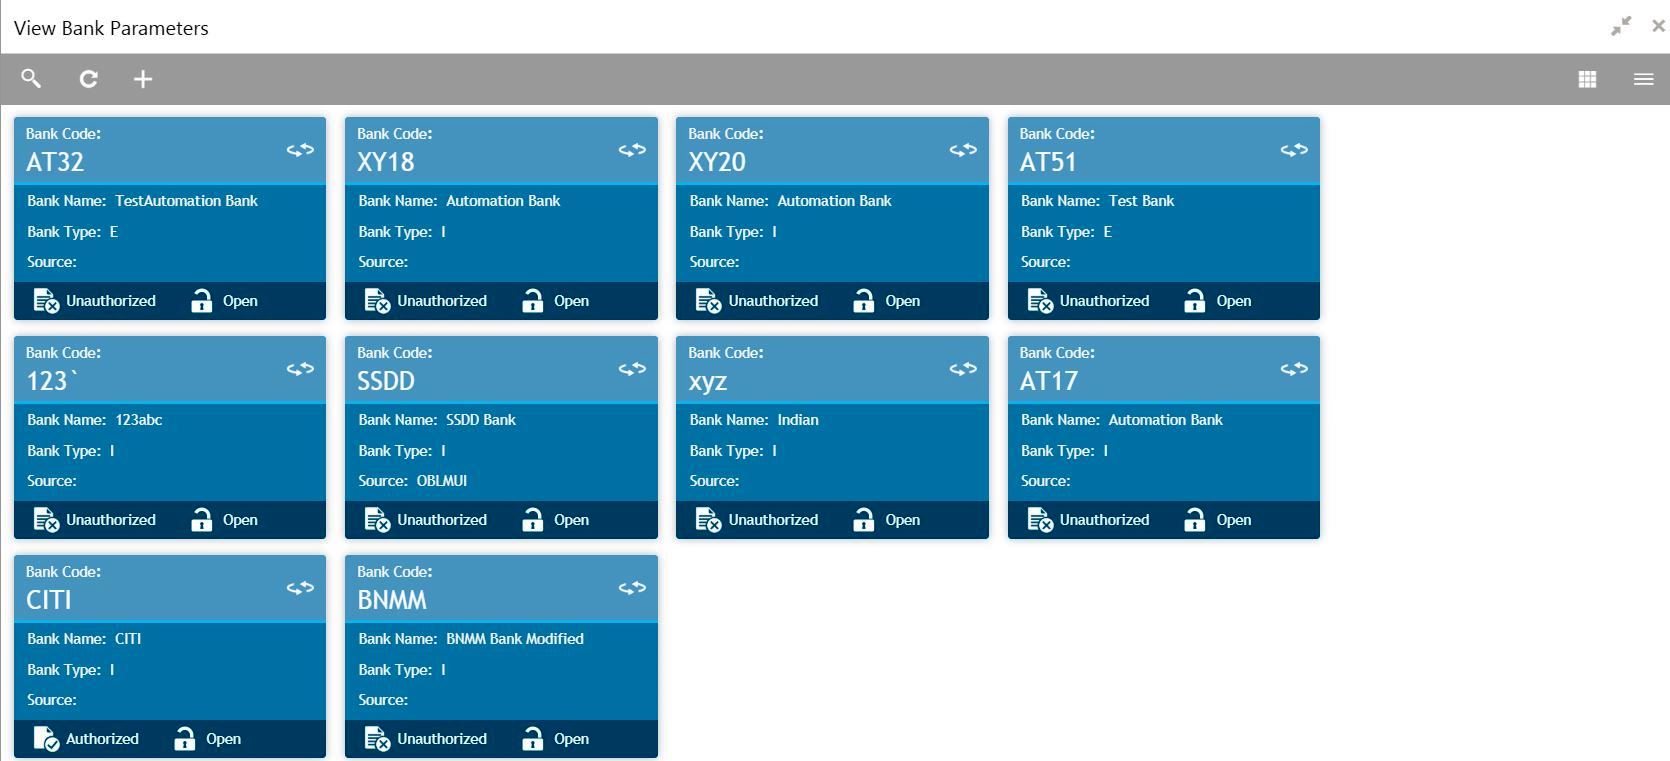
To create Bank parameters go to Oracle Banking Liquidity Management > Bank Parameters
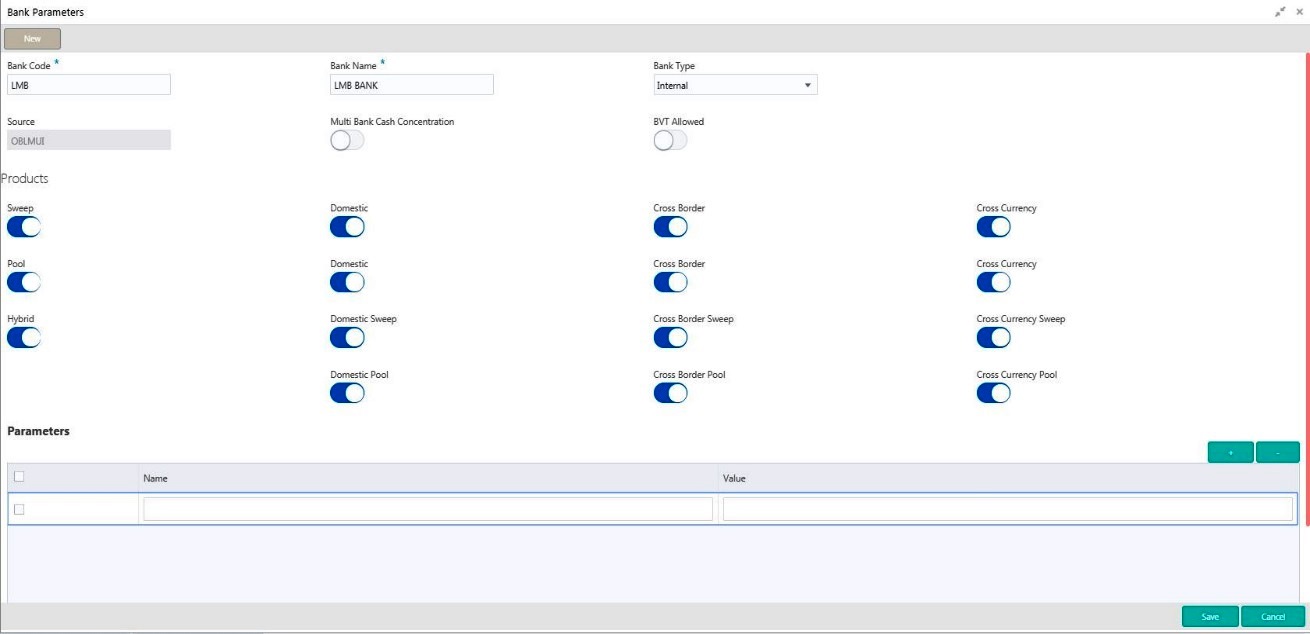
You are required to input the following details in this screen:
Bank Code
Specify the bank code. You can select the bank code from the option list.
Bank Name
The system displays the bank name based on the selected bank code.
Bank Type
Select the bank type from the drop down list. The options are:
- Internal - This is the bank that is implementing the OBLM
- External - These banks are different from the implementing bank
Sweep
Check this box to select domestic/cross border/cross currency in selected banks.
Domestic Sweep
Check this box if selected banks allow domestic sweeps.
Cross Border Sweep
Check this box if selected banks allow cross border sweeps.
Cross Currency Sweep
Check this box if selected banks allow cross currency sweeps.
Pool
Check this box to select domestic/cross border/cross currency in selected banks.
Domestic Pool
Check this box if selected banks allow domestic pool.
Cross Border Pool
Check this box if selected banks allow cross border pool.
Cross Currency Pool
Check this box if selected banks allow cross currency pool.
Hybrid
Check this box to select domestic/cross border/cross currency for selected banks.
Domestic Sweep Hybrid
Check this box if selected banks allow domestic sweeps hybrid.
Cross Border Sweep Hybrid
Check this box if selected banks allow cross border sweeps hybrid.
Cross Currency Sweep Hybrid
Check this box if selected banks allow cross currency sweeps hybrid.
Domestic Pooling Hybrid
Check this box if selected banks allow domestic pool hybrid.
Cross Border Pool Hybrid
Check this box if selected banks allow cross border pool hybrid.
Cross Currency Pool Hybrid
Check this box if selected banks allow cross currency pool hybrid.
BVT Allowed
Check this box if selected banks allow BVT.
Multi Bank Cash Concentration
Check this box if the selected banks is to participate in MBCC.
If the Bank is internal and this box is selected, it means that the host bank supports MBCC.
If the Bank is external and this box is selected, it means that the host bank can create MBCC structures involving these banks
Additional Information
Specify additional parameters if any. Click ‘+’ to add a row and specify the Parameter, Value of the same. Click ‘-’ to remove a row.
6.4 Maintaining Branch Details
Branch Parameters allows you to maintain the branch details.
To View Branch parameters go to Oracle Banking Liquidity Management > Branch Parameters

To create Branch parameters go to Oracle Banking Liquidity Management > Branch Parameters

You are required to input the following detail in this screen:
Branch Code
Specify the branch code.
Branch Name
Specify the name of the branch.
Bank Code
Specify the bank code. You can select the bank code from the option list.The list displays all the bank codes maintained in the system.
Pool
Check this box to select domestic/cross border/cross currency for selected branch.
Domestic Pool
Check this box if the selected branch allows domestic pool.
Cross Border Sweep
Check this box if the selected branch allows cross border sweeps.
Cross Currency Sweep
Check this box if the selected branch allows cross currency sweeps.
Sweep
Check this box to select domestic/cross border/cross currency for selected branch.
Domestic Sweep
Check this box if the selected branch allows domestic sweeps.
Cross Border Pool
Check this box if the selected branch allows cross border pool.
Cross Currency Pool
Check this box if the selected branch allows cross currency pool.
Hybrid
Check this box to select domestic/cross border/cross currency for selected branch.
Domestic Hybrid Pool
Check this box if the selected branch allows domestic hybrid pool.
Cross Border Hybrid Sweep
Check this box if the selected branch allows cross border hybrid sweeps.
Cross Currency Hybrid Sweep
Check this box if the selected branch allows cross currency hybrid sweeps.
Domestic Hybrid Sweep
Check this box if the selected branch allows domestic hybrid sweeps.
Cross Border Hybrid Pool
Check this box if the selected branch allows cross border hybrid pool.
Cross Currency Hybrid Pool
Check this box if the selected branch allows cross currency hybrid pool.
Bic Code
Specify BIC code relevant for the branch.
External Reference
Specify the External Reference for branch.
Date
This date reflected on the field will be the current date of the branch.
Cross Border Pooling
Check this box if the selected branch allows cross border pooling.
Local Clearing Code
Specify local clearing code for the selected branch.
BIC Code
Specify BIC code relevant for the branch.
Local Currency
Select the local currency used by the branch from the drop down list.
Balance Type
Select the balance type from the drop down menu. The options are:
- Online - The account balances are fetched from DDA when sweep happens
- Offline - The account balances maintained in LM by file upload are fetched for sweeps
Address
Specify the address of the branch in the text fields.
Additional Information
Specify additional information if any. Click ‘+’ to add a row and specify the Parameter and Value. Click ‘-’ to remove a row.
6.5 Maintaining Interface Instructions
Interface Instructions are maintained to define cross border payments for banks. Click on Interface Instruction Setup link in the Oracle Banking Liquidity Management tab to open the Interface Instruction Setup page.
To create Interface instructions go to Oracle Banking Liquidity Management > Interface instructions..
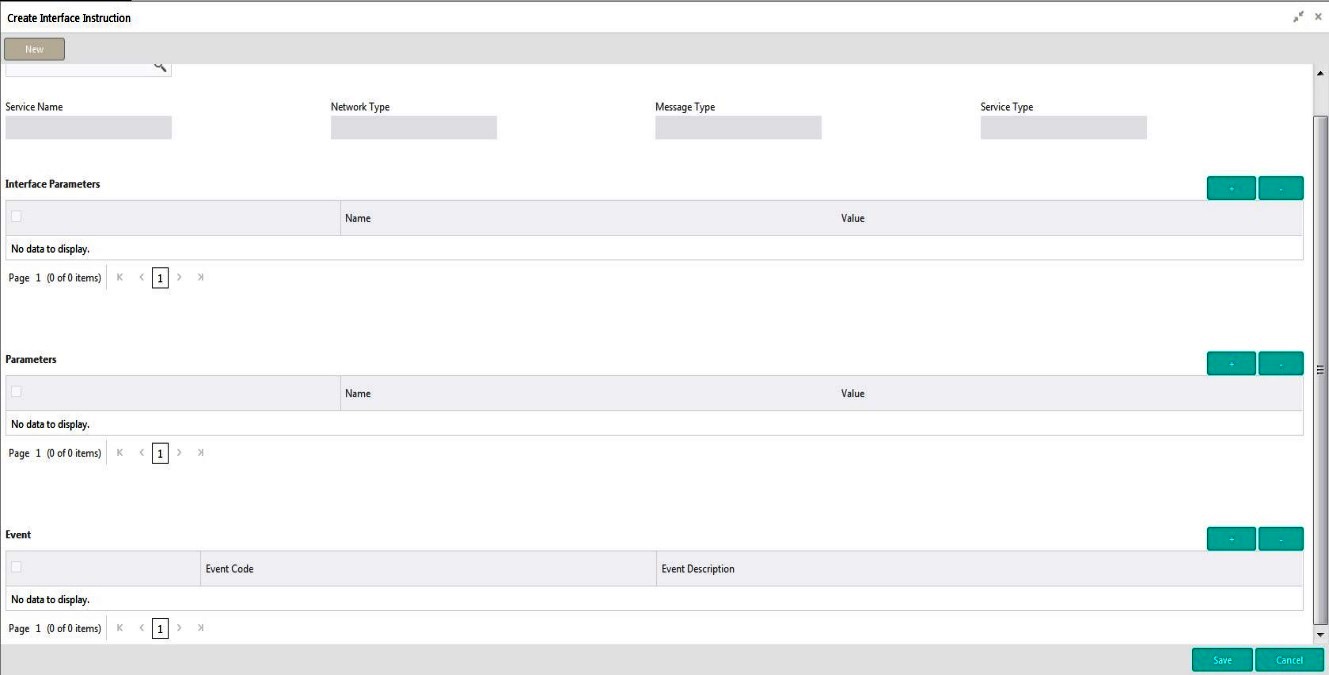
Click on New button to add a new Interface instruction. You are required to input the following details in this screen:
External System ID
Specify the external system ID for which the instruction is to be set. You can select the relevant external system from the option list. The list displays all the external system id maintained in the system.
Service Name
The system displays the service name for selected external system Id.
Network Type
The system displays network type for the selected external system Id.
Message Type
The system displays message type for the selected external system Id.
Service Type
The system displays Service type for the selected external system Id.
Name
Specify the interface parameter name for interface instruction.
Value
Specify the interface parameter value for interface instruction.
Event Code
Specify the event code for interface instruction.
Event Description
Specify the event description for interface instruction.
Parameter Name
Specify the parameter name.
Parameter Value
Specify the parameter value. Dynamic values are entered as #.
6.5.1 Maintaining External System Details
Click ‘+’ to add a row
You can specify the following system details:
External System ID
User has to select External System ID and Service from LOV, for which interface instruction need to be setup
Click +/ - to add/remove a row.
6.5.2 Maintaining Payment Parameters
Specify the payment parameters for each system. Select the System for which the payment parameters are to be set. Click ‘+’ to add a row.
You can specify the following details:
Parameter Name
Specify the parameter name.
Parameter Value
Specify the parameter value. Dynamic values are entered as #.
Click ‘-’ to remove a row.
Click Save button to save the changes.
6.5.3 Maintaining Parameters and Event
You can set customizable parameters and event for External Systems added. Select the External System and Service for which the parameters/event are to be added. Click ‘+ button to add row under ‘Parameter’ section.
You can input the following details for parameters:
Param Name
Specify the name of the parameter which has to be added.
Param Value
Specify the value for the parameter which has to be added.
You can input the following details for event:
Event Code
Specify the Code of the event which has to be added.
Event Description
Specify the description for the event which has to be added.
6.6 Maintaining Currency Definitions
Currency setup allows to maintain and define the currencies supported by the bank.
To view Currency Parameters go to Oracle Banking Liquidity Management > view Currency Parameters.

To view Currency Parameters go to Oracle Banking Liquidity Management > Create Currency Parameters

Click on New button to add a new currency. You are required to input the following details in this screen:
Currency Code
Specify the currency code of the currency.
Currency Name
Specify the name of the currency.
IE Participation
Check this box to allow the accounts in Interest Enhancement Structure
IE Benefit
Check this box to allow the accounts in Interest Enhancement Structure
Click Save to save the details.
6.7 Maintaining Country Parameters
Country Parameters setup allows you to define country level liquidity management regulatory compliance.
To view Country parameters go to Oracle Banking Liquidity Management > View Country parameters.\

To create Country parameters go to Oracle Banking Liquidity Management > Create Country parameters
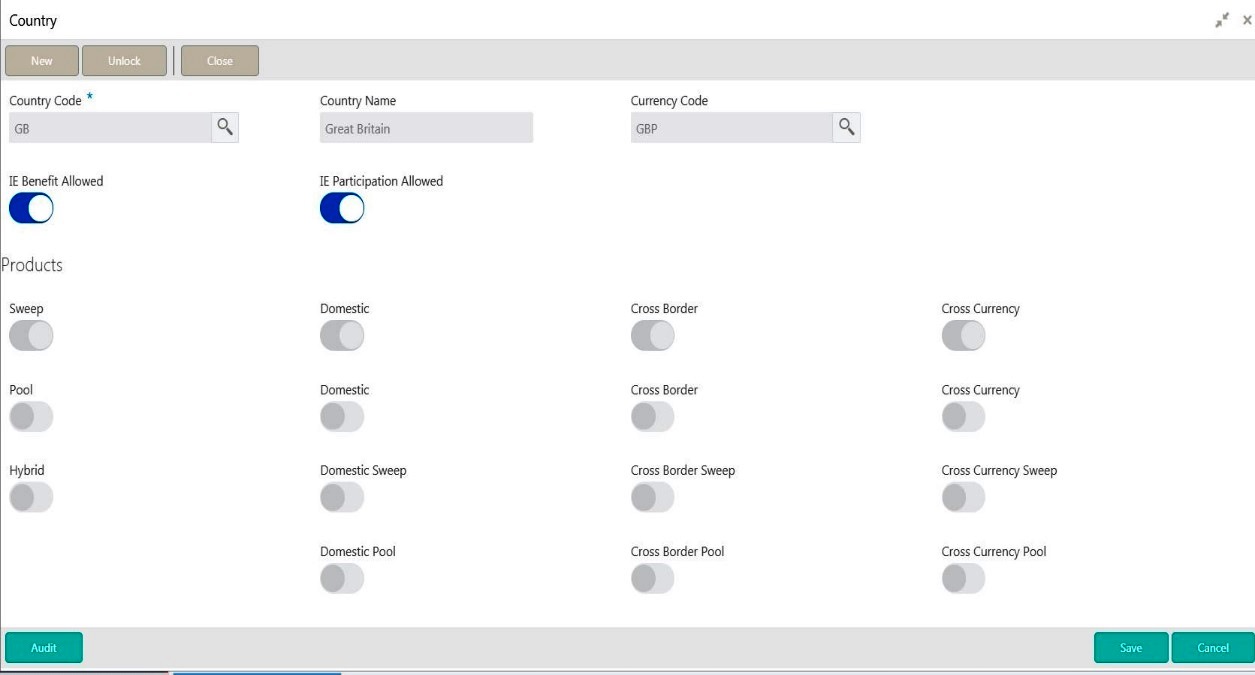
Click on New button to add regulatory compliance for a country. You are required to input the following details in this screen:
Country Code
Specify the country code of the country for which the compliance is to be set. You can select the relevant country code from the option list. The list displays all the country codes maintained in the system
Country Name
Specify the name of the country.
Currency Code
Input the base currency
Domestic Sweep
Check this box to allow domestic sweep for the accounts in the country.
Cross Border Sweep
Check this box to allow cross border sweep for the accounts in the country.
Domestic Pool
Check this box to allow domestic pool for the accounts in the country.
Pool
Check this box to select domestic/cross border/cross currency pool account pairs in the country.
Cross Border Pool
Check this box to allow cross border pool for the accounts in the country.
Cross Currency Sweep
Check this box to allow cross currency account pairs in the country.
Cross Currency Pool
Check this box to allow cross currency pool for the accounts in the country.
Sweep
Check this box to select domestic/cross border/cross currency sweep account pairs in the country.
Hybrid
Check this box to select domestic/cross border/cross currency hybrid account pairs in the country.
Domestic Hybrid Sweep
Check this box to allow domestic hybrid sweep for the accounts in the country.
Cross Border Hybrid Sweep
Check this box to allow cross border hybrid sweep for the accounts in the country.
Cross Currency Hybrid Sweep
Check this box to allow cross currency hybrid sweep account pairs in the country.
Domestic Pool Hybrid
Check this box to allow domestic hybrid pool for the accounts in the country.
Cross Border Pool Hybrid
Check this box to allow cross border hybrid pool for the accounts in the country.
Cross Currency Pool Hybrid
Check this box to allow cross Currency hybrid pools for the accounts in the country.
IE Participation
Check this box to allow the accounts in Interest Enhancement Structure.
IE Benefit
Check this box to allow the accounts in Interest Enhancement Structure.
Click Save to save the details.
6.8 Maintaining Customer Setup
Customer setup allows you to define the customers.
To view Customer Parameters go to Oracle Banking Liquidity Management > View Customer Parameters
.

To Create Customer Parameters go to Oracle Banking Liquidity Management > Create Customer Parameters
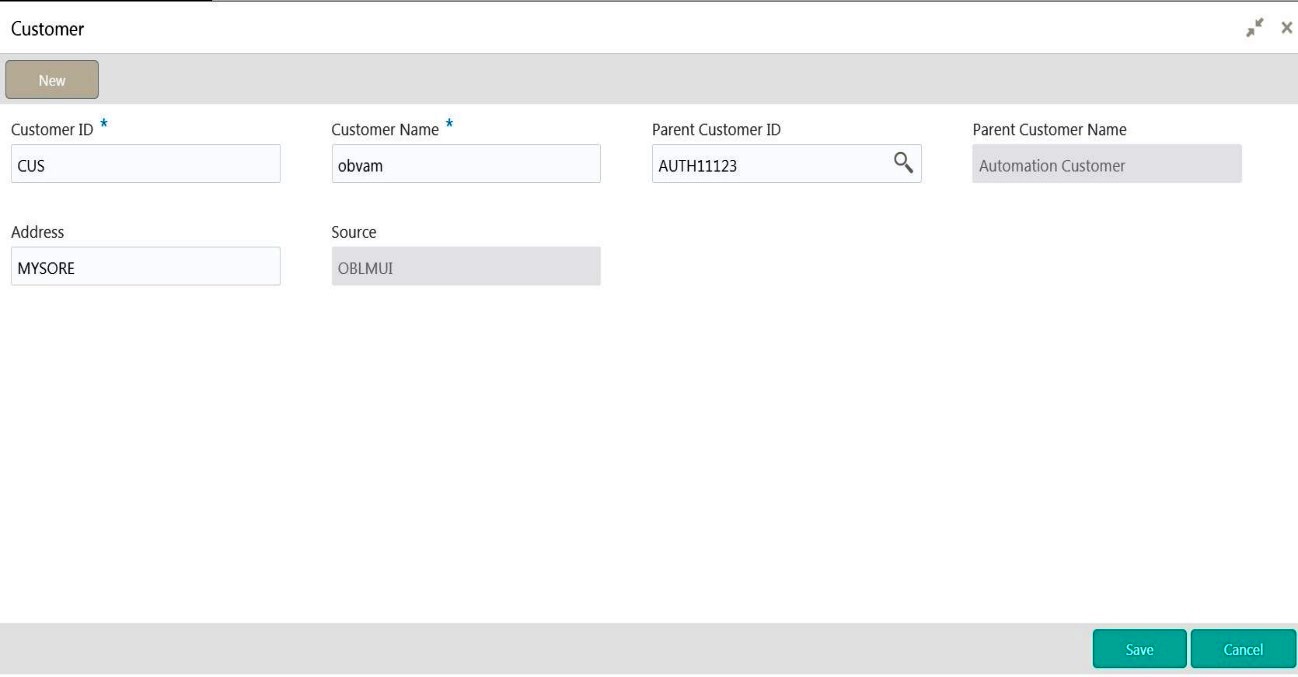
Click on New button to add customer. You are required to input the following details in this screen:
Customer ID
Specify the customer ID.
Customer Name
Specify the name of the customer.
Parent Customer ID
Specify the parent customer of the new customer. You can select the parent customer ID from the option list. The list displays all the customer IDs maintained in the system
Parent Customer Name
Parent customer Name will be displayed based on the Parent Customer ID selection
Address
Specify the address of the customer.
Source
Add the source.
Added Customer has to be authorized by different user which has the authorization role assigned.
Click Save to save the details.
6.9 Maintaining Account Setup
Account maintenance allows you to define the participating accounts for a customer ID.
To view Account Parameters go to Oracle Banking Liquidity Management > View Account Parameters.

To Create Account Parameters go to Oracle Banking Liquidity Management > Create Account Parameters
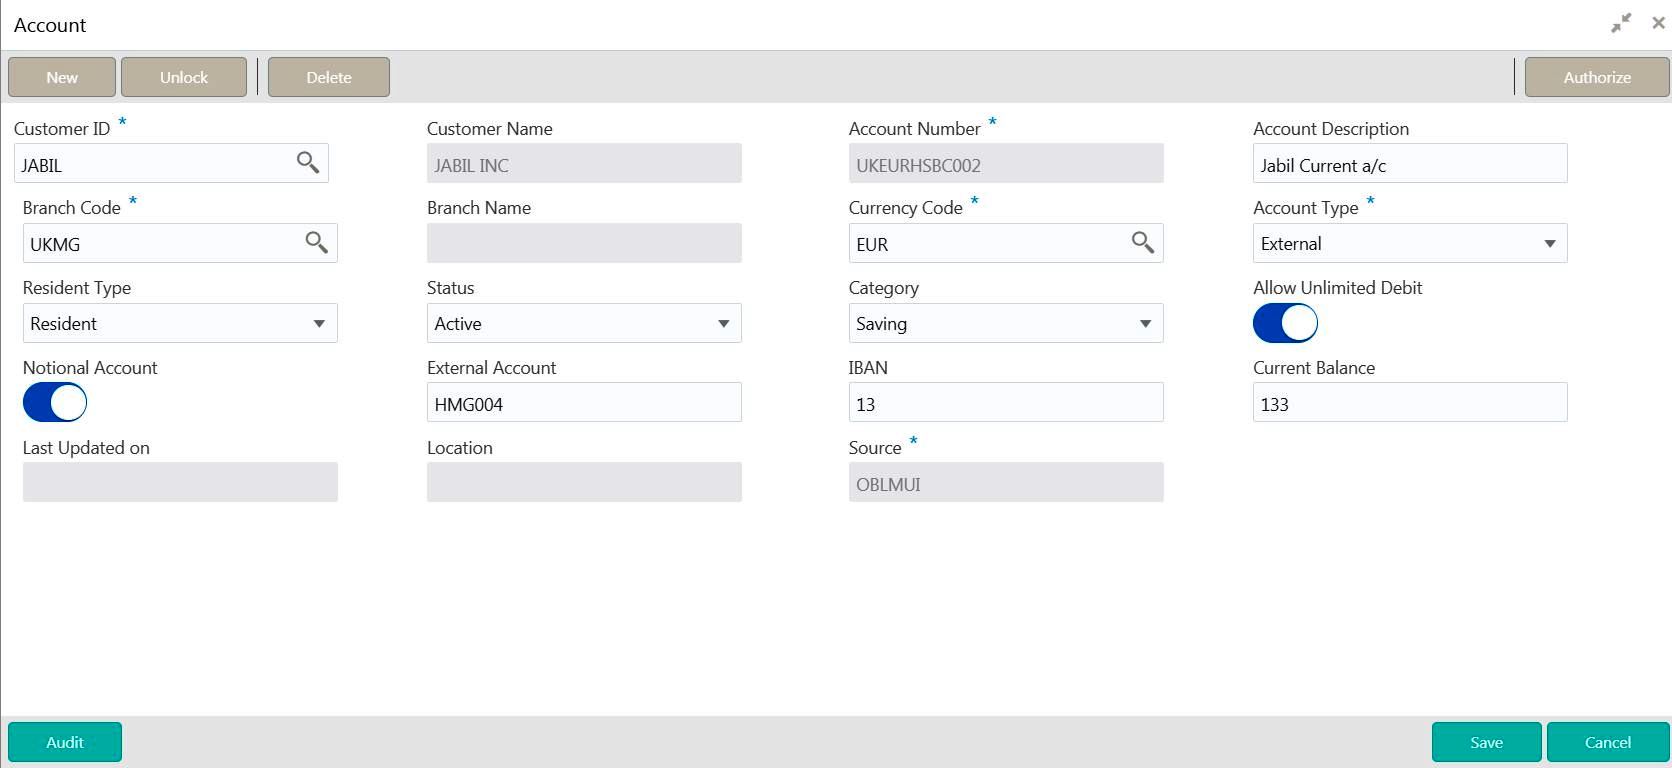
Click on New button to add an account. You are required to input the following details in this screen:
Customer ID
Specify the customer ID.You can select the customer ID from the option list. The list displays all the customer IDs maintained in the system
Customer Name
The system displays the name of the customer.
Account Number
Specify the account number of the customer.
Account Description
Specify a description for the account.
Account Resident Type
Indicate the resident type of the account to be maintained. The options are:
- Resident
- Non - Resident
Account Status
Select the status of the account from the drop down list. The options are:
- Active
- Blocked
Account Type
Indicate the type of the account to be maintained. The options are:
- Internal
- External
External Account
Specify the external account number. The field will be enabled only if the account type selected is External.
Currency Code
Specify the currency of the account. You can select the currency from the option list. The list displays all the currencies maintained in the system
IBAN
Specify the IBAN.
Bank ID
Select the Bank associated with the account. You can select the bank ID from the option list. The list displays all the bank IDs maintained in the system
Bank Description
The system displays the description of the bank.
Branch Code
Select the Branch associated with the account. You can select the branch ID from the option list. The list displays all the Branch Code maintained in the system
Branch Description
The system displays the description of the branch.
Allow Unlimited Debit
Check this box to allow unlimited debit for the account.
Debit Threshold
Specify the debit threshold amount to be set. This field will be disabled if the ‘Allow Unlimited Debit’ field is selected.
Debit’ field is selected.
Current Balance
Specify the current balance of the account.
Last Updated On
The system displays the date of last update.
Notional Account
Check this box to allow notional pooling for this account.
Location
Specify the location of the account.
Input By
Reflects the User ID using which the account has been created
Authorized By
Reflects the User ID using which the account has been authorized
Added Account has to be Authorized by different user which has the authorization role assigned.
6.10 Maintaining Sweep Frequency Setup
Sweep Frequency setup allows you to define custom frequencies for sweeps.
To view Frequency go to Oracle Banking Liquidity Management > view Frequency.

To create Frequency go to Oracle Banking Liquidity Management > create Frequency

Click on New button to add an new frequency. You are required to input the following details in this screen:
Frequency ID
Specify a frequency ID.
Frequency Description
Specify a description for the new frequency.
6.10.1 Maintaining Cron-based Frequency
Specify the details for Cron-based frequency type to set a time based frequency.
You are required to input the following details in this screen:
Frequency
Select the frequency in which the sweep is to be executed from the drop down menu. The options are:
- Daily -
- Weekly
- Monthly
- Yearly
Depending on the frequency selected, the system displays more options to set the correct frequency as mentioned below :-
On Selection of Daily, Every and Every Week Day Options will be display. If Every selected, Days field will be enable to enter number of frequency day. If Every Week Day selected, Frequency execution time field will be enable to enter time for frequency execution on BOD or EOD.
On Selection of Weekly, Weekdays checkbox and time fields will be display. Week Day and frequency execution time on that week day can be defined in those fields.
On Selection of Monthly, Days of every month and time fields details will be display. Monthly frequency and time details can be defined in those fields.
On Selection of Yearly, Days of every Year and time fields details will be display. Yearly frequency (month details) and time details can be defined in those fields.
Click Save to save the details.
6.11 Maintaining External System Setup
External System setup allows you to define DDA / Payment System.
To view External System setup go to Oracle Banking Liquidity Management > View External System.

To create External System setup go to Oracle Banking Liquidity Management > Create External System

Click on New button to add an new DDA interface. You are required to input the following
External System ID
Specify the external system ID.You can select the external system ID from the option list. The list displays all the external system IDs maintained in the system
External System Name
The system displays the external system name.
6.11.1 Maintaining External System Details
Click ‘+ button to add row under this section. You can input the following details:
Service Name
Specify the Service name to be interfaced
Service Description
Specify a Description for the method.
Integration type
Specify the Integration type for the selected external system.
Network Type
Specify Network type for the selected external system.
Message Type
Specify Message type for the selected external system.
Service Type
Specify Service type for the selected external system.
6.12 Maintaining Sweep Instruction Setup
Sweep Instruction setup allows you to maintain the different sweep instructions in LM system which are fetched from the core banking system.
To view Sweep Instruction go to Oracle Banking Liquidity Management > View Sweep Instruction..

To create Sweep Instruction go to Oracle Banking Liquidity Management > Create Sweep Instruction.
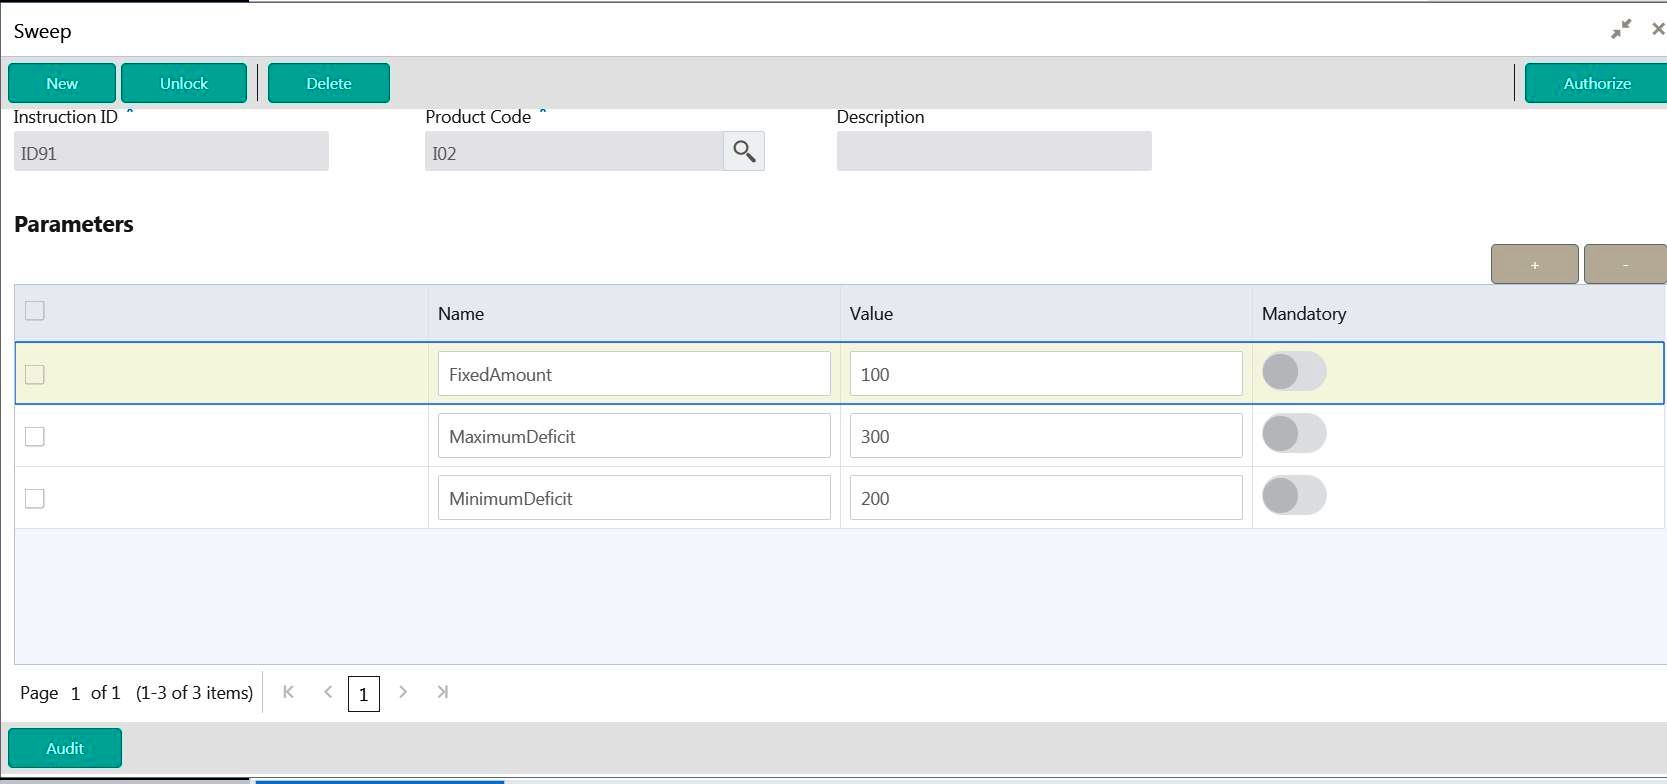
Click on New button to add an new sweep instruction. You are required to input the following details in this screen:
Instruction ID
Specify the instruction ID.You can select the instruction ID from the option list. The list displays all the instruction IDs maintained in the system.
Product ID
Specify the product ID.You can select the product ID from the option list. The list displays all the product IDs maintained in the system.
Description
The system displays the description of product.
Parameter
The system displays the list of parameters associated with the selected product ID and their values. You can enter the parameter values.
Click Save to save the details.
6.13 Maintaining Currency Cut off Setup
Currency Cutoff setup allows you to define the currency cut off times for a country. .
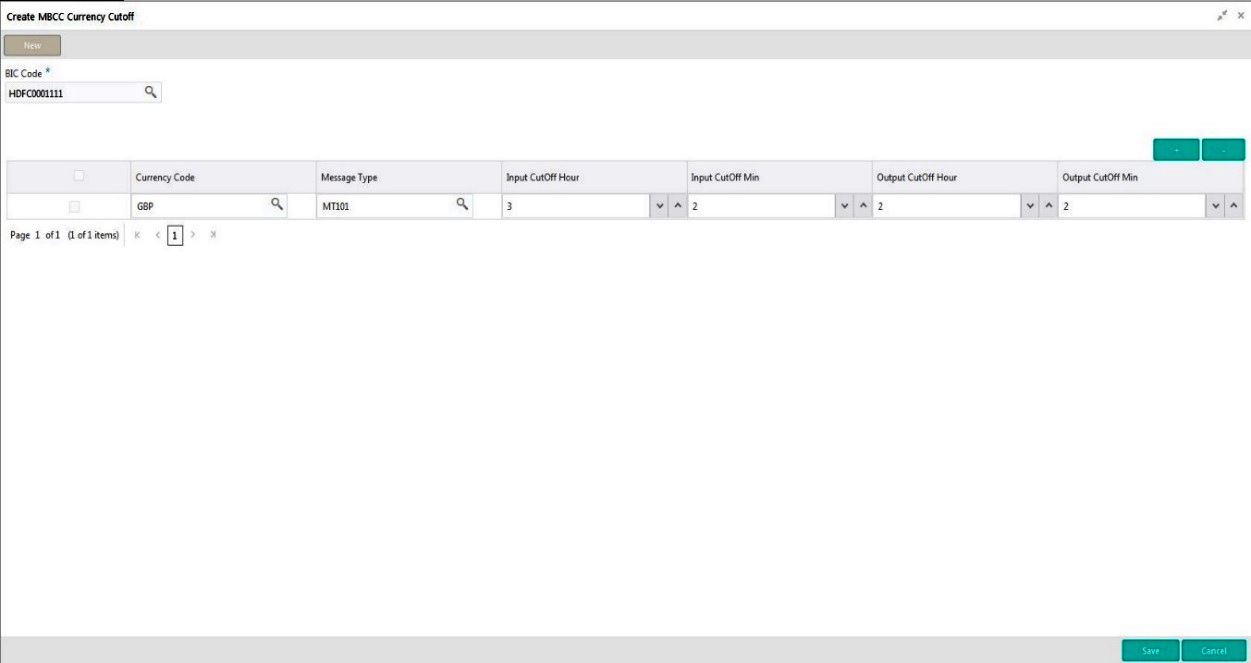
Click on New button to add currency cut off for a country. You are required to input the following details in this screen:
BIC Code
Select the BIC Code of the branch for which currency cutoffs are to be maintained
Currency
Specify the currency for which the cut off time is to be set. You can select the currency from the option list. The list displays all the currencies maintained in the system
MessageType
Specify the message type to be associated with the currency.You can select the message type from the option list. The list displays all the message type maintained in the system
IncomingCutOfTime
Specify the incoming cut off time for the currency.
OutgoingCutOffTime
Specify the outgoing cut off time for the currency
6.14 Maintaining Interest Rule Setup
Interest Rule setup allows you to maintain previously maintained UDEs to create formula which is used by the system for interest calculations.
Click on New button to add a new rule. You are required to input the following details in this screen:
Rule ID
Specify a rule ID.
Rule Description
Specify a description for the rule.
Apply Interest on Account Opening Month
Check this box to apply the interest on the account opening month.
Apply Interest on Account Closing Month
Check this box to apply the interest on the account closing month.
6.14.1 Maintaining System Elements
To calculate interest or charges for an account, you require the following data:
- Principal - The amount for which you want to calculate interest
- Interest period - The number of days for which you want to apply interest
- Interest rate
These components, required to calculate interest, are called ‘data elements’ (the elements that provide the required data to calculate interest). Data elements are of two types:
- System Data Elements (SDEs)
- User Data Elements (UDEs)
System Data Elements (SDEs) can include be any of the following:
- Values for data elements like the balance in an account, on which interest has to be applied
- Number of transactions in a day
Information, such as the ones listed above, is constantly updated in the system and is readily available for computation of interest. They are therefore called SDEs.
Click ‘+ button to add system elements.
Specify the system elements. You can select the system elements from the option list.
6.14.2 Maintaining User Elements
A rule consists of System Data Elements and the User Data Elements. Click ‘+ button to add User Elements under this section.
You can specify the following details:
User Elements
Specify a user element.
Type
Select the type of user element from the drop down list. The options are:
- Amount
- Rate
- Number
- Rate Code As Rate
Get Latest
Select the option which is to be used as latest. The options are:
- Use Current
- Use Effective
6.14.3 Maintaining Debit/ Credit Formula
Click ‘+ button to add debit/credit formula.
You can specify the following details:.
Accruals Required
Check this box if accrual are required.
Rounding Required
Check this box if rounding is required.
Book Flag
Select the book flag from the drop down list. The options are:
- Booked
- Non Booked
- Tax
Days in a Month
Select the number of days to be considered in a month from the drop down list. The options are:
- Actual
- 30 - Days’
- Euro-30
Periodicity
Select the frequency of using the formula from the drop down list. The options are:
- Daily
- Periodic
Days Year
Select the number of days to be considered in a year from the drop down list. The options are:
- Actual
- 360 Days’
- 365 Days’
6.14.4 Formula Wizard
To apply interest or charges on an account, you require certain data. For example, to calculate interest for an account you would require the following data:
- the principal (the amount for which you want to calculate interest)
- the period (i.e., the number of days for which you want to apply interest)
- the rate (the interest rate)
When you want to apply charges on an account, you may have to specify the conditions for which you would need to apply charges. The amount that is charged may be different for different conditions. For example, you may want to apply charges on every extra account statement that has to be given to the customer.
When you define a ‘Rule’, you specify exactly how such data is to be picked up for calculating either the interest or charge. A ‘Rule’ identifies the method in which interest or charges have to be calculated.
The data required to calculate interest and charges are broadly referred to as ‘data elements’. Data elements are of two types:
- System Data Elements
- User Data Elements
Using the System Data Elements and the User Data Elements that you define for a rule, you can create formulae. Formulae connect SDEs and UDEs to give a result. The result of a formula is the interest or charge that has to be applied on an account.
Click on the Formula Wizard button to open the Debit/Credit Formula wizard to create rules the result as per the set
Note
You can define any number of formulae for a rule.
6.14.4.1 Building Blocks of Formulae
Element
To build a formula you require certain building blocks. These blocks could be SDEs, UDEs or (the result of) other formulae that you have previously created.
Operators
Operators are symbols that you would use to build mathematical expressions while defining a formula. The following is a list of symbols that you would require to build a formula.
Operator |
Description |
+ |
Plus |
- |
Minus |
/ |
Divide by |
* |
Multiply |
Logical Operators
Logical Operators are indicators of certain conditions that you specify while building a formula. The following is a list of logical operators that you would require to build a formula: ‘AND’ ‘OR’ and:
Operator |
Description |
AND |
the conjunction ‘and’ |
OR |
the conjunction ‘or’ |
> |
greater than |
>= |
greater than or equal to (please note that there is no space between the two symbols) |
< |
less than |
<= |
less than or equal to (please note that there is no space between the two symbols) |
< > |
Not equal to (please note that there is no space between the two symbols) |
= |
equal to |
Functions
The following are the functional operators available while defining a formula:
Operator |
Description |
ABS |
Absolute value of |
LEAST |
minimum of |
GREATEST |
maximum of |
SUM |
the total value of |
ROUND |
round to |
TRUNC |
integer part of |
FLOOR |
round off to the (lower) nearest |
CEILING |
round off to the (higher) nearest |
POWER |
to the power of |
MOD |
the remainder |
6.14.4.2 Building Formulae
Using the building blocks discussed earlier, you can create or build formulae. You can build any number of formulae for a rule using the SDEs, UDEs and the results of formulae that you have defined for the rule
Click Save to save the details.
6.15 Maintaining Interest Product Setup
Interest Product setup allows you to create, edit and update various products in LM. Click on Interest Product Setup link in the Setup page to open the Interest Product Maintenance page.
Click on New button to add a new interest product. You are required to input the following details in this screen:
Product Code
Specify a product code for the new interest product.
Product Description
Specify a description for the new interest product.
Product Group
Specify the product group under which the new product is based. You can select the product group from the option list. The list displays all the product groups maintained in the system
Product Group Description
The system displays the description for the selected product group.
Rule
Specify the rule to be associated with the interest product. You can select the rule from the option list. The list displays all the rules maintained in the system
Rule Description
The system displays the description for the selected rule.
Start Date
Specify the date from which the interest product will be active.
End Date
Specify the date till which the interest product will be active.
UDE Currency
Select the UDE currency to be associated with the product from the drop down list. The options are:
- Account Currency
- Local Currency
Currency Code
Select the currency from the option list.The list displays all the currencies maintained in the system
6.15.1 Maintaining Accrual
Product Level
Check this box if the interest accrual is to be done at product level.
Accrual Day
Specify the day the accrual should happen.
Frequency
Select the frequency of accrual from the drop down list. The options are:
- Daily
- Monthly
- Quarterly
- Semi Annual
- Annual
- On Liquidation
Cycle
Select the cycle for the accrual from the drop down list.
Payment Method
Select the payment method for interest accrual from the drop down list. The options are:
- Bearing
- Discounted
Amount Block for Discount
Check this box to block amount for discount.
6.15.2 Maintaining Calculation and Liquidation Frequency
Click on Calculation and Liquidation Frequency tab to open it.
You can enter the following details:
Days
Enter the number of days after which the interest will get calculated and accrued regularly.
Month
Enter the number of months after which the interest will get calculated and accrued regularly along with the days.
Year
Enter the number of years after which the interest will get calculated and accrued regularly along with the months and days.
For example, if Days= 15 and Months= 1, Interest will get computed for every one and half month.
Start from Account Opening
Check this box to start the calculation of liquidation from the start of account opening.
OD Interest Reversible
Check this box if OD interest is reversible.
First Liquidation On
Specify the date for calculation of first liquidation.
Liquidation at Month Ends
Check this box to allow liquidation at month ends.
Start Date
Specify the start date of liquidation.
Back Value Recalculation Flag
Check this flag to allow back value recalculation.
Defer Liquidation
Check this flag to allow deferring of liquidation.
Defer Liquidation Days
Specify the number of days by which the liquidation can be deferred.
Liquidation Before Month End
Check this box to allow deferring of liquidation before month end.
Defer Before Month End Days
Specify the number of days by which the liquidation can be deferred before month end.
6.16 Maintaining Interest UDE Setup
Interest UDE setup allows you to create, edit and update user data elements like interest and tax.
To view Interest UDE go to Oracle Banking Liquidity Management > View Interest UDE..

To create Interest UDE go to Oracle Banking Liquidity Management > create Interest UDE

Click on New button to add a new product. You are required to input the following details in this screen:
Product Code
Specify the product code You can select the product code from the option list. The list displays all the product codes maintained in the system
Branch Code
Specify the branch code.You can select the branch code from the option list. The list displays all the branch codes maintained in the system
Currency Code
Specify the currency code.You can select the currency code from the option list. The list displays all the currency codes maintained in the system
Effective Date
Specify the date from which this will be effective.
User Elements
Click ‘+ button to add row under this section. Specify the User Element and User Element Value.
Click Save to save the details.
6.17 Maintaining Interest Product Mapping Setup
Interest Product Mapping setup helps you in account class maintenance. Click on Interest Product Mapping setup Setup link in the Setup page to open the Interest Account Product Mapping page.
Click on New button to map a new product. You are required to input the following details in this screen:
Account No.
Specify the account number to be mapped.You can select the account number from the option list. The list displays all the account numbers maintained in the system.
Interest Product
Specify the interest product.You can select the interest products from the option list. The list displays all the interest products maintained in the system.
Click Save to save the details.
6.18 Maintaining File Upload
File upload allows you to do all the setups using file uploads. .

You can view Click on New button to upload a new file. You are required to input the following details in this screen:
Function ID
Select the function ID for which the upload is to be done
Function Description
Description of the function ID will be displayed in this field
Input File
To Drag and Drop or Upload the file here
Upload Button
Clicking the Upload button will upload the file to the server