DASHBOARD BUILDER
Dashboard Builder provides an ability to the Bank to build custom dashboards.
Dashboard Builder is an administrative maintenance that allows the System Administrator![]() Administrator is a set of individuals that administer the applicant/Affiliate entity. For example, Accountants, Authorized Signatories for organizations, Power of Attorney for individuals. to create and configure dashboard templates for Retail, Corporate and Administrator users.
Administrator is a set of individuals that administer the applicant/Affiliate entity. For example, Accountants, Authorized Signatories for organizations, Power of Attorney for individuals. to create and configure dashboard templates for Retail, Corporate and Administrator users.
Note: Dashboard Builder for User Type Administrator is available from OBDX 18.3.0.1.0 release.
System Administrator can configure new dashboards by dragging and dropping the desired widget at desired location in template. Administrator can also add new rows while configuring new dashboard to add more widgets. System administrator can define the dashboard for a user segment, application roles or for a user type. Facility is provided to search, view, edit and delete the configured dashboards.
These dashboards are responsive and can adapt to any type of device that Bank wants to enable it to the customers’ i.e. desktop, mobile and tablet. System allows the user to design new template and preview on different types of devices before enabling it.
The administrator can define multiple dashboards with the various attributes/ widgets. Further these templates can be mapped to the roles, party or even to a specific user.
Prerequisites
- Transaction access is provided to System Administrator
- Approval rule set up for System Administrator to perform the actions
- Application roles are maintained in application and widgets are mapped to application roles
Workflow
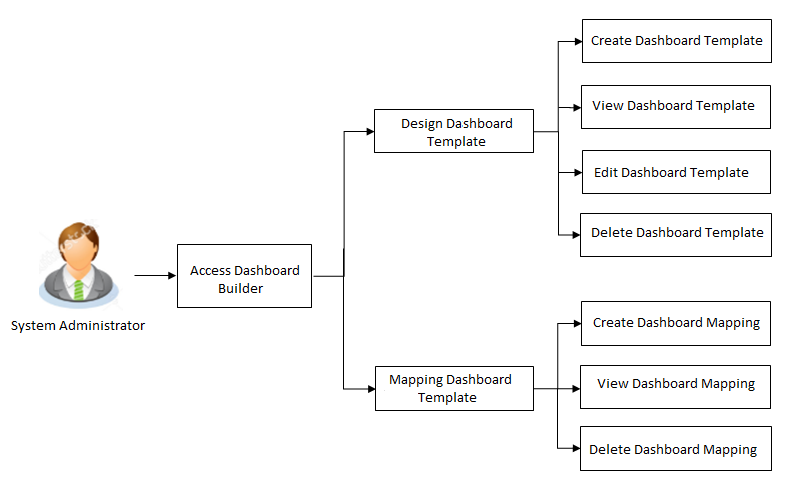
Features supported in application
Design
Mapping
- View Dashboard Mapping
- Create Dashboard Mapping
- Delete Dashboard Mapping
![]() How to reach here:
How to reach here:
System Administrator Dashboard > User Experience > Dashboard Builder
OR
Bank Administrator Dashboard > Toggle Menu > User Experience > Dashboard Builder
Dashboard Builder – Summary
Dashboard Builder- Design summary page displays the list of already designed templates, with template name, description, dashboard type, value and date of creation. The administrator can view the dashboard template details by clicking the View link in the Action column against the respective template.
|
Field Name |
Description |
|---|---|
|
User Type |
Specify the user type for which the dashboard template needs to be viewed. The options are:
|
|
Template Name |
Name of the template that the administrator can enter to view the specific template. |
|
Template Name |
Displays the name of the custom dashboard template. |
|
Description |
Displays the description as defined for the custom dashboard template. |
|
Type |
Displays the type for which the dashboard template is created i.e. application role, segment, user type or module. |
|
Value |
Displays the name of the application role / segment / module for which the dashboard template is defined. |
|
Date Created |
Displays the date of dashboard template creation. |
|
Actions |
The available action buttons against the dashboard template are displayed. The action button can be:
|
- In the Action column, click to view the already created dashboard template.
OR
Click to navigate to the previous screen.
OR
Click to cancel the transaction and navigate to the 'Dashboard'.
Dashboard Builder - Design – View
Using this option, System Administrator can view the details of already created dashboard template. The system administrator can view the template in desktop, tablet and for mobile mode by clicking the respective icons.
To search and view a dashboard template:
- In the Dashboard Builder – Summary screen, select the appropriate type of user in the User Type field. All the dashboard templates of the selected user type appears on the screen.
OR
In the Template Name field, enter the name of the template that you want to search. The searched dashboard template appears on the screen. - In the Action column, click View against the template, which you want to view. The Dashboard Builder - View screen appears.
OR
Click to navigate to the previous screen.
- Click to modify the template. The Dashboard Builder - Edit screen appears.
OR
Click to delete the dashboard template.
OR
Click to cancel the transaction and navigate to the 'Dashboard'.
OR
Click to navigate to the previous screen.
OR
Click the Desktop/ Tab/ Mobile icon to view the template in desktop, tab or mobile mode.
Dashboard Builder – Design - Create
System Administrator can create new custom dashboard template for Retail, Corporate and Administrator user using this option.
As part of creation of custom dashboard, the administrator needs to select the appropriate tab for which the dashboard needs to be created/ designed i.e. user segment or module or application role or user type.
System will facilitate the user with a default dashboard available and the administrator can decide to create a custom dashboard by dragging and dropping new widgets available from the list of widgets.
Administrator can change the grid size and can also remove the specific row by right clicking on the specific row
Following types of dashboard can be created:
- Segment Dashboard - Design dashboard for a user segment
- Application Role Dashboard - Design dashboard for an application role
- Module Dashboard - Design dashboard for the available application modules i.e. CASA, Term Deposit, Loans etc.
- User Type Dashboard - Design dashboard for a user type i.e. Retail, Corporate or Administrator.
To create a new dashboard template:
- In the Dashboard Builder screen, click . The Dashboard Builder screen appears in create mode.
|
Field Name |
Description |
|---|---|
|
User Type |
Select the user type for which the dashboard needs to be created. If dashboard needs to be created for a user segment then user type ‘Retail’ needs to be selected. User Segment is not supported for Corporate and Administrator user. |
|
Select Module |
System lists the dashboard for the segments / application roles / user type / module depending on the option selected. |
- In the User Type field, select the appropriate user type. If dashboard needs to be created for a user segment then user type ‘Retail’ needs to be selected. User Segment is not supported for Corporate and Administrator user.
- From the Segment Dashboard/ Application Role Dashboard/ Module Dashboard/ User Type Dashboard tabs, select the appropriate module. The Dashboard Builder - Design screen of the selected module appears.
For example, here Maker module is selected from the Application Role Dashboard. The Dashboard Builder - Design template for Corporate Maker module appears.
OR
Click to cancel the transaction and navigate to the 'Dashboard'.
OR
Click to navigate to previous screen.
Note: In case of Segment based and application role based dashboard, system will list the widgets based on the mapping of application role(s) to widgets in the Role to Transaction mapping.
- Drag and drop widgets from the widget list.
- Right click and then click Custom Grid to add custom columns and add new widgets to the new rows added. The Custom Grid screen appears.
-
 Field Description
Field Name
Description
Number of Grids
Specify the number of grids i.e. the widgets required in the selected row.
Enter Column Size for each Grid
Specify the column size for each widget.
In the Enter Column Size for each Grid field, enter the column size for each widget.
Click to confirm the entered value.
OR
Click to cancel the custom grid addition.
OR
Click to cancel the transaction and navigate to the 'Dashboard'.
OR
Click to navigate to previous screen.
OR
Click the Desktop/ Tab/ Mobile icon to review the created template in desktop, tab or mobile mode.
OR
Click to make the changes if any for the selected device type.
OR
Click to cancel the transaction.
A warning message of canceling the operation appears. Click Yes to confirm.
OR
Click to navigate to previous screen.
Click to complete the transaction.
Note: Click the Watch Tutorial Video link to view the tutorial video on how to configure the dashboard.
Dashboard Builder – Design - Create Administrator Template
The system administrator can select a default dashboard available for administrator and can create a custom dashboard by dragging and dropping new widgets available from the list of components.
The administrator can create the administrator dashboard template either by selecting the administrative maintenance or group of administrative functions.
As part of administrative maintenances UI![]() User Interface component, there are individual transaction quick links put in a single widget and basis on the application role to component mapping available, the administrator user on actual login will be shown only those quick links that his application role has access to.
User Interface component, there are individual transaction quick links put in a single widget and basis on the application role to component mapping available, the administrator user on actual login will be shown only those quick links that his application role has access to.
As part of system functions UI component, there is a logical group of transactions that can placed as a widget on the dashboard by selecting the administrative function from the group.
To create a new administrative dashboard template:
- In the Dashboard Builder screen, click . The Dashboard Builder screen appears in create mode.
|
Field Name |
Description |
|---|---|
|
User Type |
Select administrator from the user type list. |
|
List of Dashboards |
System displays the list of dashboards available for the application role. |
- In the User Type field, select the administrator user.
- From the Segment Dashboard/ Application Role Dashboard/ Module Dashboard/ User Type Dashboard tabs, select the appropriate module. The Dashboard Builder - Design screen of the selected module appears.
To create a dashboard for a newly created administrator application role or to customize the dashboard for an existing administrator application role, user will need to select Application Role Dashboard tab.
The Dashboard Builder - Design template for Administrator appears.
OR
Click to cancel the transaction and navigate to the 'Dashboard'.
OR
Click to navigate to previous screen.
- Drag and drop widgets from the widget list.
- If you drag and drop Administrative Activities widget, system will display a widget with a set of quick links. It will have all the quick links in the widget but the user with the assigned role on actual login will have only those quick links available for which he/she has access to.
- If you drag and drop System Administrator Functions widget, the Dashboard Builder screen with Component Input box appears allowing you to select the group of administrative maintenance.
-
Dashboard Builder - Component Input box
- From the Component Type list, select the appropriate option and click Confirm. The selected group of administrative components is added as a widget on the dashboard template.
OR
Right click and then click 1x1/ 1x2/ 1x3/ 1x4 to add a row with 1/2/3/4 columns and add new widgets to the new rows added.
|
Field Name |
Description |
|---|---|
|
Number of Grids |
Specify the number of grids i.e. the widgets required in the selected row. |
|
Enter Column Size for each Grid |
Specify the column size for each widget. |
In the Enter Column Size for each Grid field, enter the column size for each widget.
Click to confirm the entered value.
OR
Click to cancel the custom grid addition.
OR
Click to cancel the transaction and navigate to the 'Dashboard'.
OR
Click to navigate to previous screen.
OR
Click the Desktop/ Tab/ Mobile icon to review the created template in desktop, tab or mobile mode.
OR
Click to make the changes if any for the selected device type.
OR
Click to cancel the transaction.
A warning message of canceling the operation appears. Click Yes to confirm.
OR
Click to navigate to previous screen.
Click to complete the transaction.
Note: Click the Watch Tutorial Video link to view the tutorial video on how to configure the dashboard.
Dashboard Builder - Edit
The system administrator can modify the configured dashboard using the Edit option. The administrator can edit the dashboard widgets for desktop, tablet or mobile devices by clicking the specific icons.
To edit the configured dashboard:
- In the Dashboard Builder - Summary screen, click the View link, against the dashboard, which you want to edit. The Dashboard Builder - View screen appears.
- Click to modify the dashboard template. The Dashboard Builder screen appears in edit mode.
OR
Click the Desktop/ Tablet/ Mobile icon to edit the template in desktop, tablet or mobile mode.
OR
Click to cancel the transaction.
OR
Click to delete the dashboard template.
OR
Click to navigate to the previous screen.
- Drag and drop widgets from the widget list if required.
- To remove an existing widget from the template, place the cursor on widget and click ‘x’ against the respective widget
- Right click and then click Custom Grid to add custom no. of widgets along with definition of column size of each widget, if required. The Custom Grid screen appears.
OR
Right click and then click 1x1/ 1x2/ 1x3/ 1x4 to add a row with 1/2/3/4 columns and add new widgets to the new rows added, if required.
OR
Right click and then click Remove Me to remove a specific row, if required. -
Field Description
Field Name
Description
Number of Grids
Specify the number of widgets to be defined in the added row.
Enter Column Size for each Grid
Specify the number of columns for each widget.
- In the Number of Grids field, enter the value for number of widgets to be displayed.
In the Enter Column Size for each Grid field, enter the value for the column size of each widget - Click to confirm the entered value.
OR
Click to cancel the adding/ customizing the columns to the widget. - Right click and then click Remove Me to remove the rows if required.
- Click to add new rows and add new widgets to the new rows.
- Click to save the changes.
OR
Click to cancel the transaction and navigate to the 'Dashboard'.
OR
Click to navigate to previous screen. - The Review screen appears. Verify the details, and click .
OR
Click the Desktop/ Tablet/ Mobile icon to review the template in desktop, tablet or mobile mode.
OR
Click to make the changes if any for the selected device type.
OR
Click to cancel the transaction.
OR
Click to navigate to previous screen. - The success message appears along with the status of transaction.
Click to complete the transaction.
Dashboard Builder - Delete
The System Administrator can delete the custom dashboard templates maintained in the application. Deleting specific template will also result in deleting the template mapping.
To delete the configured dashboard:
- In the Dashboard Builder - Summary screen, click the View link, against the dashboard that you want to delete. The Dashboard Builder - View screen appears.
- Click . The application prompts the administrator with a warning message 'Deletion of template will result in deleting the respective template mapping’ with an option of Confirm / Cancel.
- Click Confirm to proceed with the deletion request.
It will navigate to confirmation page with a success message along with the status and reference number.
OR
Click Cancel if you do not wish to proceed with deletion.
- Click OK to complete the transaction.
Dashboard Mapping - Summary
Using this option, System Administrator can map the configured dashboards to the user or party, or user type or user segments depending on the dashboard template selected. The system administrator can create mapping and can delete the mapping.
To view the Dashboard mapping summary:
- In the Dashboard Builder screen, click the Mapping tab. The Dashboard Builder - Mapping summary screen appears.
|
Field Name |
Description |
|---|---|
|
Mapping Type |
Select the mapping type to search the dashboard template. The options are:
|
|
Dashboard Name |
System displays the name of the dashboard template. |
|
Dashboard Type |
System displays the type of the dashboard i.e. module / application role / user type. |
|
Mapped Value |
System displays the value that is mapped to the template. In case if the dashboard is mapped to the user, user ID to whom the dashboard is mapped will be shown as mapped value. In case if the dashboard is mapped to the party, party ID to whom the dashboard is mapped will be shown as mapped value. In case if the dashboard is mapped to the Role, role name to whom the dashboard is mapped will be shown as mapped value. |
|
Date Created |
The date on which template mapping was created. |
|
Actions |
Link to delete the mapping. |
- From the Mapping Type list, select the appropriate option for which you want to view the mapping. The Dashboard Builder - Mapping Summary screen appears.
Create Mapping
Using this option, System Administrator can select the dashboard type, the dashboard template and then map either to a user or party or user segment or user type. The mapping type will depend on the type of dashboard selected.
To map dashboard templates:
- In the Dashboard Builder - Mapping tab, click Create Mapping. The Dashboard Builder - Create Mapping screen appears.
|
Field Name |
Description |
|---|---|
|
Dashboard Type |
Select the dashboard type that is to be mapped. |
|
User Type |
Select the user type for which the dashboard template needs to be mapped. |
|
Template |
Select the template from the list that needs to be mapped. |
|
Mapping Type |
Select the mapping type i.e. the selected dashboard template to map to the required option. The options are:
The mapping type options will also depend on the dashboard type selected i.e. for user type dashboard, system will not have options of User, Party |
|
Mapping Value |
The mapping value will depend on the option selected in the mapping type. For Party selected in the mapping type, the admin can capture the party for which the dashboard template is applicable. For user selected in the mapping type, the admin can capture the user for which the dashboard template is applicable. For segment selected as the mapping type, admin can capture the segment for which the dashboard template is applicable. |
|
Party ID |
Party Id to search a party that is to be mapped to the dashboard template. |
|
Party Name |
Party name to search a party that is to be mapped to the dashboard template. This field appears if you select Party option from the Mapping Type list. |
|
User ID |
User ID that is to be mapped to the dashboard template. This field appears if you select User option from the Mapping Type list. |
|
Select Segment |
Select the user segment that is to be mapped to the dashboard template. This field appears if you select Segment option from the Mapping Type list. |
- From the Dashboard Type, select the appropriate dashboard type i.e. Application Role Dashboard or Segment Dashboard or Module Dashboard or User Type Dashboard.
- From the User Type, select the user type for which the Template mapping needs to be done.
- Select the Template from the list that needs to be mapped.
- From the Mapping Type list, select the appropriate option to be mapped.
- If you select User option, enter the user name.
- If you select Party option, enter the party Id in the Party ID field, and click . The Mapping Value appears. Click link under the column to view the party details.
OR
In the Party Name field enter the party name and click . The Mapping Value appears. Click link under the column to view the party details.
OR
Click to cancel the transaction.
OR
Click to clear the entered value. - If you select Segment as an option, select the segment from the User Segment list.
- Click .
The success message along with the status of transaction appears.
Delete Mapping
Using this option System Administrator can delete the templates mapped to a User or Party or User Segment or to a User Type.
To delete the mapped dashboard template:
- In the Dashboard Builder screen, click the Mapping tab. The Dashboard Builder - Mapping summary screen appears.
- Select the Mapping Type from the list i.e. User / Party / Segment / User Type
- In the Action column, click Delete against the template mapping that you want to delete. The application will prompt the administrator with a deletion message with an option of Confirm/ Cancel.
- Click to delete the mapping. It will navigate to confirmation page with a success message and the status.
OR
Click if you do not wish to delete the mapping. - Click to complete the transaction.
FAQs
![]() Can I design new widgets using Dashboard Builder functionality?
Can I design new widgets using Dashboard Builder functionality?
![]() Can I delete the template that is mapped to a user / party / segment / user type?
Can I delete the template that is mapped to a user / party / segment / user type?
![]() Can I map the same template to multiple users or parties?
Can I map the same template to multiple users or parties?
![]() When will the newly mapped dashboard be visible to the end customer?
When will the newly mapped dashboard be visible to the end customer?