4 Installing ACSLS on the SL4000 Feature Card
This chapter describes ACSLS support for the SL4000 feature card.
Topics include:
-
Configuring the Feature Card and Preparing for ACSLS Installation
-
Installing, Configuring, and Running ACSLS on the Feature Card
Overview
Beginning with ACSLS 8.5, you can install the ACSLS server on a feature card inserted into the Base Card Cage of the SL4000 library. This upgrade provides a fully functional Oracle Enterprise Linux environment with ACSLS installed in a secure RAID-1 file system.
The feature card upgrade kit is an ordered option for the SL4000 library. It includes the following:
-
One library controller card. This will be converted into a feature card.
-
Two library controller storage cards, each card containing a hard drive and local power for the drive. These will be used by the feature card.
-
One DC power converter.
The SL4000 Base Card Cage can accommodate two feature card upgrade kits.
-
For ACSLS 8.5.0, only one feature card upgrade kit is supported.
-
For ACSLS 8.5.1, one or two feature card upgrade kits are supported.
The feature card is shipped as a generic library controller card. Its character as an ACSLS feature card is established when the card is inserted into its designated position within the SL4000 library frame.
Note:
ACSLS on the feature card does not support multiple library connections.There is a one-to-one correspondence between the instance of ACSLS running on the feature card and the SL4000 library it supports. Accordingly, this instance of ACSLS is only used to manage the library where the feature card is installed and running. This also applies in a dual feature card configuration, even if both feature cards have ACSLS installed. If you have two feature card kits installed in the same library, even if both feature cards have ACSLS installed, you can still only use ACSLS to manage the single library where the cards are installed and running.
Refer to Appendix C, "Using the ACSLS Feature Card Availability Toolkit" for more information on how to use ACSLS in a dual feature card configuration.
Installation Options
Feature card configuration is dependent on the ACSLS release level.
Feature Card with ACSLS 8.5.1
For ACSLS 8.5.1, one or two feature card upgrade kits are supported. You can now use a second feature card with its corresponding two feature storage cards for a backup copy of ACSLS or SDP2. Additionally, the ACSLS 8.5.1 Feature Card Availability Toolkit (FCAT) enables you to run ACSLS on dual feature cards to provide new availability capability for ACSLS on the feature card.
For this release, the feature card requires Oracle Support for hardware related tasks. Once the hardware is configured, you can install and manage ACSLS using the information in this guide. Alternatively, you can purchase Oracle Advanced Customer Services support to assist with installation.
ACSLS 8.5.1 supports SL4000 firmware version 1.0.2.75 or later. Verify the current version on the Feature Card at /etc/version.txt.
If you already have SDP2 installed on a feature card with its own associated storage cards, then you can now install ACSLS 8.5.1 on the second feature card, as long as you have upgraded your SL4000 firmware and both feature cards. You must upgrade all feature cards to the same firmware version as your library. Plan for the need to adjust, upgrade, or reinstall your SDP2 or ACSLS applications after a library firmware upgrade. Work with your Oracle Support representative to plan next steps.
For ACSLS 8.5.1, the application only makes use of the two feature storage cards located directly above the feature card. Although you can install a maximum of four feature storage cards, if only one application (ACSLS or SDP2) is installed on a single feature card, then only the two feature storage cards located directly above the feature card are used. The remaining feature storage cards are not used unless an additional feature card is installed and the application itself makes use of the feature storage cards. In that case, both feature cards and all four feature storage cards are used.
Feature Card with ACSLS 8.5.0
For ACSLS 8.5.0, only one feature card upgrade kit is supported. You cannot use a second feature card and associated feature storage cards for any application.
For this release, the feature card and ACSLS are installed by Oracle Support. Alternatively, you can purchase both feature card and ACSLS installation by Oracle Advanced Customer Services.
If you are interested in using the SL4000 feature card to run ACSLS 8.5.0, you must contact Oracle Support for an analysis of your tape storage environment, including planned and required usage. Oracle Support uses this analysis to determine whether the feature card can be used in your environment, and can then proceed with installation and configuration. The procedures to install ACSLS 8.5.0 are not the same as those for ACSLS 8.5.1. Do not follow the procedures outlined in this document to install with ACSLS 8.5.0.
ACSLS 8.5.0 supports SL4000 firmware version 1.0.1.69.30201 only.
If you already have SDP2 installed on a feature card with associated feature storage cards, then you cannot install ACSLS 8.5.0 at this time. Work with your Oracle Support representative to determine possible next steps.
Note:
Oracle highly recommends that you upgrade the SL4000 library firmware to 1.0.2.75 or later and ACSLS to release 8.5.1 in order to take advantage of valuable enhancements.Feature Card Locations
The rear of the SL4000 Base Module houses the Card Cage, which contains controller cards, disk storage, cooling fans, switches and power converters.
Figure 4-1 shows the feature card upgrade kit locations within the SL4000 Base Card Cage.
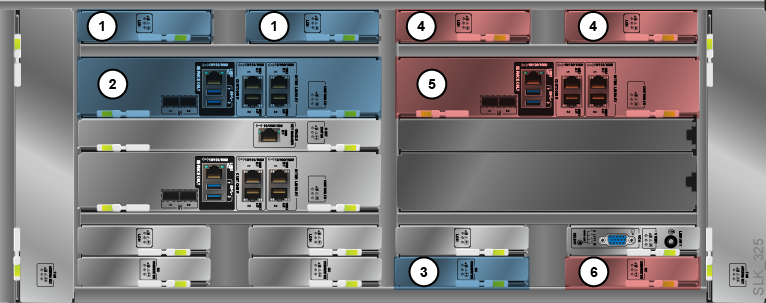
Feature Card Kit 1 (Side-A in FCAT configuration)
1. Feature Storage Cards (LOH)
2. Feature Card (LOC)
3. DC Power Converter (LOY)
Feature Card Kit 2 (Side-B in FCAT configuration)
4. Feature Storage Cards (LOH)
5. Feature Card (LOC)
6. DC Power Converter (LOY)
If you are using ACSLS with one feature card upgrade kit, Oracle recommends that the feature card is installed in the Feature Card Kit 1 (Side-A) location.
If you are using two feature card upgrade kits, and already have SDP2 installed on a feature card in the Feature Card Kit 1 (Side-A) location, ACSLS can be installed on the feature card in the Feature Card Kit 2 (Side-B) location.
Feature storage cards for each feature card are positioned directly above their respective feature cards.
Note:
-
The feature card automatically boots and performs a base initialization the first time it is powered on. Therefore, only install the feature card when you are ready to install ACSLS. Ensure that your feature card contains the proper SL4000 firmware version. If you need to update firmware to version 1.0.2.75 or later, contact Oracle support.
-
If you intend to install an additional feature card for SDP2, contact Oracle Support for assistance.
-
The feature card's position is permanent and must remain consistent. An initialized feature card can only function when it resides in its permanent slot. This also applies to the feature storage cards associated with the feature card.
Pre-Installation Requirements for ACSLS on the Feature Card
Ensure that the following equipment and system information are in place prior to installation.
Note:
All hardware installation tasks are to be completed by Oracle Support.User Equipment
Equipment Option 1:
-
USB keyboard
-
USB mouse
-
External monitor and VGA cable
-
Ethernet cable with internet access via SL4000
-
Optional USB flash drive (to store the ACSLS software bundle after download)
Equipment Option 2:
-
Laptop computer and Ethernet cable
-
Optional USB flash drive (with ACSLS software bundle stored on it)
-
WinSCP, PuTTY or similar software for file transfer and emulation
Library Equipment and Feature Card Information
-
One factory fresh library controller card with SL4000 firmware version 1.0.2.75 or later (this will become the feature card)
-
Two library controller storage cards (feature storage cards)
-
One DC Power Converter
-
Site Domain Name, DNS Service IP(s), Search Domain, SL4000 IP address, SL4000 Hostname (Contact your System Administrator)
-
Feature Card IP Address, Feature Card Hostname, Network Gateway Address, Netmask (Contact your System Administrator). If you are using the FCAT for a dual feature card configuration, you may require two IP addresses and two hostnames, depending upon your chosen configuration option. See Appendix C, "Using the ACSLS Feature Card Availability Toolkit" for more information.
-
Feature Card access credentials (i.e. the user ID
rootand its password).
Contact Oracle Support for these credentials as necessary. -
Location of local Yum repository or Yum Network Proxy and Network Proxy credentials
-
ACSLS and SL4000 publications
Video, Network, and USB Connections
If you are using an external monitor, connect it to the VGA input in the video card located in the bottom of the SL4000 frame. Use the SELECT switch to set the video controller setting as shown in Figure 4-2.
-
Select Position 3 (F1) for the feature card in the left (Feature Card Kit 1) position within the SL4000 Base Card Cage.
-
Select Position 4 (F2) for the feature card in the right (Feature Card Kit 2) position within the SL4000 Base Card Cage.
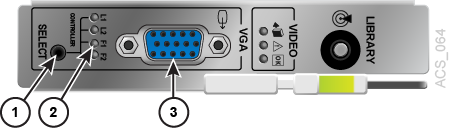
-
SELECT switch
-
Video controller setting
-
VGA video input
For the network connection, connect a CAT5 Ethernet cable to the top network access point in position 1 of the two CUSTOMER connectors on the feature card, as shown in Figure 4-3. This position corresponds to ifconfig device id p4p3. The IP ports are not preconfigured by default. See "Step 2: Establish a Temporary Connection to the External Network" for configuration instructions.

-
CUSTOMER network input 1
-
CUSTOMER network input 2
Note:
While the Feature Card can operate with a single network connection, the Feature Card initialization scripts detailed below establish an IP bond3 network to allow for redundant network connectivity.If you are using an optional USB flash drive to upgrade the feature card's SL4000 firmware or ACSLS release, or to install any version of ACSLS, insert the flash drive into one of the USB ports on the feature card, as shown in Figure 4-4. Note that USB ports are to be used by Oracle Support only.
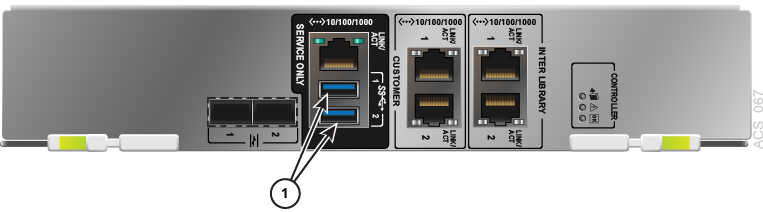
-
USB ports
Initializing the Feature Card and Storage Cards
Note:
All hardware installation tasks referenced in the following sections are to be completed by Oracle Support.The factory shipped library controller card contains a base image of Linux 6.8 that is specific to the SL4000 feature card. The initialization service is used to establish the card as a feature card.
If the feature card has already been newly inserted into the library for ACSLS use, you can skip this step. Otherwise, perform the following tasks to initialize and verify your feature card in preparation for ACSLS feature card configuration and installation:
Step 1: Insert and Install the DC Power Converter
Insert the DC power converter into the SL4000 library as shown in Figure 4-1, "Base Card Cage Showing Feature Card Upgrade Locations".
Step 2: Insert and Initialize the Feature Card
To initialize the feature card using the Feature Card Kit 1 (Side-A) location:
-
Insert and seat the factory fresh library controller card directly above the upper left feature card slot in the SL4000 library as shown in Figure 4-1.
Note:
If using the Feature Card Kit 2 location, use the upper right feature card slot instead. -
The library controller card automatically boots and runs an initialization service. A series of screens are displayed as the root file system is established on the feature card. This process establishes the designated library controller card as a feature card.
WARNING:
The feature card's position is permanent and must remain consistent. An initialized feature card can only function when it resides in its permanent slot. This also applies to the feature storage cards associated with the feature card.
-
Log in to the feature card as user
root.
Step 3: Verify Feature Card Initialization
To verify that an individual feature card is initialized, log in to the feature card as user root and verify that the following are configured:
Use df to verify file system setup. Output should appear similar to the following:
# df
Filesystem     1K-blocks      Used  Available  Use%  Mounted on
/dev/sdX3       16382888   6446788    9080856   42%  /
tmpfs            8037332       224    8037108    1%  /dev/shm
/dev/sdX1         499656     74716     388244   17%  /boot
/dev/sdX2       64376668  10257336   50826148   17%  /u01
/dev/sdX6       25451616    306876   23828800    2%  /var
#
Note that sdX may be sdc, sde, or some other name.
Step 4: Insert, Initialize, and Verify the Second Feature Card if Using Dual ACSLS Feature Cards
If you are using the ACSLS Feature Card Availability Toolkit (FCAT) in a dual feature card configuration, perform the following steps for the second feature card:
-
For the second feature card, repeat the installation and initialization steps described in "Step 2: Insert and Initialize the Feature Card".
-
For the second feature card, repeat the verification steps described in "Step 3: Verify Feature Card Initialization".
Step 5: Insert and Initialize All Feature Storage Cards
Perform the following steps to initialize your feature storage cards:
-
For each feature card, verify that two associated feature storage cards are seated in their proper locations within the SL4000 Base Card Cage, directly above the feature card. If you are using the ACSLS Feature Card Availability Toolkit (FCAT), ensure that all four feature storage cards are installed. See Figure 4-1 for proper locations.
-
Perform a soft boot on each feature card and ensure that all feature cards are running. See "Performing a Soft Boot of the Feature Card".
Configuring the Feature Card and Preparing for ACSLS Installation
Note:
-
All ACSLS software tasks referenced in the following sections are to be completed by the customer or Oracle Advanced Customer Services, if purchased separately.
-
Feature card configuration scripts provide baseline configuration of the feature card to run ACSLS. ACSLS must be the only application running on the feature card. Other applications may interfere with ACSLS operations.
-
In the steps below that require you to manually edit specific configuration files, you must make a restorable copy of the originals, which will be restored in a later step.
Perform the following tasks to prepare the initialized feature card and its associated feature storage cards for use by ACSLS:
-
Step 2: Establish a Temporary Connection to the External Network
-
Step 5: Configure the Feature Card for Bond3 Network Connectivity
-
Step 6: Configure the Feature Card with DNS Servers and Other Required Settings
Step 1: Connect User Equipment
Connect your user equipment to the library using one of the options described in User Equipment.
-
If you are using User Equipment Option 1 or have not yet downloaded the ACSLS software bundle onto a flash drive, then proceed with Step 2: Establish a Temporary Connection to the External Network below.
-
If you are using User Equipment Option 2, ensure that you have downloaded the ACSLS software bundle to your laptop or flash drive. Then proceed with Step 4: Extract the ACSLS Feature Card Scripts.
Step 2: Establish a Temporary Connection to the External Network
To establish the network connection:
-
If you have not already done so, log in to the feature card as user
root. -
Gather the following details for your newly initialized feature card. These are defined and assigned by your System Administrator, and will be associated with the feature card in these steps.
-
IP address
<IP_BOND3>Note:
This is the Customer Network Interface IP (i.e. "public") address. -
Netmask
<NM> -
Gateway address
<IP_GW>
-
-
Using vi or your favorite text editor, edit and update the Internet configuration file for port
/etc/sysconfig/network-scripts/ifcfg-p4p3as follows, and then save your updated settings.Note:
Remember to make a copy of the original file first.DEVICE=p4p3 TYPE=Ethernet USERCTL=no NM_CONTROLLED=no BOOTPROTO=static IPV6INIT=no ONBOOT=yes IPADDR=<IP_BOND3> NETMASK=<NM> GATEWAY=<IP_GW>
-
Enable the
p4p3communication port:ifconfig p4p3 <IP_BOND3> netmask <NM> up; route add default gw <IP_GW> p4p3
-
Using vi or your favorite text editor, edit and update the
/etc/resolv.conffile as follows, and then save your updated settings.Note:
Remember to make a copy of the original file first.domain <currentDomain> search <searchDomain> <currentDomain> nameserver <dns1_IP> nameserver <dns2_IP> nameserver <dns3_IP>
The
<currentDomain>is your site's domain suffix, which may already be included in the file. Otherwise, you must ask your local System Administrator. The second and thirdnameserverentries are optional depending on whether your site provides multiple nameservers. -
Ping the feature card to verify that the IP address is successfully configured. If there is no response then the connection has not been successfully established.
ping <IP_BOND3>
Step 3: Download the ACSLS Software Bundle
On the feature card, download the latest bundle ACSLS_8.5.1-X.Y_Linux.zip from the Oracle Software Delivery Cloud website.
This step may require the Firefox browser (already installed on the feature card) or another terminal window to allow the download process to be monitored and guided.
Use the Firefox browser on the feature card to download ACSLS software.
-
From your login shell, enter the command
firefox &.The Firefox browser is displayed on your desktop machine.
-
Once Firefox launches, configure your local network proxy preferences:
-
Click the open menu icon at the top right of the browser, then select preferences.
-
From the menu in the left-hand frame, select Advanced, then Network, then Connection Settings.
-
From the pop-up menu, select or define the appropriate proxy for your local network environment.
-
-
Set the download location for the ACSLS software bundle to
/root/Downloads.-
Click the open menu icon at the top right of the browser, then select preferences.
-
From the menu in the left-hand frame, select General.
-
Under Downloads in the right frame, make sure the Save files to radio button is selected.
-
To the right of the radio button, click Browse and select File System from the left-hand frame.
-
From the right-hand frame, select the
rootfolder, then selectDownloads, and click the open button at the bottom of the frame.
The display under Downloads should show the selection,
Save files to /root/Downloads. -
-
In the Firefox browser, navigate to the Oracle Software Delivery Cloud. If the Oracle Cloud is not displayed, navigate to the Oracle Software Delivery Cloud at the following URL and follow the steps listed below.
-
Click Sign In.
-
Enter the user name and password provided by Oracle support.
-
If offered, click Accept on the Export Restrictions screen.
-
Select Download Package from the menu.
-
Type
ACSLSin the text box and click Search. -
Select the resulting product version you desire, and it will be added to your cart.
-
Select Checkout from the upper right to display the Checkout screen.
-
Under Platform/Languages, click the menu and select Linux x86-64. Then click Continue.
-
On the Oracle Terms and Restrictions Screen, review and accept the terms of the licenses by checking the box and clicking Continue.
-
Download your individual packages by clicking on each name.
-
-
Once the ACSLS software download is complete, you must perform the following steps to close the temporary connection and to place the system in the correct state for the remaining configuration steps to succeed:
-
Enter the following command to disable the port:
ifdown p4p3
-
Restore the original
/etc/resolv.conffile and remove all copies or backups of it from that directory. -
Restore the original
/etc/sysconfig/network-scripts/ifcfg-p4p3file, and remove all copies or backups of it from that directory.
-
Step 4: Extract the ACSLS Feature Card Scripts
To extract the ACSLS software and associated scripts:
-
Clean up any previous downloads and installs to ensure the latest release is used. To do this, remove any previously downloaded versions of ACSLS 8.5.0 or 8.5.1 from the
/tmpdirectory:cd /tmp rm -rf ACSLS_8.5.0* rm -rf ACSLS_8_5_1*
Additionally, if the directory
/opt/ACSLSexists, remove any previously downloaded versions of ACSLS 8.5.0 or 8.5.1:cd /opt/ACSLS rm -rf ACSLS_8.5.0* rm -rf ACSLS_8_5_1*
-
Copy the ACSLS download bundle from your download location of
/root/Downloadsor from your USB flash drive, into the feature card/tmpdirectory.For example, to copy the bundle from the
Downloadsdirectory to the/tmpdirectory:cp /root/Downloads/<ACSLS_bundle_name>.zip /tmp
Note:
If you are using a USB flash drive for the download, remove the flash drive from the library once the download is complete. -
Once the ACSLS download bundle is in
/tmp, unzip the bundle to extract the filefc_config_scripts.zip. This file contains the ACSLS feature card scripts.unzip –x <ACSLS_bundle_name>.zip ACSLS_8.5.1/fc_config_scripts.zip
Note:
fcindicates "feature card" and should not be confused with "fibre channel".Ensure that the file
fc_config_scripts.ziphas been extracted to the directory/tmp/ACSLS_8.5.1.ls –alt /tmp/ACSLS_8.5.1
The file
fc_config_scripts.zipshould appear in the directory listing for/tmp/ACSLS_8.5.1. -
Extract the file
featureCard_unzipper.shfrom thefc_config_scripts.zipfile in the directory/tmp/ACSLS_8.5.1:cd /tmp/ACSLS_8.5.1unzip –x fc_config_scripts.zip featureCard_unzipper.sh
The following files should now appear in a directory listing for
/tmp/ACSLS_8.5.1:fc_config_scripts.zipfeatureCard_unzipper.sh
-
As user
root, execute thefeatureCard_unzipper.shutility to automatically transfer the extracted files to their final locations on the ACSLS feature card. This utility also validates that you are installing on a supported SL4000 firmware version of the feature card../featureCard_unzipper.sh
You should see a message similar to the following:
The version of SL4000 Firmware hosted on feature card is '1.0.2.X.Y'.ACSLS can be installed on this feature card.
-
After running
featureCard_unzipper.sh, verify the presence of the extracted files in the directory/usr/local/bin.ls -alt /usr/local/bin
The following files should appear, among others:
featureCard_acslsStorageManager.shfeatureCard_bond3.shfeatureCard_hostname.shfeatureCard_resolvconf.sh
-
Verify the presence of the extracted files in the directory
/etc/init.d.ls -alt /etc/init.d/
The following files should appear:
bootCounterFCmountFileSystemsFCstartupCheckFC
FCindicates that these services support ACSLS running on the feature card. These services are designed to run in the background.
Step 5: Configure the Feature Card for Bond3 Network Connectivity
Note:
The bond3 network is the default network configuration for ACSLS on the feature card. Optionally, you can customize the network configuration settings to suit your network infrastructure.To configure the feature card with the bond3 Customer Network Interface as user root:
-
Go to the repository directory of the feature card configuration scripts.
cd /usr/local/bin
-
Use the
ifconfigcommand to verify that the bond3 network does not already exist.If it exists, then disable the bond3 network interface of the feature card using the following command:
./featureCard_bond3.sh –d
This disables the ports for the remaining steps, and should not be required on a newly initialized feature card.
Note:
Stop any applications currently running on the feature card. -
Enter the following command to establish the
ifcfgfiles for portp4p1, portp4p3, andbond3:./featureCard_bond3 -c <IP_BOND3> <IP_GW> [NM]
where:
-
IP address
<IP_BOND3> -
Gateway address
<IP_GW> -
Netmask
<NM>
-
-
Verify the contents of directory
/etc/sysconfig/network-scriptsby listing theifcfgfile in the directory:ls -alt /etc/sysconfig/network-scripts
Verify that the following files appear:
ifcfg-p4p3 ifcfg-p4p1
Note:
The fileifcfg-bond3does not appear, as it is currently disabled. -
Verify that configuration entries exist for ports
p4p1andp4p3, and the bond3 network interface on the feature card. This will show both enabled and disabled ports.ifconfig -a -
The script
featureCard_bond3.shsets up the bond3 external network interface on the feature card which ACSLS will use for its operation. Next, enable the bond3 network interface:./featureCard_bond3.sh -e
-
Verify that the feature card can now be pinged from outside the library or from the Library Controller card.
ping <IP_BOND3>
Step 6: Configure the Feature Card with DNS Servers and Other Required Settings
To configure the feature card with your DNS servers:
-
Contact your System Administrator to obtain DNS server IP addresses, a local domain name, and the search list. This information will be used to update
/etc/resolv.confwith your new feature card settings.You must have a minimum of one DNS server IP address. The maximum is three.
-
The script
featureCard_resolvconf.shsets up the following for the feature card:-
DNS servers,
<DNS1_IP> [DNS2_IP] [DNS3_IP] -
Domain name,
<DOMAINNAME> -
One or more search domains,
<SEARCHDomain1> …[SEARCHDomainN]
The feature card configuration scripts are found in directory
/usr/local/bin. -
-
Set up and verify the DNS servers (domain name servers) for the feature card.
./featureCard_resolvconf.sh -dns <DNS1_IP> [DNS2_IP] [DNS3_IP]
If not satisfied, then revert the change, as follows, before making another change.
./featureCard_resolvconf.sh -revert
Note that you can only revert the very last change.
-
Once you are satisfied with the DNS server settings, then set up and verify the Domain Name
<domainName>setting for/etc/resolv.confon the feature card../featureCard_resolvconf.sh -domain <domainName>
If not satisfied, then revert the change, as follows, before making another change.
./featureCard_resolvconf.sh -revert
Note that you can only revert the very last change.
-
Once you are satisfied with the Domain Name setting, then set up the Search Domain list,
<searchDomain1>…[searchDomainN], for/etc/resolv.confon the feature card../featureCard_resolvconf.sh -search <searchDomain1> … [searchDomainN]
If not satisfied, then revert the change, as follows, before making another change.
./featureCard_resolvconf.sh -revert
Note that you can only revert the very last change.
Note:
Once the DNS servers and other required settings are configured, the resolv.conf file will be made immutable to ensure that the settings are not accidentally overwritten. If you need to update this file, use the same procedure as outlined in this section. Otherwise, to make changes to this file you may need to remove and re-enable the immutable attribute of the file: Use the following commands:chattr -i /etc/resolv.conf <make changes using your favorite editor> chattr +i /etc/resolv.confWhen finished, ensure that you make the file immutable again.
Step 7: Configure the Feature Card Host Name
The script featureCard_hostname.sh changes the default host name of the feature card so that host applications can identify through the host name and communicate with ACSLS running on the feature card.
-
Assign a new host name to the feature card. This host name should be registered with DNS lookup or LDAP for your organization so that the feature card can be accessed by the ACSLS host applications as proper server.
./featureCard_hostname.sh <FC_HOSTNAME>
where
FCindicates the feature card.FC_HOSTNAMEmust be comprised of standard characters:-
a-z
-
A-Z
-
0-9
-
- (hyphen)
-
. (period)
An _ (underscore) and other non-standard characters cannot be used.
-
-
After running
featureCard_hostname.sh, verify that the/etc/hostsfile contains the following.<IP_BOND3> <FC_HOSTNAME>
-
Verify that the feature card can now be pinged by
<FC_HOSTNAME>from outside the library or from the Library Controller card:ping <FC_HOSTNAME>
Step 8: Initialize and Configure the Storage Cards
The factory shipped library storage cards require initialization and configuration to be used in conjunction with the feature card. Configuration is specific to the application that is to be installed on the feature card. Do not use an SDP2 storage card configuration script for the ACSLS application, or vice versa. The configuration scripts are unique to the application and will cause faults if used otherwise.To initialize and configure the storage cards using the Feature Card Kit 1 location:
-
Ensure that the feature storage cards have been installed by Oracle Support and are running. See "Step 5: Insert and Initialize All Feature Storage Cards".
-
From the feature card, as user
root, run the following command to configure the storage for ACSLS on the feature card:cd /usr/local/bin./featureCard_acslsStorageManager.sh
-
As part of this process, RAID storage is mirrored. Watch the output on the screen to see it complete with a success message.
To see more detail during, or after this process, use the following command:
cat /proc/mdstat
This command displays the configuration definition of the RAID mirror created by the
featureCard_acslsStorageManager.shcommand.
Step 9: Verify Storage Card Configuration
Once the featureCard_acslsStorageManager.sh script completes, the storage cards are configured. Verify this as follows:
Use df and the specific ls command below to verify file system configuration. Output should appear similar to the following:
# df Filesystem 1K-blocks Used Available Use% Mounted on /dev/sdX3 16382888 6755128 8772516 44% / tmpfs 8037336 76 8037260 1% /dev/shm /dev/sdX1 499656 74812 388148 17% /boot /dev/sdX2 65924860 10267712 52285324 17% /u01 /dev/sdX6 16382888 467952 15059692 4% /var /dev/sdY1 47929224 1271936 44215920 3% /bkupa /dev/sdZ1 47929224 1271936 44215920 3% /bkupb /dev/mdN 191986276 3929464 178297736 3% /export # # ls -al /bkupc lrwxrwxrwx 1 root root 10 Sep 24 20:51 /bkupc -> /u01/bkupc #
Note:
-
sdX,sdY, andsdZ, may besda,sdb,sdc,sdd, or some other name, as determined by Linux.sdXrefers to the SSD on the feature card; and/bkupcis also located on the SSD.sdYandsdZrefer to the hard drives on the storage cards. -
mdNmay bemd1ormd2, depending upon whether you have installed the feature card in the Side-A (md1) or Side-B (md2) location within the SL4000 Base Card Cage.
Alternatively you might use lsblk to readily see the partitions and mirrors. For example:
# lsblk
NAME MAJ:MIN RM SIZE RO TYPE MOUNTPOINT
sdX 8:0 0 111.8G 0 disk
sdX1 8:1 0 512M 0 part /boot
sdX2 8:2 0 64G 0 part /u01
sdX3 8:3 0 16G 0 part /
sdX4 8:4 0 1K 0 part
sdX5 8:5 0 8G 0 part [SWAP]
sdX6 8:6 0 16G 0 part /var
sdY 8:32 0 558.9G 0 disk
sdY1 8:33 0 46.6G 0 part /bkupa
sdY2 8:34 0 186.3G 0 part
mdN 9:2 0 186.1G 0 raid1 /export
sdZ 8:48 0 558.9G 0 disk
sdZ1 8:49 0 46.6G 0 part /bkupb
sdZ2 8:50 0 186.3G 0 part
mdN 9:2 0 186.1G 0 raid1 /export
Note:
In some cases, thefeatureCard_acslsStorageManager.sh script may need to reconfigure or otherwise perform cleanup, and ask you to reboot. Please reboot as directed. Once the system reboots, open a terminal window and run that script again so it can complete its work. See "Step 8: Initialize and Configure the Storage Cards".The configuration setup leverages the two attached disk drives (/dev/sdY and /dev/sdZ in the example above) to do the following:
-
Formats both storage cards, each with a single 200GB partition for ACSLS data.
-
Pairs the two disks into a RAID-1 configuration as device
/dev/md1(or/dev/md2). -
Mounts
/dev/md1(or/dev/md2) to/export. -
Mounts the RAID device.
-
Creates two 50GB partitions for assorted backup files,
sdY2andsdZ2, including a copy ofACSLS_8.5.1.X.Y_Linux.zip. -
Creates the directories
/export/home,/export/backup,/export/PACKAGE, and/opt/ACSLS, if not already present.
Oracle recommends that you label the feature card and the two feature storage cards using an external label. If you remove these components for servicing or other reasons, ensure that you replace them in the locations from which they were removed. Example labels might be:
-
For Feature Card Kit 1: Feature Card Left –Side-A, Storage Card Left 1, Storage Card Left 2
-
For Feature Card Kit 2: Feature Card Right –Side-B, Storage Card Right 1, Storage Card Right 2
Step 10: Extract the ACSLS Software Bundle
To extract the ACSLS software:
-
If you have previously attempted to install ACSLS on the feature card, you may have extraneous files remaining. Ensure that no previously downloaded versions of ACSLS are present.
You may not have directories
ACSLS_8.5.0orACSLS_8.5.1, depending on whether any previous ACSLS installations were performed on the feature card and not subsequently removed.To remove previous versions of ACSLS:
cd /opt/ACSLS
rm -rf ACSLS_8.5.0*
rm -rf ACSLS_8_5_1*
-
Copy the ACSLS download bundle from the feature card directory of
/tmpto the ACSLS installation area. For example, to copy from the location/tmpto/opt/ACSLS:cp /tmp/ACSLS_8.5.1.X.Y.Linux.zip /opt/ACSLS
-
Unzip the ACSLS bundle:
unzip ACSLS_8.5.1.X.Y.Linux.zip
The ACSLS 8.5.1 files are extracted to the directory
/opt/ACSLS/ACSLS_8.5.1. -
Verify the presence of the extracted files in the directory
/opt/ACSLS/ACSLS_8.5.1.ls /opt/ACSLS/ACSLS_8.5.1
The following files should appear, amongst others:
ACSLS-8.5.1-X.Y.x86_64.rpm
fc_config_scripts.zip
pkg_install.sh
pkg_uninstall.sh
PostgreSQL-10.5-0-OL6.x86_64.rpm
PostgreSQL-10.5-0-OL7.x86_64.rpm
public-yum-ol6.repo
public-yum-ol7.repo
README.txt
wlUpdate
-
Once you have confirmed that all files are readily available, you can then remove any copies of the
ACSLS_8.5.1-X.Y.Linux.zipfrom/tmpand/root/Downloads.
Installing, Configuring, and Running ACSLS on the Feature Card
Once you have initialized and configured the feature card, you must install and configure the ACSLS software on the card.
Step 1: Installing ACSLS
Installation of ACSLS 8.5 and later differs significantly from previous ACSLS releases.
Before installing ACSLS 8.5 and later on the feature card, ensure that you have completed all initialization and configuration tasks described earlier in this chapter.
Additionally, ensure that you have completed the pre-installation tasks described in Chapter 3, "Installing ACSLS on Linux". Reference the sections on configuring YUM, creating user accounts and groups, and installing ACSLS.
Note:
-
ACSLS must be installed in the default directories on the feature card. User-defined directories are not supported.
-
ACSLS 8.5 and later uses the StorageTek Library Control Interface (SCI) protocol to connect with and operate the library. It does not use direct SCSI communications with the SL4000.
-
ACSLS 8.5 and later on a feature card does not support the ACSLS High Availability package on Linux. Instead, use the ACSLS Feature Card Availability Toolkit (FCAT).
-
ACSLS 8.5 and later on a feature card does not support the ACSLS SNMP Agent.
-
You must follow all steps for configuring the SL4000 to ACSLS as described in the ACSLS Administrator's Guide.
Once installation is complete, ACSLS resides on a RAID-1 disk pair under the /export file system.
Three redundant backup directories, /bkupa, /bkupb, and/bkupc, store the downloaded ACSLS package and the customized Linux system files. Copies of unexpired ACSLS database backup files are also maintained in these locations.
You may need to manage these RAID-1 disk and backup directories when troubleshooting or addressing system faults associated with the feature card.
Step 2: Configuring and Running ACSLS
Follow the instructions provided in the ACSLS Administrator's Guide to use
acsss_config to configure ACSLS and create a database image of your library. Although local backups of the database on the feature card will be created, it is highly recommended that you also establish periodic backups of your database to tape media or a storage server outside of the library as part of your own organization's disaster recovery processes.
Before running acsss_config, ensure that you have completed the following library configuration tasks using the SL4000 GUI:
-
Define an SL4000 library certificate, including the Library Name (CN). This name must match that used in
acsss_configandconfig new acs. If using a host name (DN), not an IP address, it must also resolve to the same exact name. -
Define an SL4000 user that the ACSLS SCI interface can use to connect to the SL4000 library.
-
Ensure that the SL4000 library is SCI capable, or has an SCI capable partition.
-
Ensure ACSLS server time and SL4000 library time are synced within a couple minutes of each other.
Refer to the ACSLS Administrator's Guide for more information about these tasks.
Note:
ACSLS on the feature card does not support multiple library connections.There is a one-to-one correspondence between an instance of ACSLS running on the feature card to the SL4000 library that it supports. Accordingly, ACSLS, when running on the feature card, should be used only to manage the SL4000 within which the feature card is installed. It should not be used to manage other libraries within your organization.
Once configured, enter the following command to enable acsss and begin operations:
acsss enable
This command is only valid if at least one ACS is configured.
For any additional operations, refer to your ACSLS publications, as all ACSLS operations run on the feature card as they do on a standalone server.