Chapter - 6 : OIDG GnuPG Encryption and Decryption
OIDG supports GPG encrypted batch request processing .To support this you need to configure the GnuPG keys in your Linux machine. Following section describes the gpg-key creation.
Verifying GnuPG-Agent
- Log in to PuTTY.
- Run the GnuPG agent from application Linux user using below command.
gpg-agent
Output: gpg-agent: gpg-agent running and available - If the output is ‘No gpg-agent running in this session’, follow the steps to run the gpg agent.
- Enter the following command to run the gpg-agent
eval 'gpg-agent --daemon'
- It shows the location of the GPG Agent file
Now copy that file by following command
cp -fs /tmp/gpg-CENE8e/S.gpg-agent ~/.gnupg/
- Verify the status of GPG- agent
gpg-agent
- Enter the following command to run the gpg-agent
Generating GnuPG Key
- Log in to PuTTY as root.
- Give the permission to the gpg-agent by using the following command.
chmod o+rw $(tty) - Switch to the WebLogic installed user.
- Enter the following command to create GPG Key.
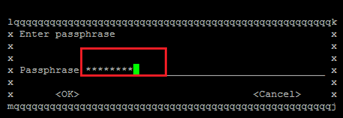
gpg --gen-key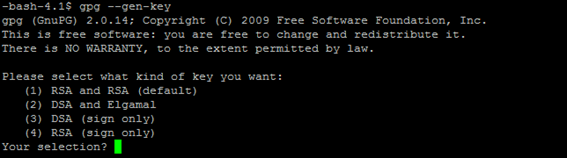
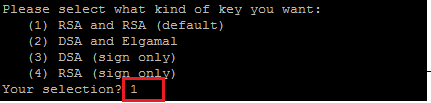
- Enter 1 as your section option (RSA and RSA).
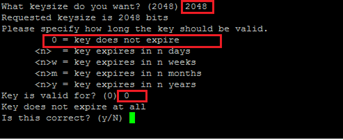
- Enter the Key size as 2048 and enter 0 for never expire.
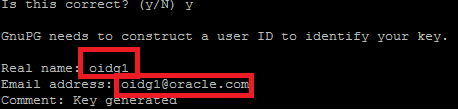
- Enter y, Real name, Email Address and Comment.
- Enter 0.
- Enter the GPG Password.
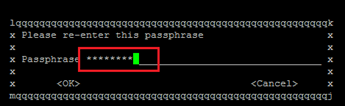
- Re-enter GPG Password.
- Now, you can check the key and secret keys using the following command:
gpg --list-secret-keys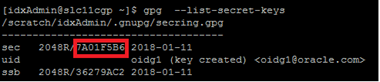
- Enter the below command to check List keys.
gpg --list-keys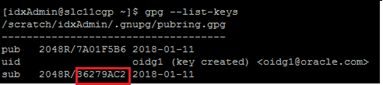
Exporting and Importing Secret Sub Keys
Exporting a Secret Key
gpg --export-secret-keys -a ‘<secret key id>’ > Full path/gpgchefsecret.asc
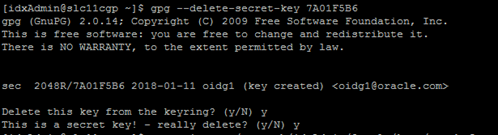
Note: <secret key id> should be highlighted value of step 11 screenshot.
Exporting a Public Key
gpg --armor --export ‘<Email id>’> Full path /gpgchefpublic.asc
Note: <Email id> should be same as the one entered in the step 7.
Backing up the Secret and Public Key and Deleting Secrete Key
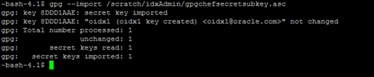
gpg --export-secret-subkeys ‘<sub id>’ > Full path /gpgchefsecretsubkey.asc
Note: <sub id > should be highlighted value of step 12 screenshot.
gpg --delete-secret-key ‘<secret key id>’
gpg --import Full path /gpgchefsecretsubkey.asc
Trusting the Keys
Trust the secret key using the below command:
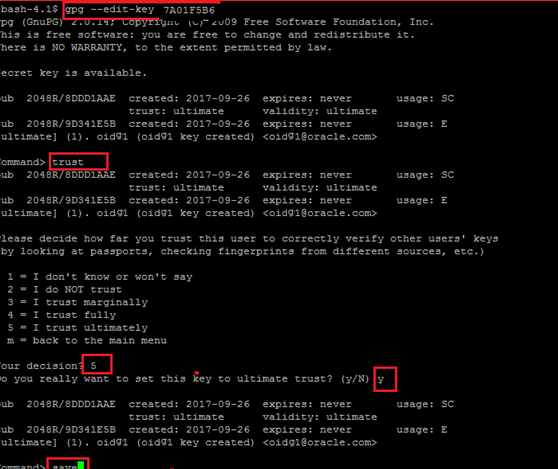
gpg --edit-key <secret key id>
Command> trust
Your decision? 5
Do you really want to set this key to ultimate trust? (y/n) y
Command> save
Steps to Find oidx.gpg.backup.key.id:
Enter gpg –list-keys command as shown below.
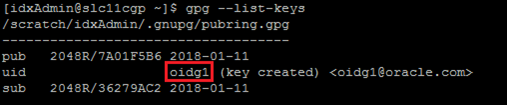
In the above screen, oidg1 is the backup key id.
Testing the gpg:
Encrypt File:
gpg -e -r " <GPG KeyID> " <InputFilePath>/<InputFileName>
Example: gpg –e –r “oidg1” /scratch/oraBase/FileMove/POLMIG_1.xml
Decrypt File:
gpg --output <OutputFilePath>/<OutputFileName>--batch –passphrase <Password> --decrypt<InputFilePath>/<InputFileName>
Example: gpg --output /scratch/oraBase/FileMove/POLMIG_TEST.xml --batch --passphrase Welcome123 --decrypt "/scratch/oraBase/FileMove/POLMIG_1.xml.gpg”
Digital Signature
To support GPG digital signature following configuration has to do
- Generate gpg public/private key pair at both sender and receiver end.
- Each has to share their public key each other and this public key are imported at their host system's by using Custom key API RESTful web service.
- The sender has to send a file which has sender has to Sign the file with their sender private key and encrypt with receiver public key.
-
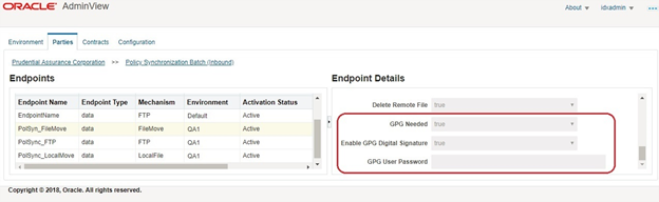
Admin view application at the Parties Endpoint page, select the gpg needed has true and give the gpg password of host private key and check the Enable digital signature check box. (This setting is used to decrypt the payload xml which has encrypted with the public key).
-
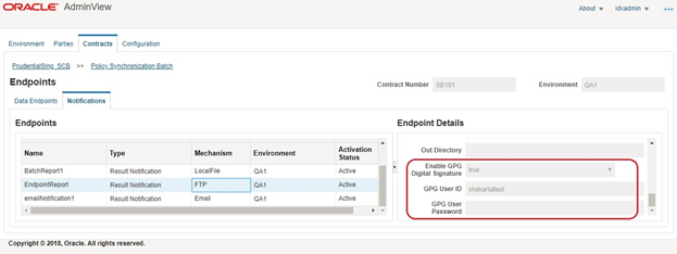
Admin view application at the Notification Endpoint page, check the Enable digital signature check box and enter host private key user id and password. (This setting is used to sign the notification report xml file which needs to send).
-
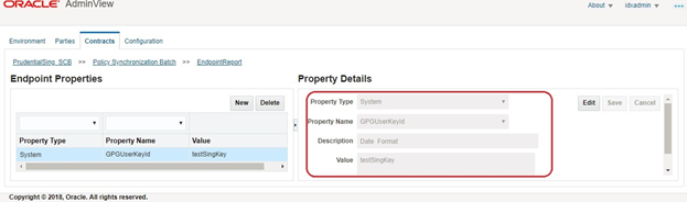
Admin view application at the Notification Endpoint >> Endpoint Properties page, select System type property and property name has GPGUserKeyId and enter the property value has sender public key name (This setting is used to encrypt the notification report xml file with sender public key).
-
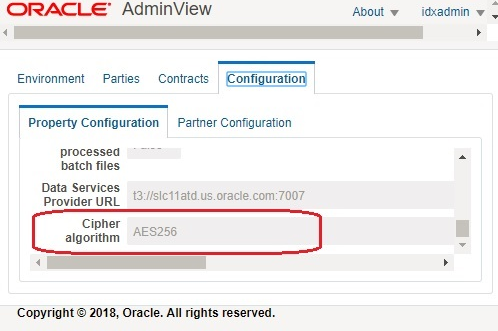
Admin view application at the Configuration >> Property Configuration page enter cipher algorithm value has AES256.
-
Use below GPG command and provide appropriate key values and encrypt payload.xml file and output will be payload.xml.gpg file, which is digitally signed and encrypted with cipher algorithm AES256.
-
GPG command : gpg --always-trust --default-key YYY(Sender private key name/id) --passphrase YYY(Sender private key passphrase) --cipher-algo AES256 -e -s -r YYY(receiver public key) payload.xml
Example : sender (Prudential) has a public/private key pair and receiver (SCB) also has a public/private key pair, when Prudential sending files to SCB.
Example : GPG command : gpg --always-trust --default-key YYY(Sender private key name/id) --passphrase YYY(Sender private key passphrase) --cipher-algo AES256 -e -s -r YYY(receiver public key) payload.xml
Specify the cipher algorithms (--cipher-algo AES256) which has to use if not it will take default cipher algorithm.
Audit Log Configuration:
Below is the configuration required for audit logging.
- Log in to WebLogic as the admin user.
- Go to Security Realms, 'myrealm', Providers and select the Auditing tab.
- Click New and provide a name.
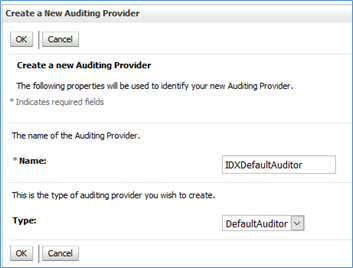
Figure 6.1 - Creating New Auditing Provider - Click the created provider and select the ‘Provider Specific’ tab.
- Select the Severity and check boxes based on requirements.
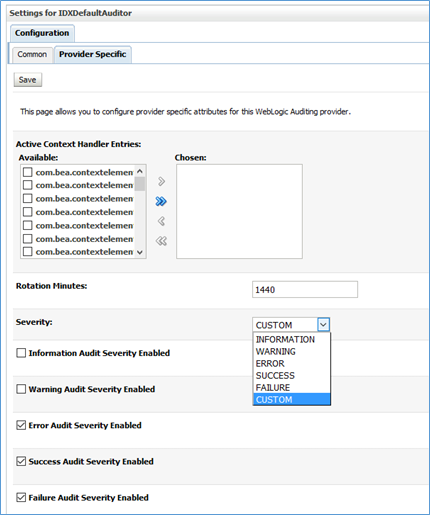
Figure 6.2 - Settings for IDXDefalutAuditor Note: It is recommended to reduce the value of Rotation Minutes to 6 hours or less, based on requirements.
- Click ‘Advanced’ and change the marker fields if necessary.
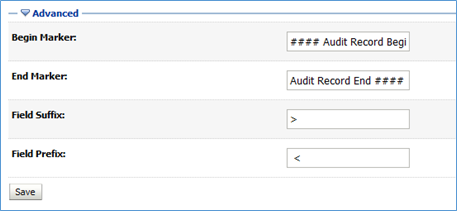
Figure 6.3 - Advanced Options - In WebLogic, click on the domain name under ‘Domain Structure’.
- On the General tab of Configuration, click on the ‘Advanced’ link at bottom of the page.
- On the ‘Configuration Audit Type’ drop down, select ‘Change Audit’ or ‘Change Log and Audit’, based on requirements.
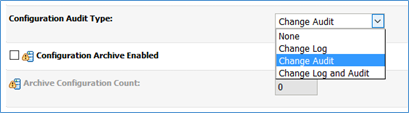
Figure 6.4 - Audit Type Configuration - In setDomainEnv.sh file add the location where the audit log files need to be generated.
AUDIT_LOG_DIR="<path>"
EXTRA_JAVA_PROPERTIES="${EXTRA_JAVA_PROPERTIES} -Dweblogic.security.audit.auditLogDir=${AUDIT_LOG_DIR}"
export EXTRA_JAVA_PROPERTIES
- Log in to the EM console and navigate to domain → Security → Audit Policy.
- Select MFT from the Audit Component Name drop down.
- Change the Audit Level to 'Medium' and then Apply.
- Navigate to domain → Security → Security Provider Configuration. Expand Security Store Provider and then Identity Store Provider.
- Click on configure and Add a new property with the name 'virtualize' and a value of 'true'. Then click on OK and OK again.
- Restart the all the servers and the audit log files should be generated at the given path.
Find the following audit log entry for a user login.
#### Audit Record Begin <Jan 24, 2018 3:38:38 AM> <Severity =SUCCESS> <<<Event Type = Authorization Audit Event V2 ><Subject: 8
Principal = class weblogic.security.principal.WLSUserImpl("OIDXAdminUser1")
Principal = class weblogic.security.principal.WLSGroupImpl("OIDXAdmin_Group")
Principal = class weblogic.security.principal.WLSGroupImpl("Administrators")
Principal = class weblogic.security.principal.WLSGroupImpl("IntegrationAdministrators")
Principal = class weblogic.security.principal.WLSGroupImpl("AdminChannelUsers")
Principal = class weblogic.security.principal.WLSGroupImpl("Monitors")
Principal = class weblogic.security.principal.WLSGroupImpl("IntegrationAdministrators")
Principal = class weblogic.security.principal.WLSGroupImpl("OracleSystemGroup")
><ONCE><<url>><type=<url>, application=consoleapp, contextPath=/console, uri=/console.portal, httpMethod=GET>>> Audit Record End ####