Deploy the Admin Console Application for Websphere
- Select Applications>New Application.
- Select New Enterprise Application.
- Use the Local file system or Remote file system browsing feature to locate the AdminConsole-websphere.war file and rename to AdminConsole.war.
- Click Next.
- Confirm that Fast Path is selected and click Next.
- On the Select installation options screen, click Next.
- On the Map modules to servers screen:
- Select the server from the scrolling list.
- Check the box for AdminConsole.war and click Apply.
- Click Next.
- On the Map resource references to resources screen, enter proper datasources and click Next.
- On the Map virtual hosts for Web modules screen, check the box for AdminConsole.war and click Next.
- On the Map context roots for Web modules screen, enter AdminConsole for the Context Root and click Next.
- On the Metadata for modules screen, Leave it as unchecked, click Next.
- Confirm the settings on the Summary screen and click Finish.
- The system lists output from the installation, with the final status at the end. Look for "Application AdminConsole_war installed successfully."
- Click the link to Save directly to the master configuration.
Create a Shared Library for AdminConsole
- Select Environment > Shared Libraries.
- Select the AdminConsole application server from the selection box.
- Click New.
- For the Name field, enter SharedLibs.
- For the Classpath field, enter the full paths to the following jar files (using the directory that was created in steps 4 and 5 in the AdminConsole Setup section):
- eclipselink-2.6.4.jar
- commons-logging-1.2.jar
- log4j-api-2.9.1.jar
- javax.persistence-2.1.1.ar
- javax.ws.rs-api-2.0.1.jar
- db2jcc4-10.1.jar (Only If IBM DB2 database)
- ojdbc8-12.2.0.1.jar (Only If Oracle database)
- For the Native Library Path field, enter the full path for the following jar file:
- el-api-2.2.jar
- Check "Use an isolated class loader for this shared library" under class loading and Click OK.
- Save the configuration changes.
- Select Applications>WebSphere enterprise applications.
- Click on the AdminConsole application.
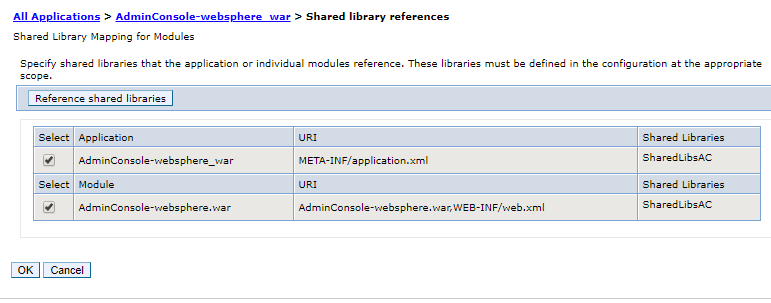
- Under the References heading, click the Shared library references link.
- Check the AdminConsole.war module and click the Reference shared libraries button.
- In the Available box, click on SharedLibs and then click the >> button. This will move SharedLibs to the Selected box.
- Click OK.
- Click OK.
- Save the configuration changes.Configure the AdminConsole Application
- Select Applications>Application Types>WebSphere enterprise application.
- Select the AdminConsole.war application.
- Under Detailed Properties, click Class loading and update detection.
- Select Classes loaded with local class loader first (parent last) option.
- Select Class loader for each WAR file in application option.
- Click OK.
- Save the configuration.
- Add the websphere security, the Admin Console security in version 1.0 will be a FORM based authentication and authorization using container based security model.


Please follow the security document for webpshere to add security roles and groups. Admin Console - Webpshere Security.
Start the AdminConsole Application
- Select Servers>Server Types>WebSphere application servers.
- Select the AdminConsole application.
- Click Start.
- Look for the message: "<server name> server started successfully."
Using a web browser, connect to the Administrative Console using the appropriate server_name and port. (Ex: server_name:port/admin" class="external-link" rel="nofollow">http://server_name:port/admin).
AdminConsole Deployment
- Open a browser.
- Navigate to http://hostname:port/AdminConsole/index.html.
