Upload Rates from Select Table
This is no longer necessary as now Aggregate, Select and Ultimate are all the same.
Select tables are used when two indexes are needed for the rating strategy.
Steps to Create a Select Rate Group
-
Navigate to Admin Explorer.
-
Select and right-click on the Rate Groups folder.
-
Select New Rate Group.
-
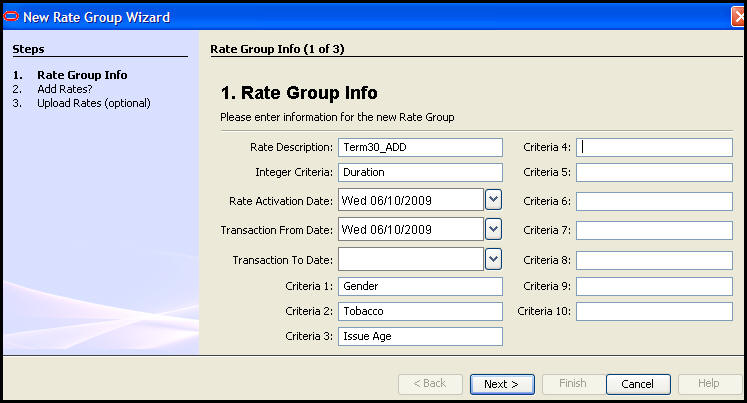
Enter the Rate Description. This is a descriptive name that is used to identify the rates. It should be the name provided with the rate table. This name will be stored as the RateDescription in AsRateGroup and AsRate.
-
Enter the Integer Criteria. This is the main index in the database table. Duration is always the Integer Criteria for Select tables.
-
Enter the Rate Activation Date. This date is used in conjunction with a policy’s effective date to identify when a set of rates is active for a policy. The policy must be effective on or after the date listed here. Rate Activation Date is stored as EffectiveDate in the AsRateGroup table.
-
Enter the Transaction From Date. Transactions that occur on or after this date will use the associated rates. Transaction From Date is stored as the ActiveFromDate in AsRateGroup.
-
Enter the Transaction To Date. When loading new rates, this field should be left blank. The Transaction To Date is stored as the ActiveToDate in AsRateGroup.
-
Enter the descriptions for Criteria 1 through Criteria 10 and select Next. The descriptions should be entered as they appear in the Excel spreadsheet. Criteria names must remain constant for all rate groups in the system. These criteria names will correlate to columns in your rate table. Criteria names are case sensitive so make sure the names match exactly.
Step One of Rate Group Wizard
-
Determine how the rates should be added.
-
Select Yes and then Next to upload an Excel spreadsheet of Select rate information. Continue with the steps below for uploading an Excel spreadsheet.
-
Select No and then select Finish to add rates manually using the Rate Group Editor.
-
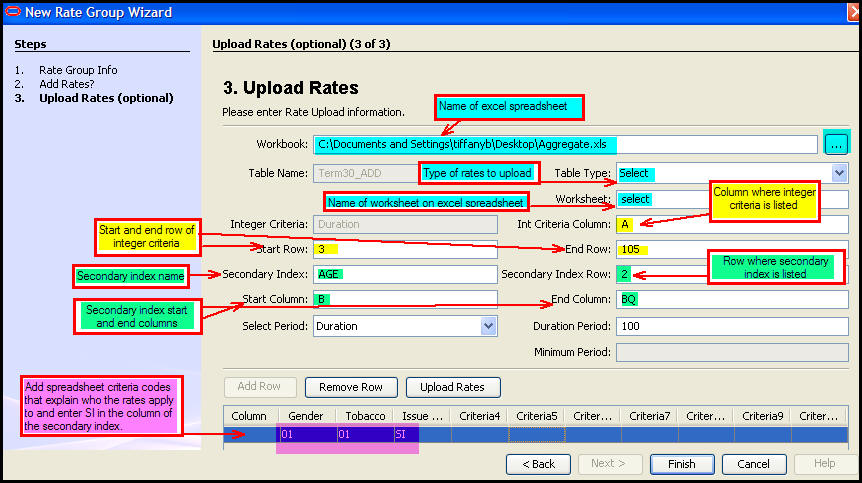
Browse to the location of the worksheet that contains the rates to upload.
-
Specify Select as the table type (rate type) to be uploaded.
| Important | Make sure the IntegerCriteria is listed as Duration. |
-
Enter the literal worksheet name (exactly as appears on the spreadsheet) in the Worksheet field.
-
Enter the spreadsheet column identifier that contains the Initial Integer Criteria for the intended indexing strategy.
-
Enter the starting and ending row numbers that contain the rates to be uploaded.
-
Enter the Secondary Index criteria. In the screen shot above the Secondary Index is IssueAge.
-
Enter the row on the spreadsheet where this secondary integer begins in the field labeled Secondary Index Row.
-
Enter the starting and ending column letters that contain the rates to be uploaded in the fields labeled Start Column and End Column.
-
Select the Select Period. There are several options. The option chosen will define the label of the last field on the screen.
-
Enter the Duration. The Duration is typically 100 years.
Step Three of Rate Wizard
-
Select Add Row.
-
Enter the code value for the first criteria. In the example above, this spreadsheet contains rates for a male smoker. The code value for male is 01.
-
Enter the code value for the next criteria. In the example above, this spreadsheet contains rates for a male smoker. The code value for smoker is 01.
-
Enter SI in the field for the secondary index. In the example above, the secondary index is Issue Age so SI is entered in that field.
-
Select Finish. The rates will upload and display in the Configuration Area when complete.