Create a Shared Library for ServiceLayer
- Select Environment > Shared Libraries.
- Select the ServiceLayer application server from the selection box.
- Click New.
- For the Name field, enter SharedLibs.
- For the Classpath field, enter the full paths to the following jar files (using the directory that was created in steps 4 and 5 in the ServiceLayer Setup section):
aspectjrt-1.8.10.jar
aspectjweaver-1.8.10.jar
commons-logging-1.2.jar
coherence.jar
oraclepki.jar
osdt_cert.jar
osdt_core.jar
eclipselink-2.6.4.jar
javax.persistence-2.1.1.ar
javax.ws.rs-api-2.0.1.jar
db2jcc4-10.1.jar (Only If IBM DB2 database)
ojdbc8-12.2.0.1.jar (Only If Oracle database)
-
For the Native Library Path field, enter the full path for the "el-api-2.2.jar" file.
-
Check "Use an isolated class loader for this shared library" under class loading and click OK.
-
Save the configuration changes.
-
Select Applications>WebSphere enterprise applications.
-
Click on the ServiceLayer application.
-
Under the References heading, click the Shared library references link.
-
Check the PASService.war module and click the Reference shared libraries button.
-
In the Available box, click on SharedLibs and then click the >> button. This will move SharedLibs to the Selected box.

-
Click OK.
-
Click OK.
-
Save the configuration changes. Configure the ServiceLayer Application
-
Select Applications>Application Types>WebSphere enterprise application.
-
Select the PASService.war application.
-
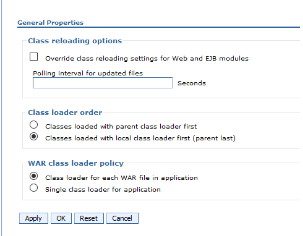
Under Detailed Properties, click Class loading and update detection.
-
Select Classes loaded with local class loader first (parent last) option.
-
Select Class loader for each WAR file in application option.
-
Click OK.
-
Save the configuration.
-
Add the WebSphere security (the service layer security which is the BASIC authentication and authorization using container based security model).
Note: Follow the security document for WebSphere to add security roles and groups.
Start the ServiceLayer Application
- Select Servers>Server Types>WebSphere application servers.
- Select the ServiceLayer application.
- Click Start.
- Look for the message: "<server name> server started successfully."
Using a web browser, connect to the Administrative Console using the appropriate server_name and port. (Ex: server_name:port/admin" class="external-link" rel="nofollow">http://server_name:port/admin).
Test the Deployments
The initial test of the deployment is to confirm that the application presents a Login screen when the application URL is opened. Final testing of the ServiceLayer deployment must wait until after the Web Application Utility is configured and initial users have been set up.
ServiceLayer Deployment
- Open a new Internet Explorer window.
- Navigate to http://hostname:port/PASService/dist/index.html.
Note: If you change the context name, use that name in the URL instead of PASService.
- Confirm that the http://hostname:port/PASService/dist/index.html screen appears.
