Configuring Toolbars
To configure toolbars, use the Toolbar Definition (EOTL_TOOLBAR) component.
This section discusses how to configure toolbars.
|
Page Name |
Definition Name |
Usage |
|---|---|---|
|
EOTL_TOOLBAR_DEFN |
Define general toolbar attributes. |
|
|
EOTL_TOOLBAR_BTNS |
Configure toolbar buttons. |
|
|
EOTL_TOOLBAR_DISP |
Configure component-specific toolbar content. |
|
|
EOTL_TOOLBAR_FFLD |
Specify the default cursor position for pages. |
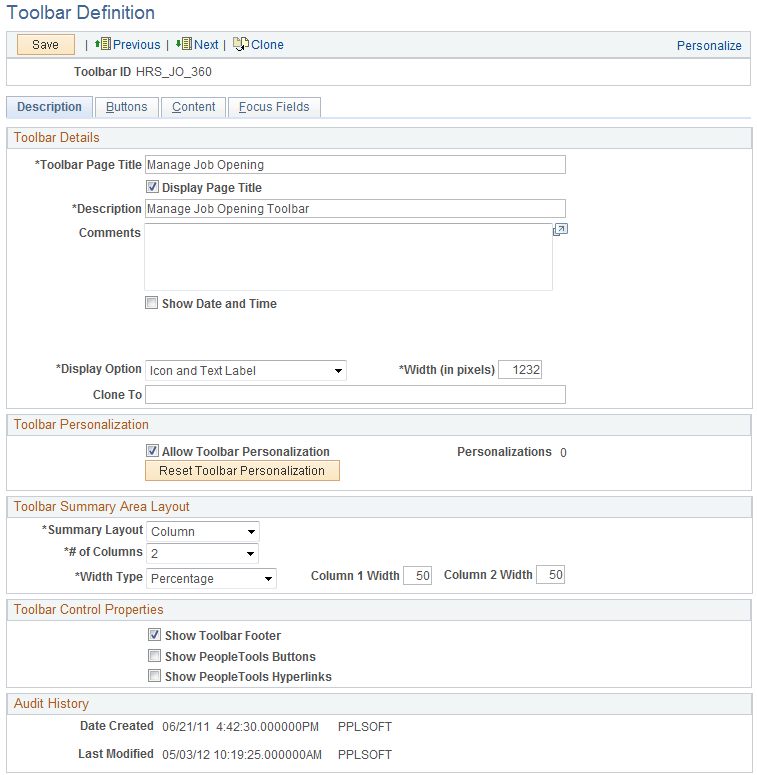
Use the Toolbar Definition - Description page (EOTL_TOOLBAR_DEFN) to define general toolbar attributes.
Navigation
Image: Toolbar Definition - Description page
This example illustrates the fields and controls on the Toolbar Definition - Description page. You can find definitions for the fields and controls later on this page.
|
Field or Control |
Definition |
|---|---|
| Toolbar ID |
Displays the toolbar's unique identifier. This ID is referenced in PeopleCode to manipulate toolbar properties. |
Toolbar Details
|
Field or Control |
Definition |
|---|---|
| Toolbar Page Title |
Enter a page title that is displayed on the left side of the page above the toolbar buttons. A page title is not a required toolbar element, but it is recommended. |
| Display Page Title |
Select to have the page title displayed. The default state for page title is set to On. Page title can be set dynamically through PeopleCode. |
| Description |
Enter a description of the toolbar (for example, the name). This is a required field that is used to help users identify the toolbar on the Toolbar Definition component. |
| Show Date and Time |
Select to have the date and time (in the user's time zone) appear on the toolbar when the user accessed the component associated with the toolbar. |
| Display Option |
Select Icon Only, Icon and Text Label, or Text Only. You can see about seven buttons on the toolbar at a time, if both the button and text are displayed. This number varies depending on the length of text and language used in the application. Grey vertical separators appear between each button. Text links are active links all the time, not just on the roll over state. Buttons are clickable as well as any space between the button and the text. Any remaining buttons can be accessed by using the << or >> button on the left and right side of the buttons. Only secondary buttons are scrollable; primary buttons always appear. When you scroll to the right, the last button to the right becomes the first button on the next scroll set. The same is true when you scroll to the left. |
| Width (in pixels) |
Enter the width of the toolbar in pixels. The default toolbar width is set to 745 pixels. |
| Clone To |
Enter the ID of the new toolbar that the system clones from the current toolbar when a user clicks the clone button on the toolbar of this page. |
Toolbar Personalizations
|
Field or Control |
Definition |
|---|---|
| Allow Toolbar Personalization |
Select to allow toolbar personalization. |
| Personalizations |
Displays the number of user personalizations that the toolbar currently has. This information helps administrators to evaluate the usability of the current toolbar settings and to determine the impact that updating a toolbar has on users. |
| Reset Toolbar Personalizations |
Click to delete any toolbar personalizations that users performed. When changes to the toolbar functionality occur, administrators can use this button to refresh users' toolbar settings. |
Toolbar Summary Area Layout
|
Field or Control |
Definition |
|---|---|
| Summary Layout |
Select Column or Row. The summary information area will be displayed under the button bar only after a customer or contact has been selected. Depending on the application, the summary area may contain other information besides customer information. The information in the content area is displayed in a two-column format, with the number of fields being configurable. |
| # of Columns (number of columns) |
You can select a one or two column display if you select columns for the summary layout. The recommended number of columns is 2. |
| Width Type |
Define the width of the columns using either a pixel or percentage amount. |
| Column 1 Width and Column 2 Width |
Enter the width of the item display area in pixels or as a percentage of the total toolbar width. If pixel is used, be sure that the sum of width of the columns does not equal or exceed the toolbar width value (some border and spacing values make the total width less than the toolbar width specified). If percentage is used, be sure that the width of all columns does not exceed 100%. |
Toolbar Control Properties
Select to have the toolbar footer, PeopleTools buttons, and PeopleTools links displayed. It is suggested that you disable the PeopleTools buttons and links from being displayed because it may cause confusion to users if the button used for the same function appears twice on a page. When using a new toolbar, it is recommended that you disable the PeopleTools generated folder tabs from the component property settings.
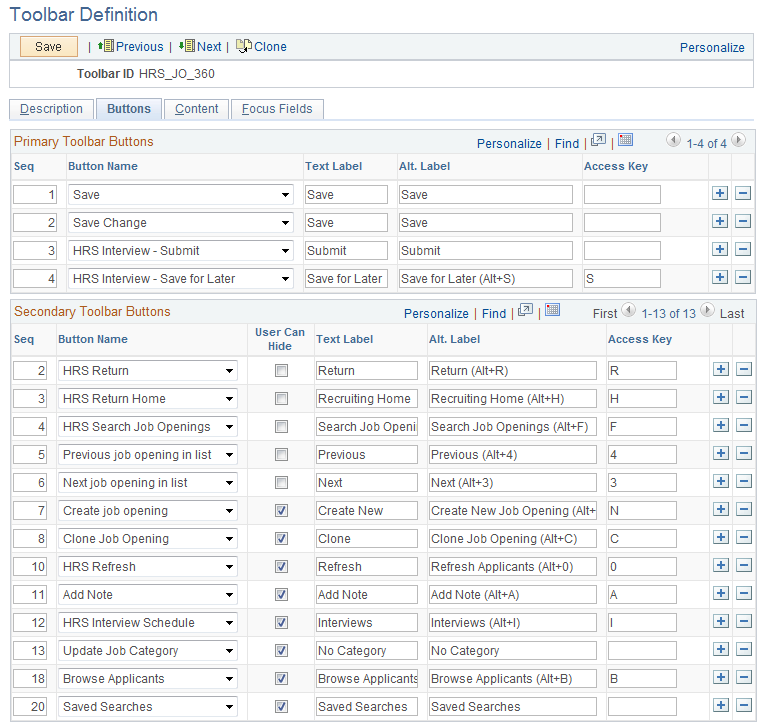
Use the Toolbar Definition - Button page (EOTL_TOOLBAR_BTNS) to configure toolbar buttons.
Image: Toolbar Button Definition - Buttons page
This example illustrates the fields and controls on the Toolbar Button Definition - Buttons page. You can find definitions for the fields and controls later on this page.
|
Field or Control |
Definition |
|---|---|
| Seq (sequence) |
Enter sequence numbers to determine the order of the toolbar buttons. |
| Button Name |
Select the button to place on the toolbar. Buttons that perform custom actions cannot necessarily be shared between components because these actions can be component-specific. Use the separator image (a vertical line) as needed to group buttons. |
| User Can Hide |
Select to allow users to show or hide the button from the toolbar on the Personalize Toolbar page. You may not want to give users the ability to manipulate the visibility of some basic yet important toolbar functions, such as Save or Add. In this case, clear the check box of these buttons. These buttons become required buttons that users cannot manipulate on the Personalize Toolbar page. They always show up in the toolbar. |
| Text Label |
Specify the text that is displayed on the button (for primary toolbar buttons) or next to the button (for secondary toolbar buttons) if the toolbar is configured to show both button icon and text. |
| Alt. Label (alternate label) |
Enter the text that users can see if they put the mouse over the button. |
| Access Key |
If you enter an access key, the keyboard shortcut Alt + access key brings the system focus to the associated button. You must terminate the access key with the enter key to execute the toolbar button function associated with the hotkey. Access key is disabled in toolbar footers. |
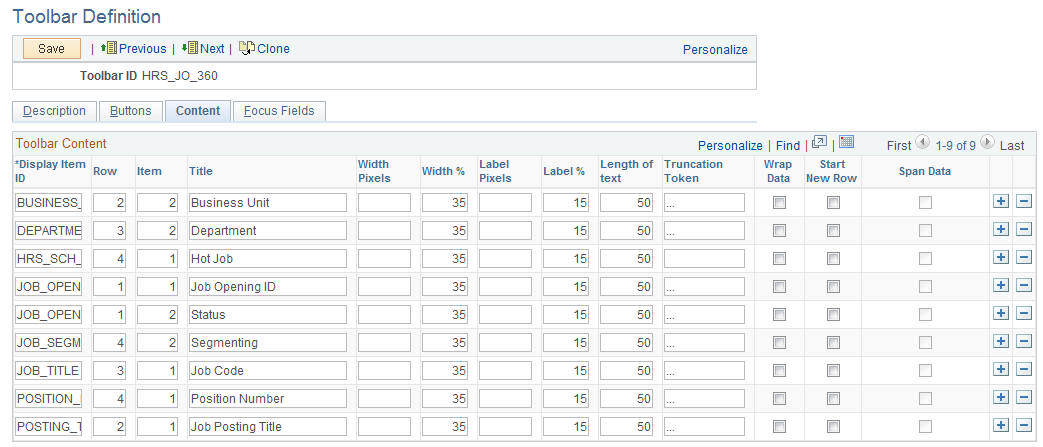
Use the Toolbar Definition - Content page (EOTL_TOOLBAR_DISP) to configure component-specific toolbar content.
Navigation
Enterprise Components
Image: Toolbar Definition - Content page
This example illustrates the fields and controls on the Toolbar Definition - Content page. You can find definitions for the fields and controls later on this page.
|
Field or Control |
Definition |
|---|---|
| Display Item ID |
Enter the ID of the data to appear on the toolbar. The ID and the data that it references come from an array that component PeopleCode populates. |
| Row |
Enter the toolbar row in which the content appears. Row 1 appears under the button bar. If you define display items for additional rows, those rows appear in order under row 1. |
| Item |
Enter the position of the item in the row. Enter 1 for the item that appears in the leftmost position in the row, 2 for the next label to the right, and so forth. |
| Title |
Enter a label for the item. |
| Width Pixels, Width %, Label Pixels and Label % |
Enter the width of the display item label and data in pixels or as a percentage of the total toolbar width. If the latter, be sure that the total percentage for all fields on the same row does not exceed 100%. It is recommended that you indicate widths in percentage because the toolbar layout is adjusted automatically. The general guideline is 20% for the display item label, and 30% for the display item data. If pixel is used (for advanced HTML usage), the total width of all display columns on the same row should not equal or exceed the width of the toolbar as defined. |
| Length of text |
Enter the maximum number of characters of data (not label text) that can appear in this row. The text is truncated with the specified truncation token if it exceeds the length of text value, and is wrapped if it is too long for the width that you specify. |
| Truncation Token |
Enter the characters that indicate truncated data. This appears when the data is longer than the value that you entered in the Length of text field. |
| Wrap Data |
Select to wrap data if its length exceeds what is specified for the text length. |
| Start New Row |
Select if the display item should start on the next new row. |
| Span Data |
Select to let the display item span across horizontally to use the other column to display its long item value. This option is enabled only when Start New Row field is selected. |
Use the Toolbar Definition - Focus Fields page (EOTL_TOOLBAR_FFLD) to specify the default cursor position for pages.
Navigation
Image: Toolbar Definition - Focus Fields page
This example illustrates the fields and controls on the Toolbar Focus Fields Definition page. You can find definitions for the fields and controls later on this page.
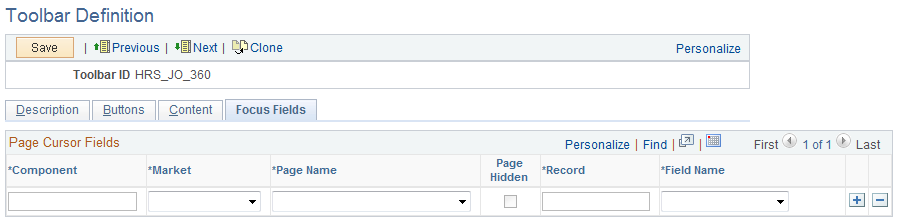
For pages that uses the toolbar, you can specify the field in which the cursor always appears when the page is rendered. The toolbar doesn't set the cursor position for any page that either doesn't have a focus field defined in the toolbar definition or its focus field doesn't exist on the page, for example, the button is hidden, or is removed from the page after the toolbar definition.
|
Field or Control |
Definition |
|---|---|
| Component, Market, and Page Name |
Enter the component and market of the page in which the selected toolbar definition is referenced. The component you enter determines the drop-down values for page names. |
| Record and Field Name |
Enter the record where the focus field resides and the focus field itself. The record you enter determines the drop-down values for field names. Multiple fields on the same page can be defined. This is useful when you want to set the cursor on a different field when the user enters the page in a different type of transaction mode. The toolbar always puts the cursor to the first editable, available field on the page. |
Access any PeopleSoft page that uses the toolbar.
Image: Toolbar used on the Manage Job Opening page (HRS_JO_360)
This example illustrates the toolbar used on the Manage Job Opening page (HRS_JO_360).
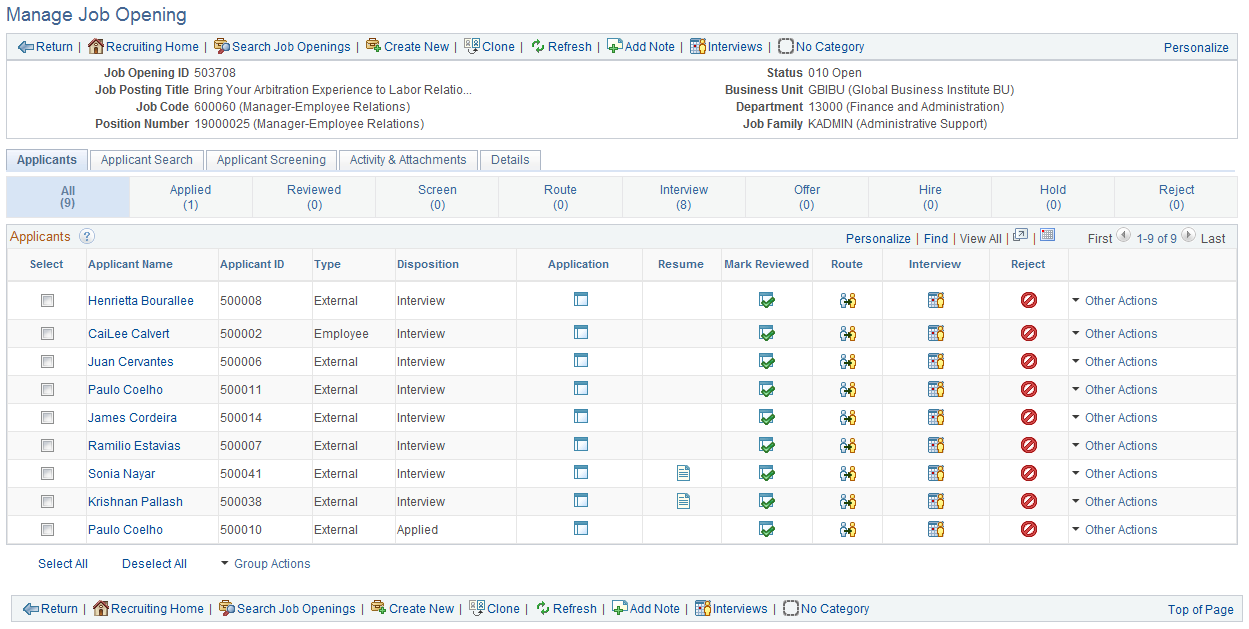
Confirm that the toolbar buttons, content, and other controls work and are displayed as intended.
At runtime, you can find out which toolbar that a page is using (for debugging purposes). To do so, right click on the toolbar area of the page to view the HTML source code, and look for keywords TOOLBAR ID If the page uses the toolbar, a comment appears in the source code that indicate the actual toolbar being used, for example:
<!-- TOOLBAR ID: [HRS_JO_360] -->