Using the PeopleSoft Outlook Menu
This section provides an overview of the PeopleSoft and Outlook integration, and discusses how to:
Define settings and options.
Use the PeopleSoft Scheduler and Scheduling Assistant.
Replicate appointments, meetings, tasks, and address books.
Within Microsoft Outlook, the following two components are installed that enable all of the communication and interaction between Microsoft Outlook and the PeopleSoft system:
The Microsoft Add-In—this is represented in the PeopleSoft Outlook menu and handles all of the communication and information within Microsoft Outlook.
The PeopleSoft Outlook URL Handler—this is an external Windows application that allows you to drill into Microsoft Outlook directly from the PeopleSoft system.
When you select Settings & Options from the PeopleSoft menu in Microsoft Outlook, the following pages are available:
Servers page—shows the server detail (such as the server URL, connectivity, and the server functions that you selected).
Options page—shows the display options and frequency of updates.
Status Log page—shows the send and receive data and errors in the log.
Note: After the Microsoft Outlook Add-In installation completes, you must go to the Settings and Options - Servers page (PeopleSoft Outlook menu, Settings & Options, Servers) and define the server URL and functions.
The server must show the Enable check box selected to attempt connectivity. If the server was determined to be online during the last connection attempt, the Online check box is selected.
Defining the Servers Page
Access the PeopleSoft Settings and Options - Servers page (PeopleSoft Outlook menu, Settings & Options, click the Servers page).
Use the PeopleSoft Settings and Options - Servers page to define the server URL that you want to connect to and the functions that you want to assign to the server.
Image: PeopleSoft Settings & Options - Servers page
This example illustrates the fields and controls on the PeopleSoft Settings & Options - Servers page. You can find definitions for the fields and controls later on this page.
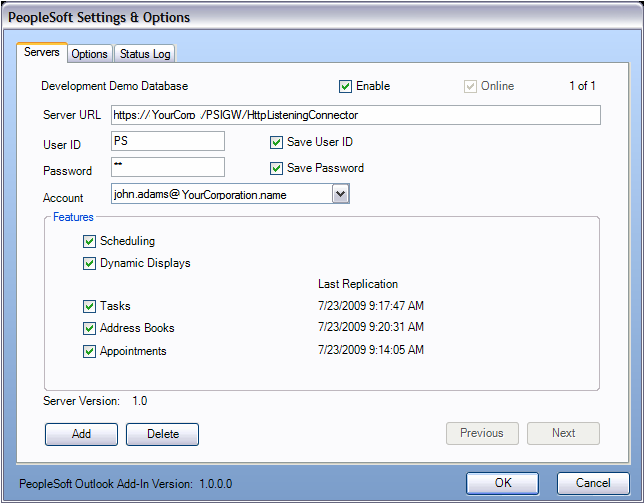
Define the URL and functions to assign to the server:
|
Field or Control |
Definition |
|---|---|
| Enable |
The server must show this check box selected to attempt connectivity. If the server was determined to be online during the last connection attempt, the Online check box is selected. |
| Server URL |
Enter the URL of the server that you want to connect to. This is your Integration Broker URL. |
| User ID |
Enter your User ID. |
| Save User ID |
Select to save your User ID in the system and avoid the need for future entry. |
| Password |
Enter your password. |
| Save Password |
Select to save your password in the system and avoid the need for future entry. |
| Account |
Select an account in the form of the email address of the user. You can select from a list of multiple accounts. The selected account drives the information from the parameters that you defined in the Outlook setup. |
| Features |
Select the features that you want to use. Values are:
|
| Add |
Click to add a new server option. Note: This section of the PeopleSoft Settings & Options - Servers page shows the current version of the PeopleSoft Outlook Add-In and the server that you are using. |
| Delete |
Click to delete an existing server option. Alternatively, you can disable a server by clearing the Enable check box. |
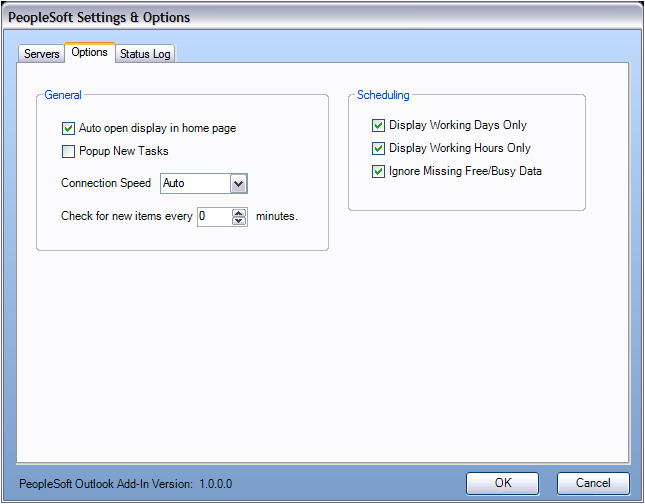
Defining the Options Page
Access the PeopleSoft Settings & Options - Options page (PeopleSoft Outlook menu, Settings & Options, click the Options page).
Use the PeopleSoft Settings & Options - Options page to review or select your display features and frequency of updates.
Image: PeopleSoft Settings & Options - Options page
This example illustrates the fields and controls on the PeopleSoft Settings & Options - Options page. You can find definitions for the fields and controls later on this page.
|
Field or Control |
Definition |
|---|---|
| Auto open display in home page |
Select to automatically open the display in your Microsoft Outlook home page. |
| Popup New Tasks |
Select to be alerted by popup messages when a new task falls into your queue. |
| Connection Speed |
Select to specify the connection speed. Values are:
You can adjust your connection speed which will adjust the chunk size when sending and receiving files. In Desktop Integration's File Transfer page, an option exists to override your connection speed. |
| Check for new items every |
Specify the frequency of system updates in minutes. This determines how often you want to replicate the PeopleSoft system information. If set to 0, no replication will take place. |
| Display Working Days Only |
Select to only display working days by default in the PeopleSoft Scheduling Assistant. |
| Display Working Hours Only |
Select to only display working hours by default in the PeopleSoft Scheduling Assistant. |
| Ignore Missing Free/Busy Data |
Select for the system to ignore missing free/busy data. When you select this option you avoid unnecessary clutter from unavailable data. |
Reviewing the Status Log Page
Access the PeopleSoft Settings & Options - Status Log page (PeopleSoft Outlook menu, Settings & Options, click the Status Log page).
Use the PeopleSoft Settings & Options - Status Log page to review the send and receive data and any errors in the log.
Image: PeopleSoft Settings & Options - Status Log page
This example illustrates the fields and controls on the PeopleSoft Settings & Options - Status Log page. You can find definitions for the fields and controls later on this page.
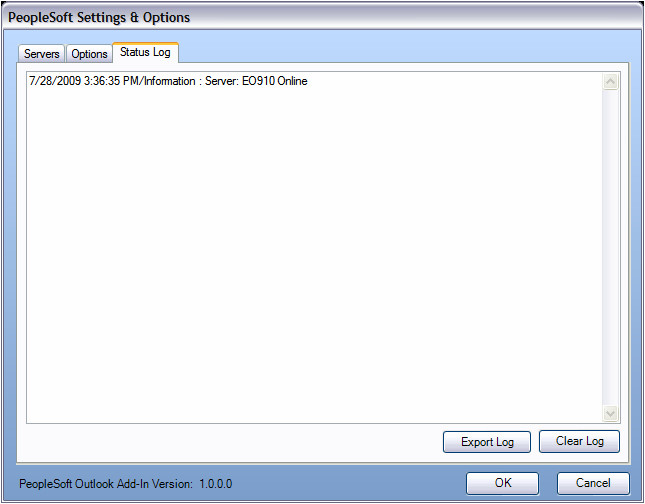
If you are experiencing any issues, you can access this page and clear the log or export and save the log information. This log is only available in the current session. If you exit Microsoft Outlook, and then log back in, the log information is erased and no longer visible. This page also displays the current version of the PeopleSoft Outlook Add-In that you are using.
Use the PeopleSoft Scheduler page and Scheduling Assistant to expand the functionality of your appointments, meetings, address books, and messages.
The PeopleSoft Scheduling Assistant helps you manage and schedule all of your PeopleSoft meetings.
Navigation
PeopleSoft Outlook menu, Scheduling Assistant
Image: PeopleSoft Scheduler page
This example illustrates the fields and controls on the PeopleSoft Scheduler page. You can find definitions for the fields and controls later on this page.
The PeopleSoft Scheduler page and Scheduling Assistant provide the following features and functionality:
Meetings Group Actions
|
Field or Control |
Definition |
|---|---|
| Send |
Click to send the selected meeting or group of meetings. |
| Cancel |
Click to cancel the selected meeting or group of meetings. |
| Save Group |
Click to save the selected meeting or group of meetings. |
| Add Meeting |
Click to add a meeting. |
| Refresh |
Click to refresh. This action retrieves the data from the PeopleSoft system. If you have unsaved data the system prompts you to save now, or your data will be lost. |
Selected Meeting Actions
|
Field or Control |
Definition |
|---|---|
| Send Invitations |
Click to send the selected invitation or group of invitations. |
| Cancel Meeting |
Click to cancel the selected meeting or group of meetings. |
| Save Meeting |
Click to save the selected meeting or group of meetings. |
| Address Book |
Click to add someone from your address book to the selected meeting or group of meetings. |
| Check Names |
Click to initiate the system to verify that your selected participants have valid email addresses. |
| Delete |
Click to delete the selected meeting or group of meetings. |
| Send as iCal |
Click to send the selected meeting as an iCalendar attachment. |
| Custom Message |
Click to send a custom message, and then select Message to choose which message you want to use. |
| Message |
Click to choose the message you want to use. |
Options
|
Field or Control |
Definition |
|---|---|
| Message To All Attendees |
Click to send the same message to multiple people. |
| Display |
From the drop-down list, select the features that you want to display in your Outlook homepage. Values are:
|
Meeting Queue
When you look in the Meeting Queue display, you see everything that is assigned to you to be scheduled. You can click a specific meeting (line item) to display the meeting details in your Outlook homepage.
These options enable you to filter what is visible in your Meeting Queue.
|
Field or Control |
Definition |
|---|---|
| Filter |
Select from the available options to display in your Outlook homepage:
|
| Save All |
Click to save everything selected in your Meeting Queue. |
| Refresh |
Click to refresh your Meeting Queue. |
PeopleSoft
|
Field or Control |
Definition |
|---|---|
| Display |
Displays Dynamic Displays for the current document. |
The replication options in the PeopleSoft Outlook menu have no dialog or visual component. These items are replicated to and from PeopleSoft only. Therefore, only appointments, meetings, tasks, and address books that are also PeopleSoft items can be replicated. The menu options enable you to perform the replications manually.
Alternatively, you can set up a schedule for replication in the PeopleSoft Settings & Options pages.
See Defining Settings and Options.
Replicating Appointments and Meetings
Use the PeopleSoft Replicate Appointments/Meetings option to manually start the replication process for those items.
Replicating Tasks
Use the PeopleSoft Replicate Tasks option to manually start the replication process for those items.
Replicating Address Books
Use the PeopleSoft Replicate Address Books option to manually start the replication process for those items.