Configuring Absence Management Integration with PeopleSoft Payroll Systems
Most mapping and setup pages are shared by Payroll for North America and Payroll Interface. Additional setup is required when Payroll for North America is used with PeopleSoft Time and Labor. After you complete the setup, the application runs separate conversion processes depending on the payroll system with which you integrate. These processes are discussed in subsequent sections.
|
Page Name |
Definition Name |
Usage |
|---|---|---|
|
GP_ABS_PAYGROUP |
Map pay groups that are defined in Absence Management to pay groups that are defined in Payroll for North America or Payroll Interface. |
|
|
GP_ABS_ERN_DED_MAP |
Map elements defined in Absence Management to codes in direct interface with Payroll for North America or Payroll Interface. |
|
|
GP_ABS_MANAGE_GPI |
View and manage generated positive input from the absence process by Calendar Group ID. Filter records by EmplID and select or clear specific records for conversion to Payroll for North America or Payroll Interface. |
Use the Absence Pay Group Mapping page (GP_ABS_PAYGROUP) to map pay groups that are defined in Absence Management to pay groups that are defined in Payroll for North America or Payroll Interface.
Navigation
Image: Absence Pay Group Mapping page
This example illustrates the fields and controls on the Absence Pay Group Mapping page.
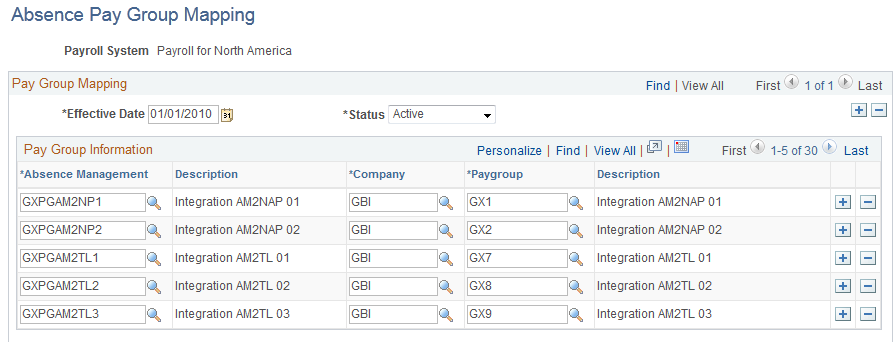
Use this page to establish a one-to-one correspondence between pay groups in Absence Management and pay groups in Payroll for North America or Payroll Interface. For Payroll for North America, the pay group prompt list originates from the Payroll for North America Pay Group Table without any PI Configuration value; those for Payroll Interface have a PI Configuration value.
Note: A company may have multiple pay groups, but each pay group is attached to only one company.
Use the Absence Earns/Deductn Mapping page (GP_ABS_ERN_DED_MAP) to map elements defined in Absence Management to codes in direct interface with Payroll for North America or Payroll Interface.
Navigation
You use different pages to map Absence Management codes to the payroll system's earning or deduction codes depending on which applications you use. This topic discusses pages used to:
Map Absence Management codes to Payroll for North America without Time and Labor.
Map Absence Management codes to Payroll for North America with Time and Labor.
Map Absence Management codes to Payroll Interface.
Mapping Absence Management Codes to Payroll for North America without Time and Labor
Access the Absence Earnings/Deduction Mapping page using Payroll for North America as the payroll system .
Image: Absence Earns/Deductn Mapping page
This example illustrates the fields and controls on the Absence Earns/Deductn Mapping page for Payroll for North America without Time and Labor.
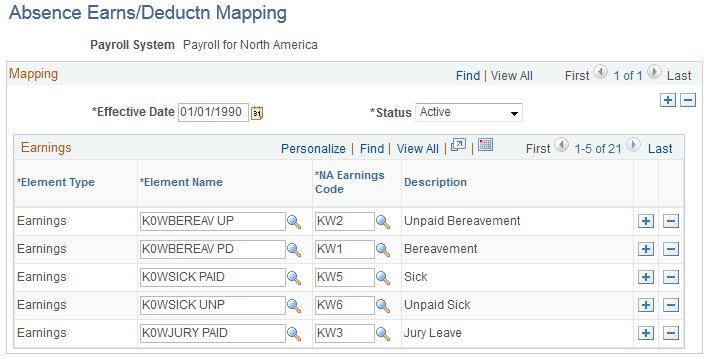
Use this page to map earning elements in Absence Management to Earning Codes in a Payroll for North America system that does not interface with Time and Labor.
Note: All positive input generated in Absence Management that interfaces directly with Payroll for North America without Time and Labor must be linked to earning codes on the Absence Earnings/Deduction Mapping page. Earning codes for Payroll for North America originate from the Payroll for North America Earnings Code table.
Mapping Absence Management Codes to Payroll for North America with Time and Labor
If you use Time and Labor, you must map Time Reporting Codes (TRCs) to both Payroll for North America Earnings Codes and Absence Management elements at the same time. You do this on the Time and Labor TRC setup pages by selecting the Absence Flag and selecting North American Payroll as the payroll system.
Mapping Absence Management Codes to Payroll Interface
Access the Absence Earnings/Deduction Mapping page using Payroll Interface as the payroll system .
Image: Absence Earns/Deductn Mapping page
This example illustrates the fields and controls on the Absence Earns/Deductn Mapping page for Payroll Interface.
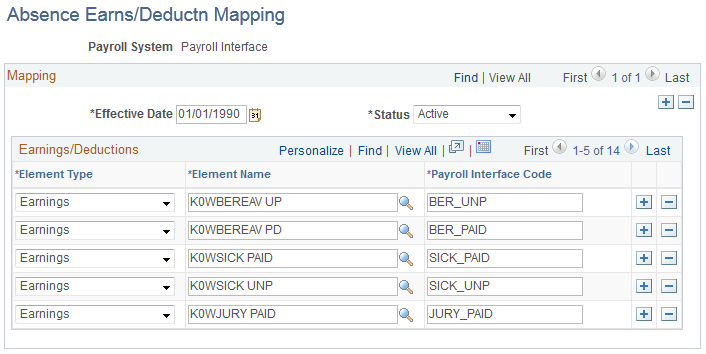
For Payroll Interface, you can map both earning and deduction elements from Absence Management.
Note: Positive input generated in Absence Management does not need to be mapped to valid Payroll Interface codes. Absence Management does not validate Payroll Interface codes. Mapped Payroll Interface codes are free form, as defined by the third-party payroll system's interface. Element numbers (PIN_NUM), Element Codes (PIN_CODE) or Element Names (PIN_NM) can be used instead of mapped Payroll Interface codes to identify Absence codes in Absence Management's output interface file.
You must identify the payroll and absence system for each payee using the Payroll page in the Job Data component of PeopleSoft HR.
See Updating Job Data.
Select Payroll for North America or Payroll Interface in the Payroll System field. In addition, select Absence Management in the Absence System field. Enter the Absence Management system's Pay Group, Eligibility Group, Exchange Rate Type, and Use Rate As Of in the fields provided in the Absence Management System group box. To set any of the latter three values to default from the Absence Management pay group's values, select the appropriate check box under Use Pay Group Value. Otherwise, enter a corresponding value in each field.
Note: If you are using Absence Management as a stand alone system, the valid Payroll System in Job Data is Global Payroll. When you select Global Payroll as a Payroll System, the Absence System is automatically defaulted to Absence Management. Thus there are no additional integration components to setup other than the usual processing and organizational framework.
Note: For Payroll for North America that interfaces with Time and Labor, the employee should also be enrolled in Time and Labor's Time Reporter Data.
Use the Manage Generatd Positive Input (Manage Generated Positive Input) page (GP_ABS_MANAGE_GPI) to view and manage generated positive input from the absence process by Calendar Group ID.
Filter records by EmplID and select or clear specific records for conversion to Payroll for North America or Payroll Interface.
Navigation
Image: Manage Generatd Positive Input page
This example illustrates the fields and controls on the Manage Generatd Positive Input page.
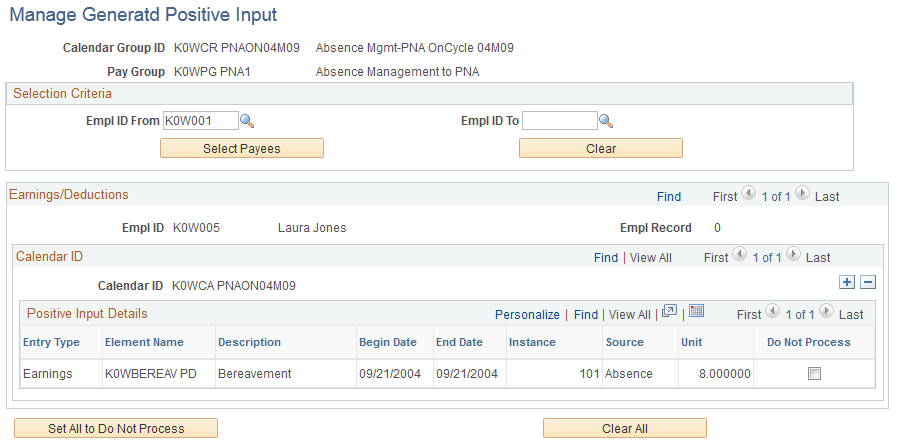
Absence Management creates a Generated Positive Input (GP_PI_GEN_DATA) file when the Absence Take process runs during absence processing. Absence Management uses this file to provide information to the payroll system's interface file.
After the Generated Positive Input file is created, the user can opt not to send or process some absences to the payroll system. This page displays absence results for the selected Calendar Group ID as generated positive input. Select the Do Not Process check box in the Positive Input Details group box for all items that you do not want to transfer to the payroll system that Absence Management integrates with, either Payroll for North America or Payroll Interface.
Use the following fields and buttons to filter results by Employee ID and select or clear all check boxes.
|
Field or Control |
Definition |
|---|---|
| EmplID From and EmplID To |
Enter an employee ID in one or both fields to limit the records that display in the Positive Input Details group box. Specifying a value in the EmplID From field sets the lower end of the range of values. Specifying a value in the EmplID To field sets the higher end of the range of values. You can leave these fields blank to display all generated positive input for the Calendar Group ID. |
| Select Payees |
Click this button to display records for the range of EmplIDs that you specified in the EmplID From and EmplID To fields. |
| Clear |
Click this button to remove values in the EmplID From and EmplID To fields. After clicking this button, you must click the Select Payees button again to display records for all, or a different range of EmplIDs. |
| Set All to Do Not Process |
Click this button to select the Do Not Process check box for all displayed records. |
| Clear All |
Click this button to clear the Do Not Process check box for all displayed records. |