Integrating with Enterprise Learning Management
ePerformance uses the Integration Broker to facilitate communication between the ePerformance and Enterprise Learning Management systems. Use the following steps to set up the integration between two systems.
Note: These steps assume that both systems are operating on the same PeopleTools version.
Ping the local gateway in both HCM and ELM systems.
From the HCM system:
Navigate to.
Search for the gateway that has the Local Gateway check box selected.
Click the Ping Gateway button. Verify that the ping request was successful; the gateway status is active.
Repeat the above substeps in the ELM system. Make sure that the gateway can be pinged successfully.
Verify that the target location for service configuration is set up in both HCM and ELM systems.
From the HCM system:
Navigate to .
Click the Setup Target Locations link. Verify that information is entered in the Target Location field of the Web Services Target Locations section.
Repeat the above substeps in the ELM system.
Update the HCM and ELM node properties and ping the nodes in both systems.
From the HCM system:
Navigate to .
Search for the HR node. It needs to be the default local node.
On the Node Definitions page that appears, click the Properties link. Add a row using this information and save the change:
Field or Control
Definition
Name Type Category
Property Name SOA_ENABLED
(Enter this property name manually)
Value True
Access the Connectors page. Click the Ping Node button and verify that the ping request was successful.
Return to the search page to look for the ELM node. In this example, PSFT_LM (description: PS ELM - Local Node) is used. Access the Node Definitions page and click the Properties link, Add a row using this information and save the change:
Field or Control
Definition
Name Type Category
Property Name SOA_ENABLED
(Enter this property name manually)
Value True
Access the Connectors page. Click the Ping Node button and verify that the ping request was successful.
From the ELM system:
Repeat the above substeps. Search for the ELM node (the default local node), add a new property and ping the node. Next, search for the HR node (for example, PSFT_HR, add a new property and ping the node.
Add routings to HMCR_SYNCH_PORT and ensure the service operation is active in both HCM and ELM systems.
From the HCM system:
Navigate to
Search for and open the HMCR_SYNCH_PORT service operation.
On the General page that appears, select the Active check box to activate the service operation.
Access the Routings page. Enter HMCR_IS2 in the Routing Name field and click the Add button.
On the Routing Definitions page that appears, enter this information:
Field or Control
Definition
Description HMCR_IS2
Active <select this check box>
Comments Inbound Synchronous
Sender Node <the ELM node you updated earlier>
Receiver Node <the HR node you updated earlier>
Owner ID HCM Service Framework
Save the change. Click the Return button.
Add a new routing on the Routings page. Enter HMCR_OS2 in the Routing Name field and click the Add button.
On the Routing Definitions page that appears, enter this information:
Field or Control
Definition
Description HMCR_OS2
Active <select this check box>
Comments Outbound Synchronous
Sender Node <the HR node you updated earlier>
Receiver Node <the ELM node you updated earlier>
Owner ID HCM Service Framework
Save the change. Click the Return button.
From the ELM system:
Navigate to
Search for and open the HMCR_SYNCH_PORT service operation.
On the General page that appears, select the Active check box to activate the service operation.
Access the Routings page. Enter HMCR_IS2 in the Routing Name field and click the Add button.
On the Routing Definitions page that appears, enter this information:
Field or Control
Definition
Description HMCR_IS2
Active <select this check box>
Comments Inbound Synchronous
Sender Node <the HR node>
Receiver Node <the ELM node>
Owner ID HCM Service Framework
Add a new routing on the Routings page. Enter HMCR_OS2 in the Routing Name field and click the Add button.
On the Routing Definitions page that appears, enter this information:
Field or Control
Definition
Description HMCR_OS2
Active <select this check box>
Comments Outbound Synchronous
Sender Node <the ELM node>
Receiver Node <the HR node>
Owner ID HCM Service Framework
Verify that the domain status is Active in both HCM and ELM systems.
From the HCM system:
Navigate to .
On the Domain Status page that appears, select Active in the Domain Status field and click the Refresh button. If the current status is Inactive, change it to Active and click the Update button.
Repeat the above substeps in the ELM system.
Verify the trusted node.
From the HCM system:
Navigate to .
On the Single Signon page that appears, verify that the ELM node exists in the Trust Authentication Tokens issued by these Nodes section. Add it to the section manually if it is not already displayed.
Access the same page in the ELM system. Verify that the HR node exists in the Trust Authentication Tokens issued by these Nodes section. Add it to the section manually if it is not already displayed.
Verify the ELM portal node URL configuration in the HCM system.
Navigate to .
On the Node Definitions page that appears, access the Portal page. Make sure that information is entered in these fields:
Field or Control
Definition
Content URI Text http://<webserver machine name>:<Port>/psc/<pshome or instance name>
Portal URI Text http://<webserver machine name>:<Port>/psp/<pshome or instance name>
Change all of Learning CREFs node from ELM (default value) to the ELM local node name you updated earlier in the HCM system.
Navigate to .
On the Structure and Content page that appears, click the Workforce Development link.
On the next screen of the page, click the Performance Management link.
On the next screen of the page, click the ELM Learning link.
Image: Structure and Content page
This example displays the Structure and Content page.
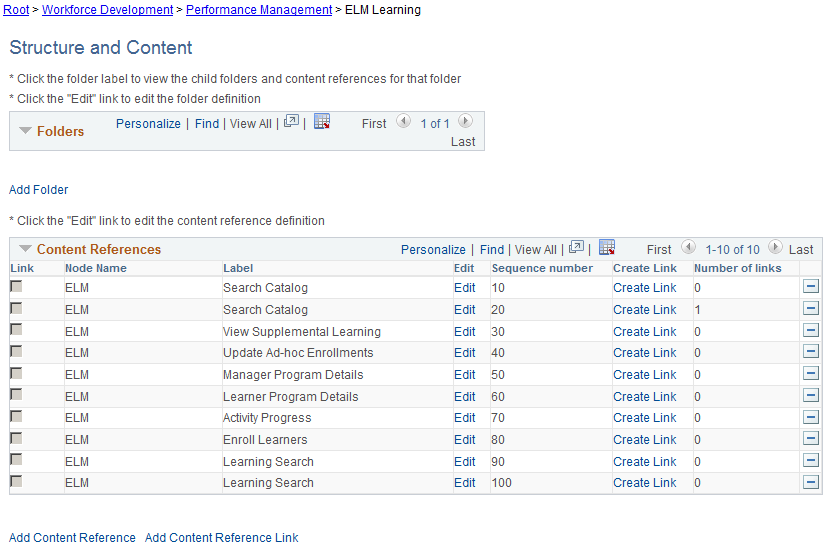
(Perform this task on all entries listed in the Content References section) Click the Edit link and change the current node name to your actual ELM node in the URL Information section on the Content Ref Administration page. Save the change.
Verify that the permission list setup is correct for the HMCR_SYNCH_PORT service operation in both HCM and ELM systems.
From the HCM system:
Navigate to .
Search for and open the HMCR_SYNCH_PORT service operation.
On the General page that appears, click the Service Operation Security link.
Make sure that the PTPT1000 permission list is listed. Add it when necessary.
Repeat the above substeps in the ELM system.
Refresh service registry in both HCM and ELM systems, and make sure there are no errors.
Navigate to .
On the Service Registry page that appears, click the Refresh Cache button. Verify that there are no errors.
Repeat the above substeps in the ELM system. The navigation path is .
Verify the access type in the HCM system.
Note: This step is technically not part of the integration step; this is done to make sure that the documents can show up properly.
Navigate to .
(Perform this step on these component entries: EP_APPR_SELECT, EP_CREATE_MY_DVL and EP_CREATE_MY_PRF) Click the Configure button to open the Direct Reports Configuration page. On this page, make sure that the selected access type is By Part Posn Mgmt Supervisor.