Forwarding Applicants
This topic provides an overview of applicant forwarding and discusses how to forward applicants.
|
Page Name |
Definition Name |
Usage |
|---|---|---|
|
HRS_FWRD_APPL |
Forward applicants. |
|
|
HRS_FWRD_APP_PRVW |
Preview a message before sending it. |
Forwarding an applicant sends applicant information to one or more persons. When users forward an applicant, the system sends a notification (HRS_FORWARD_APPLICANT) to the recipients that the recruiter specifies on the Forward Applicant page.
Forwarding an applicant is similar to routing an applicant. However, when you forward an applicant, the system does not change the applicant disposition, nor do recipients have an online process for recording their feedback.
Attaching Resumes When Forwarding
Your security configuration affects how the Forward Applicant transaction handles applicant resumes.
If at least one recruiting role type is configured to use enhanced applicant security, then users must explicitly choose whether to attach resumes when forwarding. The Include Resume check box becomes visible on the Forward Applicant page.
If you do not use enhanced applicant security for any recruiting role types, then the Forward Applicant transaction automatically attaches a resume (if one exists).
See Understanding Enhanced Applicant Security.
When attaching the applicant’s resume, the system uses this logic:
If the applicant has multiple applications, only the resume from the most recently created application is sent.
If the most recent application does not have a resume, there is no attachment.
Attached resume files are delivered in their original file format.
If the resume text was pasted into the system rather than uploaded as an attachment, the resume text is sent as an HTML file if resume text field is rich text-enabled or as an unformatted text (.txt) file if the resume text field is not rich text-enabled.
If an application has both online resume text and a file attachment, only the file attachment is sent.
Applicant Notes for Forwarding
When you forward an applicant, the system records the transaction in an applicant note. The note appears on the Manage Applicant Page: Notes Tab.
See Understanding Applicant Notes for more details about the note that is created by the Forward Applicant transaction.
Use the Forward Applicant page (HRS_FWRD_APPL) to forward applicants.
Navigation
Click the Forward Applicant toolbar button on the Manage Applicant page.
Click the Forward Applicant icon or use the Forward Applicant group action on the Manage Applicant List page.
Select Forward Applicant (or from the row-specific action menu or the group action menu on any of these pages:
Search Applicants (all types of searches)
Search Applications
Manage Application
Manage Job Opening
Image: Forward Applicant page (1 of 2)
This is the first of two examples illustrating the Forward Applicant page. In this example, enhanced applicant security is active, so the page displays instructional text that would not be there if all users had standard security.
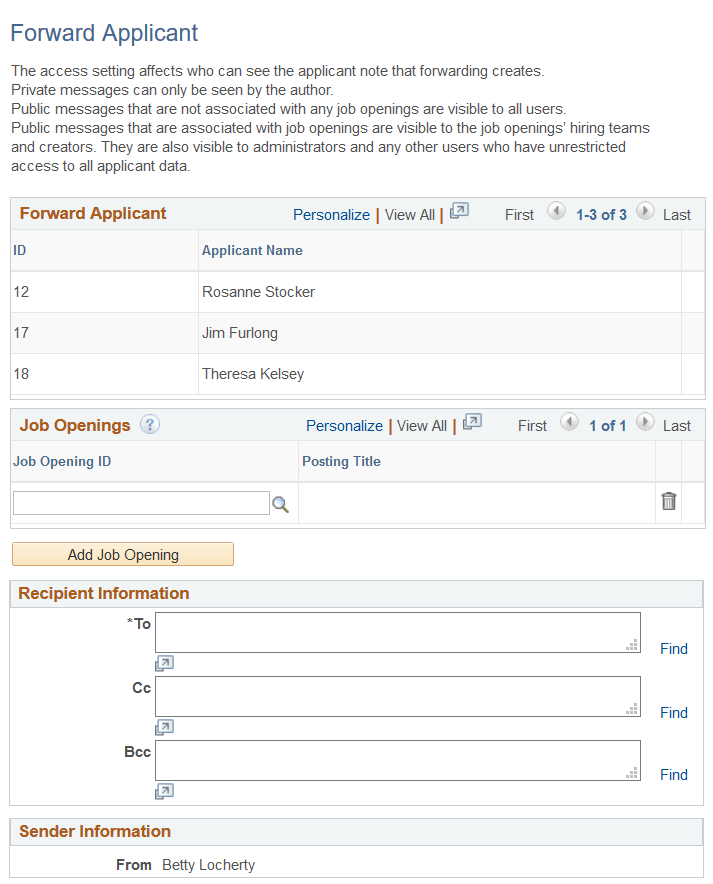
Image: Forward Applicant page (2 of 2)
This is the second of two examples illustrating the Forward Applicant page.
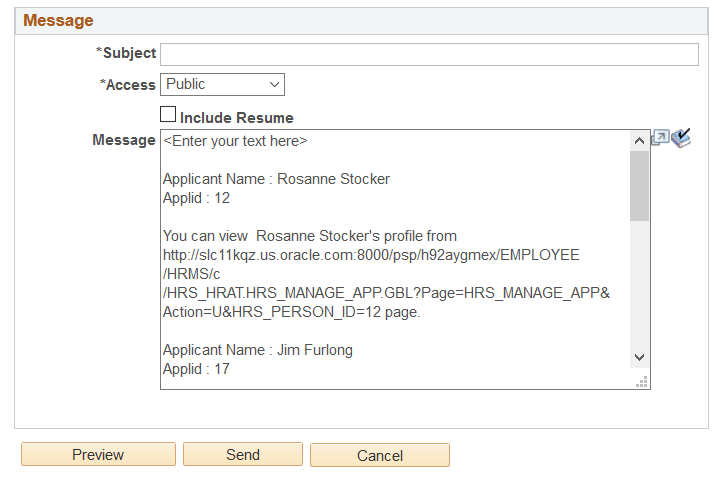
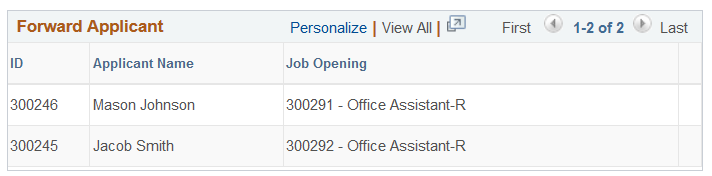
Image: Forward Applicant grid with the Job Opening column
This example illustrates the Forward Applicant grid when the Job Opening column is visible. When the Job Opening column is visible, the separate Job Openings grid is hidden.
Understanding Job Openings in the Forward Applicant Transaction
This page displays job opening information in one of two ways:
If the transaction was initiated from a specific application, the job opening is identified in the Forward Applicant grid, and the user cannot modify the information.
This occurs when the transaction is initiated from the Manage Job Opening page, the Search Applications page, or the Manage Application page.
If the transaction was initiated from the applicant record (without the context of a specific application), a separate Job Openings grid appears, and the user can manually add job openings to the grid.
This occurs when the transaction is initiated from the Search Applicant page, the Manage Applicant page, or the Manage Applicant List page.
Instructional Text
If enhanced applicant security is enabled for at least one recruiting role type, instructional text at the top of the page explains how the combination of the transaction’s job openings and its public/private setting affects which users can see the note.
Forward Applicant
|
Field or Control |
Definition |
|---|---|
| ID and Applicant Name |
These fields identify the applicants that are being forwarded. |
| Job Opening |
This column is visible only if you initiated the transaction from the context of a job opening. It identifies the job opening from which you forwarded the applicant. If this column is visible in the Forward Applicant grid, the page does not display a separate Job Openings grid. |
Job Openings
The Job Openings grid and the associated Add Job Opening button are visible only if you initiated the transaction without the context of a job opening. Use the grid to manually associate job openings with the transaction.
|
Field or Control |
Definition |
|---|---|
| Job ID and Posting Title |
Select one or more job openings to associate with this transaction. You can only select job openings to which you have access, and they must be in Open, Filled/Closed, or Hold status. All users have access to job openings that they created and where they are on the hiring team. Users with standard applicant security can additionally access job openings if they the department security tree gives the user access to the job opening’s department. Users with enhanced applicant security do not gain access to job openings through the department security tree. See Understanding Enhanced Applicant Security. Associating the transaction with job openings can affect the visibility of the applicant note that records the transaction. Specifically, users with enhanced applicant security can view the note only if they have access to at least one of the job openings. Job openings do not affect note visibility for users with standard security. |
| Add Job Opening |
Click this button to add additional rows to the Job Openings grid. |
Recipient Information
Use this group box to enter email addresses of the people to whom you want to forward these applicants.
|
Field or Control |
Definition |
|---|---|
| To, Cc, and Bcc |
Enter the email addresses of the people to whom you are forwarding the applicant. |
| Find |
Click to access the Find Email Address page, where you can search for and select employees to whom you want to forward these applicants. |
Sender Information
|
Field or Control |
Definition |
|---|---|
| From |
Displays the name of the user who is forwarding the applicant. When the system creates an applicant note for this transaction, the sender is considered the note author. |
Message
|
Field or Control |
Definition |
|---|---|
| Subject |
Enter the subject of the email. |
| Access |
Select a value to indicate whether the note that the transaction creates is public or private. Select Private to limit access to the note’s author (the person forwarding the applicant).. Select Public to allow other users to see the note. Users with standard security can see all public notes. Users with enhanced applicant security can see public notes as long as they have access to one of the associated job openings (or if there are no associated job openings). However, these users will not be able to see the message details. |
| Include Resume |
Select this check box to attach the applicant’s resume to the message. This check box is visible only if at least one recruiting role type is subject to enhanced applicant security. When this check box is visible, it is visible to all users, not just those subject to enhanced applicant security. |
| Message |
Enter the message text. The default message text comes from the HRS_FORWARD_APPLICANT template. The template includes the name, and ID of each included applicant, a link to the Manage Applicant page for each applicant, and a sign-off that includes the sender’s name. For users subject to standard applicant security, the Message field is initially blank. The user adds any personalized message, and when the user sends, the system adds the template text to the end of the message. To see the entire message, the user needs to click the Preview button to access the Forward Applicant Preview Page. For users subject to enhanced applicant security, the template text appears in the Message field, so the entire message is visible on this page while the user personalizes the message. Additionally, the system adds <enter your text here> to the beginning of the message. Users can then modify this portion of the message before sending. For more information about standard and enhanced applicant security, see Understanding Enhanced Applicant Security. |
Buttons
|
Field or Control |
Definition |
|---|---|
| Preview |
Click to access the Forward Applicant Preview Page, where you can preview the email before you send it. Before you can preview the message, you must enter an email address and a message subject. |
| Send |
Click to send the email. The system creates an applicant note for the transaction. If enhanced applicant security is active for at least one recruiting role type, and the access is Public, and the transaction is not associated with any job openings, then saving triggers a warning message that the note will be visible to all users. This gives the sender an opportunity to protect job-opening related information by editing the message or associating the note to the relevant job opening(s). |
| Resend |
After you forward an applicant, you can re-access the transaction from the Manage Applicant Page: Notes Tab. In this mode, the page displays the Resend button instead of the Send button. You can modify the original message before resending. Resending is considered a separate transaction, and a new applicant note is created when you resent. |
| Cancel |
Click to return to the previous page without sending or saving the email. |
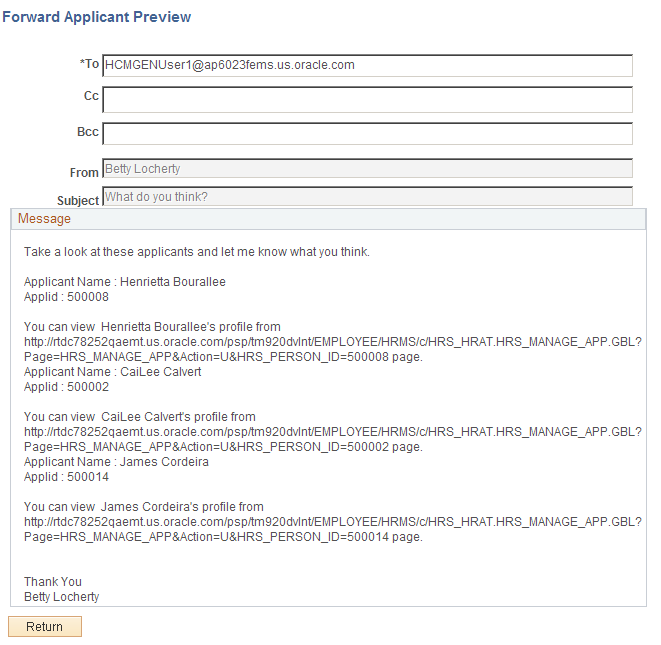
Use the Forward Applicant Preview page (HRS_FWRD_APP_PRVW) to preview a message before sending it.
Navigation
Click the Preview button on the Forward Applicant page.
Image: Forward Applicant Preview page
This example illustrates the Forward Applicant Preview page.