Understanding the PAR System
In an organization, the records of employees will have constant updates like hire, promotions, leaves of absence, layoffs, retirement, pay rate changes, awards, and so on. To maintain both current records and a complete history of employee job data, the administrators regularly submit PARs for these changes in PeopleSoft Human Resources.
This topic provides an overview on how to use PeopleSoft Fluid User Interface to manage the Administrator PAR transactions for U.S Federal Government Agencies.
The fluid PAR interface provides a simple to use, intuitive application for Federal HR Administrators to perform various Federal Personnel Action Request transactions. Using the fluid Interface an administrator can quickly create, process and authorize the personnel action requests without navigating to multiple components. It provides you a guided way to enter data in request component using Activity Guide Frame work and displays only the relevant fields, using the benefits of Page and Field Configurator utility. You can also easily configure multiple approval flows and view the synopsis of changes as an approver and as a requester.
Image: Administrator PAR transactions — High Level WorkFlow
The diagram shows a high level workflow for Administrator PAR transactions.
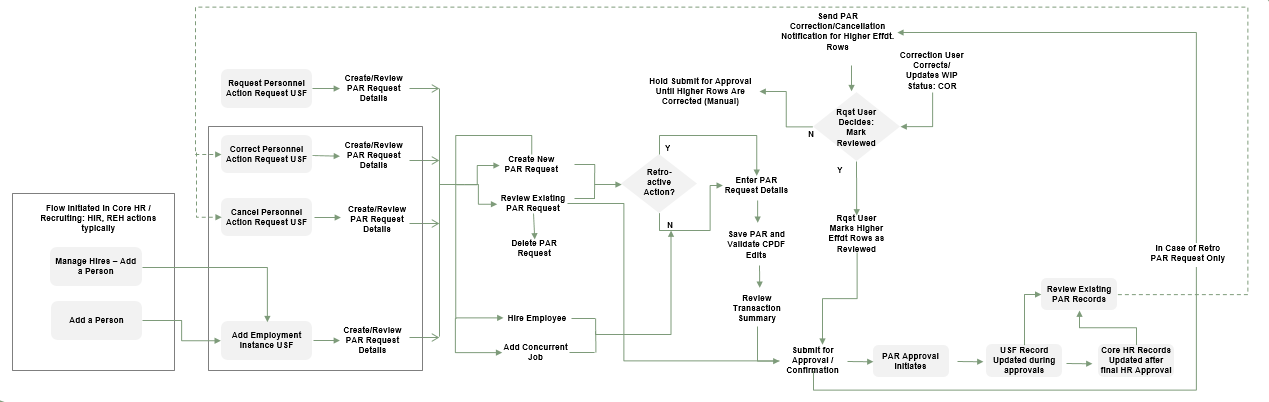
As a Federal HR Administrator, to create a PAR:
Access the Create Personnel Action USF Tile from your homepage
Select the employee
Click the Create Personnel Action button
Enter the effective date. If you enter a past date (prior to the latest PAR row) as the effective date, system automatically identifies and process the request as retroactive personnel action request. For more information, see Creating a Retroactive PAR
Enter the PAR request details
Save PAR
Validate the request details and review errors if any
Review the details using Transaction Summary before submitting for review. For information on configuring the fields to be displayed in Transaction Summary , see Defining Transaction Summary Configuration
For more information on creating a Personnel Action Request, see Personnel Actions USF Page
To approve a PAR:
Access the Approvals tile from your homepage
Select the Personnel Action Request
Review the summary of changes to Approve, Deny or Pushback the request.
For more information, see Authorizing and Approving Personnel Actions Using Fluid
|
Role |
Description |
|---|---|
|
PAR Requestor |
This role is required for creating PAR requests through Create/View Personnel Action Request page. |
|
PAR Viewer |
This role is required to access View Job Information functionality through Fluid Approvals. |
|
PAR Analyst |
This role is to be added to Correction and Cancellation users to receive Push Notification and Email Notification while performing Retroactive PAR Transaction through Create/View Personnel Action Request page. |
|
PAR Error Viewer |
This role is required for accessing the View Edit Errors functionality through Fluid Approvals. |
|
PAR 1st Authorizer |
This role has been created to provide access to approve Fluid PAR requests at First Authorized level. |
|
PAR 2nd Authorizer |
This role has been created to provide access to approve Fluid PAR requests at Second Authorized level. |
|
PAR Position Administrator |
This role is required to carry out position administrator role for Federal PAR Approvals. |
|
PAR Final Approver |
This role is required to carry out final approval role for Federal PAR Approvals. |
|
PAR AG Administrator |
This role is required to make modifications to the Activity Guide (AG) template setup for Create/View Personnel Action Request functionality. |
|
Federal PAR Administrator |
This role is responsible for administering the Approval transactions of Federal Create/View Personnel Action Request functionality. |
|
PAR Specialist |
This role is required to Approve, Deny or Pushback the cancellation and correction request. |
|
Permission List |
Description |
Objects / Pagelets |
Roles Assigned |
|---|---|---|---|
|
HCCPFGPAR |
Federal PAR Request |
Administer Workforce USF Menu —Create/View Personnel Action —Review Job History —Related Information Guided Processes Menu —Grouplets —My Preferences —My Personalizations |
PAR Requestor PAR Final Approver Federal PAR Administrator |
|
HCCPFGPARERRS |
Federal PAR Errors |
Administer Workforce USF Menu —View Edit Errors |
PAR Error Viewer |
|
HCCPFGPARSUMMARY |
Federal PAR Summary |
Administer Workforce USF Menu —Personnel Search |
PAR Requestor PAR Final Approver Federal PAR Administrator |
|
HCCPFGVIEWJOBINFO |
View Job Information |
Administer Workforce USF Menu —Create/View Personnel Action —Review Job History —Personnel Search |
PAR Viewer |
Transaction Summary page in the ‘Create Personnel Action Process’ displays the changes made by the user along with the existing data. This helps the users to review the changes before submission. As an administrator, you can configure the fields that need to be displayed based on the selected NOA code.
Use the Transaction Summary Configuration page to configure the fields to be displayed for each NOA code.
Navigation
Set Up HCM, Product Related, Workforce Administration, Workforce Data USF, Transaction Summary Configuration
Image: Transaction Summary Configuration page
This example illustrates the fields and controls on the Transaction Summary Configuration page.

|
Field or Control |
Definition |
|---|---|
| NOA Code |
Select the Nature of Action Code(NOA). The fields in the Summary page will be displayed based on the configuration of the selected NOA code. |
| Show Only Changed |
Use the “Show only changed” check box to list only the modified fields in the transaction summary page. On selecting the checkbox, only the modified fields, out of the selected fields in the configuration, would be displayed in the summary. |
| Use as default |
Use the ‘Default’ check box to select one configuration as the default configuration. If no specific configuration is defined for a NOA code, this default configuration will be used to display the summary data. |
| Clone |
Click the Clone button to copy configuration from another NOA Code. You can select the NOA code from which the configuration is copied. |
| Select Fields |
Click on “Select Fields” button to open the field selector component in a modal window. This modal window lists all the visible pages in the selected component and the fields corresponding to each pages. You can select the fields that needs to be added in the Transaction Summary Page. Note: Derived record fields, Related record fields and Invisible fields are excluded. For more information on configuring related fields, see ‘Selected Fields — Related Information’ section in this document. |
Selected Fields — Field Details
In this section, the fields that are selected for Transaction Summary will be listed. You can add further configuration to these fields.
|
Field or Control |
Definition |
|---|---|
| Group Header and Group Number |
You can select and group the fields to appear together in the Transaction Summary page. Select the check box to choose a field as a header for group. Enter the number of the group to which the field belongs in The Group Number field. For example, consider that you want to group Field A, Field B, and Field C and make Field A as the group header. In this case, enter ‘1’ as the Group Number for Field A and put the same number for all the fields which you wish to include in the group. Note: If the group number of a header field is changed, then the group number of all the fields in that group will get updated. All members of the group should be from the same record, and the header must be a key field. |
| Sort order |
Enter the order in which the fields to be displayed. When saved, the order number values will be updated to form a continuous sequence. |
Selected Fields — Field Label
In this section, you can modify the existing label of the field.
|
Field or Control |
Definition |
|---|---|
| Override Label |
Select the ‘Override label’ check box, if you want to override the existing label. |
| Text ID |
Select the Text Id corresponding to the new label. Text Id field is enabled only if you select the ‘Override label’ check box. Note: Use the ‘Go to Maintain Text Catalog’ link to add a new Text Id. |
Selected Fields — Related Information
In this section, you can configure which fields to be displayed as the related fields.
|
Field or Control |
Definition |
|---|---|
| Show Related Information |
Select the check box if you want to display the related information along with the field in summary page. |
| Change Related Field |
Click the button to open Related Information window. In the new window, you can select ‘Choose from Page Fields’ option (choose any of the listed record fields) or select ‘Choose Other’ and enter the field name directly. Note: This button is enabled only if you select the ‘Show Related Information’ check box. |
As an administrator you can enable Approvals for Cancellation/Correction of Personnel Action Request using Setup Process Definition page.
Note: By default, Approvals for Cancellation/Correction PAR will be disabled.
To enable Approvals:
Access Setup Process Definitions page.
Select the required Process ID.
Select the Process ID as FederalPARCancellation, to set up Approvals for Cancellation PAR.
Select the Process ID as FederalPARCorrection, to set up Approvals for Correction PAR.
In the Setup Process Definitions page, update the Status field as Active. This indicates that the approval process is available for use.
Save to apply the changes.
Navigation
Enterprise Components, Approvals, Approvals, Approval Process Setup
Image: Setup Process Definitions
This example illustrates the Setup Process Definition page when FederalPARCancellation is selected as the Process ID.
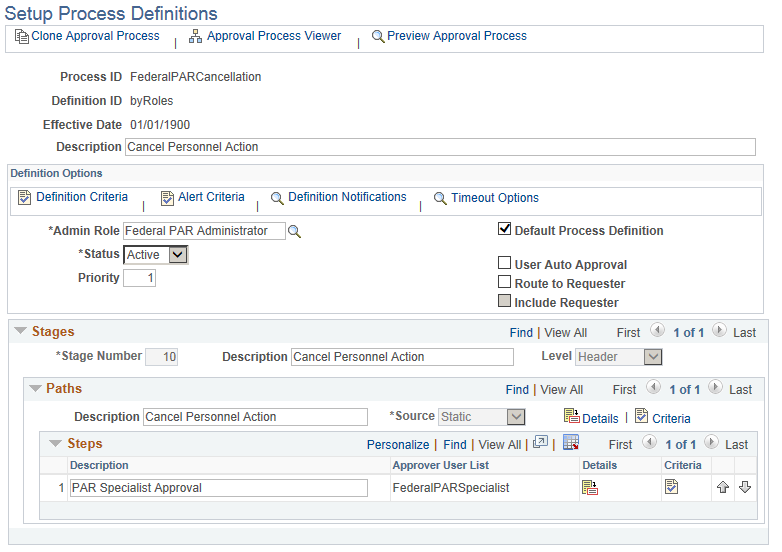
For more information on fields and controls of this page, see Setup Process Definitions Page