Working with Transactions
This topic provides an overview of transactions and discusses how to:
Set up a transaction.
Set up a stop transaction.
Verify a transaction.
Verify a stop transaction.
The LOG sample data that is delivered with Payroll Interface includes transactions and corresponding stop transactions for deductions, savings plans, and additional pay. This topic describes how to set up the transaction and the stop transaction for deductions using the LOGEXP export file.
When setting up transactions, the implementation details will vary depending on the type of transaction and the requirements of the third-party payroll system. The following procedures, however, show which Payroll Interface components need to be defined.
To set up a transaction:
Set up the PS Tables component—identify the tables and fields that are required for the transaction.
Set up the Field Definition Table component—define the fields that will be included in the export file.
(Optional) Set up the Instance Table component—create an instance ID if you want to restrict or modify the data that is sent to the third-party payroll system.
Set up the Definition Table component—define the transaction record and field sequences.
To set up a stop transaction:
Set up the Field Definition Table component—define the fields that will be included in the export file.
Review the Process Table component—identify the COBOL process that will perform the stop transaction.
Set up the Definition Table component—define the stop transaction record and field sequences.
Follow these steps to set up a deduction transaction using the LOGEXP export file.
Step 1: Set Up the PS Tables Component
Identify the PeopleSoft tables and fields that store the data that is required for the transaction:
Table: DED_CALC.
Fields: DEDCD (deduction code), DED_CLASS (deduction class), and DED_CUR (deduction amount).
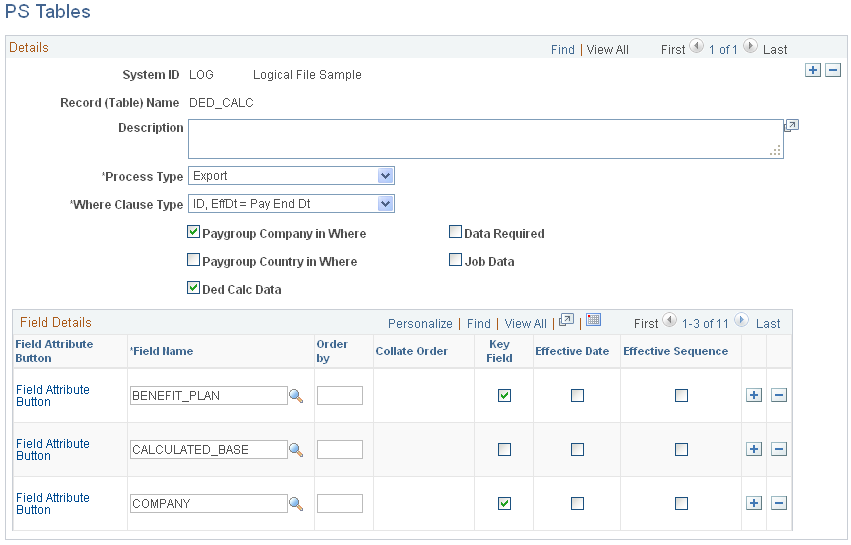
Use the PS Table (PI_PSREC_PNL) page to set up the PeopleSoft table and fields:
Navigation
Image: PS Tables page for Step 1: Set Up the PS Tables Component
This example illustrates the fields and controls on the PS Tables page for Step 1: Set Up the PS Tables Component.
Step 2a: Set Up the Field Definition Table Component, Export File Fields
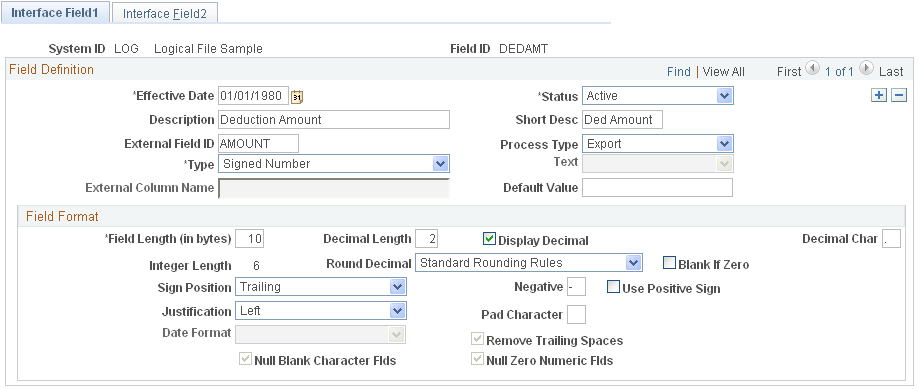
Define the fields for the deduction transaction: DEDAMT (shown in the following example) and DEDCD (not shown).
The default value for DEDAMT is the calculated deduction amount. The default value for DEDCD is the deduction code.
Note: The DED_CLASS field, identified in the PS Tables component, is not included in the export file. However, an instance ID for this field is set up in step 3.
Use the Interface Field1 page to set up the field definition for the DEDAMT field.
Navigation
Image: Interface Field1 page for Step 2a: Set Up the Field Definition Table Component, Export File Fields
This example illustrates the fields and controls on the Interface Field1 page for Step 2a: Set Up the Field Definition Table Component, Export File Fields.
Step 2b: Set Up the Field Definition Table Component, PeopleSoft Table and Fields
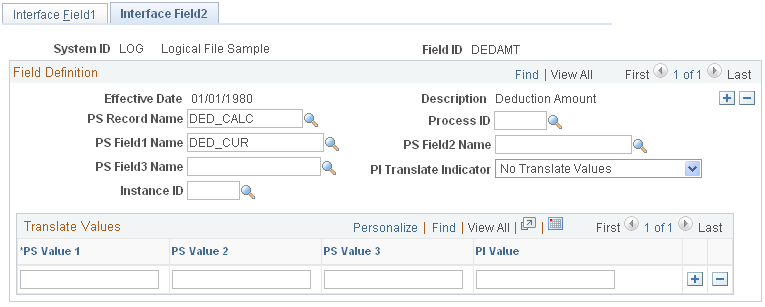
Identify the corresponding PeopleSoft table and field for the DEDAMT field:
Table: DED_CALC
Field: DED_CUR
Note: You must set up the DED_CALC table and DED_CUR field in the PS Tables component before you can access them through the Field Definition component.
Use the Field Definition Table - Interface Field2 page to identify the PeopleSoft record (table) and fields:
Navigation
Image: Interface Field2 page for Step 2b: Set Up the Field Definition Table Component, PeopleSoft Table and Fields
This example illustrates the fields and controls on the Interface Field2 page for Step 2b: Set Up the Field Definition Table Component, PeopleSoft Table and Fields.
Step 3: (Optional) Set Up the Instance Table Component
Instance IDs enable you to restrict or modify the data that is sent to the third-party payroll system.
Deduction class values are A (after tax), B (before tax), N (non-taxable or employer paid), and T (taxable or imputed income). The Calculate Deductions process calculates deductions for all classes (A, B, N, T). In this example, the third-party payroll system wants to receive deductions only for class values A and B. Therefore, set up an instance ID DEDCLS for the DED_CLASS field to export calculated deductions for class values A and B. (Alternatively, you can set up the instanced ID to exclude class values N and T.)
Note: When setting up an instance ID, you can either include the values that you want to export orexclude values that you don't want to export. You may need to experiment to determine which set up works best. Alternatively, you can create a view to retrieve a restricted data set.
Use the Interface Instance Table page to set up instance IDs.
Navigation
Image: Interface Instance Table page for Step 3: (Optional) Set Up the Instance Table Component
This example illustrates the fields and controls on the Interface Instance Table page for Step 3: (Optional) Set Up the Instance Table Component.

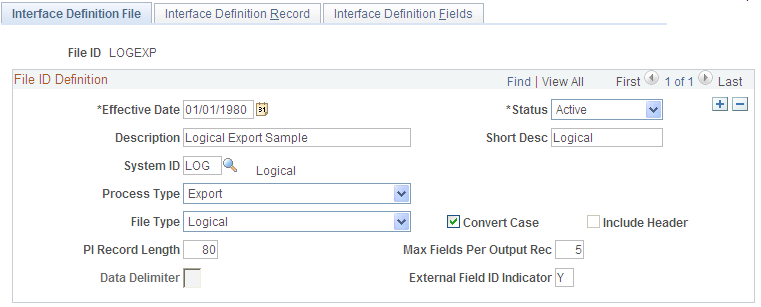
Step 4a: Set Up the Definition Table Component, File
Define the file, record, and field sequences for the export file.
Note: If you change any of the records or fields for a transaction, be sure to make the same changes to the records or fields for the corresponding stop transaction.
Use the Interface Definition File page to access the LOGEXP export file.
Navigation
Image: Interface Definition File page for Step 4a: Set Up the Definition Table Component, File
This example illustrates the fields and controls on the Interface Definition File page for Step 4a: Set Up the Definition Table Component, File.

Step 4b: Set Up the Definition Table Component, Record
The LOGEXP export file includes nine record sequences. Record 40 is the deduction transaction. Record 50 is the deduction stop transactions.
|
Record Sequence |
Record ID |
Description |
|---|---|---|
|
10 |
PERS |
Personal Data |
|
20 |
EMPL |
Employment Data |
|
30 |
JOB |
Job Data |
|
40 |
DED |
Deductions |
|
50 |
SDED |
Stop Deductions |
|
60 |
SAVE |
Savings |
|
70 |
SSAV |
Stop Savings |
|
80 |
APAY |
Additional Pay |
|
90 |
SPAY |
Stop Additional Pay |
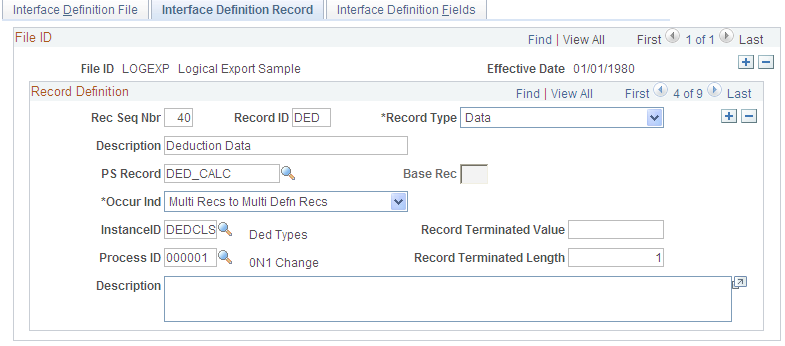
Record 40, the deduction transaction (DED), includes:
Record type: Data
Instance ID: DEDCLS—the instance ID created in step 3.
Process ID: 000001 ON1 Change—a process required for the deduction transaction.
Use the Interface Definition Record page to set up the record sequences for the export file.
Navigation
Image: Interface Definition Record page for Step 4b: Set Up the Definition Table Component, Record
This example illustrates the fields and controls on the Interface Definition Record page for Step 4b: Set Up the Definition Table Component, Record.

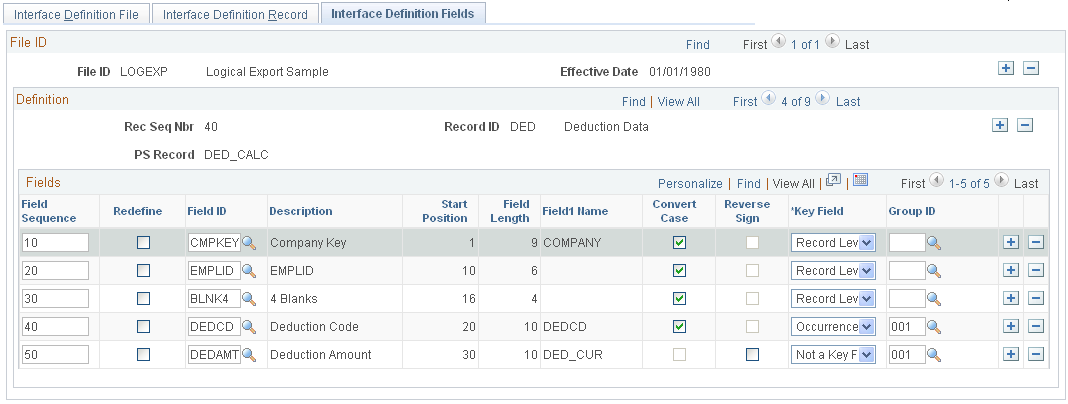
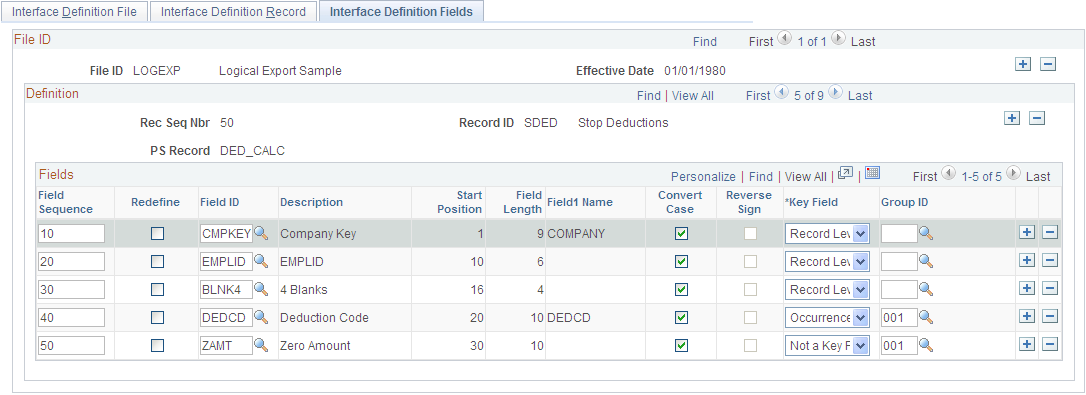
Step 4c: Set Up the Definition Table Component, Fields
Record 40, the deduction transaction, includes five field sequences:
Field Seq#: 10–50.
Field Seq 40 and 50 are a grouped field (Group ID 001).
Field Seq 50 is DEDAMT, the actual deduction amount.
Note: The field sequences (10–50) for transaction record 40 must be identical to the field sequences for stop transaction record 50. The value of field sequence 50 changes from DEDAMT to ZAMT.
Use the Interface Definition Fields page to set up the field sequences for the record:
Navigation
Image: Interface Definition Fields page for Step 4c: Set Up the Definition Table Component, Fields
This example illustrates the fields and controls on the Interface Definition Fields page for Step 4c: Set Up the Definition Table Component, Fields.
Follow these steps to set up a stop transaction for deductions using the LOGEXP export file.
Step 1: Set Up the Field Definition Table Component, Export File Fields
For Payroll Interface to recognize a stop transaction, the delivered record-level process IDs must be used. PeopleSoft code moves the pay period end date (of the pay calendar entry being used with the run control) to the DATE_VAL field in the PI_PARTIC_EXTBL table when a stop process is identified. Along with the date, you'll see the corresponding field ID and CHAR_VAL (for example, for a deduction code).
See Export Processing.
Define the field for the deduction stop transaction: ZAMT. When the stop transaction is processed, the ZAMT default value, rather than the DEDAMT default value, is written to the export file.
The default value is determined by the requirements of the third-party payroll system (refer to the vendor documentation). For LOG systems, the default value may be 000.00 or zero. For CSV systems, the default value may be probably ~, the tilde character.
Use the Interface Field1 page to set up a field definition for the ZAMT field:
Navigation
Image: Interface Field1 page for Step 1: Set Up the Field Definition Table Component, Export File Fields
This example illustrates the fields and controls on the Interface Field1 page for Step 1: Set Up the Field Definition Table Component, Export File Fields.
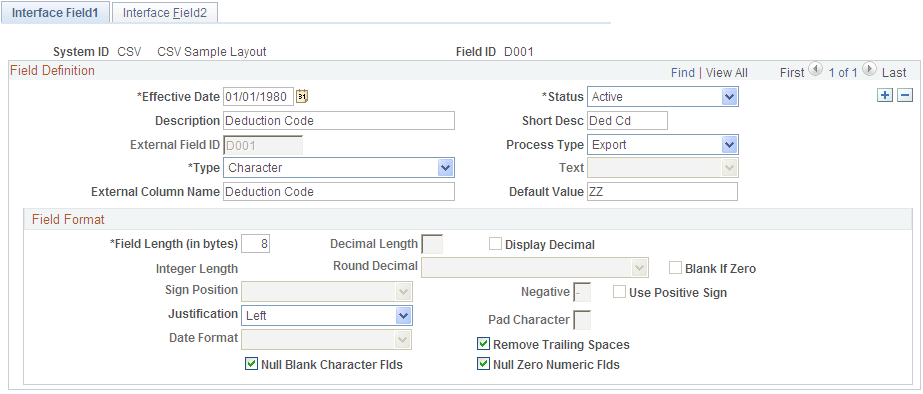
Note: Because the ZAMT field does not correspond to a PeopleSoft table or field, the Interface Field2 page does not need to be set up.
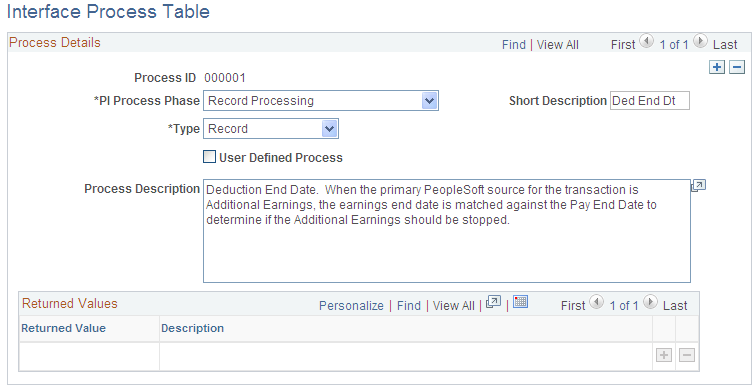
Step 2: Review the Process Table
Identify the COBOL process that will perform the stop transaction. This can be one of the processes delivered with Payroll Interface or a user-defined process. In this example, use Payroll Interface Process ID 000026.
See Working with COBOL Processes.
After the process is attached to the stop transaction record (see step 3), it runs in the background during the Export process. If the process determines that a deduction code is missing, the ZAMT default value (rather than the DEDAMT default value ) is written to the export file and a flag on the PI_PARTIC_EXPT table is set to P.
See Export Processing.
Use the Interface Process Table page to view the processes that are delivered with Payroll Interface.
Navigation
Image: Interface Process Table page for Step 2: Review the Process Table
This example illustrates the fields and controls on the Interface Process Table page for Step 2: Review the Process Table.
Step 3a: Set Up the Definition Table Component, File
Define the file, record, and field sequences for the export file.
Use the Interface Definition File page to access the LOGEXP export file.
Navigation
Image: Interface Definition File page for Step 3a: Set Up the Definition Table Component, File
This example illustrates the fields and controls on the Interface Definition File page for Step 3a: Set Up the Definition Table Component, File.
Step 3b: Set Up the Definition Table Component, Record
Record 50, the deduction stop transaction (SDED), includes:
Record Type: Process
Base Rec: 40—the corresponding record for the deduction transaction.
Process ID: 000026—the process that stops the deduction.
Note: The Base Rec field joins the transaction to the stop transaction: record 40 is joined to record 50.
Use the Interface Definition Record page to set up the record sequences for the export file.
Navigation
Image: Interface Definition Record page for Step 3b: Set Up the Definition Table Component, Record
This example illustrates the fields and controls on the Interface Definition Record page for Step 3b: Set Up the Definition Table Component, Record.
Step 3c: Set Up the Definition Table Component, Fields
Record 50, the deduction stop transaction, includes five field sequences:
Field Seq#: 10–50.
Field Seq 40 and 50 are a grouped field (Group ID 001).
Field Seq 50 is now ZAMT, the zero amount that is sent when the deduction is stopped.
Note: The field sequences (10–50) for stop transaction record 50 must be identical to the field sequences for transaction record 40. The value of field sequence 50 changes from DEDAMT to ZAMT.
Use the Interface Definition Fields page to set up the field sequences for the record:
Navigation
Image: Interface Definition Fields page for Step 3c: Set Up the Definition Table Component, Fields
This example illustrates the fields and controls on the Interface Definition Fields page for Step 3c: Set Up the Definition Table Component, Fields.
To verify the transaction:
Run the Calculate Deductions and Confirmation processes.
Run the Export process.
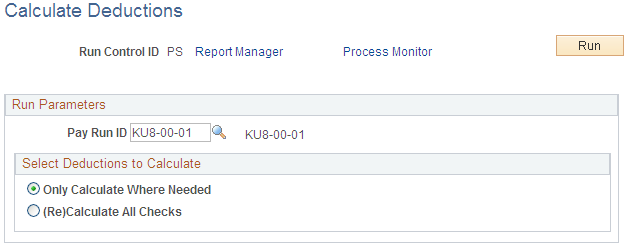
Step 1: Run the Calculate Deductions and Confirmation Processes
Calculate and confirm the deductions for the employee.
Use the Calculate Deductions page to calculate the deductions:
Navigation
Image: Calculate Deductions page for Step 1: Run the Calculate Deductions and Confirmation Processes
This example illustrates the fields and controls on the Calculate Deductions page for Step 1: Run the Calculate Deductions and Confirmation Processes.
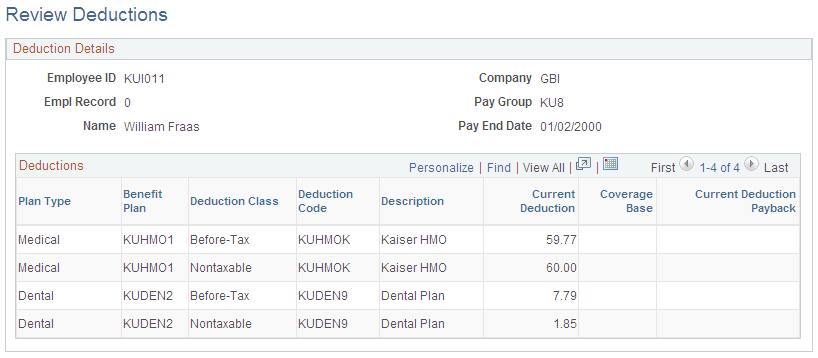
Review the results. The employee has medical and dental before-tax and nontaxable deductions. However, because the DEDCLS instance ID is set up, only the before-tax deductions will appear in the export file.
Use the Review Deductions page to review deductions.
Navigation
Image: Review Deductions page for Step 1: Run the Calculate Deductions and Confirmation Processes
This example illustrates the fields and controls on the Review Deductions page for Step 1: Run the Calculate Deductions and Confirmation Processes.
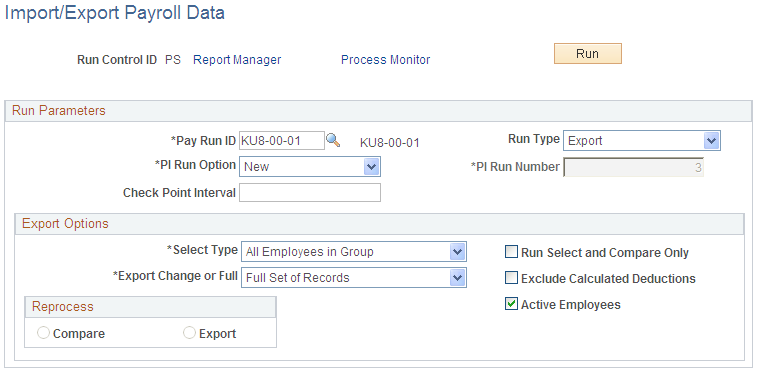
Step 2: Run the Export Process
Use the Import/Export Payroll Data page to run the Export process:
Navigation
Image: Import/Export Payroll Data page for Step 2: Run the Export Process
This example illustrates the fields and controls on the Import/Export Payroll Data page for Step 2: Run the Export Process.
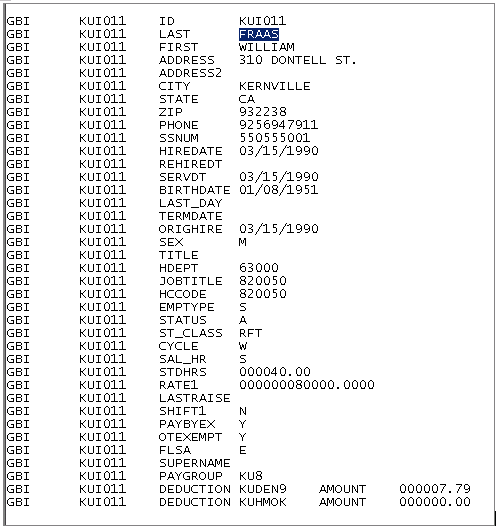
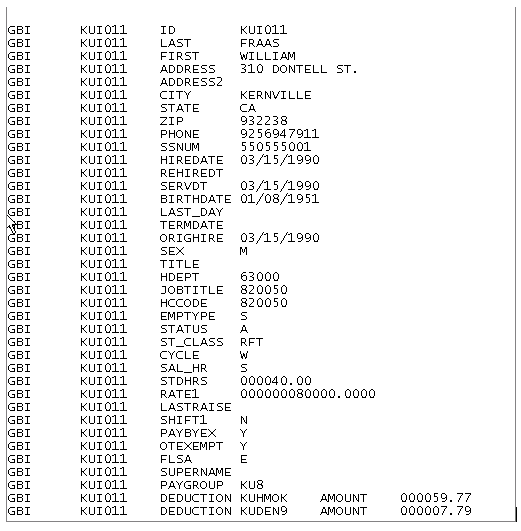
Review the export file. Because the instance ID DEDCLS is set up, only the before-tax deductions appear in the export file. Notice, however, that the transaction has worked. The DEDAMT or 59.77 value appears in the export file for deduction code KUHMOK:
Image: Export file showing the transaction for deduction KUHMOK (amount 59.77)
This example illustrates the fields and controls on the Export file showing the transaction for deduction KUHMOK is the amount of 59.77.
To verify the stop transaction:
Terminate one of the benefits for the employee.
Run the Calculate Deductions and Deduction Confirmation processes.
Run the Export process.
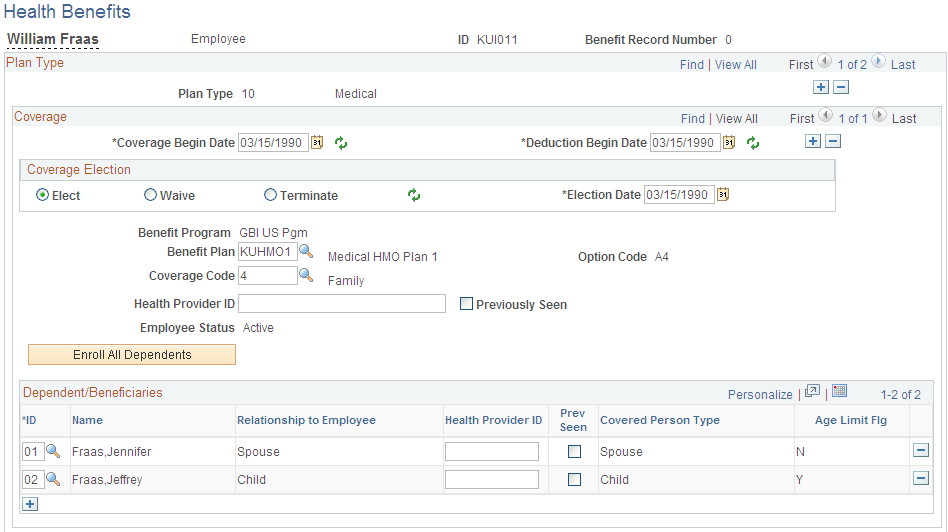
Step 1: Terminate a Benefit
Terminate the medical benefits for the employee, deduction code KUHMOK.
Use the Health Benefits page to terminate the medical benefits.
Navigation
Image: Health Benefits page for Step 1: Terminate a Benefit
This example illustrates the fields and controls on the Health Benefits page for Step 1: Terminate a Benefit.
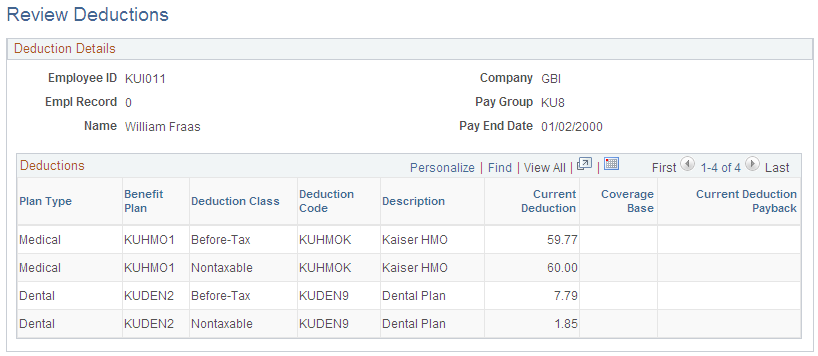
Step 2: Run the Calculate Deductions and Confirmation Processes
Calculate and confirm the deductions for the employee. The terminated medical benefits no longer appear.
Use the Review Deductions page to review the deductions.
Navigation
Image: Review Deductions page for Step 2: Run the Calculate Deductions and Confirmation Processes
This example illustrates the fields and controls on the Review Deductions page for Step 2: Run the Calculate Deductions and Confirmation Processes.
Step 3: Run the Export Process
Run the Export process and review the export file. Notice that the stop transaction succeeded. The ZAMT or 000.00 value appears in the export file for deduction code KUHMOK, the terminated medical benefit.
Image: Export file showing the stop transaction for deduction KUHMOK (amount 00.00)
This example illustrates the export file showing the stop transaction for deduction KUHMOK is the amount of 00.00.