Creating Work Schedules and Schedule Definitions
To create work schedules and schedule definitions, use the Shifts (SCH_SHIFT), Shifts BRA (SCH_SHIFT_BRA), Workdays (SCH_WRKDAY) and Schedule Definition (SCH_DEFINITION) components. Use the SCH_SHIFT, SCH_WRKDAY and SCH_DEFINITION component interfaces to load data into the tables for these components.
This section discusses how to create work schedules and schedule definitions.
|
Page Name |
Definition Name |
Usage |
|---|---|---|
|
SCH_SHIFT SCH_SHIFT_DTL_BRA |
Set up elapsed, flex, and punch shifts. |
|
|
SCH_SHIFT_BRA |
(BRA) Specify shift types. |
|
|
SCH_GROUP |
Set up schedule groups to categorize schedules. |
|
|
SCH_WRKDAY |
Define shifts. |
|
|
SCH_DEFINITION |
Set up schedule definitions. |
|
|
SCH_DEFINITION_2 |
Set up shift information, or enter shifts setup on the Shift page, for the schedule definition. |
|
|
Schedule Calendar Page |
SCH_CLND_VW_SEC |
View a schedule calendar. |
Use the Shift page (SCH_SHIFT) to set up elapsed, flex, and punch shifts.
Use the Shift page (SCH_SHIFT_DTL_BRA) to set up elapsed, flex, and punch shifts for Global Payroll for Brazil.
Navigation
Image: Shift page
This example illustrates the fields and controls on the Shift page. You can find definitions for the fields and controls later on this page.

The Shift page (SCH_SHIFT_DTL_BRA) is cloned from the Shift page (SCH_SHIFT) and is used to set up shifts primarily for Global Payroll for Brazil
|
Field or Control |
Definition |
|---|---|
| Shift ID |
Shift ID is keyed by SetID. The SetID is used to filter shifts for display, for association to schedules. |
| Effective Date |
Enter an effective date for this shift. If you modify previously-saved schedule definition detail, these limitations apply to the effective date on the Shift page:
|
| Shift Type |
If the value is Elapsed, only the elapsed punch types will display in the Shift Details grid. An elapsed shift can contain only one punch entry. If the value is Punch, In, Out, Break, Meal, and Transfer punch types can be entered unless the Off Shift check box is selected, in which case only In and Out can be entered. The Flex Shift Information group box does not appear on the page. Punch shifts require an In and Out punch to be saved. If the value is Flex, only In and Out punches can be entered. The Flex Shift Information group box appears and is available. Flex shifts require an In and Out punch to be saved. |
| Off Shift |
Select to designate a shift as being non-work time. This field cannot be changed once the shift has been saved. Note: (Global Payroll for Brazil) Shifts that are indicated as off shifts (with the Off Shift check box selected) are not processed by eSocial. |
| Sched Hrs (scheduled hours) |
This field displays the total amount of work time for the shift. For example, you may require a time reporter to punch in at 09:00 and punch out at 17:00 each workday, but the shift includes a one-hour lunch break for which the time reporter isn't required to punch. The calculation of Total Scheduled Hours for the shift including meal and break is derived from the Schedule Total Options field on the Time and Labor Installation — Configurations page or the Schedule Settings on the System Settings page of Global Payroll/Absence Management setup. You can also manually edit this number for punch and flex shifts. For an elapsed shift, the value in the Scheduled Work Hours field will always equal the duration of the elapsed punch entry. The field cannot be changed. If you modified a shift, the system, at save time, checks if the shift is used in any schedules. If it is, then the schedule will need refreshing. Use the Schedules to be Validated page to learn if the changes will affect an existing schedule. If you make any changes that affect punch time or punch duration, the system updates the value in the Scheduled Hours field. Review the Scheduled Hours field before saving changes to be sure the field contains the correct data. |
| Start Time |
Enter the time the shift starts. |
| End Time |
Enter the time the shift finishes. |
Taskgroup for Time Reporting
|
Field or Control |
Definition |
|---|---|
| Taskgroup |
If required, select a taskgroup for the Taskgroup field. The Taskgroup and Time Reporting Template ID fields determine which reporting elements should be available for the Shift Detail rows on the Shift page. No elements are visible if these fields are blank. Otherwise, the default punch or elapsed time reporting template (depending on the definition type) from the taskgroup definition will be used to determine which time reporting elements will be visible. If Task Profile Reporting is selected on the Time Reporting Template, the Task Profile ID element will be available, but no task elements. If Task Element Reporting is selected, the task reporting template from the taskgroup definition will be used to determine the task elements that display. The task and time reporting elements will not be available for OUT punches, or for Off Shifts. |
| TR Template (Time Reporting Template) |
If a taskgroup is selected for the Default Taskgroup field, a Time Reporting Template may default. The Time Reporting Template may also be overridden manually. |
Schedule Configuration Totals
Global Payroll, Absence Management and Time and Labor share schedule setup pages and records. However, these fields are only used by the Global Payroll and Absence Management systems. These totals are derived for the shift from the Schedule Configuration Indicators which can be associated to each punch or scheduled duration. There are four Schedule Configuration Indicators and four related Schedule Configuration Totals.
The labels for the Schedule Configuration Indicators and Schedule Configuration Totals fields are set using values from the Text Catalogue, and can be relabeled as needed.
Flex Shift Information
|
Field or Control |
Definition |
|---|---|
| Core Begin |
Enter the begin time for the core period, the time that time reporters are expected to be present at work, excluding meal and break time. This time must be later than the time of the In punch for the shift. |
| Core End |
Enter the end time for the core period, the time that time reporters are expected to be present at work, excluding meal and break time. This time must be earlier than the time of the Out punch for the shift. |
| Weekly Hours |
Enter the weekly number of hours that this shift requires. |
Shift Details
|
Field or Control |
Definition |
|---|---|
| Type |
The terms punch and punch type are interchangeable. You cannot have consecutive type (except the value Transfer) of the same value. Valid types are: In: An In punch marks the start of a work period—either the beginning of a shift, or a return to work after a break or meal. The first punch of a punch or flex shift must be an In punch. Punch or flex shifts cannot be saved if an In punch does not have a punch time and duration. Transfer: Start of a work period that generally denotes a change in task and compensation-related characteristics. Break: Start of a break period. If you enter a Break punch, an In or a Transfer punch must immediately follow it to save the page. You can't have a Break punch followed by a Meal or Out punch. Meal: Start of a meal period. If you enter a Meal punch, an In punch or Transfer punch must immediately follow it to save the page. For example, a Meal punch cannot be followed by a Break or Out punch. Out: The last punch of a punch or flex shift must be an Out punch. An Out punch marks the start of nonwork time. For punch periods with a punch type of Out, the Duration field is unavailable. An Out punch cannot be entered without an In punch preceding it somewhere in the shift (edit at save time). Punch or flex shifts cannot be saved if an Out punch isn't entered or does not have a punch time. No additional punches can be added to a shift after the Out punch row. Elapsed: This punch type is used only if you create an elapsed shift. The duration associated with this entry reflects the elapsed duration of the shift. An elapsed shift cannot be saved if an Elapsed punch does not have a punch duration. |
| Time |
This field is used only for punch and flex shifts; all punches (except the Out punch) in punch and flex shifts must have a time and a duration. Enter the time that this punch is scheduled. The first punch time of a shift must always be entered. Subsequent punch times can be entered, or the system can calculate punch times based on the duration of the preceding punch. Change the time of a punch other than the last punch and the duration changes accordingly, based on the new and the subsequent punch times. In addition, if the punch is not the first, the duration of the previous punch changes based on the changed punch's new time. Enter a punch time and the system calculates the duration, based on the punch time of the previous row. Enter a duration and the system calculates the value in this field on the next punch row. |
| Time Zone |
Enter a time zone value if required. All punch times are converted to the Base time zone when stored on the database and converted when displayed/entered on the pages (this is done automatically by PeopleTools). When a punch time is entered, the duration of the previous punch is calculated. When a duration is entered, the time of the next punch is calculated. Those calculations are changed to take into account time zones. All times will be converted to the Base Timezone before calculating. |
| Duration |
This field displays the duration of the punch period in hours. A user can enter it or the system can calculate it when the next punch time is entered. Change the time of a punch, other than the last punch and the duration changes, based on the new and the subsequent punch time. If it is not the first punch, the duration of the previous punch changes, based on the new punch time. If you delete a row, the duration of the punch above the deleted row changes to the difference between the punch time of that row and the punch time of the row that followed the deleted row. The system displays a warning if a punch or flex shift is longer than 24 hours. |
| Cfg 1-4 (configuration 1-4) or Sch Cfg 1-4 (schedule configuration 1-4) |
These Schedule Configuration fields are for use with Global Payroll and Absence Management. |
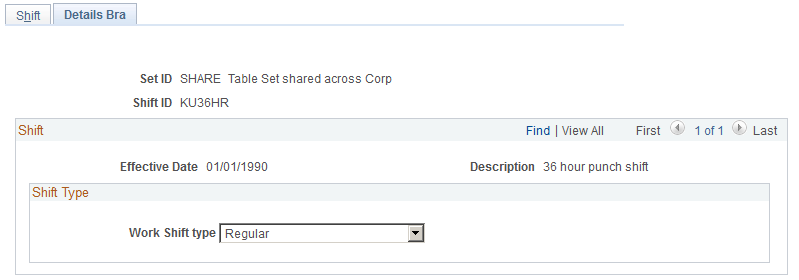
Use the Details Bra page (SCH_SHIFT_BRA) to specify shift types.
Navigation
Image: Details Bra page
This example illustrates the fields and controls on the Details Bra page.
|
Field or Control |
Definition |
|---|---|
| Work Shift type |
Specify the work shift type. Values are: Others Regular Rotating Shift Scale of work 12x36 Scale of work 24x72 This data is used in eSocial reporting, for example, loading of employee information, hiring, and contract data updates of company employees). |
Use the Schedule Group page (SCH_GROUP) to set up schedule groups to categorize schedules.
Navigation
Image: Schedule Group page
This example illustrates the fields and controls on the Schedule Group page. You can find definitions for the fields and controls later on this page.
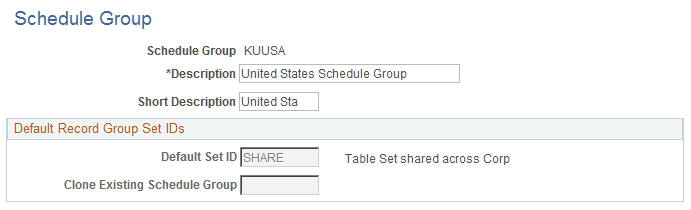
A schedule group can be thought of as a schedule organization unit, similar to a business unit both in idea and design. Shifts, Workdays and Schedule Definitions are created based on a SetID value, and Schedule Groups group these together by way of the Set Control value.
Schedule groups are specified on the Workgroup and Paygroup pages, and selected on the Schedule Assignment page. The label for Schedule Group is also set using values from the Text Catalog, and can be relabeled as needed.
|
Field or Control |
Definition |
|---|---|
| Default SetID |
Select a SetID. |
| Clone Existing Schedule Group |
If an existing Schedule Group is entered, the SetID will be copied from its definition. The SetID must either already be defined on the SetID table, or be the same as the Schedule Group code. If it's the same as the Schedule Group, it will be inserted in the SetID table when the page is saved. Note: The Default SetID field must be blank in order to enter or select a value for the Clone Existing Schedule Group field. |
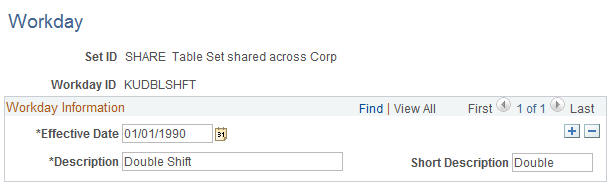
Use the Workday page (SCH_WRKDAY) to define shifts.
Workday is keyed by SetID, for further filtering when building a schedule.
Navigation
Image: Workday page
This example illustrates the fields and controls on the Workday page. You can find definitions for the fields and controls later on this page.
|
Field or Control |
Definition |
|---|---|
| Effective Date |
Enter an effective date for this workday. |
Use the Definition page (SCH_DEFINITION) to set up schedule definitions.
Navigation
Image: Definition page
This example illustrates the fields and controls on the Definition page. You can find definitions for the fields and controls later on this page.
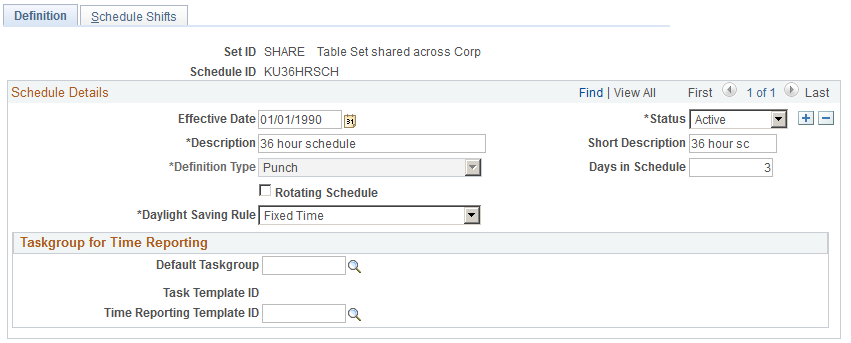
Schedule Definitions contain a list of shifts to be worked on each day of the schedule. Schedule Definitions are keyed by SetID for further filtering, and associated to a schedule group for filtering when assigning to an employee.
|
Field or Control |
Definition |
|---|---|
| Effective Date |
The effective date is used as the starting point of the Schedule Definition. Day one of the schedule starts from the effective date. When a new effective dated row is entered, the Day Numbers assigned to each row of the Schedule Shifts page are recalculated. The system uses the previous active effective dated row of the Schedule Definition to calculate which Day number the Schedule would be up to on the new effective date. That Day will be made Day number 1. Days following this will be adjusted accordingly. |
| Definition Type |
Select the type of shift you are creating. Valid options are: Elapsed, Flex, Punch. If the schedule definition is saved as a particular type, it cannot be changed to another type. Prior to saving for the first time, the field can be changed in add mode. If the field is changed, any shifts from the Shift Details grid on the Shift page, that do not match the new type, are deleted. If you do change this field while in Add mode, and punch detail has already been entered, you receive a warning that punch detail will be deleted if the Shift Type field is changed. The system deletes the punch details for all effective-dated rows. This field is updated, for all effective-dated rows, to the new type. Once a shift is saved as one type, you cannot change it to another type of shift (you can't change an elapsed shift to a punch shift). If the value is Elapsed, only the elapsed punch types will display on the Shift page. An elapsed shift can contain only one punch entry. If the value is Punch, In, Out, Break, Meal, and Transfer punch types can be entered on the Shift page. The Flex Shift Information group box does not appear on the page. Punch shifts require an In and Out punch to be saved. If the value is Flex, only In and Out punches can be entered. |
| Num Days in Schedule (number of days in schedule) |
Enter the number of days in this schedule. When the number of days is changed, the system automatically inserts or deletes the appropriate number rows from the Schedule Shifts page to ensure there is one row for each day of the schedule. There will always be at least one row for each day in the schedule. |
| Rotating Schedule |
Select this field if the schedule is to be used as a rotating schedule. The Rotation Details group box appears on the page. See Rotating Schedules later in this section. |
| Daylight Saving Rule |
This field caters for two issues that may arise from the use of Time Zones:
Note: These calculations will be done only if different time zones are involved, or, the date is the beginning or end of daylight savings. |
| Default Taskgroup |
If required, select a taskgroup for the Default Taskgroup field. The Task and Time Reporting Templates determine which reporting elements should be available on the detail rows on the Shift page. If the Taskgroup and Time Reporting Template are blank, no elements will be visible. Otherwise, the default Punch or Elapsed Time Reporting Template (depending on the Definition Type) from the Taskgroup definition will be used to determine which Time Reporting elements will be visible. If Task Profile Reporting is selected on the Time Reporting Template, the Task Profile ID element will be available, but no Task elements. If Task Element Reporting is selected, the Task Reporting Template from the Taskgroup definition will be used to determine the Task Elements that display. The Task and Time Reporting elements will not be available for OUT punches, or for Off Shifts. |
| Time Reporting Template ID |
If a taskgroup is selected for the Default Taskgroup field, a Time Reporting Template may default. The Time Reporting Template may also be overridden manually. |
Select the Rotating Schedule field if the schedule is to be used as a rotating schedule. The Rotation Details grid appears on the page.
Each Rotation uses the same pattern of Shifts defined in the Schedule Definition, but has a different Relative Day number. The Relative Day number of the Rotation is used in the schedule resolution process when determining the Shifts to be worked on a specific date.
Each Rotation has an Offset Day number assigned. The Offset is used when the Schedule Calendar is derived, by adding it to the calculated Day Number. Therefore each Rotation follows the same pattern of Shifts, but will be at a different point in that pattern on any given day.
Define multiple rotations of a schedule by inserting each rotation manually or using the Add Rotations button. Click the Add Rotations button to automatically divide your schedule into rotations based on the number of days you specify for each rotation.
Once saved, you cannot clear the Rotating Schedule field and Rotation ID's cannot be changed or deleted. However, an Effective Status at the rotation details level allows a rotation row to be inactivated.
When an employee is assigned to a rotating schedule, the Schedule ID and Rotation ID fields on the Schedule Assignment record identifies which Schedule ID and Rotation ID the employee is assigned.
Use the Schedule Shifts page (SCH_DEFINITION_2) to set up shift information, or enter shifts setup on the Shift page, for the schedule definition.
Navigation
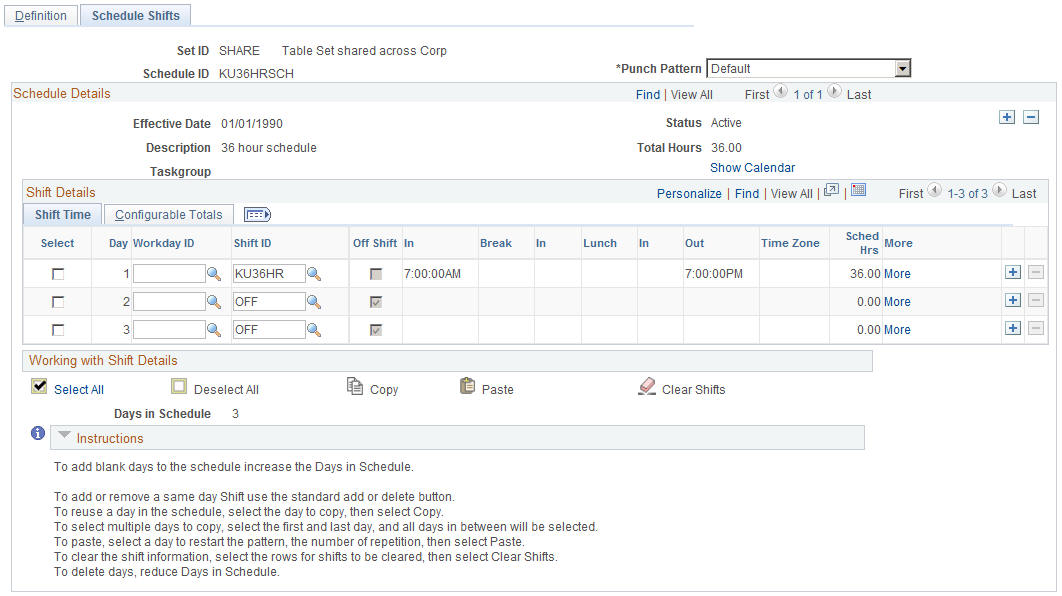
Image: Schedule Shifts page
This example illustrates the fields and controls on the Schedule Shifts page. You can find definitions for the fields and controls later on this page.
|
Field or Control |
Definition |
|---|---|
| Punch Pattern |
On this page, if the Definition Type chosen on the Definition page is set to Punch, the Punch Pattern field will display with a value of Default, which is the punch pattern defined on the Time and Labor Installation — Configurations tab. If not all of the punch types are displayed that are needed, the user can change that from a value of Default to a value of All Punches, to see all punch types visible for use. Note: There are two navigation paths for this tab: Setup HCM, Install, Product Specific, Time and Labor Installation, Configurations tab, and the Global Payroll/Absence Management navigation path: Setup HCM, Product Related, Global Payroll and Absence Management, System Settings, Installation Settings, Schedule Settings Folder tab. |
| Effective Date |
Enter an effective date for this shift. When a new effective dated row is entered, the day numbers assigned to each row of the Schedule Shifts page are recalculated. The system uses the previous active effective dated row of the schedule definition to calculate which day number the schedule would be up to on the new effective date. That day will be made day number 1. Days following this will be adjusted accordingly. |
| Total Hours |
Sums the scheduled hours of the schedule. |
| Show Calendar |
Click this link to view the derived Schedule Calendar page as you design your schedule definition. |
Note: You can also access the Schedule Calendar link from the Assign Work Schedule page.
Shift Details
In the Shift Details grid, the Shift Time tab, Time Reporting Elements tab (if a time reporting template is chosen), Task Reporting Elements tab (if the time reporting template has task template selected instead of task profile), a Chartfields tab, if Chartfields are listed on the task template and finally a Configurable Totals tab.
The Configurable Totals tab will display the total of the Schedule Configuration Indicators that make up the scheduled day. There are four configuration totals, which can be used by Global Payroll or Absence Management users within their rules processing.
|
Field or Control |
Definition |
|---|---|
| Shift ID |
The use can enter shifts to complete the schedule pattern. Shifts are optional, as start and end times for a punch schedule can be entered (if the Shift ID field is blank), or scheduled hours for an elapsed schedule for a day. If there are two shifts in one day, the user can use the + button at the end of each row, to add another shift for the day. If Shift ID is blank, the Shift Details grid fields can be entered. All processing and validation of Shift Details entered here is the same as the standard Shift page. If Shift ID is entered, the details from the Shift definition are displayed, and the fields are display only. For an Off Shift, the user can choose an off shift that has been created, or specify a specific start and end time for the off time and select the Off Shift check box. |
| Workday |
The use can enter workdays to complete the schedule pattern. Workdays are optional, and used to label the actual day. |
Click the More link beside a Shift Details row to be taken to the Shift definition page to update a shift if required. This view of the shift detail is important if there are changing elements within a shift, such as different timezones, task elements or time reporting elements.
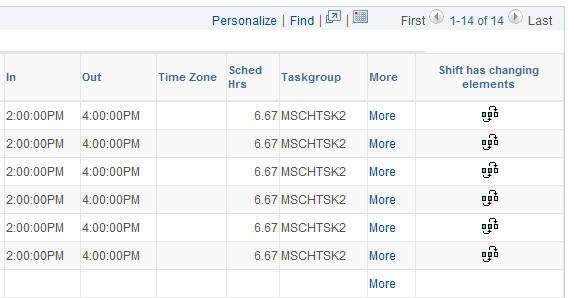
Next to the More link, there is a column that displays a Changing Elements in a Shift icon. This icon represents a shift that has a different task or time reporting elements scheduled for different punch times. For more detail of the changing elements, you can click on the More link for Shift detail.
The column for Changing Elements per Shift also appears on the Schedule Calendar page (click the Show Calendar link on the Schedule Shifts page):
Use the Schedule Calendar page (SCH_CLND_VW_SEC) to view a schedule calendar.
Navigation
Click the Show Calendar link on the Schedule Shifts page.
Image: Schedule Calendar page (1 of 2)
This example illustrates the fields and controls on the Schedule Calendar page (1 of 2). You can find definitions for the fields and controls later on this page.

Image: Schedule Calendar page (2 of 2)
This example illustrates the fields and controls on the Schedule Calendar page (2 of 2). You can find definitions for the fields and controls later on this page.
To reuse days in the schedule, select the days to copy (by selecting the Select check box next to the appropriate rows), then click the Copy link. Next, select the day to restart the pattern, and click the Paste link. The Select All link will select all of the rows. The Clear Shifts link will clear all of the shift details entered on the selected rows. The Clear All Boxes link will clear all selected boxes. The Click for Instructions link is a collapsible section of instructional text on how to use the links.
There is a Scheduled Hours total for each day and also a Total Hours for the whole schedule at the top of the page.
When the schedule definition is saved, the system checks that any punch or flex shifts in the schedule do not overlap with a shift on the same, or a following day. The last shift of the schedule will also be checked for an overlap with the first shift.
Note: When setting up longer shifts, such as a 48 hour shift, you need a break between the shift and then an Off day, since the 48 hour shift spans over two days. It is up to the user how many off days there are in between.