Installing CAL on a Workstation without the POS Interface
- On the workstation, press Start, select All Programs, select Micros Client Application Loader, and then select McrsCAL Config.
- Decipher and enter the correct access code, and then press the Configure CAL button.
- Enter the correct code based on the six-digit number shown at the top, and then press Next.
- In the Enter CAL Server dialog, select MICROS Simphony as the POS Type.
MICROS Simphony is used for both Simphony Standard and Premium Cloud Service environments.
- Set the following values, and then press Next:
-
Server Name: Leave this field blank.
-
Server IP/URL: Leave this field blank.
-
CAL Enabled: Select this option if it is not automatically set by default.
-
Secure Connection: Select this option to use the Translation Layer Security (TLS) 1.2 Encryption protocol. (If you are installing CAL version 139 or later, this option is set by default.)
-
Server: Enter the CAPS server name.
-
Port: Enter 443.
-
Update: Click the Update button to automatically fill the Server Name and Server IP/URL fields after the application server name is resolved and recognized. You are now required to use an HTTPS secure connection in your Server URL.
-
- If you are using Simphony release 2.9 (CAL version 138), skip to Step 8.
- Beginning with Simphony release 2.9.1 and later, if you are installed on a Simphony Standard or Premium Cloud Service environment, CAL prompts you to enter your Simphony EMC logon credentials. Enter your User name and Password in the CAL Authentication dialog, and then press the Login button.
- If the Enterprise has multiple properties, select the property from the Property Search and Select dialog, and then press Next.
If the property does not appear in the list, enter the property name in the Property Name field, and then press Search.
You do not see a property list if only one property is configured or if there are multiple properties, but only one property is using workstations.
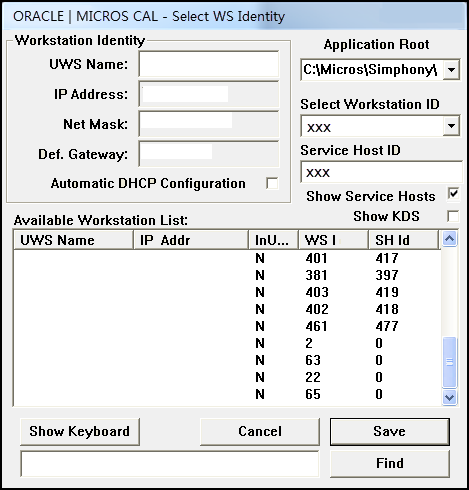
- In the Select WS Identity dialog, select the Show Service Hosts option, select the appropriate service host from the available workstation list, and then press Save. Make sure the Service Host ID and Workstation ID populate. The workstation automatically restarts several times when installing the CAL package.
Figure 7-31 Select Workstation Dialog

- If you are using Simphony release 2.9 or Simphony release 2.9.2, after the CAL process completes:
- Browse to
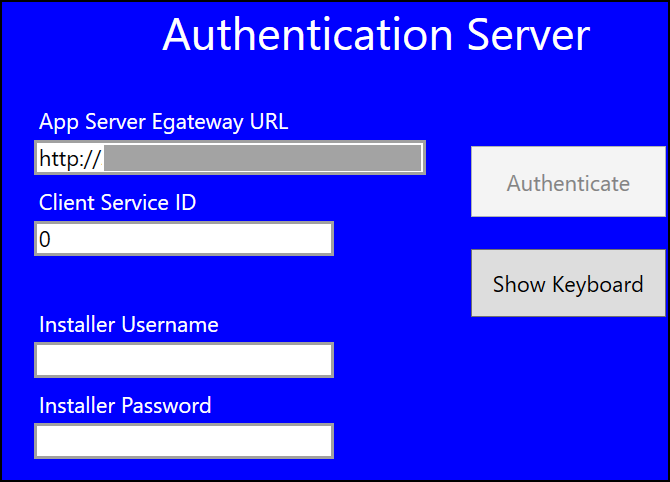
[Drive letter]:\\MICROS\Simphony\webserver, and then click AuthenticationServer. - For Simphony release 2.9, enter the following details in the Authentication Server application:
-
Client Service ID: Enter the Service ID for Check and Posting. You can find the Service ID in the Workstations tab of the Property Parameters module.
-
Installer Username: Enter the Install User Security Username configured in the Security tab of the Property Parameters module. Contact your system administrator for assistance.
-
Installer Password: Enter the Install User Security Password configured in the Security tab of the Property Parameters module. Contact your system administrator for assistance.
Figure 7-32 Authentication Server Application for Simphony 2.9

-
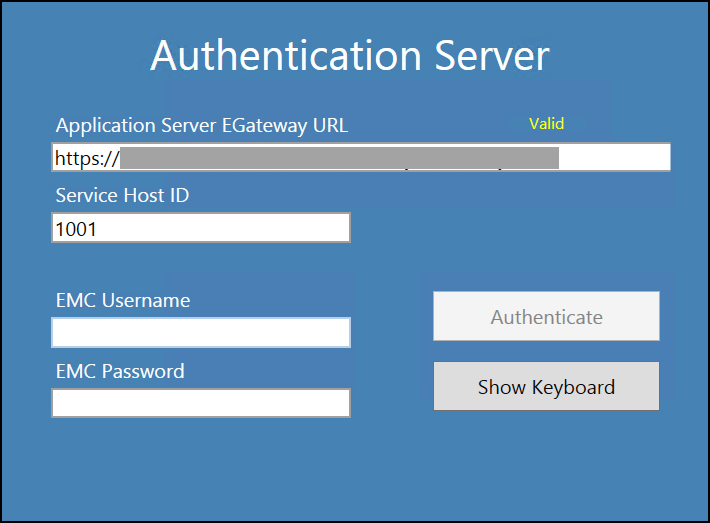
- For Simphony release 2.9.2 and later, enter the following details in the Authentication Server application:
-
Service Host ID: The service host ID. This value is automatically populated.
-
EMC Username: Enter your EMC user name.
-
EMC Password: Enter your EMC password.
Figure 7-33 Authentication Server Application for Simphony 2.9.2

-
- Click Authenticate.
- Restart the workstation.
- Browse to