2. Collateral Creation
This chapter contains the following sections:
- Section 2.1, "Introduction"
- Section 2.2, "Stages in Collateral Creation"
- Section 2.3, "Process Flow Diagram"
- Section 2.4, "Process Matrix"
- Section 2.5, "Processing Collateral Creation"
- Section 2.6, "Capturing Collateral Details through ELCM and CAM Process"
2.1 Introduction
Oracle FLEXCUBE facilitates collateral creation from different sources. This manual assist you through the available options, stages involved in the collateral creation workflow. In the first section, the chapter briefs on the stages involved. The next section talks about the steps involved in detail.
2.2 Stages in Collateral Creation
The process of creating a collateral involves the following stages:
- Initiation - The user initiates collateral creation process and captures all the collateral details.
- External Check - At this stage you can check if there is an existing charge on the collateral submitted by the customer. The results of external check are maintained in External Check sub-screen of the Collateral Investigation screen.
- Field Investigation - You can investigate on the collateral to prevent any fraud and misrepresentation of facts by the customer. These details can be captured in Collateral investigation sub-screen.
- Valuation - The user initiates valuation of the collateral and updates the results in Valuation Details screen.
- Review - At this stage all the investigation done on the collateral are reviewed to decide if the same can be accepted.
- Legal Opinion - The legal opinion on the collateral are sought and updated in legal opinion screen.
- Risk Evaluation - The risk management team evaluates whether the credit risk is mitigated by the proposed collateral.
- Approval - The approval authority approves or rejects the collateral creation.
- Customer Agreement - Once approved, collateral agreement is generated by the system and sent to customer for signature.
- Collateral Perfection - The bank registers the collateral with relevant registration authorities.
- Collateral Creation Hand off to ELCM Module - Once the collateral perfection stage is successfully completed, the collateral record details are passed on to ELCM module for collateral creation. This stage is automated.
- Handoff Retry Stage - If any failure occurs during the handoff, the system moves the task to handoff retry stage for manual completion to create the Collateral in ELCM.
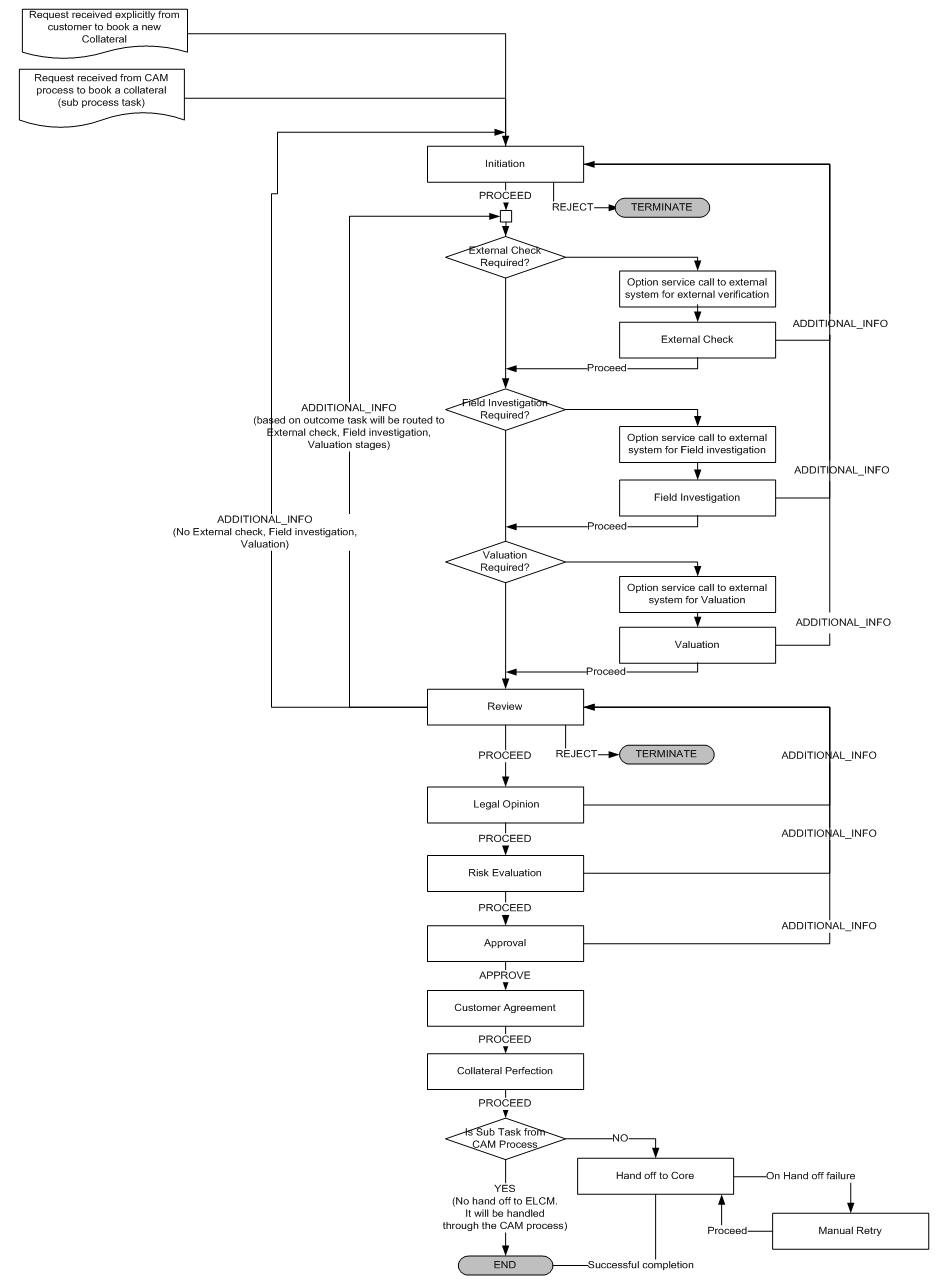
2.3 Process Flow Diagram
The process flow diagram given below illustrates the activities carried out during various stages of a collateral creation.
2.4 Process Matrix
The process matrix given below lists out the different stages, condition to move to next stage, target stage, and remarks for each condition.
Sl.No. |
Source Stage |
Function ID |
Outcome |
Target Stage |
Remarks |
1 |
Initiation |
ORDCOINT/ORDCOINP |
PROCEED External Check Required = True |
External Check |
If the outcome of this stage is PROCEED and ‘External Check Required’ check box is enabled, then the task is saved and moved to ‘External Check’ stage. |
|
|
|
PROCEED Field Investigation Required = True |
Field Investigation |
If the outcome of this stage is PROCEED and ‘Field Investigation Required’ check box is enabled, then the task is saved and moved to ‘Field Investigation’ stage. |
|
|
|
PROCEED Valuation Required = True |
Valuation |
If the outcome of this stage is PROCEED and ‘Valuation Required’ check box is enabled, then the task is saved and moved to ‘Valuation’ stage. |
|
|
|
REJECT |
Termination |
If the outcome of this stage is REJECT then the process gets terminated. |
|
|
|
PROCEED External Check Required = False Field Investigation Required = False Valuation Required = False |
Review |
If the outcome of the stage is PROCEED and ‘External Check Required’, ‘Field Investigation Required’ and ‘Valuation Required’ check box is disabled then the system moves the saved task to ‘Review’ stage. |
2 |
External Check |
ORDCOEXC |
PROCEED Field Investigation Required = True |
Field Investigation |
If the outcome of this stage is PROCEED and ‘Field Investigation Required’ check box is enabled, then the task is saved and moved to ‘Field Investigation’ stage. |
|
|
|
PROCEED Valuation Required = True |
Valuation |
If the outcome of this stage is PROCEED and ‘Valuation Required’ check box is enabled, then the task is saved and moved to ‘Valuation’ stage. |
|
|
|
ADDITIONAL INFO |
Initiation |
If the outcome of this stage is ADDITIONAL INFO then the task is saved and moved to ‘Initiation’ stage. |
|
|
|
PROCEED Field Investigation Required = False Valuation Required = False |
Review |
If the outcome of the stage is PROCEED and ‘Field Investigation Required’ and ‘Valuation Required’ check box are disabled then the system moves the task to ‘Review’ stage. |
3 |
Field Investigation |
ORDCOFIG |
PROCEED Valuation Required = True |
Valuation |
If the outcome of this stage is PROCEED and ‘Valuation Required’ check box is enabled, then the task is saved and moved to ‘Valuation’ stage. |
|
|
|
ADDITIONAL INFO |
Initiation |
If the outcome of this stage is ADDITIONAL INFO then the task is saved and moved to ‘Initiation’ stage. |
|
|
|
PROCEED Valuation Required = False |
Review |
If the outcome of this stage is PROCEED and ‘Valuation Required’ check box is disabled, then the task is saved and moved to ‘Review’ stage. |
4 |
Valuation |
ORDCOVAL |
PROCEED
|
Review |
If the outcome of this stage is PROCEED then the task is saved and moved to ‘Review’ stage. |
|
|
|
ADDITIONAL INFO |
Initiation |
If the outcome of this stage is ADDITIONAL INFO then the task is saved and moved to ‘Initiation’ stage. |
5 |
Review |
ORDCOREV |
PROCEED
|
Legal Opinion |
If the outcome of this stage is PROCEED then the task is moved to ‘Legal Opinion’ stage once all the mandatory fields are specified in the screen. |
|
|
|
REJECT |
Terminate |
If the outcome of this stage is REJECT then the process gets terminated. |
|
|
|
ADDITIONAL INFO External Check Required = False Field Investigation Required = False Valuation Required = False
|
Initiation |
If the outcome of the stage is ADDITIONAL INFO and ‘External Check Required’, ‘Field Investigation Required’ and ‘Valuation Required’ check box are disabled then the system moves the task to ‘Initiation’ stage. |
|
|
|
ADDITIONAL INFO External Check Required = True |
External Check |
If the outcome of the stage is ADDITIONAL INFO and ‘External Check Required’ check box is enabled then the system moves the task to ‘External Check’ service call. |
|
|
|
ADDITIONAL INFO Field Investigation Required = True |
Field Investigation |
If the outcome of the stage is ADDITIONAL INFO and ‘Field Investigation Required’ check box is enabled then the system moves the task to ‘Field Investigation’ service call. |
|
|
|
ADDITIONAL INFO Valuation Required = True |
Valuation |
If the outcome of the stage is ADDITIONAL INFO and ‘Valuation Required’ check box is enabled then the system moves the task to ‘Valuation Required’ service call. |
6 |
Legal Opinion |
ORDCOLGO |
PROCEED
|
Risk Evaluation |
If the outcome of the stage is PROCEED then the task is saved and moved to ‘Risk Evaluation’ stage. |
|
|
|
ADDITIONAL INFO |
Review |
If the outcome of the stage is ADDITIONAL INFO, then the task is saved and moved to ‘Review’ stage. |
7 |
Risk Evaluation |
ORDCORSK |
PROCEED
|
Approval |
If the outcome of the stage is PROCEED then the task is saved and moved to ‘Approval’ stage. |
|
|
|
ADDITIONAL INFO |
Review |
If the outcome of the stage is ADDITIONAL INFO then the task is saved and moved to ‘Review’ stage. |
8 |
Approval |
ORDCOAPR |
APPROVE |
Customer Agreement |
If the outcome of the stage is APPROVE, then the task is saved and moved to ‘Customer Agreement’ stage. |
|
|
|
ADDITIONAL INFO |
Review |
If the outcome of the stage is ADDITIONAL INFO, then the task is saved and moved to ‘Review’ stage. |
9 |
Customer Agreement |
ORDCOCAG |
PROCEED
|
Collateral Perfection |
If the outcome of the stage is PROCEED after the customer agreement is signed and received by the bank, then the task is saved and moved to ‘Collateral Perfection’ stage. |
10 |
Collateral Perfection |
ORDCOPER |
PROCEED CAM_PROCESS_REF is NULL |
Handoff to ELCM Module |
If the outcome of the stage is PROCEED and the task is saved, then system triggers DB hand off to ELCM. |
|
|
|
PROCEED CAM_PROCESS_REF is NOT NULL |
COMPLETED |
If the outcome of the stage is PROCEED and the task is saved, then the collateral process are completed and the response is received by CAM process. Collaterals are handed off from CAM Process. |
11 |
Handoff to ELCM System |
|
Successful handoff completion |
COMPLETED |
Successful completion of Collateral creation process. |
|
|
|
Exceptions like unavailability of ELCM services or error while handing off to ELCM. |
Handoff Retry |
In case of any exceptions like, unavailability of ELCM services, error while handing off to FCUBS, the task is moved to Manual retry stage. |
12 |
Handoff Retry |
ORDCOMRT |
PROCEED Retry Again = True |
Handoff to ELCM System |
The system invokes DB adapter calls to handoff collateral details to ELCM. |
|
|
|
PROCEED Retry Again = False |
COMPLETED |
|
To acquire the next stage, you need to go to the ‘Task’ menu and select ‘Assigned’ under ‘Standard’ option.
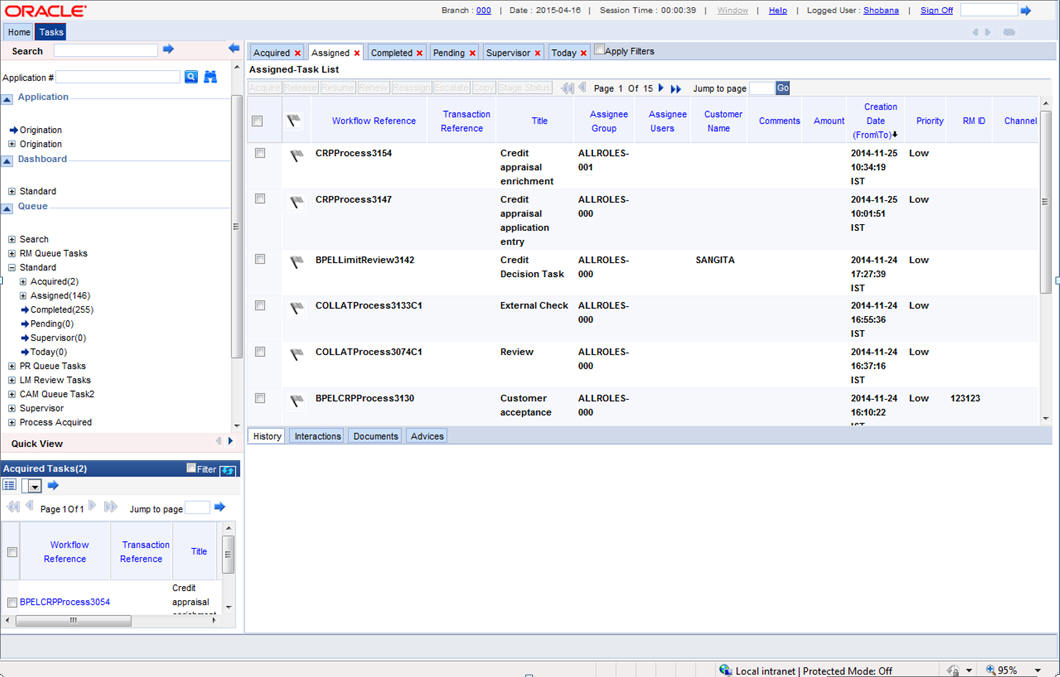
All tasks that have been successfully completed are listed in the right-side of the screen. Select the check box against your ‘Workflow Ref No’ and click ‘Acquire’ button at the top of the screen to acquire the next stage of the task.
The system displays the message as ‘Acquire Successful’ on successful acquisition of the task.
Click ‘Ok’ to proceed to the next stage. To select the acquired task for the next stage, select ‘Acquired’ under ‘Standard’ option in the ‘Task’ menu. All the tasks that have been successfully acquired are displayed in the right side of the screen. Search for your workflow reference number and click the ‘Workflow Ref No’ to open the required screen.
2.5 Processing Collateral Creation
Step 1. Initiation
This section contains the following topics:
- Section 2.5.1, "Collateral Details Tab"
- Section 2.5.2, "Property and Vehicle Tab"
- Section 2.5.3, "Machinery and Marketable Securities Tab"
- Section 2.5.4, "Policy/Guarantee/Precious Metal Tab"
- Section 2.5.5, "TD/Miscellaneous Tab"
- Section 2.5.6, "Remarks Tab"
- Section 2.5.7, "Maintaining Document Details"
- Section 2.5.8, "Maintaining Collateral Preferences"
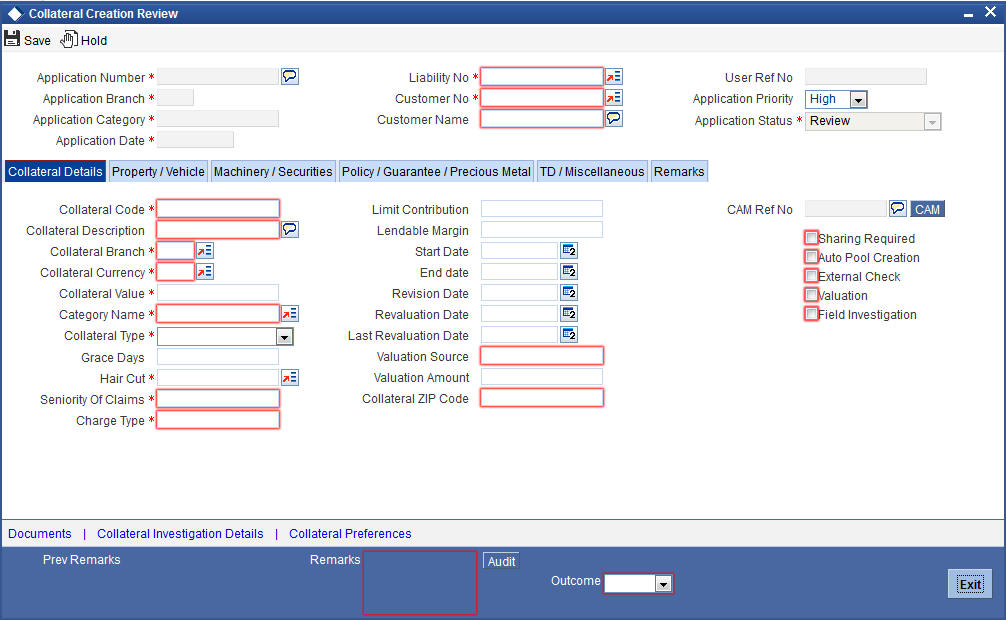
You can maintain collateral details in ‘Collateral Creation’ screen, if you have the required access rights. You can invoke this screen by typing ‘ORDCOINT or ORDCOINP in the field at the top right corner of the Application tool bar and clicking the adjoining arrow button. In ‘Collateral Creation Process’ you can specify the necessary details for creating the collateral data.
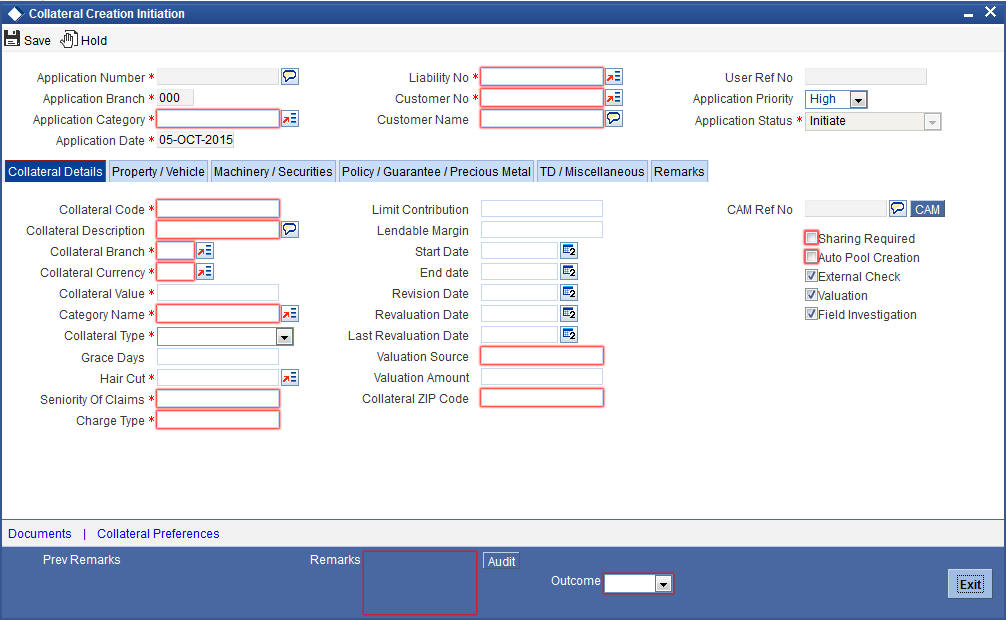
Specify the following in this screen:
Application Number
The system displays the application reference number on initiating a process. This number is unique throughout the process.
Application Branch
The system displays the branch where application is captured.
Application Date
The system defaults the application initiation date.
Application Category
Select the application category from the adjoining option list. The category is used for populating the documents, advices, and checklist mapped in Document sub-screen.
Channel
Select the channel which initiated the application from the adjoining option list.
Channel Reference No
Specify the channel reference number.
External Source
Specify the external source.
Source Reference No
Specify the reference number of the external source.
Application Priority
Select application priority from the adjoining drop-down list.The options available are:
- High
- Low
- Medium
User Reference No
Specify the user reference number.
Application Status
The system defaults the application status based on the current stage of the process.
2.5.1 Collateral Details Tab
Liability No
Select the liability number from the adjoining option list.
Customer No
Select the customer number from the adjoining option list.
Customer Name
The system displays the name of the customer.
Collateral Code
Specify the code of the collateral.
Collateral Description
Give a brief description on the collateral.
CAM Process Reference No
The system displays the CAM process reference number which triggered collateral creation.
CAM
Click CAM to view CAM process flow details.
Collateral Branch
Select the branch where collateral is created from the adjoining option list.
Collateral CCY
Select the currency of the collateral from the adjoining option list.
Collateral Amount
Specify the collateral amount.
Collateral Category
Select the collateral category under which the collateral should be created. You can select the appropriate category from the adjoining option list.
Collateral Type
Select the type of collateral from the adjoining drop-down list. The options available are:
- Property
- Vehicle
- Marketable Securities
- Plant and Machinery
- Term Deposit
- Precious Metal
- Guarantee
- Miscellaneous
- Policy
Based on the collateral type selected in the Collateral Details tab, system forces the user to complete corresponding tabs.
Start Date
Specify the start date from when the collateral is submitted.
End Date
Specify the collateral expiry date.
Revision Date
Specify the collateral revision date.
Revaluation Date
Specify the collateral revaluation date.
Grace Days
Specify the grace days.
Last Valuation Date
Specify the last valuation date.
Valuation Source
Select the source of valuation.
Valuation Amount
Specify the valuation amount.
Collateral ZIP Code
Specify the pin code of the collateral location.
External Check Required
‘External Check Required’ is selected by default. However, you can disable this check box if you want to skip the external check.
Valuation Required
‘Valuation Required’ is selected by default. However, you can disable this check box if you want to skip the valuation of the collaterals.
FI Required
‘FI Required’ is selected by default. However you can disable this check box if you want to skip the field investigation.
Charge Type
Select the collateral charge type.
Haircut%
Select the haircut percentage from the adjoining option list.
Seniority of Claims
Specify the seniority of bank’s claim on the property.
Limit Contribution
Specify the limit contribution amount.
Sharing Required
If this check box is selected, the collateral can be shared by the liabilities given in the Sharing details section in Collateral Preference sub-screen.
Auto Pool Creation
Select this check box if auto pool creation is required.
Lendable Margin
Specify the lendable margin.
2.5.2 Property and Vehicle Tab
Click ‘Property/Vehicle’ tab to provide details on property and vehicle.
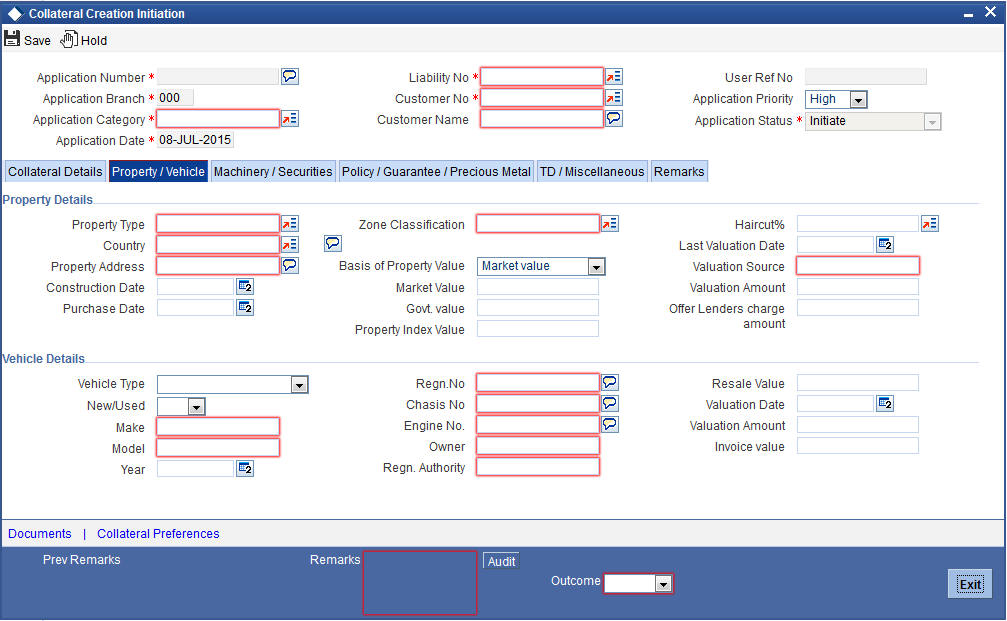
Property Type
Select the type of property from the adjoining option list.
Country
Select the country of the location of collateral from the adjoining option list.
Property Address
Specify the property address.
Construction Date
Specify the property construction date.
Purchase Date
Specify the property purchase date.
Zone Classification
Select the zone of the property from the adjoining option list.
Basis of Property Value
Select the basis of property value from the adjoining drop-down list. The options available are:
- Market Value
- Property Index Value
- Govt. Value
Market Value
Specify the market value of the property.
Govt. Value
Specify the government value of the property.
Property Index Value
Specify the index value of the property.
Haircut %
Select the haircut percentage from the adjoining option list.
Last Valuation Date
Specify the last valuation date from the customer submitted valuation report.
Valuation Source
Specify the source of valuation from the valuation report.
Valuation Amount
Specify the valuation amount.
Other Lenders Charge Amount
Specify the combined charge amount of other lenders if the property is already mortgaged to other lenders.
Vehicle Type
Select the type of vehicle from the adjoining drop-down list.
New/Used
Indicate whether the vehicle is new or used.
Make
Specify the make of the vehicle.
Model
Specify the model of the vehicle.
Year
Specify the year of manufacturing of the vehicle.
Regn No.
Specify the vehicle registration number.
Chasis No
Specify the vehicle chasis number.
Engine No
Specify the engine number of the vehicle.
Owner
Specify the owner details of the vehicle.
Regn. Authority
Specify the registration authority of the vehicle.
Resale Value
Specify the resale value of the vehicle.
Valuation Date
Specify the valuation date of the vehicle. This is applicable for used cars only.
Valuation Amount
Specify the valuation amount of the vehicle. This is applicable for used cars only.
Invoice Value
Specify the invoice value of the vehicle.
2.5.3 Machinery and Marketable Securities Tab
Click ‘Machinery/Securities’ tab to provide details on machinery and marketable securities.
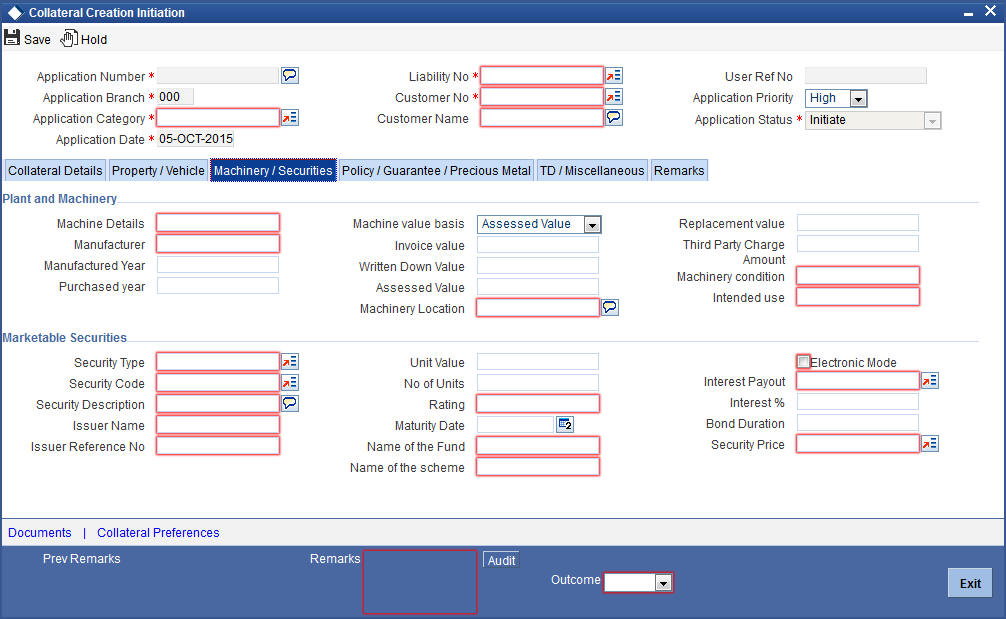
Plant and Machinery
Machine Details
Specify the machine number of the collateral. The system displays an error message if any duplicates exists for this machine number.
Manufacturer
Specify the manufacturer details.
Manufactured Year
Specify the year of manufacturing.
Purchased Year
Specify the year of purchase.
Machine Value Basis
Select the basis of machine value from the adjoining drop-down list. The options available are:
- Assessed Value
- Written Down Value
- Invoice Value
Invoice Value
Specify the invoice value of the machinery.
Written Down Value
Specify the written down value of the machinery after depreciation.
Assessed Value
Specify the assessed value of the machinery.
Machinery Location
Specify the location of the machinery.
Replacement Value
Specify the replacement value of the machinery.
Third Party Charge Amount
Specify the charge amount of other lenders, if any.
Machinery Condition
Specify the condition of the machinery.
Intended Use
Specify the intended usage of the machinery.
Marketable Securities
Security Type
Select the type of marketable security from the adjoining option list.
Security Code
Select the security code from the adjoining option list.
Description
The system displays security code description.
Issuer Name
The system displays the issuer name from Issuer Maintenance (GEDISSUR) screen.
Issuer Ref No.
The system defaults the issuer reference number from Securities (GEDSECTY) screen.
Unit Value
The system displays the face value captured in Securities screen as unit value.
No. of Units
Enter the number of units submitted by the customer.
Rating
Specify the rating of the securities.
Maturity Date
The system displays the expiry date captured in Securities screen as maturity date.
Name of the Fund
Specify the name of the mutual fund.
Name of the Scheme
Specify the scheme name of the mutual fund.
Electronic Mode
Select this check box if securities are in electronic mode.
Interest Payout
Select the interest payment frequency from the adjoining option list.
Interest %
Specify the interest percentage on bonds.
Bond Duration
Specify the duration of the bonds.
Security Price
Specify the market value of the security.
2.5.4 Policy/Guarantee/Precious Metal Tab
Click ‘Policy/Guarantee/Precious Metal’ tab to provide details on LIC policy, guarantee, and precious metal.
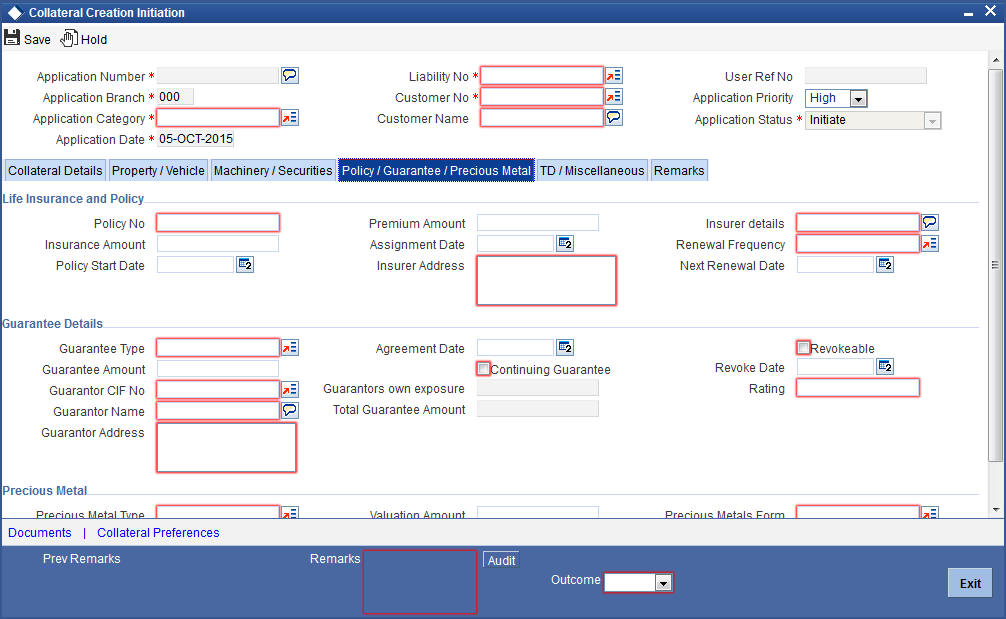
Life Insurance Policy
Policy No.
Specify the life insurance policy number.
Insurance Amount
Specify the sum assured amount.
Policy Start Date
Enter the start date of the policy.
Premium Amount
Specify the premium amount.
Assignment Date
Enter the date of assigning the policy to the bank.
Insurer Address
Specify the address of the insurance company.
Insurer Details
Specify the details of insurance like the nature of the policy, term of the policy etc.
Renewal Frequency
Select the renewal frequency of the policy from the adjoining option list.
Next Renewal Date
Enter the next renewal date.
Guarantee
Guarantee Type
Select the type of guarantee from the adjoining option list.
Guarantee Amount
Specify the guarantee amount.
Guarantor CIF No.
Select the guarantor CIF number from the adjoining option list.
Guarantor Name
Specify the name of the guarantor. The system displays the name of the guarantor if the guarantor CIF number is entered.
Guarantor Address
Specify the address of the guarantor.
Agreement Date
Specify the guarantee agreement date.
Continuing Guarantee
Select this check box if it is a continuing guarantee.
Guarantor’s Own Exposure
The system displays the total exposure of the guarantor.
Total Guarantee Amount
The system displays the combined guarantee amount of guarantor.
Revokeable
Select this check box to revoke or withdraw the guarantee provided.
Revoke Date
Indicate the date when the Guarantor revokes the guarantee. This field is enabled only when the Revoke check box is selected.
Rating
You can assign a credit rating to each Guarantor. Here specify the rating assigned to the Guarantor.
Precious Metal
Precious Metal Type
Specify the type of precious metal from the adjoining option list.
Weight in Gms
Specify the weight of the precious metal in grams.
Valuation Amount
Specify the valuation amount.
Unit Rate
Specify the unit rate of the precious metal.
Precious Metal Form
Select the form of the metal from the adjoining option list.
Notes
Specify the notes related to collateral.
2.5.5 TD/Miscellaneous Tab
Click ‘TD/Miscellaneous’ tab to provide details on term deposit and other miscellaneous details.
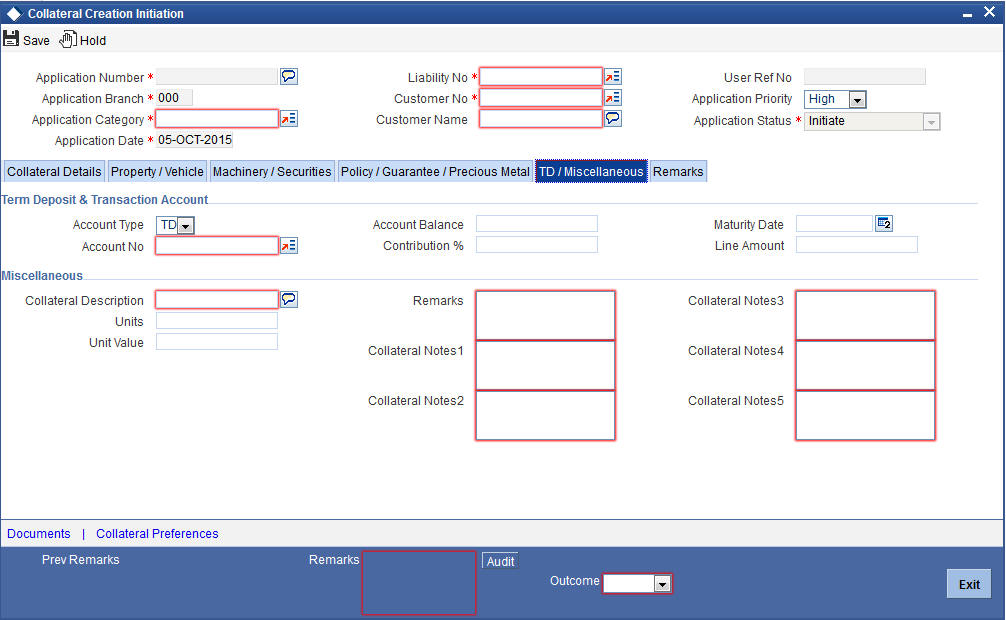
Term Deposit and Transaction Account
Account Type
Select the type of account from the adjoining option list.
Account No.
Select the transaction account number from the adjoining option list.
Account Balance
The system displays the account balance.
Contribution %
Specify the percentage of account balance that needs to be used as collateral.
Maturity Date
Enter the maturity date of the TD.
Lien Amount
The system displays the lien amount, if any.
Miscellaneous
Collateral Desc.
Give a brief description on those collateral which does not belong to the standard collateral type.
Units
Specify the number of collaterals submitted.
Unit Value
Specify the value of each unit.
Remarks
Specify remarks, if any.
Collateral Notes 1
Specify additional details on collateral, if any.
Collateral Notes 2
Specify additional details on collateral, if any.
Collateral Notes 3
Specify additional details on collateral, if any.
Collateral Notes 4
Specify additional details on collateral, if any.
Collateral Notes 5
Specify additional details on collateral, if any.
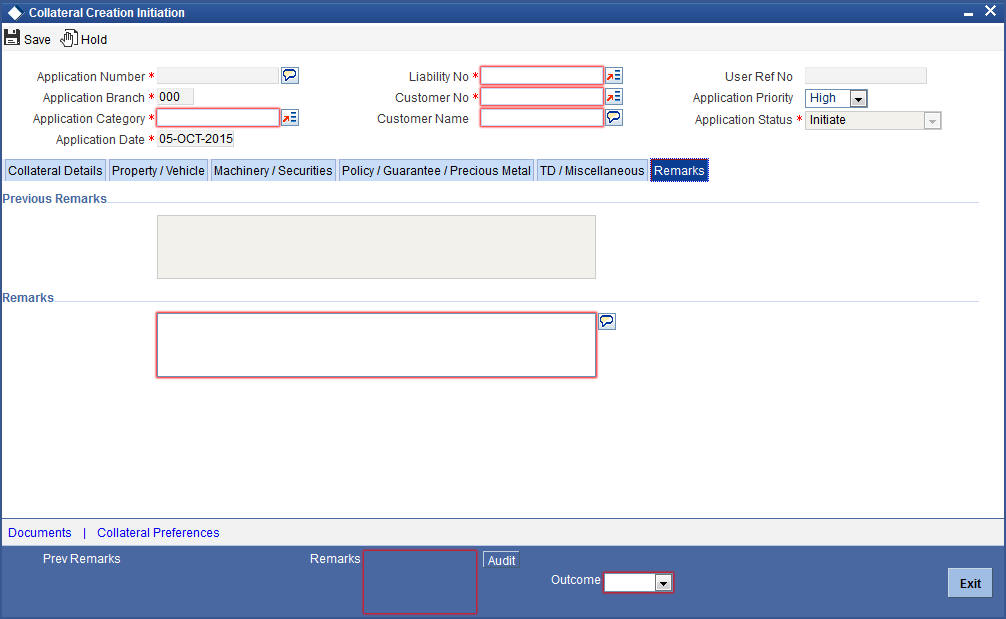
2.5.6 Remarks Tab
Click ‘Remarks’ tab to update remarks, if any. Remarks specified in the previous stage gets defaulted in the ‘Previous Remarks’ field.
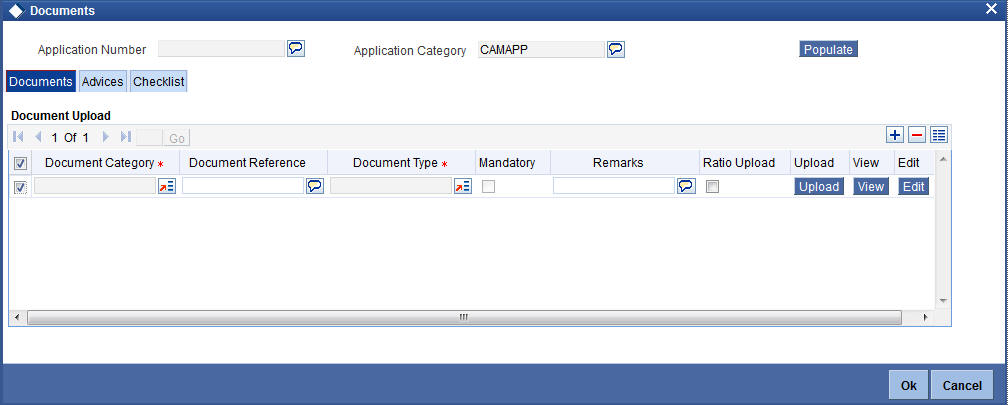
2.5.7 Maintaining Document Details
You can maintain the collateral related documents details through the ‘Documents’ screen. Click ‘Documents’ button from ‘Collateral Creation’ screen to invoke this screen.
Application Number
The system displays the application number.
Application Category
The system displays the application category.
Documents
Document Category
Select the document category from the adjoining option list.
Document Reference
Specify the document reference number.
Document Type
Select the type of document.The adjoining option list displays all the document types maintained in the system. Select the appropriate one.
Mandatory
Select this check box to indicate whether the document is mandatory.
Remarks
Specify remarks, if any.
Ratio Upload
Select this check box if you require ratio upload.
Upload
Click ‘Upload’ button to open the ‘Document Upload’ sub-screen. The ‘Document Upload’ sub-screen is displayed below:

In the ‘Document Upload’ sub-screen, specify the corresponding document path and click the ‘Submit’ button. Once the document is uploaded through the upload button, the system displays the document reference number.
View
Click ‘View’ to view the document uploaded.
Edit
Click ‘Edit’ to edit the uploaded documents.
Advices
Click ‘Advices’ tab in Documents screen to view advice details.
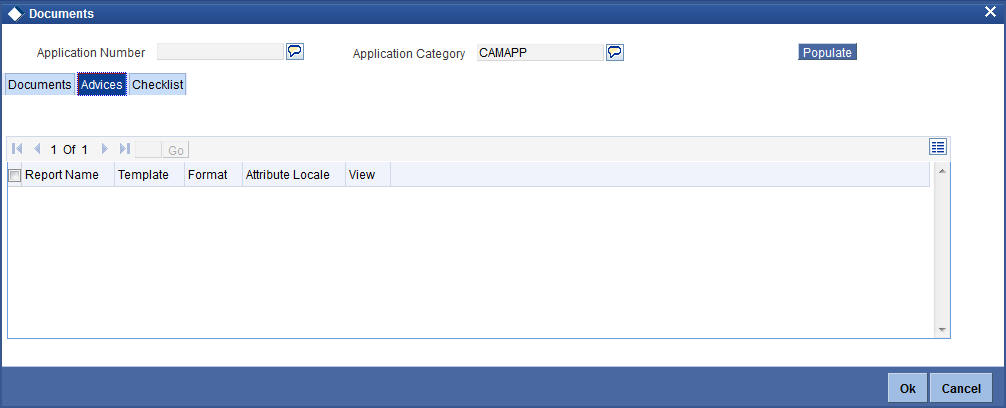
Report Name
The system displays the report name.
Template
The system displays the template.
View
Click ‘View’ to view the uploaded document.
Checklist
Click ‘Checklist’ tab in Documents screen to view checklist details.

Checklist Item
The system displays the checklist details.
Mandatory
This field is updated based on the maintenances in Documents sub screen.
Verified
Select this check box to confirm that the corresponding checklist is verified.
Comments
Specify comments, if any.
2.5.8 Maintaining Collateral Preferences
Click ‘Collateral Preferences’ in the Collateral Creation screen to maintain collateral preferences details. You can also invoke this screen by typing ‘ORCCOLPF’ in the field at the top right corner of the application toolbar and click the adjoining arrow button
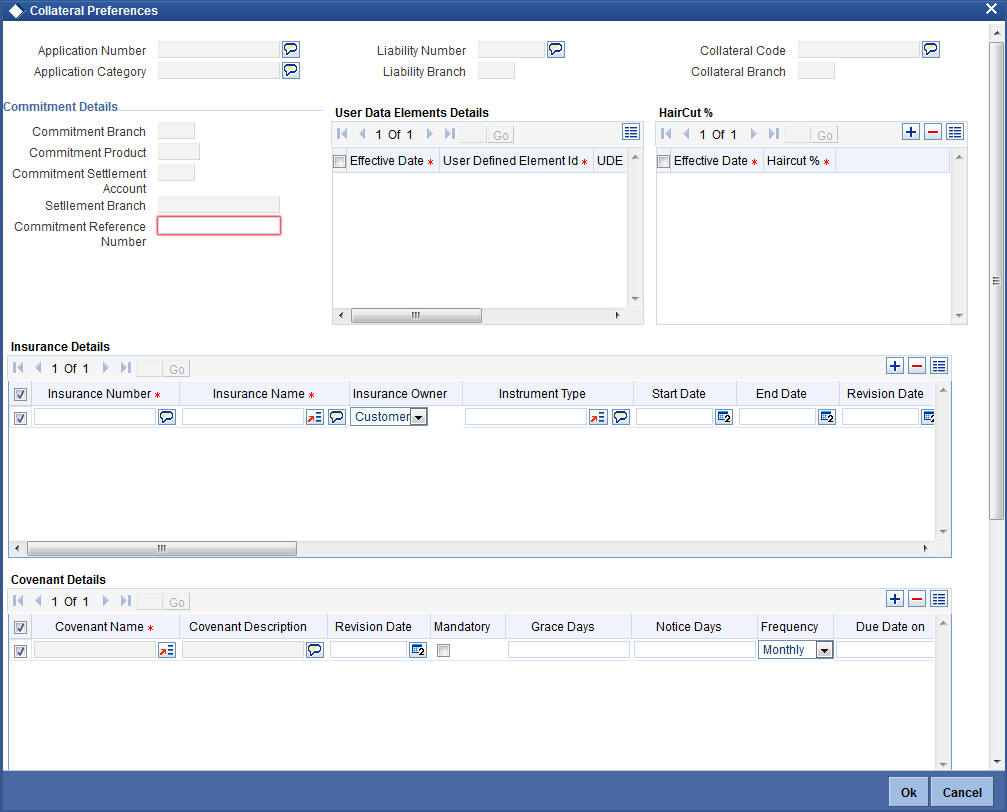
The system displays the following in the Collateral Preference screen:
- Application Number
- Application Category
- Liability Number
- Liability Branch
- Collateral Branch
- Collateral Code
Commitment Details
Commitment Reference Number
Specify the commitment reference number.
Haircut %
Effective Date
Specify the date on which the Haircut % becomes effective from the adjoining option list.
Haircut %
Specify the Hair cut% of the Collateral. You can enter values between 1 to 100.
Insurance Details
Insurance Number
Specify the insurance number under which that insurance has been issued.
Insurance Name
Specify the name of the Insurance/Insurance Company associated with the collateral. The option list displays all valid insurance company names maintained in the system. Select the appropriate one.
Insurance Owner
Select the owner of the insurance policy from the adjoining drop-down list. This list displays the following values:
- Bank
- Customer
Instrument Type
Specify the type of the insurance that is associated with that collateral. The option list displays all valid insurance types maintained in the system. Select the appropriate one.
Start Date
Specify the start date for that insurance.
End Date
Specify the end date for that insurance.
Revision Date
Specify the date of revision of the insurance.
Notice Days
On choosing a covenant name, system defaults the Notice Days details, that is, the number of days prior to next revision date of the covenant. You can modify this value. The period during the notice days will be the notice period.
Periodicity
Select the premium periodicity of the insurance. The list displays the following values:
- Daily
- Weekly
- Monthly
- Quarterly
- Half Yearly
- Yearly
Premium Status
Specify the insurance premium payment status. You can select one of the following premium payment statuses from the drop-down list.
- Paid
- Unpaid
Premium End Date
Specify the end date of the premium payment.
Insurance Currency
Specify the insurance currency of the policy.
Insurance Amount
Specify the insured amount of the policy.
Cover Date
Specify the date from which the insurance policy is valid. The insurance cover date cannot be greater than the collateral expiry date.
Text Code
Specify the text code for the insurance.
Premium Currency
Specify the currency of the premium to be paid.
Premium Amount
Specify the amount of the premium to be paid.
Remarks
Specify the remarks about the insurance details.
Policy Assigned to Bank
Specify whether the insurance policy has been assigned to the bank or not. You can select one of the following options.
- Yes
- No
Coverage
Specify the coverage details of the insurance.
Covenant Details
Covenant Name
Select the covenant name from the list available here. The list displays the covenant names maintained in Covenant Maintenance screen.
Covenant Description
Description of the specified covenant is displayed here based on the details maintained at ‘Covenant Maintenance’ level.
Revision Date
System defaults the Revision Date for the covenant, on save of the collateral category record, based on the Frequency and Due Date of the covenant, maintained in the 'Covenant Maintenance' screen
Mandatory
Mandatory/Non-mandatory details are shown on choosing a covenant name. You may change this.
Grace Days
You can change the Grace Days details which are displayed here on choosing a covenant name.
Notice Days
Once you select the covenant name, system defaults the Notice Days details, that is, the number of days prior to next revision date of the covenant. You can modify the value. The period during the notice days are the notice period.
Frequency
You may change the frequency shown here on choosing a covenant name.
Due Date On
Due date of the specified covenant is defaulted here based on the details maintained at ‘Covenant Maintenance’ level.
Start Month
Starting month of the specified covenant is defaulted here based on the details maintained at ‘Covenant Maintenance’ level
Remarks
Remarks if any specified for the covenant at the ‘Covenant Maintenance’ level are defaulted here.
Source Restrictions
Restriction Type
Choose the ‘Allowed’ option to maintain an allowed list of liability restrictions. Choose the ‘Disallowed’ option to maintain a disallowed list of liability restrictions.
Default value of this field will be’ Disallowed’. If you select restriction type as ‘allowed’, then you need to input at least one record.
Source Code
Specify the source from the adjoining option list.
Source Description
Give a brief description on the source.
Sharing Details
Liability Number
Specify the liability number of the liability that is sharing the collateral. Each liability mapped here cannot be more than 100% of the total collateral value.
Shared Percentage
Specify the percentage share of the liability in the collateral.
Contract Details
Contract Reference
You can link the Term Deposit Account Number or Contract Reference Number as collateral for a Liability by specifying the ‘Contract Reference No’ here. The adjoining list of options in this field displays all contract types other than Contract Type ‘AC’.
Note
- The Term Deposit contract needed for Collateral Linkage must be maintained in Netting Maintenance with any contract type other than ‘AC’
- Once the contract is linked as collateral, then its collateral value cannot exceed its contract amount as maintained in the Account Netting screen.
- The start date of the collateral should be later than the value date of the respective contract netting maintenance. Likewise, the expiry date of the collateral should be earlier than the expiry date of the respective contract netting maintenance.
- The system blocks/marks Lien on the linked Term Deposit contract.
Contract Branch
Specify the branch of the contract.
Contract Contribution
Specify here the amount being contributed from the contract as a collateral for the liability.
On saving the above maintenance, the system computes the sum of all the collateral values (specified under 'Contract Contribution') and updates the same after final hand-off to the ELCM in the 'Collateral Value' field of the 'Collaterals Maintenance' screen.
Step 2. External Check
At this stage, you can select if there is an existing charge on the collateral submitted by the customer. These details are captured in the ‘External Check’ section. The function ID of this stage is ‘ORDCOEXC’.
Go to the ‘Assigned’ task list and acquire the task by clicking the corresponding the ‘Acquire’ button. The task is moved to the ‘Acquired’ task list.
External Check/Risk Valuation
You can capture the external check details during ‘External Check’ stage. Click ‘External Check/Risk Valuation’ tab in ‘Collateral Investigation Details’ screen. The following screen is displayed:
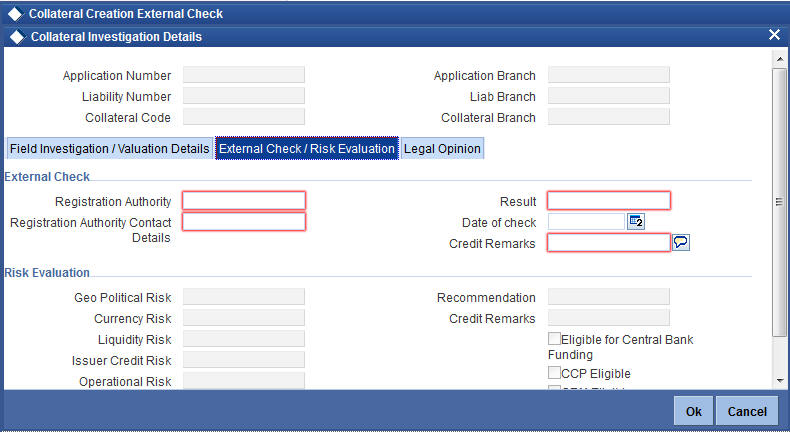
External Check
Registration Authority
Specify the registration authority details.
Registration Authority Contact Details
Specify the registration authority contract details.
Result
Specify the result of the external check.
Date of Check
Specify the date when the external check was started.
Credit Remarks
Specify credit remarks, if any.
Step 3. Field Investigation
The information captured in the previous stage is enriched in the collateral investigation stage.
The proposal is enriched by capturing additional information like field investigation agency code, result, field investigation agent remarks, credit remarks, and so on.
At this stage, you can interface with a third party field investigation agency system and trigger field investigation request electronically or can capture the field investigation details internally in this screen.
You can maintain details on collateral investigation in the ‘Collateral Investigation Details’ screen during the ‘Field Investigation’ stage (ORDCOFIG). Click ‘Collateral Investigation Details’ in Collateral Creation screen to invoke this screen.
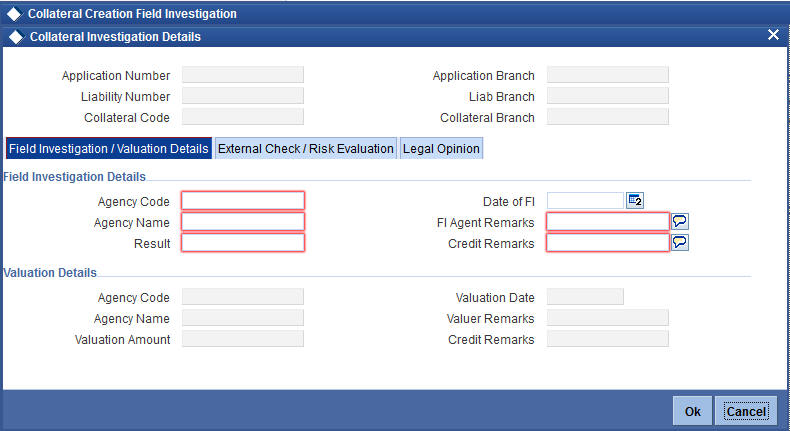
Field Investigation Details
Agency Code
The system defaults the agency code.
Agency Name
The system displays the field investigation agency name.
Result
Specify the result of the field investigation.
Date of FI
Enter the date of field investigation.
FI Agent Remarks
Specify the remarks by the field investigation agent.
Credit Remarks
Specify the remarks by credit team.
Step 4. Valuation
Go to your ‘Assigned’ task list and acquire the task by clicking the corresponding the ‘Acquire’ button. The task will then be moved to the ‘Acquired’ task list.
The collateral is evaluated either internally or by an external valuation agency. The valuation details are captured during the Valuation stage (ORDCOVAL).
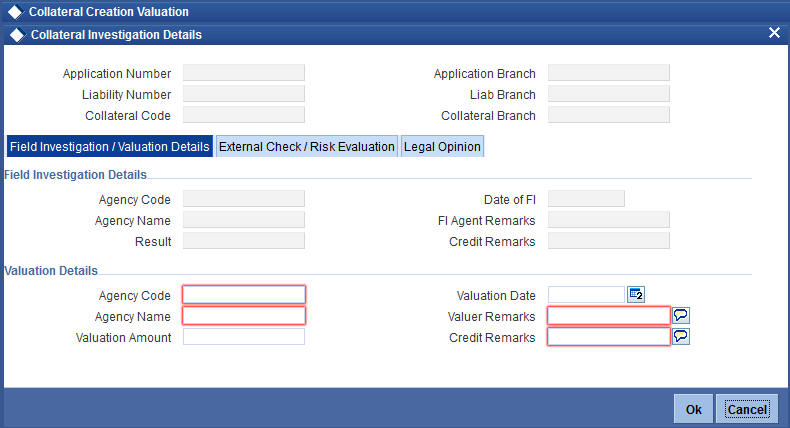
Valuation Details
Agency Code
Specify the valuation agency code.
Agency Name
The system displays the valuation agency name.
Valuation Amount
Specify the valuation amount.
Valuation Date
Enter the date of valuation.
Valuer Remarks
Specify the remarks by valuation agent.
Credit Remarks
Specify the remarks by credit team.
Once the valuation details are captured, select the action ‘PROCEED’ in the text box adjoining the ‘Audit’ button in this screen and save the record by clicking the save icon in the tool bar.
The system creates a task ‘Risk Evaluation’ in the ‘Assigned’ task list.
Step 5. Reviewing Field Investigation, External Check and Valuation Details
At this stage the user reviews the field investigation, valuation and external check details of the collateral and decides if the collateral can be accepted. Select the action ‘PROCEED’ in the text box adjoining the 'Audit' button in this screen and save the record by clicking the save icon in the tool bar.
Go to the pending list in the system. The system displays all the pending activities. Click ‘Acquire’ button adjoining the ‘Input Details’ task to acquire it. The system displays the information message as “The task was successfully Acquired!”.
During Credit Review stage, the system checks for collateral creation process flow completion and displays necessary message to the reviewer. If ‘Override Collateral Task Completion’ flag in Credit Appraisal Enrichment stage is checked, this validation is skipped by the system and limit origination process flow can proceed to next task. The function ID of the collateral creation review stage is ‘ORDCOREV.
Step 6. Legal Opinion on the Collateral
You can go to your ‘Assigned’ task list and acquire the task by clicking the corresponding ‘Acquire’ button. Go to the ‘Acquired’ task list and double click on the record to invoke ‘Legal Opinion’ (‘ORDCOLGO) screen.
Legal Option
Click ‘Legal Opinion’ tab in ‘Collateral Investigation Details’ screen. The following screen is displayed:
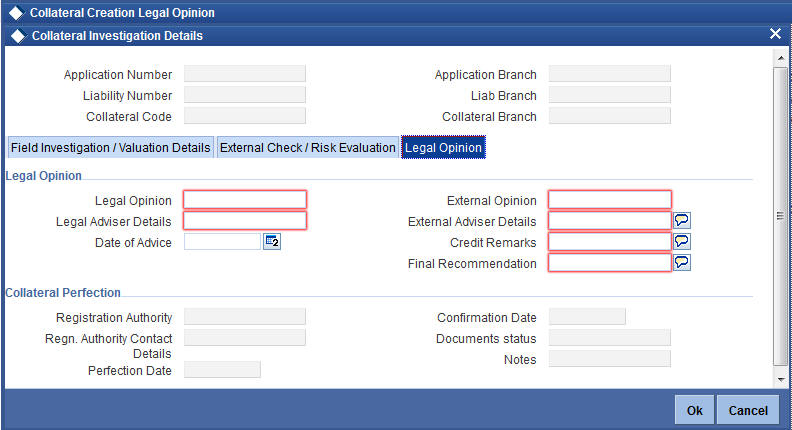
Legal Opinion
Legal Opinion
Specify the legal opinion on the acceptability of the proposed collateral.
Legal Adviser Details
Specify the legal adviser details.
Date of Advice
Specify the date when the advice was received from legal team.
External Opinion
Specify the external legal opinion.
External Adviser Details
Specify the external legal adviser details.
Credit Remarks
Specify remarks of the credit team, if any.
Final Recommendation
Specify the final opinion based on the internal and external legal opinion.
Step 7. Risk Evaluation of the Collateral
At this stage, the risk management team evaluates the credit risk of the proposed collateral. You can capture the risk evaluation details during this stage (‘ORDCORSK).
You can acquire this task by clicking ‘Assigned’ in the task list and click the adjoining ‘Acquire’ button.
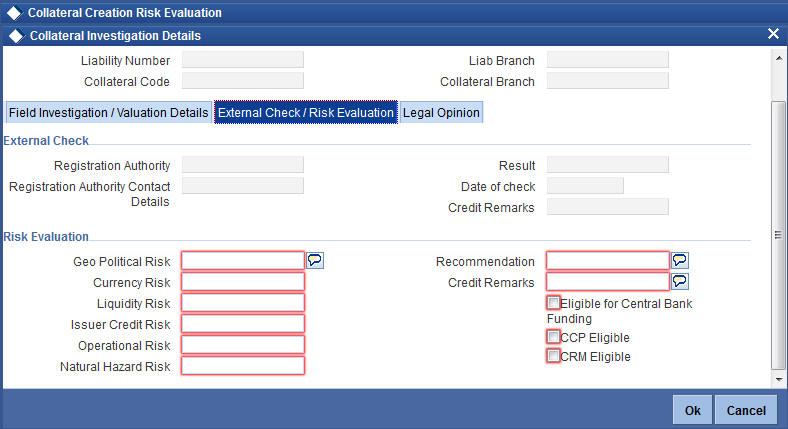
Risk Evaluation
Eligible for Central Bank Funding
Select this check box if the collateral is eligible for central bank funding.
CCP Eligible
Select this check box if the collateral is part of the eligible collaterals accepted by Central Clearing Party
CRM Eligible
Select this check box if the collateral is recognized as credit risk mitigant for basel capital calculations.
Geo Political Risk
Specify geographical political risk involved in the collateral. For example: Oil assets situated in certain countries like Iraq.
Currency Risk
Specify if the collateral currency posses any currency risk.
Liquidity Risk
Specify the liquidity risk of the collateral.
Issuer Credit Risk
Specify the credit risk of the collateral issuer.
Operational Risk
Specify the operational risk involved in managing the collaterals like ship, aeroplane, or a warehouse with goods.
Natural Hazard Risk
Specify if the location of the collateral is prone to natural hazards like floods, earthquake, and so on.
Recommendation
Specify the final recommendation after risk evaluation.
Credit Remarks
Specify credit remarks, if any.
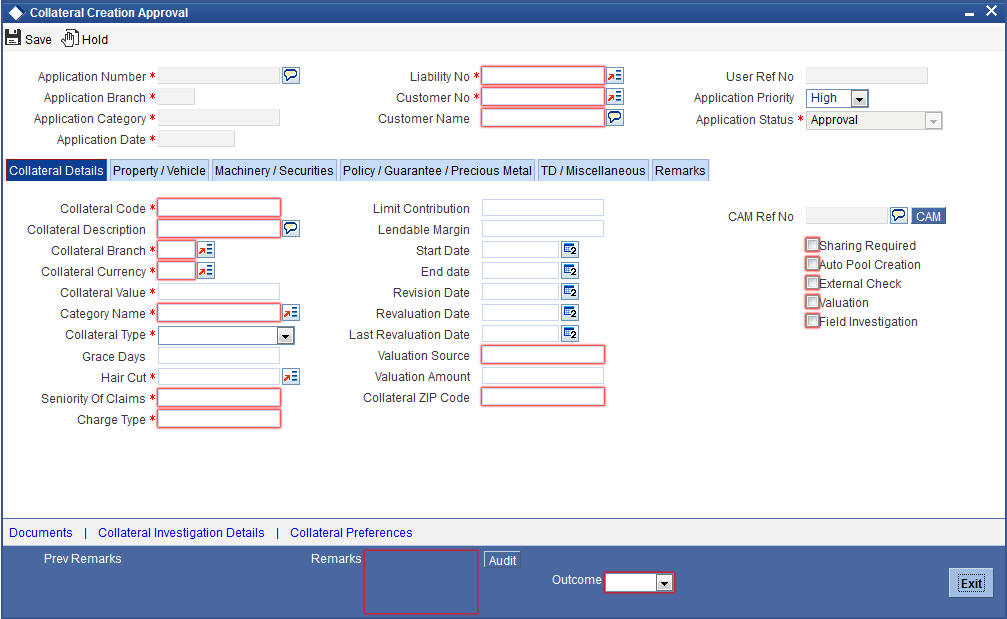
Step 8. Collateral Approval
In this stage, the created collateral is approved or rejected by the approval authority based on the legal opinion, risk evaluation, and own assessment. The approver can approve, disapprove, or send back the task for more clarifications (‘ORDCOAPR).
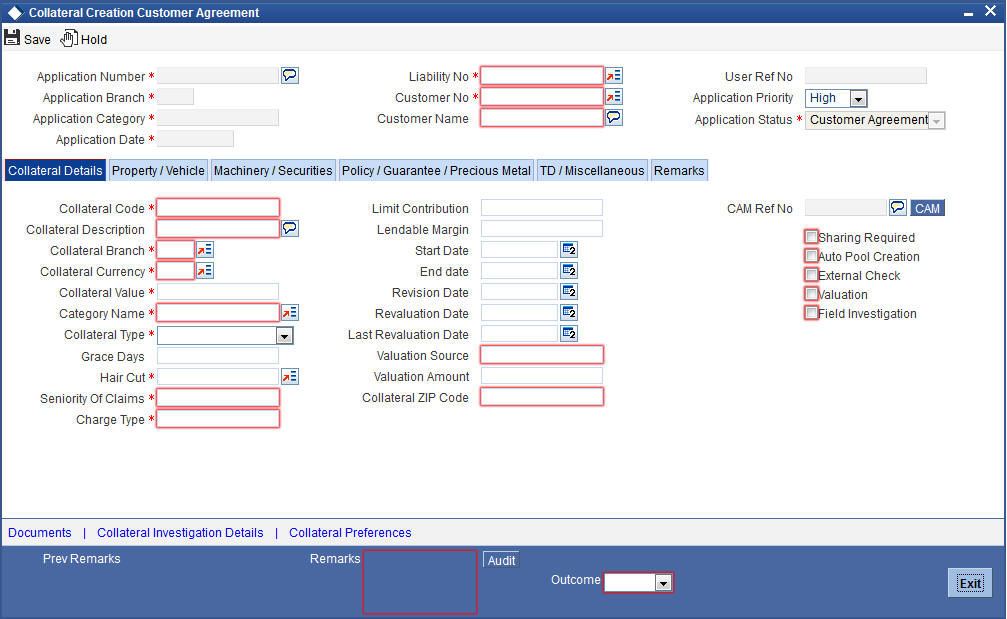
Step 9. Customer Agreement
Once the proposed collateral is approved, the system generates a collateral agreement which is sent to the customer for their signature. If the customer accepts the agreement, then you can move the task to next stage (ORDCOCAG).
Step 10. Collateral Perfection
You can register the collateral details either internally or through an external agency. On acquiring, the task moves to the ‘Acquired’ list. Fetch the record from the ‘Acquired’ list. In this stage you can capture the collateral registration details (‘ORDCOPER).

Collateral Perfection
Registration Authority
Specify the registration authority with which collateral is perfected.
Regn. Authority Contact Details
Specify the contact details of registration authority.
Perfection Date
Specify the date on which bank’s charge has been registered.
Confirmation Date
Specify the date on which you received confirmation of perfection.
Documents Status
Specify if the perfection documents are received from registration authority.
Notes
Specify notes, if any.
Step 11. Manual Retry
After successfully completing the collateral perfection stage, the details can be handed off to ELCM module for collateral creation. At this stage, if any exceptions like, unavailability of ELCM services, error while handing off to FCUBS occurs, then you can manually try the process again.
2.6 Capturing Collateral Details through ELCM and CAM Process
You can capture the collateral details in Collateral Maintenance (GEDCOLLT) screen of ELCM. The details captured in this screen gets displayed Collateral Creation screen.
For more information on Collateral Maintenance screen, refer section Collateral Maintenance in ‘Enterprise Limits and Collateral Management’ user manual.
For each new collateral, the CAM process initiates one collateral creation process. After successfully creating the collateral, all the collateral data gets saved in ELCM table which can be queried from Collateral Maintenance (GEDCOLLT) screen of ELCM.
For more information on CAM process flow, refer Credit Appraisal Management user manual.