8. Account Documents
8.1 Introduction
The Documents Maintenance screen allows for both the paperless storage of documents within Oracle Financial Services Lending and Leasing system, first with Accounts during the Line of credit origination cycle and later with accounts during customer service.
This chapter explains how use the Account Document section to:
- View an image
- Search for an image
- Split an image of more than one page
- Change the status of an image
- Combine two images into a multiple page image
- Attach an image to an existing Account
- Print an image
- Attach documents to Accounts and then view these documents in a browser.
It also explains how to use the Account Document Tracking screen to attach documents to accounts and then view these documents in a browser.
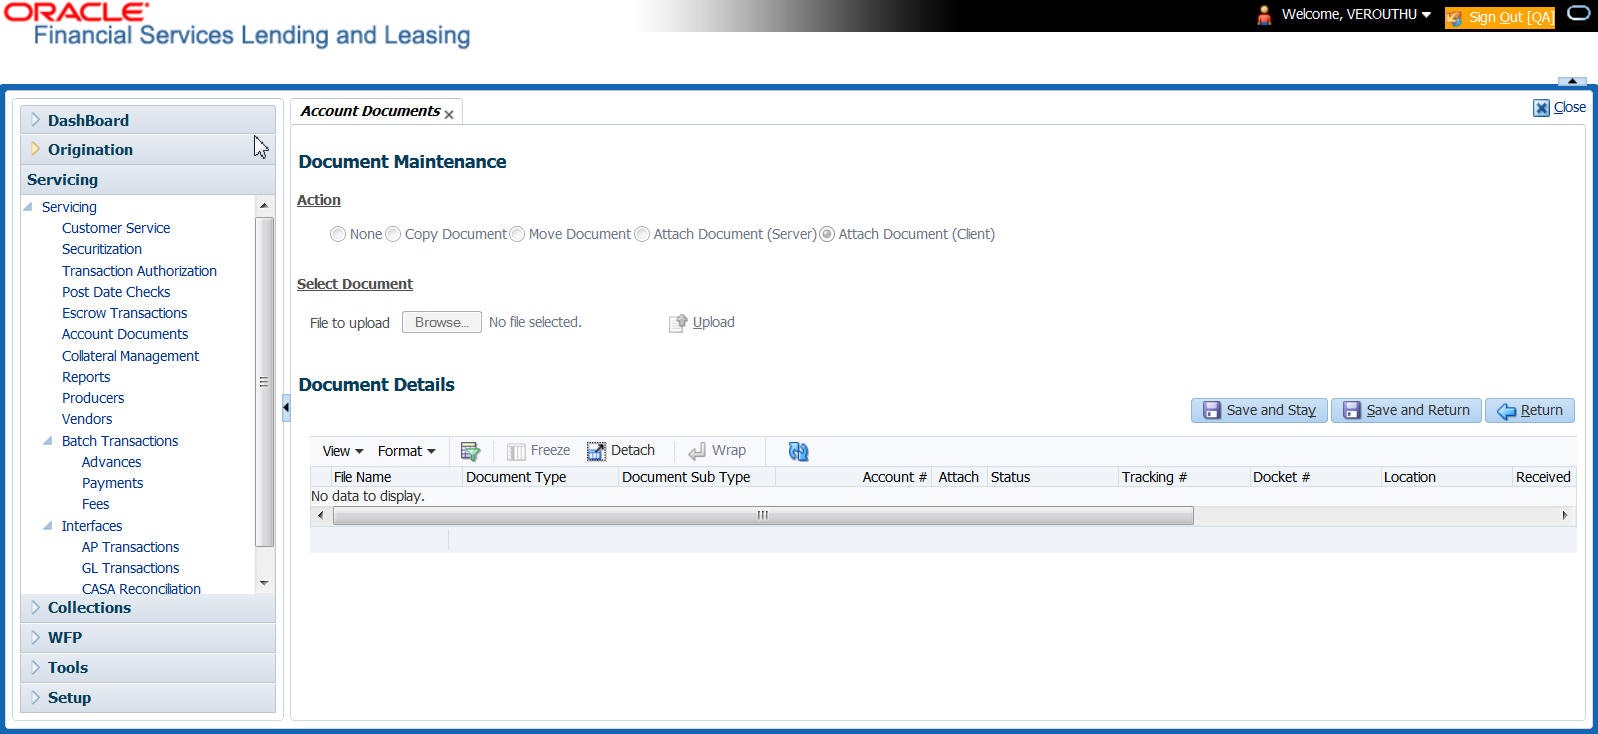
Account Document screen
The Account Document screen consists of “Document Maintenance” and “Document Details” sections.
Credit Accounts are often sent or faxed to financial institutions from producers (or ‘dealers’) on behalf of the customer. These credit Accounts, if received as fax, can be stored in the system as images. Frequently, more than one Account is received in a single fax or a single Account is received across multiple faxes. In such cases, the Account Document Tracking screen can help you organize and maintain your image collection.
The Account Document screen’s Document Maintenance screen allows you to upload documents to an Account in the form of GIF files, PDF files, DOC files, XLS files, and TXT files. The Document Maintenance screen’s Document Details section allows you to view these documents.
8.2 Account Document screen
Oracle Financial Services Lending and Leasing supports the online attachment of document images to an Account using the Account Documents screen’s Document Maintenance section. You can attach the documents from either a client machine or server. A default image directory can be maintained in the system using the system parameter: UIX_DEFAULT_IMAGE_PATH.
When you choose List File in the Select Document sub section in the Document Maintenance section, system displays all available files in the selected directory in Document Details section. You can use the Document Maintenance sub-section and Action sub-section to attach selected documents to a particular account.
8.2.1 Attaching a Document to an Account from a server
To attach a document to an Account from a server
- On the Oracle Financial Services Lending and Leasing Account home screen, click the Servicing > Servicing > Account Documents link.
- In the Action sub-section, click Attach Document (Server).
- In the Select Document sub-section, use the default image directory in Directory Path field. (The default path is the value for system parameter UIX_DEFAULT_IMAGE_PATH). -or-
- In the Directory Path field, specify the full path name to the document on server that you want to attach to an account. You can click Reset Path at any time to return to the default image directory.
- In the Select Document section, click List File. The system displays files from the entry in Select Document section Directory Path in the Document Maintenance record.
- In the Document Details record, select the record you want to work with and click Edit in Details column.
- In the Document Details record, specify, view or edit the following information:
Field:
Do this:
File Name
View the file name for the document.
Document Type
Select the type for the document.
Document Sub Type
Select the sub type for the document.
Account#
Select the account number to attach/copy/move the document image.
Attach
Select the attachment type.
Status
View the status of the document.
Tracking #
Specify the tracking number of the document.
Docket #
Specify the docket number of the document.
Location
Specify the location of the document.
Received Dt
View the document image received date.
Effective Dt
Specify the effective date of the document.
Expiry Dt
Specify the expiration date of the document.
Comment
Specify any comments regarding the document.
- Select the Attach check box to attach file to the account.
- Click Save And Return.
- In the Action sub-section, click Post.
The system attaches the document to Account.
You can view the document in a browser by clicking View Document in the Document Details section.
8.2.2 Attaching a Document to an Account from a Client Machine
To attach a document to an Account from a client machine
- On the Oracle Financial Services Lending and Leasing Application home screen, click the Origination master tab.
- Click the Account Documents link.
- In the Action sub-section, click Attach Document (Client).
- In the Select Document section, click Browse in File to upload field.
The system opens a Choose File to Upload dialog box. - In the Choose File to Upload dialog box, locate the document you want to attach to the account. You can select multiple files by holding the Ctrl or Shift key on your keyboard.
- When you have located the document you want to attach to the account in Open dialog box’s File name: field, click Open.
- The selected files appear in the Select Document sub-section’s File to Upload field.
- In the Select Document sub-section, click Upload.
- In the Document Details record, select the file uploaded from your server and click Edit.
- In the Document Details section, enter, view or edit the following information:
Field:
Do this:
File Name
View the file name for the document.
Document Type
Select the type for the document.
Document Sub Type
Select the sub type for the document.
Account #
Select the application number to attach/copy/move the document image.
Attach
Select the attachment type.
Status
View the status of the document.
Comment
Specify any comments regarding the document.
Tracking #
Specify the tracking number of the document.
Docket #
Specify the docket number of the document.
Location
Specify the location of the document.
Received Dt
Specify the received date of the document.
Effective Dt
Specify the effective date of the document.
Expiry Dt
Specify the expiration date of the document.
Comments
Specify any comments regarding the document.
- Select the Attach check box to attach the file to account.
- Click Save And Return.
- In the Action sub-section, click Post.
The system attaches the document to Account.
You can view the document in a browser by choosing View Document in the Action section.
8.2.3 Copying a Document
The Action section’s Copy Document command copies the document image from one Account to another Account. This command has no impact on the source Account or the source Account’s document image.
To copy a document to an Account from another Account
- On the Oracle Financial Services Lending and Leasing Application home screen, click the origination master tab.
Click the Account Documents link.
- In Action sub-section, click Copy Document.
- In Document Maintenance sub-section, select either ‘Customer#’ or ‘Business#’ option and use the Account# field to specify Account with the image you want to copy.
- While selecting the above option, you can use any of the below combinations to define your search:
- Customer # (only)
- Customer # and Account #
- Business # (only)
- Business # and Account #
- In Document Maintenance sub-section, click Search.
The system displays the files attached to that Account in Document Details section. - In Document Details section, select the document you want to copy and click Edit.
- In Copy/Move Account # field, specify the application number of Account to which you want to copy the document.
- Click Save And Return.
- In the Action sub-section, click Post.
8.2.4 Moving a Document
The Action section’s Move Document command moves an existing document image from one Account to another Account. This command detaches the document image from source Account and attach to second Account.
To move a document to an Account from another Account
- On the Oracle Financial Services Lending and Leasing Application home screen, click the Origination > Origination > Account Documents link.
- In Action sub-section, click Move Document.
- In Document Maintenance sub-section, select either ‘Customer#’ or ‘Business#’ option and use Account # field to specify the Account with the image you want to move.
- While selecting the above option, you can use any of the below combinations to define your search:
- Customer # (only)
- Customer # and Account #
- Business # (only)
- Business # and Account #
- In Document Maintenance sub-section, click Search.
The system displays the files attached to that Account in Document Details sections. - In Document Details section, select the document you want to move and click Edit.
- In Copy/Move Account # field, specify the application number of Account to which you want to move the document.
- Click Save And Return.
- In the Action sub-section, click Post.
You can view the documents attached to a particular account by loading application on Customer Service screen, then clicking Customer Service tab and then clicking on Document Tracking sub tab.
8.2.5 Viewing a Document Attached to an Account
To view a document attached to an Account
- Using above method, load the account with the document you want to view.
- In the Account Document section, click Edit.
- View/edit the following display only information:
Field:
Do this:
Document Type
View the document type.
Comment
Specify any comments regarding the image.
- In the Account Document Details section, select the record you want to work with and click Edit.
- In the Account Document Details section, view the following display only information:
Field:
View this:
Document Sub Type
The document sub type.
Version
The version (version numbers will be incremental by batch job, first version will start with 1.0).
Page #
The page number.
Document File Type
The document file type.
Status
The status.
Tracking #
The tracking number of the image.
Docket #
The docket number of the image.
Location
The location of the of the image.
Received Dt
The effective date of the image.
Effective Dt
The effective date of the image.
Expiry Dt
The expiration date of the image.
Comment
Any comments regarding the image.
- Use the Account Document and Account Document Details sections to select the document you want to view.
- In multiple paged documents, choose 1 in the Page # field on Account Document Details section to view the all pages in the document
-or-
- Choose a specific page number to view only that page.
- Click View Document.
The system opens a browser to display the actual document (which browser appears depends on what type of document you selected and what browsers are set up to work in conjunction with your Oracle Financial Services Lending and Leasing system). - You can add comments to the Comments field in the Account Document and Account Document Details sections.
- Click Save And Return.
8.3 Document Tracking section
You can view the documents attached to a particular Account by loading the application on the Underwriting/Funding screen and then clicking on Document tab.
8.3.1 Locating an Account Document
To locate an account document
- On the Oracle Financial Services Lending and Leasing Application home screen, click the Origination > Underwriting/Funding link.
- Select and open the application you want to work with.
- Click Document sub tab. The Account Document screen appears.
Information about the documents attached to Account appears in Account Documents and Account Document Details sections.
8.3.2 Viewing a Document Attached to an Account
To view a document attached to an account
- Using the above method, load the account with the document you want to view.
- In the Account Document section, click Edit.
- View/edit the following display only information:
Field:
Do this:
Document Type
View the document type.
Comment
Specify any comments regarding the image.
- In the Account Document Details section, select the record you want to work with and click Edit.
- In the Account Document Details section, view the following display only information:
Field:
View this:
Document Sub Type
The document sub type.
Version
The version (version numbers will be incremental by batch job, first version will start with 1.0).
Page #
The page number.
Document File Type
The document file type.
Status
The status.
Tracking #
The tracking number of the image.
Docket #
The docket number of the image.
Location
The location of the image.
Received Dt
The effective date of the image.
Effective Dt
The effective date of the image.
Expiry Dt
The expiration date of the image.
Comment
Any comments regarding the image.
- Use the Account Document and Account Document Details section to select the document you want to view.
- In multiple paged documents, choose 1 in the Page # field on Account Document Details section to view the all pages in the document
-or-
- Choose a specific page number to view only that page.
- Choose View Document. The system opens a browser to display the actual document (which browser appears depends on what type of document you selected and what browsers are set up to work in conjunction with your system).
- You can add comments to the Comments field in the Account Document and Account Document Details sections.
- Click Save And Return.