| Oracle® Retail Home Oracle Retail Home Administration Guide Release 21.0 F45466-03 |
|

 Previous |
 Next |
| Oracle® Retail Home Oracle Retail Home Administration Guide Release 21.0 F45466-03 |
|
Previous |
Next |
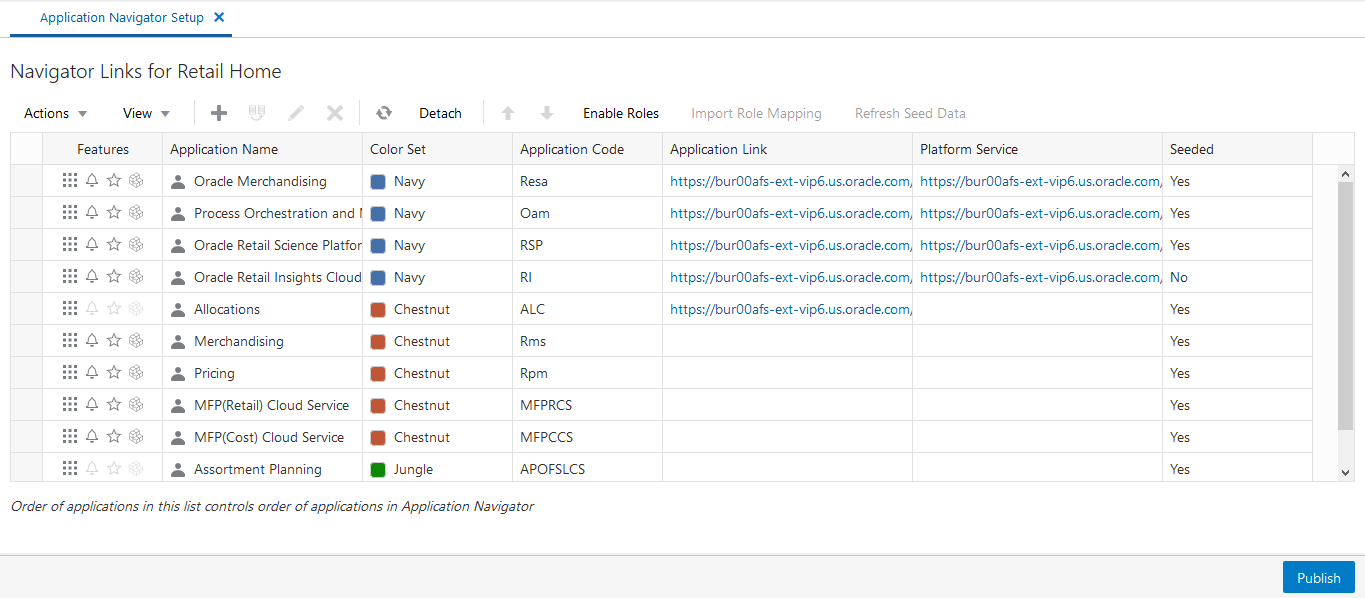
The Retail Home Application Navigator Setup page gives administrators the ability to configure applications within Retail Home. Retail Home uses these applications to populate its application navigator menu, to define dashboard tiles within Retail Home dashboards and to populate the application navigator menus in other Retail Applications.
Retail Home creates an initial set of application entries for known Retail Applications upon initial installation or upgrade to current version. These entries only contain the name and application code for applications and are initially disabled. On upgrade, the oldest entry for each known application will be flagged instead of inserting a new application (when present).
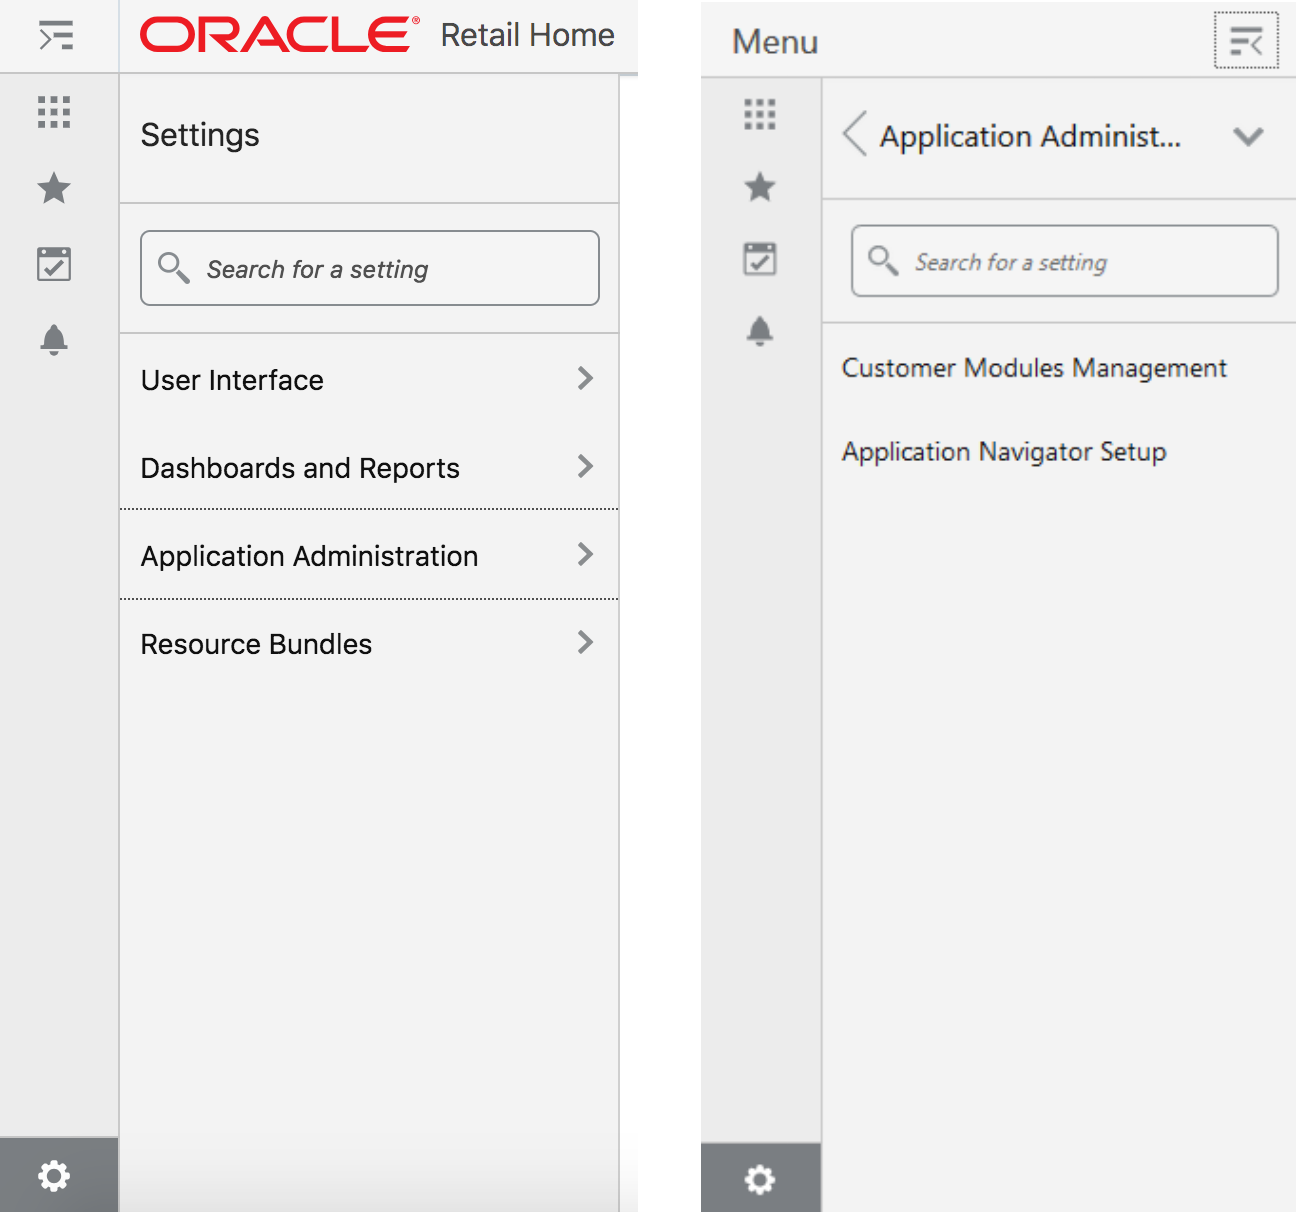
The Application Navigator Setup page can be launched from the Retail Home Settings menu's Application Administration section.
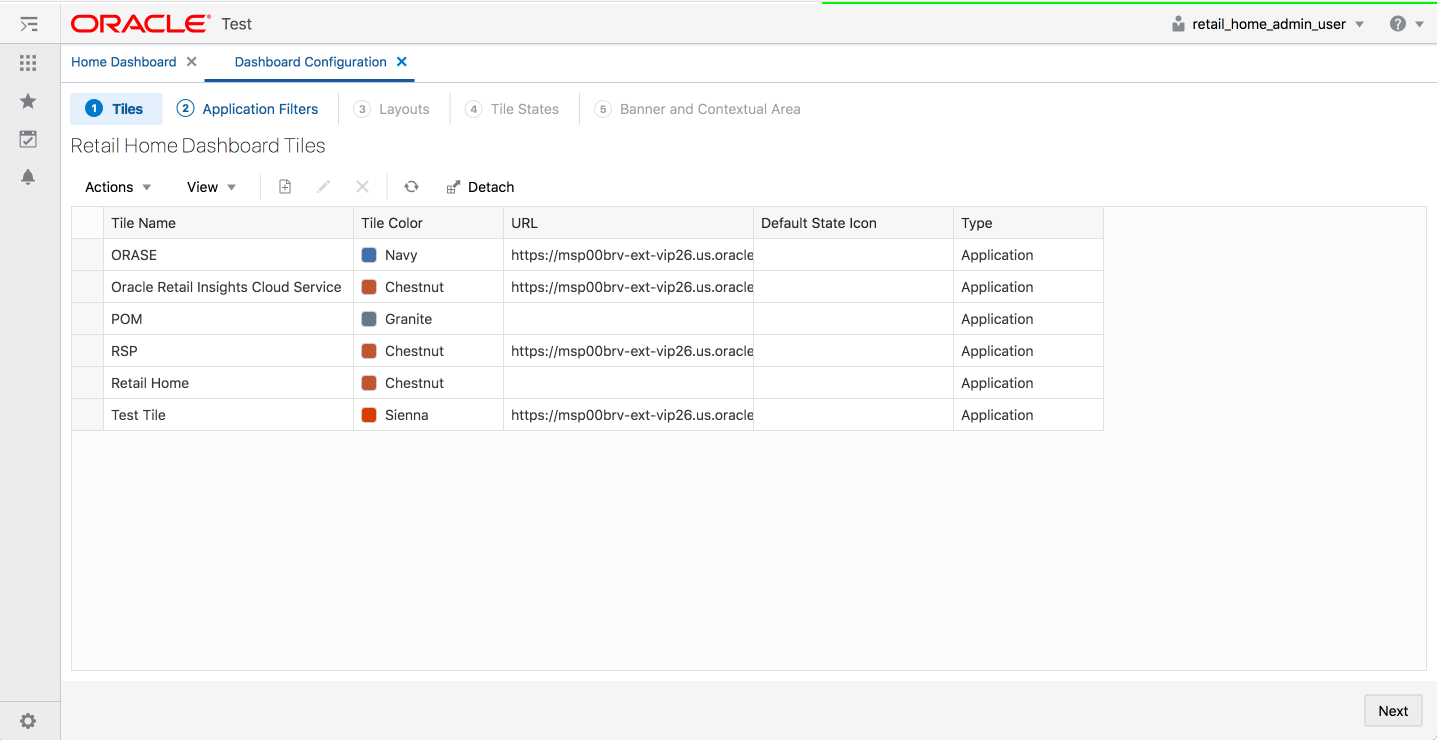
The Application Navigator Setup page shows a table of all the application navigator entries currently configured in Retail Home.
The following information is shown for each application:
Features - Displays whether these features are enabled or not for this application: Application Navigator, Notifications, Favorites, and Resource Bundle Customizations.
Application Name - The name that will be displayed in Application Navigator menus and in Retail Home Dashboard Tiles.
Color Set - The color scheme used to display this application in the Retail Home Application Navigator menu and in Retail Home Dashboard Tiles.
Application Code - The unique code associated with a Retail Application. This is required to support features such as Favorites, Notifications and Resource Bundle Customization.
Application Link - The URL used to launch the application from Application Navigator menus or from the header of a dashboard tile.
Platform Service URL - The URL used to access Platform ReST Services. This is required to support features such as Favorites, Notifications and Resource Bundle Customization.
Seeded - Shows whether the application was seeded by Retail Home
The table toolbar gives users the ability to add, duplicate, edit, delete, refresh and reorder applications, as well as manage roles associated with each application.

The Add icon  on the table toolbar allows users to add a new Application Navigator entry in Retail Home.
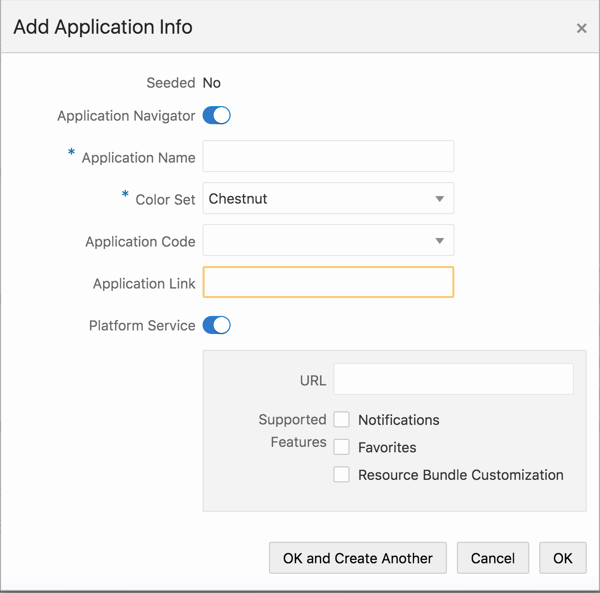
To add an application navigator entry, users enter the following information in the "Add Application Info" dialog:
Seeded - Shows whether the application is a seeded application or not.
Application Navigator Switch - Controls whether the application will be displayed in the Retail Home Application Navigator menu.
Application Name - A unique name for the application that will be displayed in the Application Navigator menus and in the Retail Home Dashboard Tile header.
Color Set - The color scheme used to display this application in the Retail Home Application Navigator menu and for the background of the Retail Home Dashboard Tile.
Application Code - The unique code associated with a Retail Application. This is required to support features such as Favorites, Notifications and Resource Bundle Customization.
Application Link - The URL used to launch the application from Application Navigator menus or from the header of a dashboard tile.
Platform Service Switch - Controls the display of options under platform services (URL & sup-ported features).
Platform Service URL - The URL used to access Platform ReST Services. This is required to support features such as Favorites, Notifications and Resource Bundle Customization.
Platform Service Supported Features - Check boxes to determine whether Notifications, Favorites & Resource Bundle Customization is available for the application.
The "Duplicate" icon  on the table toolbar allows users to create a new application navigator entry using the selected application navigator entry as a starting point.
Users can modify the details in the ”Add Application Info” dialog. See the section above titled Adding an Application Navigator Entry for details about adding a new application navigator entry.
|
Note: It is allowed to duplicate from an existing seeded entry, but the new application navigator entry will not be considered a seeded entry. |
The Edit icon  on the table toolbar allows users to change the details of an existing application navigator entry in Retail Home.
Users can modify the details in the "Edit Application Info" dialog:
The "Delete" icon  on the table toolbar allows users to delete the selected application navigator entry from Retail Home.
|
Note: Users cannot delete seeded entries from the Manage Application Navigator page. |
The order of the application navigator entries in the Manage Application Navigator table is the order that the applications will be displayed in the Application Navigator menus in Retail Home and in other Retail Applications.
The ”Move Up” icon  and the ”Move Down” icon
  on the table toolbar allow users to move the selected application navigator entry up or down in the table.
Roles can be associated with each application navigator entry to restrict which users will have access to the application through the application navigator menus outside of Retail Home. Users who do not have access to the application will not see it in the application navigator menus.
Roles are disabled by default and all users will see links to all applications in the application navigator menus. Use the Enable Roles button in the table toolbar to enable role mappings.
Mapping roles to applications is accomplished through the upload of a CSV formatted file containing a mapping of applications to roles. The CSV file is required to have columns ”App Name” and ”Role Name”. Any other columns included in the file will be ignored. The ”App Name” column should contain the name of the application currently shown in the Application Name column. The keyword ”all” may be used in the ”App Name” column in place of an application name to map a role to all applications currently in the table. The ”Role Name” column should contain a valid enterprise role name.
Applications can provide a standard configuration for Retail Home dashboards through platform services. When imported, Retail Home will automatically create any specified dashboards or additional application entries specified in the data.
There are two ways to tell Retail Home to load this data. When a new application is created or a seeded entry updated with platform services enabled, Retail Home will automatically attempt to load seed data. Additionally, the data for an application can be manually updated by pressing the refresh seed data button in the toolbar.
If an application does not provide seed data or has not deployed a supported version of the platform services, no update will occur and the failure will be logged silently. In the case of a manual refresh, an error will be displayed to the user.
For full details on the behavior of importing seed data, refer to Chapter 9, "Seeding Application Dashboards".
Application navigator entries can be published to the applications through their PSRAF URLs. These applications are represented by the system-generated application navigator entries. Data that is published includes the details of each application including links and role mappings. Only applications that have an application link will be published. Use the Publish button located in the page footer to publish this data.
Once the application navigator entries have been published, if further changes are made to the application navigator entries or the role mappings it will be necessary to publish again in order for those changes to be pushed out to the applications.
|
Important Note: If the application navigator entries for an application are currently managed through ORAAC (Oracle Retail Application Admin Console) then this Publish action will replace the application navigator entries that were configured through ORAAC. |
The application navigator screen allows you to create new OAuth client applications in IDCS or OCI IAM for authentication. This is only available for applications that have a platform service URL configured. The dialog can be opened by selecting Create IDCS OAuth 2.0 Client from the Actions menu. There is no corresponding task bar button.

This dialog takes the following values:
The App Name is 2-100 characters and will be used as the name in IDCS or OCI IAM.
Description is a detailed description of the application.
Scope allows multiple scopes to be defined on the client. These scopes must already exist in IDCS or OCI IAM and should be provided as fully-qualified scopes (FQS), such as "rgbu:rh:service".
When the application is created, another dialog will open to show the client ID and client secret of the new application. These values should be copied down to a safe location, as they will only be shown once. Retail Home cannot retrieve the credentials again after the dialog is closed.
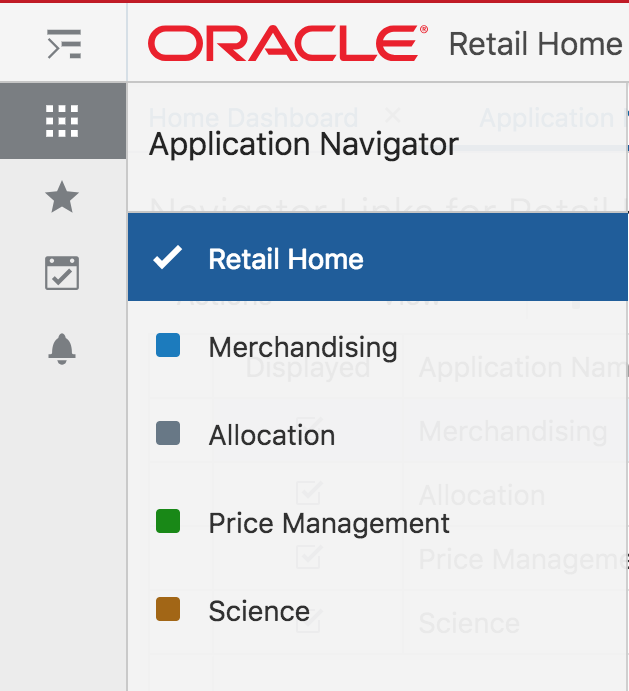
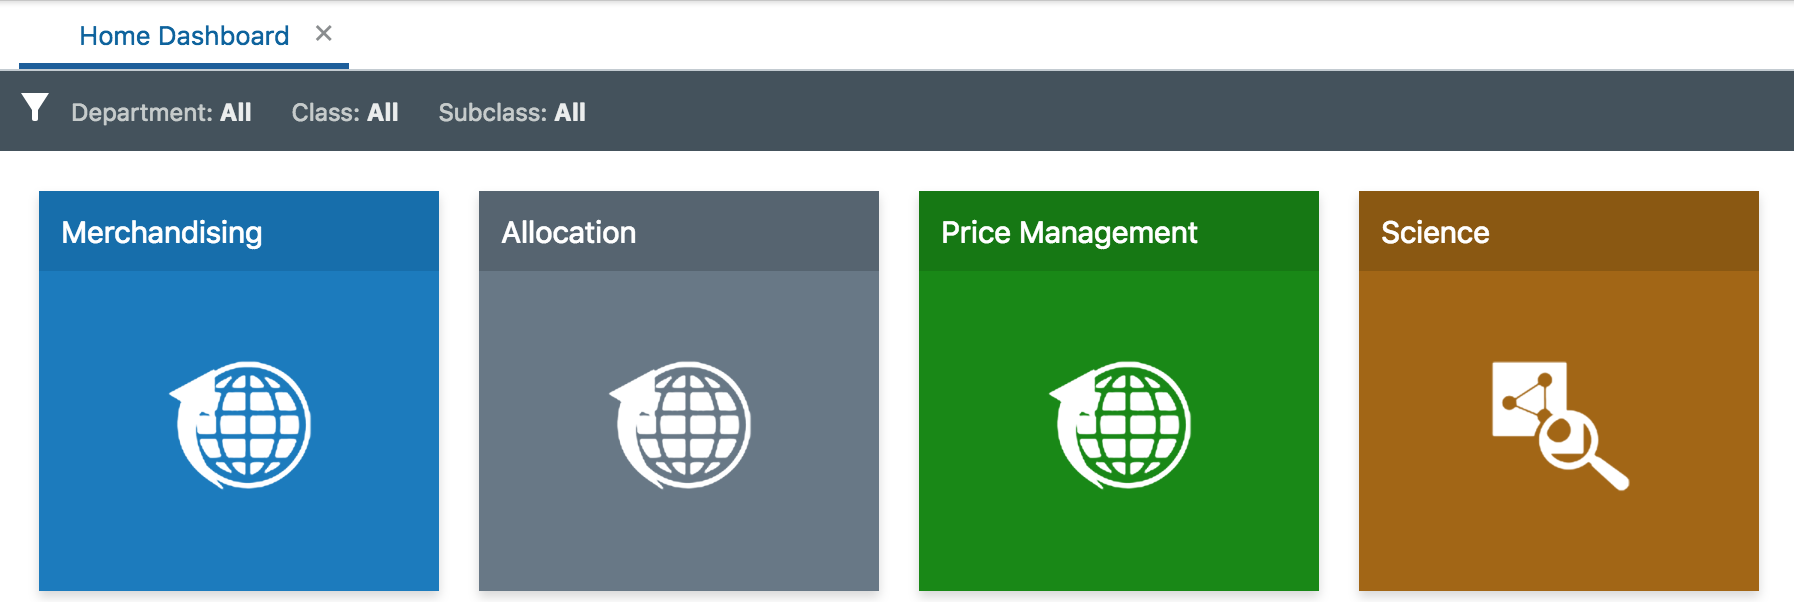
Retail Home is a portal-type application for the RGBU enterprise. The UI consists of a tile-based configurable dashboard that highlights important metrics and KPIs across RGBU applications. A Retail Home administrator configures persona-based dashboards for each enterprise role through the Dashboard Configuration flow.
The Retail Home dashboard can be configured with 4 different kinds of reports.
Tile state reports render within dashboard tiles. A tile can display up to 5 tile state reports.
Expanded tile reports can be launched from a tile state to show more data.
Banner reports render in the region above the tiles.
Contextual area reports render on the right side of the screen next to the tiles and below the banner.
A Retail Home administrator can access the Dashboard Configuration flow as follows:
Open the Settings menu.
Open the Dashboard and Reports submenu.
Open the Dashboards submenu.
Select Dashboard Configuration. This will open the Dashboard Configuration flow in a tab.
In Retail Home, an administrative user defines dashboards for enterprise roles. Users will see the dashboards configured for their enterprise role(s) when they log in to Retail Home. This section describes how to create dashboard tiles, the first step in the Dashboard Configuration flow.
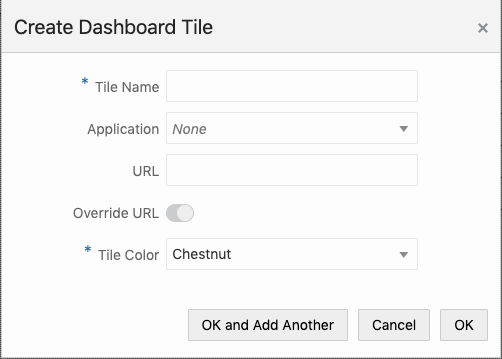
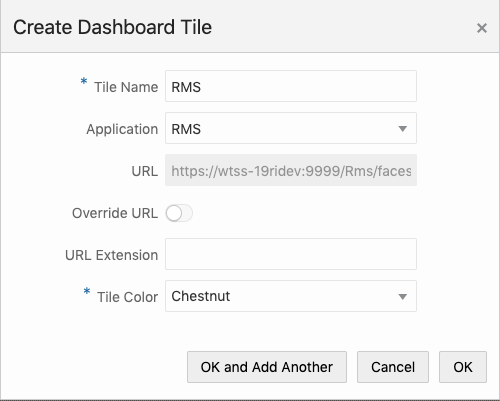
To add a new dashboard tile, complete the following steps:
In the Dashboard Configuration flow, select the Tiles tab if it is not already selected.
Click on the Add icon to open the Create Tile Dialog Box.
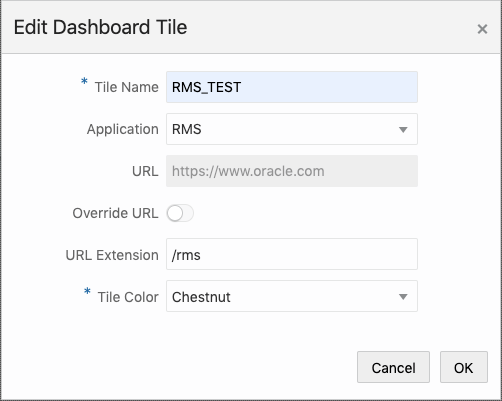
Enter text in the Tile Name text box.
Select the appropriate Application from the drop down. The URL, URL Extension, and Tile Color fields will be populated with corresponding values. The URL field gets the application URL automatically, but the user has the ability to override the value using the Override URL switch.
The URL field is editable if Override URL is enabled. Clicking OK when the URL field is editable saves the value entered in the text area. Clicking OK when the URL field is disabled will override the value with the application URL.
Enter URL Extension. The URL Extension is appended to the URL when the OK button is clicked.
Select the appropriate Tile Color in the drop down.
Click OK to save your changes and close the dialog box. Click OK and Add Another to save your changes. Click Cancel to close the dialog box without saving your changes.
In the Tile tab, select a row containing tile information. This will make the Edit icon clickable.
Click the Edit icon to open the Edit Tile Dialog Box. Make edits in the dialog box as shown in Figure 2-11. Click OK to save the edits. Click Cancel to not save the edits.
Retail Home supports the creation of filters for dashboard tiles. Filter options can be configured on a per-application basis and can be retrieved from a REST endpoint or BI analysis. Filter options can also be manually defined in the UI.
To add a new filter for an application, complete the following steps:
In the Dashboard Configuration flow, select the Filters tab if it is not already selected.
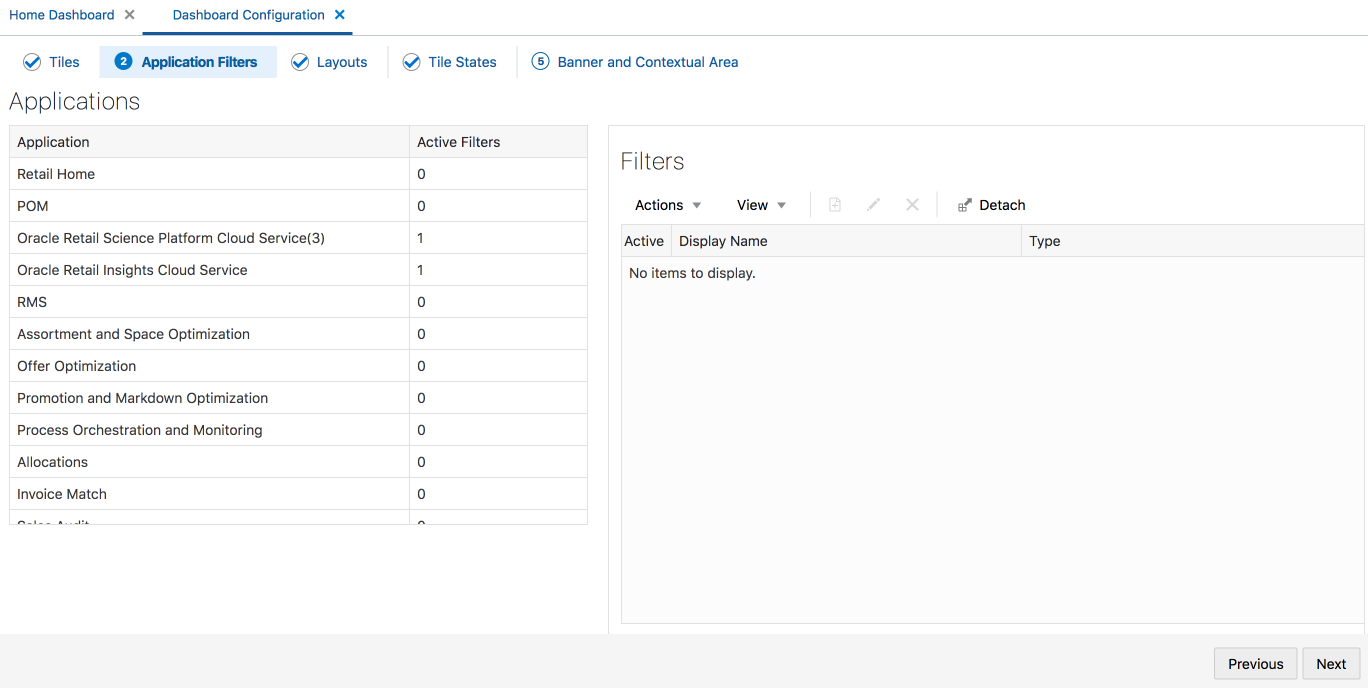
Select the application to add a filter for from the list of applications on the left.
Select the add button  on the list of filters to the right.
Toggle the Active switch to turn on the filter.
Enter a Display Name and the Parameter the filter applies to. The parameter is the actual string sent to the tile state's data source.
Select the Type of filter to add. The supported filter types are radio buttons, toggles, multi-select inputs, checkboxes, and numeric inputs.
Define the filter options for the filter. They can be set to load from a data source (either BI or REST service) or be manually entered.
Filters must be enabled on a tile before they will appear in the UI. See the later section on configuring tiles for details.
An existing filter can be edited by selecting it and selecting the edit button to open the dialog again. Filters can be removed by selecting the remove button and confirming.
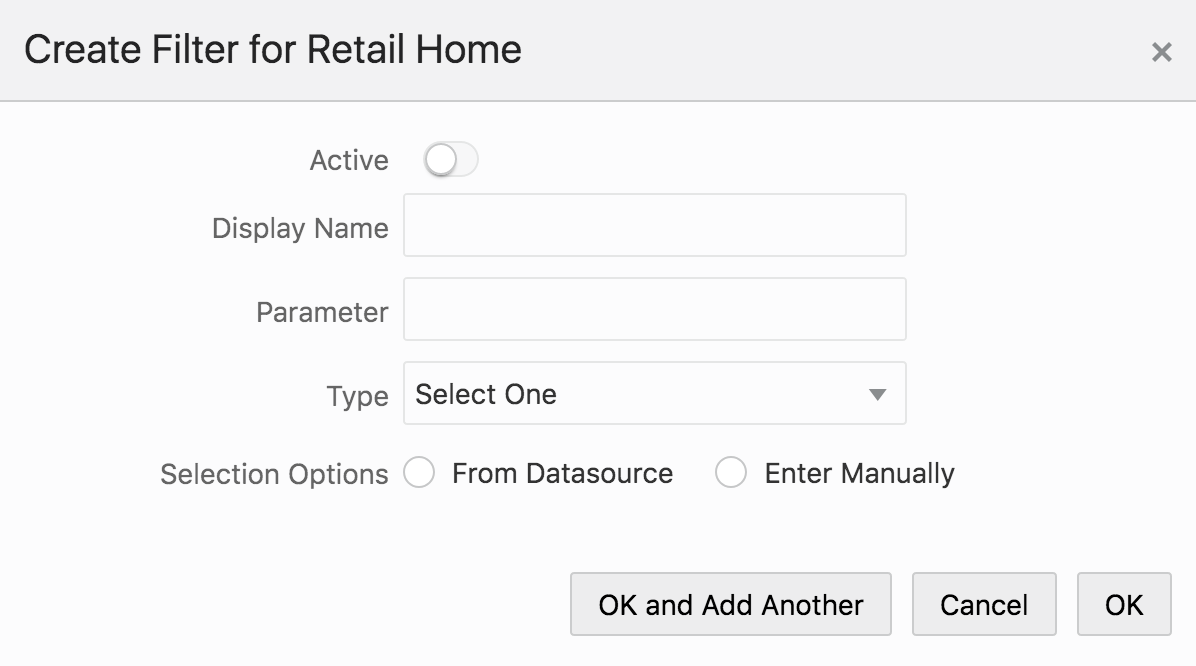
Filter options can be manually input or configured to load from a BI or REST data source.
To manually enter filter options, select Enter Manually in the dialog.
The first column is the label to display to the user and the second column is the string that will be submitted to the tile state's data source. Additional rows can be added with the button at the bottom. The controls on the left and right offer options for rearranging the list and removing rows.
To localize the display names, open the edit dialog in a browser using a different locale. Any changes to the display name column will only apply for the locale you are currently in.
Selecting the data source option presents a second choice of which type of data source to use. Service endpoint allows calling a REST service, BI allows returning results from a BI analysis.
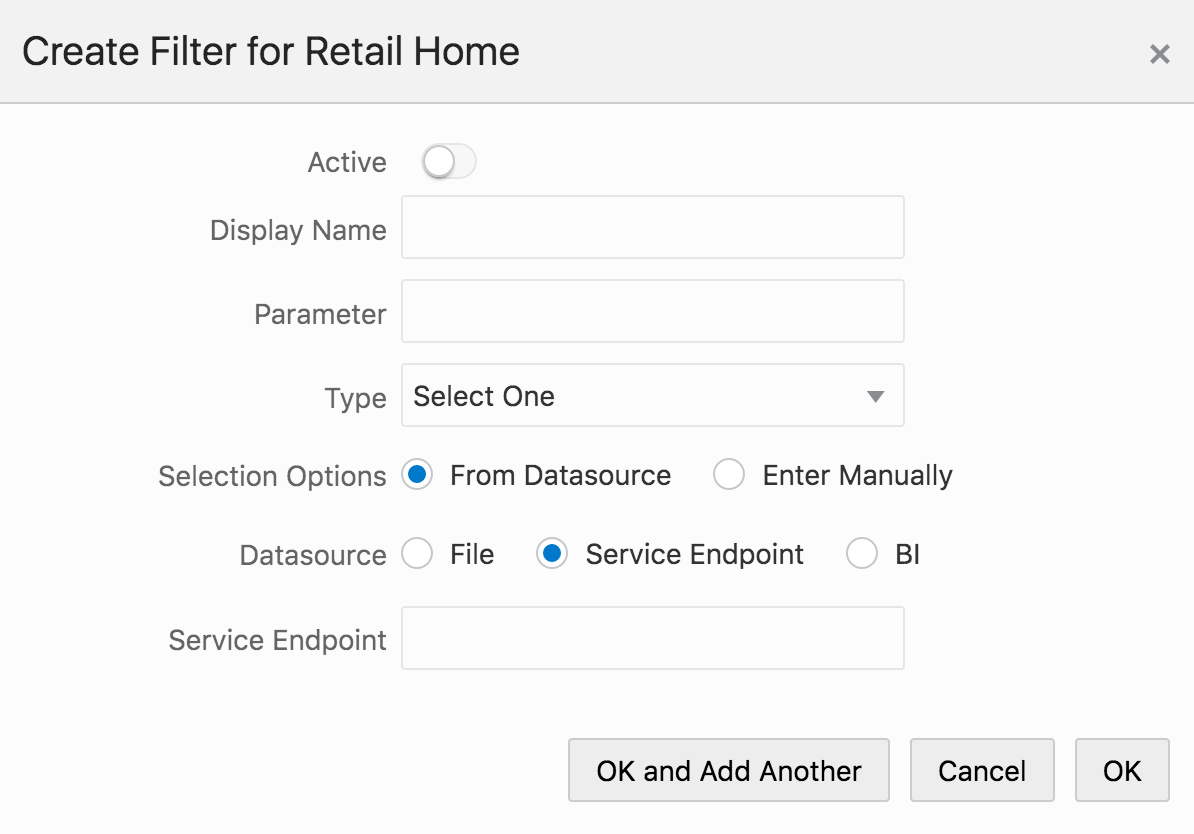
A service endpoint must be implemented according to the instructions in the developer's guide. Enter the full URL to the service in the field. The endpoint will be called with the nameSearch and pageSize query parameters and return JSON containing filter options.
A BI analysis can also return filter options. Enter the catalog path to the corresponding analysis in the BI instance Retail Home is integrated with. The BI analysis should accept a NameSearch parameter and return two columns for the value and display name respectively.
Data sources are expected to provide their own localization.
In Retail Home, an administrative user defines dashboards for enterprise roles. Users will see the dashboards configured for their enterprise role(s) when they log in to Retail Home. This section describes how to associate enterprise roles with application tiles.
To add a new dashboard for a role, complete the following steps:
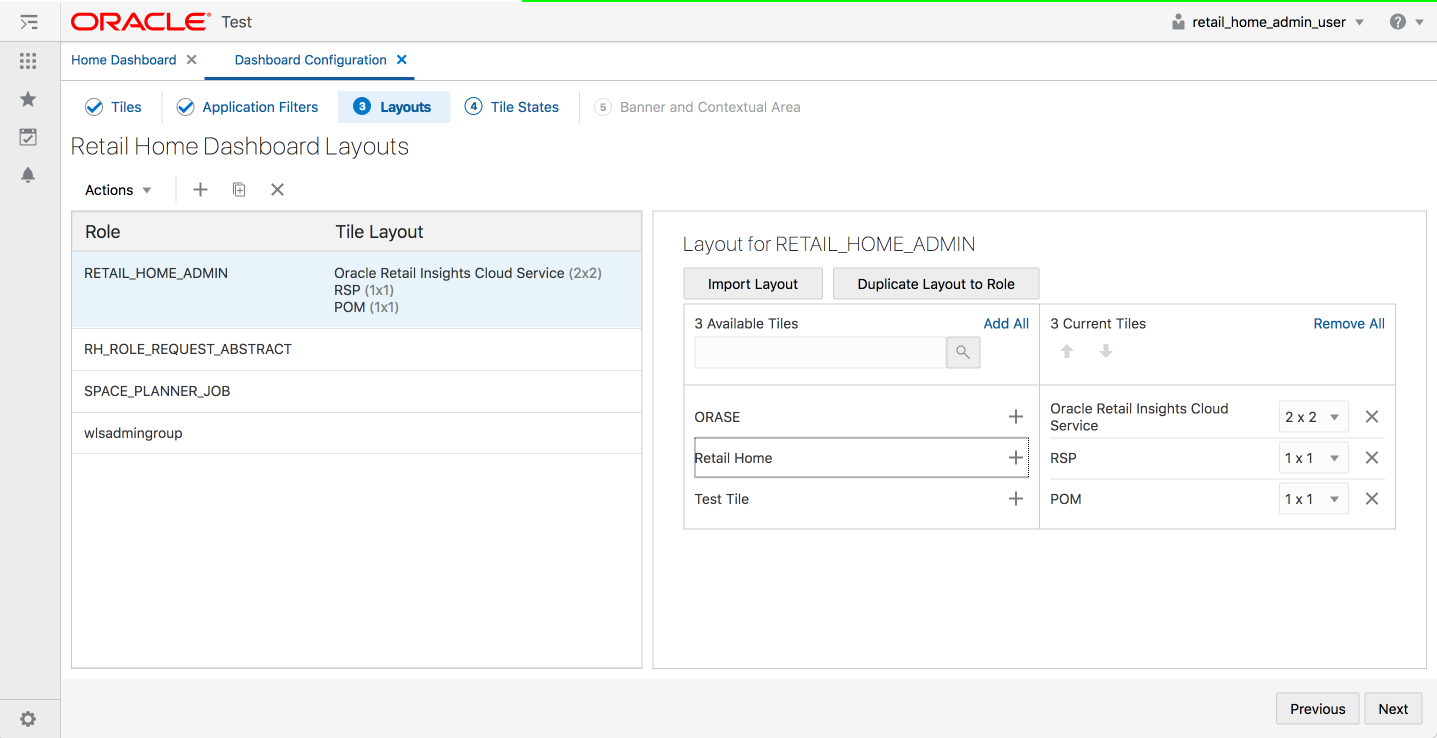
In the Dashboard Configuration flow, select the Layouts tab if it is not already selected.
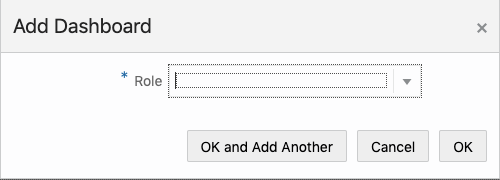
Click the Add icon. The Add Role dialog box is displayed. The dialog displays a Role Name search listing out the roles that are configured.
Enter text in the Role Name text box to search for a specific role. If the result includes more than one role, select the appropriate one.
Click OK to save your changes and close the dialog box. Click OK and Add Another to save your changes and to add additional roles. Click Cancel to close the dialog box without saving your changes.
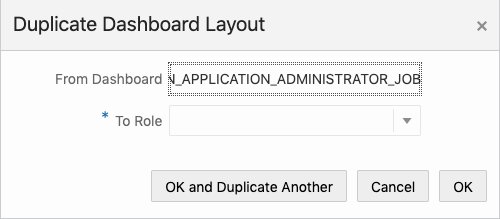
To duplicate an existing association between a role and an application, complete the following steps:
In the Dashboard Configuration flow, select the Layouts tab if it is not already selected.
Select the row in the table that you wish to duplicate to another role.
Click the Duplicate icon. The Duplicate Role Configuration dialog box is displayed.
Enter text in the To Role text box to search for a specific role. If the result includes more than one role, select the appropriate one.
Click OK to save your changes and close the dialog box. Click OK and Duplicate Another to save your changes and duplicate the configuration to another role. Click Cancel to close the dialog box without saving your changes.
You can add a tile, change the order of the tiles, toggle the display, and adjust the size of a tile.
To add a tile to a role, complete the following steps.
From the Dashboard Configuration flow, select the Layouts tab if it is not already selected.
Select the Role in the table that you wish to edit. The tiles associated with the role is displayed in the layout table to the right.
Click on the add icon for the tile to be associated with the role from the available Tiles listed out on the left column of the layout table. The selected tile is added to the right column of the layout table. The Roles table is also updated with the selected tile.
To change the order of application tiles, select a tile and click on the Up/Down Arrow icon. The Roles table is updated accordingly.
To adjust the size of a tile, select an alternative size from the drop-down list. The Roles table is updated accordingly.
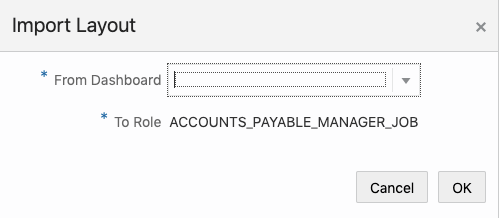
To import Tile Layout of another role to the selected role, click on the import layout button to open Import Layout Dialog box. Select the appropriate role from the drop down. Click OK to confirm the layout change. Click Cancel to close the Dialog box without saving the changes.
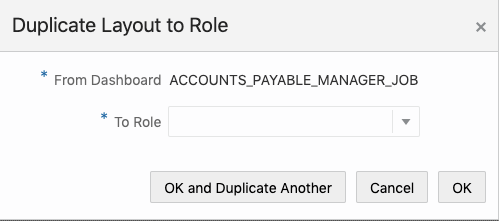
To Duplicate the Tile Layout of the selected role to another role, click on Duplicate Layout to Role button. Select the Role to which the layout needs to be applied. Click OK to confirm the layout change. Click Cancel to close the Dialog box without saving the changes.
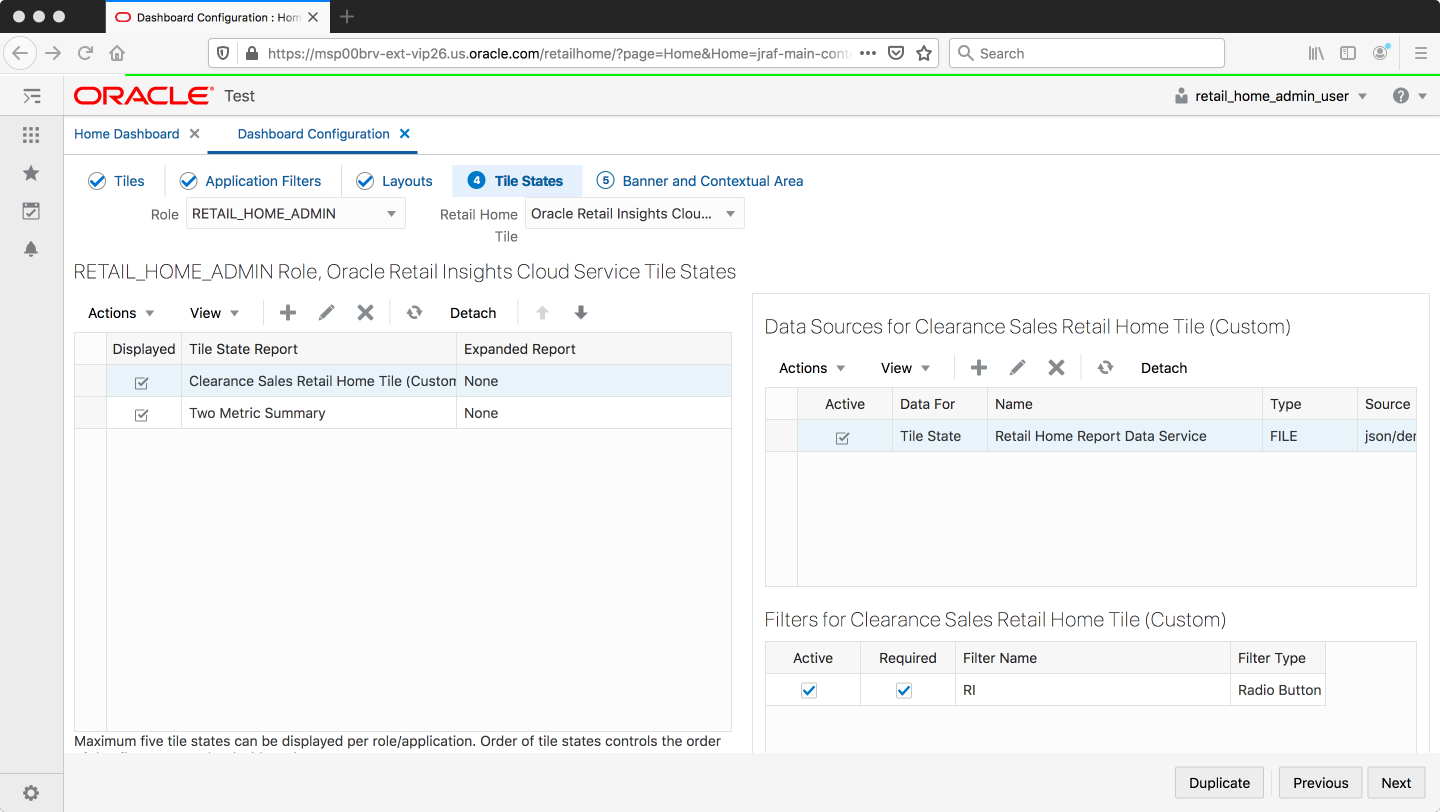
Retail Home displays application tiles within the dashboard. You can configure application tile states and the data sources used for the metrics displayed in the tiles.
Figure 2-21 shows the Data configuration tab of the Dashboard configuration flow.
At the top of the screen, the Role and Retail Home Tile select controls are used to select which dashboard application tile to configure.
Tile States and Data Sources tables are rendered below the controls and are for configuring tile states and data sources respectively.
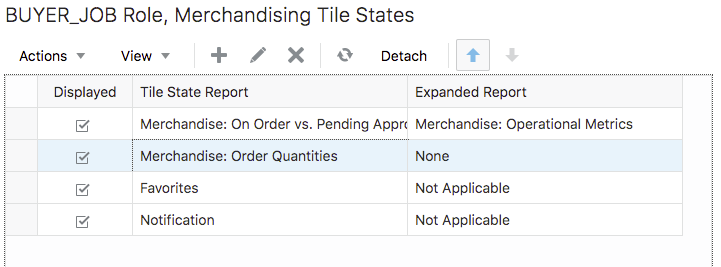
The following fields are configurable for Tile States:
Displayed - A check box that toggles between two states, displayed and not displayed.
Tile State Report - This field is mandatory and is used to indicate the report that is displayed in the tile state.
Expanded Report - This field is optional and is used to indicate which expanded tile report can be launched from this tile state.
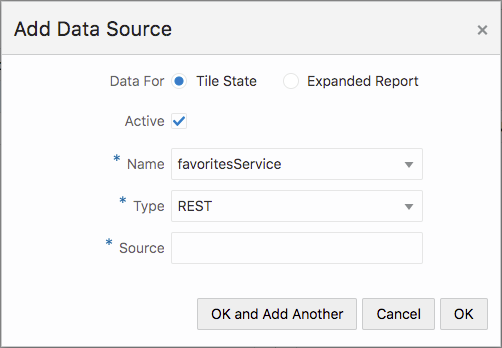
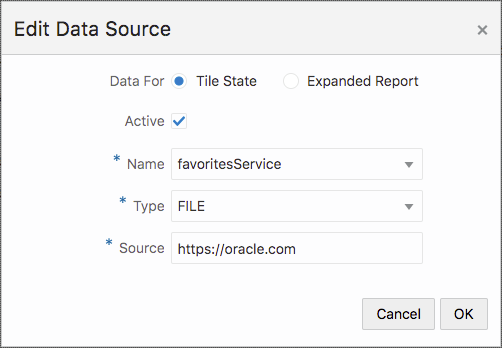
The following fields are configurable for Data Sources:
Data For - The report type that the data source is for, either Tile State or Expanded Report.
Active - A check box that toggles between two states, active and inactive. Only one data source for a report type can be active at a time.
Name - The name of the data source.
Type - The data type, either REST or FILE.
Source - The URL for the source of the data.
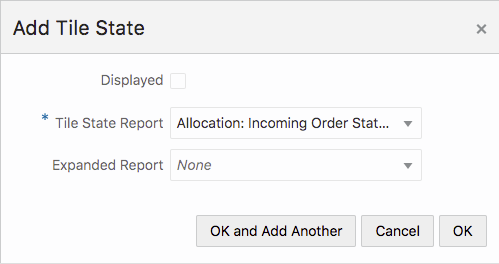
To add a tile state, complete the following steps:
In the Dashboard Configuration flow, select the Data tab if it is not already selected.
Select a combination of role and Retail Home Tile from the drop-down list.
Click the Add icon in the Tile States table toolbar. The Add Tile State dialog box is displayed.
|
Note: Only five tile states can be displayed for a given role/application at a time. |
Toggle the Displayed check box to control whether the tile state displays in the tile or not.
Select the desired Tile State Report from the drop-down list.
Optionally, select the desired Expanded Report from the drop-down list.
Click OK to save your changes and close the dialog box. Click OK and Add Another to save your changes and add another tile state. Click Cancel to close the dialog box without saving your changes.
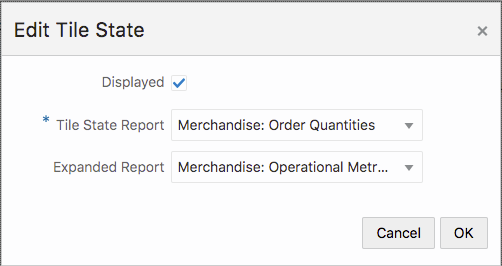
To edit a tile state, select the tile state in the table, click the Edit icon in the table toolbar, and make edits in the dialog, as shown in Figure 2-23, "Edit Tile State". Click OK to save the edits. Click Cancel to not save the edits.
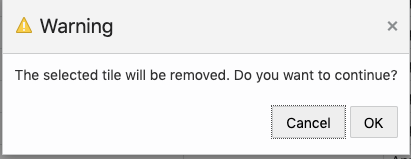
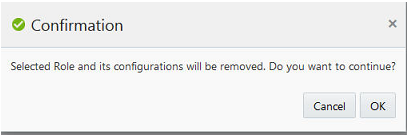
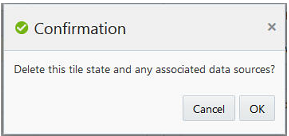
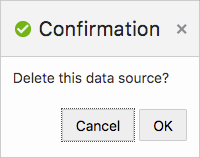
To delete a tile state and its associated data sources, select the tile state in the table, click the Delete icon in the table toolbar, and click OK in the Confirmation dialog. Click Cancel to cancel the delete.
To move a tile state within the list, select the tile state you want to move and use the Up Arrow and the Down Arrow icons to adjust the position as required.
|
Note: The Favorites and Notification tile states are always the last two tile states respectively and cannot be moved. |
To add a data source, complete the following steps:
In the Dashboard Configuration flow, select the Data tab if it is not already selected.
Select a combination of Role and Retail Home Tile from the drop-down menus.
Select the Tile State Report that you want to add a data source for.
In the Data Sources table toolbar, click the Add icon.
Select the Data For value. If the data source provides data to a tile state report, select Tile State. If the data source provides data to an expanded tile report, select Expanded Report.
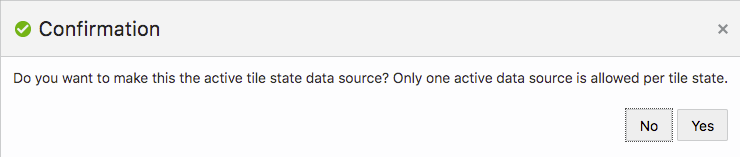
Select the Active check box to toggle to the active state.
|
Note: If another data source is active, you will be asked if you want to make the new data source active upon saving. Click Yes to make the new data source active. |
Select the data source Name from the drop-down list.
Select the data source Type from the drop-down list.
Enter a valid URL for the data source.
|
Note: The URL will be validated and you will receive an error message if the URL is not valid. |
Click OK to save your changes and close the dialog box. Click OK and Add Another to save your changes and add another data source. Click Cancel to close the dialog box without saving your changes.
To edit a data source, select the data source in the table, click the Edit icon in the table, and edit the values in the Edit Data Source dialog, as shown in Figure 2-29, "Edit Data Source". Click OK to save the edits. Click Cancel to not save the edits.
To delete a data source, select the one you want to delete, click the Delete icon in the table toolbar, and click OK in the Confirmation dialog. Click Cancel to cancel the delete.
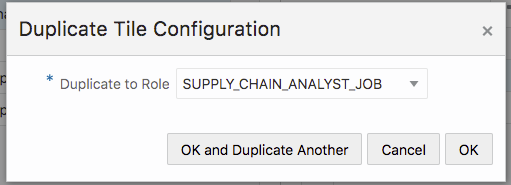
You can duplicate all of the tile states and their associated data sources from the selected role/application intersection to another role.
Click the Duplicate button at the bottom of the page. Then, use the Duplicate to Role search to find and select the Role to which you wish to duplicate the configuration.
Click OK to duplicate the tile configuration. Click OK and Duplicate Another to duplicate more than one tile configuration. Click Cancel to not duplicate the configuration.
Filters for an application must be applied to individual tile states before they will show up for a user.
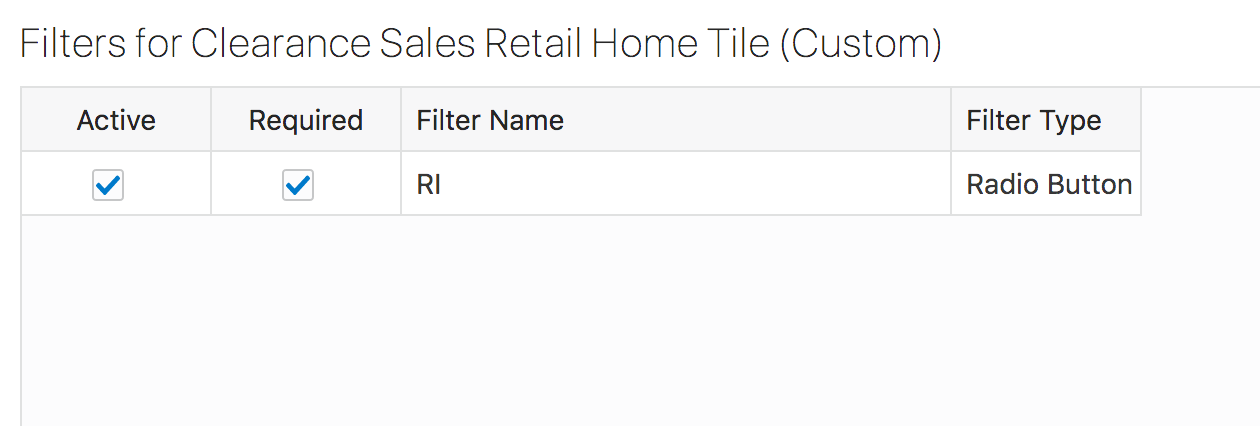
This table allows enabling a filter for a tile state as well as designating whether it is required or not.
Filter values will be passed as query parameters to the data source backing a tile state.
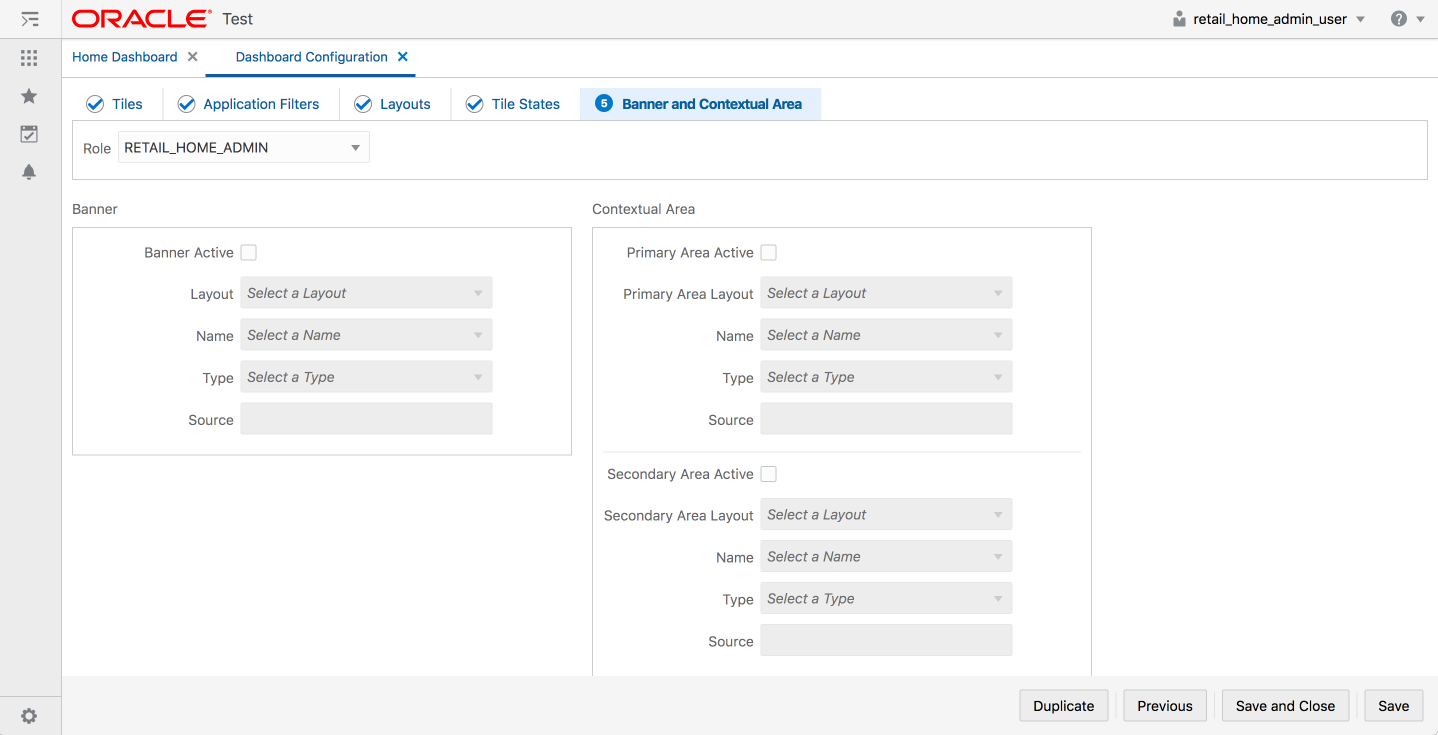
You can configure Retail Home to display reports and metrics in the banner and contextual areas of the Dashboard.
|
Note: Currently there are no report layouts for banner and contextual reports available in the release version of Retail Home. |
To configure the reports and metrics, complete the following steps:
In the Dashboard Configuration flow, select the Banner and Contextual Area tab if it is not already selected.
Select a role from the Role drop-down list.
Select the Banner Active check box. This determines whether or not the banner is displayed on the dashboard. If the banner is active, you must provide a value for the following:
Select a layout from the Layout drop-down list.
Select a banner data source name from the Banner data Name drop-down list.
Select a data source type from the Type drop-down list.
Enter a valid data source URL into the Source text box. The URL will be validated.
To configure the Contextual Area, select the check box to make the Primary Area active or the Secondary Area active. If you make both areas active, then both will be displayed on the dashboard. If you do not want to display the Contextual Area, then do not make either area active.
For whichever area(s) you have designated (Primary and/or Secondary) as active, provide values for the following:
Select a layout from the Layout drop-down list
Select a data source name for the report from the Name drop-down list.
Select a data source type from the Type drop-down list.
Enter a valid data source URL into the Source text box. The URL will be validated.
Click Save to save your work and continue. Click Save and Close to save your work and close the tab.
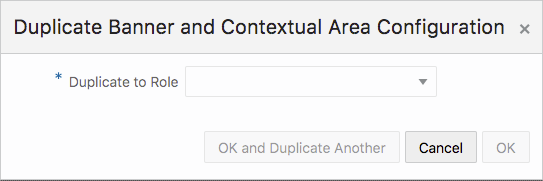
You can duplicate your Banner and Contextual Area Configuration to another role's Dashboard.
Once the configuration has been saved for the currently selected Role, click the Duplicate button at the bottom of the page.
Select the role you want to duplicate the configuration to in the Duplicate to Role field.
Click OK to save your changes and exit the dialog box. Click OK and Duplicate Another to repeat the process with another role. Click Cancel to not duplicate the configuration.
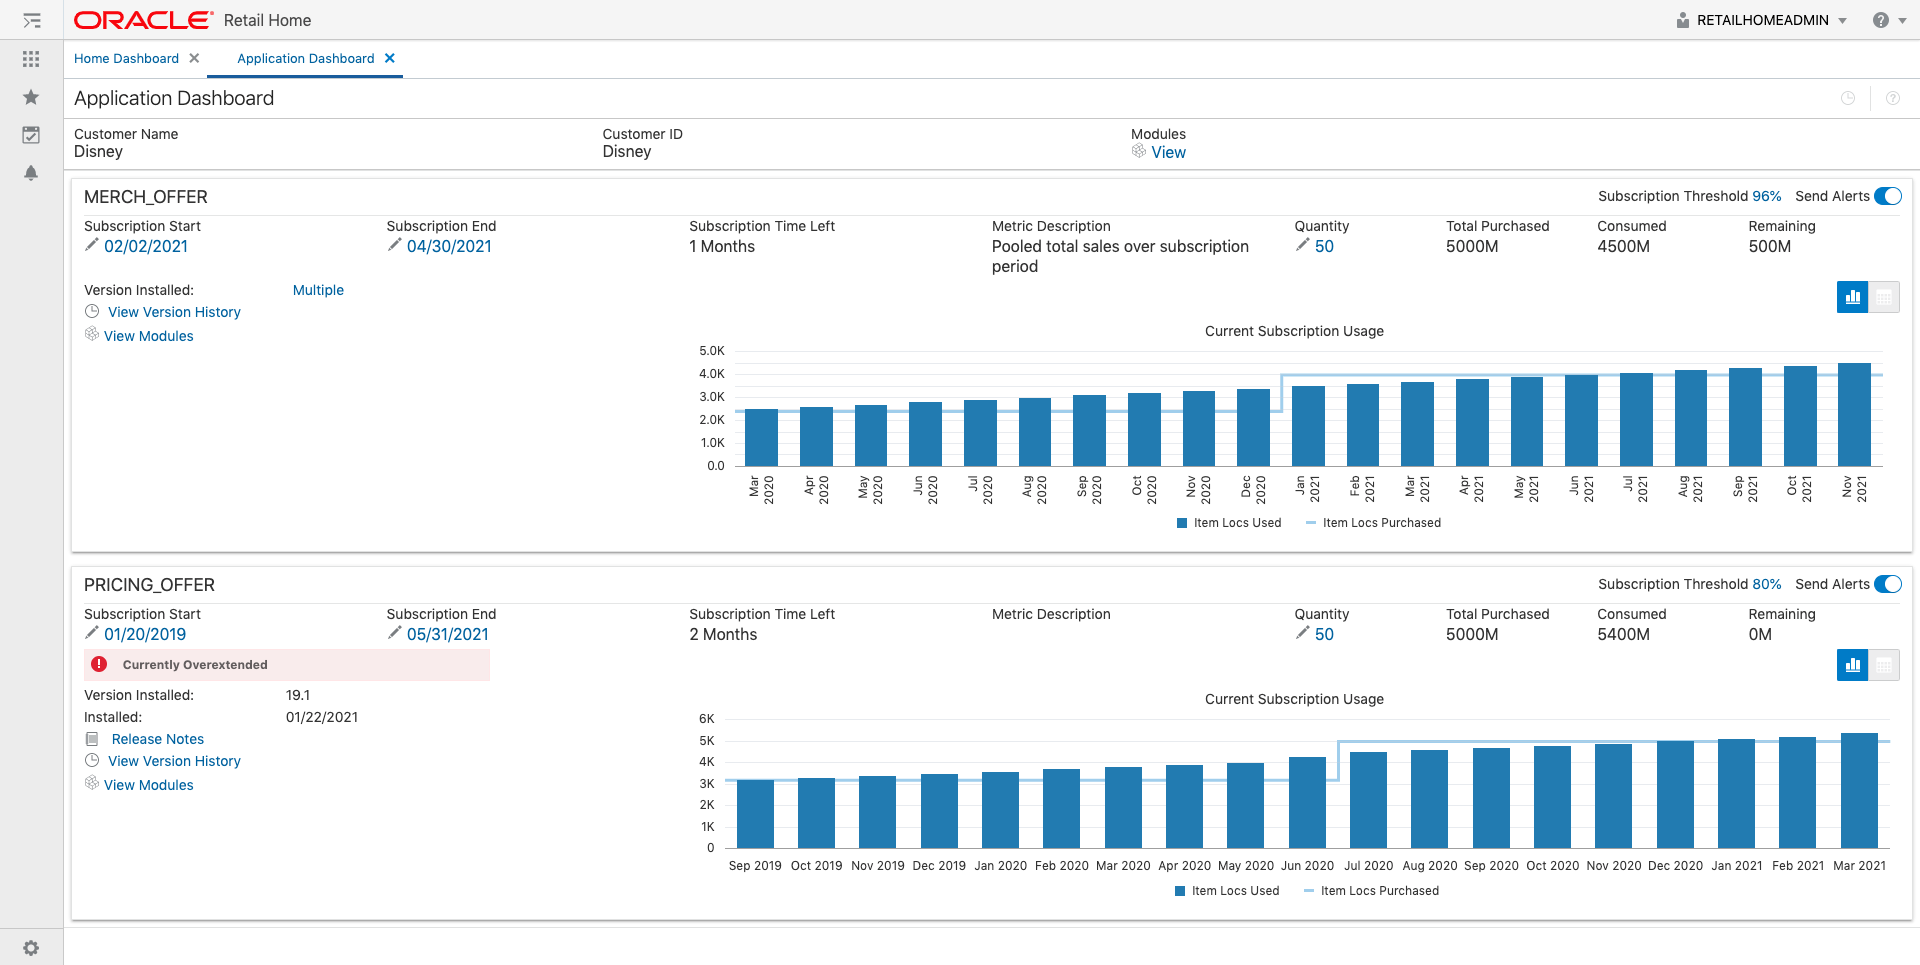
The Retail Home Application Dashboard page gives customer administrators the ability to view information about the products to which they have subscribed.
The Application Dashboard page can be launched from the Retail Home Settings Menu's Application Administration section.
The subscription metrics displays details related to all the applications subscribed by the customer which includes the ability to view usage history, view installed version and turn off alerts for nearing the overextension of a subscription. The default value for alerts is set to "on". The customer would also see a "Currently Overextended" message for applications whose current usage cross the permitted purchased limit.
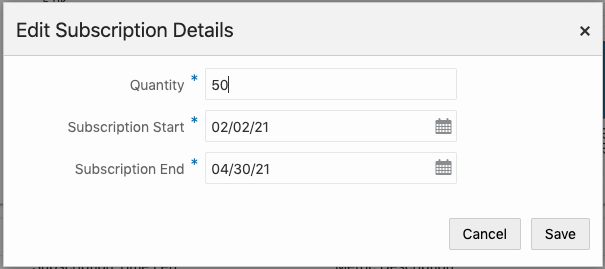
The Customer has the ability to edit Quantity purchased, Subscription Start Date, and Subscription End Date by clicking on the edit icon.
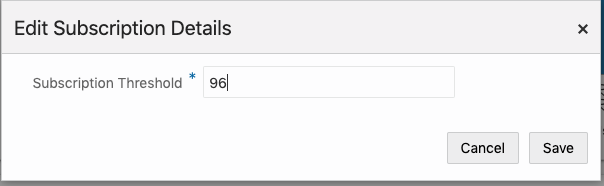
The customer also has the ability to edit subscription threshold. An email alert is automatically triggered by the system once the consumed amount crosses the threshold limit set on the total purchased amount.
The Version area shows the currently installed version of the application, and when this version was installed. If multiple versions are present, a Multiple link will be shown. Clicking this link will display a list of installed versions.
Version history contextual pane shows details related to previously installed versions, installed date and release notes related to each version. The pane can be accessed by clicking the View Version History link. If the application does not support version reporting, a "No version information available" message will be displayed.