| Oracle® Retail Home Oracle Retail Home Administration Guide Release 3.0.2 F16712-02 |
|

 Previous |
 Next |
| Oracle® Retail Home Oracle Retail Home Administration Guide Release 3.0.2 F16712-02 |
|
Previous |
Next |
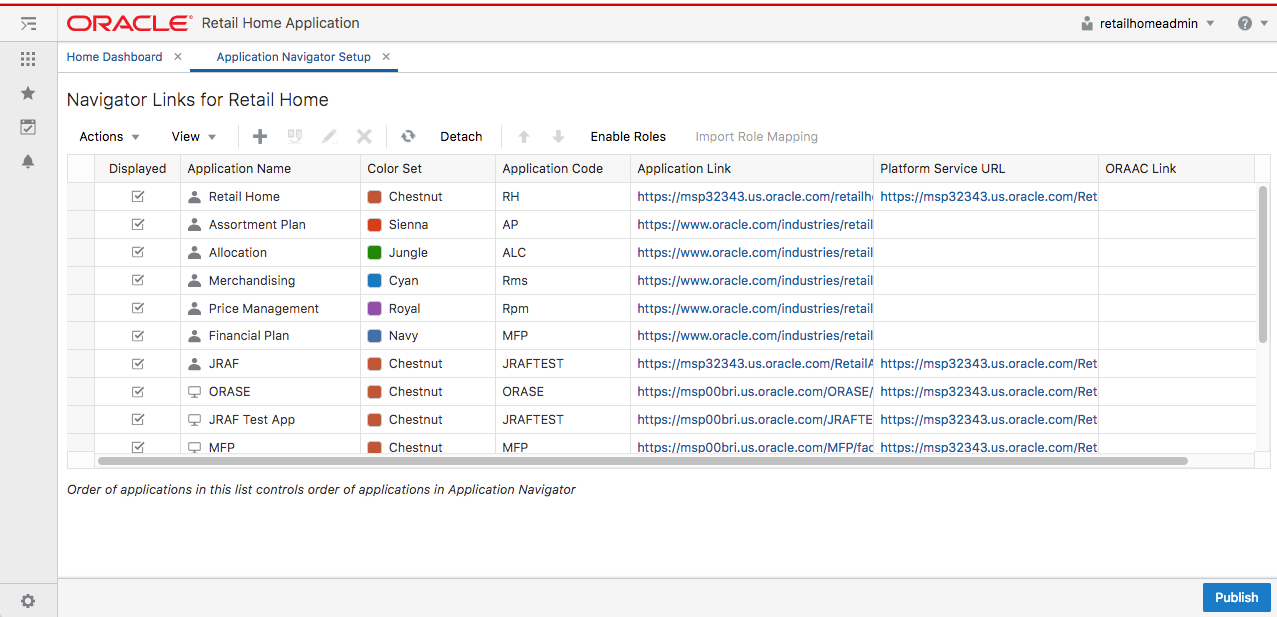
The Retail Home Application Navigator Setup page gives administrators the ability to configure applications within Retail Home. These applications are used to populate the Retail Home application navigator menu, to define dashboard tiles within Retail Home dashboards and to populate the application navigator menus in other Retail Applications.
Application Navigator entries will be added and/or removed by the system when managing Retail Domains on the Domain Configuration page or when managing the Active state of applications in the Manage Customer Modules page. Refer to the Domain Configuration and Manage Customer Modules sections in this document for further details. System generated entries cannot be removed through the Application Navigator Setup page and only a few attributes of the system-generated entries can be modified on this page. See more details in the following sections.
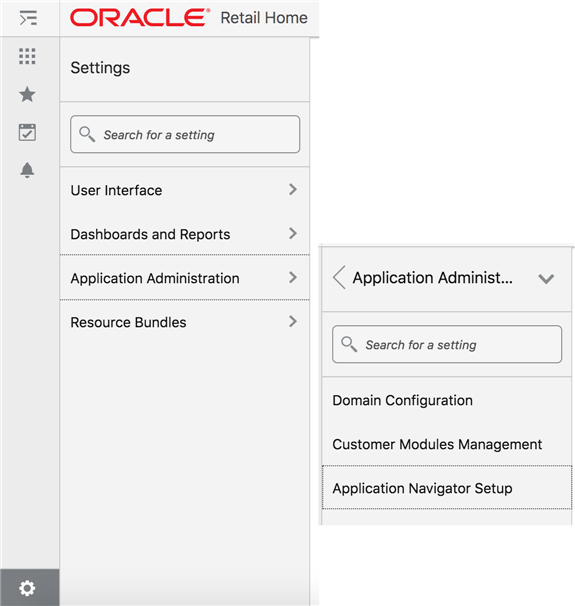
The Application Navigator Setup page can be launched from the Retail Home Settings menu's Application Administration section.
The Application Navigator Setup page shows a table of all the application navigator entries currently configured in Retail Home.
The following information is shown for each application:
Displayed - When checked, the application will be displayed in the Retail Home Application Navigator menu.
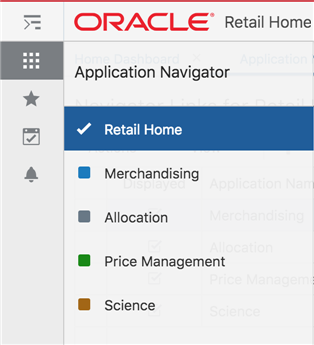
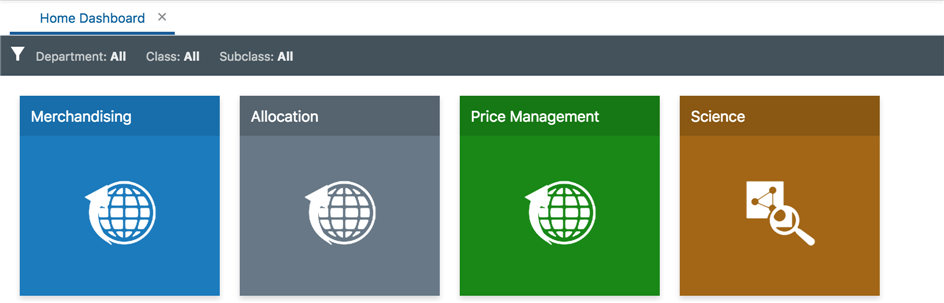
Application Name - The name that will be displayed in Application Navigator menus and in Retail Home Dashboard Tiles.
Entry Type - The type of application navigator entry either user entry () or system-generated entry ().
Color Set - The color scheme used to display this application in the Retail Home Application Navigator menu and in Retail Home Dashboard Tiles.
Application Code - The unique code associated with a Retail Application. This is required to support features such as Favorites, Notifications and Resource Bundle Customization.
Application Link - The URL used to launch the application from Application Navigator menus or from the header of a dashboard tile.
Platform Service URL - The URL used to access Platform ReST Services. This is required to support features such as Favorites, Notifications and Resource Bundle Customization.
ORAAC Link - The URL used to access the ORAAC instance associated with this application.
Roles - The roles that have access to the application. This column is not displayed if Roles are disabled.
The table toolbar gives users the ability to add, duplicate, edit, delete, refresh and reorder applications, as well as manage roles associated with each application.

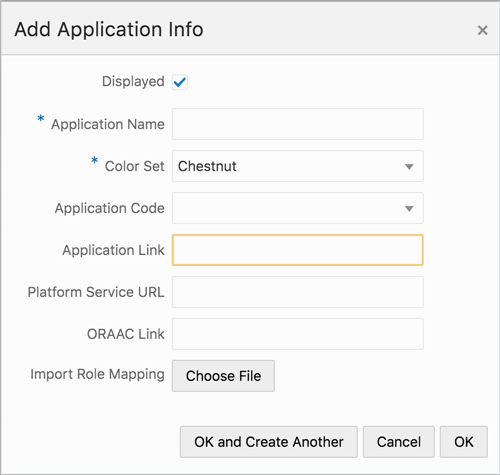
The "Add" icon on the table toolbar allows users to add a new Application Navigator entry in Retail Home.
To add an application navigator entry, users enter the following information in the "Add Application Info" dialog:
Displayed - Controls whether this application will be displayed in the Retail Home Application Navigator menu.
Application Name - A unique name for the application that will be displayed in the Application Navigator menus and in the Retail Home Dashboard Tile header.
Color Set - The color scheme used to display this application in the Retail Home Application Navigator menu and for the background of the Retail Home Dashboard Tile.
Application Code - The unique code associated with a Retail Application. This is required to support features such as Favorites, Notifications and Resource Bundle Customization.
Application Link - The URL used to launch the application from Application Navigator menus or from the header of a dashboard tile.
Platform Service URL - The URL used to access Platform ReST Services. This is required to support features such as Favorites, Notifications and Resource Bundle Customization.
ORAAC Link - The URL used to access the ORAAC instance associated with this application.
Import Role Mapping - Allows the user to upload a CSV file mapping Roles to the current application. This is not available if Roles are disabled. See the section titled Mapping Roles to Applications below for more details.
The "Duplicate" icon on the table toolbar allows users to create a new application navigator entry using the selected application navigator entry as a starting point.
Users can modify the details in the ”Add Application Info” dialog. See the section above titled Adding an Application Navigator Entry for details about adding a new application navigator entry.
|
Note: It is allowed to duplicate from an existing system-generated entry, but the new application navigator entry will not be considered a system-generated entry. |
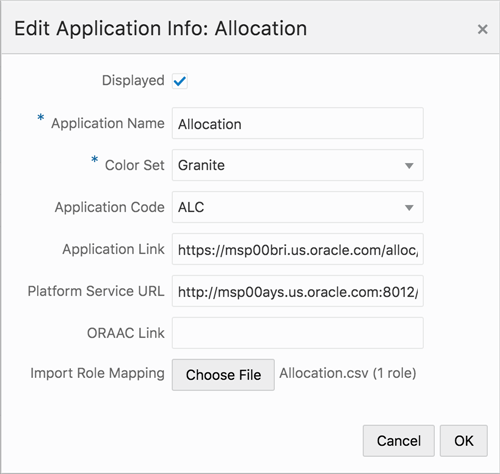
The "Edit" icon on the table toolbar allows users to change the details of an existing application navigator entry in Retail Home.
Users can modify the details in the "Edit Application Info" dialog:
For system-generated entries, only the following details of the Application Navigator entry may be modified:
Application Name
Color Set
Role Mapping
The "Delete" icon on the table toolbar allows users to delete the selected application navigator entry from Retail Home.
|
Note: Users cannot delete system-generated entries from the Manage Application Navigator page. |
The order of the application navigator entries in the Manage Application Navigator table is the order that the applications will be displayed in the Application Navigator menus in Retail Home and in other Retail Applications.
The ”Move Up” icon and the ”Move Down” icon on the table toolbar allow users to move the selected application navigator entry up or down in the table.
Roles can be associated with each application navigator entry to restrict which users will have access to the application through the application navigator menus outside of Retail Home.
Roles are disabled by default and all users will see links to all applications in the application navigator menus. Use the Enable Roles button in the table toolbar to enable role mappings.
Mapping roles to applications is accomplished through the upload of a CSV formatted file containing a mapping of applications to roles. The CSV file is required to have columns ”App Name” and ”Role Name”. Any other columns included in the file will be ignored. The ”App Name” column should contain the name of the application currently shown in the Application Name column. The keyword ”all” may be used in the ”App Name” column in place of an application name to map a role to all applications currently in the table. The ”Role Name” column should contain a valid enterprise role name.
Import the role mapping CSV file using the Import Role Mapping button on the table toolbar or through the ”Import Role Mapping” field on the Application Info dialogs described in the previous sections. When importing using the table toolbar a successful import will replace the role mappings for all applications currently managed in Retail Home. When importing using the Application Info dialogs only the roles mapped to the application being maintained in the dialog will be updated, replacing all existing role mappings for that application.
Application navigator entries can be published to the applications that are associated with a domain. See the Domain Configuration chapter for details about configuring domains. These applications are represented by the system-generated application navigator entries. Data that is published includes the details of each application including links and role mappings. Only applications that have an application link will be published. Use the Publish button located in the page footer to publish this data.
Once the application navigator entries have been published, if further changes are made to the application navigator entries or the role mappings it will be necessary to publish again in order for those changes to be pushed out to the domain applications.
|
Important Note: If the application navigator entries for an application are currently managed through ORAAC (Oracle Retail Application Admin Console) then this Publish action will replace the application navigator entries that were configured through ORAAC. |