12 カスタムOAuthプラグインの開発
OAM 12cでは、OAuthトークンに、ポリシー・レスポンスを使用して定義されたクレームを含めることができます。その結果、ユーザー・セッション($session)およびLDAPエントリ($user)ネームスペースを使用して、OAuthクライアントまたはリソース・サーバー定義でクレームを定義できます。たとえば、OAuthクライアント構成で$session.authn_levelまたは$user.attr.givennameを指定できます。OAuthトークンに外部ソースから取得したクレームが必要なユースケースがあります。たとえば、トークンにはRESTエンドポイントから提供されたクレームが必要です。
| クレーム名 | クレーム値 |
|---|---|
| my_plugin_claim1 | myvalue1 |
| my_plugin_claim2 | myvalue2 |
| my_plugin_claim3 | myvalue3 |
- カスタム・レスポンス・プラグインの開発
- OAMプラグインとしてのカスタム・コードのパッケージ化とデプロイ
- アイデンティティ・ドメインで使用するプラグインの登録
- クライアント/リソース・サーバー定義でのカスタム・クレームの指定
カスタム・レスポンス・プラグインの開発
カスタム・レスポンス・プラグインをコンパイルするプロセスは、顧客フェデレーション・ユーザー・プロビジョニング・プラグインに似ています。詳細は、ユーザー・プロビジョニング・プラグインの開発を参照してください。
OAuthCustomClaimsPluginのコード・スニペットは次のとおりです:public class OAuthCustomClaimsPlugin extends ResponsesProviderPlugin{
public ExecutionStatus initialize(PluginConfig config) {
//Use initialization parameters for the plugin.
super.initialize(config);
//parameter REST_URL is not used. This is only for example.
Object tmp = config.getParameter("REST_URL");
LOGGER.finer("OAuthCustomClaimsPlugin initialize REST_URL from configuration "+tmp);
//If cacheResponsesInSession is false, responses will not be cached in user session.
cacheResponsesInSession = (String) config.getParameter("cacheResponsesInSession");
LOGGER.finer("OAuthCustomClaimsPlugin initialize cacheResponsesInSession from configuration "+tmp);
return ExecutionStatus.SUCCESS;
}
@Override
public ExecutionStatus execute(RequestContext requestContext, Responses responses) {
Object[] params = {requestContext.getUserId(),
requestContext.getOAuthClientID(),requestContext.getOAuthClientName(),
requestContext.getOAuthIdentityDomain(),getAsString(requestContext.getScopes())};
LOGGER.logp(Level.FINER, "OAuthCustomClaimsPlugin","execute",
"userID: {0} "
+ "client id: {1} client name:{2} identity domain: {3} scopes:{4}", params);
//Retrieve the custom claims
//This is an example, in real world problem customer would write custom code to retrieve
// the claims for a user from the REST_URL.
responses.setResponse("myclaim1", "myvalue1");
responses.setResponse("myclaim2", "myvalue2");
responses.setResponse("myclaim3", "myvalue3");
//Cache claims in session
//By default, claims are not cached in the user session.
//After user obtains a token from an authz code, user session can contain the claims returned by the plugin.
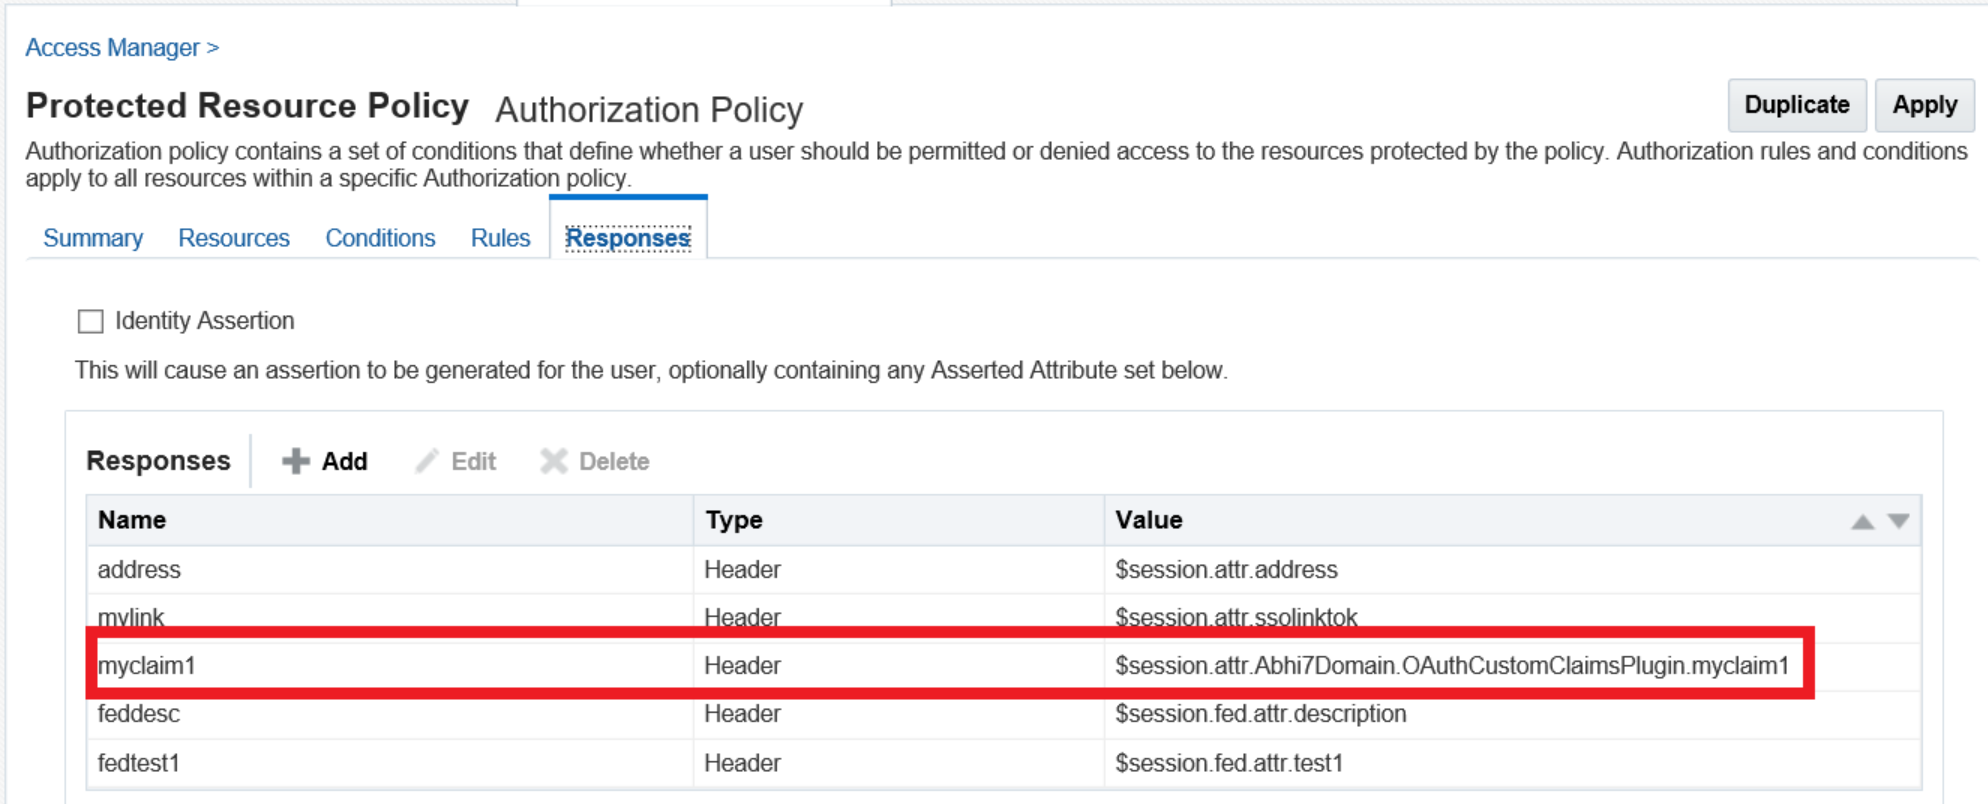
//From an authz policy, this can be retrieved using $session.attr.<idDomain>.<pluginName>.<claimnamefromplugin>
if(cacheResponsesInSession != null && cacheResponsesInSession.equalsIgnoreCase("true")){
LOGGER.finer("enabling cache ");
responses.setCacheInUserSession(true);
}
return ExecutionStatus.SUCCESS;
}
}ユーザー・セッションにキャッシュされたクレーム
$session.attr.<idDomain>.<pluginName>.<claimnamefromplugin>$session)内のクレームを参照してください。
ノート:
セッション内のクレームのキャッシュ、つまりセッション属性としてはデフォルトで無効になっています。プラグインがresponses.setCacheInUserSession(true)を設定した場合にのみ、セッション属性にプラグインからのクレームが移入されます。
OAMプラグインとしてのカスタム・コードのパッケージ化とデプロイ
-
カスタム・レスポンス・プラグインをデプロイするプロセスは、カスタム・フェデレーション・ユーザー・プロビジョニング・プラグインに似ています。詳細は、ユーザー・プロビジョニング・プラグインの開発を参照してください。
-
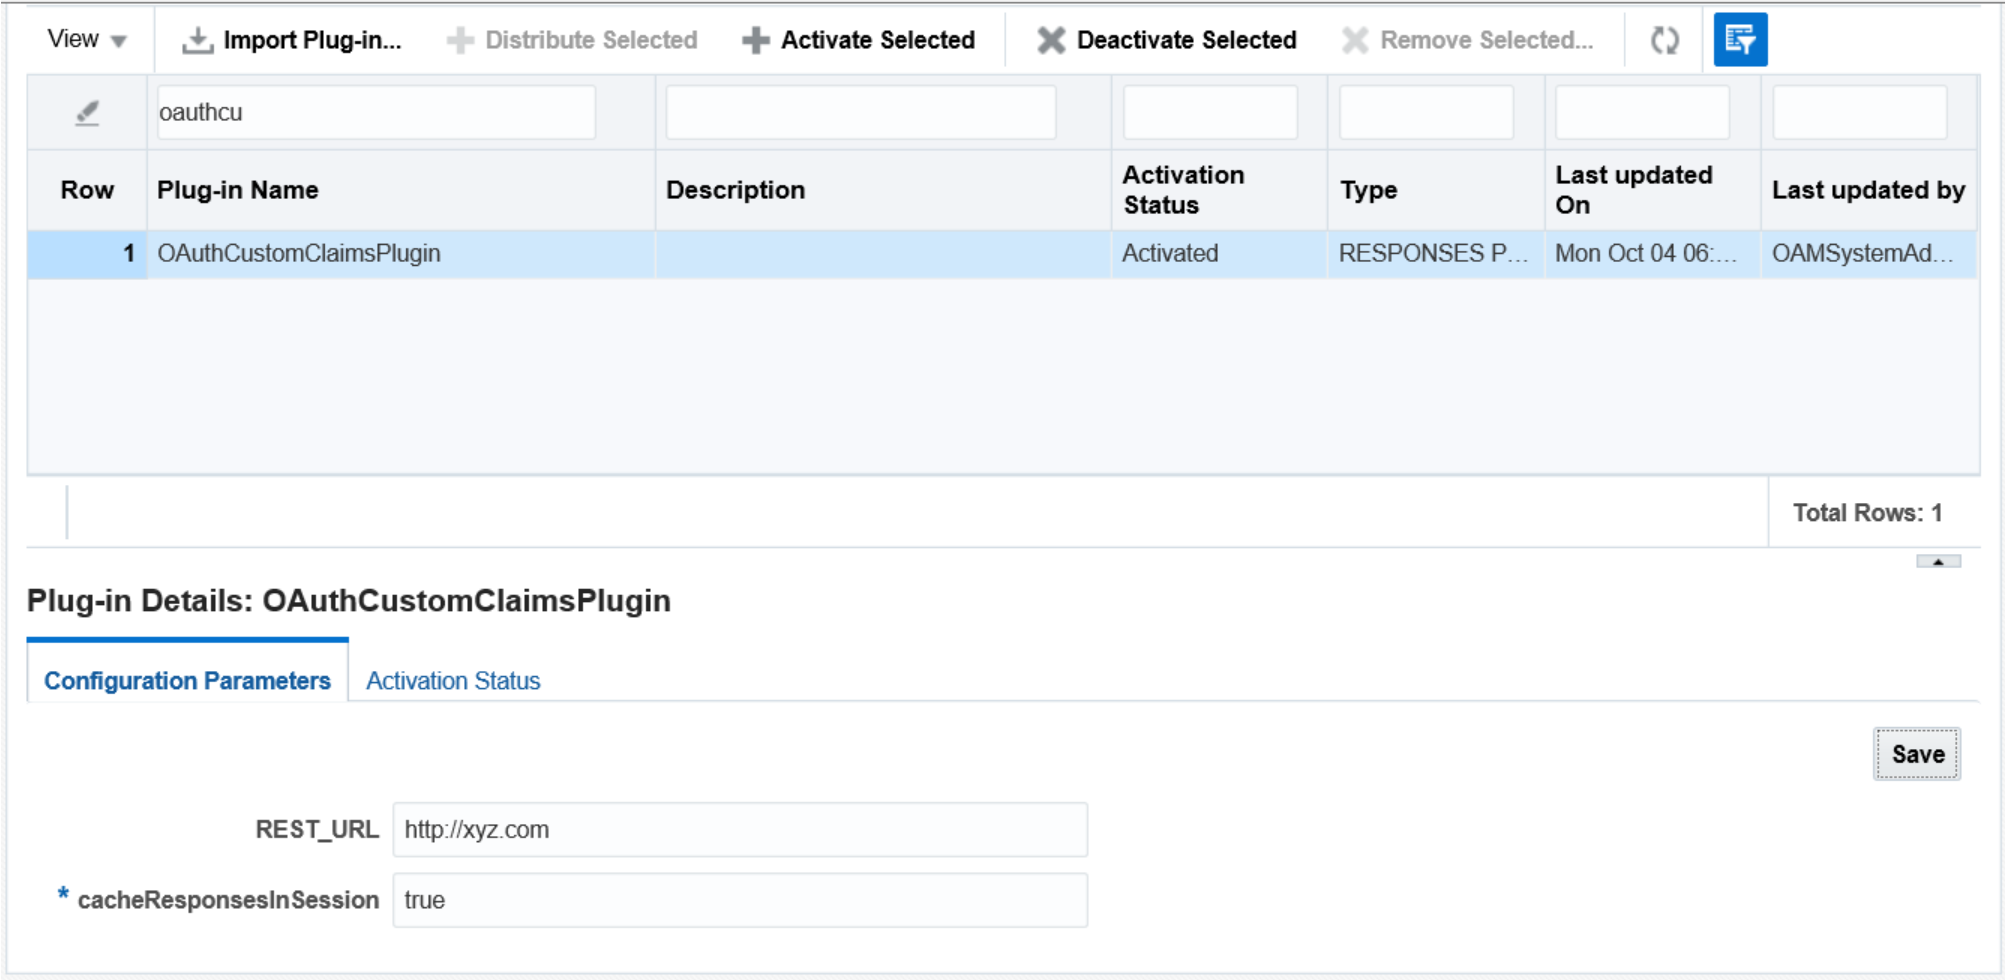
OAMコンソールでプラグインをインポート、配布およびアクティブ化します。
図12-1 プラグインのデプロイ

ノート:
プラグインは、実行時にOAMサーバーからの分離が保証されるサンドボックス(oSGi)で実行されます。
アイデンティティ・ドメインで使用するプラグインの登録
許可されるプラグインのリストは、customAttrsキーと値のペアをJASON文字列として使用して、アイデンティティ・ドメイン・レベルで定義されます。
{
    "name": "IDDomainName",
    "identityProvider": "oidoci",
    "description": "Updated Domain",
    "tokenSettings": [
        {
            "tokenType": "ACCESS_TOKEN",
            "tokenExpiry": 3600,
            "lifeCycleEnabled": false,
            "refreshTokenEnabled": true,
            "refreshTokenExpiry": 86400,
            "refreshTokenLifeCycleEnabled": false
        },
        {
            "tokenType": "AUTHZ_CODE",
            "tokenExpiry": 3600,
            "lifeCycleEnabled": false,
            "refreshTokenEnabled": true,
            "refreshTokenExpiry": 86400,
            "refreshTokenLifeCycleEnabled": false
        },
        {
            "tokenType": "SSO_LINK_TOKEN",
            "tokenExpiry": 3600,
            "lifeCycleEnabled": false,
            "refreshTokenEnabled": true,
            "refreshTokenExpiry": 86400,
            "refreshTokenLifeCycleEnabled": false
        }
    ],
    "errorPageURL": "/oam/pages/servererror.jsp",
    "consentPageURL": "/oam/pages/consent.jsp",
    "customAttrs": "{\"allowedCustomPlugins\":\"OAuthCustomClaimsPlugin\"}"
}
クライアントまたはリソース・サーバー定義でのカスタム・クレームの指定
{
    "attributes": [
       {
        "attrName": "my_plugin_claim1",
        "attrValue": "$plugin.OAuthCustomClaimsPlugin.myclaim1",
        "attrType": "DYNAMIC"
        },{
        "attrName": "my_plugin_claim3",
        "attrValue": "$plugin.OAuthCustomClaimsPlugin.myclaim3",
        "attrType": "DYNAMIC"
        }
    ],
    "secret": "mysecret",
    "id": "OAuthClientID",
    "scopes": [
        "ResourceServer1.scope3","ResourceServer1.scope2","ResourceServer1.scope1"
    ],
    "clientType": "CONFIDENTIAL_CLIENT",
    "idDomain": "IDDomain",
    "description": "Client Description",
    "name": "OAuthClientName",
    "grantTypes": [
        "CLIENT_CREDENTIALS","PASSWORD","JWT_BEARER","REFRESH_TOKEN","AUTHORIZATION_CODE"
    ],
    "defaultScope": "ResourceServer1.scope1",
    "redirectURIs": [
        {
            "url": "http://localhost:8080/Sample.jsp",
            "isHttps": true
        }
    ],


........
........

}{
"iss": "http://oamserverhost:<OAM_WLS_MANAGEDSERVER_PORT>/oauth2",
"aud": [
"ResourceServer1",
"http://oamserverhost:<OAM_WLS_MANAGEDSERVER_PORT>/oauth2"
],
"exp": 1633332319,
"jti": "mTswLkuKKMknpVcd_p9oEg",
"iat": 1633328719,
"sub": "user1",
"client": "OAuthClientID",
"scope": [
"ResourceServer1.scope1"
],
"domain": "IDDomain",
"grant": "AUTHORIZATION_CODE",
.......
"my_plugin_claim3": "myvalue3",
"my_plugin_claim1": "myvalue1",
......
}サンプルのスクリーンショット
図12-2 認可ポリシー・レスポンスの画面

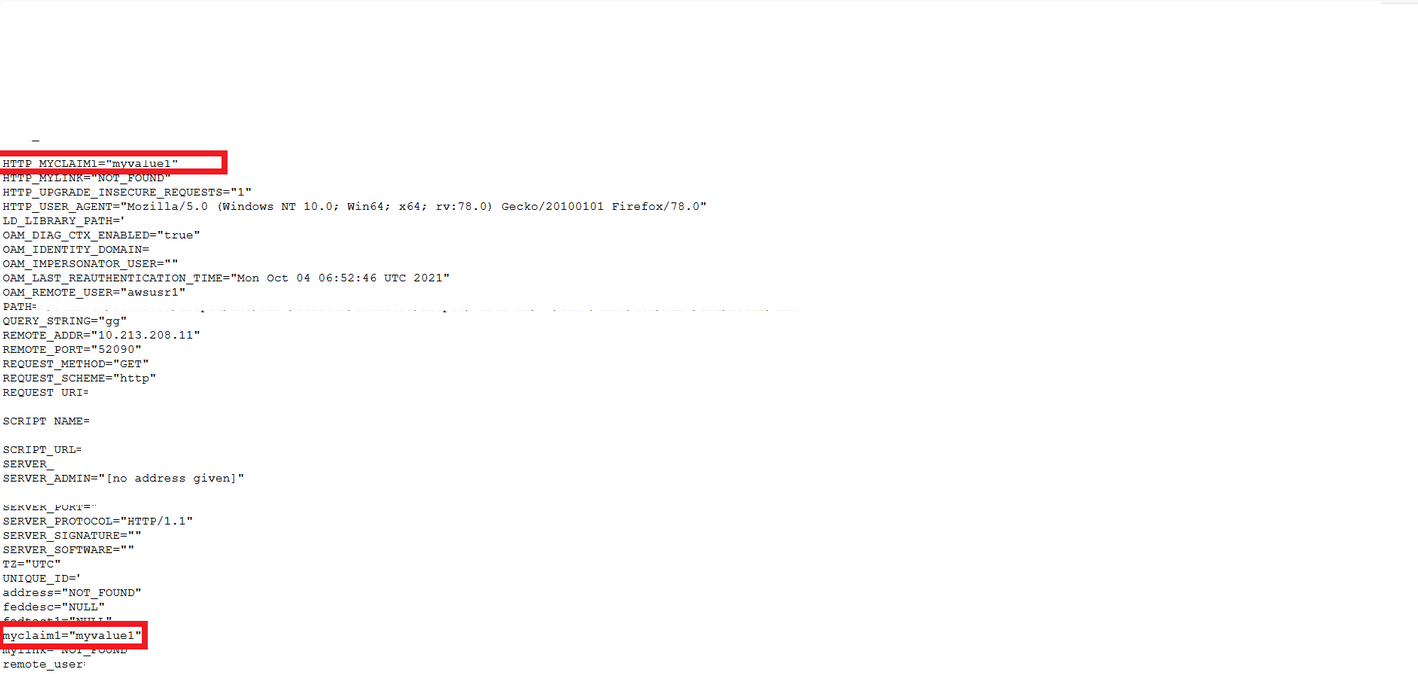
図12-3 CGIスクリプトの画面
