Using Fed Attributes: OAM Authorization and HTTP Headers
This article describes how attributes received in SAML/OpenID SSO messages can be used in OAM Authorization Policies and how they can be provided to protected web applications.
At runtime, when OAM/SP successfully processes a SAML / OpenID SSO Response message, the server saves some of the information from the response in the OAM session, as attributes that can be used in OAM authorization policies
-
In conditions for authorization rules
-
In responses to provide the SAML/OpenID attributes to protected web applications
The SAML / OpenID SSO Response information is saved in the OAM session as attributes referenced by the following identifiers:
-
The IdP partner name, referenced by
$session.attr.fed.partner -
The NameID value from the SSO response, referenced by
$session.attr.fed.nameidvalue -
The NameID format from the SSO response, for SAML protocols, referenced by
$session.attr.fed.nameidformat -
The attributes contained either in the SAML Assertion’s
AttributeStatementor in the OpenID SSO Response, referenced by $session.attr.fed.attr.ATTR_NAME, with ATTR_NAME being -
Either the local session attribute name, if an IdP Attribute Profile mapping was applied
-
Or the attribute name from the SSO response, if no IdP Attribute Profile mapping was applied for this attribute
Overview
A typical OAM environment is made of the following:
-
LDAP directory
-
OAM admin server, with the OAM admin console OAM runtime server
-
Web applications
-
WebGate agents protecting web application on HTTP servers (OHS, IIS…)
When an authenticated user requests access to a protected resource:
-
WebGate intercepts the call and ensures that the user is authenticated
-
The user is authorized to access the resource by evaluating authorization policies for this resource
-
WebGate injects data, as cookies or HTTP headers, into the HTTP request that will be forwarded to the protected resource
The OAM Authorization Policies used to evaluate whether a user can access a resource or not can be based on various conditions:
-
Identity: Condition based on the users identity or groups to which the user belongs
-
IP Address: Condition based on the user’s IP address
-
Temporal: Condition based on time
-
Attributes: Condition based on attributes (LDAP, HTTP request or session attributes).
An administrator could use the Federation data received in the SAML/OpenID SSO message in an authorization rule, by using an attribute condition that evaluates the Federation attributes.
The OAM Authorization Responses which are used to inject data into the HTTP request to make it available to protected web applications are based on
-
User LDAP attributes
-
HTTP request data
-
Static strings
-
OAM session attributes
Similarly to the OAM Authorization Policies, an administrator can inject federation data into the HTTP request via the use of OAM session attributes referencing the federation entries ($session.attr.fed.partner, $session.attr.fed.attr.ATTR_NAME…)
Federation SSO Setup
Use the same SAML 2.0 Federation setup that was configured for the previously, where:
-
OAM acts as a Service Provider
-
The IdP (
AcmeIdP) sends a SAML Assertion with-
NameID set to
userID -
Attributes sent
-
emailset to user’s email address -
fnameset to user’s first name -
surnameset to user’s last name -
titleset to user’s last job title
-
-
OAM/SP configured with an IdP Attribute Profile to
-
Map
fnameto firstname -
Map
surnameto lastname -
Leave email as is
-
Two users will be used:
Alice:
-
userID: alice
-
email:
<alice@oracle.com> -
first name: Alice
-
last name: Appleton
-
title: manager
Bob:
-
userID: bob
-
email:
<bob@oracle.com> -
first name: Bobby
-
last name: Smith
-
title: engineer
The XML SAML Response with the Assertion sent back by the IdP is:
<samlp:Response ..>
    <saml:Issuer ...>http://acme.com
/idp</saml:Issuer>
    <samlp:Status>
        <samlp:StatusCode
Value="urn:oasis:names:tc:SAML:2.0:status:Success"/>
    </samlp:Status>
    <saml:Assertion ...>
        <saml:Issuer ...>http://acme.com /idp</saml:Issuer>
        <dsig:Signature ...>
        ...
        </dsig:Signature>
        <saml:Subject>
            <saml:NameID ...>alice</saml:NameID>
            ...
        </saml:Subject>         <saml:Conditions ...>
         ...
        </saml:Conditions>         <saml:AuthnStatement ...>
        ...
        </saml:AuthnStatement>
        <saml:AttributeStatement ...>
            <saml:Attribute Name="email" ...>
                <saml:AttributeValue
...>alice@oracle.com</saml:AttributeValue>
            </saml:Attribute>
            <saml:Attribute Name="title" ...>
                <saml:AttributeValue
...>manager</saml:AttributeValue>
            </saml:Attribute>
            <saml:Attribute Name="surname" ...>
                <saml:AttributeValue
...>Appleton</saml:AttributeValue>
            </saml:Attribute>
            <saml:Attribute Name="fname" ...>
                <saml:AttributeValue
...>Alice</saml:AttributeValue>
            </saml:Attribute>
        </saml:AttributeStatement>
    </saml:Assertion>
</samlp:Response>
The Test SP page shows different results, since OAM/SP processed the attributes according to the rules where:
-
email was not changed
-
title was not changed
-
fname was mapped to firstname
-
surname was mapped to lastname
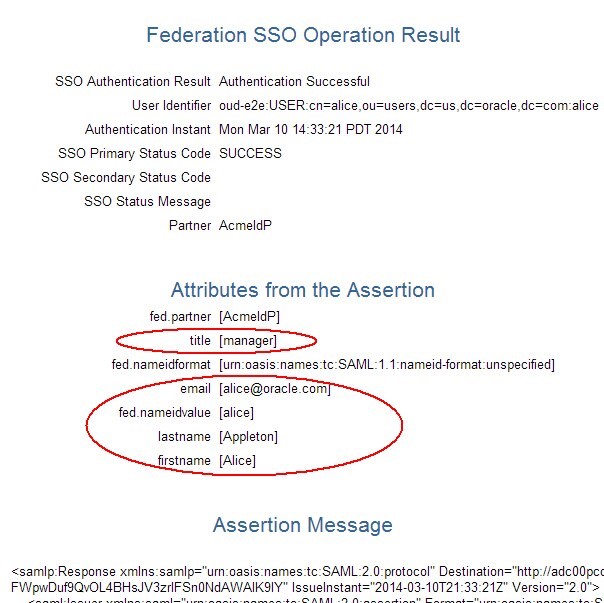
Description of the illustration Test_Federation_SSO.jpg
Protected Web Application
In this example, use the following components:
-
OHS is installed
-
A WebGate agent has been configured for this OHS instance
-
An OAM Application Domain has been created for this WebGate, which protects all the resources on the OHS server
-
Authentication Policy:
-
Name: Protected Resource Policy
-
Authentication Scheme: FederationScheme
-
-
Authorization Policy:
-
Name: Protected Resource Policy
-
Resources
-
/** and /…/*
-
Linked to Protected Resource Policy
-
-
Authentication Policy and “Protected Resource Policy” Authorization Policy
-
The
/cgi-bin/printenvresource on OHS prints out data when processing the HTTP Request sent by the browser -
HTTP Headers
-
Request data (path, query string…)
-
Server data (IP address, port…)
An example of a browser accessing the resource without being protected by OAM/WebGate results in the following display (in the test, the web application will be protected as listed above):
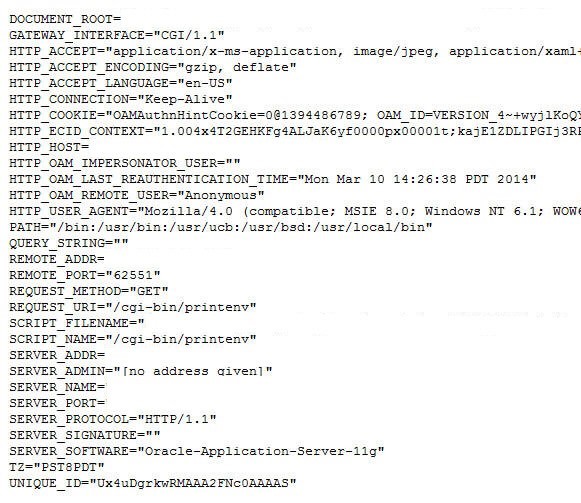
Description of the illustration Protected_web_Application.jpg
Authorization Conditions
The following example shows how to construct an Authorization Policy using a Federation attributes stored in the OAM session for a resource with the following constraints:
-
Users are authenticated via Federation SSO (so the resource is protected via a FederationScheme Authentication Policy)
-
The IdPs provide the job title of the user, and it is known locally as title (if the IdP sends the job title via a name different than title, then an IdP Attribute Profile needs to be used to map it to the local title name)
-
Only users with the manager title should have access to the resource
To create such an authorization policy, execute the following steps:
-
Go to the OAM Administration Console:
http(s)://oam-admin-host:oam-adminport/oamconsole -
Navigate to Access Manager , Application Domains
-
Search and click on the Application Domain for the resource
-
Click on the Authorization Policies
-
Open the Authorization Policy protecting the resource (Protected Resource Policy in this example)
-
Click on the Conditions tab
-
Click Add to define a new condition:
-
Name:
TitleCondition -
Type:
Attribute
-
-
Click Add Selected
-
Select the newly created condition
-
In the Condition Details window, click Add:
-
Namespace:
Session -
Attribute Name:
Other -
Enter the attribute name:
fed.title -
Operator:
Equals -
Attribute Value:
manager
-
-
Click OK
-
Click on the Rules tab
-
Remove the TRUE condition if present in the Allow Rule , Selected Conditions
-
Add the TitleCondition to the Allow Rule , Selected Conditions
-
Click Apply
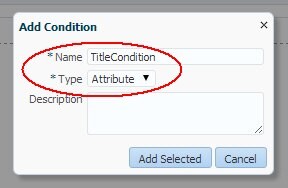
Description of the illustration Add_Condition.jpg
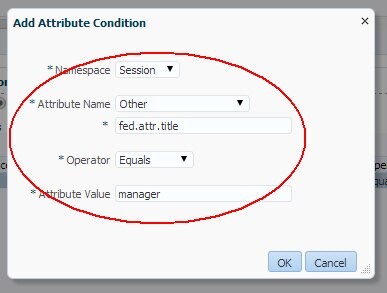
Description of the illustration Add_Attr_Condition.jpg
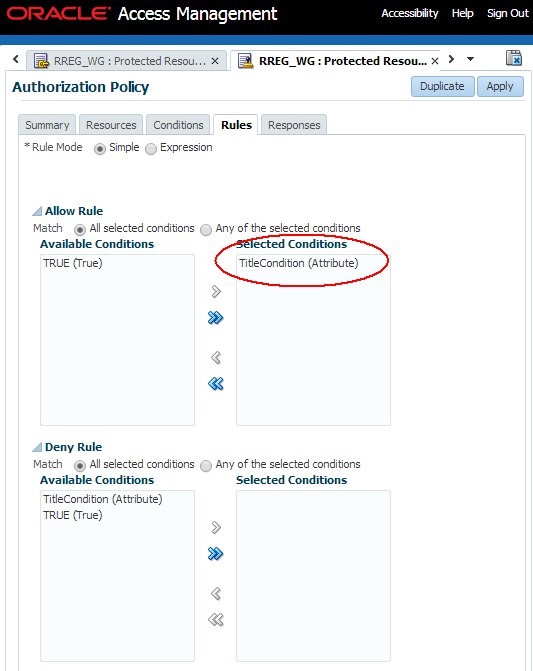
Description of the illustration Authorization_Policy.jpg
To test, in a new browser access the protected resource. You will be redirected to the IdP.
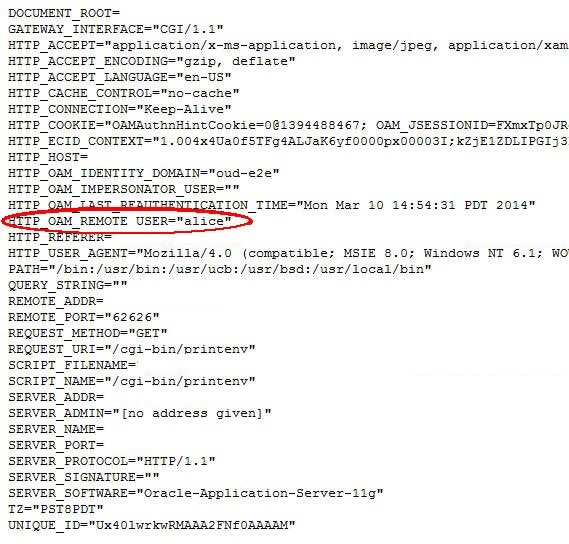
If you authenticate at the IdP with alice, the browser shows the following at the end of the now, showing the Remote User HTTP header set to alice (since the IdP provided the title attribute set to manager and OAM only allows access to users with the OAM session attribute fed.title set to manager):
Description of the illustration Document_root.jpg
If you authenticate at the IdP with bob, the browser shows the following at the end of the now, showing an error (since the IdP provided the title attribute set to engineer and OAM only allows access to users with the OAM session attribute fed.title set to manager):

Description of the illustration OAM_Operation_error.jpg
Injecting Fed Attributes
The following example shows how to inject SAML / OpenID attributes collected from the SSO response as HTTP Headers for the protected Web with the following constraints:
-
Users are authenticated via Federation SSO (so the resource is protected via a FederationScheme Authentication Policy)
-
The IdPs provide the job title of the user, and it is known locally as title (if the IdP sends the job title via a name different than title, then an IdP Attribute Profile needs to be used to map it to the local title name)
-
OAM/WebGate is configured to inject:
-
Email address as emailaddress
-
First name as firstname
-
Last name as lastname
-
The configuration is done via the use of Authorization Response objects in an Authorization Policy definition
To configure such an authorization policy, execute the following steps:
-
Go to the OAM Administration Console:
http(s)://oam-admin-host:oam-adminport/oamconsole -
Navigate to Access Manager , Application Domains
-
Search and click on the Application Domain for the resource
-
Click on the Authorization Policies
-
Open the Authorization Policy protecting the resource (Protected Resource Policy in this example)
-
Click on the Responses tab
-
Click Add to create the entry for the email address:
-
Type:
Header -
Name:
emailaddress -
Value:
$session.attr.fed.attr.email
-
-
Click Add
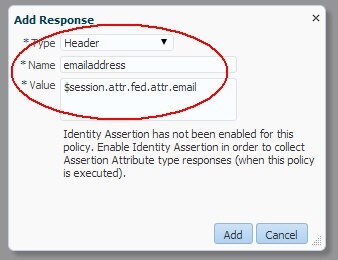
-
Click Add to create the entry for the first name:
-
Type:
Header -
Name:
firstname -
Value:
$session.attr.fed.attr.firstname
-
-
Click Add
-
Click Add to create the entry for the last name:
-
Type:
Header -
Name:
lastname -
Value:
$session.attr.fed.attr.lastname
-
-
Click Add
-
Click Apply
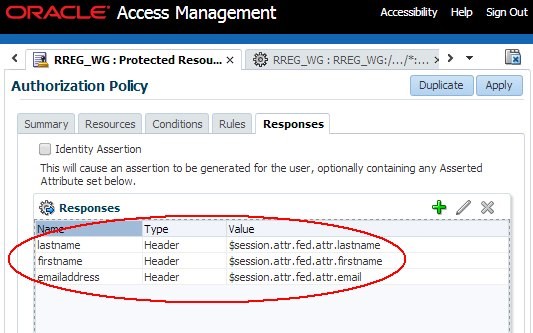
Description of the illustration ACS_Authorization_Policy.jpg
To test, in a new browser access the protected resource. You will be redirected to the IdP where authentication occurs.
OAM/WebGate then injects the Authorization Response items based on the OAM Session attributes (received from the IdP) and the protected web application displays those (my test page displays an HTTP header as HTTP_NAME, with NAME being the name of the HTTP Header).
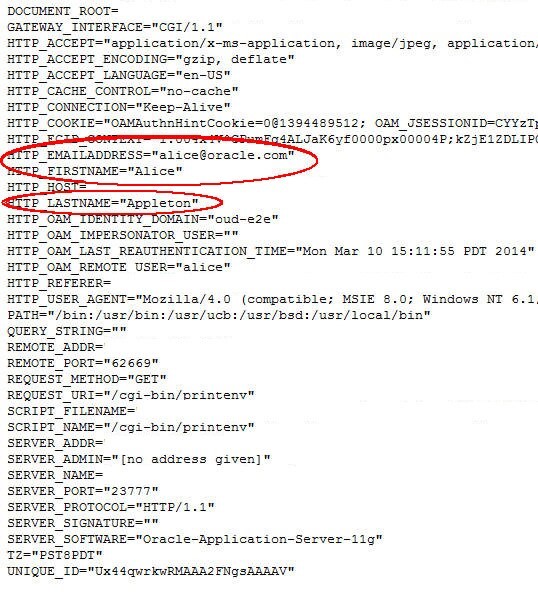
Description of the illustration Authorization_Response.jpg
More Learning Resources
Explore other labs on docs.oracle.com/learn or access more free learning content on the Oracle Learning YouTube channel. Additionally, visit education.oracle.com/learning-explorer to become an Oracle Learning Explorer.
For product documentation, visit Oracle Help Center.
Using Fed Attributes- OAM Authorization and HTTP Headers
F61887-01
September 2022
Copyright © 2022, Oracle and/or its affiliates.