Custom Post-Authentication Module in OAM and SP
This article shows how to implement a custom authentication plugin that will be invoked after Federation SSO is complete and that will:
- Access the information contained in the SAML Assertion (IdP name, user attributes…)
- Update the LDAP user attributes based on the SAML User attributes
For more information on how to design a custom Authentication Plugin, refer to the OAM Developer’s Guide, chapter 3, which describes how to develop such a module: http://docs.oracle.com/cd/E40329_01/dev.1112/e27134/authnapi.htm. Let’s focus on how to:
- Implement the plugin
- Compile it
- Package it
- Upload the plugin to OAM
- Create a new Federation Authentication Module
Federation Authentication Module
Important note: When using the Federation Test SP application, the Authentication Module is by-passed and as such, the plugins defined in such a module won’t be executed.
An OAM Authentication Module is:
- A collection of Authentication Plugins
- An orchestration determining the order of the execution of the plugins
The OOTB Federation Authentication Module, called FederationPlugin, is made of two plugins:
- FedAuthnRequestPlugin: Starts the Federation SSO flow, determines which IdP to use if not provided by a previous Authentication Plugin, creates an SSO request and redirects the user to the IdP
- AssertionProcessing: Processes an incoming SAML/OpenID SSO Response and maps the message to a local user record in the LDAP directory
The orchestration can be seen by:
- Go to the OAM Administration Console:
http(s)://oam-adminhost:oam-admin-port/oamconsole. - Navigate to Access Manager , Authentication Modules.
- Open FederationScheme.
- Click on the Steps tab to see the plugins.
- Click on the Steps Orchestration tab to see the orchestration between the different plugins, and the plugin that is used to start the operation.
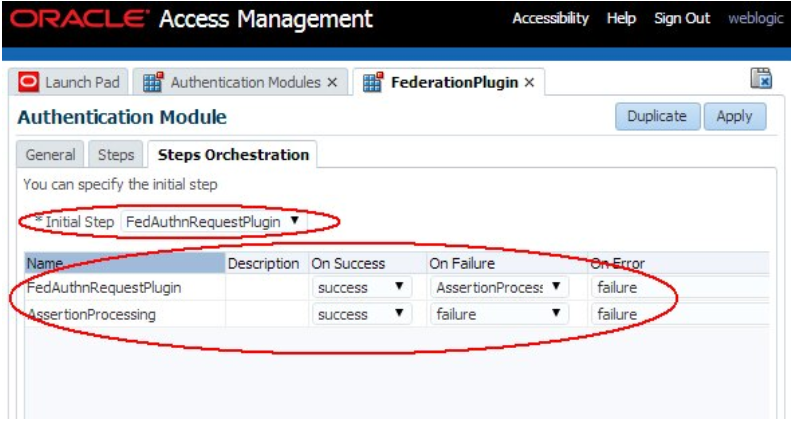
Description of the illustration Federation_Plugin_Screen.png
AssertionProcessing Plugin
The AssertionProcessing plugin is responsible for the validation and consumption of an incoming SSO Assertion, for the mapping of the Assertion to a local LDAP user record and returns the user’s identity as well as the content of the Assertion to OAM.
The AuthenticationContext instance shared between the Authentications Plugins contains CredentialParam objects that allow the various plugins to communicate at runtime as well as the result of the authentication operation.
oracle.security.am.plugin.authn.AuthenticationContext: Context for the authentication operation shared across the various Authentication Pluginsoracle.security.am.plugin.authn.Credential: Collection of credentials data stored in the AuthenticationContextoracle.security.am.plugin.authn.CredentialParam: Single credential parameter referenced by a name, and has a type (string most of the time) depending on the type stored in the Credential instance
Authentication Context Data
Upon successful authentication, an OAM Authentication Plugin returns the following data in the AuthenticationContext:
- The JaaS Subject identifying the user, with the following Principal instances:
oracle.security.am.common.utilities.principal.OAMUserPrincipalwhose name contains theuserIDoracle.security.am.common.utilities.principal.OAMUserDNPrincipalwhose name contains the user’s DNoracle.security.am.common.utilities.principal.OAMGUIDPrincipalif present, whose name contains the user’s GUID
The following CredentialParam instances contained in the Credential object of the AuthenticationContext
- The user’s DN referenced by the KEY_USERNAME_DN string
- Type: String
- Value: The user’s DN
The following PluginResponse instances contained in the AuthenticationContext:
- The userID referenced by the
KEY_AUTHENTICATED_USER_NAMEstring - Type: PluginAttributeContextType.LITERAL
- Value: The userID
The name of the Identity Store where the user record is located
- Referenced by the
KEY_IDENTITY_STORE_REFstring - Type: PluginAttributeContextType.LITERAL
- Value: The OAM ID Store name
The Authentication Level if it was overridden during the Federation SP processing (see this article for more information: Art 27 Mapping Fed Authn Method to Authn Levels in OAM SP)
- Referenced by the KEY_AUTHN_LEVEL string
- Type: PluginAttributeContextType.LITERAL
- Value: authn level as a string
Assertion data, with each element being a standalone PluginResponse instance:
- Referenced by its name (see below)
- Type: PluginAttributeContextType.SESSION
- Value: A string object
The data contained in the AuthenticationContext is used by OAM for further processing.
The Assertion data is made of the following elements:
- IdP partner name, referenced by
fed.partner - The SAML NameID Format, referenced by
fed.nameidformat - The NameID value, referenced by
fed.nameidvalue - User attributes contained in the Assertion, referenced by
fed.aLr.ATTRIBUTE_NAME, withATTRIBUTE_NAMEbeing - Either the name of the attribute contained in the Assertion, if no IdP Attribute Profile mapped the name to a local OAM Session Attribute Name
- Or the name of the OAM Session Attribute Name which is the result of the mapping of the name of the attribute in the Assertion to a local OAM Session Attribute Name based on the IdP Attribute Profile used for the IdP Partner.
Example
Let’s take the following example to examine the data that is returned by the AssertionProcessing plugin at the end of the flow:
- OAM acts as an SP
- The partner IdP is a SAML 2.0 IdP registered as
acmeIdPin the OAM/SP server, and the IdP’s ProviderID/Issuer ishttp://acme.com/idp - The IdP sends a SAML 2.0 Assertion containing
- NameID of format
urn:oasis:names:tc:SAML:1.1:nameidformat:emailAddress, with the value being the user’s email address - Three SAML Attributes
- Name set to uid containing the
userID - Name set to lastname containing the user’s last name
- Name set to firstname containing the user’s first name
The IdP partner in OAM/SP is bound to an IdP Attribute Profile with only one entry, which maps the SAML Attribute Name uid to the OAM Session Attribute Name userid In the example, the test user will be alice:
- UserID at OAM/SP alice
- Attributes sent in the SAML Assertion:
- userID: alice
- lastname: Appleton
- firstname: Alice
- Email address for alice is
alice@oracle.com
An example of the SAML 2.0 Assertion is:
<samlp:Response ..>
     <saml:Issuer ...>hLp://acme.com/idp</saml:Issuer>
     <samlp:Status>
         <samlp:StatusCode
 Value="urn:oasis:names:tc:SAML:2.0:status:Success"/>
     </samlp:Status>
     <saml:Assertion ...>
         <saml:Issuer ...>hLp://acme.com/idp</saml:Issuer>
         <dsig:Signature ...>
         ...
         </dsig:Signature>
         <saml:Subject>
 <saml:NameID ...>alice@oracle.com</saml:NameID>
             ...
         </saml:Subject>         <saml:Conditions ...>
          ...
         </saml:Conditions>         <saml:AuthnStatement ...>
         ...
         </saml:AuthnStatement>
         <saml:AttributeStatement ...>
             <saml:Attribute Name="userid" ...>
                 <saml:AttributeValue ...>alice</saml:AttributeValue>
             </saml:Attribute>
             <saml:Attribute Name="lastname" ...>
                 <saml:AttributeValue ...>Appleton</saml:AttributeValue>             </saml:Attribute>
             <saml:Attribute Name="firstname" ...>
                 <saml:AttributeValue ...>Alice</saml:AttributeValue>
             </saml:Attribute>
         </saml:AttributeStatement>
     </saml:Assertion>
 </samlp:Response>
After a successful processing of the SAML 2.0 Assertion and the mapping of the incoming SSO response to a local user record, the AssertionProcessing plugin returns to OAM the AuthenticationContext with the following data:
The Subject containing:
oracle.security.am.common.utilities.principal.OAMUserPrincipalwith name set to alice (alice’s local userID)oracle.security.am.common.utilities.principal.OAMUserDNPrincipalwith name set to cn=alice,ou=users,dc=us,dc=oracle,dc=com (alice’s local DN)oracle.security.am.common.utilities.principal.OAMGUIDPrincipalwith name set to alice’s local GUID
The following CredentialParam instances contained in the Credential object of the AuthenticationContext
KEY_USERNAME_DNwith value set tocn=alice,ou=users,dc=us,dc=oracle,dc=com(alice’s local DN)
The following PluginResponse instances contained in the AuthenticationContext:
KEY_AUTHENTICATED_USER_NAMEwith string value set toalice(alice’s local userID), with type set to literalKEY_IDENTITY_STORE_REFwith string value set toIDStore(name of local OAM ID Store), with type set to literalfed.partnerwith string value set toacmeIdP(local IdP Partner name), with type set to sessionfed.nameidformatwith string value set tourn:oasis:names:tc:SAML:1.1:nameid-format:emailAddress, with type set to sessionfed.nameidvaluewith string value set to alice@oracle.com , with type set to sessionfed.attr.uidwith string value set to alice, with type set to session (the name of the attribute was mapped from userid to uid because of the IdP Attribute Profile)fed.attr.lastnamewith string value set to Appleton, with type set to sessionfed.attr.firstnamewith string value set to Alice, with type set to session
Custom Authentication Plugin
Overview
In this article, let’s assume that the OAM/SP deployment needs to support:
- Creation/provisioning of user accounts when the user is redirected to OAM/SP but does not have a local account: the newly created account is populated with the SAML 2.0 Assertion data
- Automatic updates of the user account so that the LDAP user attributes are refreshed with the latest SAML 2.0 Assertion data.
Using a Just-In-Time User Provisioning module that provides support for #1. To be able to meet the requirements for #2, a custom Authentication Plugin is needed that will:
- Be invoked after a successful processing of the
AssertionProcessingplugin - Examine the data extracted from the SAML 2.0 Assertion
- Connect to LDAP and eventually update the LDAP user attributes
For this example, the environment is made of:
-
OAM as a SAML 2.0 SP
-
The partner IdP is a SAML 2.0 IdP registered as acmeIdP in the OAM/SP server, and the IdP’s ProviderID/Issuer is http://acme.com/idp
-
The IdP sends a SAML 2.0 Assertion containing
-
NameIDof formaturn:oasis:names:tc:SAML:1.1:nameidformat:emailAddress, with the value being the user’s email address -
Three SAML Attributes
-
Name set to uid containing the userID
-
Name set to lastname containing the user’s last name
-
Name set to firstname containing the user’s first name
-
The IdP partner in OAM/SP is bound to an IdP Attribute Profile with only one entry, which maps the SAML Attribute Name uid to the OAM Session Attribute Name userid
The custom Authentication plugin is made of the following:
- One Java class extending the
oracle.security.am.plugin.authn.AbstractAuthenticationPlugInclass - A
MANIFEST.MFfile describing the Java classes - An XML file describing the plugin
Those three elements is bundled in a JAR file that is then uploaded to the OAM server via the OAM Administration Console. Once uploaded and activated modify the Federation Authentication Module.
Java Class
The class implementing the custom Authentication plugin must adhere to the following:
-
Extend the
oracle.security.am.plugin.authn.AbstractAuthenticationPlugInclass -
Implement the following methods:
-
public ExecutionStatusprocess (AuthenticationContext context) throwsAuthenticationException -
Must return a status (failure or success)
-
In this example, this method retrieves the Assertion data and the user DN Connect to LDAP and update the user record attributes based on the Assertion data
-
public String getPluginName()returns the name of the custom plugin In our example it returnsCustomAttributesUpdatePlugin -
public String getDescription()returns a description of the custom Authentication Plugin In our example it returnsCustom Attributes Update Plugin -
public Map<String, MonitoringData> getMonitoringData()Not used in an Authentication Plugin flow and in our example it returns null -
public boolean getMonitoringStatus()Not used in an Authentication Plugin flow In our example it returns false -
public int getRevision()must be the same value than the version specified in the manifest file In our example it returns 10 -
public void setMonitoringStatus(boolean status)Not used in an Authentication Plugin flow In our example this method will be empty
The following code is an example of the custom plugin.
package postsp;
 import java.util.Hashtable;
 import java.util.Map;
 import java.util.Set;
 import javax.naming.Context;
 import javax.naming.NamingException;
 import javax.naming.directory.Attributes;
 import javax.naming.directory.BasicAttribute;
 import javax.naming.directory.BasicAttributes;
 import javax.naming.directory.DirContext;
 import javax.naming.directory.InitialDirContext;
 import javax.security.auth.Subject;
 import oracle.security.am.common.utilities.principal.OAMUserDNPrincipal;
 import oracle.security.am.common.utilities.principal.OAMUserPrincipal;
 import oracle.security.am.plugin.ExecutionStatus;
 import oracle.security.am.plugin.MonitoringData;
 import oracle.security.am.plugin.PluginAttributeContextType;
 import oracle.security.am.plugin.PluginResponse;
 import oracle.security.am.plugin.authn.AbstractAuthenticationPlugIn;
 import oracle.security.am.plugin.authn.AuthenticationContext;
 import oracle.security.am.plugin.authn.AuthenticationException;
 public class CustomAttributesUpdatePlugin extends
 AbstractAuthenticationPlugIn
 {
   public ExecutionStatus process(AuthenticationContext context)
               throws AuthenticationException {
     // user's ID and DN. Note: we are not making necessary checks for size/null to
     // keep the sample code minimal.
     Subject subject = context.getSubject();
     Set<OAMUserPrincipal> principalsUserID =
               subject.getPrincipals(OAMUserPrincipal.class);
     Set<OAMUserDNPrincipal> principalsDN =
               subject.getPrincipals(OAMUserDNPrincipal.class);
     String localUserID =
 (String)principalsUserID.iterator().next().getName();
     String localUserDN = (String)principalsDN.iterator().next().getName();
     // get the assertion data. Note: We are not making necessary checks for size/null to
     // keep the sample code minimal.
     PluginResponse partnerResponse = context.getResponse(               PluginAttributeContextType.SESSION, "fed.partner");
     String partnerName = (String)partnerResponse.getValue();     PluginResponse nameIDResponse = context.getResponse(
               PluginAttributeContextType.SESSION, "fed.nameidvalue");
     String nameID = (String)nameIDResponse.getValue();
     PluginResponse uidResponse = context.getResponse(
               PluginAttributeContextType.SESSION, "fed.aLr.uid");
     String uid = (String)uidResponse.getValue();
     PluginResponse firstnameResponse = context.getResponse(
               PluginAttributeContextType.SESSION, "fed.aLr.firstname");
     String firstname = (String)firstnameResponse.getValue();     PluginResponse lastnameResponse = context.getResponse(
               PluginAttributeContextType.SESSION, "fed.aLr.lastname");
     String lastname = (String)lastnameResponse.getValue();
     try {
       // open ldap connection
       Hashtable env = new Hashtable();
       env.put(Context.INITIAL_CONTEXT_FACTORY,
 "com.sun.jndi.ldap.LdapCtxFactory");
       env.put(Context.PROVIDER_URL, "ldap://host:port");
       env.put(Context.SECURITY_PRINCIPAL, "admin");
       env.put(Context.SECURITY_CREDENTIALS, "password");       DirContext ldapContext = new InitialDirContext(env);
       // modify user ldap record. Note: We are not making the necessary checks to
       // keep the sample code minimal.
       Attributes attributes = new BasicAttributes();
       attributes.put(new BasicAttribute("givenname", firstname));
       attributes.put(new BasicAttribute("sn", lastname));
       attributes.put(new BasicAttribute("mail", nameID));
       attributes.put(new BasicAttribute("uid", uid));
       ldapContext.modifyAttributes(localUserDN,
                          DirContext.REPLACE_ATTRIBUTE, attributes);
     }
     catch (NamingException ex) {
       throw new AuthenticationException(ex);
     }
     // return success, so that OAM can resume the flow
     return ExecutionStatus.SUCCESS;
   }
   public String getPluginName() {
     return "CustomAttributesUpdatePlugin";
   }
   public String getDescription() {
     return "Custom Attributes Update Plugin";
   }
   public Map<String, MonitoringData> getMonitoringData() {
     return null;
   }
   public boolean getMonitoringStatus() {
     return false;
   }
   public int getRevision() {
     return 10;
   }
   public void setMonitoringStatus(boolean arg0) {
   } }
Plugin Registration File
The custom Authentication plugin must be defined in a plugin XML file such as:
<Plugin type="Authentication">
<author>uid=admin</author>
<email>admin@example</email>
<creationDate>08:00:00,2014-01-15</creationDate>
<description>Custom Attributes Update Plugin</description>
<conhguration>
</conhguration>
</Plugin>
Important Note: The XML file must have the same name as the class implementing the plugin, in this case CustomAttributesUpdatePlugin.xml
See the OAM Developer’s Guide for more information
Manifest File
Before packaging the custom Authentication plugin in a JAR file, a MANIFEST.MF must be defined such as: Manifest-Version: 1.0 Bundle-ManifestVersion: 2 Bundle-Name: CustomAttributesUpdatePlugin Bundle-SymbolicName: CustomAttributesUpdatePlugin Bundle-Version: 10 Bundle-Activator: postsp.CustomAttributesUpdatePlugin Import-Package: org.osgi.framework;version=”1.3.0”,oracle.security.am.plugin,oracle.security.am.plugin.authn,oracle.security.am.common.utilities.principal,javax.naming,javax.naming.directory,javax.security.auth Bundle-RequiredExecutionEnvironment: JavaSE-1.6
See the OAM Developer’s Guide for more information
Note: The manifest file must include the Import-Package property which lists all the packages that are used in the plugin
Building the Plugin
Compiling
The following JAR files from the OAM deployment need to be used for compilation:
- felix.jar
- oam-plugin.jar
- utilities.jar
These files are found in the following locations:
- felix.jar:
$IAM_HOME/oam/server/lib/plugin/felix.jar - oam-plugin.jar:
$IAM_HOME/oam/server/lib/plugin/oamplugin.jar - utilities.jar:
$IAM_HOME/oam/server/lib/plugin/utilities.jar
In this example, we put the CustomAttributesUpdatePlugin.java file in a src/postsp folder:
bash-4.1$ ls -l src/postsp/ total 4
-rw-r--r-- 1 root root 4377 Oct 1 09:54 CustomAttributesUpdatePlugin.java
To compile, execute the following command:
$JDK_HOME/bin/javac -cp $IAM_HOME/oam/server/lib/plugin /felix.jar:$IAM_HOME/oam/server/lib/plugin/oam-
plugin.jar:$IAM_HOME/oam/server/lib/plugin/utilities.jar src/postsp /\*.java
Packaging the Custom Plugin
We created the MANIFEST.MF in the current directory based on the content listed in the previous section, and the CustomAttributesUpdatePlugin.xml in the src directory, which contains the plugin definition listed in the previous section.
find
.
./MANIFEST.MF
./src
./src/userauthn
./src/userauthn/CustomAttributesUpdatePlugin.class
./src/userauthn/CustomAttributesUpdatePlugin.java
./src/CustomAttributesUpdatePlugin.xml
To create the CustomAttributesUpdatePlugin.jar JAR file that contains the plugin and the required files, execute the following command:
jar cfvm CustomAttributesUpdatePlugin.jar MANIFEST.MF -C src/ . added manifest adding: CustomAttributesUpdatePlugin.xml(in = 238) (out= 158)(deflated 33%) adding: postsp/(in = 0) (out= 0)(stored 0%) adding: postsp/CustomAttributesUpdatePlugin.java(in = 4377) (out= 1206)(deflated 72%) adding: postsp/CustomAttributesUpdatePlugin.class(in = 3726) (out= 1667)(deflated 55%)
This creates the CustomAttributesUpdatePlugin.jar. To view the contents of the file:
unzip -l CustomAttributesUpdatePlugin.jar Archive: CustomAttributesUpdatePlugin.jar
| Length | Date | Time | Name |
|---|---|---|---|
| 0 | 10-01-2014 | 10:04 | META-INF/ |
| 542 | 10-01-2014 | 10:04 | META-INF/MANIFEST.MF |
| 238 | 10-01-2014 | 09:11 | CustomAttributesUpdatePlugin.xml |
| 0 | 10-01-2014 | 09:59 | postsp/ |
| 4377 | 10-01-2014 | 09:54 | postsp/CustomAttributesUpdatePlugin.java |
| 3726 | 10-01-2014 | 09:54 | postsp/CustomAttributesUpdatePlugin.class |
| 8883 | 6 |
Important Note: The JAR file must have the same name as the class implementing the plugin, in this case
CustomAttributesUpdatePlugin.jar
Deploying the Custom Authentication Plugin
Perform the following steps to deploy the custom Authentication plugin in OAM:
- Go to the OAM Administration Console:
http(s)://oam-adminhost:oam-admin-port/oamconsole - Navigate to Access Manager, Plugins
- Click Import Plug-In
- Select the plugin JAR file (
CustomAttributesUpdatePlugin.jarin this example)
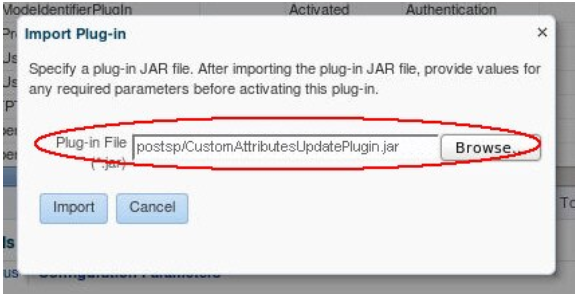
Description of the illustration Specifying_Plug-in_JAR_file.png
The plugin will be in an uploaded state:
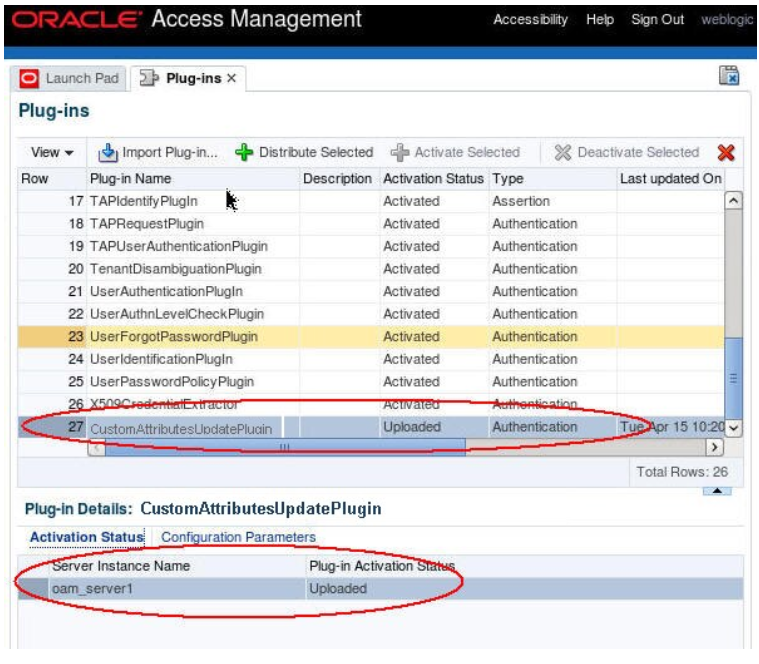
Description of the illustration Plug-in_loaded_Screen.png
You need to distribute the plugin to the runtime OAM servers and activate it:
- Select the plugin
- Click Distribute Selected The Activation Status tab of the plugin shows the state of the plugin
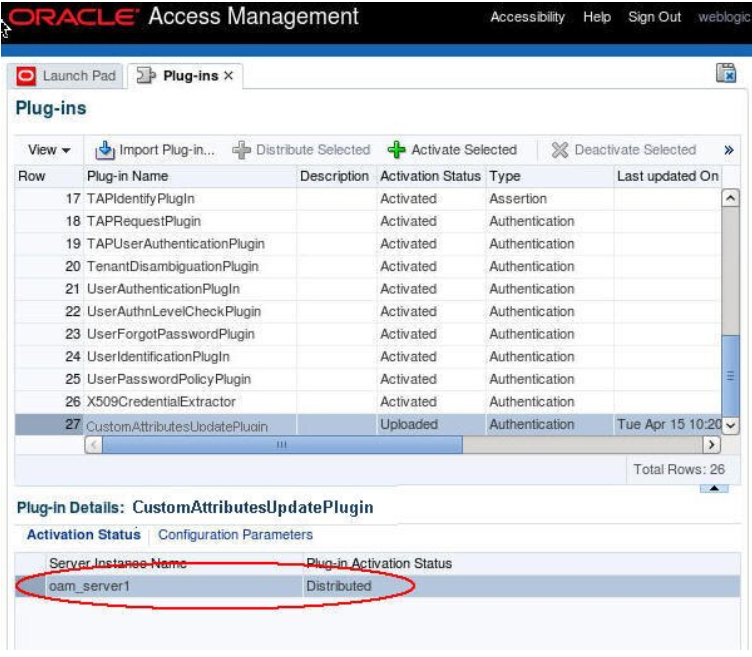
Description of the illustration Plug-in_Screen_with_Status.png
You need to activate the plugin:
- Select the plugin
- Click Activate Selected The Activation Status tab of the plugin shows the state of the plugin
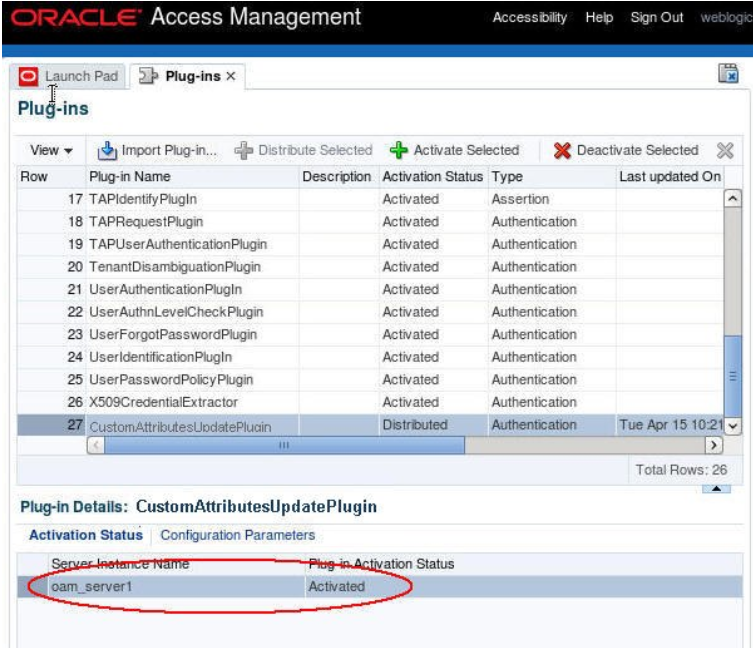
Description of the illustration Plug-in_Screen_with_Status_Activated.png
Creating the Authentication Module
Create a new Federation Authentication Module, based on the existing FederationPlugin Authentication Module, which differs from the existing one:
-
CustomAttributesUpdatePluginis the step invoked after a success result from theAssertionProcessingplugin -
Orchestration:
-
On Success will be mapped success
-
On Failure will be mapped to failure
-
On Error will be mapped to failure
Perform the following steps to create a new Authentication Module:
- Go to the OAM Administration Console:
http(s)://oam-adminhost: oam-admin-port/oamconsole - Navigate to Access Manager, Authentication Modules
- Click Create Authentication Module
- Select Create Custom Authentication Module
- Enter a Name (
CustomFedModulefor example)
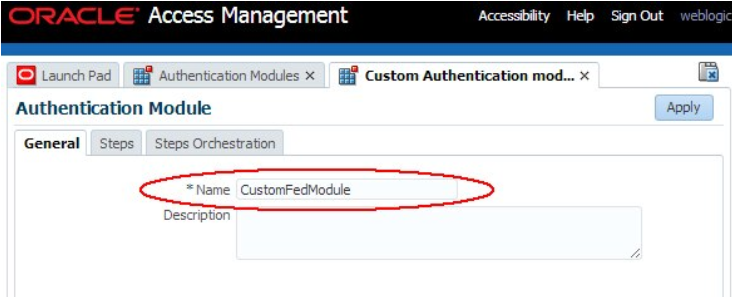
Description of the illustration Creating_Authentication_Module.png
Perform the following steps to add steps to the new Authentication Module:
- Click on the Steps tab
- Click Add to add the
FedAuthnRequestPluginstep: - Step name :
FedAuthnRequestPlugin - Plug-in Name :
FedAuthnRequestPlugin - Click OK
- Click Add to add the
AssertionProcessingstep: - Step name:
AssertionProcessing - Plug-in Name:
FedUserAuthenticationPlugin - Click OK
- Click Add to add the
AttributesUpdatestep: - Step name:
AttributesUpdate - Plug-in Name:
CustomAttributesUpdatePlugin - Click OK
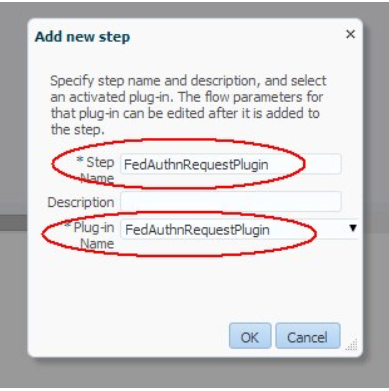
Description of the illustration Add_Authentication_Module.png
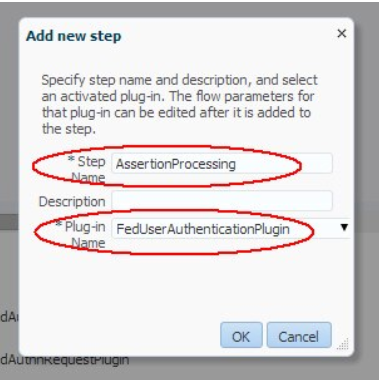
Description of the illustration Add_Assertion_Processing_Screen.png
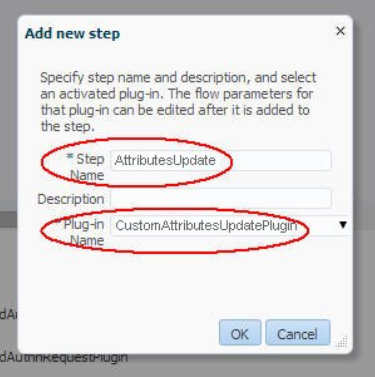
Description of the illustration Attributes_Update_Screen.png
The Steps tab shows:
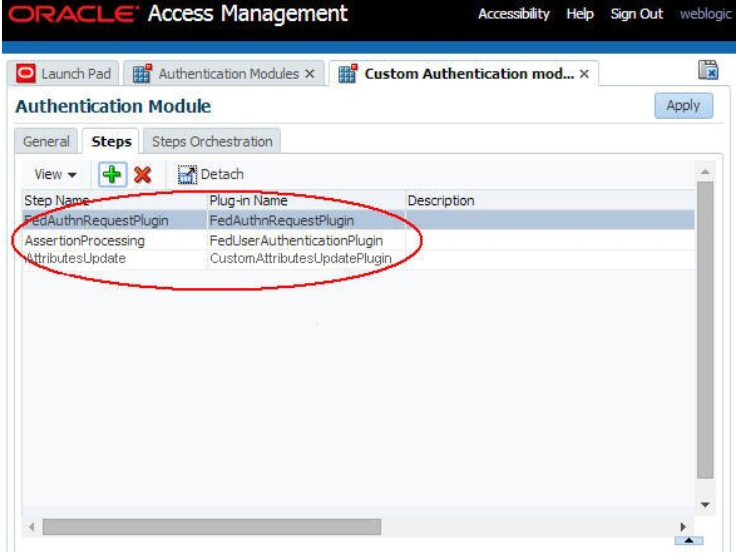
Description of the illustration Steps_Screen.png
Perform the following steps to define the steps orchestration for the new Authentication Module:
- Click on the Steps Orchestration tab Select
FedAuthnRequestPluginas the Initial Step ForFedAuthnRequestPlugin: - Select success for On Success
- Select
AssertionProcessingfor On Failure Select failure for On Error - For
AssertionProcessing: - Select
AttributesUpdatefor On Success - Select failure for On Failure Select failure for On Error
- For
AttributesUpdate: - Select success for On Success
- Select failure for On Failure
- Select failure for On Error
- Click Apply
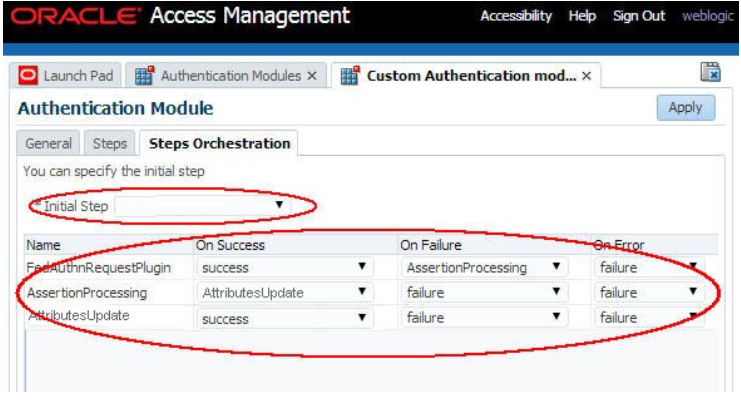
Description of the illustration Define_Orchestration_Screen.png
Authentication Scheme
Before being able to protect resources with an Authentication Policy that uses the new Authentication Module, a new Authentication Scheme needs to be created, referencing that new custom module. This is required, since the Authentication Policy is bound to an Authentication Scheme, not an Authentication Module. To create a new Authentication Scheme for that custom module, perform the following steps:
- Go to the OAM Administration Console:
http(s)://oam-adminhost:oam-admin-port/oamconsole - Navigate to Access Manager , Authentication Schemes
- Click Create Authentication Scheme
- Enter a name (for example
CustomFedScheme) and a description Set the Authentication Level to an acceptable value (2 in this example) - Select
FORMas the Challenge Method - Set the Challenge Redirect URL (in this example, we set it to
/oam/server/) - Select the newly created custom Authentication Module (
CustomFedModulein the example) - Set the Challenge URL (
/pages/servererror.jspin this example) - Set the Context Type (
customWarfor example) - Set the Context Value (
/oamhere, since we don’t use any pages) - Enter the following for the Challenge Parameters at least:
- initial_command =NONE
- is_rsa=true
- Click Apply
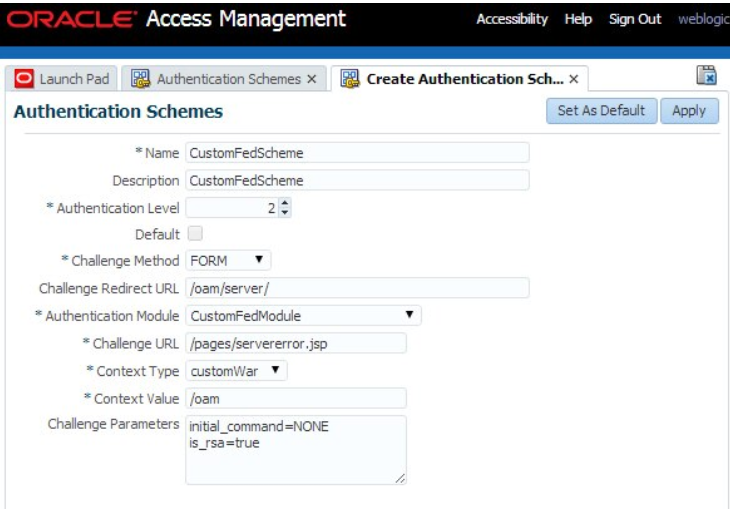
Description of the illustration Authentication_Schemes_Screen.png
Test
Protect a resource with an Authentication Policy using the newly created Authentication Scheme. This invokes the custom Authentication Module. Prior to the Federation SSO, the LDAP user record for alice at OAM/SP is:
dn: cn=alice,ou=users,dc=us,dc=oracle,dc=com
objectClass: person
objectClass: organizationalPerson
objectClass: inetOrgPerson
objectClass: top
givenName: al
title: manager
uid: alice
cn: alice
sn: APPLETON
userPassword:: e1NTSEE1MTJ9TXp0R2d0Si9GT1NzYUxvRXJqZW0rM1Q2eU5QMW9ZZmZ2Y3FkVWpaS1o1OFNGMy95ZDBueUxUbnllRi83SFRtS2JmOTJ0anY4TFd6di9UanliOGw4WFNQV1BxSnF3N mail: alice@oracle.com
After authentication, the IdP sends the following information for user alice in the SAML 2.0 Assertion:
- SAML Attributes:
- userID: alice
- lastname: Appleton
- firstname: Alice
- SAML NameID: alice@oracle.com
After Federation SSO, the CustomAttributesUpdatePlugin has to update alice’s LDAP record so that sn, givenname, uid and mail are set to the values from the SAML Assertion.
The LDAP user record for alice after the Federation SSO operation at OAM/SP is now:
dn: cn=alice,ou=users,dc=us,dc=oracle,dc=com
objectClass: person
objectClass: inetOrgPerson
objectClass: organizationalPerson
objectClass: top
givenName: Alice
title: manager
uid: alice
cn: alice
sn: Appleton
userPassword:: e1NTSEE1MTJ9TXp0R2d0Si9GT1NzYUxvRXJqZW0rM1Q2eU5QMW9ZZmZ2Y3FkVWpaS1o1OFNGMy95ZDBueUxUbnllRi83SFRtS2JmOTJ0anY4TFd6di9UanliOGw4WFNQV1BxSnF3N
mail: alice@oracle.com
More Learning Resources
Explore other labs on docs.oracle.com/learn or access more free learning content on the Oracle Learning YouTube channel. Additionally, visit education.oracle.com/learning-explorer to become an Oracle Learning Explorer.
For product documentation, visit Oracle Help Center.
Custom Post-Authentication Module in OAM and SP
F60230-01
September 2022
Copyright © 2022, Oracle and/or its affiliates.