Create SAML 1.1 and OpenID 2.0 SP Partners in OAM and IdP
This article covers how to set up a Federation agreement between OAM acting as an IdP and a remote SP Partner via the SAML 1.1 or OpenID 2.0 protocols:
- Set up a remote SAML 1.1 SP Partner
- Set up a remote OpenID 2.0 SP Partner
This article also describes how to perform the above tasks either via the UI, or via the use of the OAM WLST commands.
Establishing Federation Trust
Establishing Trust between Federation partners is a pre-requisite before being able to perform any Federation SSO operation between the Federation servers.
Trust establishment involves exchanging certificate information, if the protocol used relies on PKI X.509 certificates to secure message exchanges, as well as the locations/URLs of the services implementing the federation protocol.
SAML 1.1
OAM Administration Console
To create a new SAML 1.1 SP Partner, execute the following steps (ensure first that you have all the data from the SP partner, such as certificates, SP identifiers and URLs):
-
Go to the OAM Administration Console:
http(s)://oam-admin-host:oam-adminport/oamconsole -
Navigate to Identity Federation, Identity Provider Administration
-
Click on the Create Service Provider Partner button
-
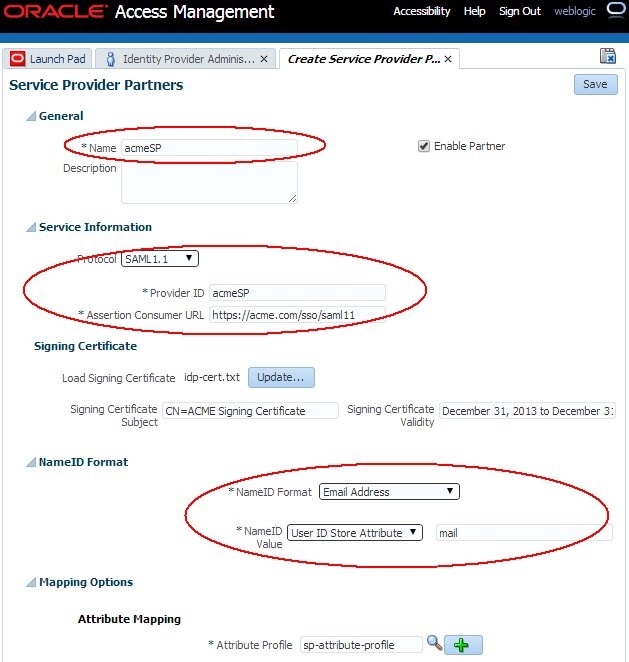
In the Create screen:
- Enter a name for the partner
- Select SAML 1.1 as the Protocol
- Enter the Issuer / ProviderID of the SP Partner. In case the SP Partner does not have an Issuer (if the partner is only an SP, and not and IdP and SP), enter the Assertion Consumer Service URL
- Enter the Assertion Consumer Service URL for that SP Partner: this is the URL where the user is redirected from IdP with the SAML Assertion.
- If the SP Partner signs SAML messages, upload the Signing Certificate file:
- either in PEM format (where the file contains as the first line —–BEGIN CERTIFICATE—–, then the certificate in Base64 encoded format, then the last line as —–END CERTIFICATE—–)
- or in DER format where the certificate is stored in binary encoding
- Enter how the
NameIDvalue will be set:- If selecting User ID Store Attribute, this means that the
NameIDvalue will be set to the LDAP Attribute specified in the field next to the drop down - If selecting Expression, this means that the
NameIDvalue will be set based on the expression specified in the field next to the drop down.
- If selecting User ID Store Attribute, this means that the
- Select the Attribute Profile that is used to populate the SAML Assertion with attributes.
-
Click Save

Description of the illustration OAM_Admin_Console.jpg
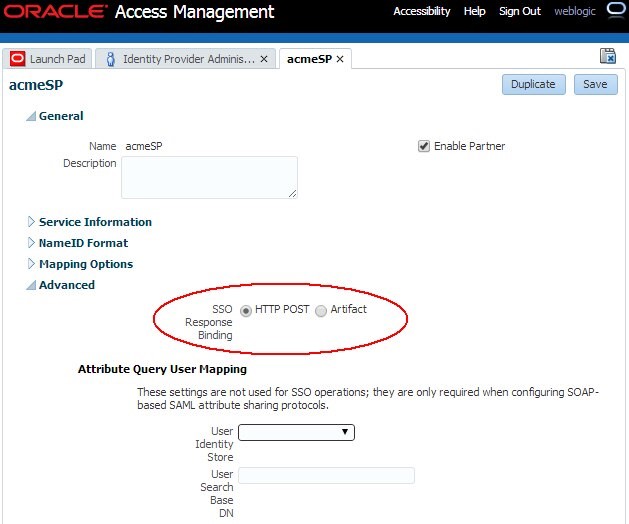
After the partner is created, the Edit Partner screen is shown with:
- The settings set in the previous screen modifiable
- An Advanced Settings section displayed:
- SSO Response Binding: how the Assertion should be sent to the SP, if the SP did not request any particular binding
Note: The Attribute Query User Mapping subsection is only relevant to the SAML Attribute Authority/Request bow, when the SAML Attribute Query exchange is exercised. This bow is not part of the Federation SSO bow.

Description of the illustration Edit_Partner_screen.jpg
WLST
To create a new SAML 1.1 SP Partner using the OAM WLST commands, execute the following steps (ensure first that you have all the data from the SP partner, such as certificates, SP identifiers and URLs):
-
Enter the WLST environment by executing:
$IAM_ORACLE_HOME/common/bin/wlst.sh -
Connect to the WLS Admin server:
connect() -
Navigate to the Domain Runtime branch:
domainRuntime() -
Create SAML 1.1 SP Partner that calls
acmeSPin OAM:addSAML11SPFederationPartner("acmeSP", "https://sp.com", "https://sp.com/saml11/sso" -
By default, the new SP partner will be configured to:
-
Use Email Address as the
NameIDformat -
User the mail LDAP user attribute as the
NameIDvalue -
Use HTTP-POST as the Default SSO Response Binding
-
Use the default Service Provider Attribute Profile No certificate has been uploaded for this SP partner
-
-
Exit the WLST environment:
exit()
Modifying Federation Settings via WLST
This section lists how to change the common SP Partner settings via the OAM WLST commands:
-
SAML Signing Certificate
-
SP Partner Attribute Profile for an SP Partner
-
SAML
NameIDsettings -
SAML SSO Request and Response bindings
We assume that you are already in the WLST environment and connected using:
-
Enter the WLST environment by executing:
$IAM_ORACLE_HOME/common/bin/wlst.sh -
Connect to the WLS Admin server:
connect() -
Navigate to the Domain Runtime branch:
domainRuntime()
SAML Signing Certificate
There are various WLST commands available to manage signing and encryption certificates:
-
getFederationPartnerSigningCert()which prints the partner’s signing certificate in Base64 encoded format:getFederationPartnerSigningCert("acmeSP","sp") -
With
acmeSPbeing the name of partner created earlier -
spindicates the partner typesetFederationPartnerSigningCert()which uploads the signing certificate file passed as a parameter to the SP Partner configuration:setFederationPartnerSigningCert("acmeSP","sp", "/tmp/cert.file") -
With
acmeSPbeing the name of partner created earlier -
spindicates the partner type the third parameter indicates the location on the file system of the file containing the certificate:- either in PEM format (where the file contains as the first line —–BEGIN CERTIFICATE—–, then the certificate in Base64 encoded format, then the last line as —–END CERTIFICATE—–)
- or in DER format where the certificate is stored in binary encoding
-
deleteFederationPartnerSigningCert()which removes the signing certificate from the SP partner entry:deleteFederationPartnerSigningCert("acmeSP","sp") -
With
acmeSPbeing the name of partner created earlier -
spindicates the partner type
SP Partner Attribute Profile
To configure the SP Partner Attribute Profile for a specific SP Partner, use the following commands:
-
To configure an SP Partner to use a specific SP Partner Attribute Profile, execute:
setSPPartnerAttributeProfile(partnerName, aZrProfileID) -
partnerNameis the name that was used to create the SP Partner -
attrProfileIDis the SP Partner Attribute Profile ID -
To list the existing the SP Partner Attribute Profiles, execute:
listSPPartnerAttributeProfileIDs()
SAML SSO Request and Response bindings
To configure the SAML bindings for a specific SP Partner, use the following commands:
-
To configure the SP partner, execute:
configureSAMLBinding(partnerName, partnerType, binding, ssoResponseBinding="httppost") -
partnerNameis the name that was used to create the SP Partner -
partnerTypeshould be set tospsince the partner is an SP -
binding: this only applies to SAML 2.0. Use
httppost -
ssoResponseBinding: The binding to use to send the SAML Assertion back to the SP;httppostfor HTTP-POST binding, or artifact for Artifact binding
SAML NameID Settings
To configure NameID settings for a SAML SP Partner:
Use the following command:
-
setSPSAMLPartnerNameID(partnerName, nameIDFormat, nameIDValue="", customFormat="", nameIDValueComputed="false") -
partnerNameis the name that was used to create the SP Partner -
nameIDFormat: possible values areorafed-emailaddressforurn:oasis:names:tc:SAML:1.1:nameidformat:emailAddressorafed-x509forurn:oasis:names:tc:SAML:1.1:nameidformat:X509SubjectNameorafed-windowsnamequalifierforurn:oasis:names:tc:SAML:1.1:nameidformat:WindowsDomainQualiQedNameorafed-unspecifiedforurn:oasis:names:tc:SAML:1.1:nameidformat:unspecifiedorafed-customfor a customNameIDformat that will be specified in thecustomFormatparameter
-
customFormatcontaining the format to be used, ifnameIDFormatwas set toorafed-custom -
nameIDValueComputed: this setting is for SAML 2.0 only. Set it to false.
OpenID 2.0
OAM Administration Console
To create a new OpenID 2.0 SP/RP Partner, execute the following steps (ensure first that you have all the data from the SP partner, such as SP/RP realm and URLs):
-
Go to the OAM Administration Console:
http(s)://oam-admin-host:oam-adminport/oamconsole -
Navigate to Identity Federation, Identity Provider Administration
-
Click on the Create Service Provider Partner button
-
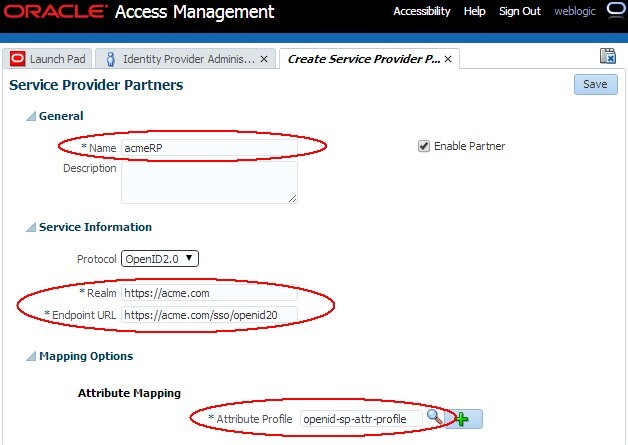
In the Create screen:
- Enter a name for the partner Select OpenID 2.0 as the Protocol Enter the realm of the RP/SP Partner.
- Enter the OpenID endpoint URL for that RP Partner: this is the URL where the user will be redirected from IdP with the OpenID Response.
- Select the Attribute Profile that is used to populate the OpenID Response with attributes.
-
Click Save.

Description of the illustration Create_SrProvider_Screen.jpg
After the partner is created, the Edit Partner screen is shown with the same information displayed in the Create Partner screen.
The OpenID 2.0 protocol mainly relies on user attributes being shared between the OP and the RP during the OpenID 2.0 SSO exchange. IdP achieves this via the SP Attribute Profile that indicates which attributes has to be added to the SSO response and how those attributes should be set.
WLST
To create a new OpenID 2.0 RP Partner using the OAM WLST commands, execute the following steps (ensure first that you have all the data from the SP partner, such as SP/RP realm and URLs):
-
Enter the WLST environment by executing:
$IAM_ORACLE_HOME/common/bin/wlst.sh -
Connect to the WLS Admin server:
connect() -
Navigate to the Domain Runtime branch:
domainRuntime() -
Create OpenID 2.0 RP Partner that will be called acmeRP in OAM:
addOpenID20SPFederationPartner("acmeRP", "https://sp.com", "https://sp.com/sso/openid20" -
By default, the new SP partner is configured to use the default Service Provider Attribute Profile
-
Exit the WLST environment:
exit()
Modifying Federation Settings via WLST
This section lists how to change the common SP Partner settings via the OAM WLST commands:
- SP Partner Attribute Profile for an SP Partner
we will assume that you are already in the WLST environment and connected using:
-
Enter the WLST environment by executing:
$IAM_ORACLE_HOME/common/bin/wlst.sh -
Connect to the WLS Admin server:
connect() -
Navigate to the Domain Runtime branch:
domainRuntime()
SP Partner Attribute Profile
To configure the SP Partner Attribute Profile for a specific SP Partner, use the following commands:
To configure an SP Partner to use a specific SP Partner Attribute Profile, execute:
setSPPartnerAttributeProfile(partnerName, attrProfileID)partnerNameis the name that was used to create the SP PartnerattrProfileIDis the SP Partner Attribute Profile ID- To list the existing the SP Partner Attribute Profiles, execute:
listSPPartnerAttributeProfileIDs()
More Learning Resources
Explore other labs on docs.oracle.com/learn or access more free learning content on the Oracle Learning YouTube channel. Additionally, visit education.oracle.com/learning-explorer to become an Oracle Learning Explorer.
For product documentation, visit Oracle Help Center.
Create SAML 1.1 and OpenID 2.0 SP Partners in OAM and IdP
F59900-01
September 2022
Copyright © 2022, Oracle and/or its affiliates.