Integrating Office 365 with OAM and Id Pre-Requisites
This article shows how to integrate OAM (11.1.2.2.0 or later) as an IdP with Office 365 for Federation SSO using the SAML 2.0 protocol.
The integration covers:
-
Browser Federation SSO integration: This is the flow the user exercises when accessing the www.office365.com resources via a browser:
-
The www.office365.com prompts the user to enter its email address
-
The server detects that Federation SSO should be used for that domain and starts a Federation SSO flow the IdP
-
IdP challenges the user, create a SAML Assertion and redirect the user to www.office365.com
-
www.office365.com grants access to the user
-
ActiveSync mail integration: in this flow, the user uses a mail application configured for Office 365
-
When the mail application is started, it sends the user’s credentials (email address and IdP password) to Office 365
-
www.office365.com makes a direct connection over SSL to the IdP and uses the SAML 2.0 ECP protocol to send a SAML AuthnRequest and the user’s credentials via HTTP Basic Authenticationwww.office365.com
-
The IdP validates those credentials and return a SAML Assertion via the ECP protocol
-
Office 365 grants access to the mail application
It is important to note that integration with Office 365 for non SAML 2.0 components will not work, such as:
-
Lync clients
-
OWA Mobile Apps
This article is based on
-
The testing performed
-
The Microsoft article regarding SAML 2.0 support for Office 365 and more specifically the technical document listing steps required to configure Office 365 (user management and Federation trust establishment):
-
Microsoft Blog
-
Technical document describing how to configure Office 365
Overview
In order to integrate with Office 365 using the SAML 2.0 protocol, OAM must be configured to use HTTPS/SSL as their endpoints with SSL certificates issued by well known CAs (if ActiveSync mail integration is required). Failure to do so might result in Office 365 not accepting the OAM SAML 2.0 Metadata when establishing Federation Trust.
Office 365 expects that all SAML messages is signed using the SHA-1 digest algorithm. As such, IdP must be configured to use SHA-1, otherwise Office 365 SP returns an error if SHA-256 is used. Also, Office 365 requires the IdP’s signing certificate to be included in the signed SAML Assertion; So OAM needs to be configured to include it in all outgoing signed message for Office 365.
If HTTP Basic Authentication is used at the IdP (as it is required for the ActiveSync mail integration), the WebLogic domain where OAM is running needs to be configured to not validate the HTTP Basic Authentication for unsecured resources.
In order to establish trust between the two Federation servers, the following data must be retrieved:
-
The Office 365 SP SAML 2.0 Metadata.
-
Since Office 365 does not support yet SAML 2.0 Metadata consumption, the following information must be collected:
-
The OAM IdP signing certificate in Base64 encoded format
-
The OAM IdP Issuer value
-
The OAM IdP SSO and Logout URLs
Finally in order to be able to establish Federation trust, the following needs to occur:
-
For a given user, both Office 365 and the directory used by
-
OAM must have an account for that user
-
The user global unique ID (or
ImmutableId) and the email address (orUserPrincipalName) used in the Office 365 account must be set in the user account at OAM -
For the ActiveSync mail integration, the identifier in the email address (or
UserPrincipalName) used by Office 365 must be the username used for HTTP Basic Authentication at OAM
Enabling SSL
Important note: The SSL certificate used to enable SSL for OAM must have been issued by well known CAs, since the Office 365 server attempts to make a direct connection to the OAM server for the ActiveSync use case.
There are several ways to enable SSL on the public endpoints for OAM:
-
If a load balancer is fronting OAM, SSL/HTTPS can be enabled/configured on the load balancer
-
If OHS is fronting OAM, OHS is configured for SSL
-
If no component is fronting OAM, then the WLS server where OAM is running can be configured for SSL/HTTPS
Once the component (Load balancer, OHS or WLS) has been configured for SSL, the OAM configuration needs to be updated to reference the new endpoint as its public URL:
-
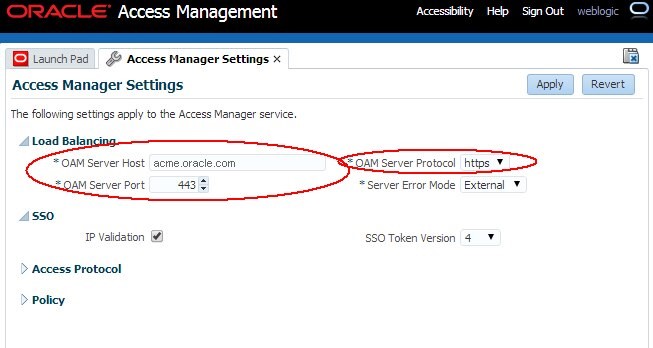
Go to the OAM Administration Console:
http(s)://oam-admin- host:oam-admin-port/oamconsole -
Navigate to Configuration , Access Manager Settings
-
Set the OAM Server Host to the hostname of the public endpoint
-
Set the OAM Server Post to the SSL port of the public endpoint
-
Set the OAM Server Protocol to https
-
Click Apply

Description of the illustration Access_Manager_Settings.jpg
Note: After making those changes, retrieving the OAM SAML 2.0 Metadata contains the new https URLs
HTTP Basic Authentication
By default, if a browser sends HTTP Basic Authentication credentials to OAM, the WLS server attempts to validate those before letting OAM process the request: this can result in authentication failures, particularly if the WLS domain was not configured with WLS LDAP Authenticators for each Identity Store created in OAM.
Note: Even if the WLS domain was configured correctly to have a WLS LDAP Authenticator for each Identity Store created in OAM, this results in two authentication operations, one by WLS, and the other one required by OAM to create an OAM session.
It is possible to disable the automatic validation of HTTP Basic Authentication credentials sent to unsecured applications in the WLS domain where OAM is running. See section “Understanding BASIC Authentication with Unsecured Resources” of the Oracle Fusion Middleware Programming Security for Oracle WebLogic Server guide for more information.
To disable the automatic validation of HTTP Basic Authentication credentials sent to unsecured applications in the WLS domain, execute the following steps:
-
Enter the WLST environment by executing:
$IAM_ORACLE_HOME/common/bin/wlst.sh -
Connect to the WLS Admin server:
connect() -
Start an edit session:
edit()startEdit() -
Navigate to the
SecurityConfigurationnode:cd('SecurityConfiguration') -
Navigate to the domain (replace DOMAIN_NAME with the name of the WLS domain where OAM is installed):
cd('DOMAIN_NAME') -
Set the
EnforceValidBasicAuthCredentialssetting to false to disableautomaticvalidation of HTTP Basic Authentication credentials sent to unsecured applications:set('EnforceValidBasicAuthCredentials','false') -
Save and activate the changes:
save()activate() -
Restart the servers in the WLS domain for the changes to take effect
SAML 2.0 Metadata, Certificate and Issuer
To download the SAML 2.0 Metadata from the Office 365 SP server:
-
Open a browser
-
Go to the Azure / Office 365 Metadata publishing service:
https://nexus.microsoftonline-p.com/federationmetadata/saml20/federationmetadata.xml -
Save the Metadata locally using the Save As button in the browser
The OAM IdP Signing Certificate must be provided as a Base64 encoded string to the Windows Powershell commands, as a single string with no spaces/line-breaks. To retrieve the OAM IdP Signing Certificate, perform the following operations to determine which keyID entry is used to sign outgoing SAML messages:
-
Go to the OAM Administration Console:
http(s)://oam-adminhost:oam-admin-port/oamconsole -
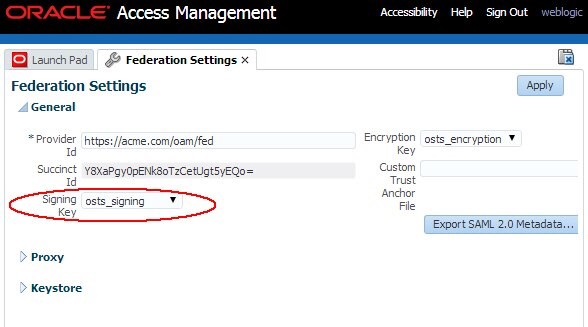
Navigate to Configuration , Federation Settings
-
Note the
keyIDof the Signing Key for SAML signature operations, in the Signing Key field

Description of the illustration Federation_Settings.jpg
Perform the following steps to retrieve the certificate for that keyID entry:
-
Open a browser
-
Go to the following URL (replace KEYENTRY_ID by the
keyIDname retrieved in the previous step): -
Save the certificate in a text file.
-
Open the file with your favorite text editor
-
The content of the file looks like:
-----BEGIN CERTIFICATE----- MIIB+DCCAWGgAwIBAgIBCjANBgkqhkiG9w0BAQQFADAhMR8wHQYDVQQDExZhZGMMHBjYy51cy5vcmFjbGUuY29tMB4XDTE0MDMwNDE5MjAzMloXDTI0MDMwMTE5MjAzMlowITEfMB0GA1UEAxMWYWRjMDBwY2MudXMub3JhY2xlLmNvbTCBnzANBgkqhkiG9w0BAQEFAAOBjQAwgYkCgYEAkQOdZCmoOQRuxSvI/74bjnUPq7u7qiGbmaN1D5TB JaM+j5XRixEUI3pidaxlbykaraqVBMJpXJ6ua0QWectv6SdzuqcvH8C5el06NxTs fB6pcvxHGXVAbAvtGr2tOPSL+5HaFQoATpiY3HugTnJfjmHRfOqIo8nUMek6zCtv rKUCAwEAAaNAMD4wDAYDVR0TAQH/BAIwADAPBgNVHQ8BAf8EBQMDB9gAMB0GA DgQWBBQ/7yJbGCbbAnaLEi4ReLwLlvSxJTANBgkqhkiG9w0BAQQFAAOBgQBrMb2i6zcChhVM7a9VVgBr8xljBsPxVWCAYNUYaoyUj9VkD4CpFF9hVX0CpceoSBTiyMQp 3sg0FAYz1PGfjrq7uFEq9iTCwa5J/7k/VSOLKd3IDqzz7w0ZERksgp3OOqOct/wB/wQplaoMZLcRoInVUbGTBDMfqmW5iZ/wjpzItg== —–END CERTIFICATE—– -
Remove the first line
(-----BEGIN CERTIFICATE-----), remove the last line(-----END CERTIFICATE-----), and modify the rest of the file to remove the line breaks. The result should be a single line file (the content was shortened): - Save the file. This line is provided as an input to the Windows Powershell command.
http://oam-runtime-host:oam-runtime-port/oamfed/idp/cert?id=<KEYENTRY_ID>
MIIB+DCCAWGgAwIBAgIBCjANBg....InVUbGTBDMfqmW5iZ/wjpzItg==
Perform the following steps to retrieve the IdP’s Issuer / Provider ID:
-
Go to the OAM Administration Console:
http(s)://oam-admin-host:oam-admin-port/oamconsole -
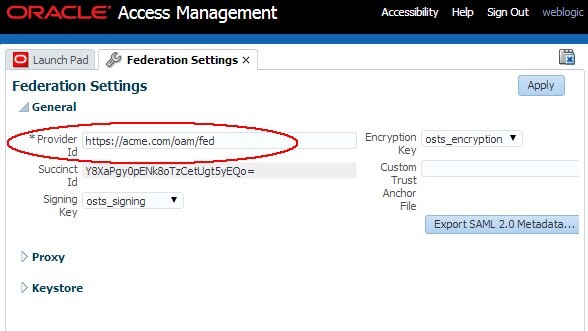
Navigate to Configuration , Federation Settings
-
Note the OAM Issuer/Provider ID value in the Provider Id field

Description of the illustration Retrieve_IDP.jpg
The OAM IdP SSO and Logout URLs are (Note: Be sure to have the public endpoints, which are the URLs that the end-user uses):
-
Browser SSO URL:
http(s)://oam-public-host:oam-publicport/oamfed/idp/samlv20 -
ECP SSO URL:
http(s)://oam-public-host:oam-publicport/oamfed/idp/soap -
Logout URL:
http(s)://oam-public-host:oam-publicport/oamfed/idp/samlv20
If you have any doubts, you can retrieve those URLs from the IdP metadata:
-
Open a browser
-
Go to
http(s)://oam-public-host:oam-public-port/oamfed/idp/metadata -
The Browser SSO URL will be the Location attribute of the XML
	 Element EntityDescriptor , IDPSSODescriptor , SingleSignOnService for which the Binding attribute is set to urn:oasis:names:tc:SAML:2.0:bindings:HTTP-Redirect:
           <md:EntityDescriptor ...>
				...
				<md:IDPSSODescriptor ...>
					...
					<md:SingleSignOnService>
						Binding="urn:oasis:names:tc:SAML:2.0:bindings:HTTPRedirect" Location="https://acme.com/oamfed/idp/samlv20"/>
					...
				</md:IDPSSODescriptor>
				...
			</md:EntityDescriptor>
-
The ECP SSO URL will be the Location attribute of the XML
Element EntityDescriptor , IDPSSODescriptor , SingleSignOnService for which the Binding attribute is set to urn:oasis:names:tc:SAML:2.0:bindings:SOAP: <md:EntityDescriptor ...> ... <md:IDPSSODescriptor ...> ... <md:SingleSignOnService> Binding="urn:oasis:names:tc:SAML:2.0:bindings:SOAP"Location="https://acme.com/oamfed/idp/soap"/> ... </md:IDPSSODescriptor> ... </md:EntityDescriptor> -
The Logout URL will be the Location attribute of the XML
  Element EntityDescriptor , IDPSSODescriptor , SingleLogoutService for which the Binding attribute is set to urn:oasis:names:tc:SAML:2.0:bindings:HTTP-Redirect:
		<md:EntityDescriptor ...>
			...
				<md:IDPSSODescriptor ...>
					...
						<md:SingleLogoutServiceBinding="urn:oasis:names:tc:SAML:2.0:bindings:HTTPRedirect" Location="https://acme.com/oamfed/idp/samlv20"ResponseLocation="https://acme.com/oamfed/idp/samlv20"/>
					...
				</md:IDPSSODescriptor>
			...
		</md:EntityDescriptor>
SHA-256 vs SHA-1
After having setting up Federation between OAM and Office 365, you must configure OAM to use SHA-1 for signatures for the Office 365 SP partner.
OAM’s Signing Certificate in Signe Messages
After having setting up Federation between OAM and Office 365, you must configure OAM so that the Federation server includes its X.509 signing certificate in all outgoing signed SAML messages for the Office 365 SP partner.
User Account
The user accounts in Office 365 and in the OAM directory must be synchronized to support the various Federation flows (Browser SSO and ActiveSync):
-
For a given user, both Office 365 and the directory used by OAM must have an account for that user
-
The user global unique ID (or
ImmutableId) and the email address (orUserPrincipalName) used in the Office 365 account must be set in the user account at OAM -
For the ActiveSync mail integration, the
userID(orImmutableId) used by Office 365 must be the username used for HTTP Basic Authentication at OAM: -
The identifier in the email address (or
UserPrincipalName) is the part of the email address before the@character. For example if theUserPrincipalNameis alice.appleton@acme.com, then the identifier isalice.appleton -
That identifier is the HTTP Basic Authentication username. For example
alice.appleton -
The User ID Attribute used in the OAM Identity Store configuration for the OAM HTTP Basic Authentication Scheme must match the incoming HTTP HTTP Basic Authentication username. For example the User ID Attribute used in the OAM Identity Store for user alice must be alice.appleton.
ImmutableId
The ImmutableId is an attribute used by Office 365 to uniquely reference a user. Even if the user record is to be deleted later on, no other user created subsequently should be able to have the same ImmutableId value.
An ImmutableId is typically
-
A random unique identifier (like 2848cfc7f6914af2a550c024bcbf0c6e)
-
Or a username that is deemed unique: no other user will have the same username even if the original user has been deleted from the system.
UserPrincipalName
The UserPrincipalName (or UPN) is an identifier that has the format of an email address. The domain name of the email address needs to map to the name used in the Office 365 domain.
For example, if Office 365 was configured for the acme.com domain for Federation SSO, then all users with an email address similar to identiSer@acme.com will be able to do Federation SSO with the IdP configured for that Office 365 domain.
ActiveSync Requirements
In an ActiveSync mail flow:
-
The Office 365 mail server makes a direct connection over SSL to the IdP and uses the SAML 2.0 ECP protocol to send a SAML AuthnRequest and the user’s credentials via HTTP Basic Authentication
-
The IdP validates those credentials and return a SAML Assertion via the ECP protocol
-
Office 365 grants access to the mail application
In such a flow, the user will:
-
Provide its email address to Office 365 (alice.appleton@acme.com for example)
-
Office 365 uses the identifier before the ‘@’ character as the HTTP Basic Authentication username (alice.appleton for example)
-
IdP must be able to validate the credentials with the username being the identifier in the email address (alice.appleton for example)
Username Requirements
Based on the above, the requirements for the user authentication at the IdP are:
| Browser |
Authentication Username |
HTTP Basic Auth Username at IdP |
|---|---|---|
| Browser based Federation SSO | Anything | N/A |
Browser based Federation SSO + ActiveSync ECP |
Anything | Identifier in the email address |
More Learning Resources
Explore other labs on docs.oracle.com/learn or access more free learning content on the Oracle Learning YouTube channel. Additionally, visit education.oracle.com/learning-explorer to become an Oracle Learning Explorer.
For product documentation, visit Oracle Help Center.
Integrating Office 365 with OAM and Id Pre-Requisites
F60937-01
September 2022
Copyright © 2022, Oracle and/or its affiliates.