Key and Certificate Management and Rollover in OAM and STS
Introduction
As part of the Federation and WS-Trust protocol interaction, OAM/OSTS need to use PKI Keys and Certificates for non repudiation and integrity via the use of digital signatures and confidentiality via digital encryption.
This article discusses about the Keys and Certificates management, including how to:
-
Generate new keys and certificates
-
Configure OAM and OSTS to use the new keys and certificates
-
Implement a key rollover on a per partner basis
-
Distribute the new certificates to partners
In a Federation/WS-Trust exchange, the following occurs:
-
OAM/OSTS uses its own PKI Keys and Certificates to perform signature and decryption operations on the SAML messages
-
Sign outgoing SAML messages and Assertions (XML Digital signatures or Query String signatures)
-
Decrypt incoming SAML Assertions (XML Digital encryption)
-
OAM/OSTS uses the partner’s signing or encryption certificate to:
-
Verify signatures on incoming SAML messages and Assertions (XML)
-
Optionally encrypt outgoing SAML Assertions (XML Digital encryption)
Example of SAML Messages with XML Digital Signatures:
 <samlp:Response ...>
   <saml:Issuer>https://idp.com</saml:Issuer>
   <samlp:Status>...</samlp:Status>
   <saml:Assertion ...>
     <saml:Issuer>https://idp.com</saml:Issuer>
     <ds:Signature xmlns:ds="http://www.w3.org/2000/09/xmldsig#">
       <ds:SignedInfo>
         <ds:CanonicalizationMethod Algorithm="http://www.w3.org/2001/10/xml-excc14n#"/>
         <ds:SignatureMethod Algorithm="http://www.w3.org/2000/09/xmldsig#rsasha1"/>
         <ds:Reference URI="#idhmf9KzAhxleuJ-L3vaVr979Ffa0">
           <ds:Transforms>
             <ds:Transform Algorithm="http://www.w3.org/2000/09/xmldsig#envelopedsignature"/>
             <ds:Transform Algorithm="http://www.w3.org/2001/10/xml-exc-c14n#"/>           </ds:Transforms>
         <ds:DigestMethod Algorithm="http://www.w3.org/2000/09/xmldsig#sha1"/>
           <ds:DigestValue>JGvBqil/NXa6dlMOn5ZhmBbOie8=</DigestValue>
         </ds:Reference>
       </ds:SignedInfo>

 <ds:SignatureValue>VgOrU79ZJO4rzHiFTCDCGNmkb0...Y776QM4vEBBybIpbCCUih7I0aA==
 </ds:SignatureValue>
     </ds:Signature>
     <saml:Subject>
       <saml:NameID>alice@acme.com</saml:NameID>
       ...
     </saml:Subject>
     ...
     </saml:Assertion>
 </samlp:Response>
Example of SAML Messages with query string signature (typically used by an SP to send the user to the IdP with an AuthnRequest):
https://idp.com/saml20sso?SAMLRequest=hZJRT8IwFIX%2FStP3sW5BTW7YEhRREtQFplHeytZBQ9fW3i7Kv3cUTdAHfL09t985J3eEvFUV47wR68tkqjRAeMto5DYajRNC8FQi%2BguX4YQ7pgIF1xpvKKEom%2FZ7U3EujM7r13iLEsaztoDItJVPjKhEQGW24QkHJbLtTFyuuS7bbsLVcpK92OmdN8XYb9SLETsw0eq59RlOWDCOWRikrkytIhsAuV5QU3x6upa6l3pw3vD6KEO7LsoiKp2VJyYtDrEhgN1JEee%2F5YjCHbKHqC335%2BWHSZ%2B9CVIQ2ku%2Fp%2FlPaxhKG8UnRo6uLDz2i7NJYZSs9mSslPm4cYJ7kVkf%2BCdRisq2UhR0zg%2FQn9fQ%2F4F&RelayState=id-mAK1whfUGrvoLqqhU2ysXLWSIw-&SigAlg=http%3A%2F%2Fwww.w3.org%2F2000%2F09%2Fxmldsig%23rsa-sha1&Signature=S5TZ0uwK9SMZUgBfDaipbNhlLqbbSG9t4rgA9n3%2FwxFsK7H66IoK6G%2BDfaIUvc5bLtTrwmxsa2iB2gjFx8pQ6%2FgH8OtFbT7mKZ7z8FihgxxTKjHJ2FQocOEn%2FrkcRKAAq%2Blig5xVSlR%2BzLq1vkQzIMNOrfLw%2FM6uk3i%2Fk
SAMLRequest: SAML AuthnRequest message
RelayState: SAML 2.0 Relay State parameter
SigAlg: signature algorithm
Signature: signature bytes covering SAMLRequest, RelayState and SigAlg parameters
The OAM/OSTS PKI keys and certificates are stored in the $DOMAIN_HOME/config/fmwconfig/.oamkeystore Java Keystore file (Note: This keystore is of type JCEKS, not JKS), and the OAM/OSTS settings reference the key entries from the .oamkeystore, so that they can be used by the components for SAML operations.
Install
During the installation phase of OAM, a key pair and self signed certificate is generated and OAM/OSTS is configured to use it for signing and decryption operations.
-
The OAM installer creates the .oamkeystore with a random password (see the “Setting new key entries” section on how to reset that password)
-
A new key entry called
stsprivatekeyaliasis created -
RSA Key Pair
-
Self signed certificate
-
Subject and Issuer set to:
cn=\<MACHINE_HOSTNAME\> -
Two entries are created in the OAM/OSTS configuration:
-
osts_signingreferencing thestsprivatekeyaliasKey Entry in the .oamkeystore -
osts_encryptionreferencing thestsprivatekeyaliasKey Entry in the .oamkeystore -
OAM is set up to use
osts_signingentry for signature operations andosts_encryptionfor decryption operations -
OSTS is set up to use
osts_encryptionfor decryption operations, andosts_signingfor signature operations in the SAML Issuance Templates
Setting new key entries
The process of creating new PKI Keys and Certificates before using them in OAM/OSTS is two-fold:
-
Creating the key entry in the
.oamkeystore -
Creating the entry in OAM/OSTS to reference the key entry in
.oamkeystore
Note: the keys and certificates need to be stored in the .oamkeystore; HSM are not supported.
Creating a new Key Entry in the .oamkeystore
As mentioned previously, the password of the .oamkeystore Keystore is unknown to the administrator, and it needs to be reset in order to make modifications. This operation is done via a WLST command:
-
Enter the WLST environment by executing:
$IAM_ORACLE_HOME/common/bin/wlst.sh. -
Connect to the WLS Admin server:
connect(). -
Navigate to the Domain Runtime branch:
domainRuntime(). -
Reset the .oamkeystore password:
resetKeystorePassword(). -
Exit the WLST environment:
exit().
One way to create a new key entry in the .oamkeystore is to use the JDK’s KeyTool application. In this example, two key entries with self signed certificates is created, one with the alias samlsigning and the other with the alias samlencryption (replace $JDK_HOME and $DOMAIN_HOME by the correct path; for the keystore password enter the one you selected during the reset operation):
$JDK_HOME/bin/keytool -genkeypair -alias samlsigning -keyalg RSA -keysize 2048-sigalg sha1withrsa -dname cn="ACME SAML Signing" -validity 1000 -keystore $DOMAIN_HOME/config/fmwconfig/.oamkeystore -storetype JCEKS
$JDK_HOME/bin/keytool -genkeypair -alias samlencryption -keyalg RSA -keysize 2048 -sigalg sha1withrsa -dname cn="ACME SAML Encryption" -validity 1000-keystore $DOMAIN_HOME/config/fmwconfig/.oamkeystore -storetype JCEKS
Updating OAM/OSTS settings
Once the key entries have been created in the .oamkeystore, new SAML key entries must be created in OAM/OSTS before those keys can be used during SAML protocol exchanges.
To create a new SAML key entry in OAM/OSTS:
-
Go to the OAM Administration Console:
http(s)://oam-admin-host:oam-adminport/oamconsole. -
Navigate to Configuration , Federation Settings or Security Token Service Settings.
-
Create a new entry:
-
In the Keystore section, click the “+” button.
-
Enter a KeyID for the new entry (for example
saml-signing). -
Select the alias for the new key entry from the dropdown which lists the key entries in the .oamkeystore (for example
samlsigning). -
Enter the password for the key entry that you set when creating that key in the previous section.
-
Repeat the process for other entries if needed.
-
-
Click Apply.
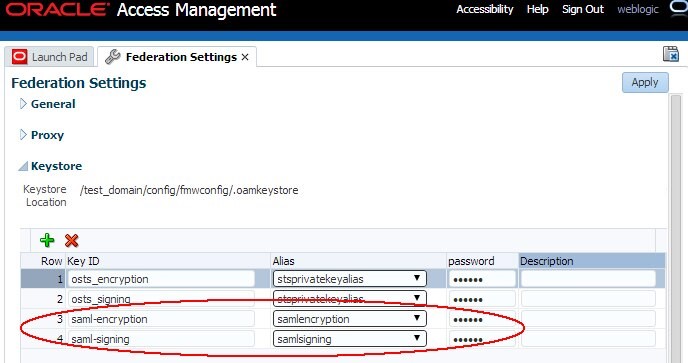
Description of the illustration Federation_Settings.jpg
Note: Different key IDs can reference the same key entry in the OAM Keystore
Using new key entries
Global Settings
To update the global OAM settings to use new keys and certificates to sign and decrypt SAML messages, perform the following operations:
-
Go to the OAM Administration Console:
http(s)://oam-admin-host:oam-admin-port/oamconsole. -
Navigate to Configuration , Federation Settings.
-
Select the Signing Key from the dropdown list of key entries (these entries are defined in the Keystore section). For example select
saml-signing. -
Select the Encryption Key from the dropdown list of key entries (these entries are defined in the Keystore section). For example select
saml-encryption. -
Click Apply.
Note: After applying, you might need to redistribute certificates and/or SAML 2.0 Metadata to partners)
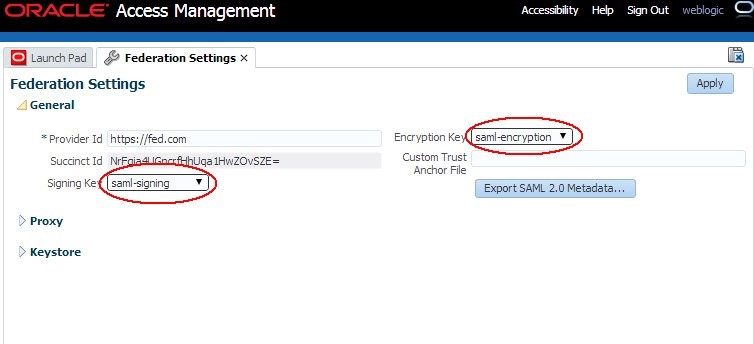
Description of the illustration Global_Settings.jpg
To update the global OSTS settings to use new keys and certificates to decrypt SAML messages, perform the following operations:
-
Go to the OAM Administration Console:
http(s)://oam-admin-host:oam-adminport/oamconsole. -
Navigate to Configuration , Security Token Service Settings.
-
Select the Default Encryption Template from the dropdown list of key entries (these entries are defined in the Keystore section). For example select
samlencryption. -
Click Apply.
Note: After applying, you might need to redistribute certificates to partners
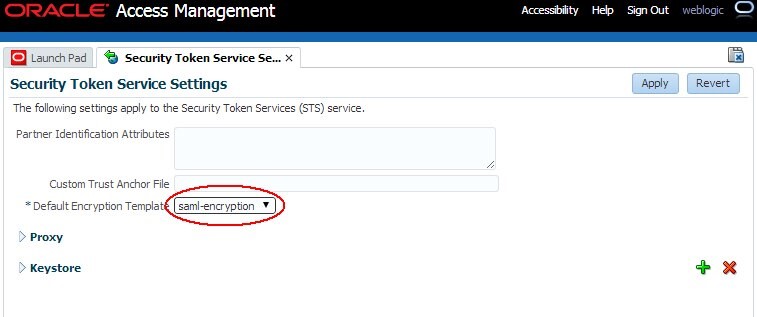
Description of the illustration Security_Token_Service_Settings.jpg
To update the OSTS settings to use new keys and certificates to sign SAML messages, perform the following operations:
-
Go to the OAM Administration Console:
http(s)://oam-admin-host:oam-admin- port/oamconsole. -
Navigate to Security Token Service , Token Issuance Templates.
-
Click on the SAML Issuance Template you want to update.
-
Click on the Security tab.
-
Select the Signing Keystore Access Template Id from the dropdown list of key entries (these entries are defined in the Keystore section). For example select
saml-signing. -
Click Apply.
Note: After applying, you might need to redistribute certificates to partners
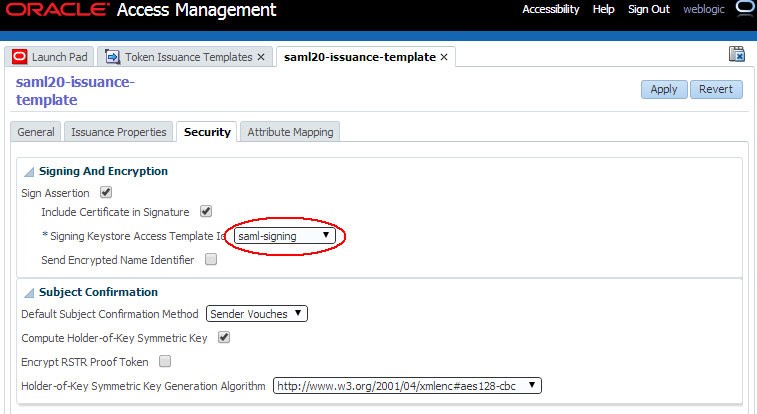
Description of the illustration Issuance_Template.jpg
Key Rollover per Partner
When an OAM/OSTS deployment is involved with numerous partners, it might be difficult to change the global signing/encryption keys/certificates at once, since this requires notifying all the partners at the same time of the changes, and having them update their configuration with the new certificates/SAML 2.0 metadata.
Note: After updating the keys/certificates in OAM/OSTS, the Federation/WS-Trust flows will not work with the partners until they upload the new certificates in their system.
OAM/OSTS provides an easy way to perform a key rollover on a per partner basis, thus allowing the OAM administrator to plan how and when to notify specific partners of the key and certificates change.
-
Performing key rollover for OAM IdP or SP partners involve:
-
Setting up new keys and certificates as explained in the previous section.
-
Updating the IdP or SP partner configuration in OAM to use the new keys and certificates.
-
Notifying the partner with new SAML 2.0 Metadata specifically generated with those new keys/certificates Or new certificates corresponding to the new key entries.
-
-
Performing key rollover for OSTS Relying Party partners involve:
-
Setting up new keys and certificates as explained in the previous section If not already one.
-
Creating a new Relying Party Profile, which would be a copy of the current Relying Party Profile used by the Relying Party partner.
-
Creating a new SAML Issuance Template, copy of the SAML Issuance Template referenced by the currently Relying Party Profile used by the Relying Party partner.
-
Update the new Relying Party Profile to use the new SAML Issuance Template instead of the current one.
-
-
Update the new SAML Issuance Template to use the new keys/certificates
-
Assign the Relying Party partner to the new Relying Party Profile
Note: OAM key rollover can be done via a group of partners by using Partner Profiles in the OAM configuration.
OAM Key Rollover
When performing a key rollover for a specific partner, you first need to update the IdP or SP Partner configuration in OAM via a WLST command:
-
Enter the WLST environment by executing:
$IAM_ORACLE_HOME/common/bin/wlst.sh. -
Connect to the WLS Admin server:
connect(). -
Navigate to the Domain Runtime branch:
domainRuntime(). -
Update the partner configuration to set the Signing Key property (referenced by
signingkeystoreaccesstemplateid) to the key entry ID defined in the Federation Settings , Keystore section (in this example,saml-signingis the key entry ID; replace<PARTNER_NAME>by the name of the partner in OAM; replace<IDP_OR_SP>by IDP or SP, the type of partner): - Update the partner configuration to set the Encryption Key property (referenced by
encryptionkeystoreaccesstemplateid) to the key entry ID defined in the Federation Settings , Keystore section (in this example, saml-encryption is the key entry ID; replace<PARTNER_NAME>by the name of the partner in OAM; replace<IDP_OR_SP>by IDP or SP, the type of partner): - Exit the WLST environment:
exit().
updatePartnerProperty("<PARTNER_NAME>", "<IDP_OR_SP>","signingkeystoreaccesstemplateid", "saml-signing", "string")
updatePartnerProperty("<PARTNER_NAME>", "<IDP_OR_SP>", "encryptionkeystoreaccesstemplateid", "saml-encryption", "string")
Once the partner configuration has been updated, the partner needs to use the SAML 2.0 metadata or certificate information. To generate this information:
-
If you need to provide SAML 2.0 metadata for the new signing and encryption key, open a browser and use the following URL to generate the metadata
http://oam-runtime-host:oam-runtime-port/oamfed/idp/metadata?signid=<SIGN_KEYENTRY_ID>&encid=<ENC_KEYENTRY_ID>. -
The
signidquery parameter contains the key entry ID for the signing certificate. -
Replace
<SIGN_KEYENTRY_ID>. -
The
encidquery parameter contains the key entry ID for the encryption certificate. Replace<SIGN_KEYENTRY_ID>An example is:http://oam.com/oamfed/idp/metadata?signid=saml-signing&encid=samlencryption. -
If you need to provide the certificate file for the new key, open a browser and use the following URL to generate the certificate in PEM format:
http://oam-runtime-host:oam-runtime-port/oamfed/idp/cert?id=<KEYENTRY_ID>. -
The id query parameter contains the key entry ID for the certificate.
-
Replace
<KEYENTRY_ID>.
An example is: http://oam.com/oamfed/idp/cert?id=saml-signing
Note: You can first generate the SAML 2.0 Metadata/Certificate and provide it to the partner before updating the partner configuration.
OSTS Key Rollover
To explain OSTS key rollover, take an example of:
-
Three Relying Party partners: RP1, RP2 and RP3
-
Two Relying Party Profiles:
RPprofileAandRPprofileB, with RP1 and RP2 usingRPprofileAand RP3 usingRPprofileB -
Two SAML 2.0 Issuance Templates,
SAMLIssuanceAreferenced byRPprofileAandSAMLIssuanceBreferenced byRPprofileB
The rollover consists of switching the RP1 first, then RP2, then RP3, to have those partners use the new saml-signing certificate.
To switch RP1, the following operations must be performed:
-
Go to the OAM Administration Console:
http(s)://oam-admin-host:oam-admin- port/oamconsole. -
Navigate to Security Token Service , Partner Profiles , Relying Party Profiles.
-
Create a new Relying Party Profile called
NewRPprofileA, copy ofRPprofileA. -
Navigate to Security Token Service , Token Issuance Templates.
-
Create a new SAML Issuance Template called
NewSAMLIssuanceA, copy ofSAMLIssuanceA. -
Update
NewRPprofileAto referenceNewSAMLIssuanceASAML 2.0 Issuance Template. - Update
NewSAMLIssuanceASAML 2.0 Issuance Template in the Security tab to use the new key entry. -
Navigate to Security Token Service , Partners , Relying Parties.
-
Open RP1 and configure it to use the
NewRPprofileARelying Party Profile: from then on, OSTS uses the new key entrysaml-signingto sign outgoing SAML 2.0 Assertions for the RP1 Relying Party partner. - Download the new certificates from OSTS by opening a browser and use the following URL to generate the certificate in PEM format.
-
The id query parameter contains the key entry ID for the certificate.
-
Replace
<KEYENTRY_ID>. - Provide the certificate to the partner.
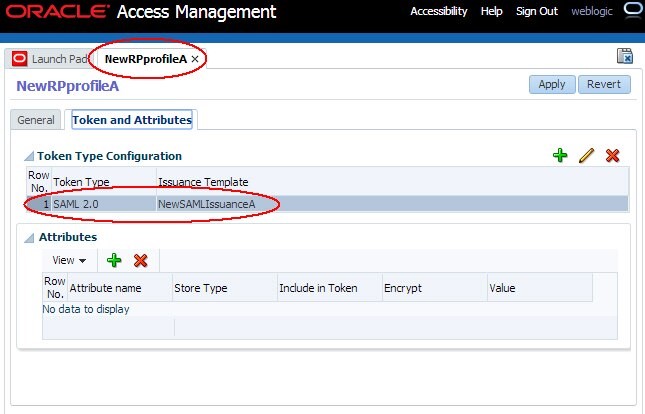
Description of the illustration New_RPProfile_A.jpg
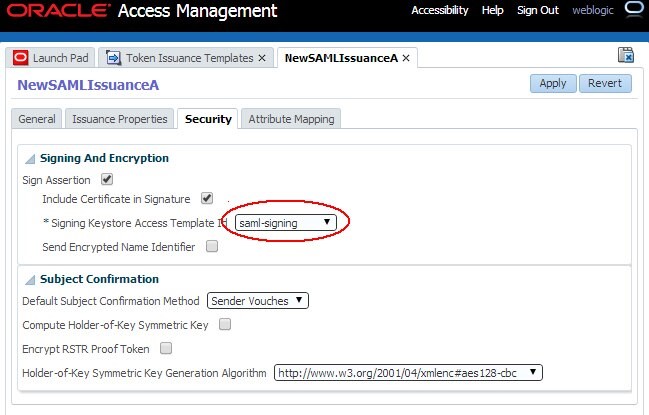
Description of the illustration New_SAMLIssuanceA.jpg
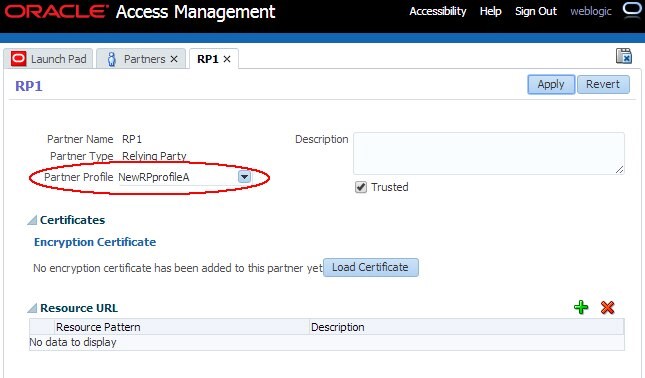
Description of the illustration Configure_RP1.jpg
http://oam-runtime-host:oam-runtime-port/sts/servlet/samlcert?id=<KEYENTRY_ID>
An example is: http://oam.com/sts/servlet/samlcert?id=saml-signing
Switching RP2 to the new certificate will be faster, since the new Relying Party profile and SAML Issuance Template have already been created.
To switch RP2, the following operations must be performed:
-
Go to the OAM Administration Console:
http(s)://oam-admin-host:oam-adminport/oamconsole. -
Navigate to Security Token Service , Partners , Relying Parties.
-
Open RP1 and configure it to use the
NewRPprofileARelying Party Profile: from then on, OSTS uses the new key entrysaml-signingto sign outgoing SAML 2.0 Assertions for the RP1 Relying Party partner. -
Provide the certificate to the partner.
Switching RP3 to the new certificate consists of repeating the operations executed for RP1, since the new Relying Party profile and SAML Issuance Template for RP3 have not been created yet.
Note: You can first provide the new certificate to the partner before updating the OSTS configuration.
More Learning Resources
Explore other labs on docs.oracle.com/learn or access more free learning content on the Oracle Learning YouTube channel. Additionally, visit education.oracle.com/learning-explorer to become an Oracle Learning Explorer.
For product documentation, visit Oracle Help Center.
Key and Certificate Management-Rollover in OAM and STS
F61370-01
September 2022
Copyright © 2022, Oracle and/or its affiliates.