Use Oracle Advanced Authentication REST APIs with Postman
Introduction
This tutorial shows you how make REST API calls to Oracle Advanced Authentication using Postman, software typically used for REST API tests.
Objectives
The Oracle Advanced Authentication REST APIs provide a way to integrate Oracle Advanced Authentication with REST clients so that they can configure and administer Oracle Advanced Authentication. For a full list of the REST API endpoints refer to OAA Admin API.
In this tutorial you will learn how to download and import the Oracle Advanced Authentication Postman collection and test some of the most common Postman requests.
Prerequisites
In order to complete this tutorial, you will require the following:
- A running Oracle Advanced Authentication installation
- Oracle Mobile Authenticator installed on a mobile device
- Familiarity with the REST architecture style
- Native Postman client v8.0.6 or later installed
- The json files Oracle_Advanced_Authentication_REST_API.postman_collection.json, Oracle_Advanced_Authentication_Example_Environment.postman_environment.json
Install the Oracle Advanced Authentication Postman Collection
Set the Environment Parameters in Postman
-
Open Postman, and select File > Import.
-
In the Import dialog box, in the File tab, select Upload Files. Choose the Oracle_Advanced_Authentication_Example_Environment.postman_environment.json , and then click Open.
-
In the left hand menu click
 .
. -
In the environment list displayed, to the right of Oracle Advanced Authentication Example Environment, click the elipsis and then Duplicate.

-
On Oracle Advanced Authentication Example Environment Copy, which appears above the original environment, click the elipsis and rename to
Oracle Advanced Authentication Environment for REST APIs. -
Update the environment variables for the new environment by entering the following values for Initial Value and Current Value. Once complete click Save and then X on the tab to close it:
- oaa-admin: Oracle Advanced Authentication hostname and admin port, for example
https://oaa.example.com - oaa-policy: Oracle Advanced Authentication hostname and policy port, for example
https://oaa.example.com - oaa-runtime: Oracle Advanced Authentication hostname and runtime port, for example
https://oaa.example.com - RELEASENAME: The
RELEASENAMEassigned to the Oracle Advanced Authentication setup, for exampleoaainstall. This is the value passed forcommon.deployment.namewhen installing OAA. - oaapolicyapikey: The
oaapolicyapikeyfor the Oracle Advanced Authentication setup, for examplea5764d4ef6b71129f38a2d8ddc88b6060653d3c8. This is the value passed forinstall.global.policyapikeywhen installing OAA. - oaaapikey: The
oaaapikeyfor the Oracle Advanced Authentication setup, for examplea5764d4ef6b71129f38a2d8ddc88b6060653d3c8. This is the value passed forinstall.global.uasapikeywhen installing OAA. - KBA: The KBA username for the Oracle Advanced Authentication setup, for example
OAAINSTALL_OAA_KBA. This takes the value<RELEASENAME>_OAA_KBAand is case sensitive. - oaafactorapikey: The
oaafactorapikeyfor the Oracle Advanced Authentication setup, for examplea5764d4ef6b71129f38a2d8ddc88b6060653d3c8. This is the value passed forinstall.global.factorsapikeywhen installing OAA.
Note: If you do not know the URL’s for
oaa-admin,oaa-policy, andoaa-runtime(spui), see Printing Deployment Details.The environment will look similar to the following:

Description of the illustration environment.jpg
Note: The URL values in the example above assume an OAA install using NodePort and hence port numbers for each of the pods are defined in the URL’s. If the OAA install uses an ingress then use the ingress URL in all cases.
- oaa-admin: Oracle Advanced Authentication hostname and admin port, for example
-
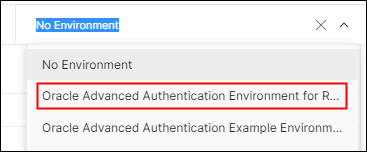
Click the Environment drop-down list, and then select the updated environment from the list:
Import the Postman Collection
-
To import the Oracle Advanced Authentication REST API Postman collection, on the Postman main page, select File > Import.
-
In the Import dialog box, in the File tab, select Upload Files. Choose the file Oracle_Advanced_Authentication_REST_API.postman_collection.json, and then click Open and then Import.
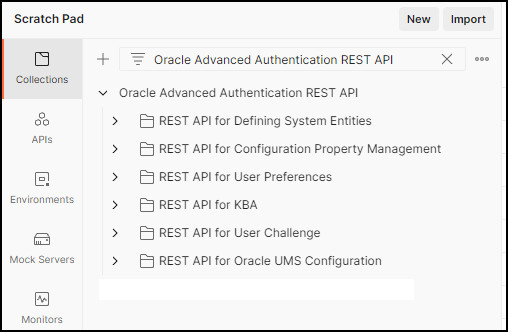
Click on Collections in the left hand menu. The collection should display as follows:
Test the REST API’s
In this section you will run some of the requests in the Postman collection for Oracle Advanced Authentication.
Note : To prevent SSL certificate verifcation errors, navigate to File > Settings, and in the General tab set SSL certificate verification to OFF.
Create an API Integration Agent
In this section you will create an API integration agent.
-
On the Collections tab, navigate to Oracle Advanced Authentication REST API > REST API for Defining System Entities -> agent/v1.
-
Select Create a new API integration agent. This request makes a POST request to the
/oaa-policy/agent/v1endpoint, and creates an API integration agent calledAPIAgentbased on the information in the Body:
-
Click Send.
-
In the response, confirm that the
Status: 200 OKappears and that the response body displays details about the integration agent created. Make note of theagentgidreturned as this will be used in the following sections.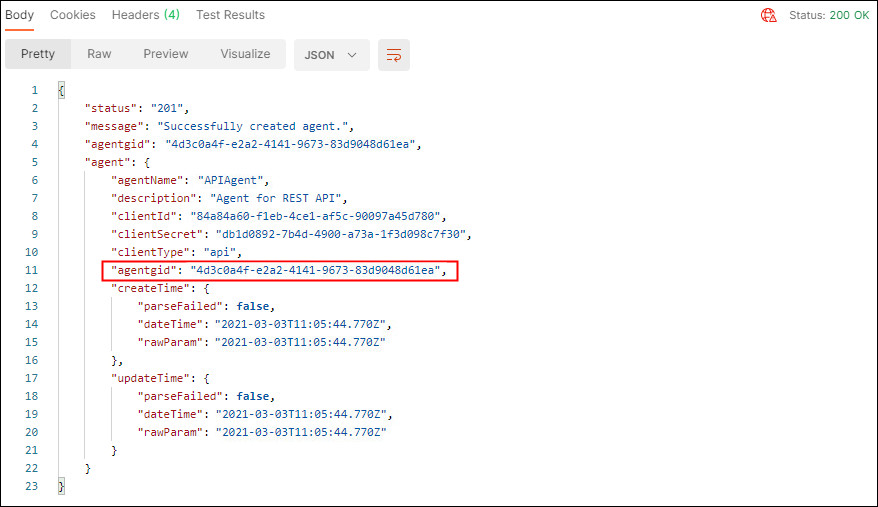
Create an Assurance Level
In this section you will create an Assurance Level for the integration agent created.
-
On the Collections tab, navigate to Oracle Advanced Authentication REST API > REST API for Defining System Entities -> AssuranceLevel/v1.
-
Select Define Assurance Level. This request makes a POST request to the
/oaa-policy/assuranceLevel/v1endpoint and creates an Assurance Level for the integration agent calledAssuranceLevel1. In the body, edit the value foragentidto match the value returned earlier: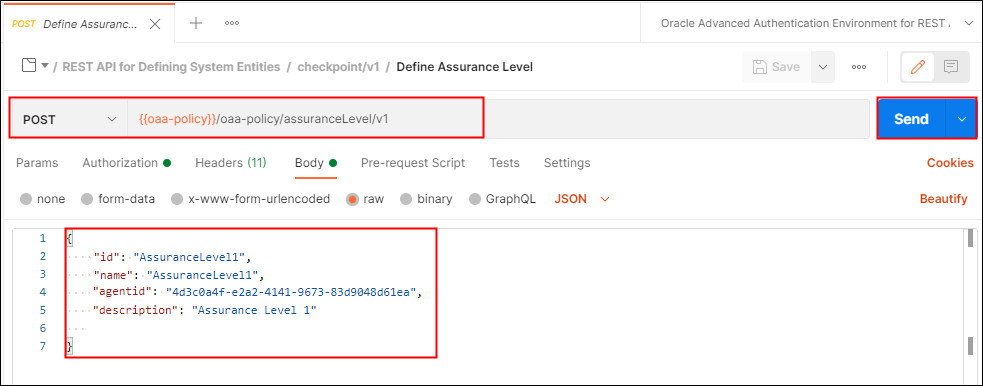
-
Click Send.
-
In the response, confirm that the
Status: 200 OKappears and that the response body displays details about the Assurance Level created.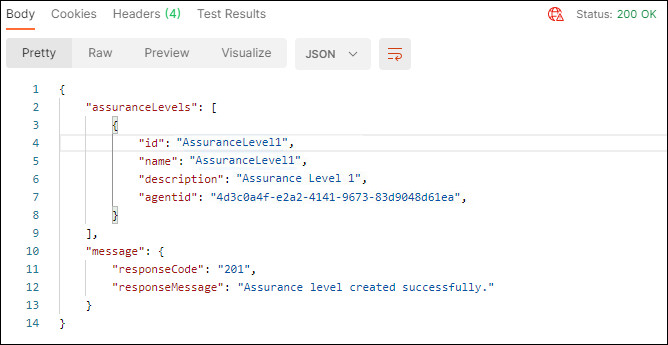
Description of the illustration createassurancelvlsuccess.jpg
Create Groups
In this section you will create an action group for Factors and a group for IP addresses. These groups will later be assigned to a policy and rule for the integration agent and Assurance Level previously created.
-
On the Collections tab, navigate to Oracle Advanced Authentication REST API > REST API for Defining System Entities -> group/v1.
-
Select Create new factor group. This request makes a POST request to the
/oaa-policy/group/v1endpoint, and creates a group for the agent calledFactorRuleGrp1. In the body, edit the value foragentidto match the value returned earlier. In this example the group sets two factors -ChallengeEmailandChallengeOMATOTP: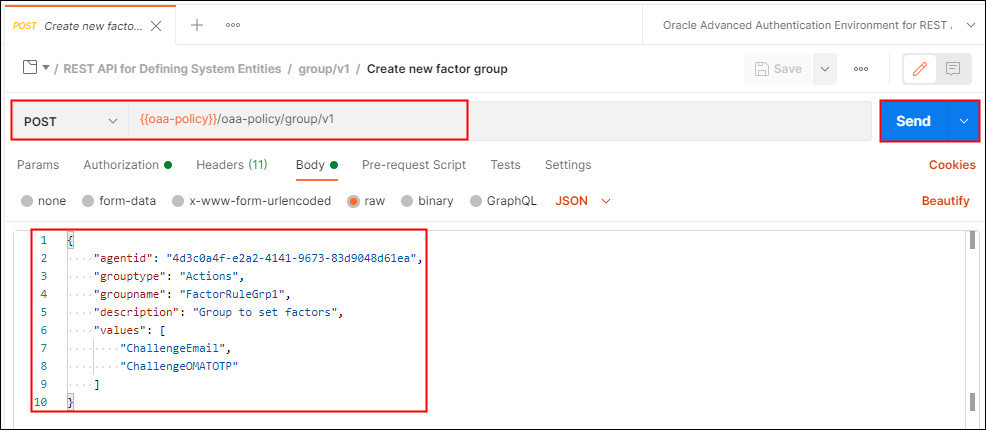
-
Click Send.
-
In the response, confirm that the
Status: 200 OKappears and that the response body displays details about the group created. Make note of thegroupidas this will be used later to assign this group to a policy.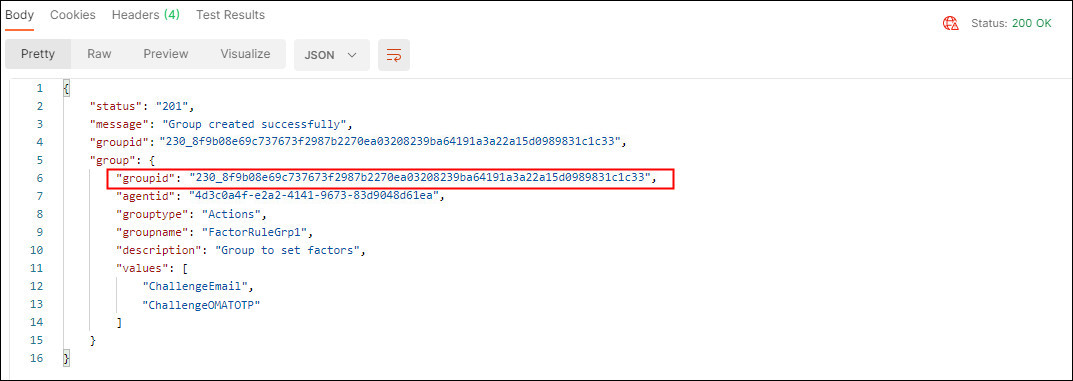
-
In the current collection under group/v1 select Create new group of type IP’s. This request makes a POST request to the
/oaa-policy/group/v1endpoint, and creates a group for the integration agent calledSecureIP. In the body, edit the value foragentgidto match the value returned earlier. In this example the values section sets the IP’s from198.51.100.1to198.51.100.3: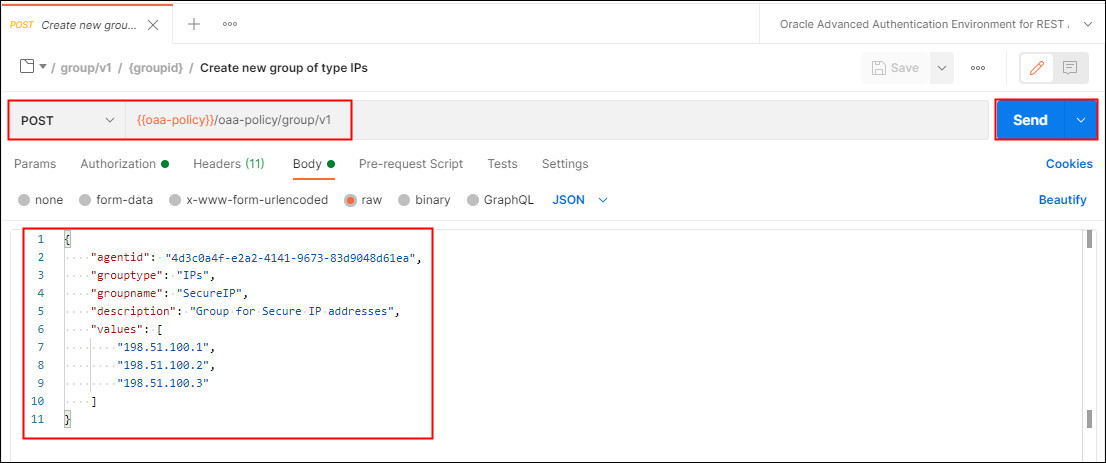
-
Click Send.
-
In the response, confirm that the
Status: 200 OKappears and that the response body displays details about the group created. Make note of thegroupidas this will be used later to assign this group to a policy.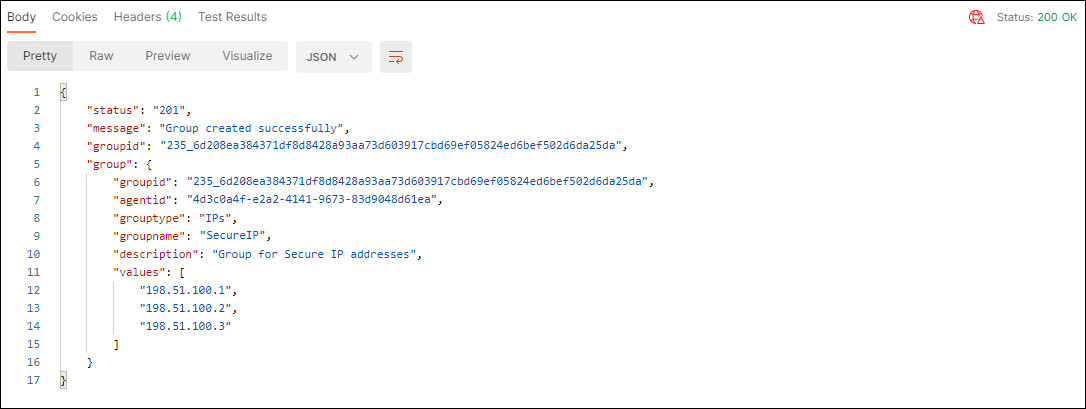
Create Policy
In this section you will create a Policy for the Assurance Level and integration agent previously created.
-
On the Collections tab, navigate to Oracle Advanced Authentication REST API > REST API for Defining System Entities -> policy/v1.
-
Select Create new policy. This request makes a POST request to the
/oaa-policy/policy/v1endpoint, and creates a policy for the previously created integration agent and assurance level calledPolicy1. In the body, edit the value foragentgidto match the value returned earlier: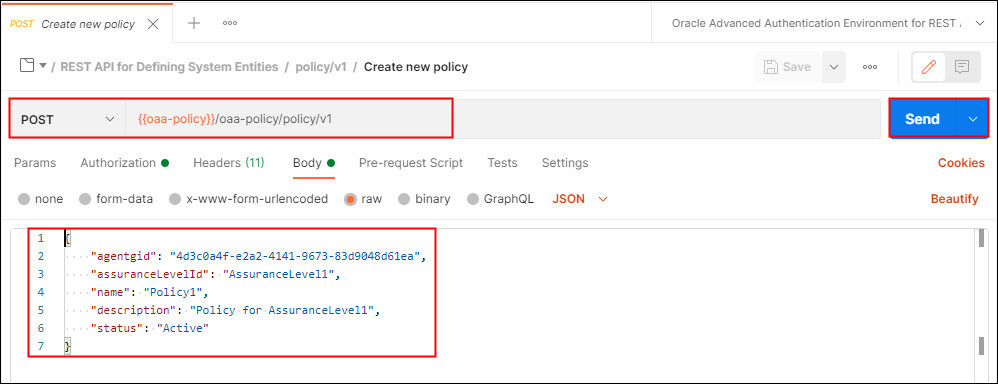
-
Click Send.
-
In the response, confirm that the
Status: 200 OKappears and that the response body displays details about the policy created. Make note of thepolicygidas this will be used later assign a rule to this policy.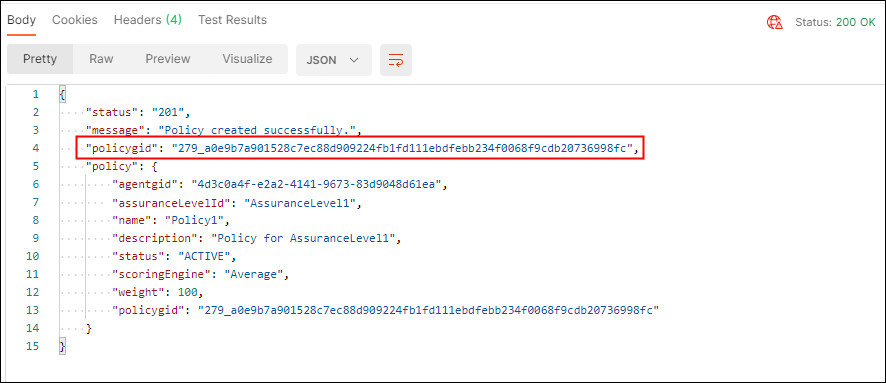
Create Policy Rule
In this section you will create a Policy Rule for the Policy.
-
On the Collections tab, navigate to Oracle Advanced Authentication REST API > REST API for Defining System Entities -> policy/v1 -> {policygid} -> rule > {ruleid}.
-
Select Define new rule for the policy. This request makes a POST request to the
/oaa-policy/policy/v1/:policygid/ruleendpoint. In the Params tab edit the value forpolicygidto match the value for the policy returned earlier. In the Body, underconditionMapedit the values underexpressionandvaluesand set to thegroupIdof theSecureIPgroup created earlier. Underresultsset the value foractionto match thegroupIdof theFactorGroup1group created earlier: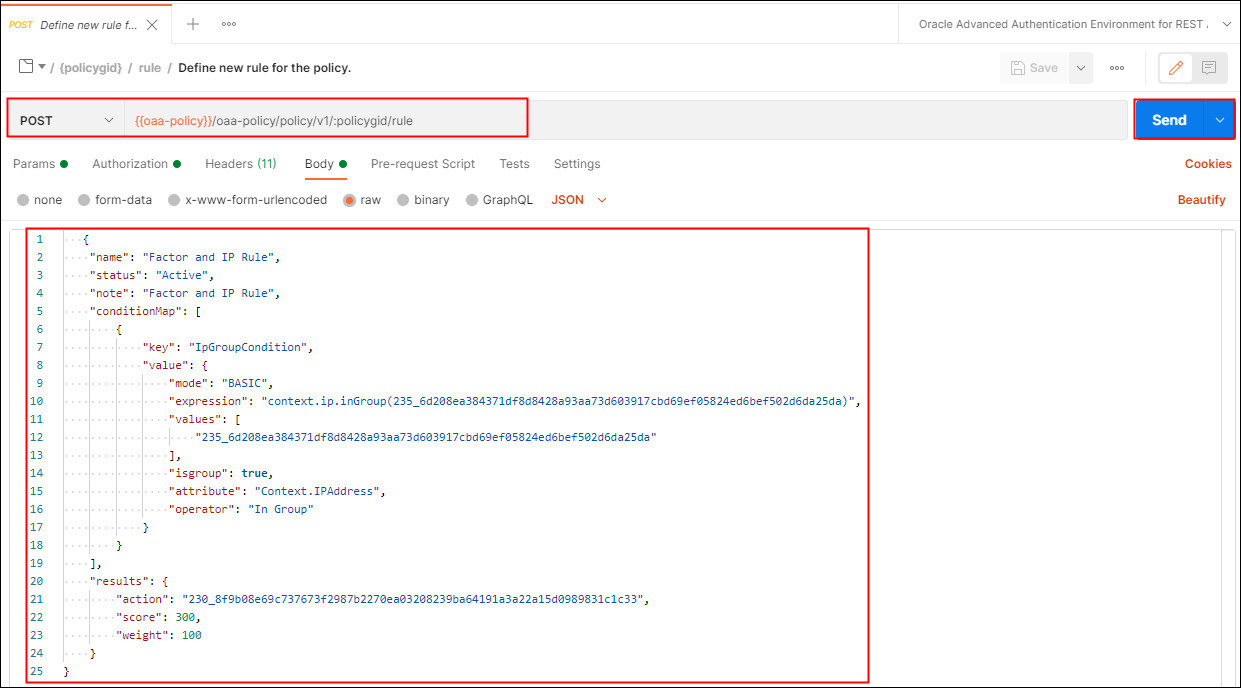
Description of the illustration createrule.jpg
In the above, the rule states that if the IP address of the end user making the authentication request is one of those defined in the
SecureIPgroup, then set the factors for authentication to those defined inFactorGroup1. -
Click Send.
-
In the response, confirm that the
Status: 200 OKappears and that the response body displays details about the rule created. Make note of therulegidfor later reference..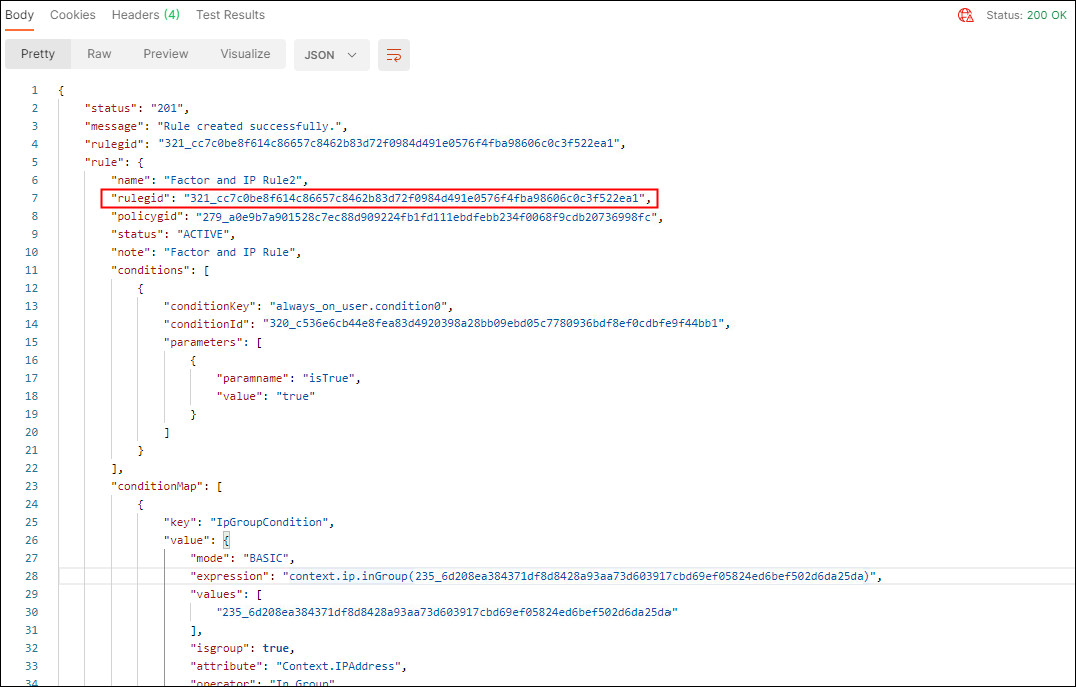
Create User Preferences
In this section you create a user user1 and register their factor preferences.
-
On the Collections tab, navigate to Oracle Advanced Authentication REST API > REST API for User Preferences -> preferences/v1.
-
Select User Preferences are created/registered. This request makes a POST request to the
/oaa/runtime/preferences/v1endpoint. In the Body, enter theuserIdto be created and their correspondinggroupId. In the example belowuser1is created in theDefaultgroup and registers the user for Email and OMATOTP factors. Change the email address value to a valid email address. Change thesecret_keyfor OMATOTP to a value of your choice to use in the Oracle Mobile Authenticator application.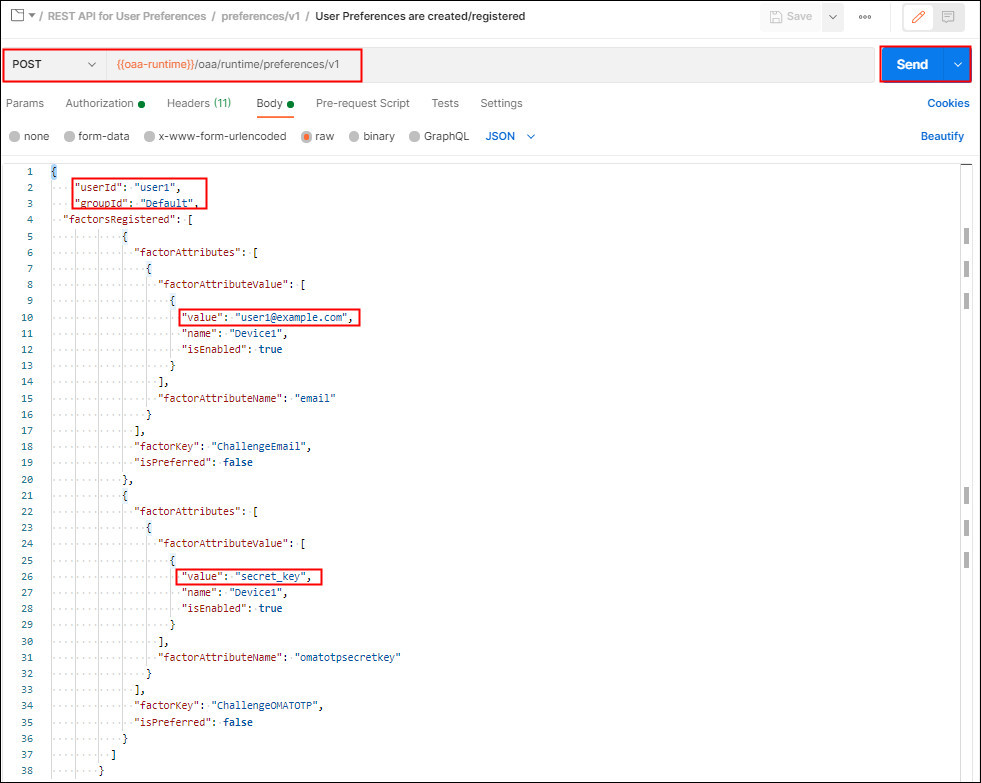
-
Click Send.
-
In the response, confirm that the
Status: 200 OKappears and that the user and their preferences are created and registered successfully.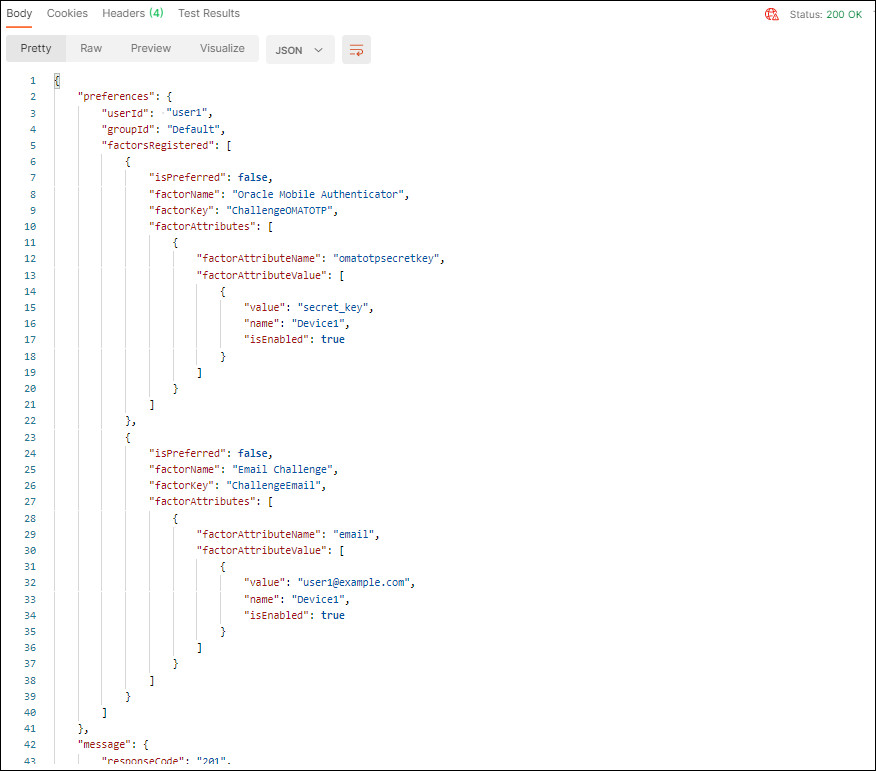
Challenge the User, Initialize the Challenge, and Validate
In this section you test a user challenge for user1 against the rule created earlier in Create Policy Rule. If the rule is validated, the factors registered for that user are returned. After choosing a factor to authenticate with, an Initialize request is sent to prompt for the OTP for that factor. A valid factor OTP is then entered and validated.
Before starting this section make sure your Oracle Mobile Authenticator has an Oracle account added with the Key set to the secret_key value entered in Create User Preferences. See Configuring an Account in Oracle Mobile Authenticator
-
On the Collections tab, navigate to Oracle Advanced Authentication REST API > REST API for User Challenge -> Challenge User, Initalize Challenge, Validate Challenge.
-
Select Challenge User. This request makes a POST request to the
/oaa/runtime/authn/v1endpoint. In the Body enter theuserIdforuser1and their correspondinggroupId. In the example below the challenge will be made foruser1against the API Integration Agent you created earlier in Create Integration Agent API. Enter the values forclientSecretandclientIdfor this API agent. In theipAddrenter an IP that was defined inSecureIPgroup created earlier: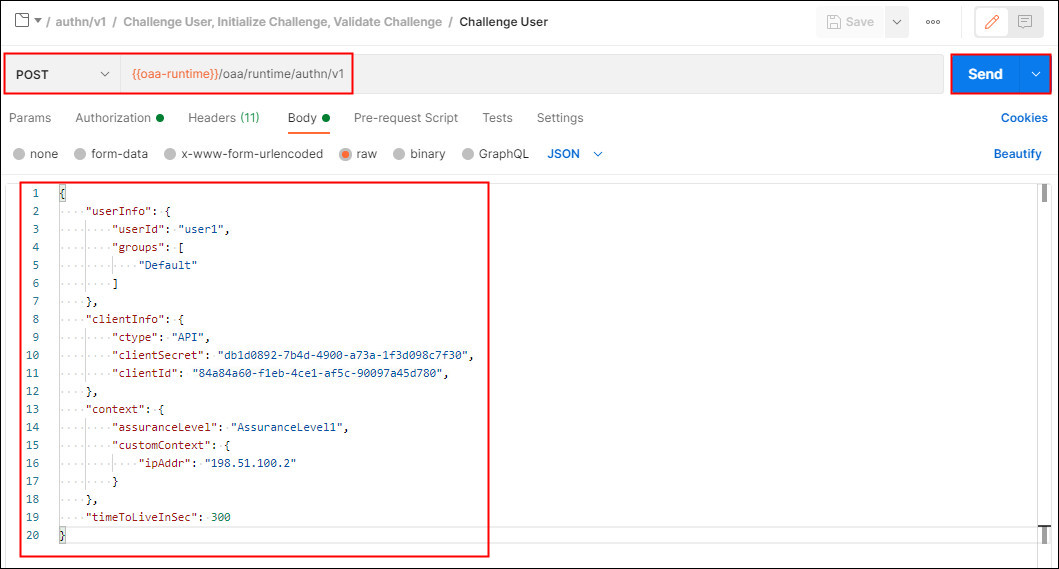
-
Click Send.
-
In the response, confirm that the
Status: 200 OKappears. AnOAA-40001message is returned statingAuthentication Required. The factors registered touser1(Email and OMATOTP) are returned along with acorrelationId. Make note of thecorrelationIdto use in subsequent requests: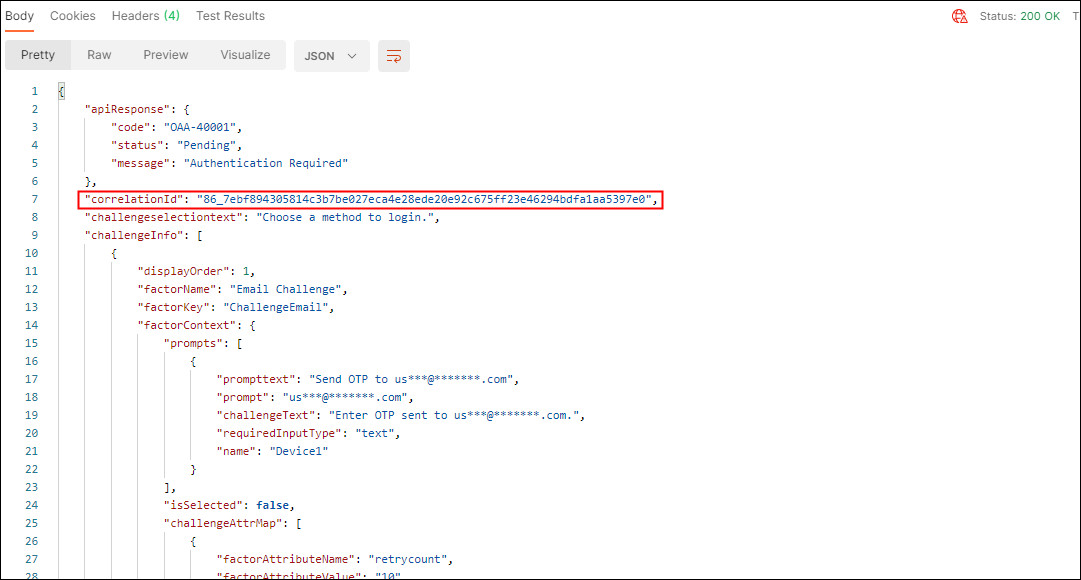
-
Under Challenge User, Initalize Challenge, Validate Challenge select Initialze Challenge. This makes a PUT request to the
/oaa/runtime/authn/v1endpoint. In the Body enter thecorrelationIdreturned in the previous response. In this example we are selecting to use the OMATOTP factor: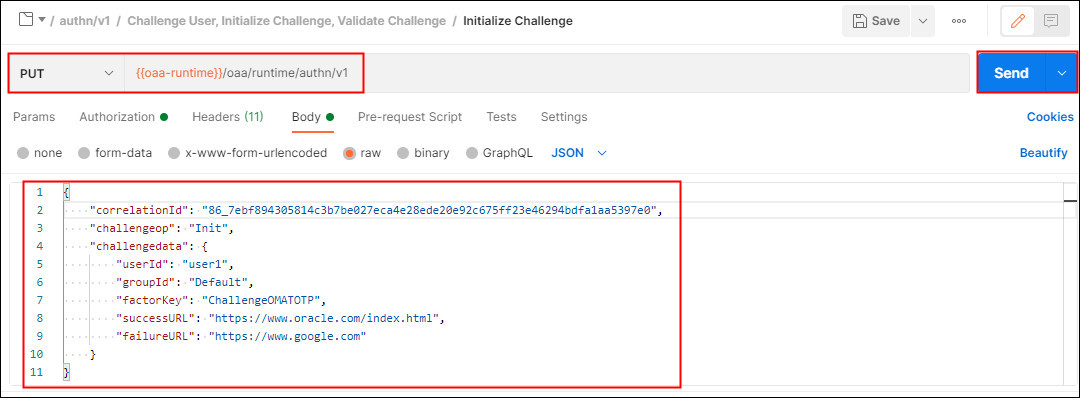
-
Click Send.
-
In the response, confirm that the
Status: 200 OKappears. AnOAA-40001message is returned statingAuthentication Requiredfor the OMATOTP. Anoncevalue is returned for the associatedcorrelationId. Make note of thenoncevalue for use the next request: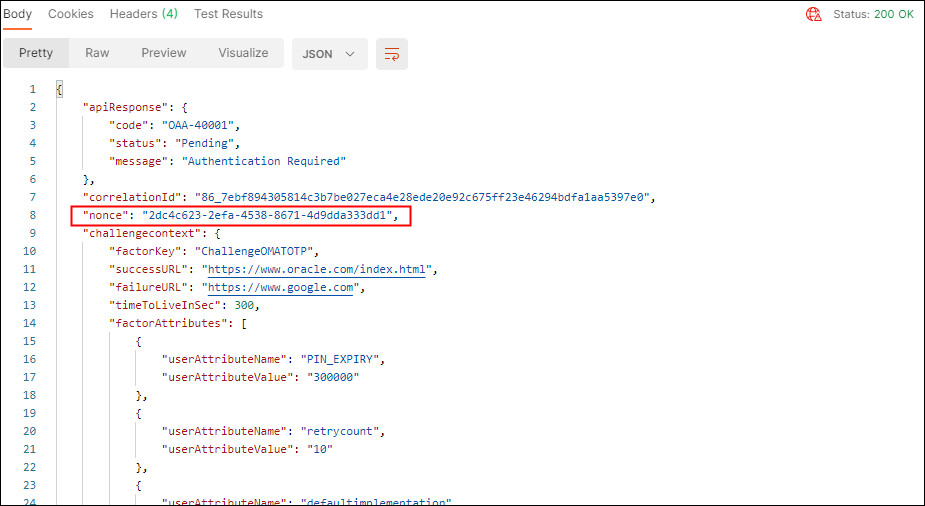
-
Under Challenge User, Initalize Challenge, Validate Challenge select Validate Challenge. This makes a PUT request to the
/oaa/runtime/authn/v1endpoint. In the Body enter thecorrelationId, andnoncereturned in the previous response. Enter a valid OTP from Oracle Mobile Authenticator in theChallengeAnswer:
-
Click Send.
-
In the response, confirm that the
Status: 200 OKappears. If the validation of the OTP is successful anOAA-40004message is returned stating the user isAuthenticated: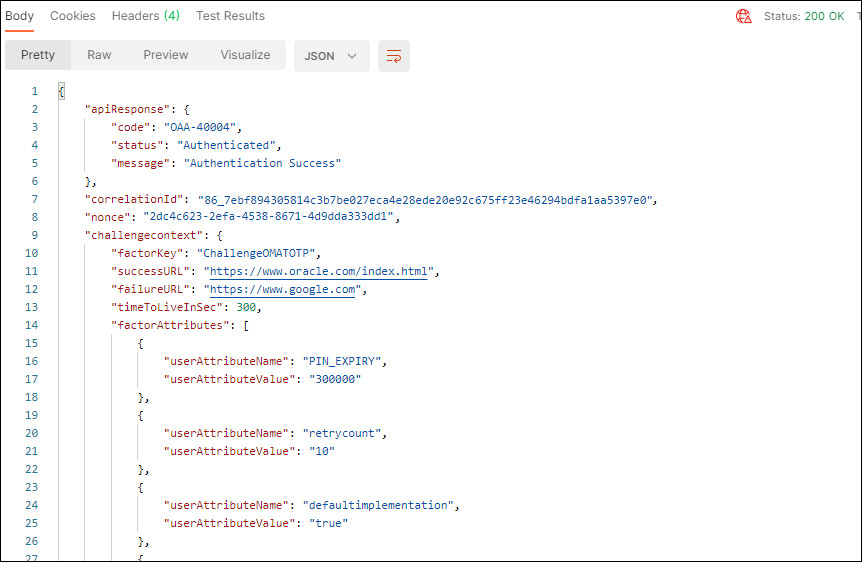
Learn More
- Oracle Advanced Authentication
- OAA Admin API
- OAA Runtime API
- Use Oracle RADIUS Agent with Oracle Advanced Authentication for Multi-Factor Authentication
- Integrate Oracle Access Management with Oracle Advanced Authentication
Feedback
To provide feedback on this tutorial, please contact idm_user_assistance_ww_grp@oracle.com
Acknowledgements
- Author - Russ Hodgson
More Learning Resources
Explore other labs on docs.oracle.com/learn or access more free learning content on the Oracle Learning YouTube channel. Additionally, visit education.oracle.com/learning-explorer to become an Oracle Learning Explorer.
For product documentation, visit Oracle Help Center.
Use Oracle Advanced Authentication REST APIs with Postman
F40566-04
February 2023
Copyright © 2023, Oracle and/or its affiliates.