| Oracle® Retail Science Cloud Services Implementation Guide Release 19.1.003.2 F40917-01 |
|

 Previous |
 Next |
| Oracle® Retail Science Cloud Services Implementation Guide Release 19.1.003.2 F40917-01 |
|
Previous |
Next |
This chapter describes the basic workflow that triggers batch processes from Process Orchestration and Monitoring (POAM), including monitoring and error handling.
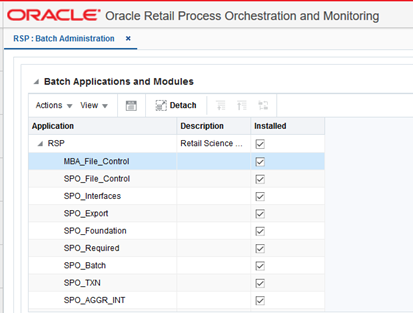
Using the Batch Administration functionality, shown in Figure 20-1, the user can enable and disable application-specific batch processes as a whole or enable and disable individual batch processes at the job level. Any modifications made will become effective with the next scheduler day load (except batch throttling configurations). The execution of application batch processes can be controlled by selecting or deselecting the check box.
To access Batch Administration, select: Schedule > Administration > Batch Administration.
Using Batch Monitoring, shown in Figure 20-2, the user can monitor the current status of different batch processes at cycle level including nightly, ad hoc, and hourly. This screen displays a pie chart section that provides a summary view of the current cycle execution. A job can have eight different job statuses: Pending, Completed, Hold, Skipped, Running, Failed, Disabled, and System Held.
To access Batch Monitoring, select: Schedule > Monitoring > Batch Monitoring
To create a new scheduler day.
Access Batch Monitoring.
Click Create Schedule, then click Yes to confirm. A new scheduler day will be created.
From the Monitoring Cycle list box, select the Nightly/Ad hoc/Hourly cycle. Note that the individual nightly batch job with its run status is loaded.
A pie chart displays the summary view of the current cycle execution.
To run a nightly batch process, complete the following steps:
Log into POAM using a valid user name and password.
Navigate to Schedules > RSP > Monitoring > Batch Monitoring.
From the CycleName drop-down list, select Nightly.
From the Auto Refresh drop-down list, select Every 30 seconds.
From Postman, do the following:
Post the url and the process to be started in the following format, replacing POAM_URL with the correct value.
POAM_URL/ProcessServices/services/private/executionEngine/schedules/RSP/execution
For example:
http://<pom-server-url>.us.oracle.com/ ProcessServices/services/private/executionEngine/schedules/RSP/execution.
In the Authorization section, provide the correct user name and password for the environment.
In the body, provide details for Cycle name, Flow name, and Request type. For example:
{
"cycleName" : "Nightly",
"flowName" : "Nightly",
"requestType" : "External Request"
}
Click Post. The body indicates that the execution has started. The process begins executing in POAM.
After triggering the process from Postman, the user can view the progress of the batch execution and the state of the batch process (either pass or fail) in the POAM UI. In the POAM UI, open the Batch Monitoring screen and select Nightly in the drop-down menu. Refresh the scheduler day you created. The batch schedule status can be viewed in the displayed graph; if Auto Refresh is set, then the graph is automatically updated.
The Job status is listed in the Batch Jobs tab.
Note the following:
The nightly batch schedule, once executed successfully, opens the next day automatically.
If any batch failures have occurred, the next day will not open automatically. In such cases, the failure must be resolved, the existing scheduler day must be closed, and the new scheduler day must be opened manually.
RI and ORASE must always be on same business dates. Triggering RI will automatically start the ORASE batch processes. (Once RI completes, it starts ORASE.)
In the RSE_CONFIG table, the parameter 'DHOC_BATCH_ENABLED is disabled by default. To execute AdHoc batch processes, you must change the value of this parameter to Y.
To enable AdHoc,, complete the following steps:
Log into the POAM using a valid user name and password.
Navigate to Schedules > RSP > Monitoring > Batch Monitoring.
From the CycleName drop-down list, select Adhoc.
From the Auto Refresh drop-down list, select Every 30 seconds.
In Batch Jobs table, search for the job RSE_BATCH_ENABLE_ADHOC.
Select the job and click Actions > Run.
Once RSE_BATCH_ENABLE_ADHOC is run, it will disable the checks that determine if it is a daily, weekly, or quarterly batch process. It will cause a new script added to the start of the daily batch to fail. It will then provide a warning message indicating that Adhoc is enabled and therefore the daily batch process is disabled.
Once the enabled AdHoc batch process passes the other AdHoc batch processes, the batch processes can be executed.
To execute the remaining Adhoc batch processes from Postman, complete the following steps:
Post the url and the process to be started in the following format, replacing POAM_URL with the correct value.
POAM_URL/ProcessServices/services/private/executionEngine/schedules/RSP/execution
For example:
http://<pom-server-url>.us.oracle.com/ ProcessServices/services/private/executionEngine/schedules/RSP/execution.
In the Authorization section, provide the correct user name and password for the environment.
In the body, provide details for Cycle name, Flow name, and Request type. For example:
{
"cycleName" : "Adhoc",
"flowName" : "Adhoc",
"requestType" : "External Request",
"processName": " RSE_SLS_TXN_ADHOC ",
"requestParameters": " jobParams.RSE_SLS_TXN_SETUP_ADHOC_JOB=-s20180101 -e20190101 -f Y "
}
Note that he requestParameters can vary from one Adhoc Job to another. A spreadsheet has been created to show the list of Adhoc Processes, along with examples on the parameters they support. (SEE ORASE-adhoc-191.xlsx).
After triggering the process from Postman, the user can view the progress of the batch execution and the state of the batch process (either pass or fail) in the POAM UI. In the POAM UI, open the Batch Monitoring screen and select Adhoc in the drop-down menu. Refresh the scheduler day you created. The batch schedule status can be viewed in the displayed graph; if Auto Refresh is set, then the graph is automatically updated.
When Adhoc is enabled, the nightly batch processes are not permitted to run. Once Adhoc is no longer required, it must be disabled.To disable the Adhoc batch process, complete the following steps:
In the Batch Jobs table, search for the job RSE_BATCH_DISABLE_ADHOC.
In the Auto Refresh drop-down menu, select Every 30 seconds.
Select that job and click Actions > Run.
To create the intraday cycle:
Log into POAM using a valid user name and password.
Navigate to Schedules > RSP > Monitoring > Batch Monitoring.
In the CycleName drop-down list, select the required cycle (for example,Hourly_Cycle_1).
From Postman, complete the following steps:
Post the url and the process to be started in the following format, replacing POAM_URL with the correct value.
POAM_URL/ProcessServices/services/private/executionEngine/schedules/RSP/execution
For example:
http://<pom-server-url>.us.oracle.com/ ProcessServices/services/private/executionEngine/schedules/RSP/execution.
In the Authorization section, provide the correct user name and password for the environment.
In the body, provide details for Cycle name, Flow name, and Request type. For example:
{
"cycleName"      :"Hourly_Cycle_1","flowName"       :"ASO_INTRADAY_CYCLE",
"requestType" : "External Request"
}
Click Post. The body indicates that the execution has started. The process begins executing in POAM.
A batch process can fail because of the following:
An actual batch process failure.
A failure as a result of the loss of communication between POAM JOS components.
'The Error Source column lists the source of error. If the source is POAM, it is generally a connection issue.
If the source of the error is Job Admin, it can be either a connection failure or an actual job failure. This can be determined by examining the logs for JOS JOB ADMIN.
JOS JOB ADMIN
.Log into JOS JOB ADMIN using a valid user name and password.
Navigate to System Logs.
Select the name of the JOB that failed. The log will be displayed at the bottom of the screen.
Skipping a Failed Job
If any job has failed for a known reason, the user can bypass it. In this way, the schedule releases the dependency and can continue executing other jobs.
To skip a failed job, complete the following steps:
Navigate to POAM > Batch Monitoring.
Select the job row that you want to skip.
Click Skip or Release Skip from More Actions.
Add any appropriate comments.
The status of the job will change to SKIPPED if the action is SKIP or to LOADED if the action is Release Skip.
Note that a job that already has a status of Skipped can only be released.