| Oracle Retail AI Foundation Cloud Services Implementation Guide Release 22.2.401.0 F72321-01 |
|

 Previous |
 Next |
| Oracle Retail AI Foundation Cloud Services Implementation Guide Release 22.2.401.0 F72321-01 |
|
Previous |
Next |
Innovation Workbench (IW) is a workspace that provides read-only access to application data objects and clean data by using Oracle APEX. This extension is a workspace for advanced analytics users to add new implementations by using Oracle Advanced Analytic (Oracle R/ODM) algorithms that are implemented as SQL/PLSQL functions. This chapter provides features, examples, and implementation details that are available in Innovation Workbench.
The key features available in Innovation Workbench are:
Schema as a Service, in which a user can use AIF cleansed, read-only data, upload and combine data to gain insights, and upload retail application data to further analyze and mine data.
Advanced Analytics, allows a user to use Oracle Machine Learning and Advanced Analytic algorithm that are implemented as SQL/PLSQL functions.
Visualize Data, enables a user to explore data, develop and visualize data using charts, and review reports using the browser.
RESTful Web Service, allows a user to declaratively create and edit RESTful service definitions using SQL Query.
SQLWorkshop, enables a user to view and manage database objects.
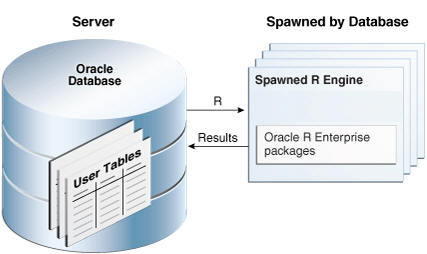
The key components of Science Innovation Workbench are Retailer Workspace Schema, Oracle APEX, and Oracle Advanced Analytics (Oracle Data Mining and Oracle R Enterprise).
Figure 20-1 Innovation Workbench Key Components
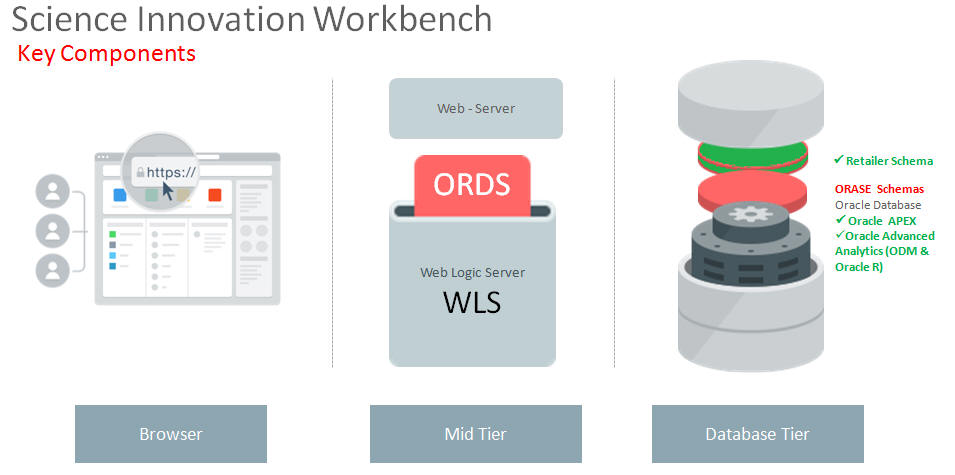
Innovation Workbench provides retailer with a logical work area (Retailer Workspace) that is associated with a predefined database schema. The schema(s) store the database objects and provide read access to an existing retailer's application data objects. The retailer workspace schema is an independent schema for a retailer to use and these data objects are owned by retailer.
This section describes Oracle APEX, a web-based software development environment.
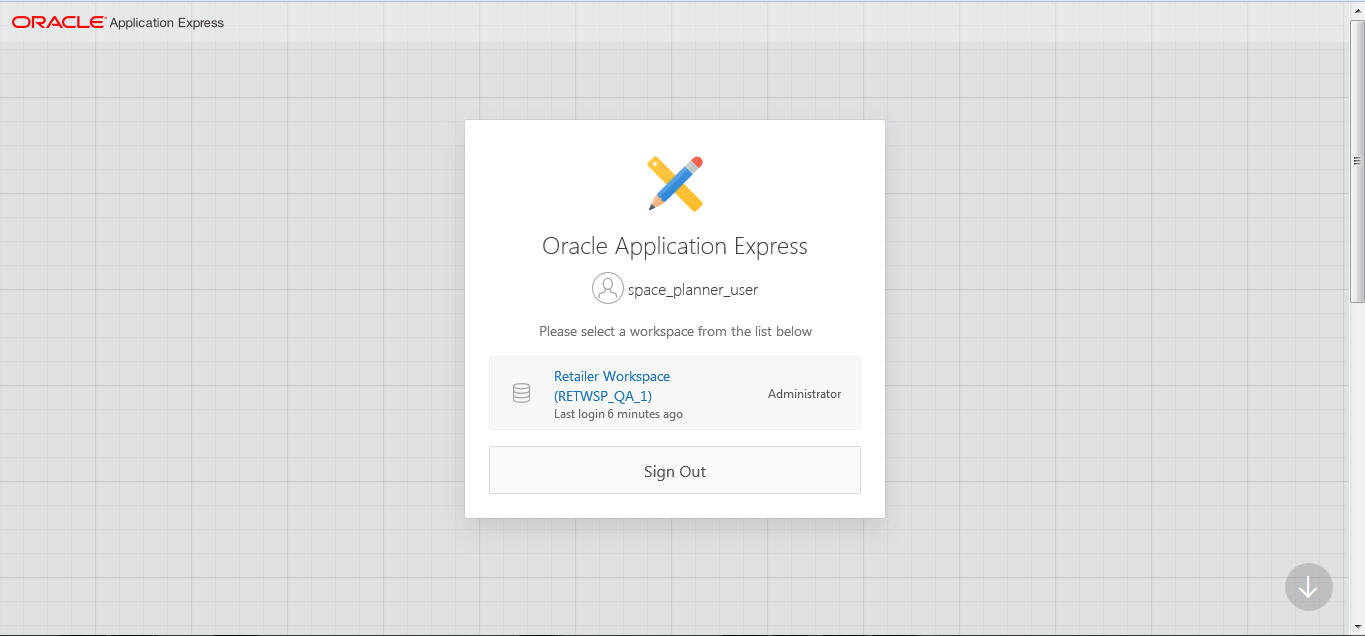
A workspace <RETAILER_WORKSPACE> is a predefined workspace for the retailer where workspace users can create database objects and applications. The workspace has privileges to the allocated <RETAILER_WORKSPACE_SCHEMA> database schema.
Innovation Workbench has two types of users: application developers and workspace administrators, and they can be created using Oracle APEX.
Innovation Workbench Administrators
The workspace administrator role is already created for the retailer; the administrator can create and edit developer accounts, manage groups, and manage development services.
Innovation Workbench Developer
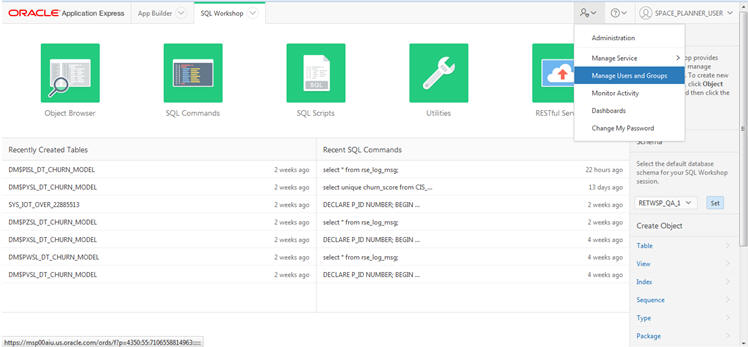
Workspace administrators can create workbench developers by selecting Manage Users and Groups. Developers can create and modify applications and browse database objects in an allocated workspace and schema. The retailer workspace schema has privileges required by Oracle Data Mining and Oracle R Enterprise for executing analytic models.
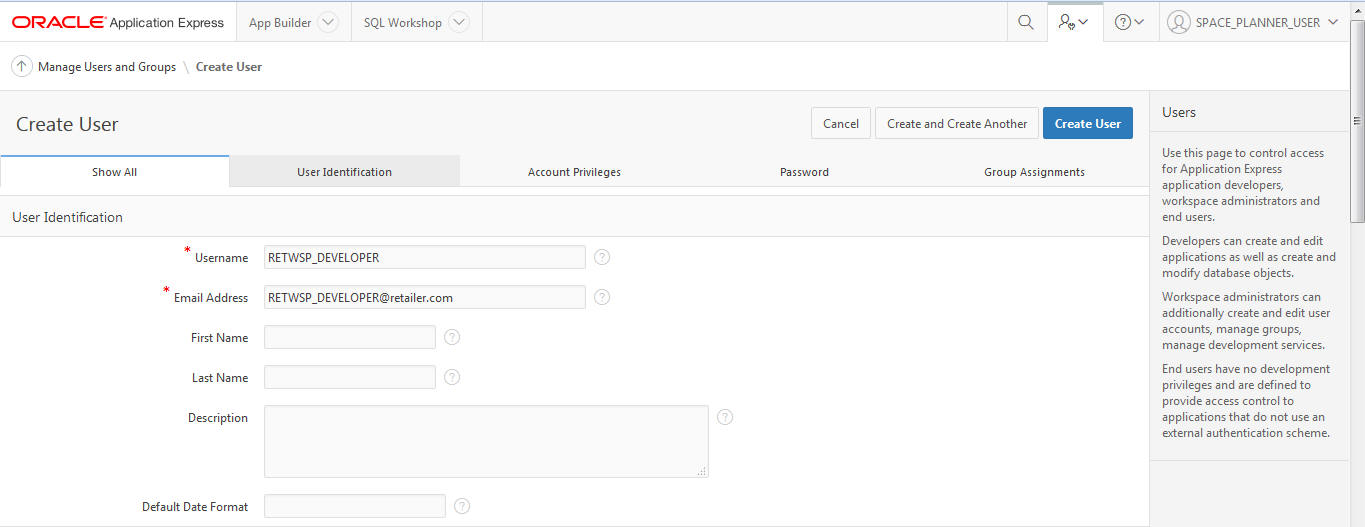
Create User. This area displays the Oracle APEX Create User screen that can be used to create a new Developer account and assign a RESTful Service group. Note that this user must also be created in Identity Management with the same username and password.
Assign Group RESTful Service.
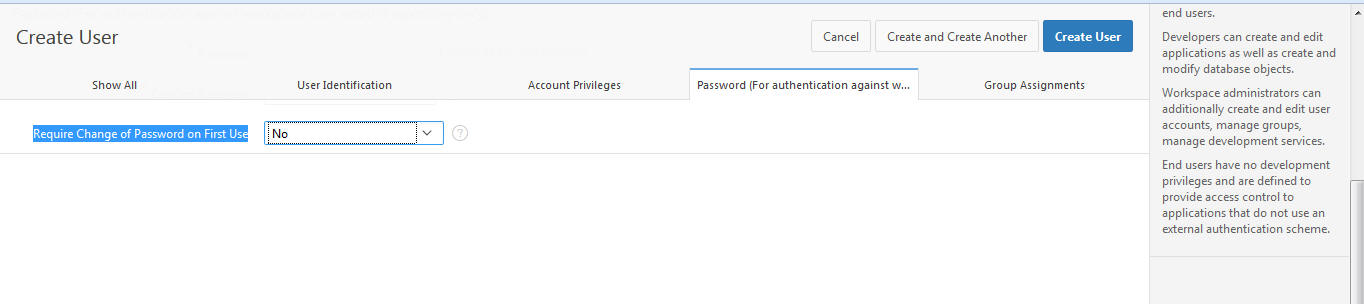
Set Require Change of Password on First Use to No.
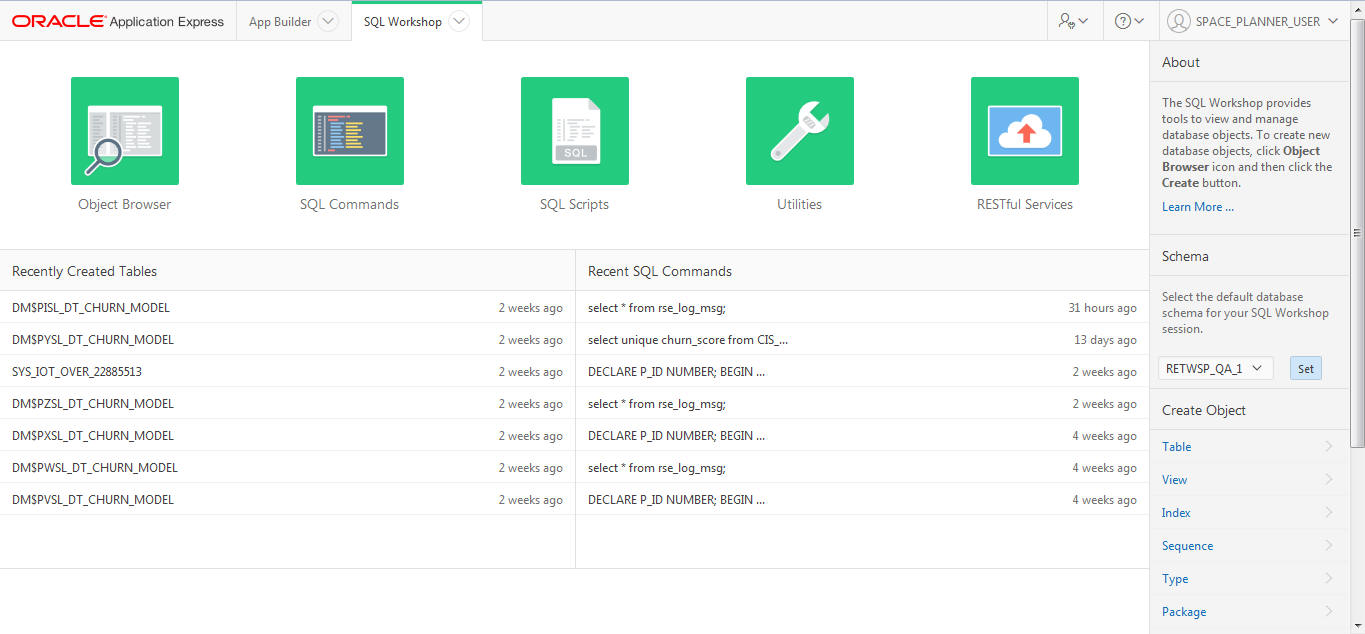
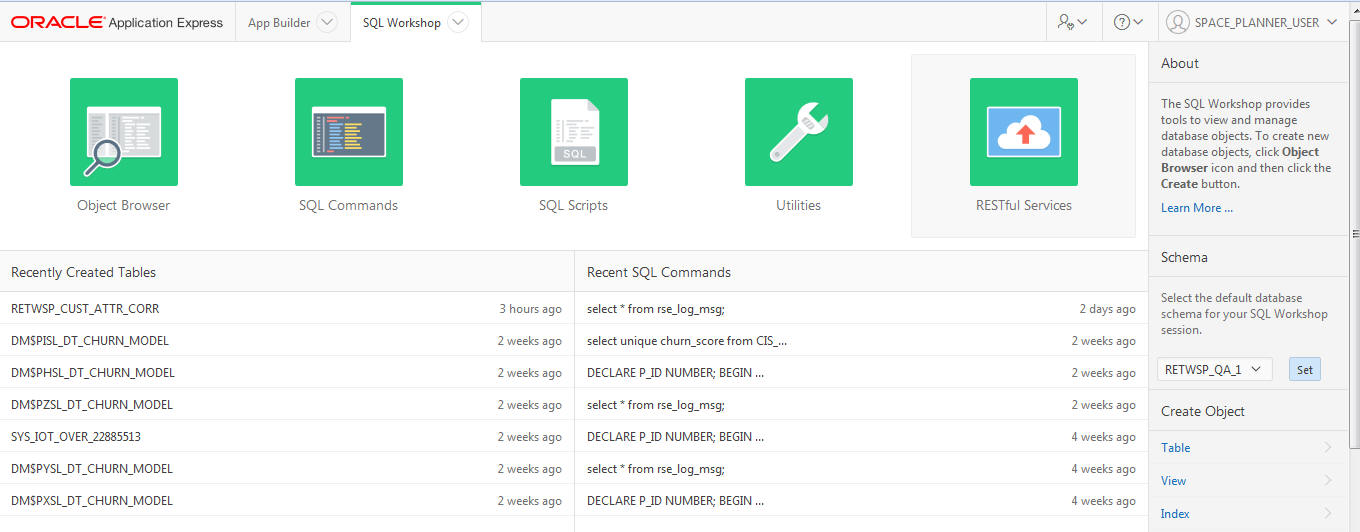
SQL Workshop
The SQL Workshop provides tools to view and manage database objects. To create new database objects, click Object Browser and then click Create.
Figure 20-6 SQL Workshop Object Browser: Reading Database Objects
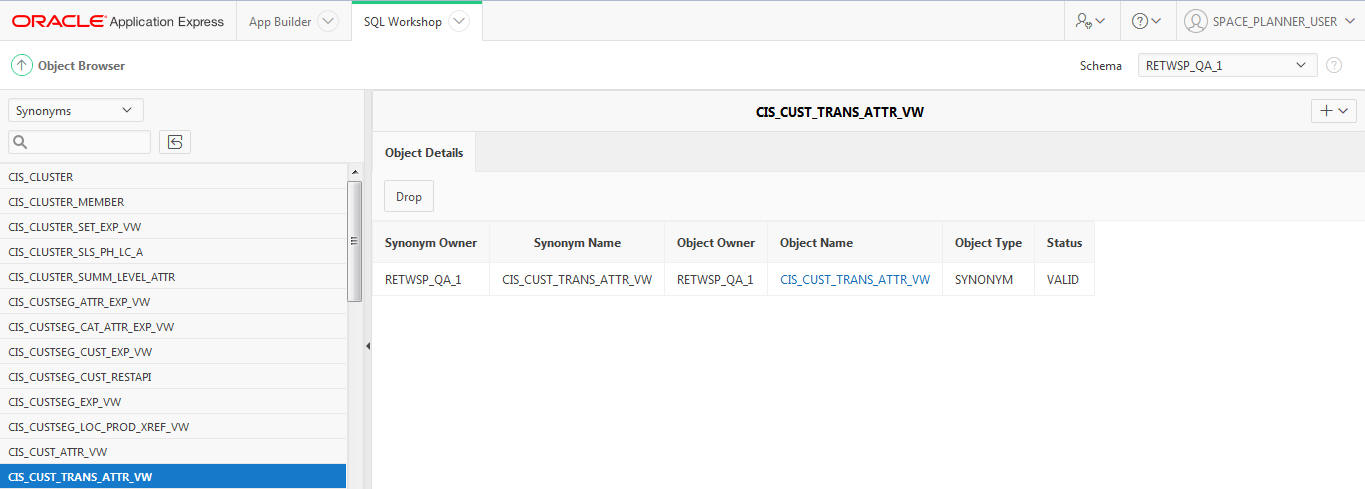
Figure 20-8 SQL Workshop SQL Command: Executing Ad Hoc SQLs
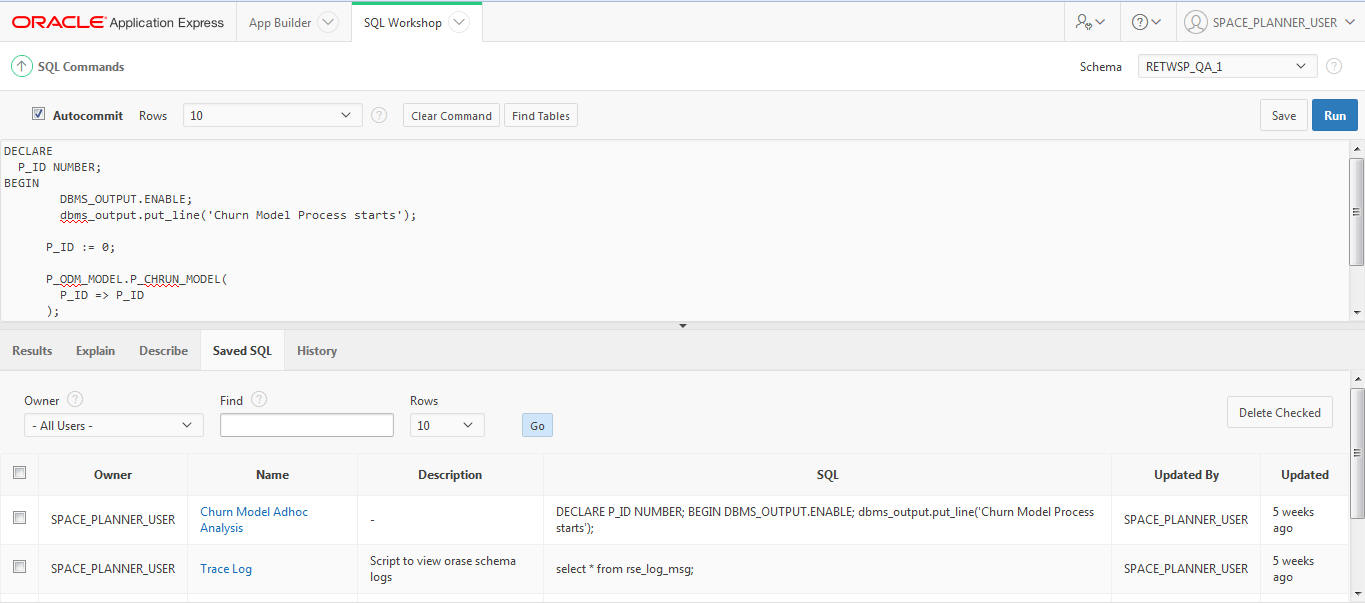
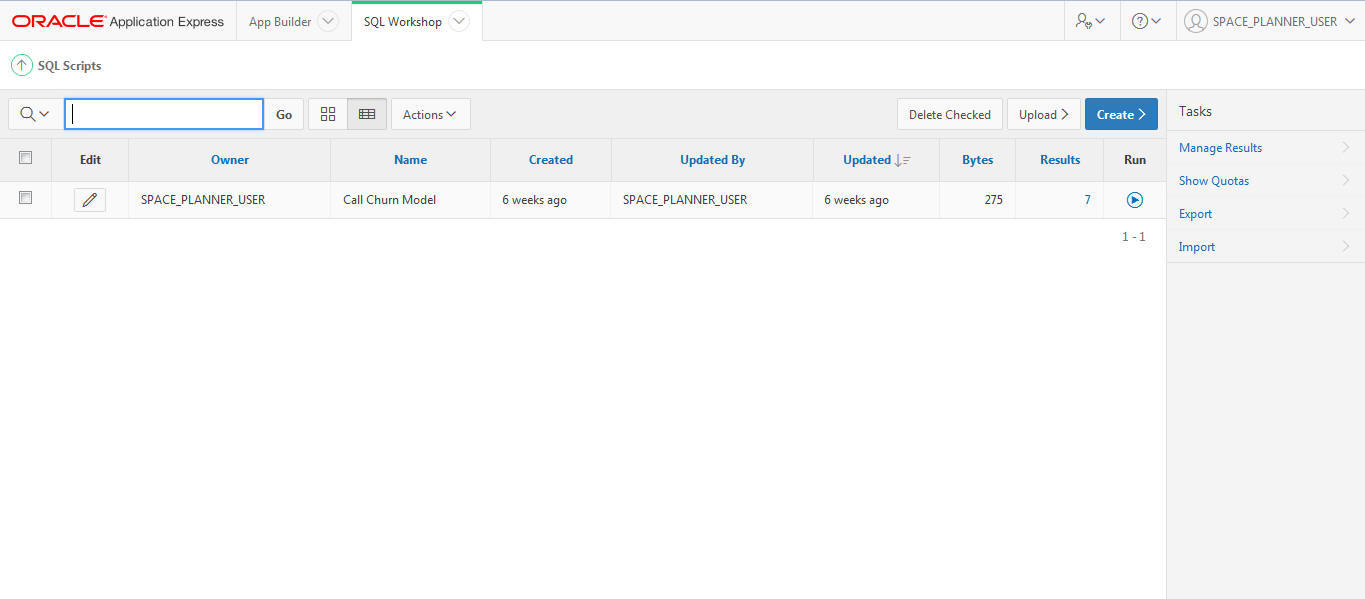
Figure 20-9 SQL Workshop SQL Scripts: Uploading, Executing, and Running
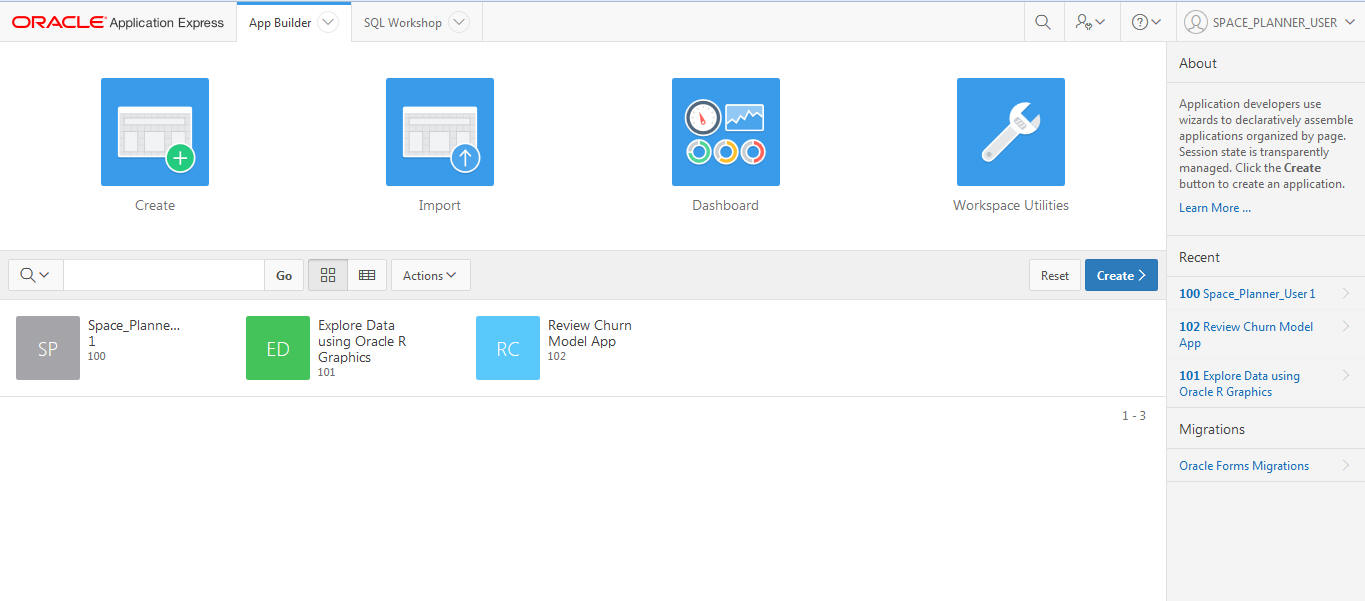
Application Builder
Application developers use wizards to declaratively assemble applications organized by page. The session state is transparently managed. Click Create to create an application.
Oracle Advanced Analytics has two components in Oracle Database Enterprise Edition, Oracle Data Mining and Oracle R Enterprise. Innovation Workbench assigns privileges required by Oracle Data Mining and Oracle R Enterprise for execution.
Oracle Data Mining offers a comprehensive set of in-database algorithms for performing a variety of mining tasks, such as classification, regression, anomaly detection, feature extraction, clustering, and affinity analysis.
Oracle R Enterprise, integrates R, the open-source statistical environment, with Oracle Database.
Figure 20-11 Machine Learning Algorithms in Database
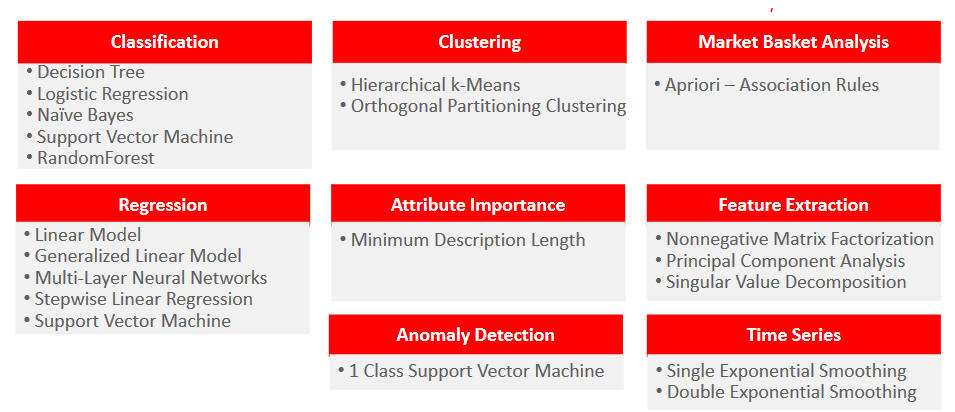
Oracle Data Mining can be used to build and deploy predictive and descriptive data mining applications, add intelligent capabilities to existing applications, and generate predictive queries for data exploration.
The Oracle Data Mining developers guide, samples, and tutorials are available at the following websites.
Oracle Data Mining Developer's Guide
http://www.oracle.com/pls/db121/vbook_subject?subject=dma
Data Mining Concepts
Oracle Data Mining Sample Programs
http://www.oracle.com/technetwork/database/options/advanced-analytics/odm/odm-samples-194497.html
Samples can be downloaded odm12csampleprograms-2184025.7z
The following scripts show how to invoke Oracle Data Mining Classification script that creates a classification model using the Decision Tree algorithm.
CREATE OR REPLACE PACKAGE BODY pkg_odm_model
AS
  -- DESCRIPTION - This script creates a classification model using the Decision Tree algorithm.
PROCEDURE proc_churn_model(
    p_id NUMBER)
IS
BEGIN
  DECLARE ---------- start drop RETWSP_CUST_CHURN_MODEL
    not_found EXCEPTION;
    PRAGMA EXCEPTION_INIT(not_found, -40203);
  BEGIN
    dbms_output.put_line('Start Drop RETWSP_CUST_CHURN_MODEL Tables');
    DBMS_DATA_MINING.DROP_MODEL('RETWSP_CUST_CHURN_MODEL');
    dbms_output.put_line('End Drop RETWSP_CUST_CHURN_MODEL Tables');
  EXCEPTION
  WHEN not_found THEN
    dbms_output.put_line('RETWSP_CUST_CHURN_MODEL not found');
  END; ------------- end drop RETWSP_CUST_CHURN_MODEL  --------------------------
  -- CREATE A SETTINGS TABLE
  --
  -- The default classification algorithm is Naive Bayes. In order to override
  -- this, create and populate a settings table to be used as input for
  -- CREATE_MODEL.
  --
  DECLARE ---------- start drop RETWSP_CUST_CHMDL_SETTINGS
    not_found EXCEPTION;
    PRAGMA EXCEPTION_INIT(not_found, -40203);
  BEGIN
    dbms_output.put_line('Start Drop RETWSP_CUST_CHMDL_SETTINGS Tables');
    EXECUTE IMMEDIATE 'DROP TABLE RETWSP_CUST_CHMDL_SETTINGS';
    dbms_output.put_line('End Drop RETWSP_CUST_CHMDL_SETTINGS Tables');
  EXCEPTION
  WHEN not_found THEN
    dbms_output.put_line('RETWSP_CUST_CHMDL_SETTINGS not found');
  END; ------------- end drop RETWSP_CUST_CHMDL_SETTINGS
  DECLARE ---------- start drop RETWSP_CUST_CHMDL_COST
    not_found EXCEPTION;
    PRAGMA EXCEPTION_INIT(not_found, -40203);
  BEGIN
    dbms_output.put_line('Start Drop RETWSP_CUST_CHMDL_COST Tables');
    EXECUTE IMMEDIATE 'DROP TABLE RETWSP_CUST_CHMDL_COST';
    dbms_output.put_line('End Drop RETWSP_CUST_CHMDL_COST Tables');
  EXCEPTION
  WHEN not_found THEN
    dbms_output.put_line('RETWSP_CUST_CHMDL_COST not found');
  END; ------------- end drop RETWSP_CUST_CHMDL_COST
  DECLARE ---------- start create table RETWSP_CUST_CHMDL_SETTINGS
    already_exists EXCEPTION;
    PRAGMA EXCEPTION_INIT(already_exists, -00955);
  BEGIN
    dbms_output.put_line('Start Create RETWSP_CUST_CHMDL_SETTINGS Tables');
    EXECUTE IMMEDIATE 'CREATE TABLE RETWSP_CUST_CHMDL_SETTINGS (
setting_name  VARCHAR2(30),
setting_value VARCHAR2(4000))';
    dbms_output.put_line('End Create RETWSP_CUST_CHMDL_SETTINGS Tables');
  EXCEPTION
  WHEN already_exists THEN
    dbms_output.put_line('Exception not found');
  END; ------------- end create table RETWSP_CUST_CHMDL_SETTINGS
  DECLARE ---------- Create RETWSP_CUST_CHMDL_COST Tables begins
    already_exists EXCEPTION;
    PRAGMA EXCEPTION_INIT(already_exists, -00955);
  BEGIN
    dbms_output.put_line('Start Create RETWSP_CUST_CHMDL_COST Tables');
    EXECUTE IMMEDIATE 'CREATE TABLE RETWSP_CUST_CHMDL_COST (
actual_target_value           NUMBER,
predicted_target_value        NUMBER,
cost                          NUMBER)';
    dbms_output.put_line('End Create RETWSP_CUST_CHMDL_COST Tables');
  EXCEPTION
  WHEN already_exists THEN
    dbms_output.put_line('RETWSP_CUST_CHMDL_COST not found');
  END; ------------- Create RETWSP_CUST_CHMDL_COST Tables ends
  -- CREATE AND POPULATE A COST MATRIX TABLE
  --
  -- A cost matrix is used to influence the weighting of misclassification
  -- during model creation (and scoring).
  -- See Oracle Data Mining Concepts Guide for more details.
  --
  dbms_output.put_line('Start Insert records into RETWSP_CUST_CHMDL_COST');
  DECLARE ---------- sub-block begins
    already_exists EXCEPTION;
    PRAGMA EXCEPTION_INIT(already_exists, -00955);
  BEGIN
    EXECUTE IMMEDIATE 'INSERT INTO RETWSP_CUST_CHMDL_COST VALUES (0,0,0)';
    EXECUTE IMMEDIATE 'INSERT INTO RETWSP_CUST_CHMDL_COST VALUES (0,1,1)';
    EXECUTE IMMEDIATE 'INSERT INTO RETWSP_CUST_CHMDL_COST VALUES (0,2,2)';
    EXECUTE IMMEDIATE 'INSERT INTO RETWSP_CUST_CHMDL_COST VALUES (0,3,3)';
    EXECUTE IMMEDIATE 'INSERT INTO RETWSP_CUST_CHMDL_COST VALUES (1,0,1)';
    EXECUTE IMMEDIATE 'INSERT INTO RETWSP_CUST_CHMDL_COST VALUES (1,1,0)';
    EXECUTE IMMEDIATE 'INSERT INTO RETWSP_CUST_CHMDL_COST VALUES (1,2,2)';
    EXECUTE IMMEDIATE 'INSERT INTO RETWSP_CUST_CHMDL_COST VALUES (1,3,3)';
    EXECUTE IMMEDIATE 'INSERT INTO RETWSP_CUST_CHMDL_COST VALUES (2,0,3)';
    EXECUTE IMMEDIATE 'INSERT INTO RETWSP_CUST_CHMDL_COST VALUES (2,1,2)';
    EXECUTE IMMEDIATE 'INSERT INTO RETWSP_CUST_CHMDL_COST VALUES (2,2,0)';
    EXECUTE IMMEDIATE 'INSERT INTO RETWSP_CUST_CHMDL_COST VALUES (2,3,1)';
    EXECUTE IMMEDIATE 'INSERT INTO RETWSP_CUST_CHMDL_COST VALUES (3,0,3)';
    EXECUTE IMMEDIATE 'INSERT INTO RETWSP_CUST_CHMDL_COST VALUES (3,1,2)';
    EXECUTE IMMEDIATE 'INSERT INTO RETWSP_CUST_CHMDL_COST VALUES (3,2,1)';
    EXECUTE IMMEDIATE 'INSERT INTO RETWSP_CUST_CHMDL_COST VALUES (3,3,0)';
    dbms_output.put_line('End Insert Records');
  EXCEPTION
  WHEN already_exists THEN
    dbms_output.put_line('RETWSP_CUST_CHMDL_COST not found');
  END; ------------- sub-block ends
  dbms_output.put_line('End Insert records into RETWSP_CUST_CHMDL_COST');
  -- Populate settings table
  DECLARE ---------- sub-block begins
    already_exists EXCEPTION;
    PRAGMA EXCEPTION_INIT(already_exists, -00955);
    v_stmt               VARCHAR2(4000);
    v_algo_name          VARCHAR2(100);
    v_algo_decision_tree VARCHAR2(100);
  BEGIN
    dbms_output.put_line('Start Populate settings table' || dbms_data_mining.algo_name);
    dbms_output.put_line('Start Populate settings table' || dbms_data_mining.algo_decision_tree);
    v_algo_name          := dbms_data_mining.algo_name;
    v_algo_decision_tree := dbms_data_mining.algo_decision_tree;
    v_stmt               := 'INSERT INTO RETWSP_CUST_CHMDL_SETTINGS (setting_name, setting_value) VALUES (''' || v_algo_name || ''',''' || v_algo_decision_tree || ''')';
    dbms_output.put_line('Start Populate settings table v_stmt --' || v_stmt);
    EXECUTE IMMEDIATE v_stmt;
  EXCEPTION
  WHEN already_exists THEN
    dbms_output.put_line('Exception not found');
  END; ------------- sub-block ends
  DECLARE ---------- sub-block begins
    already_exists EXCEPTION;
    PRAGMA EXCEPTION_INIT(already_exists, -00955);
    v_table_name  VARCHAR2(100);
    v_matrix_cost VARCHAR2(100);
  BEGIN
    v_table_name  := dbms_data_mining.clas_cost_table_name;
    v_matrix_cost := 'RETWSP_CUST_CHMDL_COST';
    EXECUTE IMMEDIATE 'INSERT INTO RETWSP_CUST_CHMDL_SETTINGS (setting_name, setting_value) VALUES' || '(''' || v_table_name || ''',''' || v_matrix_cost || ''')';
    dbms_output.put_line('End Populate settings table');
  EXCEPTION
  WHEN already_exists THEN
    dbms_output.put_line('Exception not found');
  END; ------------- sub-block ends
  ---------------------
  -- CREATE A NEW MODEL
  --
  -- Build a DT model
  dbms_output.put_line('Start Create Churn Model');
  DBMS_DATA_MINING.CREATE_MODEL( model_name => 'RETWSP_CUST_CHURN_MODEL', mining_function => dbms_data_mining.classification, data_table_name => 'cis_cust_attr_vw', case_id_column_name => 'CUSTOMER_ID', target_column_name => 'CHURN_SCORE', settings_table_name => 'RETWSP_CUST_CHMDL_SETTINGS');
  dbms_output.put_line('End Create Churn Model');
  --------------------------
  -- DISPLAY MODEL SIGNATURE
  --
  column attribute_name format a40
  column attribute_type format a20
  SELECT attribute_name,
    attribute_type
  FROM user_mining_model_attributes
  WHERE model_name = 'RETWSP_CUST_CHURN_MODEL'
  ORDER BY attribute_name;
END p_chrun_model;
END pkg_odm_model;
Test ODM Model
DECLARE
  RUN_ID NUMBER;
BEGIN
  DBMS_OUTPUT.ENABLE;
  dbms_output.put_line('Churn Model Process starts');
  RUN_ID := 1001;
  pkg_odm_model.proc_churn_model( RUN_ID => RUN_ID );
  dbms_output.put_line('Churn Model Process ends');
END;
Innovation Workbench allows an advanced user to execute the embedded R engine in Oracle Database. It allows R users to off-load calculations that require either more resources such as those available to Oracle Database or database-driven data parallelism. It supports R scripts that can be embedded in SQL or PL/SQL programs.
Innovation Workbench via Oracle R Enterprise Database Engine enables scale for large datasets, access to tables, views in the database, the use of SQL query parallel execution, and the use of in-database statistical and data mining functionality.
|
Note: R Client is not available in Innovation Workbench and only Embedded R Executions using SQL Interface are supported. |
Oracle R Enterprise user guide, samples, and tutorials are available at the following websites.
Oracle R Enterprise User Guide
https://docs.oracle.com/cd/E40980_01/doc.14/e39886/toc.htm
Oracle R Enterprise Sample
https://docs.oracle.com/cd/E11882_01/doc.112/e36763/appa_typicalinstall.htm#OREAD265
Tutorials on how to use Oracle R Enterprise
https://apexapps.oracle.com/pls/apex/f?p=44785:24:4786379229847:PRODUCT:NO::P24_CONTENT_ID,P24_PREV_PAGE,P24_PROD_SECTION_GRP_ID:8984,141,
SQL Interface for Embedded R Execution
https://docs.oracle.com/cd/E67822_01/OREUG/GUID-7F101F72-1C62-4961-BEA9-0F6E0B183F4E.htm#OREUG543
How to execute Oracle R Model
Here is an example that shows how to use R packages.
Execute R lm to fit linear models in Oracle Database. It can be used to carry out regression, analysis of variance and covariance
BEGIN
  sys.rqScriptDrop('FittingLinearModel');
  sys.rqScriptCreate('FittingLinearModel', 'function(dat,datastore_name) { mod <- lm(LOYALTY_SCORE ~ AVG_AGE + AVG_INCOME, dat) ore.save(mod,name=datastore_name, overwrite=TRUE) }');
END;
/

SELECT *
FROM TABLE(rqTableEval( CURSOR
  (select AVG_INCOME, AVG_AGE, LOYALTY_SCORE from cis_cust_attr_vw
  ), CURSOR
  (SELECT 1 AS "ore.connect", 'myDatastore' AS "datastore_name" FROM dual
  ), 'XML', 'FittingLinearModel' ));
How to Execute Oracle R Graphics
The following scripts show how to use the R Pairs function to create a correlation matrix plot between parameters in the data.The following example shows how to generate a scatter plot matrix using the R script RQG$pairs in Oracle R.
drop table retwsp_cust_attr_corr;
create TABLE retwsp_cust_attr_corr as (SELECT * FROM TABLE
(
rqTableEval(
cursor( ((select AVG_INCOME, AVG_AGE, LOYALTY_SCORE from cis_cust_attr_vw)) )
), -- Input Cursor
cursor(select 'Scatterplot Matrices' as MAIN from DUAL), -- Param Cursor
'PNG', -- Output Definition
'RQG$pairs' -- R Script
)
));
How to View an Oracle R Graphics Image in APEX
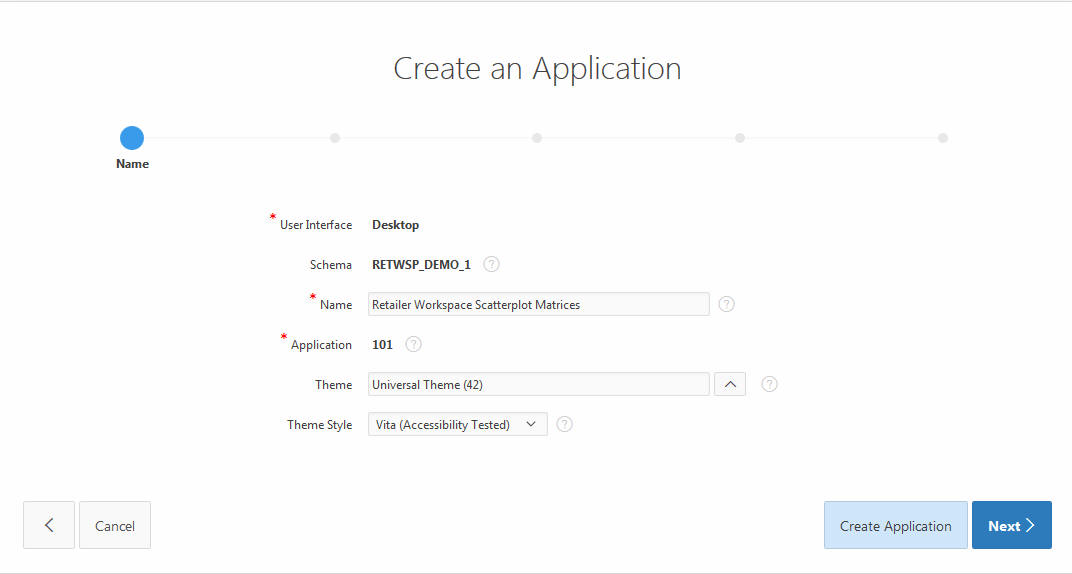
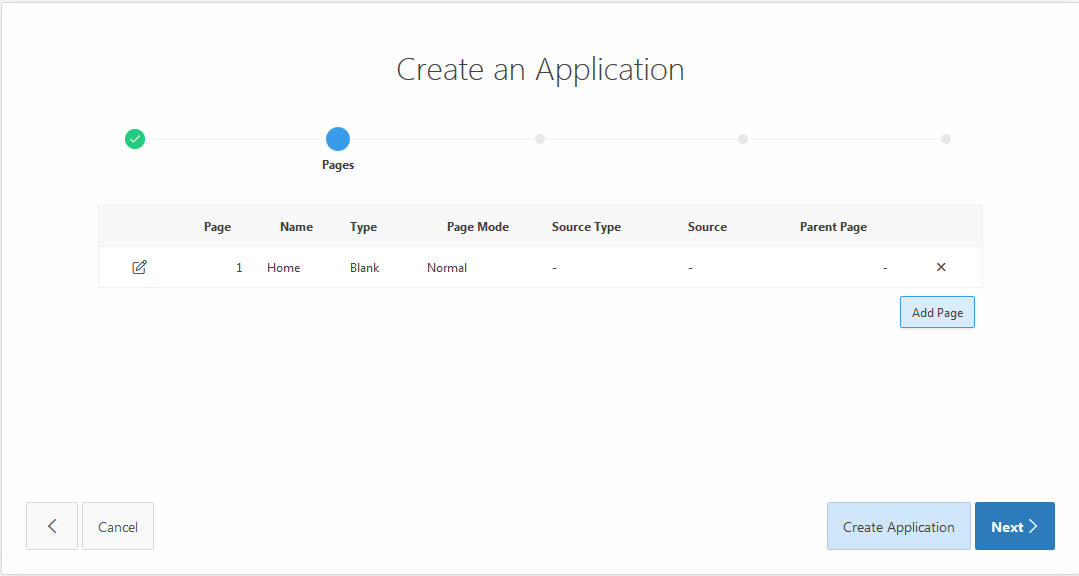
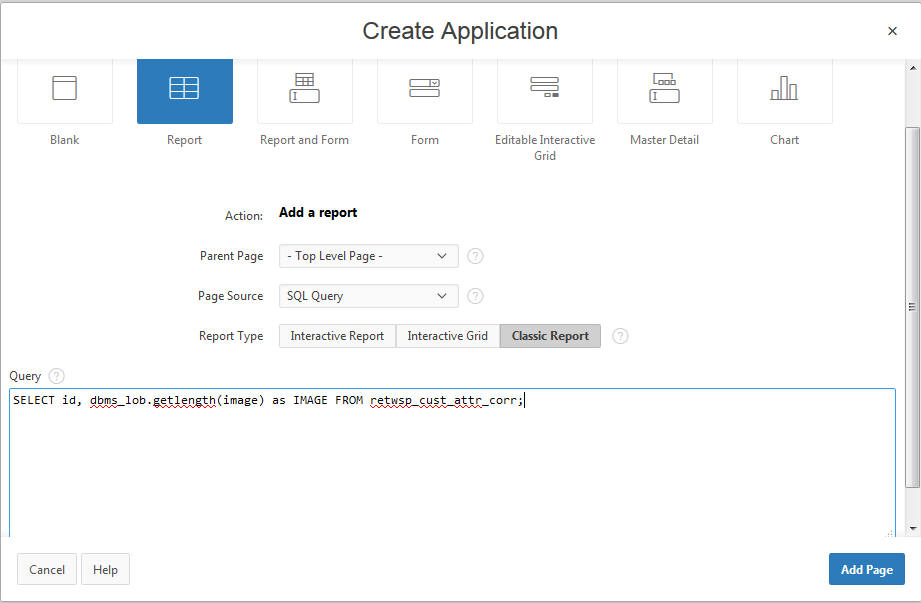
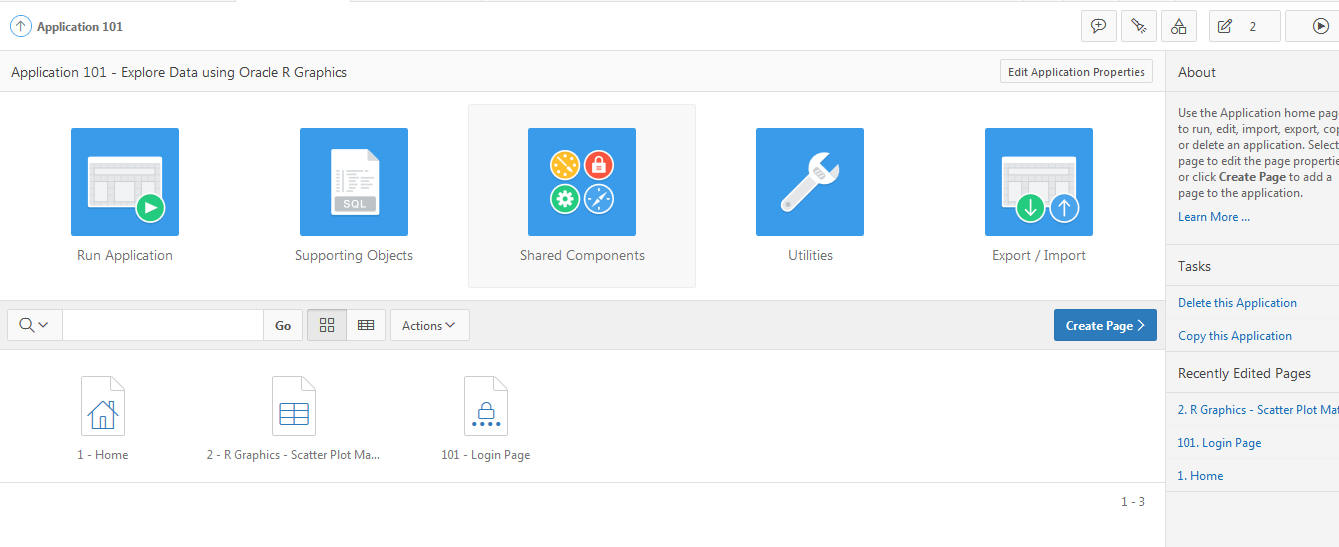
The following steps show how to create an application to display graphic images generated using Oracle R graphics. The process includes creating an application to explore input data using scatter plot matrices.
Identify an application.
Add a page to the application.
Select the report and page source as an SQL Query and report type as a Classic Report. Input Query is SELECT id, dbms_lob.getlength(image) as IMAGE FROM retwsp_cust_attr_corr;
Edit Page in Page Designer. Select Content Body, Scatter Plot Matrix, Columns - IMAGE, and type as Display Image.
Set the following BLOB Attributes and click Save.
Set Table Name as retwsp_cust_attr_corr.
Set BLOB column as IMAGE.
Set Primary Key Column 1 as ID.
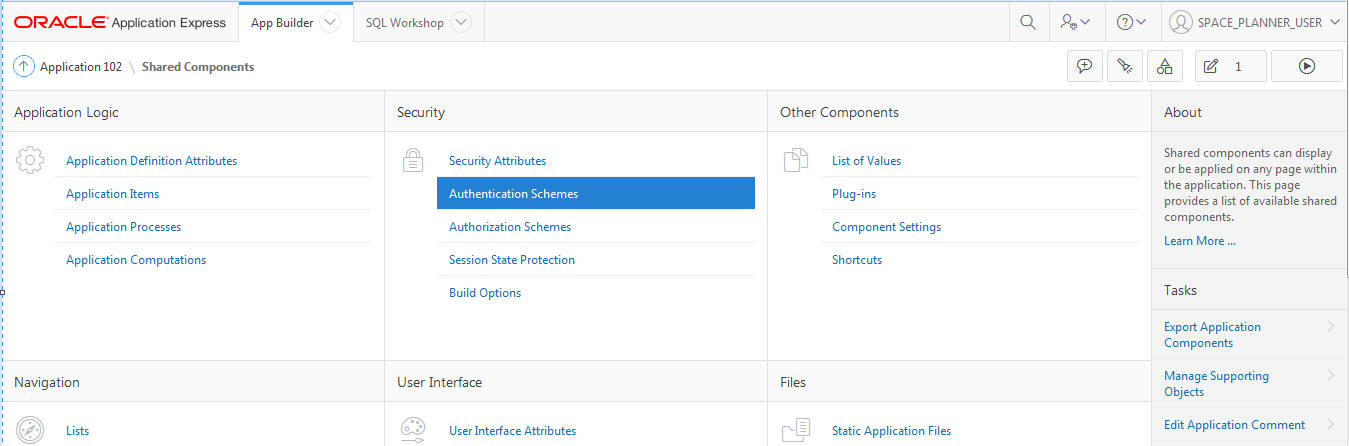
Select Shared Components.
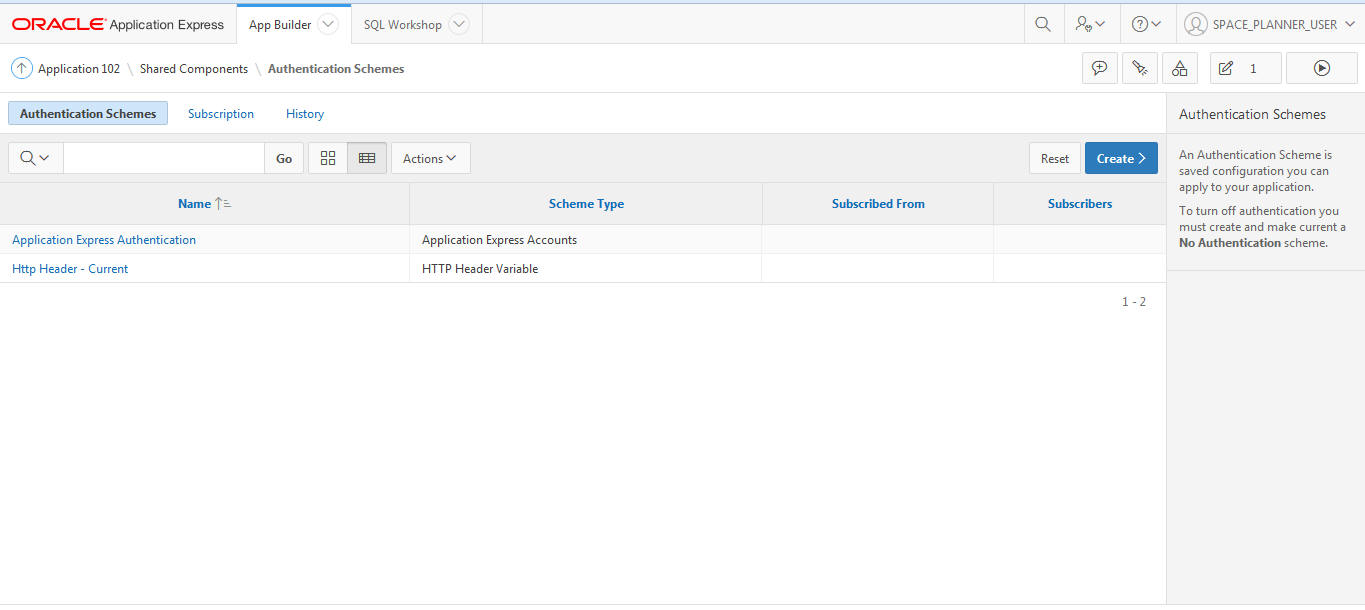
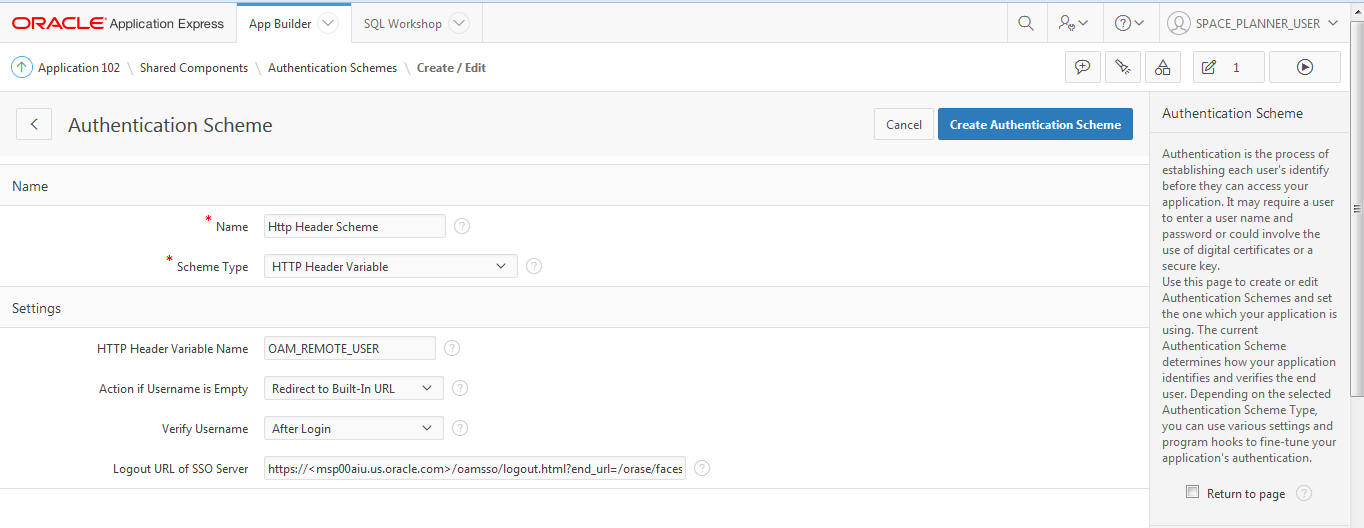
Select Authentication Scheme.
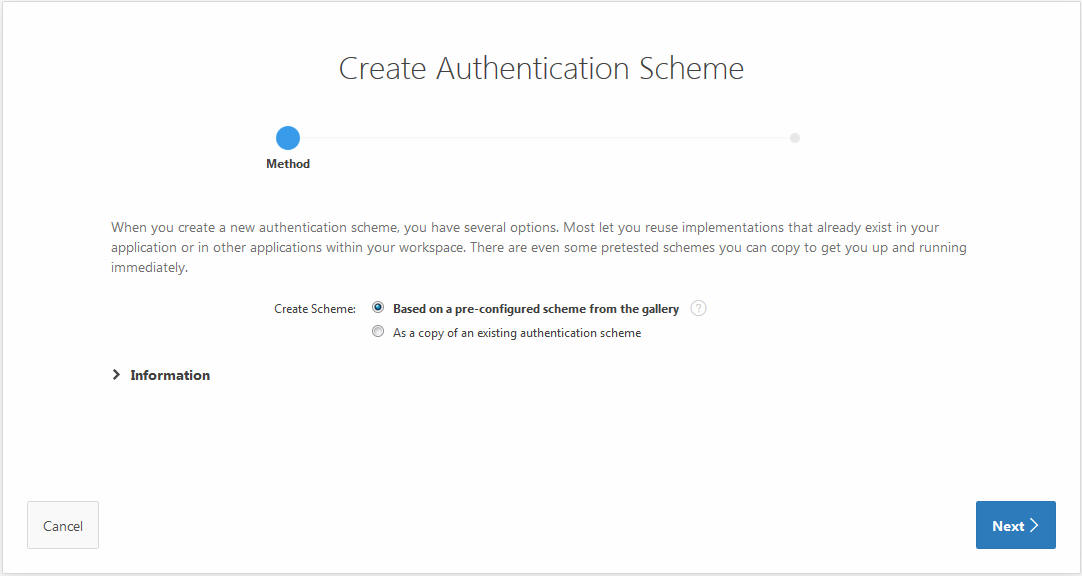
Ensure that HTTP Header is selected and is marked as Current. This will ensure that the Login screen is not displayed while the application is running.
If only Application Express Authentication is present, select Create a New Scheme to enable Single Sign On. While creating the scheme, select Based in a pre-configured scheme from the gallery.
Set the following values:
Select Scheme Type - HTTP Header Variable.
Set HTTP Header Variable Name - OAM_REMOTE_USER will be selected.
Select action if username is Empty - Redirect to Built in URL
Select verify Username - After login.
Change Logout Url of SSO Server to https://<server>/oamsso/logout.html?end_url=/orase/faces/home, Where <server> is Host URL
Click Current Authentication Scheme.
Run the application. This opens a new window with the application. If the Login window appears, then make sure the authentication scheme is set to the HTTP Header or contact administrator to ensure that the security scheme is handled appropriately.
Data scientists can use the Innovation Workbench Notebook to create notebooks, which are collections of documentation, snippets of code, and visualizations. These notebooks are bundled with key python modules for machine learning, data mining, natural language processing, network analysis, and optimization solvers.
Here is a list of python packages that are bundled with AIF. These packages provide features that span data mining processes of from data exploration to data visualization.
Ensemble Machine Learning Algorithms with scikit-learn
Deep Learning Library using TensorFlow, Keras
Data exploration and analysis using Pandas; NumPy; SciPy
Data visualization using Matplotlib; Seaborn
Data storage using cx_Oracle
Graph algorithms using Networkx
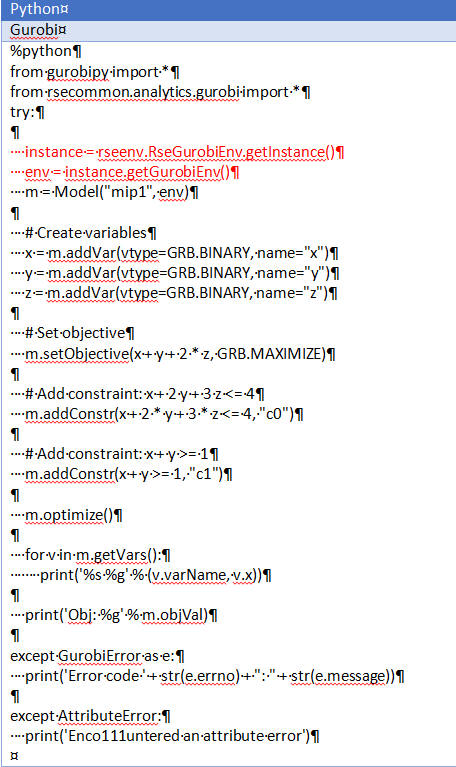
Optimization using Gurobi Solver
Data Studio graph analytics includes numerous built-in graph algorithms. Some of the classes of algorithms that it provides include:
Community Detection
Path Finding
Ranking
Recommendation
Pattern Matching
Influencer Identification
Invoking Python Code
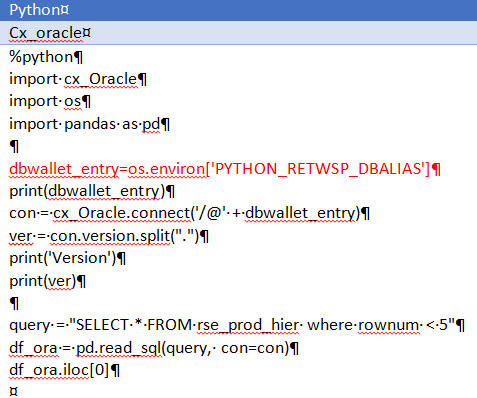
Connecting to a database using cx_Oracle
Database connection string should be fetched from environment variable. Refer to code in Figure 20-24 in red.
Figure 20-24 Connecting to a Database Using cx_Oracle
Executing Gurobi code
Create a Gurobi environment by calling RseGurobiEnv.getGurobiEnv(). Refer to the code in red in Figure 20-25
Invoking Oracle SQL/PL/SQL procedures
Figure 20-26 Invoking Oracle SQL/PL/SQL Procedures

Executing SQL
Executing PL/SQL
Invoking Parallel Graph Analytics
Figure 20-29 Invoking Parallel Graph Analytics

Creating a graph from scratch
This section describes the scheduling process.
In order to use the Datastudio Notebook REST API, either the Oracle Identity Cloud Service (IDCS) or the Oracle Cloud Infrastructure Identity and Access Management (OCI IAM) application is necessary. The IDCS or OCI IAM application must be created with following grant_type as (password) and client_credentials.
Once the IDCS or OCI IAM application is created, a new clientId:clientSecret will be generated. Note these credentials in order to perform a REST API request. A user must also be created in order to set up the Datastudio User Session.
Notebooks can be scheduled for automatic execution. To implement this, make a POST request to the using REST API call with the following payloads.
Execute once, immediately.
{
  "cronSchedule": "",
  "timeEnd": "",

}
Execute at a regular interval, and stop at a given date.
{
  "cronSchedule": "0/1440 * * * * *",
  "timeEnd": "2021-02-24T21:10:34.400Z",
  "id": "dsYVGG9Mvw"
}
Execute at a regular interval, indefinitely.
{
  "cronSchedule": "0/ 1440 * * * * *",
  " timeEnd": "",
  "id": "dsYVGG9Mvw"
   }
The REST API documentation details for request/response are located here:http://datastudio.oraclecorp.com/docs/apidoc/swagger-ui.html#/
Here is a REST API curl call example showing how to schedule a notebook.
Table 20-1 Example for Scheduling Notebooks
| Seq. # | REST API Purpose | REST API Curl Request | REST API Curl Response |
|---|---|---|---|
|
1 |
Fetch Authentication TokenPOST request |
curl --location --request POST 'https://<IDCS_HOST>/oauth2/v1/token' \--header 'Authorization: Basic <Base64 ClientID:ClientSecret>' \--header 'Content-Type: application/x-www-form-urlencoded' \--data-urlencode 'grant_type=password' \--data-urlencode 'scope=urn:opc:idm:__myscopes__' \--data-urlencode 'username=<username>' \--data-urlencode 'password=<password>' |
Response will have authentication token. To make subsequent request: { "access_token": "<Access Token>", "token_type": "Bearer", "expires_in": 3600} |
|
2 |
Setup SessionGET request |
curl --location --request GET '<APP_HOST>/datastudio/v2/sessions/user' \--header 'Authorization: Bearer <Token>' |
{ "username": "<user_name>", "permissions": [ "graph_create", "export_all", "view_permissions_tab", "import_notebook", "view_dashboard_tab", "view_credentials_tab", "create_notebook", "create_credential", "view_interpreter_tab", "delete_all" ], "authToken": "<Token>"} |
|
Note: The first two steps above are mandatory. Execute any of the following steps. |
|||
|
3 |
Schedule NotebookPOST request |
curl --location --request POST 'https://<APP_HOST>/datastudio/v2/notebooks/schedule' \--header 'Authorization: Bearer <Token>' \--header 'Content-Type: application/json' \--data-raw '{ "cronSchedule": "", "timeEnd": "", "id": "dsYVGG9Mvw"}' |
{ "id": "dsja4YWg", "status": "SUBMITTED", "startTime": null, "endTime": null, "error": null, "tasks": []} |
|
4 |
Schedule Notebook Paragraphs to execute immediatelyPOST request |
curl --location --request POST 'https://<APP_HOST>/datastudio/v2/notebooks/schedule' \--header 'Authorization: Bearer <Token>' \--header 'Content-Type: application/json' \--data-raw '{ "cronSchedule": "", "paragraphs": [ { "id": "dsB0zM58" } ], "timeEnd": "", "id": "dsYVGG9Mvw"}' |
{ "id": "dsVBqlO3", "status": "SUBMITTED", "startTime": null, "endTime": null, "error": null, "tasks": []} |
|
5 |
Schedule Notebook to execute immediately.Execute a notebook every five minutes.POST request |
curl --location --request POST 'https://<APP_HOST>/datastudio/v2/notebooks/schedule' \--header 'Authorization: Bearer <Token>' \--header 'Content-Type: application/json' \--data-raw '{ "cronSchedule": "*/1440 * * * * *", "endDate": "2020-12-17T14:10:34.400Z", "id": "dsYVGG9Mvw"}' |
{ "id": "dsja4YWg", "status": "SUBMITTED", "startTime": null, "endTime": null, "error": null, "tasks": []} |
|
6 |
Schedule Notebook Paragraphs.Execute a notebook/paragraph every five minutes.POST request |
curl --location --request POST 'https://<APP_HOST>/datastudio/v2/notebooks/schedule' \--header 'Authorization: Bearer <Token>' \--header 'Content-Type: application/json' \--data-raw '{ "cronSchedule": "*/1440 * * * * *", "paragraphs": [ { "id": "dsB0zM58" } ], "timeEnd": "2020-12-17T14:10:34.400Z", "id": "dsYVGG9Mvw"}' |
{ "id": "dsVBqlO3", "status": "SUBMITTED", "startTime": null, "endTime": null, "error": null, "tasks": []} |
|
7 |
Schedule Notebook Paragraphs.Execute a notebook/paragraph adhoc with parameters. |
curl --location --request POST 'https://<hostname>/datastudio/v2/notebooks/schedule' \--header 'Authorization: Bearer <Token>' \--header 'Content-Type: application/json' \--data-raw '{ "cronSchedule": "", "paragraphs": [ { "id": "dsa7kZYv", "message": "string", "params": { "FirstName": "Sandhya", "LastName": "Lonial" } } ], "timeEnd": "2020-02-24T21:10:34.400Z", "id": "dsYVGG9Mvw"}' |
{ "id": "dsOB0yra", "status": "SUBMITTED", "startTime": null, "endTime": null, "error": null, "tasks": []} |
|
8 |
Schedule Notebook Paragraphs.Execute a multiple paragraphs. |
{ "cronSchedule": "", "paragraphs": [ { "id": "dsB0zM58" }, { "id": "dsa7kZYv", "message": "string", "params": { "FirstName": "Sandhya", "LastName": "Lonial" } } ], "timeEnd": "2020-02-24T21:10:34.400Z", "id": "dsYVGG9Mvw"} |
{ "id": "dsOB0yra", "status": "SUBMITTED", "startTime": null, "endTime": null, "error": null, "tasks": []} |
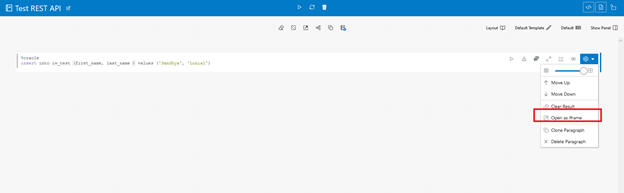
To obtain notebook and paragraph IDs, select a paragraph, using the Setting Context menu. Click Open as Iframe. A new browser tab opens. Copy the url in the address bar in browser and borrow IDs from the URL notebookId=dsYVGG9Mvw&pid=dsB0zM58
https://<host>/datastudio/?root=iParagraph¬ebookId=dsYVGG9Mvw&pid=dsB0zM58&readOnly=false&showCode=true
Consider the following:
Make sure there are no empty paragraphs as this results in an 500 error response.
To test, create a table and view records that are inserted in the table.
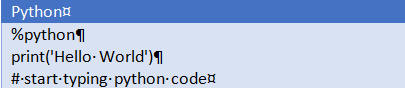
%oracle
insert into iw_test (first_name, last_name ) values (John, 'Doe')
%python
print('Hello World')
Verify using the following:
CREATE TABLE iw_test (
    person_id NUMBER GENERATED BY DEFAULT AS IDENTITY,
    first_name VARCHAR2(50) NOT NULL,
    last_name VARCHAR2(50) NOT NULL,
    PRIMARY KEY(person_id)
);
select count(*) from iw_test;
Here is a REST API curl call example showing how to schedule a notebook.
Table 20-2 Example
| REST API purpose | REST API curl request | REST API curl response |
|---|---|---|
|
Fetch Authentication Token |
curl --location --request POST 'http://bur00afq.us.oracle.com:26000/datastudio/v2/sessions/login' \--header 'Authorization: Basic b3Jhc2UxOnBhc3N3b3JkMQ==' \--header 'Content-Type: application/json' \--header 'Cookie: JSESSIONID=cmWRE8eaMH1e7ClA72Qx8QVxX3SKVMuEi1S_ErDgySh2qInJRbdZ!1637160649' \--data-raw '{"credentials":"password1","principal":"orase1"}' |
Response will have authentication token. To make subsequent request:authToken":"de6460f5-e36c-4592-b2c3-6ef18268e6c5" |
|
Schedule Notebook |
curl -X POST -H 'Content-Type: application/json' -H 'x-auth-token: de6460f5-e36c-4592-b2c3-6ef18268e6c5' -i 'https:// <host>:<port>/datastudio/v2/notebooks/schedule' --data '{ "cronSchedule": "0/5 * * * * *", "endDate": "2020-02-24T21:10:34.400Z", "id": "dsZgvK3G"} |
{"id":"dsbBVLgL","status":"SUBMITTED","startTime":null,"endTime":null,"error":null,"tasks":[]} |
RESTful Services allow for the declarative specification of RESTful access to the database. They are created by configuring a set of Uniform Resource Identifiers (URIs) to a SQL query or anonymous PL/SQL block. The set of URIs is identified by a URI template.
To create a RESTful service:
Select SQL Workshop RESTful Services.
On selecting RESTful Services, you see the option to create a RESTful Service.
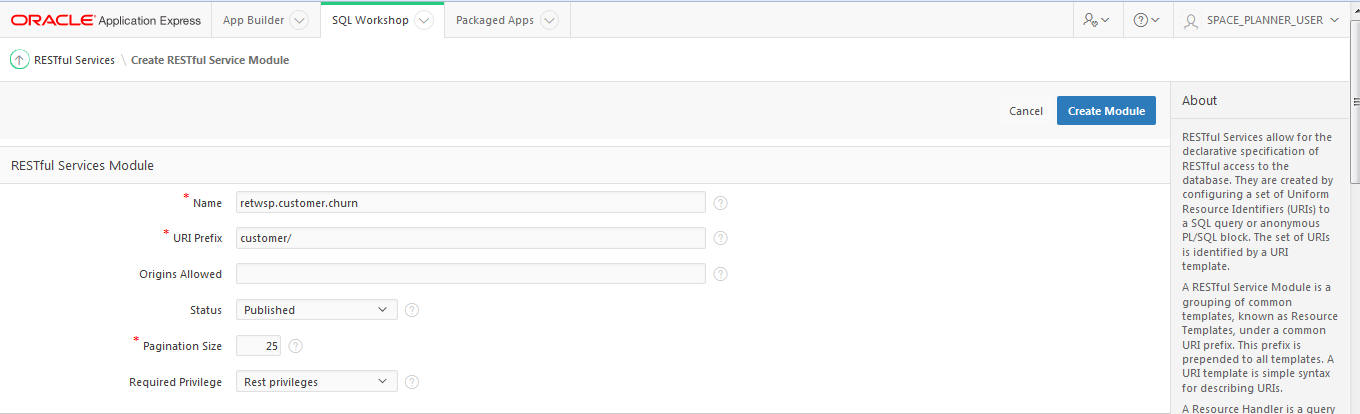
A RESTful Service Module is a grouping of common templates, known as Resource Templates, under a common URI prefix. This prefix is prepended to all templates.
A URI template is a simple syntax for describing URIs. You populate the required fields as shown in Figure 20-36 and make sure to set the required privileges as Rest Privileges.
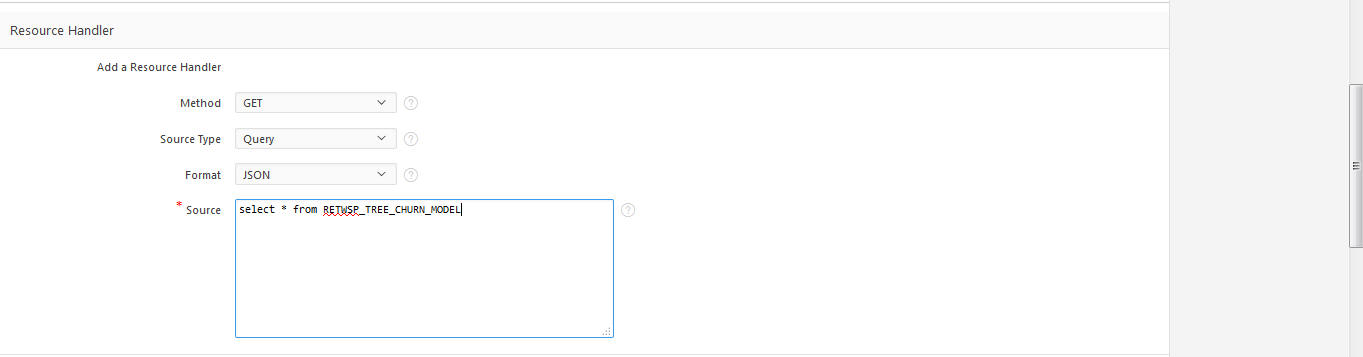
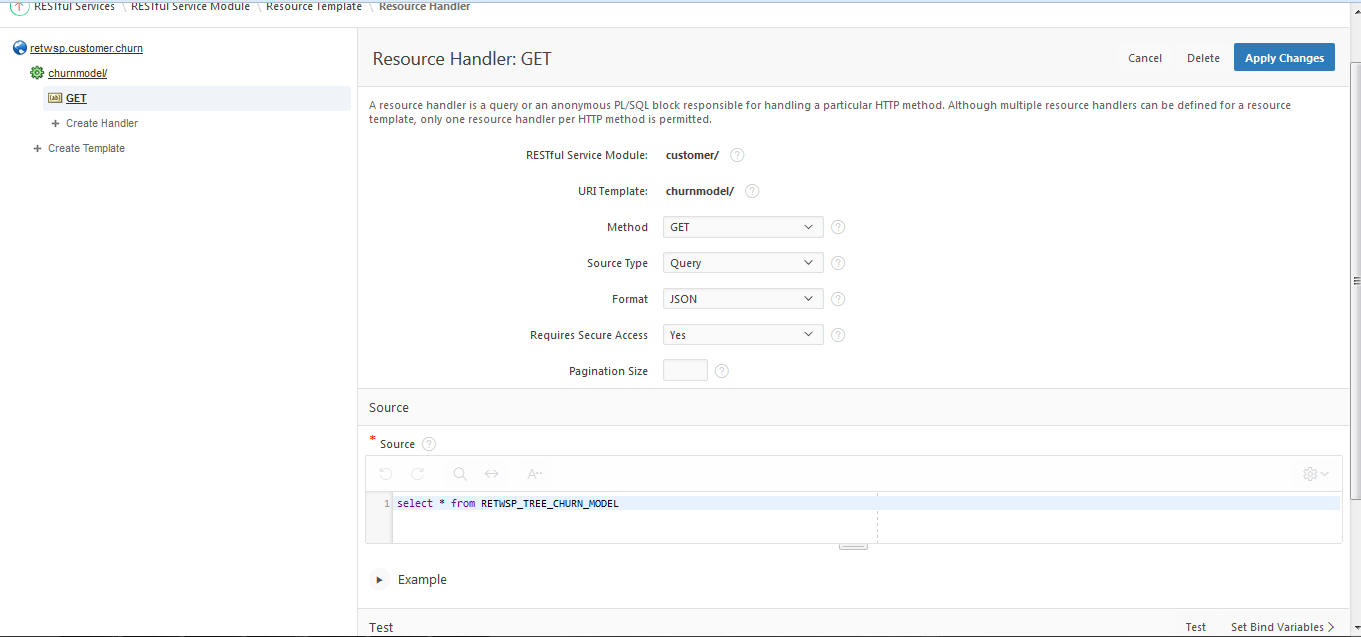
A Resource Handler is a query or an anonymous PL/SQL block responsible for handling a particular HTTP method. Multiple handlers can be defined for a Resource Template; however, only one handler per HTTP method is permitted. You can select method, source type, format, and SQL Query to read data from the schema.
To test the rest API, click Test Button (see Test at the bottom right corner.)
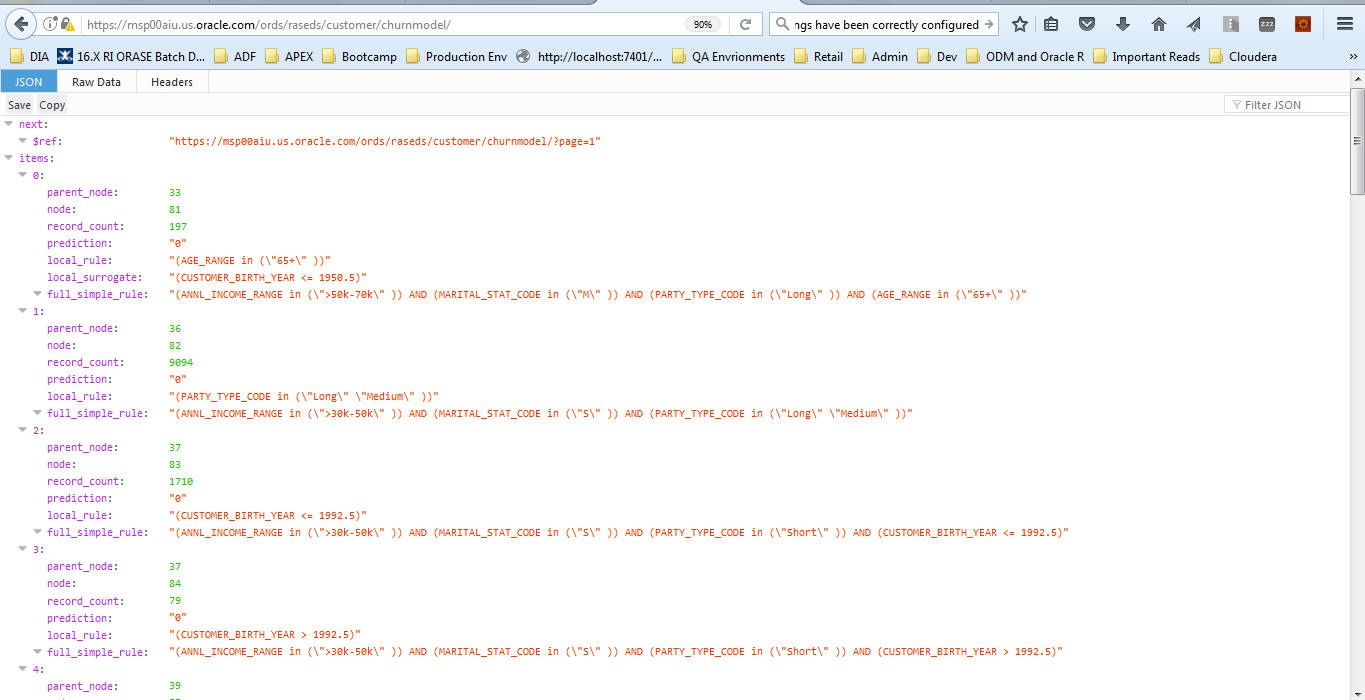
The page refreshes and displays data in JSON format.
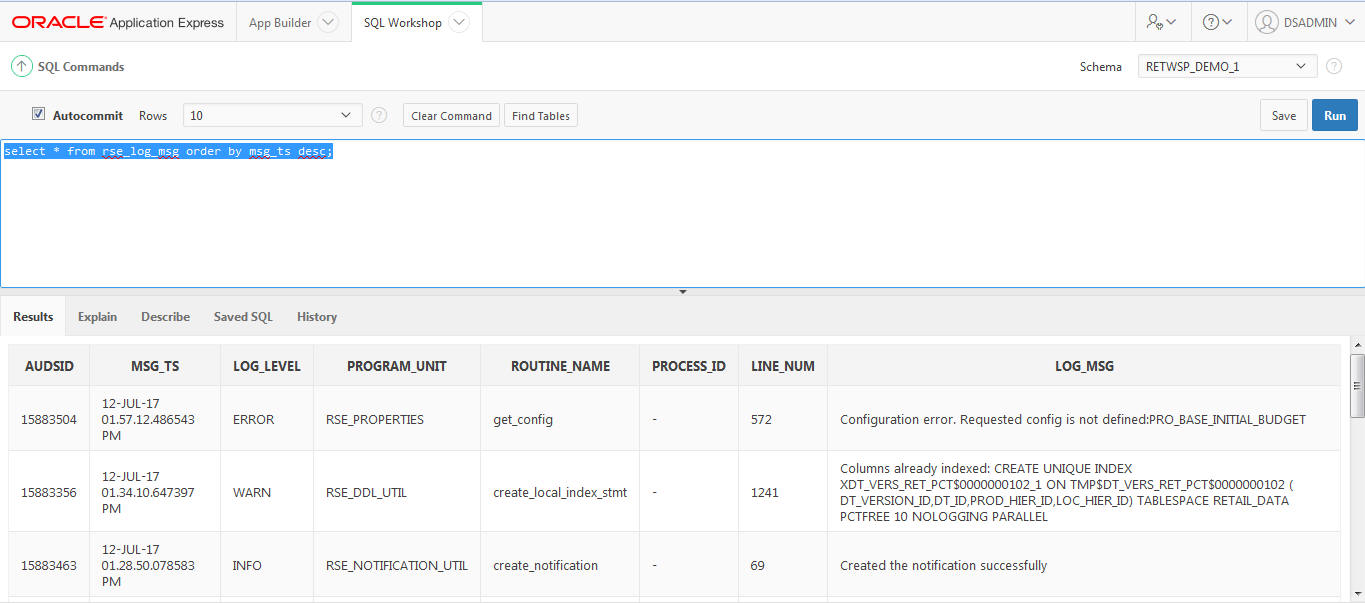
Science Innovation Workbench can also be used for monitoring application logs to troubleshoot issues in an application process due to an error in a batch or business process.
Click Innovation Workbench.
Select Retailer Workspace.
Select SQL Workshop.
Select SQL Command.
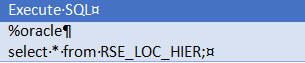
Enter SQL select * from rse_log_msg order by msg_ts desc;
Select run and view the log message in the bottom panel.
You can describe objects using describe rse_log_msg;
Innovation Workbench can be used for data mining tasks that are long running and have to rely on database scheduling functions and procedures that can be called from any PL/SQL program.
Any jobs created in the Retailer Workspace using Innovation Workbench must be created under Job Class RETAILER_WORKSPACE_JOBS. Jobs created in a default job class or any other job class other than RETAILER_WORKSPACE_JOBS can be disabled by an Oracle Administrator while managing resources.
BEGIN
DBMS_SCHEDULER.CREATE_JOB (
   job_name           =>  'retwsp_churn_model',
   job_type           =>  'STORED_PROCEDURE',
   job_action         =>  'retwsp.pkg_customer_analytics.proc_churn_model',
   start_date         =>  '01-JAN-17 07.00.00 PM US/Pacific',
   repeat_interval    =>  'FREQ=YEARLY; BYDATE=0331,0630,0930,1231; ',
   end_date           =>  '31-DEC-17 07.00.00 PM US/Pacific',
   job_class          =>  'RETAILER_WORKSPACE_JOBS',
   comments           =>  'Retailer workspace churn model job');
END;
/
The following database objects are available for the advanced analyst to use.
Table 20-3 Schema Objects
| Table Name | Description |
|---|---|
|
rse_cal_hier |
This table is used to hold all calendar hierarchies. Examples are the normal calendar hierarchy, and can also contain an alternate hierarchy for the fiscal calendar. |
|
rse_prod_hier |
This table is used to hold all product hierarchies. Examples are the normal product hierarchy, and can also contain an alternate category hierarchy. |
|
rse_loc_hier |
This table is used to hold all location hierarchies. Examples are the normal organizational hierarchy, and can also contain an alternate hierarchy for trade areas. |
|
rse_prod_loc_status |
Status of the item at this location for this time frame. A-Active; I-Inactive; C-Discontinued; D-Deleted |
|
rse_ret_lc_wk_a |
This table contains aggregate sales data for the dimensions of a location and a week. |
|
rse_sls_lc_wk_a |
This table contains aggregate sales data for the dimensions of a location and a week. |
|
rse_sls_pr_lc_cs_wk |
This table contains aggregate sales data for a Product, Location, Customer Segment and Week. The SLS_PR columns represent the metrics for that week that were on promotion, while the other metrics represent the sales metrics while the item was not on promotion. |
|
rse_sls_pr_wk_a |
This table contains aggregate sales data for the dimensions of a product and a week. |
|
rse_sls_ph_lc_wk_a |
This table contains aggregate sales transaction data for different product hierarchy/levels, at the store location/week dimension. |
|
rse_sls_pr_lc_wk |
This table contains aggregate sales data for a Product, Location, and Week. The SLS_PR columns represent the metrics for that week that were on promotion, while the other metrics represent the sales metrics while the item was not on promotion. |
|
rse_sls_txn |
This table contains sales transaction data. |
|
rse_prod_attr |
This is the table that holds product attributes. |
|
rse_prod_attr_grp |
This is the table used to load the associations of CM Groups to product attributes. |
|
rse_prod_attr_grp_value |
This is the table used to load the associations of CM Groups to product attributes and its values |
|
rse_prod_attr_grp_value_map |
This is the table used to load the associations of CM Groups to product attributes, group values and actual product attribute values |
|
rse_like_loc |
This is the table used to load the like stores for CMGroup or Category. |
|
rse_hier_level |
This table defines the various levels for all the hierarchies. |
|
rse_hier_type |
This table defines the available hierarchies for use within the RSE applications. |
|
rse_fake_cust |
Table for specifying customers who are considered as fake customers. A fake customer is a customer who purchases too many transactions to be considered a single customer. Examples are generic store cards. |
|
rse_loc_src_xref |
This table contains integration ID information that enables interaction with other systems, using IDs that other systems can accommodate for the Location Hierarchy. |
|
rse_prod_src_xref |
This table contains integration ID information that enables interaction with other systems, using IDs that other systems can accommodate for the Product Hierarchy. |
|
rse_log_msg |
This table contains messages logged while database, batch or business processing. |
|
w_party_per_d |
This table contains customer data and its attribute. |
|
cis_cust_attr_vw |
Customer Attributes - This view provides basic customer attributes. |
|
cis_cust_trans_attr_vw |
Customer Transaction Attributes - This view provides attributes for customer transactions. |
|
cis_cust_trans_ph_attr_vw |
Customer Transaction Attributes - This view provides product attributes for customer transactions. |
|
cis_custseg_attr_exp_vw |
This view provides an export of the attributes that define a segment. |
|
cis_custseg_cat_attr_exp_vw |
This view provides an export of the product attributes that define a segment. |
|
cis_custseg_cust_exp_vw |
This view provides the members for a an exportable set of segments. |
|
cis_custseg_exp_vw |
This view provides an exportable set of clusters for customer segmentation. |
|
cis_sls_cust_cal_a |
This table contains aggregate customer sales data for a configurable level of the calendar hierarchy. The table is to be partitioned by Calendar, and is also be suitable for sub partitioning by Customer using a Hash Partition strategy, so that subsequent uses can operate within the confines of a given Hash partition. |
|
cis_sls_cust_ph_cal_a |
This table contains aggregate customer sales data for a configurable level of the calendar hierarchy, for a selected set of product hierarchies. The table is to be partitioned by Calendar, and is also be suitable for sub partitioning by Customer using a Hash Partition strategy, so that subsequent uses can operate within the confines of a given Hash partition. |
|
cis_sls_ph_a |
This table contains aggregate sales data for all product hierarchy members of a configured hierarchy type and level. This can be used to identify the Top Categories for use by things like Customer Segmentation. |
|
cis_cluster_set_exp_vw |
This view provides an exportable set of clusters to send to Cat Man. |
|
cis_store_cluster_exp_vw |
This view provides an exportable set of clusters for stores. |
|
cis_store_cluster_mem_exp_vw |
This view provides the members for a an exportable set of segments. |
|
cis_store_cluster_prop_exp_vw |
This view provides an exportable set of clusters for stores. |
|
cis_cluster_sls_ph_lc_a |
This table contains calendar level aggregates for the various clusters. The table is to be partitioned by Calendar. |
|
cis_cluster_summ_level_attr |
These are metrics generated at cluster/attribute/business object level. There are metrics that are generated at that level such as centroid. |
|
cis_prod_attr_loc_share |
This table contains aggregate sales data for product attribute values as well as the share that these values are with respect to the total sales for the product hierarchy, calendar, location. The share value is a configurable value, which can either be based on sales units, sales amount or profit amount. |