14. Real Time Liquidity Management
14.1 Introduction
14.2 Structure Maintenance
14.2.1 Creating Structure
This chapter contains the following sections:
- Section 14.2.1.1, "Creating a New Structure"
- Section 14.2.1.2, "Add Accounts"
- Section 14.2.1.3, "Group Accounts"
14.2.1.1 Creating a New Structure
You can invoke the ‘Structure Maintenance’ page by clicking on the Structure Maintenance menu under “RTL”
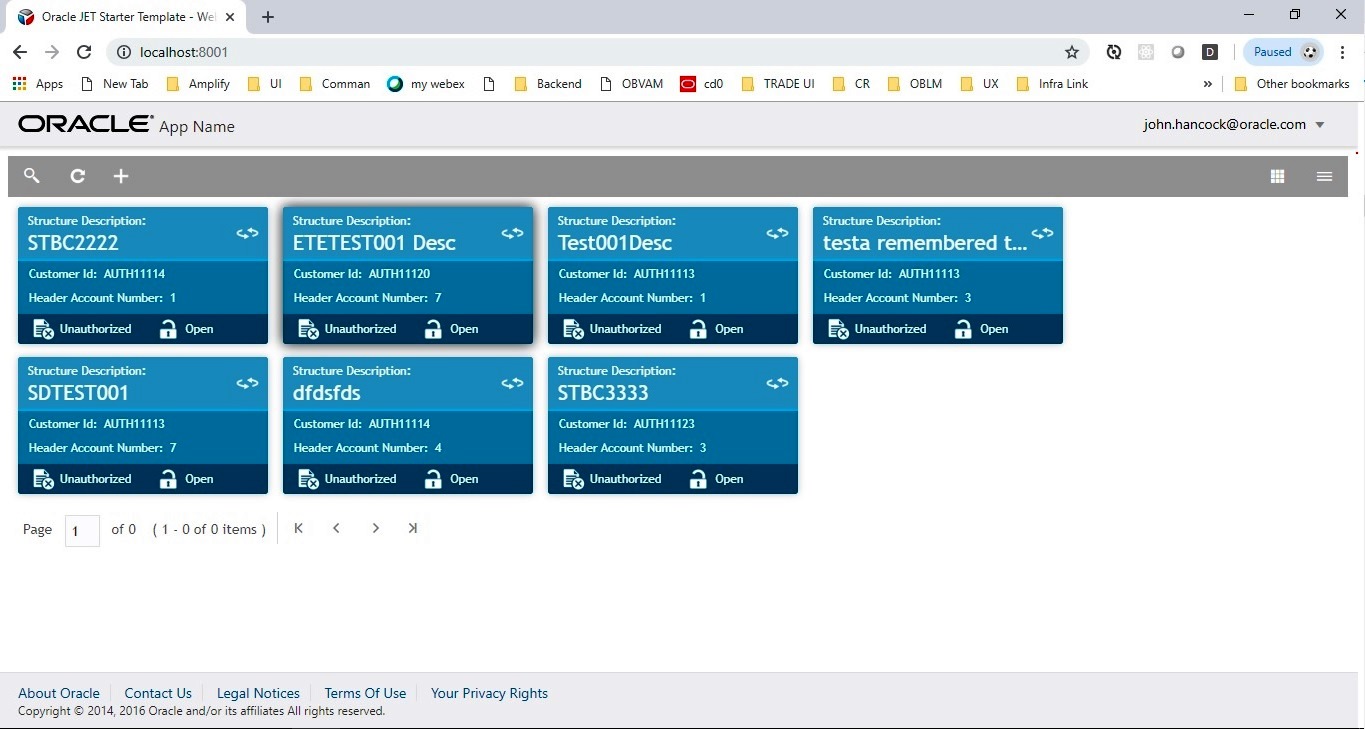
Click “+” button to add a new structure.
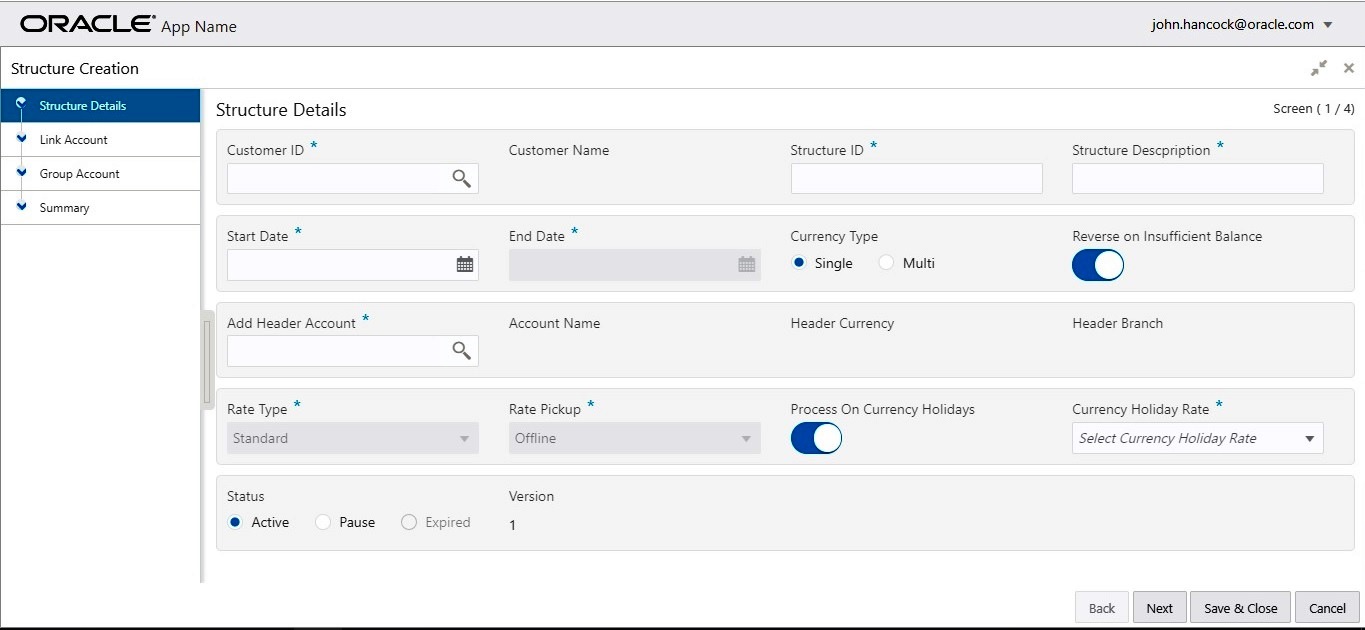
Specify the following details:
Customer ID
Select the customer ID (from the existing list of customer) by clicking magnifying glass icon.
Customer Name
After selecting the customer ID, the customer name will be automatically populated.
Structure ID
The structure ID will be generated by the system. The automatically generated ID will be displayed here.
Structure Description
Any brief description of the structure under consideration can be entered in this field.
Start Date
Select the date from which the structure should start participating into Real time liquidity related activities.
End Date
Select the date after which the structure will stop participating.
Currency Type
There are two choices:
Single: If this option is selected, the participating accounts having same currency as of header account will be able to participate.
Multi: Any account in the system can participate.
Reverse on Insufficient Structure Balance
If “Yes” option is selected (switch ON), the balance transfer activity will be reversed if the balance is found to be not sufficient to support header account.
In case of “No”, the balance transfer will be retained RTL (Real Time Liquidity) failure.
Add Header Account
The user can select the account (for the selected customer) to act as a header in structure hierarchy.
Account Name
The account name will be automatically populated based on header account selection.
Header Currency
The currency of the selected header account will be populated.
Header Branch
The branch code of the selected header account will be populated here.
Rate Type
The selection of “Rate Type” is dependent on “Currency Type” filed.
If the selection of “Currency Type” filed is “Single”, the default (and only) selection will be “Standard”. The user will not be able to change it.
If “Currency Type” is “Multi”, the default selection will be “Standard”. However, the user have a choice to change it to “Medium”.
Rate Pickup
This field will be enabled only if the “Currency Type” is “Multi”. The options are
Offline: The currency conversion rate will be picked up from DDA.
Online: As of now, this option is not supported by the system.
Process on Currency Holidays
This field will be enabled only if the “Currency Type” is “Multi”. The options are “Yes” (switch ON) and “No”.
Currency Holiday Rate
This field will be enabled only if the “Currency Type” is “Multi”. The options are
Previous Day: The previous working day rate will be applicable for currency conversion.
Average Rate: The average rate calculated by the system will be applicable.
Status
Following are the options.
Active: This is a default selection. It means that the structure will actively participate in real time liquidity activity during the period (between start and end date of structure).
Pause: The user can pause the participation of the structure during the period (between start and end date of structure).
Expired: This is non-editable field. This option will be automatically selected by the system when the current date goes beyond structure end date. To restore the previous status of structure (either active or pause), the user has to change the end date in future. i.e. Beyond current date.
Version
This is managed by system. This indicates no. of modifications done to structure.
14.2.1.2 Add Accounts
While creating the structure, the next step is to add accounts into the structure from the existing list of accounts in DDA for that particular customer.
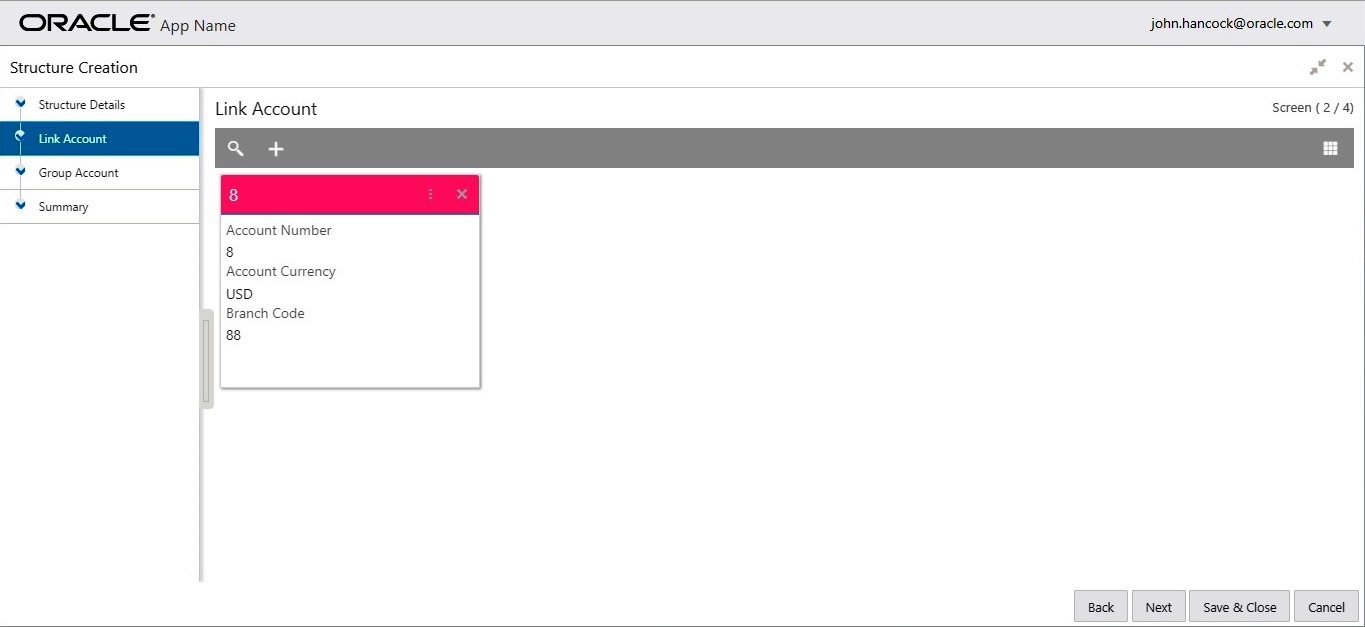
The “+” button on Link Accounts screens allow user to add an account into the structure.
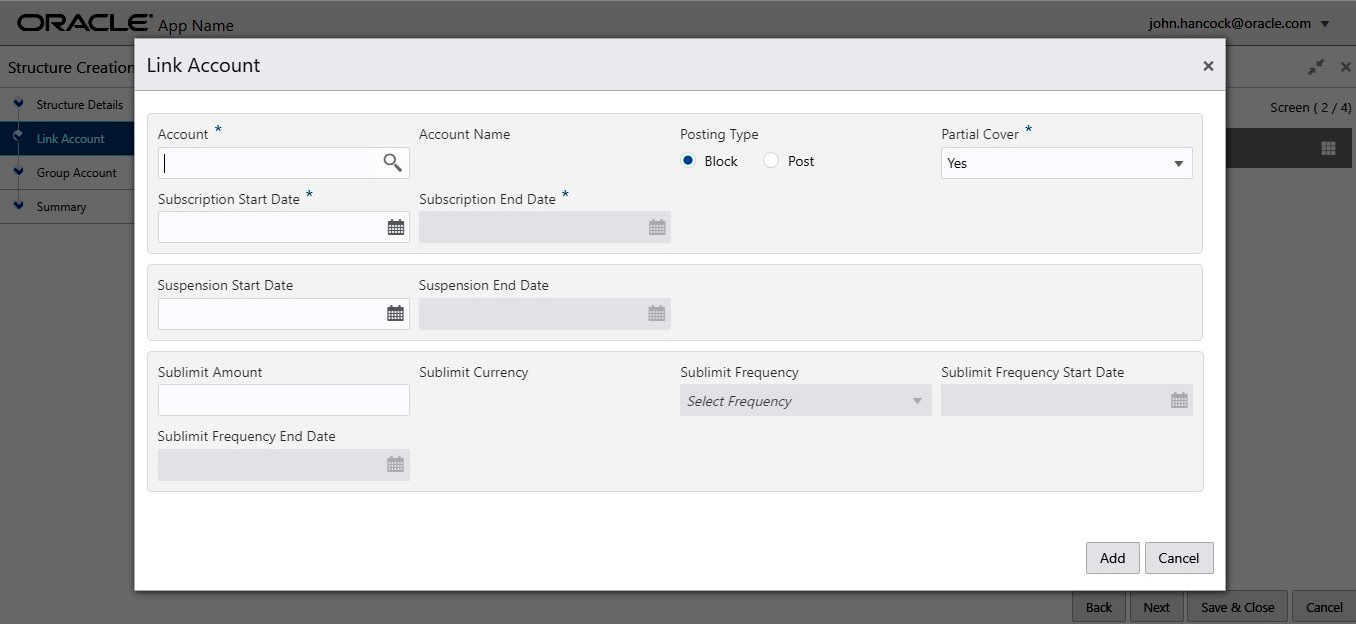
Account
The user can select the account from the list of accounts (belonging to selected customer) in structure hierarchy.
Account Name
The account name will be automatically populated based on selection of account.
Posting Type
The user have two options.
Block: This is a default selection. This means the amount will be blocked during RTL (Real Time Liquidity) execution.
Post: If this option is selected, the amount under consideration will be actually posted.
Partial Cover
If “Yes” (default value) is selected, the account will contribute the partial amount.
If “No” is selected, the account will not be considered for RTL (Real Time Liquidity).
Subscription Start Date
This is the date from which the account will start participating in RTL.
Subscription End Date
This is the date after which the account will stop participating in RTL.
Suspension Start Date
From this date, the account will temporarily pause participating into RTL.
Suspension End Date
After this date, the account will start participating into RTL once again. i.e. After temporary pause
Sublimit Amount
This is the amount (applicable for period defined by “Sublimit Frequency”) will be applicable to participate in RTL process; irrespective of the total balance of account.
Sublimit Currency
This is a currency of the selected account.
Sublimit Frequency
User can choose the frequency (duration) for which the sublimit amount will be applicable.
Sublimit Frequency Start Date
From this date, the sublimit will be applicable for the period.
Sublimit Frequency End Date
After this date, the sublimit will cease to apply.
14.2.1.3 Group Accounts
After adding accounts to structure, the next step is to group these accounts.
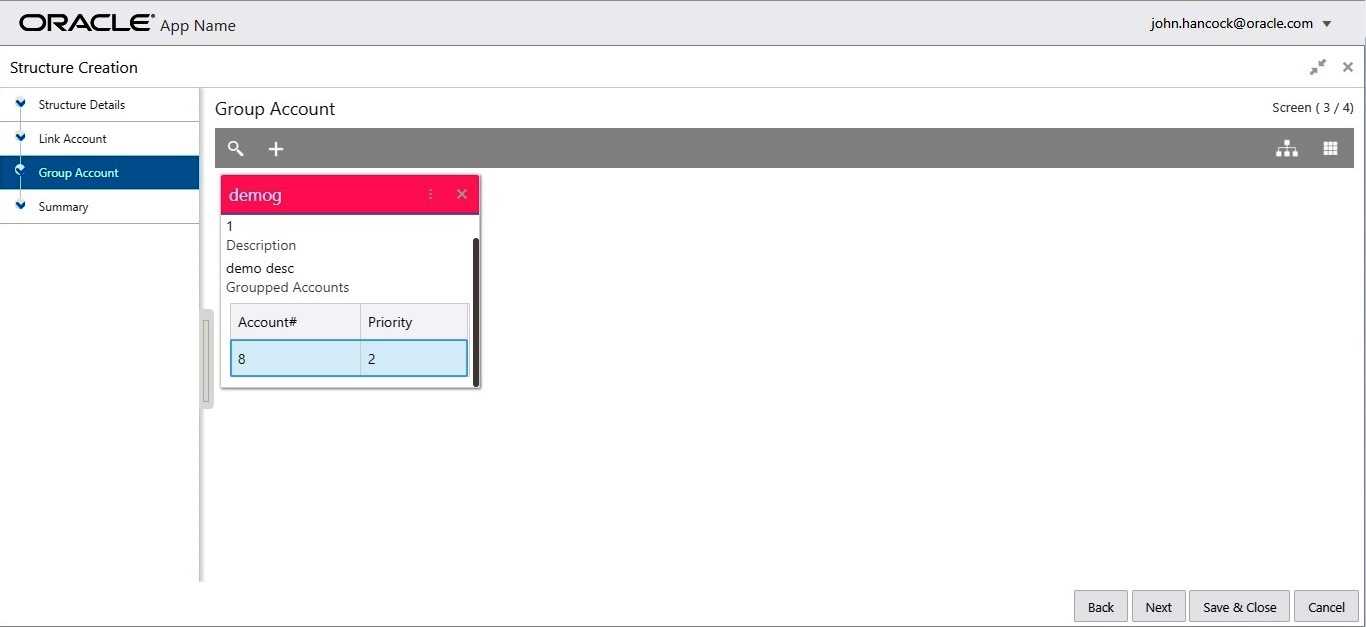
The “+” button on Group Accounts screens allow user to add an account into the structure.

Group Name
The user can specify the name of the group.
Group Priority
The RTL process will be executed based on the given priority. Lower the number, higher is the priority.
Description
The user can specify the description of the group.
Reverse on Insufficient
If default “Yes” option (switch ON) is selected, the amount (blocked or posted) contributed by the accounts under the group will be reversed.
On the left side of this screen, there is a list of accounts; which are added to the structure. The user can select the account to be added into the group.
While adding the account into the group, the priority of the account (within the group) can be specified. Once the account is added into the group, the same cannot be added in the same or any other group again within that structure.
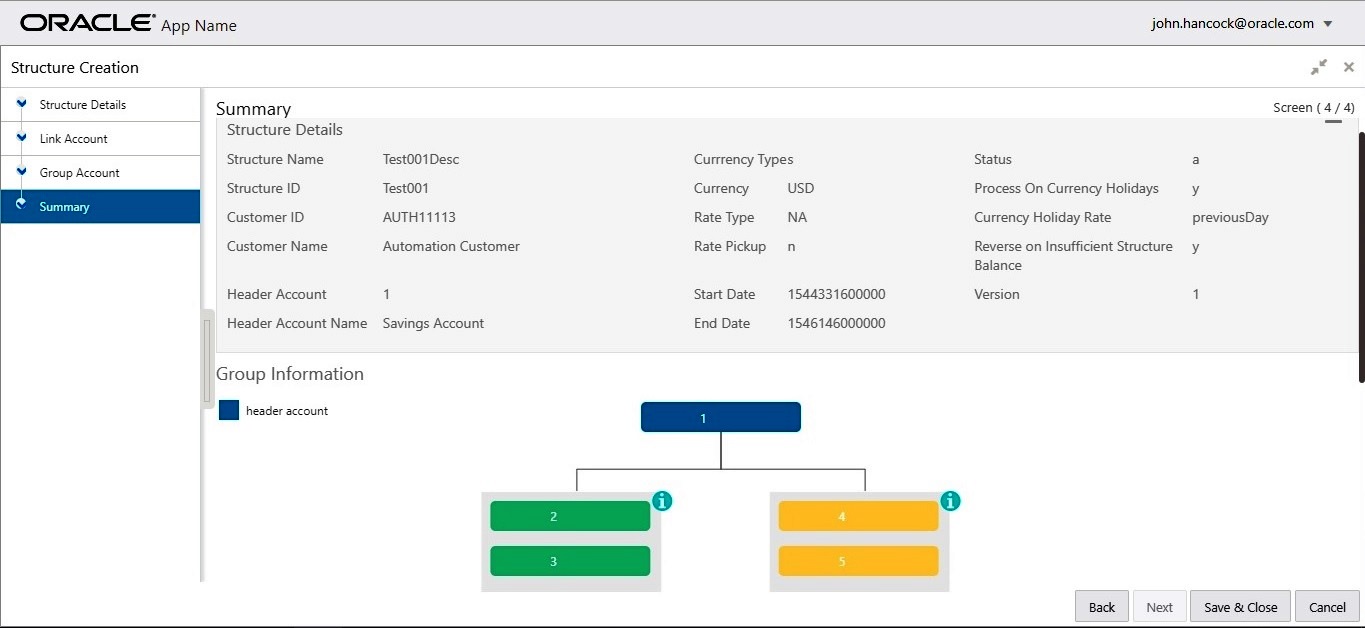
As a last step of a structure creation process, the user can view the structure hierarchy (along with important structure attributes) in the last screen before finalizing the structure.