3. Maintaining Data Specific to Data Entry Module
Before you begin operations in the Data Entry module of Oracle FLEXCUBE you must maintain certain basic information in the system. For example, you must maintain the following:
- Branch specific parameters (you can opt to enforce denomination tracking)
- Till/Vault/Cash Dispenser details of your branch
- Bank codes (for other banks)
This data is maintained first since it is required to create your teller products, enter teller transactions, and so on. In other words, this is the foundation on which you build the superstructure ‘Products’ to which, you can link transactions.
This chapter contains the following sections:
- Section 3.1, "Static Data Maintenance"
- Section 3.2, "Journal Multi Offset Template Maintenance"
- Section 3.3, "Journal Template Maintenance"
3.1 Static Data Maintenance
This section contains the following topics:
- Section 3.1.1, "Maintaining Static Data"
- Section 3.1.2, "Maintaining Data Entry Branch Conditions "
- Section 3.1.3, "Maintaining Till & Vault Parameters "
- Section 3.1.4, "Maintaining Clearing Bank Codes"
3.1.1 Maintaining Static Data
Static data, which is maintained in Oracle FLEXCUBE, can be either common to several modules or specific to a module. For example, data relating to exchange rates is common to modules like Foreign Exchange and Money Market. Static Data that is commonly accessed by several modules is maintained centrally.
Data that is specific to a module is maintained in the module itself. For example, data relating to Tills, Vaults and Cash Dispensers is specific to the Data Entry module. It is therefore maintained in the Data Entry module.
You can maintain static data specific to the Data Entry module in three different screens:
- Data Entry Branch Conditions screen
- Till/Vault/Dispenser Maintenance screen
- Clearing Bank Code Maintenance screen
The procedure to invoke and maintain the tables is explained below.
3.1.2 Maintaining Data Entry Branch Conditions
The mandatory operations and the default parameters that you can define for your branch are referred to as Branch Conditions.
For instance, you can establish operational controls in your branch such as:
- Enforce rekey of important values of a transaction at the time of authorization
- Set default parameters for your branch such as enforcing the input of currency denominations for teller transactions
- Defining an exchange rate variance (explained below) for your branch which will apply to journal and multi offset transactions
You can define the following branch conditions in the Data Entry Branch Conditions table:
- Rekey at the time of authorization of journal and multi offset transactions
- Transaction codes for cash transfers amongst Tills Vaults and Cash Dispensers
- Exchange Rate Variance
- Local currency equivalent of the Exchange Rate Variance
- Denomination input for teller transactions
- Use Exchange rate history
- Allow Cash Dispenser functionality and define the minimum dispensable amount
- Defining the maximum amount to be dispensed during an alarm situation.
You can invoke the ‘Journal Entry Branch Parameters Maintenance’ screen by typing ‘DEDBRCON’ in the field at the top right corner of the Application tool bar and clicking the adjoining arrow button.

Click new icon. You can now maintain the branch conditions for your branch.
Branch Code
Select the branch for which you are maintaining the parameters.
Journal Entry and Multi Offset Entry
You can specify the values that the authorizer of a transaction has to rekey when authorizing it.
All operations on a transaction (input, modification, etc.,) have to be authorized:
- By a user other than the one who carried out the operation
- Before you can begin the end-of-day operations
When you invoke a transaction for authorization—as a cross-checking mechanism to ensure that you are calling the right transaction—you can specify that the values of certain fields should be entered before the other details are displayed. The complete details of the transaction will be displayed only after the values to these fields are entered. This is called the ‘re-key’ option. The fields for which the values have to be given are called the ‘re-key’ fields.
If no re-key fields have been defined, the details of the transaction will be displayed immediately when the authorizer calls the transaction for authorization. The re-key option also serves as a means of ensuring the accuracy of inputs.
You can specify the values of Journal and Multi-offset transactions that the authorizer should rekey in this screen.
Under Journal Entry (on the top left corner) and Multi-Offset Entry (top right corner), you will find the following option: Rekey Required Under this option you will see two buttons against ‘Yes’ and ‘No’ respectively.
Click on the button against Yes if you want the authorizer of journal transactions to rekey values. Similarly, click on the button against Yes if you want the authorizer of multi offset transactions to rekey important fields.
Click on the button against No, in these fields, if you do not want the authorizer to rekey values at the time of authorization.
Re-Key and Multi Rekey Fields
Under Journal Entry and Multi Offset Entry respectively, you will see a list of re- key fields. Check against the fields that you want to be re-keyed at the time of authorizing for Journal and Multi Offset entries.
The fields that can be re-keyed for journal entries are:
- Value Date
- Amount
- Transaction Required
- Account
The fields that can be re-keyed for multi offset entries are:
- Value Date
- Main Transaction Code
- Offset Transaction Code
- Amount
The advantages
The ‘Rekey at authorization’ facility is a cross-checking mechanism, which has been provided in Oracle FLEXCUBE. By rekeying the values of a transaction the authorizer can ensure that a transaction is error free.
For instance, you have debited a sum of $100 USD from a customer account. The account number of the customer is USDUS100003D. The Value Date of the transaction is 20/12/99.
The authorizer of the above transaction will have to rekey, for example, the Account Number of the customer; the Amount of the transaction; and the Value Date of the transaction if you have indicated that these values have to be rekeyed at the time of authorization.
By doing so the authorizer can ensure that the transaction is error free.
Exchange Rate Variance (%)
You can maintain exchange rate variation limits for Journal and Multi offset transactions. When you input a Journal transaction, the exchange rate (which you maintain at the beginning of day in the currency table) will be applied. This is referred to as the default exchange rate.
However, for a special customer or in special cases, you may want to use an exchange rate that is greater than the default exchange rate. In this field, you can specify the maximum and minimum percentage difference of the special rate from the default rate. In other words, you can specify the Maximum and normal Exchange Rate Variance.
Note
When you enter a transaction, the system will not seek an override if the Exchange Rate that you choose to apply is lower than the Minimum Exchange Rate Variance specified in the Minimum Exchange Rate Variance field. If the Exchange Rate is between the Minimum and the Maximum Exchange Rate Variance defined, the system will display an override message. The system will not store a transaction if you apply an Exchange Rate that is more than the Maximum Exchange Rate Variance defined.
Local Currency Equivalent Variable Limit
Another parameter that you can define for Teller and Journal type transactions, in this screen, is the LCY Equivalent Variance Limit.
When a teller enters a transaction (Teller/ Journal/ Multi offset) she can change the local currency equivalent for the transaction (if it is a foreign currency transaction). The input in this field determines the variance in number of units (note NOT percentage) between the default value and the value changed.
Use Exchange Rate History
Often you may enter back dated transactions. That is, you may enter a transaction date that is earlier than your current system date. On such a transaction a teller may want to apply the exchange rate that prevailed on the transaction date. This rate must be retrieved from history.
By clicking on the box adjacent to ‘Use Exchange Rate History’ you can indicate that you would like to apply the exchange rate from history on back dated transactions. If you do not choose this option, the Spot Rate (maintained for the day on which the transaction is entered in the system) will be used for the transaction.
For example, if the default equivalent of a FCY transaction is 120 units in the LCY and the allowed variance amount that you have specified is 10 units in the LCY, then the LCY equivalent if changed should be between 110 and 130 units.
Denomination Tracking Required
You can opt for tracking denominations for data entry transactions by checking the ‘Denomination Tracking Required’ checkbox.
Back Value Details
You can post back value dated transactions in Oracle FLEXCUBE. However, for the purpose of risk tracking, you can specify a limit beyond which users will be prevented from posting a back value dated transaction in the system.
Back Valuation Check Required
Check against the option ‘Back Valuation Check Required’ if you want enable back value dated transactions.
Back Value Days
You then need to specify the number of days to which a transaction posted by a user can be back-valued dated in Oracle FLEXCUBE. If a user specifies a date that does not fall within the back value days limit (measured in calendar days i.e. this period is inclusive of holidays) maintained here, the system will display the error message as “The value date is earlier than the Permitted value days.”
- If the message is configured as an ‘error’, you will not be able to proceed with the transaction, until you specify a date, which is within the limits maintained.
- If the message is configured as an ‘override’, you will be able to proceed with entering the transaction, but an override is logged into the database, that the date specified does not fall within the limits maintained.
- If it is configured as a ‘ignore’ message, then no back-valuation check will be performed.
The same validations are carried out for transactions that are uploaded from external systems.
Note
- You will be allowed to specify the ‘Back Value Days’ only if the ‘Back Valuation Check Required’ option is checked. If the option is not enabled, the system will allow you to post back-valued transactions upto any date in the past (no check will be done). Further, if the option is checked but you have not maintained the ‘Back Value Days’ (maintained as NULL), the system will interpret it to be ‘Zero’ days allowed (for back valued transactions).
- This Functionality will be available for your branch only if the ‘Denomination Tracking Required’ functionality is not enabled for your branch.
3.1.2.1 Fields Button
You can capture additional information that you would like to use either for your convenience or to suit the requirements of your bank. Adding to its flexibility, Oracle FLEXCUBE now provides the option to add fields based on your specifications to meet your needs.
Based on your requirement and the nature of the field, you can specify default values and validations for the field. Oracle FLEXCUBE will validate all entries made to the field against the validations you define for a field. Click ‘Fields’ button to maintain the additional fields.
Refer the User Defined Fields chapter in the Modularity User Manual for details.
3.1.3 Maintaining Till & Vault Parameters
Tills and Vaults are cash repositories. Tills are cash boxes that tellers use. All Tills are linked to the one Safe, or Vault, in the bank. Bank may choose to maintain several Vaults (a Vault for every currency).
For each till or vault that you create in your branch, you have to define the following:
- A unique ID for the till/vault
- The currency details
- The vault to which the till is linked
- The shortage/overage GL
- The minimum and the maximum balance for tills
You can maintain Till or Vault details in the ‘Till/Vault Maintenance’ screen. In the ‘Till/Vault/Dispenser Maintenance’ screen click new icon in the Application tool bar.
You can invoke the ‘Till & Vault Parameter Maintenance’ screen by typing ‘DEDTVSET’ in the field at the top right corner of the Application tool bar and clicking the adjoining arrow button.

You can specify the following details:
Branch Code
The system displays the code of the branch through which you have logged in this screen.
Till/Vault/Dispenser
Specify whether you are maintaining a Till/Vault/Dispenser. . The options are:
- Vault
- Till
- Dispenser
Till Id
Specify a unique code to identify the Till/Vault you are maintaining.
Description
Specify a brief description of the Till/Vault for future reference.
Parent Vault
Specify the parent vault of the Till. Alternatively, you select the vault from the option list. The list displays all the vault maintained in the system.
Parent Vault is a vault being maintained in the same function having the type as ‘Vault’. All tills (and only tills) must be linked to any vault. And in currency preferences for the till, only currency maintained for the parent vault can be maintained.
You should link the Till you are maintaining to a valid Parent Vault. The option list displays a list of the Vaults that you have maintained in your bank. From the option list, choose the Parent Vault to which you want to link the Till.
Carry Forward Allowed
Check this box to allow carry forward of cash or TC balances to Vault before performing Till Batch closure. By default this box is checked.
If you select this check box:
- The system allows Till balancing with balance in the Till or Vault
- The system allows closure of Till or Vault with TC and cash Balance
If you do not select this check box, the system checks for the error code maintenance and performs the following:
- If you maintain error codes as 'Ignore', the system allows you to close the Till or Vault with balance and does not display any error or override message
- If you maintain error codes as 'Override', the system displays an override message at the time of Till and Vault balancing if closed with cash and TC balance
- If you maintain error codes as 'Error', the system displays an error at the time of Till and Vault balancing, if closed with cash and TC balance
The system displays the following error messages:
- For Cash Balance: The system displays, “Cash balance carry forward is not allowed”
- For TC Balance: The system displays, “TC balance carry forward is not allowed”
In this case, you have to transfer the cash balance to other Till or Vault and proceed to Till Batch Closure.
Shortage/Overage General Ledger
Specify the Shortage/Overage GL for every Till that you create. Alternatively, you select the shortage or overage general ledger from the option list. The list displays all the ledger details maintained in the system.
This GL is used in Teller transactions for posting the difference between the actual transaction amount and the amount of denominations available.
Note
The ‘Shortage/Overage GL’ field is used only for corporate teller transactions.
Allow Cash Transfer Between Branches
Check this box to perform cash transfer to another branch from this vault.
Currency Preferences
Currency preferences are mandatory for all till/Vault/Dispenser for corporate teller. It is not mandatory for retail teller.
Currency Code
Specify the currency code.Alternatively, you select the currency code from the option list. The list displays all the currency codes maintained in the system.
If the type is Vault, and if the Vault is being used as a parent vault for another till, then the same currencies have to be maintained in the child till also. This is applicable only to corporate teller.
Based on the type of Till/Vault/Dispenser, the parameters are maintained for the currencies.
Cash General Ledger
Specify the cash general ledger for the currency. Alternatively, you select the cash general ledger from the option list. The list displays all the ledger details maintained in the system.
Every currency that you have maintained for a Till/Vault should be linked to a Cash GL. While defining a product, if you specify ‘TILL’ as the Accounting Head, all accounting entries that are generated for Teller type transactions (involving the product) will be posted to the Cash GL that you specify for the currency.
Note
For a Vault, you can only maintain the Cash GL. You cannot define a maximum and a minimum currency balance.
Minimum Balance
Specify the minimum amount in each currency that the Till can contain.
Maximum Balance
Specify the maximum amount in each currency that the Till can contain.
Minimum and maximum balance validations are applicable to corporate teller and Retail Teller.
Minimum Dispensable amount
Specify the currency specific minimum amount that can be either dispensed by or deposited into the dispenser. This will be the lowest denomination available in the dispenser for the specific currency. This will be applicable only for Dispenser maintenance and not for Till or Vault maintenance.
3.1.3.1 Fields Button
You can capture additional information to use either for your convenience or to suit the requirements of your bank. Adding to its flexibility, Oracle FLEXCUBE now provides the option to add fields based on your specifications to meet your needs.
Based on your requirement and the nature of the field, you can specify default values and validations for the field. Oracle FLEXCUBE validates all entries made to the field against the validations you define for a field. Click ‘Fields’ button to maintain the additional fields.
Refer the User Defined Fields chapter in the Modularity User Manual for details.
3.1.3.2 Closing a Till/Vault
You may close a Till/Vault that you are not using. In the ‘Teller Till/Vault Maintenance’ screen, select ‘Close’ from the Actions menu in the Application tool bar or click close icon. The system ensures that the Till is not in use and that the balance in the Till is zero.
To reopen a closed Till/Vault, select ‘Reopen’ from the Actions menu in the Application tool bar or click reopen icon. The system ensures that the Parent Vault and all Cash GLs linked to the Till are open.
3.1.4 Maintaining Clearing Bank Codes
You can use the Clearing Bank Code Maintenance table to maintain a list of banks that participate in your clearing house. Maintaining a list of such banks helps you track and clear cheques bank-wise at the End of Day.
In the following table you must assign each bank a unique Bank Code. The bank code that you specify will be common to all the branches of your bank.
If a cheque drawn on another bank (which you have maintained) is input into the system, tellers can identify the drawee bank with this code. These codes are used by the system to process and sort cheques bank wise.
You can invoke the ‘Clearing Bank Code Maintenance’ screen from the Application Browser.
To maintain a new Bank Code, click new icon in Application Toolbar. The ‘Clearing Bank Code Maintenance’ screen will be displayed with no values in the fields. Specify a unique code for the bank in the Bank Code field.
In the Description field you can enter the name of the bank to which you are assigning the code and its location.
3.2 Journal Multi Offset Template Maintenance
This section contains the following topics:
- Section 3.2.1, "Maintaining Journal Multi Offset Template"
- Section 3.2.2, "Main Tab"
- Section 3.2.3, "Offset Tab"
3.2.1 Maintaining Journal Multi Offset Template
If a transaction involves one debit entry and multiple credit entries (or one credit entry and multiple debit entries), it may be referred to as a multi-offset entry transaction. In other words, a multi-offset transaction is one in which multiple accounting entries are passed (to the offset accounts) to balance a single entry
You can maintain templates that can be used for processing multi-offset transactions. The attributes of the templates will be defaulted to the transaction thereby minimizing the time and effort required to process such transactions.
You can invoke the ‘Journal Multi Offset Template Maintenance’ screen by typing ‘DEDMJTMT’ in the field at the top right corner of the Application tool bar and clicking the adjoining arrow button.
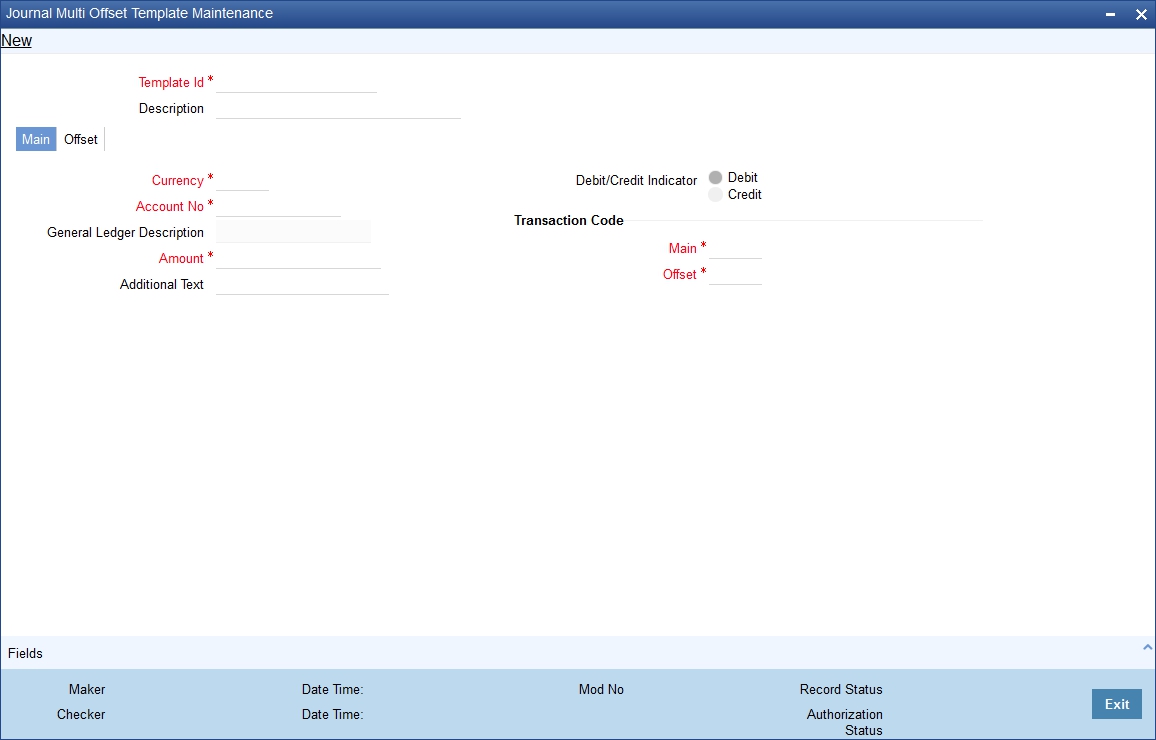
Specify the following details:
Template Identification and Description
Specify a unique id to identify the template throughout the system. You can also capture a brief description of the template being maintained.
3.2.2 Main Tab
Account Number and Description
Select the account number and the description for the template. All the account numbers that are maintained in the branch are available in the option-list provided. The entry passed to this account will represent the main leg of the multi-offset transaction.
On selection of the account number, the associated description is displayed in the next field.
Currency
The currency of the account number that you have entered (in case of a customer account) is displayed here. However, you are allowed to maintain a different currency. All the valid currencies in the branch are available in the option-list provided. You can select the appropriate currency from the list.
Amount
In this field, enter the amount of the transaction. The amount that you enter here will be considered to be in the currency that you select in the previous field.
You must also indicate whether the amount is to be credited to the account or debited from the account. To do this, you must select either ‘Dr’ or ‘Cr’, depending on the nature of the entry.
Additional Text
You can capture any additional remarks regarding the template in this field. This is a free format text and is used only for information purposes.
Debit/Credit Indicator
Debit Credit Indicator defines if the template is being maintained for Debit or Credit. In the Main Tab you can give an Account, from that account if you mark as Debit, the amount will be debited. Under the Offset tab those are the accounts which you credit for this debit in main account.
Transaction Code
A transaction code is used to identify the nature of the entries that are passed. You can specify a transaction code for the main leg of the transaction as well as for the offset entry.
An option-list consisting of all the valid transactions maintained in your branch is provided for each field (Main and Offset). You can select the appropriate transaction codes from this list.
3.2.3 Offset Tab
The details of the offset leg of the transaction are captured in the ‘OFFSET’ tab of the screen:
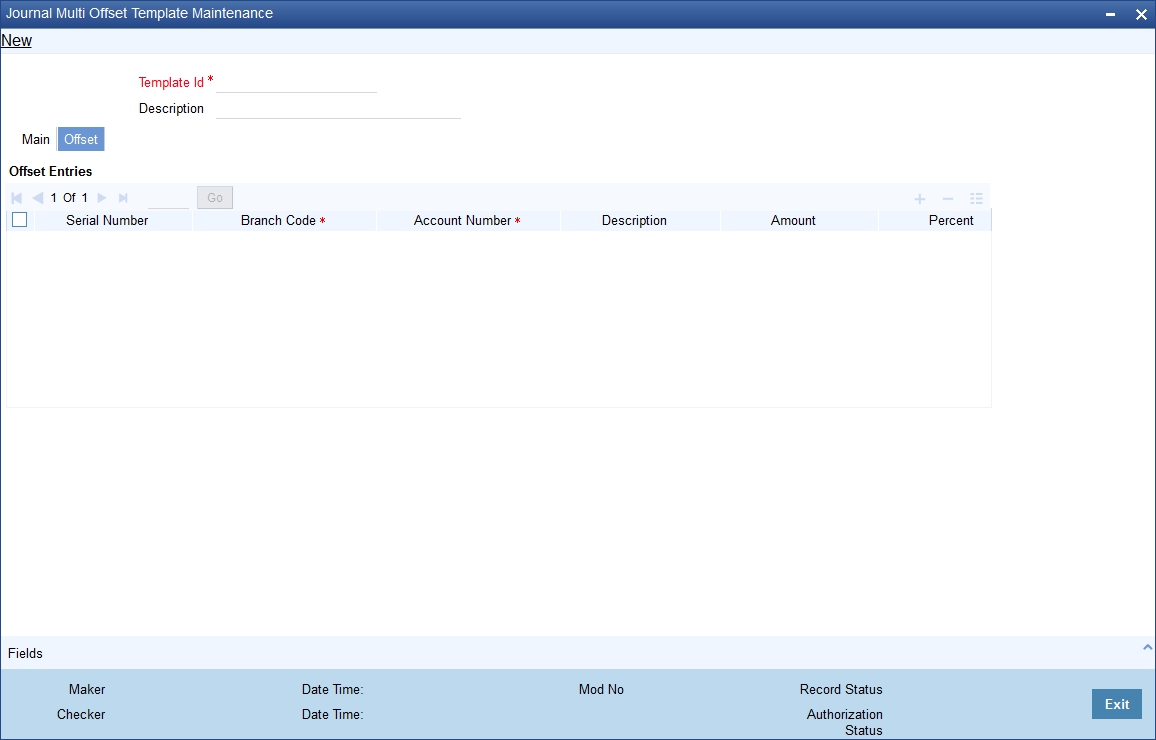
Indicating Offset Entries
For the offset leg of the transaction, you can select multiple accounts that belong to different branches of your bank. The option list provided for the ‘Account’ field gets populated with the relevant accounts, depending on the branch code selected.
Serial Number
The system displays the serial number on selection of an offset account.
Branch Code
Specify the branch code.
Account Number
Specify the account number of the customer.
Amount and Percent
For each account that is selected, you can specify either the amount or the percentage of the amount.
If you specify the amount, the percentage is automatically calculated with respect to the amount that you specify for the main leg of the transaction (in the ‘MAIN’ tab). Similarly, the amount is automatically calculated if you decide to specify the percentage for each offset account.
Note
The sum total of all the amounts specified for each offset account must be equal to the amount of the main leg. So also, the total of the percentages should not exceed 100%.
At the time of processing multi-offset transactions, you can associate a template with the transaction. The details from the template will get defaulted to the transaction.
3.3 Journal Template Maintenance
This section contains the following topics:
3.3.1 Maintaining Journal Template
The journal entry template for multiple debits to multiple credits can be maintained in the ‘Journal Entry Template Definition’ screen. You can invoke this screen by typing ‘DEDJNLPR’ in the field at the top right corner of the Application tool bar and clicking the adjoining arrow button.

In this screen, you can enter the following details:
Template Code
Enter a unique journal template code.
Description
Enter a brief description about journal template.
Sl No
By default the system generates the serial number, starting from 1.
Dr / Cr
You can indicate whether the amounts entered in the online screen is debited or credited by selecting one of the option given below:
- Debit
- Credit
Account/GL Number
Specify the account/GL number for which the template is defined. The adjoining option list displays all valid accounts and internal leaf GL codes available in the system. You can select the appropriate one.
Transaction code
Specify the transaction code for the entry. The adjoining option list displays all valid transaction codes available in the system. You can select the appropriate one.
Additional text
Specify the narration for the entire transaction.
3.3.2 Viewing Journal Template Maintenance
You can view the summary of all journal templates created, using the ‘Journal Template Maintenance’ screen. You can invoke this screen by typing ‘DESJNLPR’ in the field at the top right corner of the Application tool bar and clicking the adjoining arrow button. You can search based on the Template code, authorization status, and Record status.

In the above screen, you can base your queries on any or all of the following parameters and fetch records:
- Authorization Status
- Record Status
- Template Code
- Description
Select any or all of the above parameters for a query and click ‘Search’ button. The records meeting the selected criteria are displayed.
System displays the following details pertaining to the fetched records:
- Authorization Status
- Record Status
- Template Code
- Description