6. Data Entry Operations
Broadly speaking, teller functions would include entering:
- Teller type transactions
- Journal type transactions
- Multiple Offset Entry transactions
- Multiple accounts Dr/Cr transactions
The sale and purchase of travellers checks; foreign currency transactions; and cash deposits and withdrawals are examples of Teller transactions.
Journal transactions are typically used to post adjustment entries passed to internal accounts.
If a transaction involves one debit entry and multiple credit entries (or one credit entry and multiple debit entries), it may be referred to as a multi-offset entry transaction. The following is an example of a multi-offset transaction.
Before you start your regular teller operations for the day such as cash deposit, cash withdrawal etc., you have to perform two preliminary operations. You have to:
- Open tills and vaults
- Move cash into vaults (through teller transaction input)
- Move cash between the vault(s) and tills (through the cash movement function)
These operations are referred to as Beginning-of-day Teller operations. (Please refer the chapter ‘Beginning and End-of-Day operations’ for details).
This chapter contains the following sections:
- Section 6.1, "Retail Teller Contract"
- Section 6.2, "Batch Operations"
- Section 6.3, "Single Journal Entry Transaction"
- Section 6.4, "Multi-Offset Transactions"
- Section 6.5, "Online Journal Entry"
6.1 Retail Teller Contract
This section contains the following topics:
- Section 6.1.1, "Entering Teller Transactions"
- Section 6.1.2, "Main Tab"
- Section 6.1.3, "Tax Tab"
- Section 6.1.4, "Accounting Entries Tab"
- Section 6.1.5, "Advices Tab"
- Section 6.1.6, "Signature Verification Button"
- Section 6.1.7, "MIS Button"
- Section 6.1.8, "ICCF Button"
- Section 6.1.9, "Tax Button"
- Section 6.1.10, "Batch Summary Button"
- Section 6.1.11, "UDF Button"
- Section 6.1.12, "Clearing Details Button"
- Section 6.1.13, "Messages Button"
- Section 6.1.14, "Saving and Authorizing Transaction"
- Section 6.1.15, "Deleting a Transaction"
- Section 6.1.16, "Viewing Transaction Summary"
6.1.1 Entering Teller Transactions
Now that you have opened a batch and a till with sufficient cash in it,you can begin teller operations for the day.
Typically, the transactions that a teller can perform are:
- Cash Deposits
- Cash Withdrawals
- Sale of Traveller’s cheques
- Purchase of Traveller’s cheques
- Cheque clearance
The procedure to input teller type transactions is explained below:
You can enter a teller type transaction in the ‘Teller Transaction Input’ screen. You can invoke this screen by typing ‘DEDTLRON’ in the field at the top right corner of the Application tool bar and clicking the adjoining arrow button.
![]()
In this screen, you have to specify the following details for a transaction:
Product
Based on the type of transaction that you are entering, you have to select a product that you have maintained in the system.
To select a product, click on the option list adjoining the ‘Product Code’ field. A list of the products that you have maintained in the branch will be displayed. Click on the product that you would like to offer the customer.
When you select a product the transaction acquires the attributes that you have defined for the product.
Reference Number
All transactions that are entered into the system are assigned a unique identification number known as the Transaction Reference number.
The reference number for a transaction is based on the Branch Code, the Product Code, the date on which the transaction is entered (in the Julian Date format) and a running serial number for the day.
The Julian Date is of the following format: ‘YYDDD’
Here, YY stands for the last two digits of the year and DDD for the number of day(s) that has/have elapsed in the year.
6.1.2 Main Tab
You can capture the following details.
Transaction Branch
Specify the branch code wherein transaction is being posted. The adjoining option list displays all valid branch codes available in the system. You can select the appropriate one.
Transaction Account
Typically, you would have to manually enter the account number of the customer involved in the transaction, in this field. However, if the transaction account is a GL, you can click the adjoining option list to invoke a list of the GLs that have been maintained in your branch Double click on the GL that is the transaction account
Note
If you defined an Account Head (the GL/SL) for a product, while creating it, it will default as the Transaction Account for a transaction involving the product.
Description
The system displays a brief description of the account.
Transaction Account Type
Indicate whether the account should be debited or credited.
Transaction Currency
The Transaction Currency, by default, is the local currency or the currency of the transaction account. If you want to enter a transaction in any other currency, click on the adjoining option list. Choose a currency from the displayed list by double clicking on it.
Transaction Amount
Enter the Transaction Amount. The amount entered should be within the maximum and minimum transaction amount defined for the product. The transaction size should not exceed the limit defined for the teller.
On saving the transaction after entering all the required details in the system, the system validates the value of the transaction amount against the following:
- Product transaction limit
- User Input limit
If the transaction currency and the limit currency are different, then the system converts the amount financed to limit currency and checks if the same is in excess of the product transaction limit and user input limit. If this holds true, the system indicates the same with below override/error messages:
- Number of levels required for authorizing the transaction
- Transaction amount is in excess of the input limit of the user
Transfer Type
Specify the transfer type. The adjoining option list displays all valid transfer types maintained in the system. You can select the appropriate one.
Transfer Description
The system displays a brief description of the chosen transaction type.
Offset Branch
Based on the offset account, the system displays the branch in which the account resides.
Offset Account
The offset account that you defined for the product (which you selected in the Product Code field) will be displayed, by default, in this screen. Invariably, this would be an internal account of the bank.
On occasion, this could be a customer account. If the offset account is a customer account, you will have to manually enter the account number in this field
Remember that if the offset account is a customer account - as in the case of customer-to-customer transfers - you have to manually enter the offset account number in this field.
If you click the adjoining option list, a list of the GLs that are maintained in your branch will be displayed. Double click on the GL that you want to specify as the offset account.
Description
A brief description of the offset account is displayed here.
Offset Account Type
Indicate whether the account should be debited or credited.
Offset Currency
The currency of the transaction that you are entering will be displayed in this field. The system will display the transaction currency or the local currency as per your setup for the product the transaction involves. You can change the value that is displayed if required.
To change the currency that is displayed, click the adjoining option list. A list of the currencies that you have allowed for the product the transaction involves will be displayed. Double click on the currency that you want to specify as the Offset Currency.
Offset Amount
The transaction amount will be displayed in this field in the offset currency
If your branch has opted for denomination tracking, the system will prompt you to enter the denominations for the offset amount of the transaction. The Denominations Input screen will be displayed.
Instrument Number
You have to enter the instrument number here if the transaction code, of either leg of the transaction, specifies an instrument number. If the ‘Cheque Required’ box is checked at the product level, input to this field will be mandatory.
Clearing Bank Code
If the cheque is drawn on another bank, you can enter the Bank Code (if maintained) of the clearing bank.
Value Date
The Value Date is the date on which a transaction comes into effect. The system displays the current system date here. You can, however, enter a back dated (that is a date prior to the current system date) or a future dated transaction.
The system will display an override message in the following cases:
- If the value date is back dated or future dated
- If the value date is a holiday
Cheque Type
Select the type of cheque, from the adjoining drop-down list. You can choose any one of the following options:
- Normal
- Circular
- A Type
Exchange Rate
Different types of exchange rates can be maintained in your branch For example, you can define an exchange rate for travelers’ checks in USD and an exchange rate for cash transactions in USD.
When you define a product, you specify an ‘Exchange Rate Type’ for it. The exchange rate, corresponding to the Rate Type, defaults to all transactions entered for the product.
Note
The exchange rate that the system uses is the exchange rate corresponding to the exchange rate type that is defined for the product the transaction involves.
For instance, while creating ‘Money for Nothing’, a travelers check product for sale, you would specify an exchange rate type ‘TCsale’
When you enter a transaction for ‘Money for Nothing’ (that is when you sell ‘Money for Nothing’) the exchange rate corresponding to ‘TCsale’ will be displayed in the Exchange Rate field.
You can change the Exchange rate that is displayed in this field. Only, the changed value should be within a certain range referred to as the Exchange Rate Variance. The exchange rate variance is specified at the product level
Note
In case you are entering a Foreign Currency back value dated transaction, the system will pick up the exchange rate applicable on the Value Date. This is possible only if you have maintained the Exchange Rate History for your branch (refer the Branch Conditions screen).
The system will display an override message in the following cases:
- If you change the exchange rate to a value beyond the normal and maximum exchange rate variance range
- If you change the exchange rate to a value that is greater than the specified maximum exchange rate variance
Local Currency Exchange Rate
This field is enabled only if you check the IB in LCY option in the Transaction Code Maintenance screen for the transaction code mentioned in the accounting entry setup for that leg where transaction type is Fcy1- Fcy1. The exchange rate you specify here (Teller Entry Form screen) would then be used to calculate the local currency equivalent of the foreign currency transaction. The default value would be standard mid rate.
Note
For corporate teller transaction cross currency money exchange is not supported.
Local Currency Equivalent
The system displays the offset amount, here, in case the transaction involves the local currency.
If the transaction that you are entering involves a foreign currency, the system calculates a local currency equivalent of the transaction amount using the Exchange rate that is displayed in the previous field
If the transaction is a cross currency transaction the system calculates the LCY equivalent based on the standard rate It is arrived at for each leg of the transaction as follows:
- When customer account is debited the rate used = Standard Rate + Spread
- When customer account is credited the rate used = Standard Rate - Spread
The LCY equivalent for the transaction is taken as the average of the LCY equivalents for both the legs
Yes, you can change the local currency equivalent but within a specified range This range is referred to as the local currency variance limit. The local currency variance limit is defined at the branch level
Note
The variance that you specify is not a percentage but an absolute value (in the local currency).
Related Customer
Specify the customer of the transaction. The adjoining option displays all valid CIF maintained in the system. You can select the appropriate one.
Offset Amount
The amount dispensed by or deposited into the cash dispenser will be displayed in this field
Note
If the amount deposited into the dispenser is greater than the offset amount, the offset amount user will be a negative value.
Offset User
The amount dispensed by or deposited into the teller’s till will be displayed in this field.
Entering Denominations
If your bank has opted for denomination tracking, the system will prompt you to input denominations when you enter the transaction. You can enter the denominations in the Denominations Input screen that is displayed on clicking ‘D’ button.
If the Till GL is involved in both legs of the transaction (for example, FCY sale), you have to input denominations for both the transaction and the offset amounts
6.1.3 Tax Tab
The taxes and charges defined for the product default to the transaction. You can view the tax and charge details that apply on a transaction. In the ‘Teller Transaction Input’ screen choose the ‘Tax’ tab. The taxes and charges that apply to the transaction will be displayed. You can change the tax/charge amount calculated for the transaction. To change the charge/tax amount displayed, click the ‘Tax’ button in this screen.

While processing a transaction, you should indicate the following details.
Basis Amount
The transaction amount specified in the ‘Main’ tab is displayed here.
Total Charges
The sum of all charges applicable as per the linked product is displayed here.
Total Tax
The system computes the tax applicable on the transaction amount and displays it here.
Net Amount
The net transaction amount post deduction of applicable charges and tax is displayed here.
Charges/Tax Collection Account
Indicate the account from which you would like to collect the tax. Typically, this would be the account that you have designated as the Transaction Account. You may also choose the Offset Account or Transaction Account.
Click the ‘Tax’ or ‘Charge’ button to specify the collection account.
6.1.4 Accounting Entries Tab
You can view the accounting entries generated by the transaction that you are processing by clicking on the ‘Accounting Entries’ tab in the ‘Teller Transaction Input’ screen.

The following details are displayed here.
- Account Branch
- Account Number
- Transaction code
- Account Currency
- Foreign Currency Amount
- Local Currency Amount
- Debit/Credit
- Value Date
- Exchange Rate
- Contract Overrides
See Position Entries
Check this box to view currency position of the entries.
A list of all the system overrides displayed when the transaction was input can also be viewed.
6.1.5 Advices Tab
You can print the advices specified for the product the transaction involves. You can view the advices specified for the product while processing a transaction by clicking on the ‘Advices’ tab in the teller input screen.

Here, you can opt to generate, or suppress, an advice that has been defined for the product the transaction involves. You can also prioritize advice generation according to your convenience.
6.1.6 Signature Verification Button
While booking the transaction, you can verify the signature of the customer by invoking the ‘Signatory Details’ screen. To invoke this screen, click ‘Signature Verification’ button.

You can view consolidated customer signature in the ‘Customer Signature/Image Consolidated View’ screen. To view this screen, click ‘All Signatures/Images’ button.
Refer the User Manual on Signature Verification for further details about this screen.
6.1.7 MIS Button
MIS details are defaulted to the transaction from the product maintenance. However, you can change them for the contract. Click ‘MIS’ button and invoke the ‘MIS’ screen.

Refer the User Manual on MIS under Modularity for further details.
6.1.8 ICCF Button
Based on the ICCF maintenance at the product level, the charge details are defaulted for the contract. However, you can change them. Charges will be recovered from the charge or tax account specified in this screen. Click ‘ICCF’ button and invoke the following screen.

Refer the section titled ‘Specifying Charge Details’ in the chapter ‘Defining Attributes of a Teller Product’ in this User Manual for details about this screen.
6.1.9 Tax Button
Based on the tax maintenance at the product level, the tax details are defaulted for the contract. However, you can change them. Charges will be recovered from the charge or tax account specified in this screen. Click ‘Tax’ button and invoke the ‘Tax Details’ screen.

Refer the section titled ‘Specifying Tax Details’ in the chapter ‘Defining Attributes of a Teller Product’ in this User Manual for details about this screen.
6.1.10 Batch Summary Button
Click ‘Batch Summary’ button and invoke the ‘Batch Summary’ screen. You can view the cheque and entry total pertaining to the batch.

You can view the following details here:
- Batch No
- Description
- Check Total Debit and Credit
- Last Operator Id
- Last Operated By
- Entry Total Debit and Credit
- Last Auth ID
- Last Authorised By
6.1.11 UDF Button
Click ‘UDF’ button and invoke the ‘Fields’ screen to specify values for user-defined fields.

Here you can capture the following details:
Field Name
The system displays all UDFs linked to the product.
Value
Specify a value for each UDF.
6.1.12 Clearing Details Button
Click ‘Clearing Details’ button and invoke the ‘Clearing Details’ screen to view clearing details for the transaction.

You can view the following details:
- Remittance Name
- Remittance Address 1 and 2
- Related Reference Number
- Beneficiary ID
- Beneficiary Account
- Reason Code
- Resident Status
- Beneficiary Address 1 and 2
- Payment Details
6.1.13 Messages Button
Click ‘Messages’ button and invoke the ‘View Messages’ screen to view messages that have been generated based on the advices defined at the product level.

You can view the following details:
- Contract Reference Number
- Event Sequence Number
- Event
- Medium
- Receiver
- Name
- Message Status
- Test Status
- Authorization Status
Print Button
Click the print button to print the advices that are generated. When you click the EXIT button the system displays a message if the advices are printed for the first time, click OK if the print is successful.

Note
When Duplicate Advice Tracker field is checked and you click the EXIT button on the advice generation screen, the system displays a message “Print Successful?”. Click OK button to confirm the successful printing. Every subsequent print of the advices will be considered as duplicate advice. For more information on Duplicate Advice Tracker refer to section “Messaging Branch Parameters Maintenance” in the Core User Manual.
6.1.14 Saving and Authorizing Transaction
When you have entered all the details of a transaction you have to save the transaction in the system
To save a transaction, choose ‘Save’ from the Actions menu. The system checks whether the accounts mentioned in the ‘from’ and ‘to’ leg of the transaction belong to the same netting group or not. If they belong to the same netting group, the accounting entries will not be posted. Instead the transaction will be logged for the netting batch.
The system will automatically place an amount block on the debit account. However, for the credit account, the amount will be reflected only after the netting batch.
At the time of saving a Corporate Teller contract, the system will pass a certain information about the Corporate Teller contract to the FATCA accounts and obligations maintenance for the customer. This will be done if the beneficiary account’s customer has a reportable FATCA classification and if the Corporate Teller product used to book the contract is present in the FATCA Products, account class and Instruments maintenance.
If the Corporate Teller contract is closed or liquidated completely, then the corresponding row in FATCA accounts and obligations maintenance will be archived. If you delete the Corporate Teller contract before authorization, you should also delete the corresponding entry in FATCA accounts and obligations maintenance.
The system will update the transaction as an unauthorized transaction. The user ID of the teller who entered the transaction and the date and time at which the transaction was saved will be displayed at the bottom of the screen.
To authorize a transaction, select ‘Authorize’ icon from the Actions menu. On authorisation, the transaction will be made available for the netting batch if logged for netting batch.
Refer the section ‘Maintaining Netting Group’ in the chapter ‘Accounts for Inter-Branch Transactions’ in the Core Services User Manual for further details about netting.
Cross Validations
The system performs the following cross validations when you input a transaction. It ensures that:
- you have entered all the mandatory details in the appropriate fields
- the product related restrictions are not violated
- you have the Cash GL linked to the transaction currency and/or offset currency in case of cash based products
- the exchange rate variance conforms to that defined at the product level
Validations for a transaction
When you save a transaction the following validations will be carried out
- Transaction amount is within the Minimum and the Maximum specified in the Branch conditions Table
- Exchange rate conforms to the Variance limit defined
- Availability of funds in the specified accounts
- Teller limit verification
- Override incase the value date is back date or future dated
Authorisation Validations
You cannot authorise a transaction from the ‘Teller Transaction Input’ screen in the following cases:
- the contract has multilevel of authorization pending, the same will be done using the ‘Multilevel Authorization Detailed’ screen
- the level of authorization is greater than or equal to ‘N’
- the ‘Nth’ or the final level of the users authorisation limit is less than the difference between amount financed and sum of the limits of all the users involved in authorizing a transaction, this case holds good when the ‘Cumulative’ field is checked in the ‘Product Transaction Limits Maintenance’ screen
- the transaction amount is greater than the authoriser’s authorisation limit if the ‘Cumulative’ field is unchecked in the ‘Product Transaction Limits Maintenance’ screen
6.1.15 Deleting a Transaction
In special circumstances, you may want to remove a transaction from the system. In Oracle FLEXCUBE you have the option of either ‘deleting’ the transaction or ‘reversing’ it.
When is deletion possible?
If a transaction that you have input has not been authorized, you can delete it. Remember that only the user who input a transaction can delete it. You have to reverse a transaction that has been authorized.
Deleting a transaction
When you are in the ‘Teller Transaction Input’ choose ‘Delete’ from the Actions menu or click delete icon on the Toolbar. The transaction that is displayed in the screen will be deleted. All accounting entries passed for the transaction will be removed. The Advises specified at the product level will be suppressed, if they have not already been printed.
Note that the Charges and Tax components for the transaction will also be deleted.
In case a Wrong Check Total has been Entered
In case the actual debit and credit totals that you post to the batch do not match your entry in the Check Total field (in the Batch Opening screen), you cannot close the teller entry form or close the batch.
If you are unable to close a batch check the transactions that have been posted to the batch and correct those that have been erroneously entered or missed out
Changing the Check Total
On occasion, you may not be able to close a batch because you entered an erroneous Check Total while opening the batch. In such a case, you can correct the check total in the Batch Summary screen.
To correct the check total, invoke the ‘Batch Summary’ screen from the ‘Teller Transaction Input’ screen. In the Check Total field in this screen you can enter the correct debit and credit check totals for the batch. The total of the debit and credit entries that you have posted in the batch will be displayed in the Entry Total field.
You can correct the check total values in the Check Total field and update them in the system. You may or may not opt to use the changed values. If you opt not to use the original Check Total values the system will use the original values to tally the actual entries that you post to the batch.
6.1.16 Viewing Transaction Summary
You can view a summary of all teller transactions using the ‘Transaction Summary’ screen. You can invoke this screen by typing ‘DESTLRON’ in the field at the top right corner of the Application tool bar and clicking the adjoining arrow button.
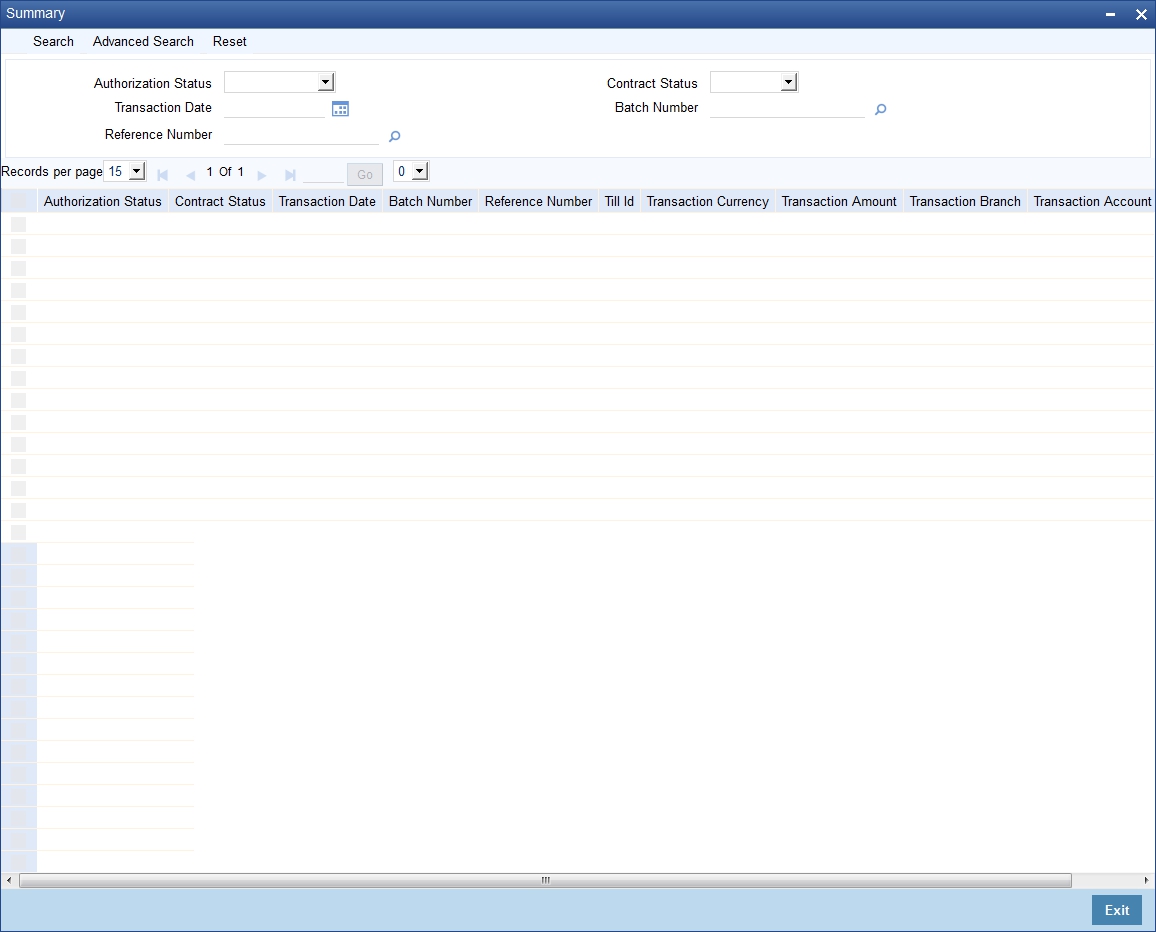
You can query on records based on any or all of the following criteria:
- Authorization Status
- Transaction Date
- Reference Number
- Contract Status
- Batch Number
Click ‘Search’ button. The system identifies all records satisfying the specified criteria and displays the following details for each one of them:
- Authorization Status
- Contract Status
- Transaction Date
- Batch Number
- Reference Number
- Till Id
- Transaction Currency
- Transaction Amount
- Transaction Branch
- Transaction Account
- Event
Double click on a record to view the detailed screen.
6.2 Batch Operations
This chapter contains the following sections:
- Section 6.2.1, "Closing a Batch"
- Section 6.2.2, "Reopening a Batch"
- Section 6.2.3, "Deleting a Batch"
- Section 6.2.4, "Balancing Teller Till"
6.2.1 Closing a Batch
Once you complete operations for the day you can ‘close’ the batch that you opened before commencing teller operations. You cannot post further transactions to a batch that is closed. You have to reopen a closed batch to post transactions.
You can close a batch when you:
- complete operations for the day
- complete operations of a particular type (for instance, entering journal transactions) and proceed to other operations (for instance, selling travelers cheques)
Normally, you can close a batch by choosing the close icon in the Toolbar. However, in case of a General Protection Fault, you can close a batch using the Batch Closure screen.
Please refer to the chapter ‘Beginning and end-of-day operations in this User Manual for further details.
6.2.2 Reopening a Batch
The following example illustrates the concept of reopening a batch.
How to reopen a batch
When in the Batch Opening screen click on reopen icon on the Toolbar or choose Reopen in the Actions Menu to reopen a closed batch.
When you attempt to reopen a batch, the system ensures that you are the user who originally opened the batch. You cannot reopen a batch that was opened by another user. The System Administrator has to reassign the batch to you, before you can use it.
Note
You cannot reopen a batch that is in use.
6.2.3 Deleting a Batch
If you want to delete all the transactions that you posted to a batch you can opt to delete the batch.
You can delete a batch under the following conditions
- if you are original user of the batch
- if all transactions posted to the batch are yet to be authorized
- if the batch is not in use currently
How to delete a batch
Open the ‘Batch Browser’ screen. Navigate to the batch that you want to delete. Choose delete icon on the Toolbar or choose Delete from the Actions menu. All the transactions posted to the batch will be deleted
Remember that you can only delete a batch if all the transactions posted to the batch are unauthorized.
6.2.4 Balancing Teller Till
At the end of the day, when you complete all operations that involve the till, you must balance it. If you do not balance a till, you cannot proceed with the end-of-day operations. To balance a till is to ensure that the cash that is left in the till is the right amount. In other words, ‘Till’ balancing involves checking the physical balance in the Till (actual balance) against the balance in the Till according to the system.
Refer the chapter ‘Beginning and end-of-day operations’ in this User Manual for further details.
6.3 Single Journal Entry Transaction
This chapter contains the following sections:
- Section 6.3.1, "Entering Journal Transactions"
- Section 6.3.2, "MIS Button"
- Section 6.3.3, "Signature Verification Button"
- Section 6.3.4, "Fields Button"
- Section 6.3.5, "Saving and Authorising Transaction"
- Section 6.3.6, "Closing a Batch"
- Section 6.3.7, "Deleting Journal Transaction"
6.3.1 Entering Journal Transactions
What is a Journal transaction?
Simple voucher entries, such as interest adjustments, payments made by the bank towards taxes, internal book entries of the bank etc., can be entered into the system as journal transactions. In a journal transaction only one accounting entry is passed - either a debit or a credit.
The difference between a journal and a teller transaction
A journal (type) transaction is different from a teller (type) transaction in that, it generates only one account entry. The offset entry is not generated as in the case of Teller transactions.
Note
Before you can enter journal transactions for the day you must open a ‘batch’ to post these transactions.
Now that you have opened a batch, you are ready to input a journal transaction. In the ‘Journal Entry’ screen, you can enter the following details of the journal transaction that you want to enter.
You can invoke the ‘Journal Single Entry Input’ screen by typing ‘DEDTRONL’ in the field at the top right corner of the Application tool bar and clicking the adjoining arrow button.
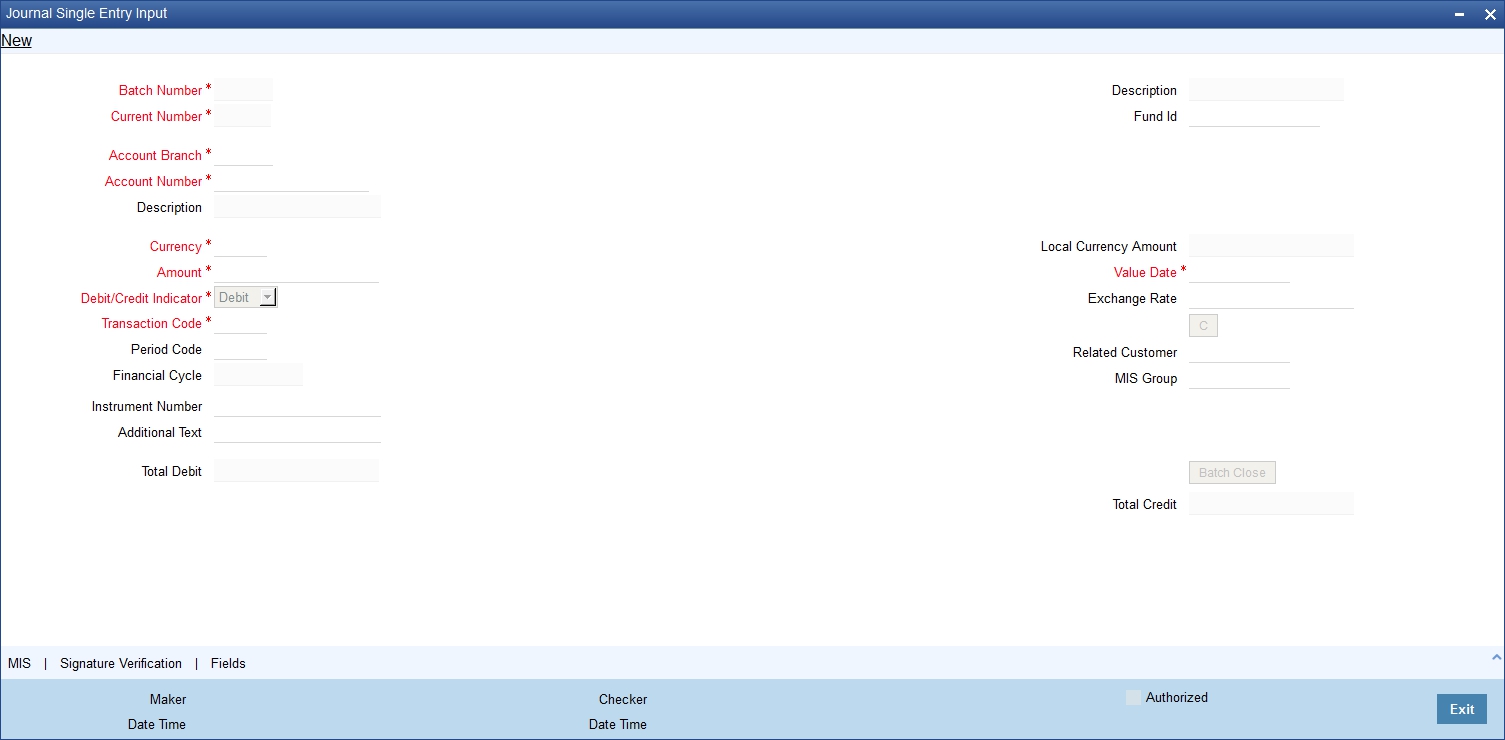
Specify the following details.
Batch Number
The batch that you have opened to post the journal transaction is displayed at the top of the ‘Journal Entry’ screen.
Description
The system displays the description for the sel4ected batch number.
Fund ID
Select the fund id to which the journal entry account will be linked from the adjoining option list. The system defaults the value of ‘Default Mudarabah Fund’ as fund id.
Current Number
Every journal transaction that you enter into the batch is assigned a ‘current number’ by the system. This helps you identify the journal transactions that you enter for the day.
Account Number
Select the account number from the adjoining option list in the Account Number field. The journal entry will be posted to this account or GL. In case you are posting to several accounts, it is advisable to manually enter the account number in this field rather than choose it from the displayed list.
To view the joint holder’s details of an account and the mode of operation maintained at the account level, place the cursor on the Account Number field and press Ctrl+J. The system displays the ‘Joint Holder’ screen.
For more information on the ‘Joint Holder’ screen refer to the section ‘Joint Holder Maintenance’ in this User Manual.
Description
The system displays the description for the selected account number.
Account Branch
In the Account Branch field, system defaults to the branch that you have logged in to. You can, choose the branch to which you want to post the journal entry.
Currency
The system displays the currency of the account number, if it is a customer account. Else, you have to enter the transaction currency, in this field. Select the currency from the adjoining option list.
Amount
In this field enter the amount of the transaction. The amount that you enter here must be in the currency of the account number that you specified.
Now you must indicate if the amount is to be credited to the account or debited from the account. To do this, you must click on either of the buttons adjacent to this field.
If the amount is to be credited to the account, click on the button against ‘Cr’. If the amount is to be debited, click on the button against ‘Dr’.
On saving the transaction after entering all the required details in the system, the system validates the value of the transaction amount against the following:
- Product transaction limit
- User Input limit
If the transaction currency and the limit currency are different, then the system converts the amount financed to limit currency and checks if the same is in excess of the product transaction limit and user input limit. If this holds true, the system indicates the same with below override/error messages:
- Number of levels required for authorizing the transaction
- Transaction amount is in excess of the input limit of the user
Debit Credit Indicator
Select the type of transaction from the drop-down list. The list display the following values:
- Debit
- Credit
Transaction Code
Select the transaction code that you want to enter from the adjoining option list.
Period Code
The financial year of your bank is divided into four quarters. These details are maintained in the Global Parameters module.
When you input a journal transaction you must indicate the financial period to which the transaction belongs. Select the financial period for the journal entry you are entering from the adjoining option list.
Financial Cycle
The period code is further divided into financial cycles. For instance, your bank’s Board of Directors meet once a month therefore, you would divide the financial cycle into monthly periods.
When you input a journal transaction, indicate the financial cycle to which the transaction belongs.
Instrument Number
In case you are entering a check transaction, you have to enter the instrument number here if the transaction code specifies an instrument number.
In Single Journal for Credit transaction instrument number should not be entered.
Additional Text
Enter any other additional information related to the transaction.
Local currency Amount
The system displays the transaction amount in case the transaction is in the local currency.
If the transaction that you are entering involves a foreign currency, the system calculates a local currency equivalent of the transaction amount using the Exchange rate that is displayed in the previous field.
Value Date
The system will display the current system date here. You can, however, enter a back dated or a future dated transaction. In Oracle FLEXCUBE, the interest is calculated on the basis of the Value Date.
Exchange Rate
In case the currency of the transaction is a foreign currency, the system displays the standard mid rate for the currency. You can change the Exchange rate that is displayed in this field. Only, the changed value should be within a certain range referred to as the Exchange Rate Variance. The exchange rate variance is specified at the Branch Level for journal transactions.
Note
In case you are entering a Foreign Currency back value dated transaction, the system will pickup the exchange rate applicable on the Value Date. This is possible only if you have maintained the Exchange Rate History for your branch (refer the ‘Branch Conditions’ screen).
Related Customer
The ID of the Customer involved in the transaction is entered in this field. This is used for MIS purposes. The adjoining option list displays a list of the Customer IDs that have been maintained in your branch. Double click on the ID that you want to enter in this field.
MIS Group
The MIS group to which the transaction belongs gets displayed here.
Total Debit
The total amount debited for the whole batch is converted into the local currency equivalent and displayed here.
Total Credit
The total amount credited for the whole batch is converted into the local currency equivalent and displayed here.
6.3.2 MIS Button
MIS details are defaulted to the transaction from the product maintenance. However, you can change them for the contract. Click ‘MIS’ button and invoke the ‘MIS’ screen.
Refer the User Manual on MIS under Modularity for further details.
6.3.3 Signature Verification Button
While booking the transaction, you can verify the signature of the customer by invoking the ‘Signatory Details’ screen. To invoke this screen, click ‘Signature Verification’ button.
You can view consolidated customer signature in the ‘Customer Signature/Image Consolidated View’ screen. To view this screen, click ‘All Signatures/Images’ button.
Refer the User Manual on Signature Verification for further details about this screen.
6.3.4 Fields Button
Click ‘Fields’ button and invoke the ‘Fields’ screen to specify values for user-defined fields.
Here you can capture the following details:
Field Name
The system displays all UDFs linked to the product.
Value
Specify a value for each UDF.
6.3.5 Saving and Authorising Transaction
When you have entered all the details of a transaction you have to save the transaction in the system.
To save a transaction, select ‘Save’ from the Actions menu in the Application tool bar or click save icon.
The system will update the transaction as an unauthorized transaction. The user ID of the teller who entered the transaction and the date and time at which the transaction was saved will be displayed at the bottom of the screen.
To authorize an account, click ‘Authorize’ icon on the Application toolbar.
Note
You cannot authorise a transaction from the ‘Journal Single Entry Input’ screen in the following cases:
- the contract has multilevel of authorization pending, the same will be done using the ‘Multilevel Authorization Detailed’ screen
- the level of authorization is greater than or equal to ‘N’
- the ‘Nth’ or the final level of the users authorisation limit is less than the difference between amount financed and sum of the limits of all the users involved in authorizing a transaction, this case holds good when the ‘Cumulative’ field is checked in the ‘Product Transaction Limits Maintenance’ screen
- the transaction amount is greater than the authoriser’s authorisation limit if the ‘Cumulative’ field is unchecked in the ‘Product Transaction Limits Maintenance’ screen
6.3.6 Closing a Batch
You can validate a batch to check whether it is balanced or not, using ‘Batch Close’ button. The system unlocks the batch further to the validation. While creating a new batch, if you have checked the option ‘Balancing’ in ‘Batch Open’ screen, you need to balance the transaction in order to exit the batch.
Save the transaction and click ‘Batch Close’ button. If the transaction is balanced, the system will process and unlock the batch. If the transaction is not balanced, system will display the error message as “Batch not balanced.”
If you see such an error message, you need to manually post equivalent entries in order to balance the batch.
If you cancel this operation at the end of transaction input, the system does not verify the batch balance. Further, the batch gets locked in ‘Batch Unlock Screen’.
While creating a new batch, if you have not checked the option ‘Balancing’ in ‘Batch Open’ screen, the input transaction need not be balanced in order to exit the batch. Thus, when you click ‘Batch Close’ button, if the transaction is balanced, the system processes the batch and unlocks it. If the transaction is not balanced, the system unlocks the batch and save the transaction.
The Validations
The system performs the following cross validations during transaction input. It ensures that:
- All the mandatory fields have been input by the user
- The transaction amount is within the allowed limit for the teller
- The exchange rate variance conforms to that defined at the branch level
- The local currency variance limit
6.3.7 Deleting Journal Transaction
In special circumstances, you may want to remove a transaction from the system. In Oracle FLEXCUBE you have the option of ‘deleting’ a journal transaction.
When a transaction can be deleted
If a transaction that you have input has not been authorized, you can delete it. Remember that only the user who input a transaction can delete it.
How to delete a transaction
When you are in the Journal Input Form, select ‘Delete’ from the Actions menu in the Application tool bar or click delete icon. The transaction that is displayed in the screen will be deleted. All accounting entries passed for the transaction will be removed.
6.4 Multi-Offset Transactions
This chapter contains the following sections:
- Section 6.4.1, "Entering Multi-offset Transactions"
- Section 6.4.2, "Main Tab"
- Section 6.4.3, "Offset Tab"
- Section 6.4.4, "Saving and Authorising Transaction"
- Section 6.4.5, "Deleting a Transaction"
6.4.1 Entering Multi-offset Transactions
Specifying a Multi-offset transaction.
What is a Multi-offset transaction?
A multi-offset transaction is one in which multiple accounting entries are passed to balance one main entry. For example, if cash that is debited from an account and credited to several other accounts, multiple offset entries are passed to balance the one debit entry.
When you enter a multi-offset transaction, the system ensures that the total amount of the offset entries is equal to the amount of the main entry.
Note
Before you can enter multi-offset transactions for the day, you must open a ‘batch’ to post these transactions.
You can invoke the ‘Journal Multi Offset Input’ screen by typing ‘DEDMJONL’ in the field at the top right corner of the Application tool bar and clicking the adjoining arrow button.

The following are the details of a Multi-offset transaction that you need to enter in this screen:
- Currency Code
- Account
- Amount
- Exchange Rate
- Instrument Number and Description
- Additional text
- Fund Identification
- Transaction Code for the main leg
- Transaction Code for the offset leg
- Indicate Debit/Credit
- Value Date
Batch Number
The batch that you have opened to post the multi-offset transaction is displayed at the top of the ‘Multi-offset Input’ screen. Every such transaction that you enter into the batch is assigned a ‘current number’ by the system. This helps you to identify the multi-offset transactions that you enter for the day.
Batch Description
The system displays the description for the selected batch number.
Template Identification
You can process a multi-offset transaction by associating a relevant template to the transaction. The details maintained for the template will be defaulted to the transaction. You will be required to capture only the remaining mandatory details (if any) to save the transaction.
The option list for ‘Template ID’ field displays the templates maintained for a particular branch. You need to choose a Template ID from this list. Further click ‘Default Template’ button to get the selected template defaulted. However, you cannot type in a Template ID in the Template Identification field.
Current Number
Every such transaction that you enter into the batch is assigned a ‘current number’ by the system. This helps you to identify the multi-offset transactions that you enter for the day.
On selection of the template, the following details get defaulted to the transaction:
In the MAIN tab
- The Account Number for the main leg of the transaction and the associated description.
- The currency and amount of the transaction. The debit/credit indicator for the same.
- The transaction code associated with the main entry and the offset entry of the transaction.
- Additional remarks, if any.
In the OFFSET tab
- The branch codes and the accounts for the offset leg of the transaction.
- The amount for each account.
You can process a multi-offset transaction without a template also. This is explained in detail in the following sections of this manual.
6.4.2 Main Tab
Click on Main to enter the details of the main leg of the transaction.
Currency Code
The system defaults to the currency code of the account number that you have entered (in case of a customer account). If the account is a GL, the system defaults to the local currency.
If you have to enter the currency of the transaction, you can do so. The adjoining option list displays a list of valid currencies. Double click the currency that is the transaction currency.
Account
Select the account or the GL of the main leg of the transaction from the adjoining option list.
To view the joint holder’s details of an account and the mode of operation maintained at the account level, place the cursor on the Account field and press Ctrl+J. The system displays the ‘Joint Holder’ screen.
For more information on the ‘Joint Holder’ screen refer to the section ‘Joint Holder Maintenance’ in this User Manual.
Description
The system displays the description for the selected account number.
Amount
In this field enter the amount of the transaction. The amount that you enter here must be in the currency of the account number that you specified.
On saving the transaction after entering all the required details in the system, the system validates the value of the transaction amount against the following:
- Product transaction limit
- User Input limit
If the transaction currency and the limit currency are different, then the system converts the amount financed to limit currency and checks if the same is in excess of the product transaction limit and user input limit. If this holds true, the system indicates the same with below override/error messages:
- Number of levels required for authorizing the transaction
- Transaction amount is in excess of the input limit of the user
Exchange Rate
In case the currency of the transaction is a foreign currency, the system displays the standard mid rate for the currency. You can change the Exchange rate that is displayed in this field. Only, the changed value should be within a certain range referred to as the Exchange Rate Variance. The exchange rate variance is specified at the Branch Level for Journal transactions.
Note
In case you are entering a Foreign Currency back value dated transaction, the system picks up the exchange rate applicable on the Value Date. This is possible only if you have maintained the Exchange Rate History for your branch (refer the ‘Branch Conditions’ screen).
Overrides
If you change the exchange rate to a value between the maximum and minimum exchange rate variance
You cannot change the exchange rate to a value that is greater than the specified maximum exchange rate variance.
Instrument Number
In case one leg of the transaction involves a check, you have to enter the instrument number here if the transaction code specifies an instrument number.
Additional Text
If required, enter any additional information related to multi-offset transactions.
Fund Identification
Select the fund id to which the journal entry account will be linked from the adjoining option list. The system defaults the value of ‘Default Mudarabah Fund’ as fund id.
Transaction code
Under Transaction Code on the right top of the screen, you will observe two fields, ‘Main’ and ‘Offset.’
In the Main field, the adjoining option list displays a list of all the transaction codes that are maintained in your branch. Double click on the transaction code that you want to specify as the transaction code of the main leg of the transaction.
In the Offset field, the adjoining option list displays a list of all the transaction codes that are maintained in your branch. Double click on the transaction code that you want to specify as the transaction code for the offset leg of the transaction.
Debit/Credit
You must indicate if the amount is to be credited to the account or debited from the account. To do this, you must click either of the buttons adjacent to this field.
If the amount is to be credited to the account, click the button against Cr. If the amount is to be debited, click the button against Dr.
Value Date
The system will display the current system date here. You can, however, enter a back dated or a future dated transaction. In Oracle FLEXCUBE, the interest is calculated on the basis of the Value Date.
Overrides
- If the value date is back dated or future dated
- If the value date is a holiday
Batch Close
While creating a new batch, you need to check the option ‘Balancing’ in ‘Batch Open’ screen, in order to balance the input transaction. To exit the batch, the transaction need to be mandatorily balanced. When you click ‘Batch Close’ button, if the transaction is balanced, the system processes the batch and unlocks it. If you cancel the batch, the batch gets locked in ‘Batch Unlock’ screen. However, you can unlock it manually.
6.4.3 Offset Tab
To enter details of the Offset leg of the transaction, click Offset.

Specify the following details.:
Serial Number
The system displays the serial number.
Branch Code
Specify the branch code of an Offset account.
Account
Enter the account number of each of the offset accounts in this column.
Amount
For each of the offset accounts enter the offset amounts.
Instrument Number
If the Offset leg of the transaction involves an instrument number, enter the same in this column. The total offset amount will be displayed at the bottom of the screen. After you have made your specifications in the above columns map each offset entry to the branch, an account and the amount.
Total Offset Account
The system displays the total offset account details.
6.4.4 Saving and Authorising Transaction
When you have entered all the details of a transaction you have to save the transaction in the system.
To save a transaction, select ‘Save’ from the Actions menu in the Application tool bar or click save icon. To authorize an account, click ‘Authorize’ icon on the Application toolbar.
The system will update the transaction as an unauthorized transaction. The user ID of the teller who entered the transaction and the date and time at which the transaction was saved will be displayed at the bottom of the screen.
The Validations
The system performs the following Cross Validations during Transaction Input. It ensures that:
- All the mandatory fields have been input by the user
- The transaction amount is within the allowed limit for the user
- The exchange rate variance conforms to that defined at the branch level
- The sum of the offset amounts is the same as the main amount
Note
You cannot authorise a transaction from the ‘Journal Multi Offset Input’ screen in the following cases:
- the contract has multilevel of authorization pending, the same will be done using the ‘Multilevel Authorization Detailed’ screen
- the level of authorization is greater than or equal to ‘N’
- the ‘Nth’ or the final level of the users authorisation limit is less than the difference between amount financed and sum of the limits of all the users involved in authorizing a transaction, this case holds good when the ‘Cumulative’ field is checked in the ‘Product Transaction Limits Maintenance’ screen
- the transaction amount is greater than the authoriser’s authorisation limit if the ‘Cumulative’ field is unchecked in the ‘Product Transaction Limits Maintenance’ screen
6.4.5 Deleting a Transaction
In special circumstances, you may want to remove a transaction from the system. In Oracle FLEXCUBE you have the option of ‘deleting’ a multi-offset transaction.
When can a transaction be deleted?
If a transaction that you have input has not been authorized, you can delete it. Remember that only the user who input a transaction can delete it.
How to delete a transaction
When you are in the Multi-offset Input Form, select ‘Delete’ from the Actions menu in the Application tool bar or click delete icon. The transaction that is displayed in the screen will be deleted. All accounting entries passed for the transaction will be removed.
6.5 Online Journal Entry
This chapter contains the following sections:
- Section 6.5.1, "Maintaining Journal Entry Online Details"
- Section 6.5.2, "Batch Summary Button"
- Section 6.5.3, "MIS Button"
- Section 6.5.4, "Viewing Journal Entry Input Summary"
6.5.1 Maintaining Journal Entry Online Details
You can invoke the ‘Journal Entry Input’ screen by typing ‘DEDJNLON’ in the field at the top right corner of the Application tool bar and clicking the adjoining arrow button.
Once you invoke the ‘Journal Entry Input’ screen, click on ‘New’ option in the Application tool bar, to invoke ‘Batch Open’ screen.

In this screen, you can enter the following details:
Batch Number
Specify the batch number.
Description
Enter a brief description about batch.
Check Total
Debit
Enter the total debit amount of the journal transaction.
Credit
Enter the total credit amount of the journal transaction.
Balancing
Check this box to indicate whether the total debit amount and total credit amount has to be balanced.
Last Operated By
The system displays the name of the person who last operated the batch.
Last Authorized By
The system displays the name of the person who last authorized the batch.
Date Time
The system displays the date and time of the batch.
Date Time
The system displays the authorized date and time.
Once you specify the batch number in the ‘Batch Open’ screen, you can specify the transaction details in the ‘Journal Entry input’ screen:

In this screen, you can enter the following details:
Batch Number
The system displays the batch number for which the journal entry transaction is to be created.
Template code
Specify the template code. The adjoining option list displays all valid template codes available in the system. You can select the appropriate one.
Value Date
Specify the value date of the transaction. By default the system displays current branch date value.
Currency
The system displays the branch local currency here.
Reference Number
The system will generate a unique reference number based on the batch number.
Current number
The system displays the current number for which the journal entry transaction is to be created.
Click ‘Fetch’ button once you enter the ‘Template Code’, the system will display the following details:
- Serial Number
- Debit/Credit indicator
- Account
- Transaction code
Branch Code
Specify the branch code. The branch code specified needs to be validated against the ‘Allowed / Disallowed’ lists maintained in the branch restrictions screen.
Fund Id
Select the fund id from the adjoining option list. The system defaults the value of Default Mudarabah Fund as fund id.
Serial No
The system displays the serial number.
User Reference No
The system displays the reference number for the journal transaction.
Dr/Cr
The system displays the debit or credit indicator based on the account class/GL for the selected template code. However you can indicate, if template code is not specified.
Account
Specify the account number.
Account Description
The system displays the description for the account selected.
Acc or GL
The system displays the account number selected in the Template. However you can specify the account number/GL. The adjoining option list displays all valid account numbers/GLs available in the system. You can select the appropriate one.
Currency
The system displays the currency code.
Amount
Enter the amount to be debited or credited.
Exchange Rate
For the foreign currencies entered, the system displays the mid rate by default based on the value date entered. However you can modify it. The tolerance will be validated.
Amount - LCY
The system displays LCY equivalent amount.
Instrument Number
In case the transaction is through an instrument, you need to specify the instrument number.
Customer
Specify the customer. The adjoining option list displays all valid customer ids and names available in the system. You can select the appropriate one.
Total Debit Amount
The system displays the net debit amount.
Total Credit Amount
The system displays the net credit amount.
Additional text
The system displays the narration from the Template. However you can modify it.
Click ‘Compute’ button to compute the transaction details.
Total Dr
The system displays the total debit details.
Total Cr
The system displays the total credit details.
Click ‘Batch Close’ button to close the batch.
6.5.2 Batch Summary Button
Click ‘Batch Summary’ button on ‘Journal Entry input’ screen to invoke the ‘Batch summary’ screen.

You can specify the following details:
Batch Number
Specify the batch number.
Description
The system displays the description for the selected batch number.
Check Total
The system displays the total debit and credit transaction details.
Entered Total
The system displays the total entered debit and credit transaction details.
6.5.3 MIS Button
Click ‘MIS’ button on ‘Journal Entry input’ screen to invoke ‘MIS’ screen. In this screen you can maintain the MIS value for a transaction (screen and functionality similar to single entry and multi offset entry).

Refer the User Manual on MIS under Modularity for further details.
6.5.4 Viewing Journal Entry Input Summary
You can view the summary of all journal entry input, using the ‘Journal Input Entry Summary’ screen. You can invoke this screen by typing ‘DESJNLON’ in the field at the top right corner of the Application tool bar and clicking the adjoining arrow button.
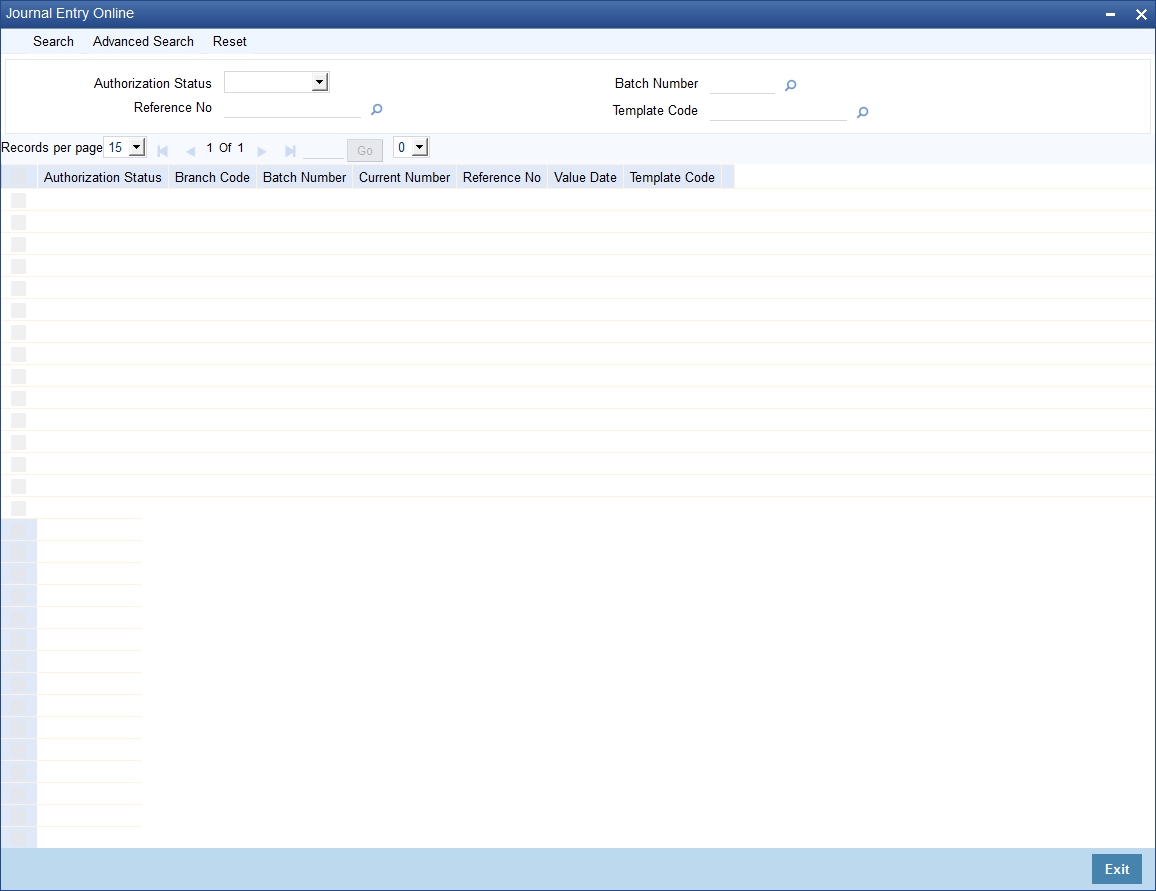
Here, you can query on journal entry input details based on any one or all of the following criteria:
- Authorized
- Batch number
- Template code
- Reference number
Click ‘Search’ button. The system identifies all records satisfying the specified criteria and displays the following details for each one of them.
- Authorization Status
- Branch Code
- Batch number
- Current Number
- Reference number
- Value date
- Template Code