9. Data Entry Control Operations
The Data Entry Supervisor of your branch performs certain operations during the day. The following are the functions that the Data Entry Supervisor would perform
- Batch authorization
- Unlocking a batch
- Reassigning a batch to another user etc.
- Batch upload
This chapter contains the following sections:
- Section 9.1, "Batch Authorization"
- Section 9.2, "Journal Batch Reassign"
- Section 9.3, "Journal Batch Browser"
9.1 Batch Authorization
Authorization is a cross-checking mechanism that Oracle FLEXCUBE offers. The transactions that tellers enter during the day must be ‘authorized’ by the Data Entry Supervisor at the end of day.
This ensures that all the transactions that have been entered by tellers conform to the parameters that have been defined for your branch.
This section contains the following topic:
9.1.1 Authorizing Batches
At the Beginning of Day, each teller opens a batch to post a particular type of transaction. A teller who enters three different types of transactions will open as many batches. Instead of authorizing individual transactions that have been entered during the day, you can authorize the batches into which they have been posted. This is called ‘summary authorization.’
Summary Authorization of a batch
At the End of Day, authorizing every transaction could be a tedious process. You can instead do, what is called, a Summary Authorization of the batch into which the transactions have been posted.
Only users other than the one who posted transactions (the Data Entry supervisor, for example) into a batch can authorize the transactions in the batch.
Summary Authorization is possible in two ways.
You can invoke the ‘Journal Batch Authorization’ screen by typing ‘DEDBTHAU’ in the field at the top right corner of the Application tool bar and clicking the adjoining arrow button.

- Summary Authorization of a batch with limits
- Summary Authorization of a batch without limits
The ‘Batch authorization’ screen can be invoked from the Application Browser.
Summary Authorization of a Batch with Limits
It is possible to define authorization limits for a user with authorization rights (Refer the SMS Manual). If such a limit has been defined for you, you cannot authorize transactions which cross the limit. That is, if the transaction amount exceeds the limit specified, you will not be allowed to authorize the transaction.
A user whose authorization limits have been defined, can perform a summary authorization of a batch. If the transaction size of any transaction posted to the batch exceeds the authorization limit defined for the authorizer, it will not be authorized.
When the summary authorization of the batch is complete, the number of transactions that were authorized and the number of transactions that were not authorized (those that crossed the authorization limit) will be displayed.
Summary Authorization of a Batch without Limits
If no authorization limits have been specified for you, you can authorize transactions of any size. If a user with an unspecified authorization limits does a summary authorization of a batch, all the transactions in the batch will be authorized.
When the summary authorization of the batch is complete, the number of entries that were authorized will be displayed.
To Authorized the transactions in a batch choose Jrnl/Teller Batch Op in the Application Browser. Click on Auth Without Limits. The ‘Batch Authorization’ screen will be displayed.
The date and the time at which the batch was authorized will be displayed in the bottom of the screen.
In this screen, you can enter the following details:
Batch Number
Specify the batch number.
Description
Enter a brief description about batch.
Batch Type
Specify the type of batch.
Entry Total
Debit
Enter the total debit amount of the journal transaction.
Credit
Enter the total credit amount of the journal transaction.
Last Open By
The system displays the name of the person who last opened the batch.
Last Auth By
The system displays the name of the person who last authorized the batch.
Date Time
The system displays the date and time of the batch.
Authorized Date
The system displays the authorized date.
9.2 Journal Batch Reassign
This section contains the following topic:
9.2.1 Reassigning Batch
To ‘reassign’ a batch is to allow a teller who did not originally open a batch to use it. The Data Entry Supervisor has the rights to reassign a batch to a teller who did not originally open a batch. However, only unauthorized batches can be reassigned.
You can invoke the ‘Journal Batch Reassign’ screen by typing ‘DEDBATRE’ in the field at the top right corner of the Application tool bar and clicking the adjoining arrow button.

To reassign a batch to a different user click on Jrnl/Teller Batch Op in the Application Browser. Choose Reassign Batch displayed under it. The ‘Batch Reassign’ screen will be displayed.
Batch Number
The adjoining option list displays a list of unauthorized batches that are opened for the day. Choose the batch that you want reassign in the batch number field.
Reassign Identification
Choose the User Id of the teller to whom you want reassign the batch in the Reassign ID field.
The system ensures that the batch is not currently in use. If you choose to reassign the batch to yourself, the system will seek an override.
Entry Total
Total Entries indicates the total amount debited and credited for a particular batch.
Last Operator Details
Last Operated By
The system displays the name of the person who last operated the batch.
Date Time
The system displays the date and time of the batch.
Last Authorizer Details
Last Auth By
The system displays the name of the person who last authorized the batch.
Date Time
The system displays the date and time of the batch.
Click ‘Ok’ button to confirm the reassign operation. If you do not want to continue with the reassign operation, choose ‘Exit’ or ‘Cancel’ button to exit the function.
9.3 Journal Batch Browser
This chapter contains the following sections:
- Section 9.3.1, "Processing Journal Batch "
- Section 9.3.2, "Viewing Journal Batches"
- Section 9.3.3, "Unlocking Journal Batches"
- Section 9.3.4, "Reserving Journal Batches"
- Section 9.3.5, "Fields Button"
- Section 9.3.6, "Maintaining Journal Batch Upload"
- Section 9.3.7, "Account Statistics Button"
- Section 9.3.8, "Upload Logs Button"
- Section 9.3.9, "Maintaining Journal Upload Preferences"
9.3.1 Processing Journal Batch
Using Oracle FLEXCUBE, you can view, unlock, reserve journal batches and set your preferences with regard to journal upload.
9.3.2 Viewing Journal Batches
You can search and view all journal batches using ‘Journal Batch Browser’ screen. To invoke the screen, type ‘DEDBTTOT’ in the field at the top right corner of the Application Browser and click the adjoining arrow button.
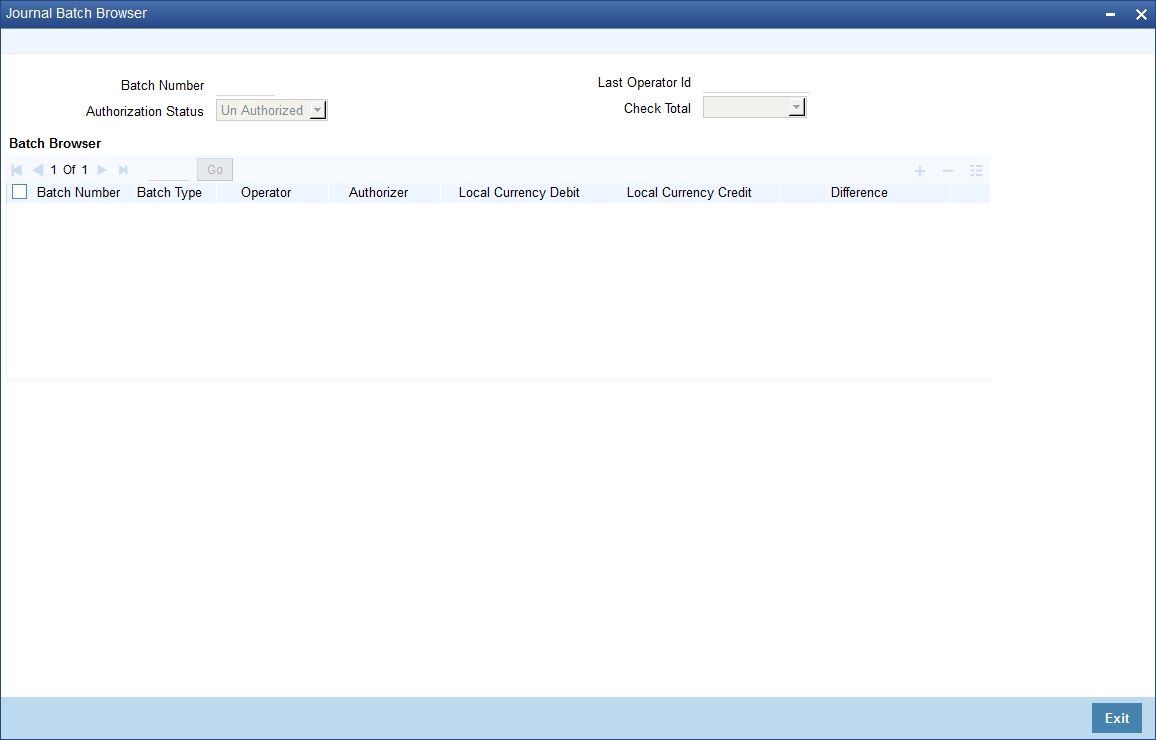
Batch Number
Specify the batch number. Alternatively, you can select the batch number from the option list. The list displays all valid batch numbers maintained in the system.
Authorization Status
Select the authorization status from the drop-down list. The list displays the following values:
- Authorized
- Unauthorized
Last Operator ID
Specify the ID of the last operator. Alternatively, you can select the last operator ID from the option list. The list displays all valid IDs maintained in the system.
Check Total
Select the query criteria for the batches from the Check Total drop-down list. The list displays the following values:
- Balanced - To query the batches where the total credit amount matches the total debit amount.
- Unbalanced - To query the batches where total credit amount does not match total debit amount.
- Null - To query both balanced and unbalanced batches.
This screen displays all the following details that have been created in the current branch:
- Batch Number
- Batch Type
- Operator
- Authorizer
- Local Currency Debit
- Local Currency Credit
- Difference
You can delete or authorize the batches based on your requirement. Select the record / records that you wish to delete or authorize by checking the adjoining box. Further click the delete button or authorize button for respective actions.
9.3.3 Unlocking Journal Batches
While entering a transaction through Journal Single and Multi Offset entries, if you have not checked the option ‘Batch Close’, the system locks the batches in. You can unlock such locked journal batches using Journal Batch Unlock screen. To invoke the screen, type ‘DEDBATUK’ in the field at the top right corner of the Application Browser and click the adjoining arrow button.

You can search for the records based on batch number and / or operator.
Batch Number
Specify the batch number. Alternatively, you can select the batch number from the option list. The list displays all valid batch numbers maintained in the system.
Description
The system displays the description for the selected batch number.
Last Operator ID
Specify the ID of the last operator. Alternatively, you can select the last operator ID from the option list. The list displays all valid IDs maintained in the system.
Batch Type
Select the type of batch from the from-down list.
The system fetches the records based on the search criteria. Select the batches that you wish to unlock and click ‘Batch Unlock’ button. The system unlocks the selected batches.
This screen displays all the following details that have been created in the current branch:
- Unlock Batch
- Batch Number
- Last Operator ID
- Description
- Batch Type
9.3.4 Reserving Journal Batches
You can reserve journal batches for DE Macro upload purpose (excel upload) for a specific branch and source combination.
To invoke Journal Batch Reservation screen, type ‘DEDBARES’ in the field at the top right corner of the Application Browser and click the adjoining arrow button:

Here, you can capture the following details:
Branch Code
Specify the branch code for which you wish to apply the restriction.
Source Code
Specify the source code. The system will apply this restriction to the branch-source combination maintained here.
Batch Restriction Details
Batch Number
This is the batch identification number.
Remarks
This field captures the remarks about the branch.
You can add more rows to the restriction list by clicking add button. Once you save the maintenance, the system considers these batches as reserved. You cannot input transactions through Single or Multi Offset Entry. These batches can be used for DE Excel Upload transactions only.
9.3.5 Fields Button
Click ‘Fields’ button and invoke the ‘Fields’ screen to specify values for user-defined fields.

Here you can capture the following details:
Field Name
The system displays all UDFs linked to the product.
Value
Specify a value for each UDF.
9.3.6 Maintaining Journal Batch Upload
You can upload journal batches into Oracle FLEXCUBE using 'Journal Batch Upload' screen. To invoke the screen, type 'DEDUPONL' in the field at the top right corner of the application toolbar and click the adjoining arrow button.

You can capture the following details on this screen:
Source Code
Select the source code from the adjoining option list.
Branch
Specify the branch code.
Batch Number
Specify the batch number.
Batch Description
Provide description for the batch code specified.
Debit Total
Specify the debit total.
Number of Debits
Specify the number of debits.
Credit Total
Specify the credit total.
Number of Credits
Specify the number of credits.
Difference
Specify the difference.
Variance
Specify the variance.
Positioning Required
Check this box if positioning is required.
Credit/Debit Check
Check this box to check debit/credit.
Balancing
You can indicate whether the entries being uploaded should be balance at the branch level. If you have enabled this option and if the batch does not balance, a message is displayed at the end of the upload session.
MIS Required
Check this box if MIS is required.
Click ‘Validate’ button to validate the journal batch upload.
Ignore Overrides
Check this box to ignore override.
Currency Details
Currency
Specify the currency.
Debit
Specify the debit amount.
Credit
Specify the credit amount.
Difference
Specify the difference amount in local currency.
Oracle FLEXCUBE supports batch upload of DE save operations. For this, you need to first maintain a job ‘GIUPLOAD’ using ‘Job Maintenance’ screen.
You can schedule your batch upload in ‘Journal Batch Upload’ screen. The system will consider the records for upload based on the value of the parameter ‘IS_UPLOAD_SCHEDULED’. If the value is ‘Y’, then the system will consider the record for upload as part of the job.
The parameter ‘IS_UPLOAD_SCHEDULED’ determines whether an upload is scheduled or not. If the value of the parameter is set to ‘Y’, then it indicates that an upload is scheduled.
As part of the job, the system will pick up all records that are scheduled for upload and start the process.
9.3.7 Account Statistics Button
You can view the status of each record in ‘Journal Batch Upload Account Statistics’ screen. Click ‘Account Statistics’ button on ‘Journal Batch Upload’ screen to view this screen. You can also invoke this screen by typing ‘DEDACSTA’ in the field at the top right corner of the application toolbar and clicking the adjoining arrow button.
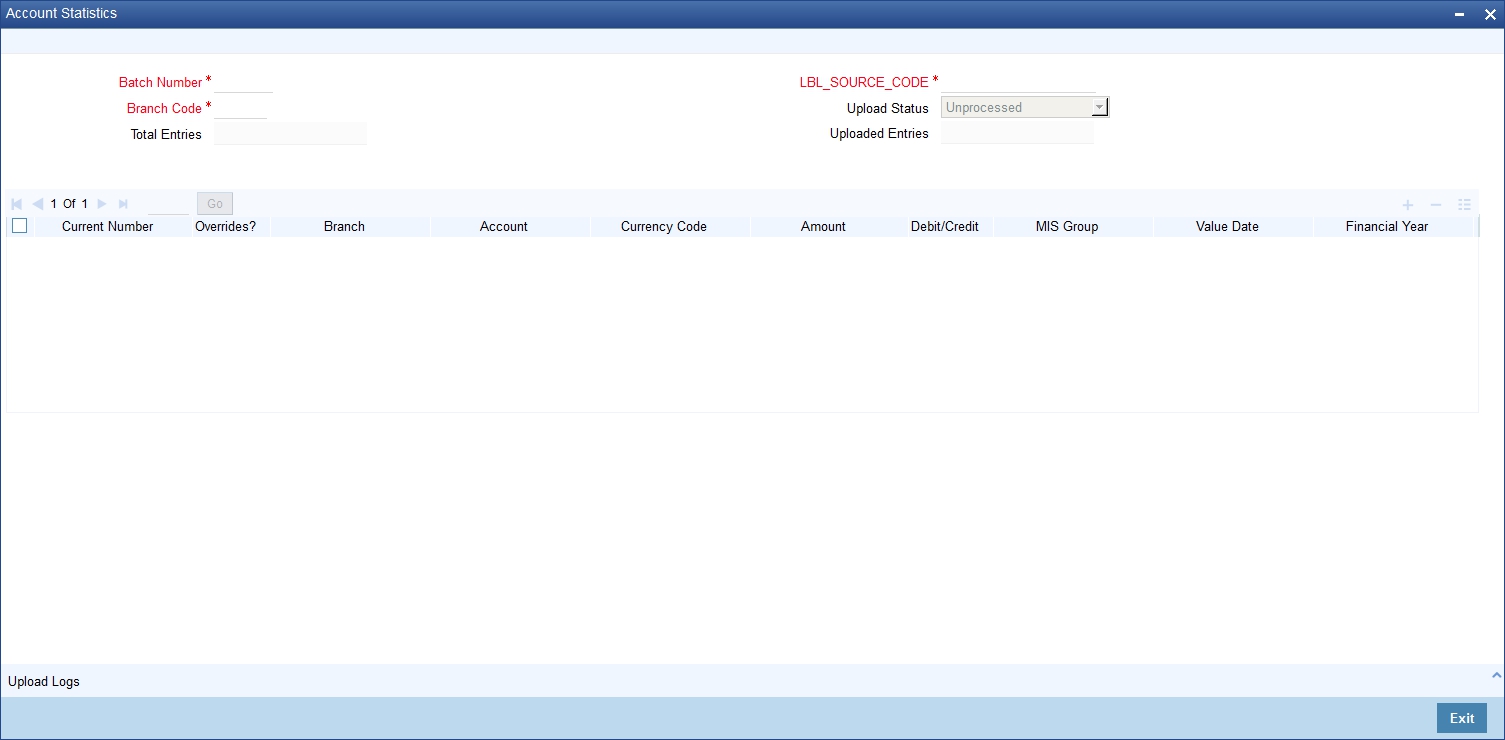
This screen shows the status of all the records uploaded for a specific batch, branch and source combination.
You can search for the details based on the following parameters:
- Batch number
- Branch code
- Source code
- Upload status
Once you have specified the search parameters, click ‘Execute Query’ button. The system displays the following details:
- Total number of entries in the results
- Number of uploaded entries in the result
- Current number
- Whether there are any overrides
- Branch
- Account
- Currency code
- Amount
- Whether debit or credit
- MIS group
- Value date
- Financial year
- Period code
9.3.8 Upload Logs Button
To view the upload logs for a selected entry, click ‘Upload Logs’ button. You can also invoke this screen by typing ‘DEDUPLOG’ in the field at the top right corner of the application toolbar and by clicking the adjoining arrow button.

In this screen, the system displays the upload logs for the selected record.
You can search for the journal batch upload logs based on the following parameters:
- Source code
- Branch code
- Batch number
- Current number
Once you have specified the search criteria, click ‘Execute Query’ button. The system displays the following details in the log.
- Serial number
- Error
- Error type
- Error message
9.3.9 Maintaining Journal Upload Preferences
You can set your preferences specific to journal upload using ‘Journal Upload Preferences Maintenance’ screen.
To invoke the screen, type ‘DEDUPLPF’ in the field at the top right corner of the Application Browser and click the adjoining arrow button.

You can maintain Suspense GLs where entries have to be posted for each external system in the event of failure of account validation during DE Upload.
You can capture the following details on this screen:
Source Code
Specify the source code for upload.
Real Local Currency
Specify the suspense GL for real local currency on credit as well as debit transactions.
Real Foreign Currency
Specify the suspense GL for real foreign currency on credit as well as debit transactions.
Contingent Local Currency
Specify the suspense GL for contingent local currency on credit as well as debit transactions.
Contingent Foreign Currency
Specify the suspense GL for contingent foreign currency on credit as well as debit transactions.
Once you have captured all the details, save the maintenance. If an invalid account is specified in the upload process, the respective Suspense GLs maintained for that external system will be debited or credited based on the nature of the transaction.